USER MANUAL HFR79F19EFGK HAIER
WARNING: Risk of fire/flammable material
EN
The symbol indicates there is a risk of fire since flammable materials are used. Take care to avoid causing a fire by ingiting flammable material.
ПЕДУПЕХДЕНЕ:Опасноct OT NOжар/эпалмATEрпаЛ
BG
CmBolbTnOKa3Ba,Ye cIeIcTeByBaOnaCHOCTOTnOxkap,TbKaTOceN3nOL3BaT3aNaIMM MATEpnaJIi.BHmAbaiTe Da He npEi3BvKate NoXkap Ype3NoIaIbAhe Ha 3aNaIMMaTePnAI.
19 Equipment
28 Energy saving tips
29 Care and cleaning
31 Troubleshooting
35 Installation
38 Technical data
40 Customer service
Thank you for purchasing a Haier Product.
Please read these instructions carefully before using this appliance. The instructions contain important information which will help you get the best out of the appliance and ensure safe and proper installation, use and maintenance.
Keep this manual in a convenient place so you can always refer to it for the safe and proper use of the appliance.
If you sell the appliance, give it away, or leave it behind when you move house, make sure you also pass this manual so that the new owner can become familiar with the appliance and safety warnings.
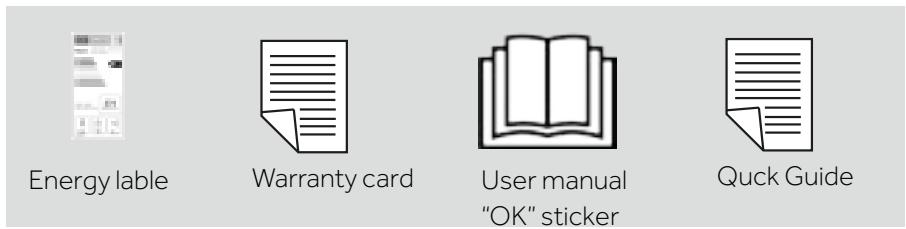
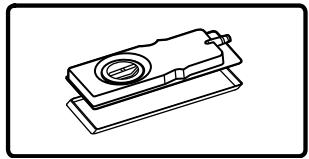
Accessories
Check the accessories and literature in accordance with this list:


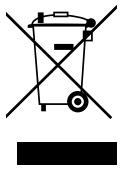
Disposal
Help protect the environment and human health. Put the packaging in applicable containers to recycle it. Help to recycle waste of electrical and electronic appliances. Do not dispose appliances marked with this symbol with the household waste. Return the product to your local recycling facility or contact your municipal office.

WARNING!
Risk of injury or suffocation!
Refrigerants and gases must be disposed of professionally. Ensure that the tubing of the refrigerant circuit is not damaged before being properly disposed of. Disconnect the appliance from the mains supply. Cut off the mains cable and dispose of it. Remove the trays and drawers as well as the door catch and seals, to prevent children and pets to get closed in the appliance.
Before switching on the appliance for the first time read the following safety hints!

WARNING!
Before first use
Make sure there is no transport damage.
Remove all packaging and keep out of children's reach.
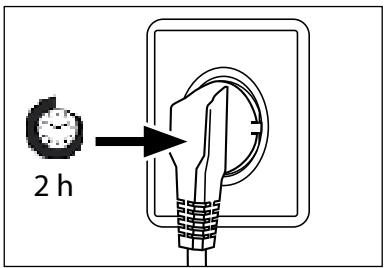
- Wait at least two hours before installing the appliance in order to ensure the refrigerant circuit is fully efficient.
▶ Handle the appliance always with at least two persons because it is heavy.
Installation
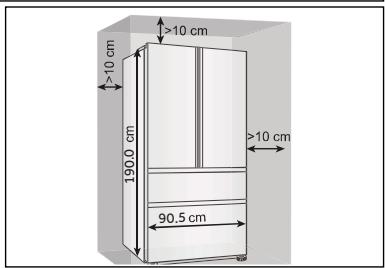
The appliance should be placed in a well-ventilated place. Ensure a space of at least 10cm above and around the appliance.
- Never place the appliance in a damp area or location where it might be splashed with water. Clean and dry water splashes and stains with a soft clean cloth.
- Do not install the appliance in direct sunlight or in the near of heat sources (e.g. stoves, heaters).
Install and level the appliance in an area suitable for its size and use.
- Keep ventilation openings in the appliance or in the in-built structure clear of obstruction.
- Make sure that the electrical information on the rating plate agrees with the power supply. If it does not, contact an electrician.
The appliance is operated by a 220-240 VAC/50 Hz power supply. Abnormal voltage fluctuation may cause the appliance to fail to start, or damage to the temperature control or compressor, or there may be an abnormal noise when operating. In such case, an automatic regulator shall be mounted.
Do not use multi-plug adapters and extension cables.
- Do not locate multiple portable socket-outlets or portable power supplies at the rear of the appliance.
- Ensure that the power cable is not trapped by the refrigerator. Do not step on the power cable.

WARNING!
- Use a separate earthed socket for the power supply which is easy accessible. The appliance must be earthed.
Only for UK: The appliance's power cable is fitted with 3-cord (grounding) plug that fits a standard 3-cord (grounded) socket. Never cut off or dismount the third pin (grounding). After the appliance is installed, the plug should be accessible.
Do not damage the refrigerant circuit.
Daily use
This appliance can be used by children aged from 8 years and above and persons with reduced physical, sensory or mental capabilities or lack of experience and knowledge if they have been given supervision or instruction concerning use of the appliance in a safe way and understand the hazards involved.
Children aged from 3 to 8 years are allowed to load and unload, but not allowed to clean or install the refrigerating appliances.
- Keep away children under 3 years of age from the appliance unless they are constantly supervised.
Children shall not play with the appliance.
If cool gas or other inflammable gas is leaking in the vicinity of the appliance, turn off the valve of the leaking gas, open the doors and windows and do not unplug a plug in the power cable of the refrigerator or any other appliance.
- Notice that the appliance is set for operation at a specific ambient range between 10 and 43^ . The appliance may not work properly if it is left for a long period at a temperature above or below the indicated range.
- Do not place unstable articles (heavy objects, containers filled with water) on top of the refrigerator, to ovoid personal injury caused by falling or electric shock caused by contact with water.
- Do not pull on the door shelves. The door may be pulled slant, the bottle rack, may be pulled away, or the appliance may topple.
- Open and close the doors only with the handles. The gap between the doors and between the doors and the cabinet is very narrow. Do not extend your hands in these areas to avoid pinching your fingers. Open or close the refrigerator doors only when there are no children standing within the range of door movement.

WARNING!
- Do not store or use inflammable, explosive or corrosive materials in the appliance or in the vicinity.
- Do not store medicines, bacteria or chemical agents in the appliance. This appliance is a household appliance. It is not recommended to store materials that require strict temperatures.
- Never store liquids in bottles or cans (besides high percentage spirits) especially carbonated beverages in the freezer, as these will burst during freezing.
Check the condition of food if a warming in the freezer has taken place.
- Do not set unnecessarily low temperature in the refrigerator compartment. Minus temperatures may occur at high settings. Attention: Bottles can burst
- Do not touch frozen goods with wet hands (wear gloves). Especially do not eat ice lollies immediately after removal from the freezer compartment. There is the risk to freeze or the formation of frost blisters. FIRST aid: keep immediately under running cold water. Do not pull away!
- Do not touch the inside surface of the freezer storage compartment when in operation, especially with wet hands, as your hands may freeze onto the surface.
Unplug the appliance in the event of a power interruption or before cleaning. Allow at least 7 minutes before restarting the appliance, as frequent starting may damage the compressor.
- Do not use electrical devices inside the food storage compartments of the appliance, unless they are of the type recommended by the manufacturer. Maintenance / cleaning
Make sure children are supervised if they carry out cleaning and maintenance.
- Disconnect the appliance from the electrical supply before undertaking any routine maintenance. Allow at least 7 minutes before restarting the appliance, as frequent starting may damage the compressor.

WARNING!
Hold the plug, not the cable, when unplugging the appliance.
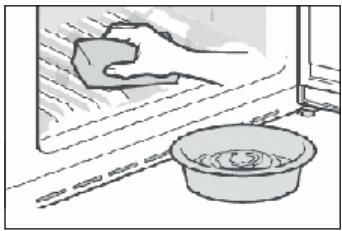
- Do not clean the appliance with hard brushes, wire brushes, detergent powder, petrol, amyl acetate, acetone and similar organic solutions, acid or alkaline solutions. Please clean with special refrigerator detergent to avoid damage.
- Do not scrape off frost and ice with sharp objects. Do not use sprays, electric heaters like heater, hair dryer, steam cleaners or other sources of heat in order to avoid damage to the plastic parts.
- Do not use mechanical devices or other means to accelerate the defrosting process, other than those recommended by the manufacturer.
- If the supply cord is damaged, it must be replaced by the manufacturer, its service agent or similarly qualified persons in order to avoid a hazard.
- Do not try to repair, disassemble or modify the appliance by yourself. In case of repair please contact our customer service.
- Eliminate the dust on the back of the unit at least once in the year to avoid hazard by fire, as well as increased energy consumption.
Do not spray or flush the appliance during cleaning.
Do not use water spray or steam to clean the appliance.
- Do not clean the cold glass shelves with hot water. Sudden temperature change may cause the glass to break.

WARNING!
The appliance contains the flammable refrigerant ISOBUTANE (R600a). Make sure the refrigerant circuit is not damaged during transportation or installation. Leaking refrigerant may cause eye injuries or ignite. If a damage has occurred, keep away open fire sources, thoroughly ventilate the room, do not plug or unplug the power cords of the appliance or any other appliance. Inform the customer service.
In case of eyes get into contact with the refrigerant, rinse immediately it under running water and call immediately the eye specialist.
Intended use
This appliance is intended for cooling and freezing food. It has been designed exclusively for use in household and similar applications such as staff kitchen areas in shops, offices and other working environments; farm houses and by clients in hotels, motels and other residential type environments as well as in bed-and-breakfast and catering business. It is not intended for commercial or industrial use.
Changes or modifications to the device are not allowed. Unintended use may cause hazards and loss of warranty claims.
Standards and directives CC and CA
This product meets the requirements of all applicable EC directives with the corresponding harmonised standards and UK standards, which provide for CE and UKCA marking.

CAUTION!
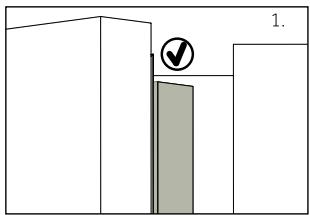
When you close the door, the vertical door strip on the left door should be bent inside (1).
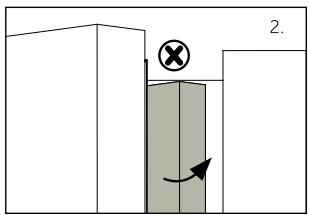
If you try to close the left door and the vertical door strip is unbent (2), you should bend it firstly, otherwise the door strip will hit the fixing shaft or right door. Thus a damage to the door slip or a leak will occur.
There is a heating thread inside the frame. The temperature of the surface will rise a little, which is normal and won't affect the function of appliance.

NOTICE
Due to technical changes and different models, some of the illustrations in this manual may differ from your model.
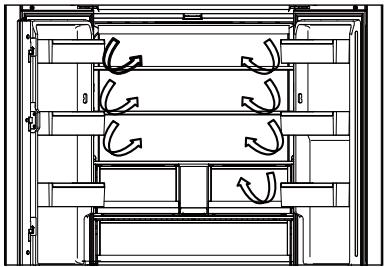
A B
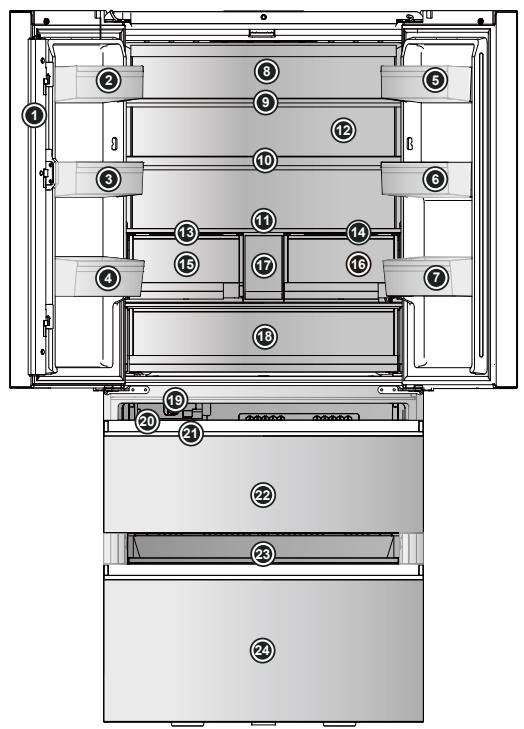
A: Fridge compartment
1 Door beam
2 Bottle holder(upper left)
3 Bottle holder(middle left)
4 Bottle holder(lower left)
5 Bottle holder(upper right)
6 Bottle holder(middle right)
7 Bottle holder(lower right)
8 Back lamp
9 Glass shelf
10 Glass shelf
11 Glass shelf
12 Air duct(with ABT pro)
13 Panel of Humidity Zone drawer
14 Panel of My Zone drawer
15 Humidity Zone drawer
16 My Zone drawer
17 Water tank
18 Fresh Box
B: Frezzer compartment
19 Auto ice maker
20 Ice storage box
21 Ice scoop
22 Upper freezer drawer
23 Sliding tray
24 Lower freezer drawer
Control panel
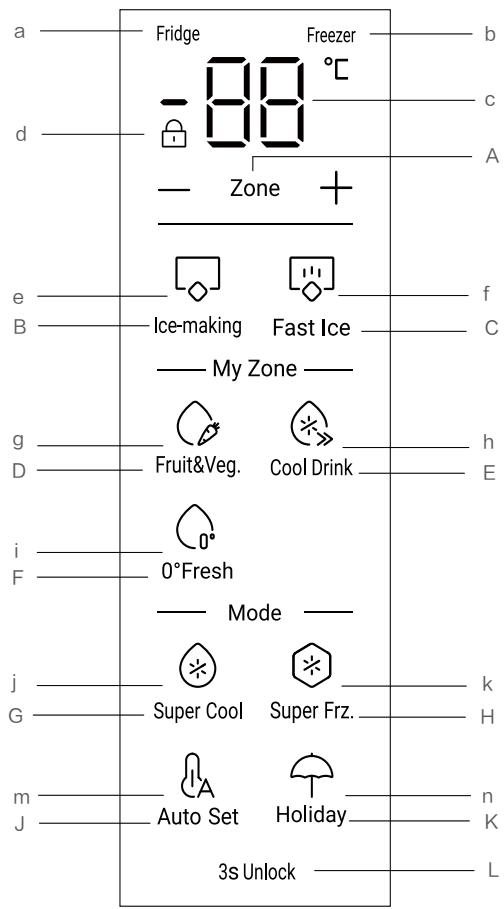
A Fridge & Freezer temperature mode switchover
B Ice-making function selector
C Fast Ice function selector
D Fruit & Veg. function selector
E Cool Drink function selector
F 0^ Fresh function selector
G Super Cool function selector
H Super Frz. function selector
J Auto Set function selector
K Holiday function selector
L Panel lock/unlock
Indicators:
a Fridge indicator
b Freezer indicator
c Temperature fridge & freezer compartment
d Panel lock
e Ice-making function
f Fast Ice function
g Fruit & Veg. function
h Cool Drink function
1 0^ Fresh function
j Super Cool function
k Super Frz. function
m Auto Set function
n Holiday function
Before first use
- Remove all packaging materials, keep them out of children's reach and dispose them in an environmentally friendly manner.
Clean the inside and outside of the appliance with water and a mild detergent before putting any food in it.
After the appliance has been levelled and cleaned, wait for at least 2-5 hours before connecting it to the power supply. See Section INSTALLATION.
Precool the compartments at high settings before loading with food. The function Super Frz. helps to cool down the compartments quickly.
The refrigerator temperature and freezer temperature are automatically set to 5^ and -18^ respectively. These are the recommended settings. If desired, you can change these temperatures manually. Please see ADJUST THE TEMPERATURE.
Switch on /of the appliance
The appliance is in operation as soon as it is connected to the power supply.
When the refrigerator is first powered on, the indicator "c" (Temperature display) illuminates. The fridge temperature and freezer temperature are automatically set to 5^ and -18^ respectively. The indicator "g" (Fruit&Veg.) illuminates.
Maybe the panel lock is active.

NOTICE
When the appliance is switched on after disconnection from the main power supply, it may take up to 12 hours for the correct temperatures to be reached.
Empty the appliance before switching off. To switch off the appliance, pull the power cord out off the power socket.
Lock/unlock panel
Automatic lock: When the fridge door and freezer door are closed and there is no key operation within 30 seconds, the display screen will be automatically extinguished and locked.
Manual unlock: When the display screen is locked, press the button "L" (3s Unlock) and hold for 3 seconds, the buzzer rings once, the indicator "d" (Panel lock) goes off, and the display is unlocked.

Manual lock: When the display screen is unlocked, press the button "L" (3s Unlock) and hold for 3 seconds, the buzzer rings once, the indicator "d" (Panel lock) illuminates, and the display is locked.

Adjust the temperature
The indoor temperatures are influenced by the following factors:
Ambient temperature
Frequency of door opening
Amount of stored foods
Installation of the appliance
Adjust the temperature for fridge
When the display screen is unlocked, press the button "A" (Zone selector), select the "fridge", the indicator "a" (Fridge indicator) illuminates, and then here comes the temperature setting mode of the fridge.
Press the button "+" or "-" Every time you press the "+" or "-" buttons, the value of the refrigerated setting gear is increased by 1 or decreased by 1. The fridge temperature will display in the sequence of 9^ 8^ 7^ 6^ 5^ 4^ 3^ 2^ 1^ .

NOTICE
After setting the temperature, if there is no operation within 5 seconds, the system will be automatically determined and save the set temperature.
Adjust the temperature for freezer
When the display screen is unlocked, press the button "A" (Zone selector), select the "freeze", the indicator "b" (Freezer indicator) illuminates, and then here comes the temperature setting mode of the freezer.
Press the button "+" or "-". Every time you press the "+" or "-" buttons, the value of the refrigerated setting gear is increased by 1 or decreased by 1. The fridge temperature will display in the sequence of "-14°C -> -15°C -> -16°C -> -17°C -> -18°C -> -19°C -> -20°C -> -21°C -> -22°C -> -23°C -> -24°C.

NOTICE
After setting the temperature, if there is no operation within 5 seconds, the system will be automatically determined and save the set temperature.
My Zone function
1.Fruit&Veg. function:
When the display screen is unlocked, press the button "D"(Fruit&Veg selector) to turn on the function.
This function is suitable to store fresh fruits and vegetables.


Fruit&Veg.


NOTICE
Cold-sensitive fruits like pineapple, avocado, bananas, grapefruits and vegetables such as potatoes, aubergines, beans, cucumbers, zucchini and tomatoes and cheese should not be stored in the My Zone drawer.
2.Cool Drink function:
When the display screen is unlocked, press the button "E" (Cool Drink selector) to turn on the function.
This function allows to store products such as water, coke and juice. The temperature in My Zone compartment is set to +2C .

3.0%Fresh function:
When the display screen is unlocked, press the button "F" (0° Fresh selector) to turn on the function.
This function sets the temperature in the My Zone drawer to 0C .Suitable to store fresh food such as meat or fish. Most foods stay fresh at 0C , but not frozen.

NOTICE
Due to different water contents of meat. Some meat with more moisture will be frozen at temperatures lower than 0^ . So "immediately cut" meat should be stored in My Zone drawer, with temperatures min, 0^ .


NOTICE: My Zone drawer
One of the three functions of the My Zone compartment must always be activated. And the three functions cannot be opened at the same time, only one can be illuminate. To reduce the refrigerator compartment temperature use the Cool Drink function. To increase it, use the Fruit&Veg. function.
Super Cool function
- When the display screen is unlocked, press the button "G" (Super Cool selector), the buzzer rings once, the indicator "g" (Super Cool function) illuminates, and then the Super Cool function will be turned on.
- When the indicator "g" (Super Cool function) illuminates, press the button "G" (Super Cool selector), the buzzer rings once, the indicator "g" (Super Cool function) goes off, and then the Super Cool function will be turned off.
- After the Super Cool function is turned on, the refrigerator will automatically turn off the function when it has lasted for about 4 hours. If you want to exit manually, you can press the button "G" (Super Cool selector) to turn it off.


NOTICE
- Under Super Cool state, the fridge temperature cannot be adjusted. If either button "+" or "-" is pressed to adjust the temperature of fridge, the indicator "g" (Super Cool function) will flash with a prompt sound to indicate that this operation cannot be carried out.
- In the state of Super Cool function, the Auto Set function and Holiday function cannot be turned on at the same time due to different control modes. When you choose one function that conflicts with another function, the original function will automatically exit.
Super Frz function
- When the display screen is unlocked, press the button "H" (Super Freeze selector), the buzzer rings once, the indicator "h" (Super Freeze function) illuminates, and then the Super Freeze function will be turned on.
- When the indicator "h" (Super Freeze function) illuminates, press the button "H" (Super Freeze selector), the buzzer rings once, the indicator "h" (Super Freeze function) goes off, and then the Super Freeze function will be turned off.
- After the Super Freeze function is turned on, the refrigerator will automatically turn off the function when it has lasted for about 50 hours. If you want to exit manually, you can press the button "H" (Super Freeze selector) to turn it off.


NOTICE
- Under Super Freeze state, the freezer temperature cannot be adjusted. If either button "+" or "-" is pressed to adjust the temperature of freezer, the indicator "h" (Super Freeze function) will flash with a prompt sound to indicate that this operation cannot be carried out.
- In the state of Super Freeze function, the Auto Set function cannot be turned on at the same time due to different control modes. When you choose one function that conflicts with another function, the original function will automatically exit..
- Super Freeze function is designed to keep nutrition value of frozen food, it will be freeze food in the shortest time. If large quantities of frozen food are to be frozen at one time. Meanwhile, Super Freeze function should be set 24h in advance, to make the freezer low temperature and put food in. At this time, the freezing speed of the freezer is improved,food can be frozen quickly, the nutrition of food is effectively kept, and the storage becomes quite convenient
Ice-making function
- Under unlocked state, press the button "B" (Ice-making function selector), the buzzer rings once, the indicator "e" (Ice-making function) illuminates, and then the Ice-making function will be turned on.
- When the indicator "e" (Ice-making function) illuminates, press the button "B" (Ice-making function selector), the buzzer rings once, the indicator "e" (Ice-making function)goes off, and then the ice-making function will be turned off.


Fast Ice function
- Under unlocked state press the button "C" (Fast Ice function selector), the buzzer rings once, the indicator "f" (Fast Ice function) illuminates, then the Fast Ice function will be turned on and the indicator "e" (Ice-making function) will also illuminates.
- When the indicator "f" (Fast Ice function) illuminates, press the button "C" (Fast Ice function selector), the buzzer rings once, the indicator "f" (Fast Ice function) goes off, and then the Fast Ice function will be turned off.
- After the Fast Ice function is turned on, the refrigerator will automatically turn off the function when it has lasted for about 8 hours. If you want to exit manually, you can press the button "C" (Fast Ice function selector) to turn it off.

Fast Ice


Fast Ice


Fast Ice

NOTICE
- If the Ice-making function is turned off, the Fast Ice will also turned off.
- If the ice storage box is full, ice making stops.
- The ice machine usually does not start making ice until approximately 48 hours after the initial installation of the equipment.
- If ice cubes are stored in the ice storage box for too long, they may stick together and not separate easily. In this case, the ice storage box should be emptied and new ice should be made.
Auto Set function
- When the display screen is unlocked, press the button "J" (Auto Set function selector), the buzzer rings once, the indicator "m" (Auto Set function) illuminates, and then the Auto Set function will be turned on.
- When the indicator "m" (Auto Set function) illuminates, press the button "J" (Auto Set function selector), the buzzer rings once, the indicator "m" (Auto Set function) goes off, and then the Auto Set function will be turned off.

i NOTICE
In Auto Set function, the fridge or freeze temperature cannot be adjusted. If either button "+" or "-" is pressed to adjust the temperature of fridge or freezer, the indicator "m" (Auto Set function) will flash with a prompt sound to indicate that this operation cannot be carried out. In Auto Set function, due to different control methods, if the Super Cool, Super Freeze or Holiday function is set, the indicator "m" (Auto Set function) will go off. In Auto Set function, the function of My Zone can be manually adjusted according to the needs.
Holiday function
Holiday function is designed for not using the fridge for a long time. When the Holiday function is turned on, the freezer is under normal control, and the temperature of fridge is automatically set to be 17^ . The actual temperature is not higher than 17^ , which prevents peculiar smell caused by overtemperature, and helps reduce energy consumption at the same time.
- When the display screen is unlocked, press the button "K" (Holiday function selector), the buzzer rings once, the indicator "n" (Holiday function) illuminates, and then the Holiday function will be turned on.
- When the indicator "n" (Holiday function) illuminates, press the button "K" (Holiday function selector), the buzzer rings once, the indicator "n" (Holiday function)goes off, and then the Holiday function will be turned off.

i NOTICE
- Under Holiday function, the fridge temperature cannot be adjusted. If either button "+" or "-" is pressed to adjust the temperature of fridge, the indicator "n" (Holiday function) will flash with a prompt sound to indicate that this operation cannot be carried out.
- Before using the Holiday function, please empty the fridge to prevent food goes bad in it. When the Holiday function is turned on, either Auto Set function or Super Cool function cannot be turned on at the same time.
- In Holiday function, the setting of "Fruit&Veg, Cool Drink,0°Fresh" icons in My zone will be switched off and the function of My zone cannot be adjusted. The fridge compartment My zone will display in the previous setting once exiting the Holiday function.
Multi-air-flow
- The refrigerator is equipped with a multi-air-flow system, with which cool air flows are located on every shelf level. This helps to maintain a uniform temperature to ensure that your food is kept fresher for longer.
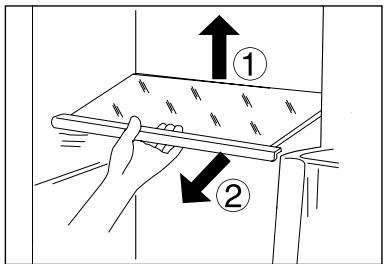
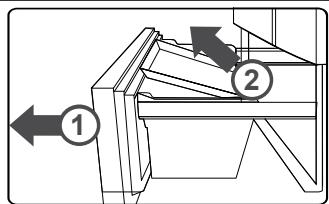
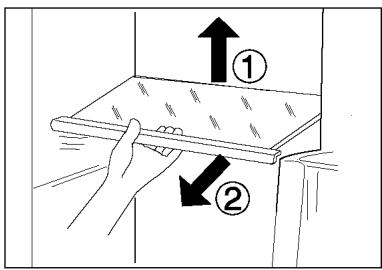
Adjustable shelves
- The height of the shelves can be adjusted to fit your storage needs.
- To relocate a shelf, remove it first by uplifting its hind edge ① and pulling it out ②.
- To reinstall it, put it on the lugs on both sides and push it to the most rearward position until the rear of the shelf is fixed inside the slots in the sides
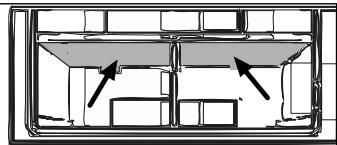
My Zone drawer
In this compartment the humidity level is lower than fridge compartment This drawer is suitable to store dry fruit and other dry food with low water content like butter, fats and oil or chocolate.
MYZONE|⑧
Humidity zone drawer
In this compartment the humidity level is higher than fridge compartment. It is controlled automatically by the system and is suitable to store fruits, vegetables, salads etc.
HUMIDITYZONE
Fresh Box
Storage zone for fruit and vegetables to keep them fresh and healthy.
FRESHBOX

NOTICE:
Cold-sensitive fruits like pineapple, avocado, bananas, grapefruits and vegetables such as potatoes, aubergines, beans, cucumbers, zucchini and tomatoes and cheese should not be stored in the Fresh box.

NOTICE
- Do not remove the plastic cover inside the two zones.
- They maintain the humidity.
- Cold-sensitive fruits like pineapple, avocado, bananas,
- grapefruits are not recommended to be stored in these two drawers.
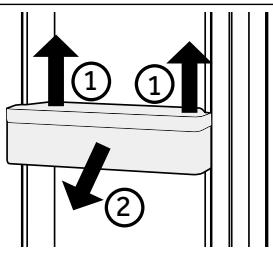
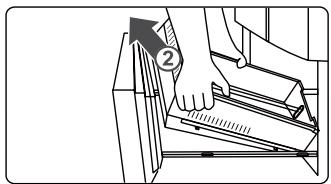
Removable door racks/bottle holder
- The door racks can be removed for cleaning:
- Place hands on each side of the rack, lift it upwards ① and pull it out ②.
- In order to insert the door rack, the above steps are carried out in reverse order.
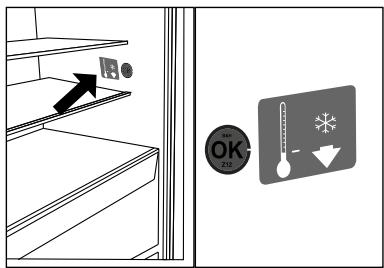
OPTIONAL: OK-temperature indicator
The OK-temperature indicator can be used to determine temperatures below +4^ . Gradually reduce the temperature if the sign does not indicate "OK".

NOTICE
When the appliance is switched on, it may take up to 12 hours for the correct temperatures to be reached.
Removable upper freezer drawer
- Pull out to the upper freezer drawer to the maximum extent
- Lift the drawer until it is separated from the support block. push it into the freezer and tilt it to take out.
In order to insert the drawer, the above steps are carried out in reverse order.

Removable lower freezer drawer
- Pull out to the lower freezer drawer to the maximum extent
- Pull out the freezing tray to stop position, lift and remove.
- Lift the drawer until it is separated from the support block. push it into the freezer and tilt it to take out.
In order to insert the drawer, the above steps are carried out in reverse order.

The Light
The LED interior light comes on when the door is opened. The performance of the lights is not affected by any of the appliances other settings.
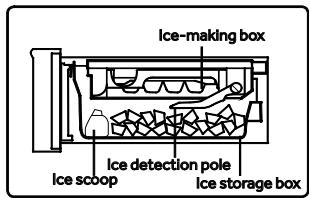
Names of Ice Maker Parts
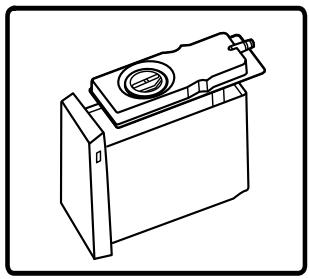
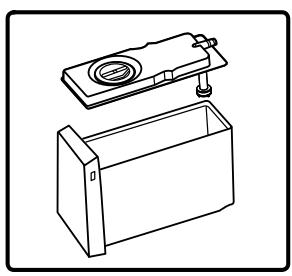
The automatic ice maker of the product is equipped with a unique water storage box. You can directly inject water into the water storage box and make ice safely and automatically. The automatic ice maker can be removed for cleaning and taken out when ice is not needed, leaving room for other frozen foods.
Ice Maker
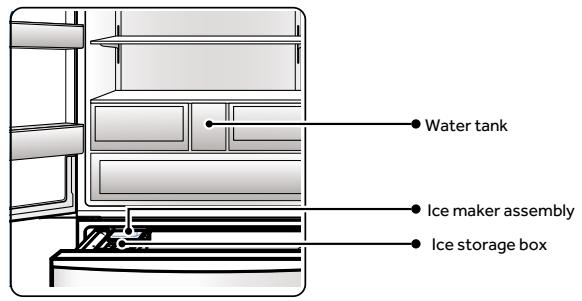
Water tank
WATER
How to Use Ice Maker

NOTICE
When Ice-making is not needed in winter, the ice maker assembly and water storage box can be removed to leave space for food storage. When storing the ice maker assembly and the water storage box outside the refrigerator, be careful to avoid dust. When using it again, it needs to be cleaned and wiped.
Add water to water storage box
Step 1:
Remove the water storage box. Lift the front of the box slightly and pull it out.
Step 2:
Rotate the knob to open the water storage box and fill with water. Be careful not to exceed the MAX level. (Refer to the mark on the water storage box for the MAX level. If the water is overfilled, it will leak from all sides.)
Step 3:
Put back the water storage box. It must be inserted into the innermost, or it will not be able to supply water normally.

NOTICE
- The temperature of the water filled in the water storage box must not exceed 60^ C .
- Only fill with drinking water; do not pour remaining mineral water, juice and tea into the water storage box.
- When making ice with well water or dechlorinated water (alkaline ionized water, water from a water purifier), scale and mucus are more likely to form, so frequent cleaning and maintenance are required.
- If you use undrinked mineral water to make ice, please clean the ice box and water storage box with neutral tableware detergent first, or scale and mucus will be produced, which will eventually lead to mold and odor.
- When the temperature is low in winter, the water in the water storage box may freeze.
- When there is no water in the water storage box, the water pump and the ice maker may also have working sound. This is a normal phenomenon.
Take ice cubes
After making ice, use an ice shovel to take ice cubes.

NOTICE
If you have just started using it or it has been more than a week since the last use, the newly made ice cubes may be smelly or dusty, so the first made ice (about 8 ice cubes) recommend thrown away.
- If you have cleaned the water supply channel of the ice maker, the ice cubes made for the first time can also be used immediately.
Ice cube storage
The ice storage capacity of the ice box can be automatically confirmed by the ice detector. (In order to correctly determine the ice storage capacity, do not place the ice cubes flatly) After the storage reaches a certain amount, stop Ice-making. Please confirm the amount of ice stored in the ice box. If there is too much ice, it will not be able to make ice, or it may affect the normal opening and closing of the door.
Cleaning and Maintenance of Ice Make
Cleaning of water storage box and its parts
Step 1:
Remove the top cover of the water storage box upwards.
Step 2:
Remove the water storage box straw, straw filter cover, straw filter pad and filter pad cap.
Step 3:
Remove the water storage box seal.
Step 4:
Clean the water storage box and its parts with a soft sponge. To remove stubborn stains, use diluted dishwashing detergent and rinse with water after removal.
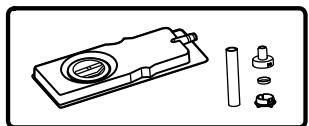

NOTICE
The installation sequence is the reverse of the removal sequence.
Do not add water beyond the MAX level. (If the water exceeds the MAX level, water will leak from all sides.)
Cleaning Ice Box
Step 1:
Turn off the Ice-making function and open the upper freezer door.
Step 2:
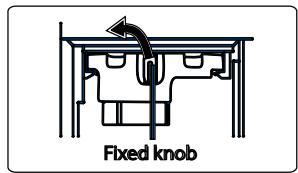
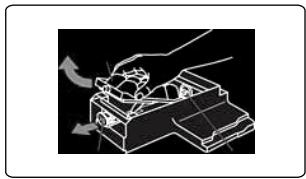
Rotate the ice box fixing knob to the left all the way, hold the handle on the front of the ice box outwards, and slowly
Step 3:
Turn the ice maker over, pull the white ice maker knob out, and then remove the ice maker.
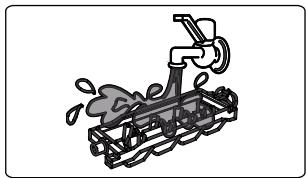
Step 4:
Wash the ice box with water; do not use brushes or decontamination powders that may scratch the surface.
Step 5:
Install the ice box in the reverse order of removal. Push the ice maker into the drawer and push it to the bottom until you hear a "click", which indicates it is fully inserted. Turn the retaining knob back to the right to lock.

NOTICE
After freezing anything other than water, the ice maker should be cleaned in time before putting it back into the automatic ice maker.
- When cleaning the water storage box, inner water storage box and the lid, use a soft sponge to wash it; do not use brush or decontamination powder. To remove stubborn stains, use diluted dishwashing detergent, but be sure to rinse with water. Do not use hard bristle brushes, wire brushes, abrasives (such as toothpaste, detergent powder, etc.), organic solvents (such as gasoline, thinner, acetone, alcohol, etc.), hot water, acid or alkali that can cause plastic cracking.
- The ice box assembly is not washable. If it gets wet, wipe it with a dry cloth. Otherwise, the Ice-making function will be damaged if water gets into the appliance. Do not add water to the ice box when installing the ice maker as the water is supplied automatically.

WARNING
Only fill potable water into the ice maker.
Ice Maker Q&A
Q1: Do not make ice?
| Pheno-
menon | Do not make ice. |
| Reason | a. Water is not added to the water storage box.
b. The water storage box is not inserted in place.
c. The Ice-making assembly is not installed properly.
d. The "Ice-Making" function is not turned on. |
| Solution | a. Add water to the water storage box.
b. Insert the water storage box correctly in place.
c. Push the ice maker assembly all the way in until the securing knob can be locked.
d. Turn on the "Ice-making" function. |
Q2:The amount of ice is small, the ice cubes are small or melted?
| Pheno-menon | The produced ice cubes are few, small and partially melting. |
| Reason | a. The refrigerator door is opened and closed frequently or isn’t closed tightly.
b. The ice storage box is uneven or mixed with other things |
| Solution | a. Close the refrigerator door tightly, and try to open and close it as less frequently as possible.
b. Use an ice shovel to flatten the ice cubes and remove the mixed foreign matter. |
Q3:The produced ice cubes are cloudy
| Pheno-
menon | The ice cubes produced have white suspensions. |
| Reason | Ice is made with water that contains minerals. |
| Solution | This is normal and there is no need to worry. |
Q4: The ice cubes have an odor?
| Pheno-
menon | The ice produced by the ice maker has a peculiar smell. |
| Reason | a. The water in the water storage box has not been replaced for a long time.
b. Odorous water or beverages are poured into the water storage box.
c. The ice cubes have been made and kept in the ice box for too long. |
| Solution | a. Change the water.
b. Refer to “Cleaning and Maintenance of Ice Maker” for cleaning.
c. Ice cubes should not be stored for a long time, or it will cause odor with other foods. |
Q5: The ice cubes are in strange shapes?
| Pheno-
menon | a. Ice cubes agglomerate or differ in size from each other.
b. Ice cubes are rounded.
c. Ice cubes have protrusions. |
| Reason | a. The refrigerator is slanted.
b. The ice cubes have been placed for too long.
c. There are concave and convex water supply channels on the ice box. |
| Solution | a. The feet can be adjusted properly to ensure the refrigerator is placed smoothly.
b. Use ice cubes as soon as possible, or remake.
c. This is normal and there is no need to worry. |

Energy saving tips
Make sure the appliance is properly ventilated (see INSTALLATION).
- Do not install the appliance in direct sunlight or in the near of heat sources (e.g. stoves, heaters).
- Avoid unnecessarily low temperature in the appliance. The energy consumption increases the lower the temperature in the appliance is set.
Functions like POWER-FREEZE consume more energy.
Allow warm food to cool down before placing it in the appliance.
- Open the appliance door as little and as briefly as possible.
Do not overfill the appliance to avoid obstructing the air flow.
Avoid air within the food packaging.
- Keep door seals clean so that the door always closes correctly.
Defreeze frozen food in the fridge storage compartment.
The most energy-saving configuration requires the appliance keep drawers, food box and shelves on factory-fresh condition, and food should be places as far as possible without blocking the air outlet of the duct.

WARNING!
Disconnect the appliance from the power supply before cleaning.
Cleaning
Clean the appliance when only little or no food is stored.
The appliance should be cleaned every four weeks for good maintenance and to prevent bad stored food odors.

WARNING!
- Do not clean the appliance with hard brushes, wire brushes, detergent powder, petrol, amyl acetate, acetone and similar organic solutions, acid or alkaline solutions. Please clean with special refrigerator detergent to avoid damage.
Do not spray or flush the appliance during cleaning.
Do not use water spray or steam to clean the appliance.
Do not clean the cold glass shelves with hot water. Sudden temperature change may cause the glass to break.
- Do not touch the inside surface of the freezer storage compartment, especially with wet hands, as your hands may freeze onto the surface.
In case of heating check the condition of frozen goods.
Always keep the door gasket clean.
Clean the inside and housing of the appliance with a sponge dampened in warm water and neutral detergent.
1. Please scrub the interior and exterior of the refrigerator, including door sealing, door rack, glass shelves, boxes and so on, with a soft towel or sponge dipped in warm water (you may add neutral detergent into the warm water).
- If there is liquid spilled, remove all the contaminated parts, directly rinse with the flow water, dry and place it back into the fridge.
- If there is spilled cream (such as the cream, melting ice cream), please remove all the contaminated parts, put into the warm water with about 40^ for some time, then rinse with the flow water, dry and place it back into the fridge.
- In case some small part or component gets stuck inside of the fridge (between shelves or drawers), use small soft brush to release it. If you could not reach the part, please contact Haier service
Rinse and dry with soft cloth.
Do not clean any of the parts of the appliance in a dishwasher.
- Allow at least 7 minutes before restarting the appliance as frequent starting may damage the compressor.
Defrosting
The defrosting of the refrigerator and the freezer compartment are done automatically; no manual operation is needed.
Replacing the LED-lamps

WARNING!
Do not replace the LED lamp yourself, it must only be replaced by either the manufacturer or the authorised service agent.
The lamps adopts LED as its light source, featuring low energy consumption and long service life. If there is any abnormality, please contact the customer service. See CUSTOMER SERVICE.
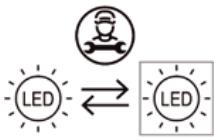
Replaceable (LED only) light source by a professional.
This product contains a light source of energy efficiency class G.
| Compartment | Voltage | Energy efficiency class | Model |
| Fridge back lamp | 12V | G | HFR79F19EFGK |
| Freezer | 12V | G |
| Fresh Box | 12V | G |
| Handle lamp | 12V | G |
Non-use for a longer period
If the appliance is not used for an extended period of time, and you will not use the Holiday-function for the refrigerator:
Take out the food.
Unplug the power cord.
Clean the appliance as described above.
- Keep the doors open to prevent the creation of bad odours inside.

NOTICE
Turn the appliance off only if strictly necessary.
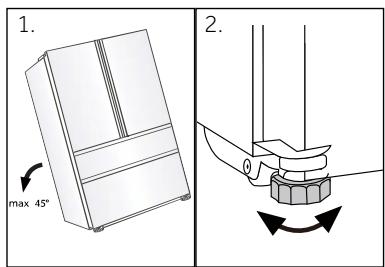
Moving the appliance
- Remove all food and unplug the appliance.
- Secure shelves and other moveable parts in the fridge and the freezer with adhesive tape.
- Do not tilt the refrigerator more than 45^ to avoid damaging the refrigerating system.

WARNING!
Do not lift the appliance by its handles.
Never place the appliance horizontally on the ground.
Many occurring problems could be solved by yourself without specific expertise. In case of a problem please check all shown possibilities and follow below instructions before you contact an after sales service. See CUSTOMER SERVICE.

WARNING!
Before maintenance, deactivate the appliance and disconnect the mains plug from the mains socket.
- Electrical equipment should be serviced only by qualified electrical experts, because improper repairs can cause considerable consequential damages.
A damaged supply should only be replaced by the manufacturer, its service agent or similarly qualified persons in order to avoid a hazard.
| Problem | Possible Cause | Possible Solution |
| The compressor does not work. | • Mains plug is not connect-ed in the mains socket.
• The appliance is in the defrosting cycle | • Connect the mains plug.
• This is normal for an automatic defrosting |
| The appliance runs frequently or runs for a too long period of time. | • The indoor or outdoor temperature is too high.
• The appliance has been off power for a period of time.
• A door of the appliance is not tightly closed.
• The door has been opened too frequently or for too long.
• The temperature setting for the freezer compartment is too low.
• The door gasket is dirty, worn, cracked or mis-matched.
• The required air circulation is not guaranteed. | • In this case, it is normal for the appliance to run longer.
• Normally, it takes 8 to 12 hours for the appliance to cool down completely.
• Close the door/drawer and ensure the appliance is located on a level ground and there is no food or container jarring the door.
• Do not open the door/drawer too frequently.
• Set the temperature higher until a satisfactory refrigerator temperature is obtained. It takes 24 hours for the refrigerator temperature to become stable.
• Clean the door/drawer gasket or replace them by the custom-er service.
• Ensure adequate ventilation. |
| The inside of the refrigerator is dirty and/or smells. | • The inside of the refrigerator needs cleaning.
• Food of strong odour is stored in the refrigerator. | • Clean the inside of the re-frig-erator.
• Wrap the food thoroughly.. |
| It is not cold enough inside the appliance. | ·The temperature is set too high.
·Too warm goods has been stored.
·Too much food has been stored at one time.
·The goods are too close to each other.
·A door/drawer of the appliance is not tightly closed.
·The door/drawer has been opened too frequently or for too long. | ·Reset the temperature.
·Always cool down goods before storing them.
·Always store small quantities of food.
·Leave a gap between several foods allowing air flowing.
·Close the door/drawer.
·Do not open the door/drawer too frequently. |
| It is too cold inside the appliance. | ·The temperature is set too low.
·The Super Frz/Super Cool function is activated or is running too long. | ·Reset the temperature.
·Switch off the Super Frz/Super Cool function |
| Moisture formation on the inside of the refrigerator compartment. | ·The climate is too warm and too damp.
·A door/drawer of the appliance is not tightly closed.
·The door/drawer has been opened too frequently or for too long.
·Food containers or liquids are left open. | ·Increase the temperature.
·Close the door/drawer.
·Do not open the door/drawer too frequently.
·Let hot foods cool to room temperature and cover foods and liquids. |
| Moisture accumulates on the refrigerators outside surface or between the doors/door and drawer. | ·The climate is too warm and too damp.
·The door is not closed tightly. The cold air in the appliance and the warm air outside it condensates. | ·This is normal in damp climate and will change when the humidity decreases.
·Ensure that he door/drawer is tightly shut. |
| Strong ice and frost in the freezer compartment. | ·The goods were not adequately packaged.
·A door/drawer of the appliance is not tightly closed.
·The door/drawer has been opened too frequently or for too long.
·The door/drawer gasket is dirty, worn, cracked or mismatched.
·Something on the inside prevents the door/drawer to close properly. | ·Always pack the goods well.
·Close the door/drawer.
·Do not open the door/drawer too frequently.
·Clean the door/drawer gasket or replace them by new ones.
·Reposition the shelves, door racks, or internal containers to allow the door/drawer to close. |
| The sides of the cabinet and door strip get warm. | ·- | ·This is normal. |
| The appliance makes abnormal sounds.
A slight sound is to be heard similar to that of flowing water. | ·The appliance is not located on level ground.
·The appliance touches some object around it.
·- | ·Adjust the feet to level the appliance.
·Remove objects around the appliance.
·This is normal. |
| You will hear an alarm beep. | ·The fridge storage compartment door is open. | ·Close the door. |
| You will hear a faint hum. | ·The anti-condensation system is working | ·This prevents condensation and is normal |
| The interior lighting or cooling system does not work. | ·Mains plug is not connect-ed in the mains socket.
·The power supply is not intact.
·The LED-lamp is out of order. | ·Connect the mains plug.
·Check the electrical supply to the room. Call the local electricity company!
·Please call the service for changing the lamp. |
| Display light up circularly, but do not feel cool. | ·It is in the demo mode. | ·When the display screen is unlocked, press “Zone” and click “Holiday” 5 times (within 5 seconds) to exit this mode. |
To contact the technical assistance, visit our website: https://corporate.haier-europe.com/en/
Under the section "website", choose the brand of your product and your country. You will be redirected to the specific website where you can find the telephone number and form to contact the technical assistance.
Power interruption
In the event of a power cut, food should remain safely cold for about 5 hours. Follow these tips during a prolonged power interruption, especially in summer:
- Open the door/drawer as few times as possible.
Do not put additional food into the appliance during a power interruption.
If prior notice of a power interruption is given and the interruption duration is longer than 5 hours, make some ice and put it in a container in the top of the refrigerator compartment.
An inspection of the goods is required immediately after the interruption.
As temperature in the refrigerator will rise during a power interruption or other failure, the storage period and edible quality of food will be reduced. Any food that defrosts should be either consumed, or cooked and refrozen (where suitable) soon afterwards in order to prevent health risks.
Memory function during power interruption
After restoration of power the appliance continues with the settings that were set before the power failure.
Unpacking

WARNING!
The appliance is heavy. Always handle with at least two persons.
- Keep all packaging materials out of children's reach and dispose them in an environmentally friendly manner.
Take the appliance out of the packaging.
Remove all packaging materials.
Environmental conditions
The room temperature should always be between 10^ and 43^ , since it can influence the temperature inside the appliance and its energy consumption. Do not install the appliance near other heat-emitting appliances (ovens, refrigerators) without isolation.
Space recommendation
Recommended space (mm) when door is opened:
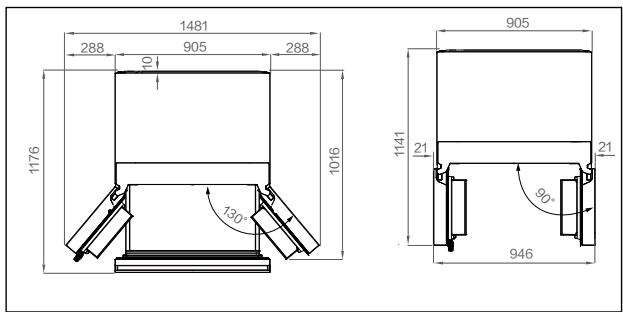
Ventilaton cross-section
To achieve sufficient ventilation of the appliance for safety reasons we recommend observing the space recommendation guidelines.
Aigning the appliance
The appliance should be placed on a flat and solid sur-
face.
- Tilt the refrigerator slightly backwards.
- Set the feet to the desired level.
Make sure the distance to the wall on the hinge side is
at least 10cm for the door to open properly.

Notice:
For a free standing appliance: this refrigerating appliance is not intended to be used as a built-in appliance
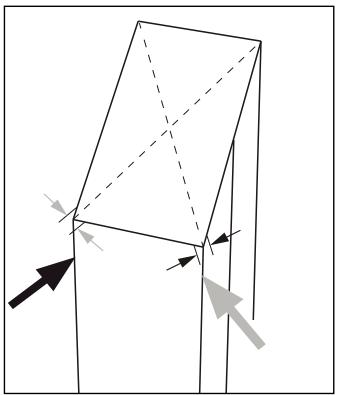
- The stability can be checked by alternately bump-ing on the diagonals. The slightly swaying should be the same in both directions. Otherwise the frame can warp; possible leaking door seals are the result. A low tendency to the rear facilitates the closing of the doors.
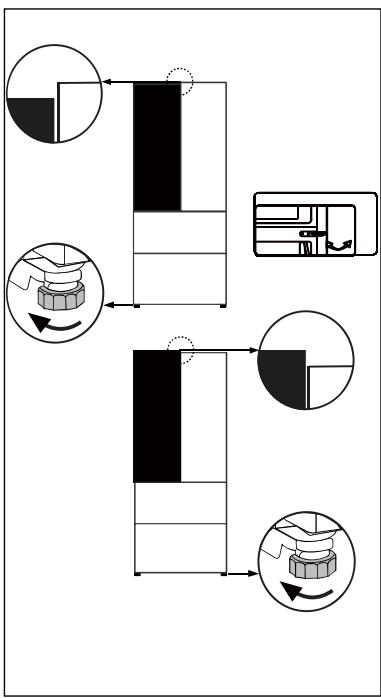
Fine tuning of the doors
If the doors are not in one level, this mismatch can be remedied by following:
Rotate the adjustable foot or adjustable hinge according to the direction of arrow to turn up or down the foot. Adjustable hinges can be fine tuned with a 6mm Allen wrench.
Contact after-sale service if needed.
Rotate the adjustment button on top of the door.

Notice:
In the future use of refrigerator, doors uneven phenomenon may occur to the weight of stored food. Then please adjust according to the above methods.
Waiting time
To the maintenance-free lubrication oil is located in the capsule of the compressor. This oil can get through the closed pipe system during slanting transport. Before connecting the appliance to the power supply you have to wait at least 2 hours so that the oil runs back into the capsule.
Electrical connection
Before each connection check if:
power supply, socket and fusing are appropriate to the rating plate.
the power socket is earthed and no multi- plug or extension.
the power plug and socket are strictly according.
Connect the plug to a properly installed household socket.

WARNING!
To avoid risks a damaged power cord must be replaced by the customer service (see warranty card).
Product fiche according to regulation EU No. 2019/2016
| Brand | Haier |
| Model name / identifier | HFR79F19EFGK |
| Category of the model | Refrigerator-freezer |
| Energy efficiency class | E |
| Annual energy consumption(kWh/year)(1) | 365 |
| Total volume(L) | 703 |
| Volume refrigerator(L) | 449 |
| Volume freezer(L) | 254 |
| Star rating | * * * * |
| Frost-free system | Yes |
| Freezing capacity(kg/24h) | 13 |
| Climate rating(2) | SN-N-ST-T |
| Noise emission class and airborne acoustical noise emissions(db(A) re 1pW) | C(37) |
| Temperature rise time (h) | 12 |
| Ice making capacity | 1.0 kg/24h |
| Type of appliance | freestanding |
Explanations:
- Yes, featured
(1) Based on the results of the standards conformance test over 24 hours. The actual consumption depends on the use and the location of the appliance.
(2) Climate rating SN: This appliance is intended for use in an ambient temperature of between +10^ and +32^
Climate rating N: This appliance is intended for use in an ambient temperature of between + 16°C and +32°C
Climate rating ST: This appliance is intended for use in an ambient temperature of between +16^ and +38^
Climate rating T: This appliance is intended for use in an ambient temperature of between +16°C and +43°C
Additional technical data
| Voltage / Frequency | 220-240V ~/ 50Hz |
| Input current (A) | 2 |
| Main fuse (A) | 15 |
| Coolant | R600a |
| Dimensions (H/W/D in mm) | 1900 / 905 / 748 |
We recommend our Haier Customer Service and the use of original spare parts. If you have a problem with your appliance, please first check section TROUBLESHOOTING.
If you cannot find a solution there, please contact
your local dealer or
our European Call Service-Center (see listed phone numbers below) or
the Service & Support area at www.haier.com where you can activate the service
claim and also find FAQs.
To contact our Service, ensure that you have the following data available.
The information can be found on the rating plate.
Model
Serial No.
Also check the Warranty Card supplied with the product in case of warranty.
| European Call Service-Center |
| Country* | Phone number | Costs |
| Haier Italy (IT) | 199 100 912 | |
| Haier Spain (ES) | 902 509 123 | |
| Haier Germany (DE) | 0180 5 39 399 | 14 Ct/Min Landline
max 42 Ct/Min Mobile |
| Haier Austria (AT) | 0820 001 205 | 14,53 Ct/Min Landline
max 20 Ct/Min all others |
| Haier United Kingdom (UK) | 0333 003 8122 | |
| Haier France (FR) | 0980 406 409 | |
- For other countries please refer to www.haier.com
Haier Europe Trading S.r.l
Branch UK
Westgate House, Westgate, Ealing
London, W5 1YY
*Duration of the guarantee of the refrigerating appliance:
Minimum guarantee is: 2 years for EU Countries, 3 years for Turkey, 1 year for UK, 1 year for Russia, 3 years for Sweden, 2 years for Serbia, 5 years for Norway, 1 year for Morocco, 6 months for Algeria, Tunisia no legal warranty required.
*The period of spare parts for the repair of the appliance:
Thermostats, temperature sensors, printed circuit boards and light sources are available for a minimum period of seven years after placing the last unit of the model on the market.
Door handles, door hinges, trays and baskets for a minimum period of seven years and door gaskets for a minimum period of 10 year, after placing the last unit of the model on the market.
*For further information about the product, please consult https://eprel.ec.europe.eu/ or scan the QR on the energy label supplied with the appliance.
45Инфорmaцяза 6e3oapanchoCT
50Ппeдидаунотpe6a
51 OnpicaHne Ha npOdyKTa
52 Panael 3a ynpabJeHne
53 Ynotpe6a
59 06opyuBahe
68 CbBETn 3a necTeHe Ha eHeprna
69Гржаи почесван.
71 OToCTpaHЯBaHe Ha HEn3IpaBHOCTn
75 Mohtupahe
78TexHnueckn daHHn
80 O6clyXbaHe Na KJIneHTn
IpeiPiBpBoHaJaHa yNoTpe6a 46
Mонтурапe 46
EkeDHeBHa ynoTpe6a 47
BkIIOUBaHe/V3KJIIOUBaHeHa ypeDa 53
PeryulipaHaHaTemnepaTpaTaHaXlaunlHka 54
PeryulipaHa Ha TempepaTpaTa Ha φpnsεpa 54
ФункшиMy Zone" 54
Функцura „Super Cool" 55
Фυнкция „Super Frz" 56
Функцяз苹паве He Na lei 57
Функuing „Fast Ice" 57
Фυнкцияза Auto Set 57
Фυнкция „Holiday" 58
YecToTaHaOTbapRHeHaBpTaTa
KolinyecTBO Ha cxbxpaHЯBaHInTe xpaHn
MOnTnIpaHneHa ypeJa
PerylinaheHaTemnepaTypaTaHaXlaDnllNka
Korato ekpaht Ha nncnne e otknouen, Hatachete 6ytoHa "CeIeKtOp 3a ,Zone", u36peTe ,xlaunlHnk", HndkatopbT ,a" (Hndkatop 3a xlaunlHnk) cBeTa n cneT OBa ce BkluohBa peKImbT 3a HaactpoKa Ha TempepaTypaTa Ha xlaunlHnk.
HaTnCHe 6byToHnTe, ^+ "nIn - .PpN BcKaO HaTnCKaHe Ha HAKo OT T8x CToHocTtHa Na HacTpoKata 3a OxlanDahe ce yBeJIuYBa nIn HaMaJyBa c 1. Tempepatypata Ha XlaIINnka ce npOMeHb CneDHaTa NocJeDoBaTeJIHOCT: 9^ - > 8^ - > 7^ - > 6^ - > 5^ 4^ - > 3^ - > 2^ - > 1^

3AbeJIeXkKA
Ako He ce n3BbprH NIKaKbMaHnIyIaIaIeBa P aMKeITe Ha 5 cekyHn CneI 3aIaBaHe Ha Tempepatpata, CNTemata aBTOMaTNUHO 3aIa3N 3aIaDeHaTa TEMpepatypa.
PergylnipaHe Ha TempepaTpaTa Ha pni3epa
Korato ekpaht Ha dincnner e otknouhen, Hatachete 6ytoHa " (CeJekeTp 3a ,Zone"), n36pepe ,pnp3ep", HndnkaTopbT ,b" (HndnkaTop 3a pnp3epa) cBeTa u cnleD ToBa ce BKJIIOUba peKIMbT 3a hAcToPoiKa Ha TempepaTypaTa Ha pnp3epa.
HaTnCShe 6byToHnTe, ^+ " nIi, -". PpN BcKaO HaTnCKaHe Ha HkOJ OT TgX CToHocCTTa Ha NaCTPOHKATA 3a OxlanDaHe ce yBeJIuYBa nIi HaMaJIaBa c 1. Tempepatypata Ha XlaDIIHnkaCe npOMeHb CneIHaT a NocLeIeOBAteJIHoCt:,-14°C->-15°C->-16°C-> -17°C->-18°C->-19°C->-20°C->-21°C->-22°C->-23°C->-24°C".

3AbeJIeXKKA
Ako He ce n3BbprHnHKaKbMaHnHyIaIeBaPamKnte Ha 5cekyHnCneIzadabaHeHa TemnepaTpaTa, CnCTemTa aBTOMaTuHo 1e 3aIa3N 3aIaDeHaTa Tempepatya.
Функця „My Zone"
1.Функц,在Fruit&Veg."
Korato ekpaht Ha nucnpe e oTKluoyeh,HaTncheTe 6yToHa „D" (CeIeKTop 3a peKIma „Fruit&Veg"), 3a da Bkluoyte nInn N3Kluoyte fynKluraTa.
TaznФyHKUЯ e nOxOJaZa 3a cxbxaHEnHe Na pncn nIIOJObe n3eJIeHuZn.


Fruit&Veg.


3AbeJIeXKKA
Плобове, УвBSTиТELи КьМ CTуdeн TemпepаТури KaTo aHaHac, abOKaDo, baHaHn, rpeinФpyTN n 3eIeHnyu KaTo KapToФи, nATlaJxahN, 606, kpaCTabuN, TnKBuKuN I DomatN, KaTO n CIpHe, He TpЯ6BaДа ce sbxpaHЯВaT B YeKMeJKeTo „My Zone".
2.ФункциЯ „Cool Drink"
Korato ekpaht Na dincnne e otknoueh, Hatachete 6yToHa "E" (CeJIeKTop 3a peKIma „Cool Drink"), 3a da BkHouHTe nInn N3KnUOHTe fHyHKzIyTa.
TaznФункци nOZBoJЯBaДа ce cIbXpaHЯВt npOdyKTH kaTo BOJa, KOJa n COK. TempepatypaВ bOTeJeHneTo „My Zone"e HacTpOeHa ha +2^


Cool Drink


3. Φύκιηλ,0°C Fresh":
Korato ekpaht Na dinpne er o TkIoueH, HATNCHEte 6yToHa ,F" (CeIekTop 3a ,0° Fresh"), 3a da BkIIOHTe IINn N3KIOUHTe yHKUraTa.
TaznФyHKZIa3aDaBa TeMpepaTypaTaBueKMeJKeTo „My Zone" Ha 0^ .POnxOJaIa e 3a cbxpanHeHne Ha npceChn XpaHn KaTo Meco nI np6a. NObeHTo xpaHn OCTaBaT CBexn Ppi 0^, 6e3 da 3ampb3BaT.

3AbeJIeXKKA
IopaДn pa3nHOTo cBdPbKAnHe Na BODa B MeCOTO, HЯКо Meca C NO-ToJMa BlaJxHocT 7e3ampb3HaT npi TeMpepatypu, No-HNCKN OTe 0^ . 3aToBaMeCOTO, KoETo 7e ce KOHCymipa He3a6abHNo, Tp8Ba Da ce cbXpaHraB VyeKMeJKeTo „My Zone" C TeMnepepatypa MINHmym O°C.


0°Fresh


3AБЕЛЕЖKA: YeКMeДжe „My Zone"
EДна OT trPnte ФункциHA OТделенeto „My Zone" Tpr6Ba BInHar n da e aKTNBupaHa. TpNTeФункциН He Morat Da 6bIaT aKtINBn EdHOBpeMeHHO, MoKeJa CBeTu HNdkaTopa cAmo Ha eHAnOT TЯx. 3a Da HamaJIte TempepatypaTa Ha XlaIqIHOTO OTdelenHe, I3noJ3BaIte ФункциЯTa „Fruit&Veg."
Функця „Super Cool"
- Korato ekpaht ha dincneje o tKloucen,HaTnche 6yToHa "G" (CeIekTop 3a yHKnra Super Cool"). L'epo3Byu cnHajn HndkaTOpBt g" (FyHKnra ,Super Cool") uCBeHe n FyHKnraTa "Super Cool" uC6bDe BkIoueHa.
- Korato INDnkaTOpbT ,g" (FyHKzna "Super Cool") cBETHe, HATNCHTe 6yToHa ,G" (CeIeKTop 3a FyHKzna "Super Cool"). LZe npO3Byu nCnHaJ, INDnKaTOpbT ,g" (FyHKzna "Super Cool") ige n3rache He FyHKznaTa "Super Cool" ige 6bJe n3KlNoeHa.
- CnéДкato Фуннкцята „Super Cool" 6ьдe вклоча,хладилнikьт abTomatuho luceЯ ИЗКЛЮчИ, когATO ИЗМИнAT OkOLO 4 уca Ако ИСКаTe ДЯ яИЗКЛЮчИт рьчHo, може TeДу Ганравпс Като habиснete 6byToHa „G" (CeilekTop 3a Фуннкця_, Super Cool").


Super Cool


Super Cool


3AbeJIeXkKA
1.ДokatoФункцяТа „Super Cool" e вклочена,temпература.TаHa xlaДинИка He можeдабъдe Perулupa.HA.Ko Hatистete HяКоI OT 6уToHnte ,+"" nIiN ,-"" 3a Da npomehnte Tempepatypata Na XlaДинИкa, ИнДикatopbT ,g"(Функця „Super Cool") Уе зamигаи Уе прзвучс сгнан, Koeto OЗнЧаABA, Que ta3n OnepaцьЯ He можeдабъдe ИЗВьршени.
2.ДokatoФункцяТа"Super Cool"eвКлючeha,pexKIMITE3a Auto Set n"Holiday"He MOrat da 6bДATakTNBIPaHn,Tb' KaTO CTaBA BbIpOc 3a pa3JIuHn pexKIMnHa yypaBLeHne.KoratoИЗбepeteФункци,КоЯTO eВ KOHΦЛKT CДpyraФункци, ПьрBOHAJHnTaФункцишe 6bДeИЗКЛHOUeHa ABTomaTNUHO.
Функця „Super Frz"
- Korato ekpaht ha dincpe e oTKluoyen, hatachete 6ytoHa "CelekeTop 3a yHKzra Super Freeze"). LPe np03Byu cnHan, nHnKaTOpBt ,h" (yHKzra "Super Freeze") ue cbETHe n yHKzraTa "Super Freeze" ue 6bDe Bkluoyeha.
- Korato InDnKAtopbT "h" (Фуннки Super Freeze") cBeTHe, nATncHete 6byToHa ,H" (CeIeKTop 3a Фуннки Super Freeze"). L'e npOzByu cnHaN, nHДиКaTOpbT ,h" (Фуннки Super Freeze") ь e n3rache n ΦуннкиЯТa ,Super Freeze" ь 6bde n3KJIIOUeHa.
- Cnéд кato Фуннкцята „Super Freeze" 6ьде ВКлоча, Xладилиньт АВТOMATУНо
Чe я ИЗКЛЮЧИ, Когато ИЗМинат Okоло 50 уаса. Ако ИСКат e Д a ИЗКЛЮЧИт e рБУН,
Можete д go habравп tcу lo HaTUCHETe 6byToHa „H" (CeLEKTOp 3a peхима „Super Freeze").


3AbeJIeKKA
1.ДokatoФункцята „Super Freeze" e Включeha, TeMnepaTypaTa ha Фризера He можеда 6ьдe ретулара. Ако натус悔Te Няков ot 6уToHnITE ,+"" nii ,-3a da npomehnte Tempepatypata Na xlaDiNInka, ИndikatopbT ,h"(Функця „Super Freeze") Luke замига и Luke позвун сигнал, koeto OЗнayaaba, Que ta3i onepaцяп He можеда 6ьдe ИЗВьршега.
2.ДokatoФункциета „Super Freeze" eВКлочena,Функциета 3a Auto Set He можеда 6ьдe akTNBIPAнa,Tь кATO CTaba Вьпрoc 3a pa3Лчн ржIMn Ha упраВленe. KoratoИЗберeteФункциЯ,КORATo E B KOнФлNTс дугafФункциЯ,Пьрвонаалнота Функцияше 6ьдe ИЗКлочeuна ABTomatuHNo.
3. Φункцята „Super Freeze" e پеданздануен 3а замраэяbahe Ha xpaин Вьв Вьзможно hab- крatableпегюд OT врeme, с цел да се за паших ралота и Stойноct. Ако Травьда за Amраэnte Галеми Колочесвахара на Bavendьж. Меничиму phункцята „Super Freeze" Травьда сбде Вьночения 24 упrelдаритello, за да се понисту Temператypа вьв Фризера, и xpaина да се посту вьтpe. Ро тои Начин ськрашаба вретсeto, Heo6xODIMO 3a замраэяbahe Вьв Фризера, xpaина т може да Сбдe Замраэзера 6ьрzo, Ийнatableх рашителна стойноct ce Заразы n CBхраненeto и CTaba Mного уdббп.
MHorOToUcKOB Bb3dUyIeH NtOK
- Xlaɪnɪnɪkɒt e ɔbɒpʌdən cɒc sɪctæm 3a MHOrOToUckOB bɜdʌyʊsɛn IntoK, KOeT O nɔ3BɔIJIra B CTyeH N BɜdʌyʊsHo CTpyu ᵠa T ekat npe3 BCEkɪ paΦT. Toba nɒmɑr a 3a nɒdʌbpxaHéT O H a nɔctɔrHHa T empepaTypa, 3a ᵠa Mɔjke xpaHata Bɪ da oCTaHe CBexKa 3a nɔ-ʌbʌlro.
PerylnpyempaTObe
- BucunHaTa Ha paTobete MoKe da ce peryIina cnped BaunTe HjKn3a cbxpaHene.
- 3a da npemeCTnTe paΦT, nbpBO ro n3BaJeTe, KaTO NOBUNrHeTe 3aHnIy My pb6 ① n ro n3dbPnATE HaBbN ②.
- 3a da ro nocTaBnTe o6paTHo, ro cNoKeTe Ha peIcnTe OT DBeTe CtpAHu Iro n36yTaHte Do Hau-3aHnOTo nIoJKeHne, dOKaTO 3aHaHa TaacT Ha paΦTaHe ce 3actOnOpn B CtpaHnHnTe OTBOPn.
YeKMeDJIe „My Zone"
B TOBA OTdJeHHe HnBOTO Ha BLnJXHOCT eNo-HNCKOOT TOBA B OTdJeHHeIeTo Ha XlaDInHnKa Toba YekMeJke e NDoXoJaIoo 3a CbXpaHHeHne Ha cyxN pIoIOBe I npyIg CyxN xpaHn C HNCKO CbDbpxKaHne HA BOda KaTO MaCLO, Ma3HNHn U OJNO UINU WOKOJaI.
MYZONE
YeKeMeJxke „Humidity Zone"
B TOBa OTeJIeHHe HnBOTO Ha BJaJxHocTe e NOBVCOKO OT TOBa B OTeJIeHHeTo Ha XlaIaINHInKa. YnpabJIaBa ce ABtOMaTnUHO OT CnCTeMaTa n e IoXoJrIo 3a CbXpaHHe Na IIOJOnBe, 3eJeHcyu, caIaTn I dp.
HUMIDITYZONEI O
Fresh Box
3oHa 3a cbxpaHene Ha IIOObe n 3eIeHcyu, KbTeTO ce 3aNa3BaT CBexn IzdpabOCIOBHN.
FRESHBOX

3A6EJIEXKA:
Плобове, УвBSTиелни Кьм CTуdeни Temпepатуни Като aHaHac, abOKaDo, baHaHni, rpeiФPyTu n Зеленчуни Като KapToФи, пТlaДжанни, 606, кpacTaВини, ТИКВини и Домати, КakTo n сирени, He TprЯбWA da ce sbxpanЯВAT B Fresh Box.

3AbeJIeXkKA
- He OTCpaHbAaTe PnaCTMaCoBnTe KaNaCu, KOInTO Ce HAMpuAT BbTpE B DBeTe OTDeJeHnY.
- Te noondbpkaT BnaXHocTtA.
3.Плобовerte,ЧьвстВиТЕЛНКьмСтудenv TeMперatypeн KaTo aHaHac, abOKадo, baHaHn,
- rpeiΦpyTu He Tpr6Ba Da ce CbXpaHЯBaT B Te3n DBe YekMeJxKeTa.
IopBnKn paToBe Ha BpaTaTa/ IocTabKn 3a 6yTnIkn
- PaΦTOBete Na BpaTaT a MOraT da ce CBaJIaT 3a NOUICTBaHe:
- XbaheTe pafoTa c pboe ot DBeTe ctpaH, NOBnIHHeTe Ro Harope ① Iro n3BaTe ②
- 3a da noctabnTe paΦTa Na bpaTata, cIeDbaiTe roPHnTe CTbKn B o6paTeH pei.
Ako He yceene TaHaHamepepee Hne TaM, MoJ, oBpHeTe Ce KbM
BaunmecTeHbproBecn
HaIIa EBypeNcKu cHb3a o6cLuykBaHe Ha KIneHTn no TelefoHa (BvKTe TenefoHHnte HOMepaNo-doJy) nIi
pa3eJa,ObcIyKBaHe nIpoIdpbXkKaTa"Ha aIpec www.haier.com, KbJeTo MoKeTe da HappaBInTe
3aBka 3a o6cIyKbaHe, KaTOn Ida HaMepe TceCTo 3aDaBaHb Bbnpocn.
3a da ce cbbpxke Te c Hauin OToeI 3a o6cIyKbaHe Ha KIneHTn, ce yBepTe, ye pa3no- Iarate CbC CleHnTe daHHN.
IhΦopMaunraTaMoKe Da 6bJe HamepeHa Ha TaBeJkKaTa C daHn.
Mодeн
CepenH N°
CbIIO Taka npOBepTe npEOCTaBeHaTa C npOyKta rapaHcIOHHa KapTa, B cLyuA, Ye e npEOCTaBeHa rapaHcIIa.
| Еврейский центов за облuyжbanе на клиенти по телега |
| Държава* | Телегонен Homep | Цара |
| Haier Italy (IT) | 199 100 912 | |
| Haier Spain (ES) | 902 509 123 | |
| Haier Germany (DE) | 0180 5 39 39 99 | • 14 цента/мен стоцноарен
• макс. 42 сentesа/мен мобilians |
| Haier Austria (AT) | 0820 001 205 | • 14,53 цента/мен стоцноарен
• макс. 20 сentesа/мен BCчки
octanaiani |
| Haier United Kingdom (UK) | 0333 003 8122 | |
| Haier France (FR) | 0980 406 409 | |
*3a pyrgn Dbprkabn, Bwxte www.haier.com
Haier Europe Trading S.r.l
Branch UK
Westgate House, Westgate, Ealing
London, W5 1YY
- jestlify参加会议的人员。
- Vestigioni's group, who are members of the Vinyličovské Kostky School.
Zásoba kostek ledu
Westgate House, Westgate, Ealing
London, W5 1YY
3. 0^ Fresh-Function:
Westgate House, Westgate, Ealing
London, W5 1YY
'Otav n oOovn evdeltaEewvival Eekleidomega, patnoTe to koupi "E" (eTuoyeaC Cool Drink) yia epepyoioiOnkai aneepepyoioiOn tnclambdaoupyiac.
2. Funcion Cool Drink:
Westgate House, Westgate, Ealing
Londres, W5 1YY
2. Fonction Cool Drink:
Westgate House, Westgate, Ealing
Londres, W5 1YY
3. 0^ Fresh functor
Westgate House, Westgate, Ealing
London, W5 1YY
2. Funzione Cool Drink:
Westgate House, Westgate, Ealing
London, W5 1YY
Westgate House, Westgate, Ealing
Westgate House, Westgate, Ealing
Londyn, W5 1YY
2. Função Cool Drink:
A这其中 is a very good idea. It's not the best idea to do it, but it is a good idea. The most important thing you should do is use the equipment properly.
Substituir as lampadas LED

AVISO!
Westgate House, Westgate, Ealing
London, W5 1YY
Standardesi directive
CK
2. Functia Cool Drink:
Westgate House, Westgate, Ealing
Londra, W5 1YY
Ice-making islevi 537
Fast Ice islevi 537
Auto Set islevi 537
Holiday islevi 538
539 Ekipman
Westgate House, Westgate, Ealing
London, W5 1YY
*Sogutma cihazinin garanti sùresi:
Asgari garanti: AB Ülkeleri icin 2 yil, Türkiye icin 3 yil, İngilterere icin 1 yil, Rusya icin 1 yil, İsveç icin 3 yil, Sırban icin 2 yil, Norveç icin 5 yil, Fas icin 1 yil, Cezayir icin 6 ay, Tunus yasal garanti gereklidehyildir.
Westgate House, Westgate, Ealing
London, W5 1YY
- Külmutusseadme garantii kestus:
Westgate House, Westgate, Ealing
London, W5 1YY
Westgate House, Westgate, Ealing
London, W5 1YY