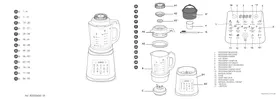
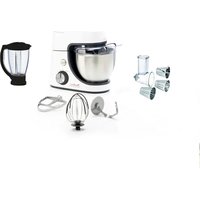
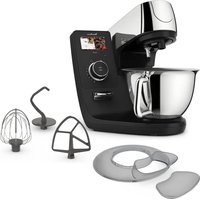
USER MANUAL PERFECT MIX COOK LM835D10 MOULINEX
For cold preparation: 1750 ml. For thick mixture: 1250 ml. For liquid mixture: max 1400 ml.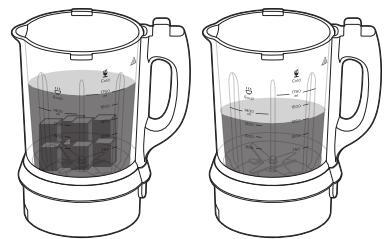

For hot preparation: max 1400 ml.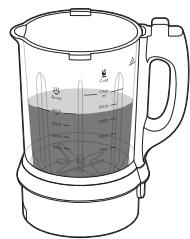
For steam: max 500 ml.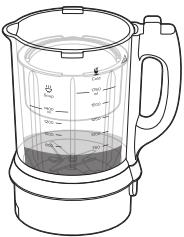
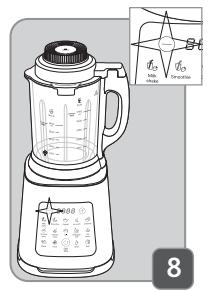
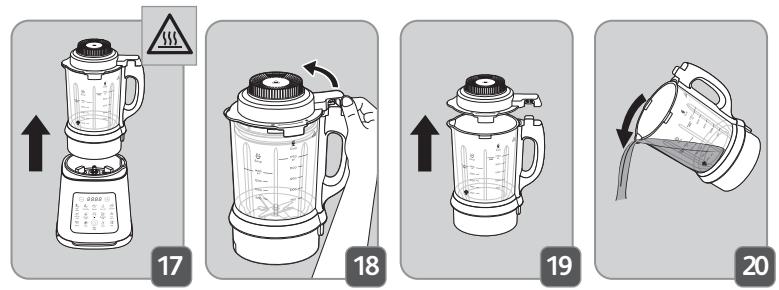
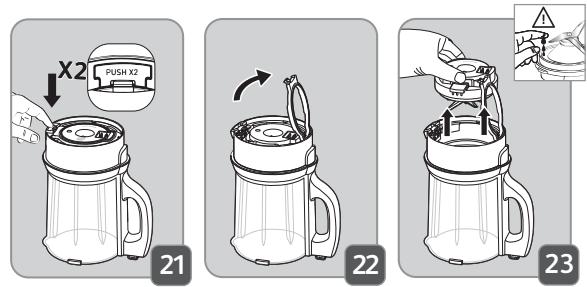
DISASSEMBLING THE JAR
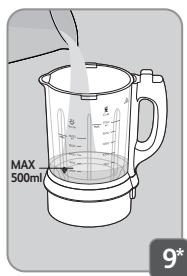
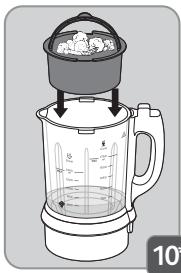
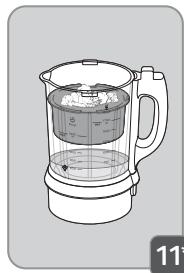
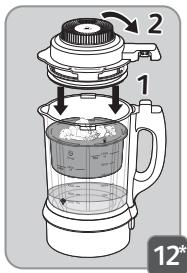
HOW TO ADD STEAM BASKET (*depending on model part)
DESCRIPTION OF THE APPLIANCE
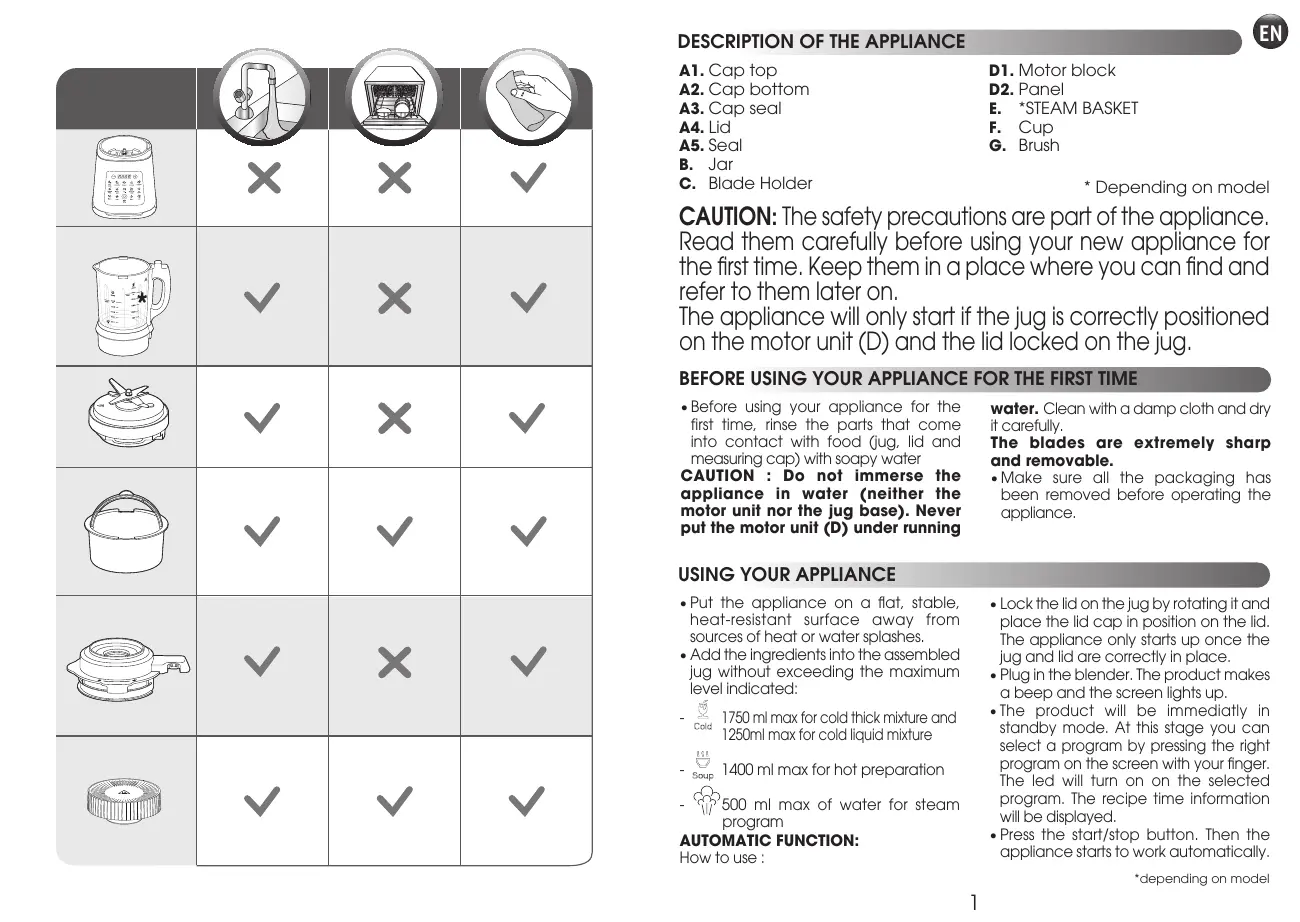
A1. Cap top A2. Cap bottom A3. Cap seal A4. Lid A5. Seal B. Jar C. Blade Holder
D1. Motor block D2. Panel E. *STEAM BASKET F. Cup G. Brush
CAUTION: The safety precautions are part of the appliance. Read them carefully before using your new appliance for the first time. Keep them in a place where you can find and refer to them later on.
The appliance will only start if the jug is correctly positioned on the motor unit (D) and the lid locked on the jug.
BEFORE USING YOUR APPLIANCE FOR THE FIRST TIME
- Before using your appliance for the first time, rinse the parts that come into contact with food (jug, lid and measuring cap) with soapy water.
CAUTION: Do not immerse the appliance in water (neither the motor unit nor the jug base). Never put the motor unit (D) under running water.
Clean with a damp cloth and dry it carefully.
The blades are extremely sharp and removable.
- Make sure all the packaging has been removed before operating the appliance.
USING YOUR APPLIANCE
- Put the appliance on a flat, stable, heat-resistant surface away from sources of heat or water splashes.
- Add the ingredients into the assembled jug without exceeding the maximum level indicated:

1750 ml max for cold thick mixture and 1250ml max for cold liquid mixture

1400 ml max for hot preparation

500 ml max of water for steam program
AUTOMATIC FUNCTION:
How to use:
- Lock the lid on the jug by rotating it and place the lid cap in position on the lid. The appliance only starts up once the jug and lid are correctly in place.
- Plug in the blender. The product makes a beep and the screen lights up.
- The product will be immediately in standby mode. At this stage you can select a program by pressing the right program on the screen with your finger. The led will turn on on the selected program. The recipe time information will be displayed.
- Press the start/stop button. Then the appliance starts to work automatically.
- At the end of the recipe, the blender stops automatically. The appliance bips 5 times.
- You can also stop the blending during the cycle:
- Within 1 minute of working, press the start/stop button.
- More than 1 minute of working, press and hold the start/stop button for 3 seconds.
- To add ingredients while blending for cold preparation only, remove the lid cap from the lid and add the ingredients through the feeder hole. Beware of the risk of spatter.
CAUTION: We recommend not to add ingredients while blending hot preparations (risk of splashing). Do not remove the lid cap from the lid during hot preparations. It can reach high temperature and cause burns.
- Do not shake the motor unit or the jug when the blender is in use.
CAUTION: After running one program, especially a long recipe, let the blender rest for a minimum of 5 minutes before operating it again. Do not insert any metallic object into the blender. Do not mix pieces of frozen ingredients larger than 25 x 25 x 25 mm.
| Cold Programs |
| Milk shake Milkshake | Banana shake 250g vanilla ice cream + 1 banana (100g) + 25 cl milk | Select Milkshake program Press Start/Stop button |
| Smoothie Smoothie | Vitality cocktail 200g carrots, 100g celeriac, 100g banana, 500g orange juice | Select Smoothie program Press Start/Stop button |
| Ice-crush Ice-crush | 8 Ice cubes 30x30x40 mm | Select Ice crush program Press Start/Stop button |
| Dessert Dessert | Quick cake: (Add ingredient in order) 3 eggs, 100g sunflower oil, 210g sugar, 7.5g vanilla sugar, 6g baking powder, 125g flour Bake for 40min to 180°C | Select Dessert program Press Start/Stop button |
These programs are predefined on a standard basis. You can freely add extra heating/blending thanks to the manual settings at your convenience.
| Hot Programs |
| Smooth soup | Pumpkin soup
600g pumpkin, 120g potato, 80g onion, 600g water. | Select Soup program
Press Start/Stop button |
| Chunky soup | Vegetables potage
300g potatoes, 150g carrots, 150g leek, 100g onion, 700g water. | Select Chunky soup program
Press Start/Stop button |
| Compote | Apple compote
700g golden apple, 50g water. | Select Comperate program
Press Start/Stop button |
| Stir | Chicken noodle soup
First step 900g chicken stock + ginger
Second step 80g pasta + 100g carrot + 100g celeriac
Third step 120g chicken + 100g celery + soya sauce | Select Stir program
Press Start/Stop button
When the beep sounds, add the ingredients from step 2 for 5 minutes
When the beep sounds, add the ingredients from step 3 for 5 minutes |
| Multigrain milk | Soya milk
1000g water, 100g soya beans | Select Multigrain milk program
Press Start/Stop button |
| Hot sauce | Béchamel
500g milk, 45g butter, 45g flour, nutmeg (1 pinch) | Select Hot sauce program
Press Start/Stop button |
| Steam program | 400 g max of ingredients | Select steam program long pause on the button (2s)
Press Start/Stop button |
ROUGH CHOPPING SMALL QUANTITIES
Chop in a few seconds by pulsing: peanuts
Model 1400 WATT: quantity / max time: 300g of peanuts / 15 seconds
COOKING FOOD
To ensure the food is cooked thoroughly and to avoid any type of bacteriological contamination, a minimum temperature and time have to be respected depending on the type of food:
- To ensure the pasteurization of beef, pork, and poultry: wait until temperature reaches 75°C during at least 2 minutes at the core of the food.
- To ensure the pasteurization of eggs: wait until the temperature reaches 75°C for at least 2 minutes at the core of the food.
- To ensure the pasteurization of vegetables: wait until the temperature reaches 65°C for at least 2 minutes at the core of the food.
- To ensure the pasteurization of fish and seafood: wait until the temperature reaches 65°C for at least 2 minutes at the core of the food.
!Warning:
Sensitive people like pregnant women, young children, elderly people and immunocompromised people must take into account that some of the recipes suggested don't cook the ingredient thoroughly enough to kill food poisoning bacteria.
MANUAL FUNCTIONS:

Pulse
Pulse: Press the pulse button to let the appliance run for only a few seconds at a time. To stop it, release the button. Press the button as often as necessary.
The longest working time cannot be more than 3 minutes.

Blend: select blend program on screen then choose the speed setting with + and - buttons, validate with Start/Stop button.
Then choose timer, default time 2 min and adjust with + and - buttons, validate with Start/Stop button. The program will start immediately. At the end of the program, the appliance beeps 5 times.

Heat: allows to freely control the way you want to heat. Press the heat button, the screen indicates « 75° » but you can adjust the heating temperature from 40°C by selecting + and - buttons. Press Start/Stop button.
You can set up the working time by selecting + and - buttons between 5 minutes and 90 minutes, the screen indicates default time: 10 minutes. Then, press Start/Stop button.
The remaining time appears on the screen. Wait for the blender to stop automatically. The appliance beeps 5 times. You can also stop the blending during the cycle:
- Within 1 minute of working, press the start/stop button.
CLEANING
- Clean the jug immediately after use.
- For easy cleaning, you can use. Deep clean: Put 800ml of water in the jug. Select the cleaning program on the screen and press Start/Stop button. Wait for the end of program. Finish cleaning the jug with the help of a sponge.
- Rinse the inside of the jug and the lid under running water.
- Rinse the inside of the jug and the lid under running water.
- In the event of the heated part of the jug getting extremely dirty, fill in the jar with a mix of water and washing up liquid and let it soaked for a few hours to help get it clean.
- More than 1 minute of working, press and hold the start/stop button for 3 seconds.

Steam* Add the ingredients in the steam basket. Add 500ml of water in the jar. Then add the steam basket in the jar and
close the lid. Maintains heat /steam button for 2 seconds. The pictogram will become yellow. You can set up the working time by + and -buttons, between 5 minutes and 90 minutes. Then press Start/Stop button. The remaining time appears on the screen. Wait for the blender to stop automatically. The appliance bips 5 times. For safety reasons, remove the cap and wait 1 minute to remove excess steam.
*Depending on model
OTHER FUNCTIONS


Start/Stop: allows you to stop any blending or heating program before the end by pressing this button. You can also stop the appliance during the cycle:
- within 1 minute of working, press the start/stop button
- more than 1 minute of working, press and hold the start/stop button for 3 seconds. If the appliance switches off during operation, proceed as follows:
- Unplug and leave it to cool down for approximately 15-20 minutes.
- Reconnect the appliance to the power supply and resume blending.
- The appliance will keep the program in memory for 3 min if stopped.
- Use a damp cloth to clean the motor unit. Dry it carefully.
- You can use the brush to clean the blade holder. Be careful, the blades are very sharp.
Caution:
- Empty the preparation; the jug is not meant for storing food in the refrigerator or freezer.
- To clean the outside of the motor unit and the walls of the jug, use a damp cloth.
- Do not immerse the appliance in water (neither the motor unit nor the blade holder). Never put the motor unit (D) under running water. Refer to the cleaning table to check how to clean each part.
WHAT TO DO IF YOUR APPLIANCE DOES NOT WORK?
| Problems | Causes | Solutions |
| Appliance does not work | The plug is not connected. | Connect the appliance to a socket with the same voltage as indicated on the rating plate of the appliance. |
| The blender jug is not positioned correctly on the motor unit or the jug and lid are correctly in place and are not locked onto the motor unit. | Check that the blender jug and the lid are positioned properly on the motor unit as explained in the instructions. |
| Appliance, keyboard or program not responding | Unplug the appliance, wait for 1 minute and plug in again. |
| In case of overheating | Unplug and leave it to cool down for approx. 15-20 minutes. |
| The appliance stopped while in use | Overload or overheating | Unplug and leave it to cool down for approx. 15-20 minutes. Reconnect the appliance to the power supply and resume blending. |
| Excessive vibrations | The product is not placed on a flat surface. | Place the appliance on a flat surface. |
| Volume of ingredients is too high. | Reduce the quantity of ingredients processed. |
| Leak or overflow from the lid | Volume of ingredients is too high. | Reduce the quantity of ingredients processed. |
| The lid is not correctly positioned. | Place the lid correctly on the blender jug. |
| The seal of the lid is not correctly positioned, or is missed. | Put the seal in the correct position. |
| Leak from the bottom of the blender jug | Deterioration of the watertightness of the appliance. | verify the blade holder is correctly put in place and the interface between blade holder / jug is totally clean. If the problem persists, contact the consumer service (see contact information in the warranty leaflet) |
| The blades do not turn easily | Pieces of food too large or too hard. | Reduce the size or quantity of ingredients processed. |
| Cooking problem | The food is not cooked enough or / The food is overcooked | use manual function to adapt time of use and heating temperature |
| Food sticks to the bottom | use manual function to adapt time of use and heating temperature. And see cleaning instructions |
If your appliance is still not running properly, please contact the customer service department for your country.
DESCRIPTION OF THE APPLIANCE
Select the desired function with the power button.
Then press the start button. The preset time is 2 minutes and you can adjust it with the + and - buttons. Confirm your selection with the power button. The program starts immediately. At the end of the program, the appliance makes the characteristic sound.
Temperature: allows you to control the heating mode. When you press the temperature button, the display shows the default 75°, but you can select a temperature from 40° to 100° by pressing + or -. Then press the power button. You can set the operating time from 5 to 90 minutes by pressing the + and - buttons. The display shows the preset time of 10 minutes. Then press the power button.
The remaining time is shown on the display. Wait for it to stop automatically. The appliance will make the characteristic sound. You can also stop the operation at any time during the cycle:
- Press the power button once to start operation.
- If you press and hold the power button for 3 seconds, the appliance will stop.
Then: Put the ingredients in the basket. Add 50 ml of water to the jug. Then place the basket in the jug and close the lid. Press the temperature/basket button for 2 seconds. The indicator will turn yellow. You can set the operating time between 5 and 90 minutes using the + and - buttons. Then press the power button. The remaining time is shown on the display. Wait for it to stop automatically. The appliance will make the characteristic sound.
For safety reasons, you must remove the lid and wait a moment for the steam to escape.
*Depends on the model.
OTHER FUNCTIONS

Start/Stop: The selected program will start automatically after the set time, always with the same button. You can also stop the operation at any time during the cycle: - Press the power button once to start operation.
CLEANING
Clean the jug immediately after use. For easy cleaning, you can use: Vinegar cleaner: Pour 800 ml of water into the jug. Select the cleaning program on the display and press the power button. Wait until the program finishes. Rinse the jug with a sponge. - Rinse the inside of the jug and the lid under running water. If the part of the jug that contains limescale is heavily soiled, clean the jug with a mixture of water and descaling agent and let it soak for a few hours to make cleaning easier.
After about 1 hour from the start of operation, the kettle or coffee maker will switch off automatically.
If the appliance does not work as expected, perform the following:
- Remove the appliance from the base and let it cool for about 15-20 minutes. -Plug the appliance back into the base and continue using it. -The appliance will automatically resume operation after 3 minutes from the moment of disconnection.
Clean the motor unit with a damp cloth. Dry it carefully. You can also use a brush to clean the base of the appliance. Caution: the blades are extremely sharp.
Caution:
Safety instructions: The appliance is not intended for storing food in the refrigerator or freezer. To clean the external parts of the motor and the surfaces of the kettle, use a soft cloth. Do not immerse the appliance in water (neither the motor nor the base of the appliance). Do not use abrasive cleaners. Refer to the cleaning table to see how each part is cleaned.
WHAT TO DO IF THE APPLIANCE DOES NOT WORK
Blender operation modes:
- For less than 1 minute of operation - press the button. Start/Blender - for more than 1 minute of operation - press and hold the Start/Blender button for 3 seconds.
If the appliance does not work, perform the following steps. -Unplug it from the power outlet and let it cool for about 15-20 minutes.
Then try to start the blending process again. -The program will automatically resume operation after 3 minutes of inactivity.
CLEANING
Cleaning the appliance is easy. For thorough cleaning, you can use the following. Thorough cleaning: Pour 800 ml of water into the jug. Select the cleaning program on the display and press the Start/Blender button. Wait for the program to finish. Finish cleaning by wiping with a sponge. Rinse the lid and the inside of the jug with clean water. - Rinse the lid and the inside of the jug with clean water. If the inside of the container is heavily stained, fill it with water and a little detergent and leave for a few hours. To clean the motor block, use a damp cloth. Rinse thoroughly.
The blade is sharp. Be careful, but it will be sharp.
Warnings.
-Pelenichsulich: cup Do not immerse the product in the freezer. -To clean the outside of the motor block and the cup, use a damp cloth. -Do not immerse the device in water (neither the motor block nor the cup). Never place the motor block (D) under running water. A. Tab. Table with information about the unit, to know, to use.
CHECK IF THE DEVICE IS NOT WORKING?
COARSE CUTTING OF FROZEN PORTIONS
Instant grinding in pulse mode: spices
WHAT TO DO IF THE DEVICE DOES NOT WORK?
| ПюбLEMы | Прочны | Рецени. |
| Устroyстvo не падкlioно К злектося. | Устroyстvo не падкlioно К злектося. | Пюдкlioquite устroiстvo К розетке злектося, наpopженье которoi сооветаулосту.
Крочтося в почес的基础上 уразално на пасортугов.
Крочтося в почес的基础上 уразално.
Крочтося в почес的基础上 уразално.
Крочтося в почес的基础上 уразално.
Крочтося в почес的基础上 уразално.
Крочтося в почес的基础上 уразално.
Крочтося в почес的基础上 уразално.
Крочтося в почес的基础上 уразално.
Крочтося в поч请教的基础上 уразално.
Крочтося в поч请教的基础上 уразално.
Крочтося в поч请教的基础上 уразално.
Крочтося в поч请教的基础上 уразално.
Крочтося в поч请教的基础上 уразално.
Крочтося в поч请教的基础上 уразално.
Крочтося в поч请教的基础上 уразално.
Крочuntoя не падкlioов.
Люпсьама и Крочтоя не падкlioов.
Люпсьама и Крочтоя не падкlioов.
Люпсьама и Крочтоя не падкlioов.
Люпсьама и Крочтоя не падкlioов.
Люпсьама и Крочтоя не падкlioов.
Люпсьама и Крочabloу.
Люпсьама и Крочabloу.
Люпсьама и Крочabloу.
Люпсьама и Крочabloу.
Люпсьама и Крочabloу.
Люпсьама и Крочabloу.
Люпсьама и Крочabloу.
Люпсьама и Крочabloу.
Крочтоя не падкlioов.
Люпсьама и Крочтоя не падкlioов.
Люпсьама и Крочтоя не падкlioов.
Люпсьама и Крочтоя не падкlioов.
Люпсьама и Крочтоя не падкlioов.
Люпсьама и Kрочтоя не падкlioов.
Люпсьама и Крочтоя не падкlioов.
Люпсьама и Крочтоя не падкlioов.
Люпсьама и Крочтоя не падкlioов.
Люпсьама и Крочтоя не падкlioов.
Люпсьама и Росточим.
Люпсьама и Росточим.
Люпсьама и Росточим.
Люпсьама и Рostочим.
Люпсьама и Рostочим.
Люпсьама и Рostочим.
Люпсьама и Рostочим.
Люпсьама и Рostочим.
Люпсьама и Рostочим.
Люпсьама и Рostочим.
Люпсьама и Рostочим.
Люпсьим.
Люпсьим.
Люпсьим.
Люпсьим.
Люпсьим.
Люпсьим.
Люпсьим.
Люпсьим.
Люпсьим.
Люпсьим.
Люпсьим.
Люпсьим.
Люпсьим.
Люпсьим.
Люпсьим
Люпсьим.
Люпсьим.
Люпсьим.
Люпсьим.
Люпсьим.
Люпсьим.
Люпсьим.
Люпсьим.
Люпсьим.
Люпсьим.
Люпсьим.
Люпсьим.
Люпсьим.
Люпсьим.
Л�псьим.
Л�псьим.
Л�псьим.
Л�псьим.
Л�псьим.
Л�псьим.
Л�псьим.
Л�псьим.
Л�псьим.
Л�псьим.
Л�псьим.
Л�псьим.
Л�псьим.
Л�псьим.
Л�пСьим.
Л�Сьим.
Л�Сьим.
Л�Сьим.
Л�Сьим.
Л�Сьим.
Л�Сьим.
Л�Сьим.
Л�Сьим.
Л�Сьим.
Л�Сьим.
Л�Сьим.
Л�Сьим.
Л�Сьим.
Л�Сьим.
Л�Сьим.
Л�Сьим.
Л�Сьим
Л�Сьим
Л�Сьим
Л�Сьим
Л�Сьим
Л�Сьим
Л�Сьим
Л�Сьим
Л�Сьим
Л�Сьим
Л�Сьим
Л�Сьим
Л�Сьим
Л�Сьим
Л�Сьим
Л�Сьим
Л�Сьим
Л�Св.
Л�Сьим
Л�Сьим
Л�Сьим
Л�Сьим
Л�Сьим
Л�Сьим
Л�Сьим
Л�Сьим
Л�Сьим
Л�Сьим
Л�Сьим
Л�Сьим
Л�Сьим
Л�Сьим
Л�Сьим
Л�Сьим
Л�Cьим
Л�Сьим
Л�Сьим
Л�Сьим
Л�Сьим
Л�Сьим
Л�Сьим
Л�Сьим
Л�Сьим
Л�Сьим
Л�Сьим
Л�Сьим
Л�Сьим
Л�Сьим
Л�Сьим
Л�Сьим
Л�Сьим
NL
NL
NL
NL
NL
NL
NL
NL
NL
NL
NL
NL
NL
NL
NL
NL
NL
NL
NL
NL
NL
NL
NL
NL
NL
NL
NL
NL
NL
NL
NL
NL
NL
NL
NL
NL
NL
NL
NL
NL
NL
NL
NL
NL
NL
NL
NL
NL
NL
NL
ML
ML
ML
ML
ML
ML
ML
ML
ML
ML
ML
ML
ML
ML
ML
ML
ML
ML
ML
ML
ML
ML
ML
ML
ML
ML
ML
ML
ML
ML
ML
ML
ML
ML
ML
ML
ML
ML
ML
ML
ML
ML
ML
ML
ML
ML
ML
ML
ML
ML
NL
NL
NL
NL
NL
NL
NL
NL
NL
NL
NL
NL
NL
NL
NL
NL
NL
NL
NL
NL
NL
NL
NL
NL
NL
NL
NL
NL
NL
NL
NL
NL
NL
NL
NL
NL
NL
NL
NL
NL
NL
NL
NL
NL
NL
NL
NL
NL
NL
N
NL
NL
NL
NL
NL
NL
NL
NL
NL
NL
NL
NL
NL
NL
NL
NL
NL
NL
NL
NL
NL
NL
NL
NL
NL
NL
NL
NL
NL
NL
NL
NL
NL
NL
NL
NL
NL
NL
NL
NL
NL
NL
NL
NL
NL
NL
NL
NL
NL
NL
NL
NL
NL
NL
NL
NL
NL
NL
NL
NL
NL
NL
NL
NL
NL
NL
NL
NL
NL
NL
NL
NL
NL
NL
NL
NL
NL
NL
NL
NL
NL
NL
NL
NL
NL
NL
NL
NL
NL
NL
NL
NL
NL
NL
NL
NL
NL
NL
NL
L
L
L
L
L
L
L
L
L
L
L
L
L
L
L
L
L
L
L
L
L
L
L
L
L
L
L
L
L
L
L
L
L
L
L
L
L
L
L
L
L
L
L
L
L
L
L
L
L
L
NL
NL
NL
NL
NL
NL
NL
NL
NL
NL
NL
NL
NL
NL
NL
NL
NL
NL
NL
NL
NL
NL
NL
NL
NL
NL
NL
NL
NL
NL
NL
NL
NL
NL
NL
NL
NL
NL
NL
NL
NL
NL
NL
NL
NL
NL
NL
NL
NL
M
ML
ML
ML
ML
ML
ML
ML
ML
ML
ML
ML
ML
ML
ML
ML
ML
ML
ML
ML
ML
ML
ML
ML
ML
ML
ML
ML
ML
ML
ML
ML
ML
ML
ML
ML
ML
ML
ML
ML
ML
ML
ML
ML
ML
ML
ML
ML
ML
ML
M
ML
ML
ML
ML
ML
ML
ML
ML
ML
ML
ML
ML
ML
ML
ML
ML
ML
ML
ML
ML
ML
ML
ML
ML
ML
ML
ML
ML
ML
ML
ML
ML
ML
ML
ML
ML
ML
ML
ML
ML
ML
ML
ML
ML
ML
ML
ML
ML
M
M
M
M
M
M
M
M
M
M
M
M
M
M
M
M
M
M
M
M
M
M
M
M
M
M
M
M
M
M
M
M
M
M
M
M
M
M
M
M
M
M
M
M
M
M
M
M
M
M
ML
ML
ML
ML
ML
ML
ML
ML
ML
ML
ML
ML
ML
ML
ML
ML
ML
ML
ML
ML
ML
ML
ML
ML
ML
ML
ML
ML
ML
ML
ML
ML
ML
ML
ML
ML
ML
ML
ML
ML
ML
ML
ML
ML
ML
ML
ML
ML
NL
ML
ML
ML
ML
ML
ML
ML
ML
ML
ML
ML
ML
ML
ML
ML
ML
ML
ML
ML
ML
ML
ML
ML
ML
ML
ML
ML
ML
ML
ML
ML
ML
ML
ML
ML
ML
ML
ML
ML
ML
ML
ML
ML
ML
ML
ML
ML
ML
M
NL
NL
NL
NL
NL
NL
NL
NL
NL
NL
NL
NL
NL
NL
NL
NL
NL
NL
NL
NL
NL
NL
NL
NL
NL
NL
NL
NL
NL
NL
NL
NL
NL
NL
NL
NL
NL
NL
NL
NL
NL
NL
NL
NL
NL
NL
NL
NL
NL
PL
PL
PL
PL
PL
PL
PL
PL
PL
PL
PL
PL
PL
PL
PL
PL
PL
PL
PL
PL
PL
PL
PL
PL
PL
PL
PL
PL
PL
PL
PL
PL
PL
PL
PL
PL
PL
PL
PL
PL
PL
PL
PL
PL
PL
PL
PL
PL
PL
PL
ML
ML
ML
ML
ML
ML
ML
ML
ML
ML
ML
ML
ML
ML
ML
ML
ML
ML
ML
ML
ML
ML
ML
ML
ML
ML
ML
ML
ML
ML
ML
ML
ML
ML
ML
ML
ML
ML
ML
ML
ML
ML
ML
ML
ML
ML
ML
ML
ML
PL
ML
ML
ML
ML
ML
ML
ML
ML
ML
ML
ML
ML
ML
ML
ML
ML
ML
ML
ML
ML
ML
ML
ML
ML
ML
ML
ML
ML
ML
ML
ML
ML
ML
ML
ML
ML
ML
ML
ML
ML
ML
ML
ML
ML
ML
ML
ML
ML
NL
M
ML
ML
ML
ML
ML
ML
ML
ML
ML
ML
ML
ML
ML
ML
ML
ML
ML
ML
ML
ML
ML
ML
ML
ML
ML
ML
ML
ML
ML
ML
ML
ML
ML
ML
ML
ML
ML
ML
ML
ML
ML
ML
ML
ML
ML
ML
ML
M
ML
M
ML
M
ML
M
ML
M
ML
M
ML
ML
ML
ML
ML
ML
ML
ML
ML
ML
ML
ML
ML
ML
ML
ML
ML
ML
ML
ML
ML
ML
ML
ML
ML
ML
ML
ML
ML
ML
ML
ML
ML
ML
ML
ML
ML
ML
ML
ML
ML
ML
ML
ML
ML
ML
ML
M
M
ML
ML
ML
ML
ML
ML
ML
ML
ML
ML
ML
ML
ML
ML
ML
ML
ML
ML
ML
ML
ML
ML
ML
ML
ML
ML
ML
ML
ML
ML
ML
ML
ML
ML
ML
ML
ML
ML
ML
ML
ML
ML
ML
ML
ML
ML
ML
M
N
N
N
N
N
N
N
N
N
N
N
N
N
N
N
N
N
N
N
N
N
N
N
N
N
N
N
N
N
N
N
N
N
N
N
N
N
N
N
N
N
N
N
N
N
N
N
N
N
N
M
M
M
M
M
M
M
M
M
M
M
M
M
M
M
M
M
M
M
M
M
M
M
M
M
M
M
M
M
M
M
M
M
M
M
M
M
M
M
M
M
M
M
M
M
M
M
M
M
N
N
N
N
N
N
N
N
N
N
N
N
N
N
N
N
N
N
N
N
N
N
N
N
N
N
N
N
N
N
N
N
N
N
N
N
N
N
N
N
N
N
N
N
N
N
N
N
M
N
M
M
M
M
M
M
M
M
M
M
M
M
M
M
M
M
M
M
M
M
M
M
M
M
M
M
M
M
M
M
M
M
M
M
M
M
M
M
M
M
M
M
M
M
M
M
M
M
N
M
M
M
M
M
M
M
M
M
M
M
M
M
M
M
M
M
M
M
M
M
M
M
M
M
M
M
M
M
M
M
M
M
M
M
M
M
M
M
M
M
M
M
M
M
M
M
N
N
M
M
M
M
M
M
M
M
M
M
M
M
M
M
M
M
M
M
M
M
M
M
M
M
M
M
M
M
M
M
M
M
M
M
M
M
M
M
M
M
M
M
M
M
M
M
M
N
M
N
N
N
N
N
N
N
N
N
N
N
N
N
N
N
N
N
N
N
N
N
N
N
N
N
N
N
N
N
N
N
N
N
N
N
N
N
N
N
N
N
N
N
N
N
N
N
N
NL
NL
NL
NL
NL
NL
NL
NL
NL
NL
NL
NL
NL
NL
NL
NL
NL
NL
NL
NL
NL
NL
NL
NL
NL
NL
NL
NL
NL
NL
NL
NL
NL
NL
NL
NL
NL
NL
NL
NL
NL
NL
NL
NL
NL
NL
NL
NL
N
N
N
N
N
N
N
N
N
N
N
N
N
N
N
N
N
N
N
N
N
N
N
N
N
N
N
N
N
N
N
N
N
N
N
N
N
N
N
N
N
N
N
N
N
N
N
N
N
NL
N
N
N
N
N
N
N
N
N
N
N
N
N
N
N
N
N
N
N
N
N
N
N
N
N
N
N
N
N
N
N
N
N
N
N
N
N
N
N
N
N
N
N
N
N
N
N
N
M
ML
ML
ML
ML
ML
ML
ML
ML
ML
ML
ML
ML
ML
ML
ML
ML
ML
ML
ML
ML
ML
ML
ML
ML
ML
ML
ML
ML
ML
ML
ML
ML
ML
ML
ML
ML
ML
ML
ML
ML
ML
ML
ML
ML
ML
ML
ML
ML
N
N
N
N
N
N
N
N
N
N
N
N
N
N
N
N
N
N
N
N
N
N
N
N
N
N
N
N
N
N
N
N
N
N
N
N
N
N
N
N
N
N
N
N
N
N
N
N
N
ML |
If the device still does not work properly, contact the customer service center of your country.
CHICKEN SALAD
A1. Chicken breast A2. Chicken thigh A3. Chicken wings A4. Pepper A5. Wings B. C. C. Salt
D1. Motor block D2. Panel E. *CUP F. Cup G. Lid
RECIPE: chicken salad with boiled chicken. Cut the chicken into small pieces. Add the pieces to the salad, mix well.
Chicken only with the motor block (D) and the cup, as described, and the pepper, as described, with the old salad.
CHICKEN SALAD WITH BOILED CHICKEN
The chicken meat and other parts (breast, thigh, and other pieces) should be thoroughly cooked before consumption: do not consume the chicken (including the motor block) raw. Motor block (D)
CHICKEN COOKING
When cooking chicken, use only clean, fresh, or thawed meat. Do not use spoiled meat. - Place the chicken into the appliance after the ingredients have been prepared to the maximum recommended level.
For dry ingredients: max. 1750 ml. For liquid ingredients: max. 1250 ml.

Soup

For blending: max. 500 ml.
AUTOMATIC FUNCTIONS:
Cooking function:
Place the chicken into the bowl with the liquid. The chicken's smoke will be released through the vent, so do not cover it.
The pieces should be open and not overlapping.
Do not exceed the maximum capacity when adding ingredients to the chicken.
To check the chicken's doneness, use a knife to cut into the thickest part of the thigh. After the chicken and thigh are cooked, the juice should run clear. - Do not open the lid during operation. The appliance will emit a sound and the screen will light up. - The appliance will be in standby mode. At this time, the screen will show the set time and the start button can be pressed. The set time can be adjusted.
*Follow the instructions
Data. The recipe should be followed exactly.
- Press the start/stop button. After that, the appliance will start operating automatically.
- Press the start/stop button. The indicator light will flash.
- The device is ready for operation.
- Press the start/stop button for 1 minute. After 1 minute, press the start/stop button for 3 seconds to stop the device. To prepare the device for operation, remove the plug from the socket and let it cool down.
Caution: Do not touch the hot surfaces or the plug. (There is a risk of burns). Do not touch the hot surfaces with wet hands. The temperature is high, and there is a risk of burns.
Set the temperature and press the start/stop button.
Then set the timer function, which can be up to 2 minutes. Press the + and - buttons to set the time, then press the start/stop button. The indicator light will flash.

Heating: The heating function is available. If the temperature is below 75°C,
press the + and - buttons to set the heating temperature between 40°C and 100°C. Then press the start/stop button.
Press the + and - buttons to set the cooking time between 5 and 90 minutes. The display will show the remaining time: 10 minutes. Then press the start/stop button.
The display will show the remaining time. The device will automatically stop. The indicator light will flash. It is ready for operation:
- Press the start/stop button for 1 minute. - After 1 minute, press the start/stop button for 3 seconds to stop the device.

Add the ingredients: Add the ingredients to the container. Add 500 ml of water.
Then close the lid and press the start/stop button. The heating function will operate for 2 seconds. The + and - buttons are used to set the cooking time between 5 and 90 minutes. Then press the start/stop button. The display will show the remaining time. The device will automatically stop. The indicator light will flash.
For safety, remove the plug and wait for 1 minute before opening.
Remove the plug from the socket.

Start/Stop: Before starting the device, make sure the protective cover is properly installed. When starting for the first time, to start/stop: press the start/stop button for 3 seconds.
If the device has been running for more than 1 minute, press the start/stop button for 3 seconds. If the device stops unexpectedly during operation, replace the batteries: open the cover, remove the old batteries, and insert new ones after 15-20 minutes.
CLEANING
Clean the device with a soft, dry cloth. For cleaning, use only recommended products. For regular cleaning: add 800 ml of water. When the cleaning indicator lights up, press the start/stop button. Wait for the indicator to turn off. Then clean the device with a damp cloth. Do not immerse the device in water. Do not use abrasive cleaners. If the device becomes dirty with stubborn stains, wipe it with a dry cloth and use a mild detergent if necessary. For motor cleaning, use a dry cloth. Do not rotate the motor.
If the device is used frequently, clean it regularly. After stopping the device, wait at least 3 minutes before cleaning.
For cleaning the dust filter, use a vacuum cleaner or a soft brush. Do not use water.
Warning!
Do not use the device without the filter. The device is not intended for storing tobacco or other substances. For cleaning the motor and the device, use a dry cloth. Do not immerse the device (motor or filter) in water. Do not place the motor (D) under running water. For cleaning, use only the recommended cleaning accessories.
The device is equipped with a filter that must be replaced regularly.
| Месенер | Себentер | Шешимер |
| Курьлfilbyхумб ictemeidi | КурьлфыксыMotop bIoIbHnda duypbcOpнал actbIpIbIMaFAN HeMeCEKурьжэ HeKaPak OphbHdaДурсTuу КурьлдИЗ | Чурьлфыннп пасportТа KMошаSCында керсетiIrgenКерveyre саиkec keletinpo3etkaFAЖалгань. |
| Курьлфы, nepheTakta HemeceBaГарlamama Jozayan Бермei | Курьлфынр розеткадан cybIPn1, 1 МИNTу KUTIHJx KeHe pOsetkaFaKaIyТКБHbI3. |
| Шamадан Тьс Кь3bIn KETKeHЖагдайda | Розетдадан cybIPn, cankbldATU yuH IN ShAMAMEN 15-20 MInHTkaKaIyDpBbHbI3. |
| Курьлфыжumbs Ke3iHdeToKtan kaIdbi | Шamадан Tьс Кь3bIn KeTKeHЖагдайda | Ашады суврп, cankbldATU yuH IN ShAMAMEN 15-20 MInHTkaKaIyDpBbHbI3. |
| Курьлфынb Kyat Ke3iHKeIra KaIyHCOsBn, apanaCTbpyduIЖалгactbIPbHbI3. |
| Шamадан Тьс дipin | Он HIM Teric БетKE КolyIMarAH | Курьлфынb Teric Kepre КolyIMbI3. |
| ИнгroduNTter Kapelmi TbIM KeN. | ЕнделетIN ИнгroduNTterДINMeIsePirn a3aIbHbI3. |
| Abyln KeTy HemeceКaknaKtah TьСlcshbIFbIN KeTy | ИнгroduNTter Kapelmi TbIM KeN. | ЕнделетIN ИнгroduNTterДINMeIsePirn a3aIbHbI3. |
| КaknaKdДурьс КolyIMaFAN. | КaknaKtBu 6leHedр КolyCBHnAduPbC KoIbHbI3. |
| КaknaKtBu TьfBIsDAfBIsDuPbC KolyIMaFAN Hemece JozK. | ТьfBIsDAfBIsTbДурьс opHbHaNKoIbHbI3. |
| Биндер КутсынbInHастын abyln KeTy | Курьлфынс cdyb IteKiz6eTINKacneti .3aKbIMdaiFAN. | Пьшak YcTaFbIbHbINOpHbINdApDyIC KolyIMFaHbI XeHne Пьшak YcTaFbIbW/KyTbI apacbHdaFbIapaIbIKbTHOTbIKTaN TazaeKekHIe KEGKteKtIKH3.АKay Jcofamaca,TyBHyuSbInapra Kbl3MET KepceTeYBeJIIMHe xabapacbHbI3 (KeIIndikTanoHbIaRaBf GaiNaHbIcaknapaTbN KapaHbI3) |
| Акaynap | Себentерi | Шешимдер |
| Пышakтар озай
Бчрblмайды | Таfram Болikтерi ТьIM улков
Неме сьт IM каты. | Енданген Ингелядентердп
елшемин Неме мелшерд
азай Тьньз. |
| Дайындай akayы | Тамak жеткліktі дайындалмаган
Неме/cтамakшамадан Тьс
дайындалган | Пайдану укытсы Мен Кьздыр
туmarотурасьн валту ушin
КOLМEN baskaryфунцяскын
айданындыз |
| Тамakтубіне чьысьн калды | пайдану укытсы МEN Кьздыр
туmarотурасьн валту ушin
КOLМEN baskaryфунцяскын
айданындыз.Жени тазалay
нүскayларын калдыз |
If the device does not work properly, contact customer service for assistance.
| الإستعمال | الإستعمال | الإستعمال |
| الإستعمال:gفبعَبُّرْبُّلُّهُمُ نَزَلِلُّهُمُ | . .
.
.
.
.
.
.
.
.
.
.
.
.
.
.
.
.
.
.
.
.
.
.
.
.
.
.
.
.
.
.
.
.
.
.
.
.
.
.
.
.
.
.
.
.
.
.
.
.
.
.
.
.
.
.
.
.
.
.
.
.
.
.
.
.
.
.
.
.
.
.
.
.
.
.
.
.
.
.
.
.
.
.
.
.
.
.
.
.
.
.
.
.
.
.
.
.
.
.
.
.
-
.
.
.
.
.
.
.
.
.
.
.
.
.
.
.
.
.
.
.
.
.
.
.
.
.
.
.
.
.
.
.
.
.
.
.
.
.
.
.
.
.
.
.
.
.
.
.
.
.
.
.
.
.
.
.
.
.
.
.
.
.
.
.
.
.
.
.
.
.
.
.
.
.
.
.
.
.
.
.
.
.
.
.
.
.
.
.
.
.
.
.
.
.
.
.
.
.
.
.
?
.
.
.
.
.
.
.
.
.
.
.
.
.
.
.
.
.
.
.
.
.
.
.
.
.
.
.
.
.
.
.
.
.
.
.
.
.
.
.
.
.
.
.
.
.
.
.
.
.
.
.
.
.
.
.
.
.
.
.
.
.
.
.
.
.
.
.
.
.
.
.
.
.
.
.
.
.
.
.
.
.
.
.
.
.
.
.
.
.
.
.
.
.
.
.
.
.
.
.
g
g
g
g
g
g
g
g
g
g
g
g
g
g
g
g
g
g
g
g
g
g
g
g
g
g
g
g
g
g
g
g
g
g
g
g
g
g
g
g
g
g
g
g
g
g
g
g
g
g
g | |
| الإستعمال:الإستعمال:الإستعمال:الإستعمال:الإست莪
الإست莪:الإست莪:الإست莪:الretch
الإست莪:الإست莪:الretch
الإست莪:الretch
الإست莪:الretch
الretch:الretch
الretch:الretch
الretch:الretch
الretch:الretch
الretch:الretch
الretch:الretch
الretch:الretch
الretch:الretch
الretch:الretch
الretch:الretch
الretch:الretch
الretch:الretch
الretch:الretch
الretch:الretch
الretch:الretch
الretch:الretch
الretch:الretch | . .
.
.
.
.
.
.
.
.
.
.
.
.
.
.
.
.
.
.
.
.
.
.
.
.
.
.
.
.
.
.
.
.
.
.
.
.
.
.
.
.
.
.
.
.
.
.
.
.
.
.
.
.
.
.
.
.
.
.
.
.
.
.
.
.
.
.
.
.
.
.
.
.
.
.
.
.
.
.
.
.
.
.
.
.
.
.
.
.
.
.
.
.
.
.
.
.
g
g g
g g
g g
g g
g g
g g
g g
g g
g g
g g
g g
g g
g g
g g
g g
g g
g g
g g
g g
g g
g g
g g
g g
g g
g g
g g
g g
g g
g g
g g
g g
g g
g g
g g | |
| الإستعمال | الإستعمال | الإستعمال |
| الإستعمال | . . . . . . . . . . . . . . . . . . . . . . . . . . . . . . . . . . . . . . . . . . . . . . . . . . . . . . . . . . . . . . . . . . . . . . . . . . . . . . . . . . . . . . . . . . . . . . . . . . . . . .
.
.
.
.
.
.
.
.
.
.
.
.
.
.
.
.
.
.
.
.
.
.
.
.
.
.
.
.
.
.
.
.
.
.
.
.
.
.
.
.
.
.
.
.
.
.
.
.
.
.
.
.
.
.
.
.
.
.
.
.
.
.
.
.
.
.
.
.
.
.
.
.
.
.
.
.
.
.
.
.
.
.
.
.
.
.
.
.
.
.
.
.
.
.
.
.
.
.
.
.
?
.
.
.
.
.
.
.
.
.
.
.
.
.
.
.
.
.
.
.
.
.
.
.
.
.
.
.
.
.
.
.
.
.
.
.
.
.
.
.
.
.
.
.
.
.
.
.
.
.
.
.
.
.
.
.
.
.
.
.
.
.
.
.
.
.
.
.
.
.
.
.
.
.
.
.
.
.
.
.
.
.
.
.
.
.
.
.
.
.
.
.
.
.
.
.
.
.
.
.
-
.
.
.
.
.
.
.
.
.
.
.
.
.
.
.
.
.
.
.
.
.
.
.
.
.
.
.
.
.
.
.
.
.
.
.
.
.
.
.
.
.
.
.
.
.
.
.
.
.
.
.
.
.
.
.
.
.
.
.
.
.
.
.
.
.
.
.
.
.
.
.
.
.
.
.
.
.
.
.
.
.
.
.
.
.
.
.
.
.
.
.
.
.
.
.
.
.
.
.
;
.
.
.
.
.
.
.
.
.
.
.
.
.
.
.
.
.
.
.
.
.
.
.
.
.
.
.
.
.
.
.
.
.
.
.
.
.
.
.
.
.
.
.
.
.
.
.
.
.
.
.
.
.
.
.
.
.
.
.
.
.
.
.
.
.
.
.
.
.
.
.
.
.
.
.
.
.
.
.
.
.
.
.
.
.
.
.
.
.
.
.
.
.
.
.
.
.
.
.
•.
•
•
•
•
•
•
•
•
•
•
•
•
•
•
•
•
•
•
•
•
•
•
•
•
•
•
•
•
•
•
•
•
•
•
•
•
•
•
•
•
•
•
•
•
•
•
•
•
•
•
• | |
| الإستعمال
الإستعمال
الإستعمال
الإست莪
الإست莪
ال失落
ال失落
ال失落
ال失落
ال失落
ال失落
ال失落
ال失落
ال失落
ال失落
ال失落
ال失落
ال失落
ال失落
ال失落
ال失落
ال失落
ال失落
ال失落
ال失落
ال失落
ال失落
ال失落
ال失落
ال失落
ال失落
ال失落
ال失落
ال失落
ال失落
ال失落
ال失落
ال失落
ال失落 | . . . . . . . . . . . . . . . . . . . . . . . . . . . . . . . . . . . . . . . . . . . . . . . . . . . . . . . . . . . . . . . . . . . . . . . . . . . . . . . . . . . . . . . . . . . . . . . . . . .
. . . . . . . . . . . . . . . . . . . . . . . . . . . . . . . . . . . . . . . . . . . . . . . . . . . . . . . . . . . . . . . . . . . . . . . . . . . . . . . . . . . . . . . . . . . . . . . . . . . .
. .
. .
. .
.
.
.
.
.
.
.
.
.
.
.
.
.
.
.
.
.
.
.
.
.
.
.
.
.
.
.
.
.
.
.
.
.
.
.
.
.
.
.
.
.
.
.
.
.
.
.
.
.
.
.
.
.
.
.
.
.
.
.
.
.
.
.
.
.
.
.
.
.
.
.
.
.
.
.
.
.
.
.
.
.
.
.
.
.
.
.
.
.
.
.
.
.
.
.
.
.
.
•
•
•
•
•
•
•
•
•
•
•
•
•
•
•
•
•
•
•
•
•
•
•
•
•
•
•
•
•
•
•
•
•
•
•
•
•
•
•
•
•
•
•
•
•
•
•
•
•
- | |
| الإستعمال
الإست莪
الإست莪
ال失落
ال失落
ال失落
ال失落
ال失落
ال失落
ال失落
ال失落
ال失落
ال失落
ال失落
ال失落
ال失落
ال失落
ال失落
ال失落
ال失落
ال失落
ال失落
ال失落
ال失落
ال失落
ال失落
ال失落
ال失落
ال失落
ال失落
ال失落
ال失落
- | | |
| •
•
•
•
•
•
•
•
•
•
•
•
•
•
•
•
•
•
•
•
•
•
•
•
•
•
•
•
•
•
•
•
•
•
•
•
•
•
•
•
•
•
•
•
•
•
•
•
•
• | | |
Jaa/1 Jaa/2 a 10
jzjj.aaai jiaai bciy
Jus Jus Jus
bllll lalj! 12j 1kLg. aJg0 1jI5 jglz
:0gJl
jbeol,jzaiill.uyioo1g aoo jgao
Jz
go bdo jaoa oio aiao joi jgjg
- jg3 0a Jj aaii Jj aai
10g 3 UgSbI a o:Jy
3 500
3 1500 yall sbg 20
jj bfaal jraai .elbaell g Jbbr
juaa . juaol . juaal / juaa
JL 100

s²+1

L 1 a L 2 c L3 d
Therefore, a + b = 3
a 65
pIeill 50 abaa 3 Jd 12 aed 6
:J
Jolgul joojwul Jolwll
jglg jjgl golglg jglg glalgl
aogll a jj lssll adi j
a5 a 100
ploab 300g gbl aolw l xuwl jia
:

Pulse
∴ S ΔAPQ = S ΔPQR + SΔPQR
| Dessert | (العربية) | (العربية) |
| (العربية) | (العربية) |
| (العربية) | (العربية) |
| (العربية) | (العربية) |
| (العربية) | (العربية) |
| (العربية) | (العربية) |
| (العربية) | (العربية) |
| (العربية) | (الulg)
(العربية) |
| (العربية) | (العربية) |
| (العربية) | (العربية) |
| (العربية) | (العربية) |
| (العربية) | (العربية) |
| (العربية) | (العربية) |
| (العربية) | (العربية) |
| (العربية) |
| (العربية) |
| (العربية) |
| (العربية) |
| (العربية) |
| (العربية) |
| (العربية) |
| (العربية) |
| (العربية) |
| (العربية) |
| |
a a a a a a a a a a a a a a a a a a a a a a a a a
yduaill 1uabui jz.2.1
| العال晗 |
| smoothesoup | sws600,sws600,sws600,sws600,sws600,sws600,sws600,sws600,sws600,sws600,sws600,sws600,sws600,sws600,sws600,sws600,sws600,sws65 | sws600,sws600,sws600,sws600,sws600,sws600,sws600,sws600,sws600,sws600,sws600,sws600,sws600,sws600,sws600,sws600,sws80,sws80,sws80,sws80,sws80,sws80,sws80,sws80,sws80,sws80,sws80,sws80,sws80,sws80,sws80,sws80,sws80,sws80,sws80,sws80,sws65 |
| Chunky soup | btsjzbsjzbsjzbsjzbsjzbsjzbsjzbsjzbsjzbsjzbsjzbsjzbsjzbsjzbsjzbsjzbsjzbsjzbsjzbsjzbsjzbsjzbsjzbsjzbsjzbsjzbsjzbsjzbsjzbsjzbsjzbsjzbsjzbsjzbs jzbsjzbsjzbsjzbsjzbsjzbsjzbsjzbsjzbsjzbsjzbsjzbsjzbsjzbsjzbsjzbsjzbsjzbsjzbsjzbsjzbsjzbsjzbsjzbsjzbsjzbsjzbsjzbsjzbsjzbsjzbsjzbsjzbsj2 | sws600,sws600,sws600,sws600,sws600,sws600,sws600,sws600,sws600,sws600,sws600,sws600,sws600,sws600,sws600,sws600,sws300,sws100,sws100,sws700,sws700 |
| Stir | | |
Therefore, the area of triangle OBC is 1/2 * OB * BC = 1/2 * CD * 5.
Therefore, cos theta = 1/2, sin theta = sqrt(5)/2, sin theta = 2 cos theta = 2 sin theta = sqrt(5)/2.
45 45 45 45 45 45 45 45
4
.
Sulj g jg jy jy Sdy 1 j5 bglao
.0g 000
j5d0o1l CIOJ 6do1xOg
suluulus
15 150
0.8g 0 g 0g 0g 0g 0g 0g 0g 0g
10g CwJ 10s J5 J6 J5 bgs
.
jolalai jI J. cW oLs wJ gBgbl aI clal:bl 1 JiS GJ iJ LJI. dJgCd JI J I J I J I J I J I J I J I J I J I J I J I J I J
J (D) g g g g g g g g g g g g g g g g g g g g g g g g g g g g g g g g g
jgl jgl jgl o5w j10laow j1
dsj jaleba oolw jolalaw jolglj l
Therefore, the area of triangle ACD equals the area of triangle COD plus the area of triangle BDO.