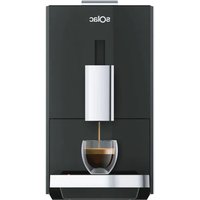
CA4810 - Coffee machine SOLAC - Free user manual and instructions
Find the device manual for free CA4810 SOLAC in PDF.
User questions about CA4810 SOLAC
0 question about this device. Answer the ones you know or ask your own.
Ask a new question about this device
Download the instructions for your Coffee machine in PDF format for free! Find your manual CA4810 - SOLAC and take your electronic device back in hand. On this page are published all the documents necessary for the use of your device. CA4810 by SOLAC.
USER MANUAL CA4810 SOLAC
INHCTPYKLJNA 3A YNOTPEBA
aSloogjI oggell aziio
jouy
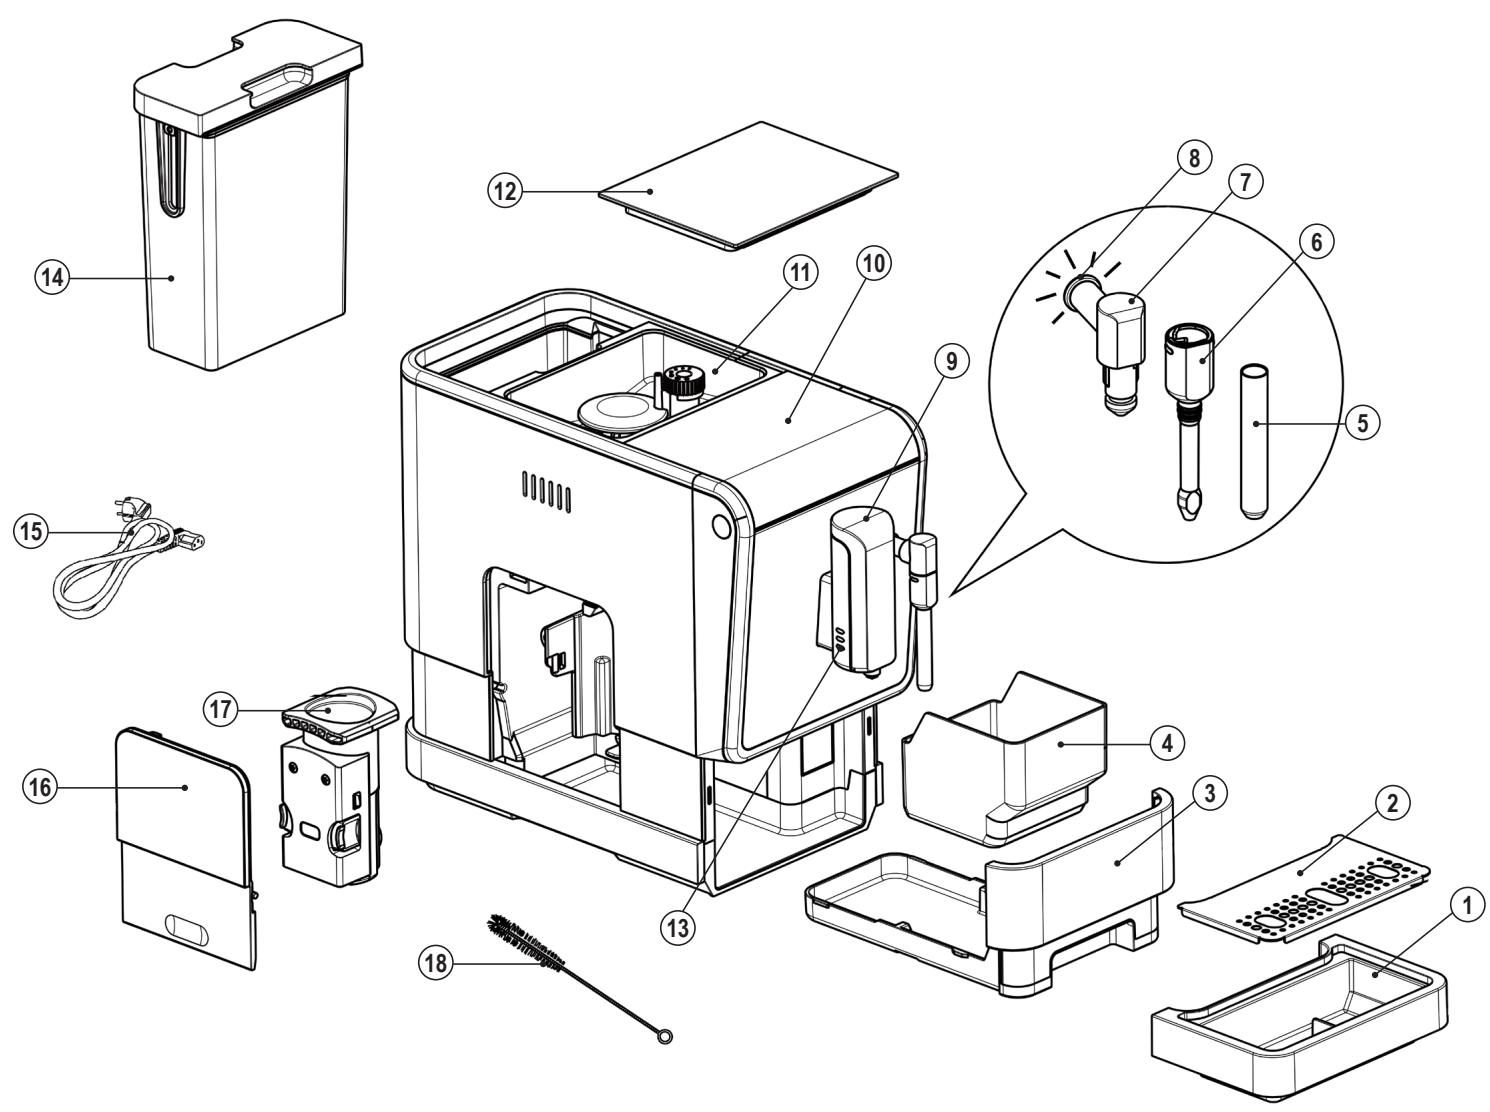
Fig.1
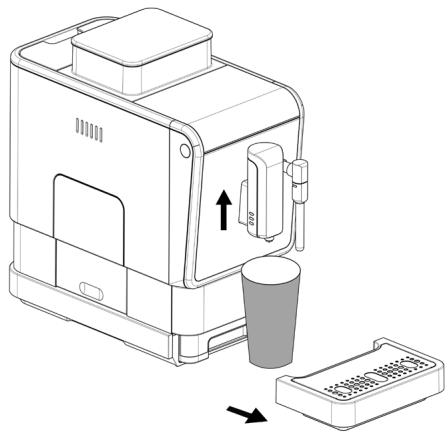
Fig.4
Fig.5
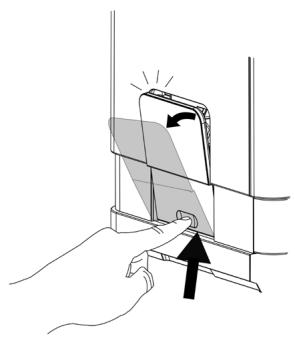
Fig.2
Fig.3

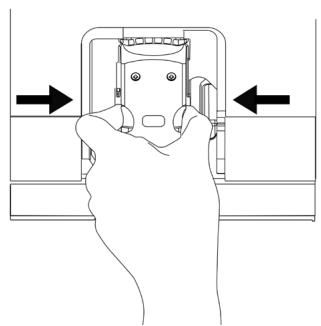
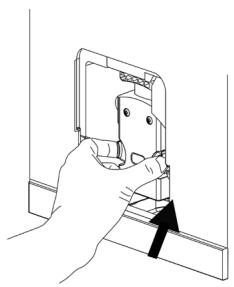
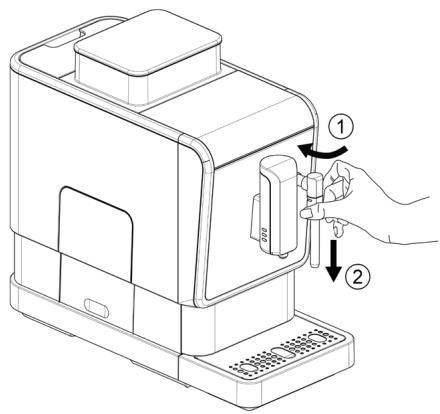
Fig.6
Fig.7
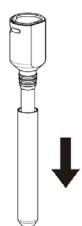
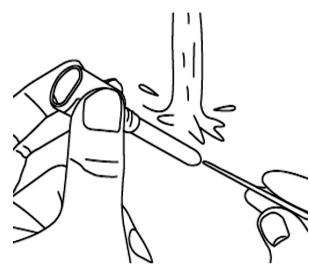
Fig.8
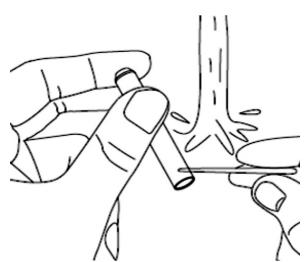
Fig.9
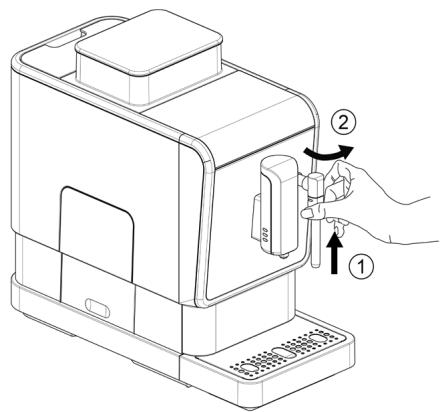
Fig.10
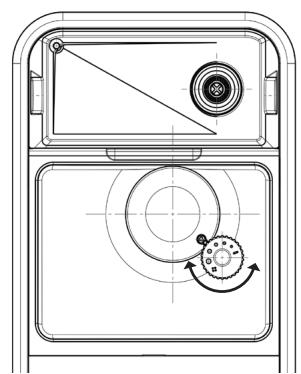
Fig.11
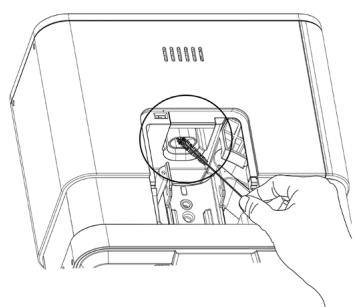
Fig.12
Cafeteria automática CA4810
- Do not use the appliance if its accessories are not properly fitted.
- Do not switch the appliance on without water.
- Do not use the appliance if the on/off switch does not work.
- Do not move the appliance while in use.
- Respect the MAX level
- Disconnect the appliance from the mains when not in use and before undertaking any cleaning task.
- Unplug the appliance from the mains before refilling the water tank.
- Store this appliance out of reach of children and/or persons with physical, sensory or reduced mental or lack of experience and knowledge.
- Do not store the appliance if it is still hot.
- Only use water with the appliance.
- The use of bottled mineral water adapted for human consumption is recommended.
- Never leave the appliance connected and unattended if is not in use. This saves energy and prolongs the life of the appliance.
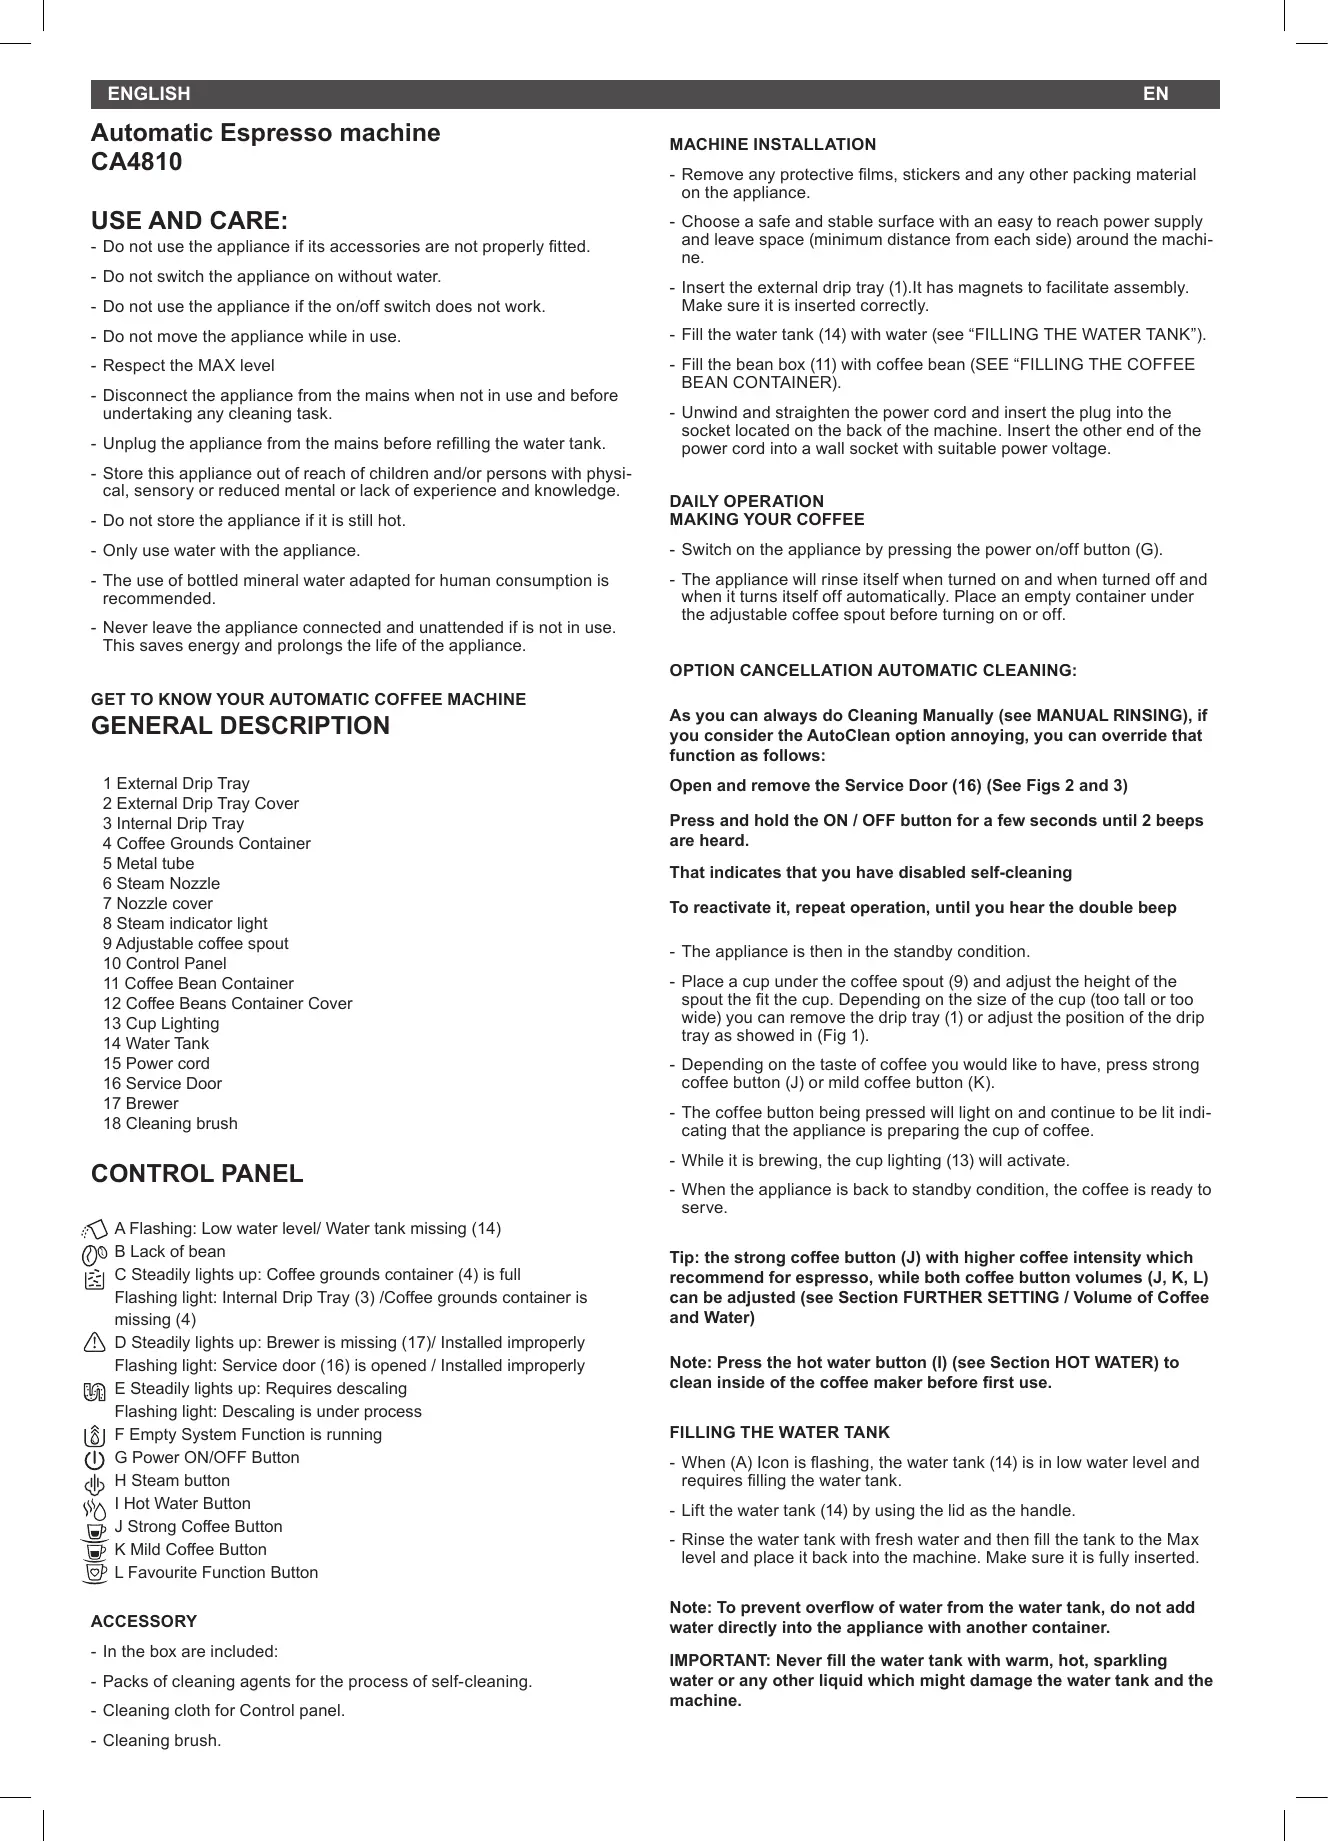
GET TO KNOW YOUR AUTOMATIC COFFEE MACHINE GENERAL DESCRIPTION
1 External Drip Tray
2 External Drip Tray Cover
3 Internal Drip Tray
4 Coffee Grounds Container
5 Metal tube
6 Steam Nozzle
7 Nozzle cover
8 Steam indicator light
9 Adjustable coffee spout
10 Control Panel
11 Coffee Bean Container
12 Coffee Beans Container Cover
13 Cup Lighting
14 Water Tank
15 Power cord
16 Service Door
17 Brewer
18 Cleaning brush
CONTROL PANEL
A Flashing: Low water level/ Water tank missing (14)
B Lack of bean
C Steadily lights up: Coffee grounds container (4) is full Flashing light: Internal Drip Tray (3) /Coffee grounds container is missing (4)
D Steadily lights up: Brewer is missing (17)/ Installed improperly Flashing light: Service door (16) is opened / Installed improperly
E Steadily lights up: Requires descending Flashing light: Descaling is under process
F Empty System Function is running
(I) G Power ON/OFF Button
H Steam button
I Hot Water Button
J Strong Coffee Button
K Mild Coffee Button
L Favourite Function Button
ACCESSION
- In the box are included:
- Packs of cleaning agents for the process of self-cleaning.
- Cleaning cloth for Control panel.
- Cleaning brush.
MACHINE INSTALLATION
- Remove any protective films, stickers and any other packing material on the appliance.
- Choose a safe and stable surface with an easy to reach power supply and leave space (minimum distance from each side) around the machine.
- Insert the external drip tray (1).It has magnets to facilitate assembly. Make sure it is inserted correctly.
- Fill the water tank (14) with water (see "FILLING THE WATER TANK").
- Fill the bean box (11) with coffee bean (SEE "FILLING THE COFFEE BEAN CONTAINER).
- Unwind and straighten the power cord and insert the plug into the socket located on the back of the machine. Insert the other end of the power cord into a wall socket with suitable power voltage.
- Switch on the appliance by pressing the power on/off button (G).
- The appliance will rinse itself when turned on and when turned off and when it turns itself off automatically. Place an empty container under the adjustable coffee spout before turning on or off.
OPTION CANCELLATION AUTOMATIC CLEANING:
As you can always do Cleaning Manually (see MANUAL RINSING), if you consider the AutoClean option annoying, you can override that function as follows:
Open and remove the Service Door (16) (See Figs 2 and 3)
Press and hold the ON / OFF button for a few seconds until 2 beeps are heard.
That indicates that you have disabled self-cleaning
To reactivate it, repeat operation, until you hear the double beep
- The appliance is then in the standby condition.
- Place a cup under the coffee spout (9) and adjust the height of the spout the fit the cup. Depending on the size of the cup (too tall or too wide) you can remove the drip tray (1) or adjust the position of the drip tray as showed in (Fig 1).
- Depending on the taste of coffee you would like to have, press strong coffee button (J) or mild coffee button (K).
- The coffee button being pressed will light on and continue to be lit indicating that the appliance is preparing the cup of coffee.
- While it is brewing, the cup lighting (13) will activate.
- When the appliance is back to standby condition, the coffee is ready to serve.
Tip: the strong coffee button (J) with higher coffee intensity which recommend for espresso, while both coffee button volumes (J, K, L) can be adjusted (see Section FURTHER SETTING / Volume of Coffee and Water)
Note: Press the hot water button (I) (see Section HOT WATER) to clean inside of the coffee maker before first use.
FILLING THE WATER TANK
- When (A) Icon is flashing, the water tank (14) is in low water level and requires filling the water tank.
- Lift the water tank (14) by using the lid as the handle.
- Rinse the water tank with fresh water and then fill the tank to the Max level and place it back into the machine. Make sure it is fully inserted.
Note: To prevent overflow of water from the water tank, do not add water directly into the appliance with another container.
IMPORTANT: Never fill the water tank with warm, hot, sparkling water or any other liquid which might damage the water tank and the machine.
FILLING THE BEAN CONTAINER
- When (B) Icon is flashing, the appliance needs to be filled with coffee bean:
- Remove the bean container lid (12)
- Slowly pour in the coffee beans.
- Install back the container lid (12)
IMPORTANT: Fill the coffee bean container (11) with coffee beans only. Grounded coffee, instant coffee, caramelized coffee and any other objects may damage the machine.
PREPARING FROTHY MILK FOR COFFEE
- Since the temperature of steam is higher than the temperature of espresso, so coffee should be prepared before making frothy milk; otherwise the espresso might be burnt.
- Prepare the coffee with large cup.
- Turn the steam nozzle toward (6) to the Drip tray (1).
- Press the steam button (H). Steam indicator light (8) will flash. Then the appliance is heating up and draining the residual water into the Drip Tray or another container.
- After the steam indicator light (8) stop flashing and stay on, place a container with milk under the steam nozzle and immerse the steam nozzle about 5 cm deep into the container.
- Press the steam button (H) again.
- Swivel the container while the hot steam comes out.
- When the milk is hot enough with froth appeared. Then press again the steam button to stop the steam.
- Use a wet towel to clean the nozzle cover and metal tube. (Refer to "DAILY CLEANING OF THE APPLIANCE").
- Pour the hot frothy milk into the coffee.
- Now you can enjoy your coffee.
HOT WATER
- The appliance can dispense hot water by simply pressing the hot water button (I). The hot water button (I) and the illumination (8) will lights up indicates that the appliance is heating up the water. When the hot water button and the illumination turn off, the water is ready to serve.
FAVOURITE FUNCTION
- You can use the Favorite function to memorize an additional volume selection for soft coffee, strong coffee or American coffee (Additional to only one of the three).
SET UP THE FAVORITE COFFEE SETTING
a) Press and hold the Favorite button (L) for 2 seconds, then the mild coffee (K), strong coffee (J), and hot water button (I) will flash and you can select any one to memorize the volume.
b) When you select either strong espresso, mild espresso or hot water. You will see the drinks come out, and then you can press and immediately hold to keep dispensing the drinks and stop it by release the button. After that the volume will be memorized.
USING THE FAVORITE FUNCTION
- Once the Favorite function is programmed, just press the Favorite Function button (L), and the memorized drink will come out.
DAILY CLEANING OF THE APPLIANCE
- Timely cleaning and maintenance of the appliance is very important in prolonging the life of the appliance.
CLEANING BREWING UNIT (17)
- Remove the external drip tray (1).
- Empty the water inside the drip tray in the sink and wash it with fresh water. Dry it afterwards.
- Slides open the internal drip tray (3) and the coffee grounds container (4).
- Empty the coffee grounds container and wash it with fresh water. Dry it afterwards.
Note: When the icon (C) lights up, the coffee grounds container needs to be empty.
- Pull down the service door (Fig 2).
- Remove the service door (16) (Fig 3).
- Press the release (Orange) knobs of Brewing group (17) (Fig 4).
- Remove the brewer (17) (Fig 5).
- Wash the brewer with fresh water. Dry the brewer afterwards.
- Insert back the brewer (17) to its original position and install back the service door (16) its original position.
Note: When Icon (D) lights up stably, it indicates that the brewer (17) is missing / installed improperly. When Icon (D) is flashing, it indicates that the service door (16) is missing/ installed improperly.
- Place the coffee grounds container (4) on the internal drip tray (3) and insert back into its original position.
Note: When Icon (C) is flashing, the coffee grounds container (4) is missing.
- Place the external drip tray (1) at its original position.
CLEANING STEAM NOZZLE (5-6-7)
- Unlock the nozzle cover (6) by turning it to left (Sometimes you may need a pliers type tool). Then pull it downward to remove (Fig 6).
- Pull the metal tube (5) downward to dis-assemble the nozzle cover and metal tube (Fig 7).
- Wash the nozzle cover (6) with warm running water and use needle or bristle of brush to clean the hole (Fig 8).
- Wash the metal tube (5) with warm running water and use needle or bristle of brush to clean the hole (Fig 9).
- Replace the metal tube (5) back to the nozzle cover (6). Then push upward to place the nozzle cover (7) back. And turn it to right to lock it (Fig 10).
- Switch off the appliance by pressing the power on/off button (G).
AUTO-SHUT OFF
- The Appliance is equipped with auto-shut off. Depending on the mode you have selected the appliance will have different auto-shut off timing (See MODE SELECTION).
FURTHER SETTING
ADJUSTIING THE VOLUME OF YOUR COFFEE/HOT WATER
- You can memorize your desired volume of coffee for both strong coffee and mild coffee and also the hot water from 25ml to 250ml.
- When making your coffee (either strong coffee (J) or mild coffee (K) or dispensing hot water (I), press and immediately hold the button you selected. The appliance will continue to make the cup of coffee.
- When the volume of coffee meets your desired volume, release the button. Two beep sounds will be heard indicates that the volume of coffee is being memorized.
GRINDING ADJUSTMENT (FIG 11)
- You can adjust the grinder to suit the roast of your coffee by turning adjuster knob in the bean container (Fig 11):
- To adjust the grind size, you can turn the adjustment knob, ALWAYS while the grinder is grinding the coffee.
CAUTION: Never do the grinding adjustment when the grinder is not operating. It may damage the grinder.
- The dots on the adjuster knob indicate the fineness of the grind.
MODE SELECTION
- The machine has two different settings: default setting, ECO mode and
speed mode. In ECO mode, the appliance helps to save more energy. In speed mode, the user can make their coffee faster than in default setting.
- Below you will see a chart with the active functions of each Mode.
| ECO Mode | Speed Mode | Default Setting | |
| Illumination Light | No | Yes | Yes |
| Pre-brewing* | Yes | No | Yes |
| Auto shut off time | 10mins | 30mins | 20mins |
| Cup Volume memory | Yes | Yes | Yes |
*Note: The pre-brewing function moistens the grounded beans in the brewer with a small amount of water before full extraction. This expands the coffee grounds to build up a greater pressure in the brewer which helps extraction of all the oils and full flavor from the grounded beans.
TO SELECT THE DESIRED MODE:
- When the machine is in standby condition, press and holds the ON/OFF Button (G) for 5 seconds, so it (G) will begin to flash. Then release and pass to the next point
- The Icon ON/OFF (G) will then be flashing and the following button will have the following indications
- To know which mode it is in, the table below indicates what is shown in the different settings:
| Hot water button (I) | Strong coffee button (J) | Mild coffee button (K) | |
| In ECO Mode | Lights ON | Flashing | Flashing |
| In Speed Mode | Flashing | Lights ON | Flashing |
| In Default Setting | Flashing | Flashing | Lights On |
- To change the MODE, press the hot water button (I) for ECO mode, strong espresso button (J) for speed mode and mild espresso button (L) for default setting. Two Beep sound will be heard indicates that the mode is being selected. (Note: If you are pressing the relative lights on button for each mode, the machine will not response).
- If you would like to remain the setting unchanged, press ON/OFF button (G again or wait for 5 seconds for the machine to return to the standby condition.
CLEANING & MAINTENANCE
SELF-CLEANING
- When icon (E) is flashing, it indicates that the appliance needs to undergo self-cleaning. The appliance will remain in the best condition if this function is performed at least once a month or more regularly depending on the hardness of water used. It is also suggested:
- Fully fill the water tank (14).
- Adding one pack of cleaning agent included in the box to the water tank.
IMPORTANT: Do not use vinegar or other cleaning agent to do self-cleaning of this appliance. The cleaning agent might damage the appliance.
- Plug in the appliance.
- Place a sufficient large container under the coffee spout.
- In standby condition, press and hold ON/OFF Button (G) and strong coffee button (J) at the same time, for 5 seconds. A beep sound will be heard with Icon (E) and strong coffee button (J) will be flashing.
- Press strong coffee button (J) to confirm undergoing the self-cleaning process. To resume back to the standby condition, press ON/OFF button (G).
- Icon (E) will be flashing indicates that the appliance is undergoing the
self-cleaning process. (Caution: Keep skin/body away from the hot water.)
- When all the water in the water tank is being dispensed out, Icon (A) (Low water level) and strong coffee button (J) will be flashing. Remove all the remaining solution in the water tank (14) and fill the tank with normal tap water until the MAX position. When water is filled into the water tank, Icon (A) will goes off. Then the appliance will continue the descending process, the appliance will brew half of water tank first and then waiting for around 1min, after that will brew the outstanding water from the water tank.
- When the self-cleaning process is completed, the appliance will switch off automatically.
Note: To ensure the descending process can be completed, please be patient during the process and make sure the applicant switch off automatically.
EMPTY SYSTEM FUNCTION
- The empty system function is recommended to be used before long period of non-use, frost protection and before talking to repair agent.
- In standby condition, press and hold the ON/OFF button (G) and mild coffee button (K) together for 5 seconds.
- Empty System Icon (F) will then be flashing.
- Remove the water tank from the appliance. Icon (F) will light up stably indicates that the empty system is under process. You can press ON/OFF Button (G) before removing the water tank (14) to resume back to the standby condition.
- When the empty system function is completed, the appliance will switch off automatically.
Important: After perform EMPTY SYSYEM FUNCTION; when you use the coffee machine again, press the hot water button (l) until water can come out from spout (5) when the coffee maker is reused again.
MANUAL RINSING
- You can perform a manual rinsing cycle to clean the coffee nozzle after use. It is also suggested to perform a manual rinsing if the appliance has not been used for a long period of time.
- In standby condition, press and hold the ON/OFF Button (G) and hot water button (I) together.
- The hot water button(I), strong coffee button (J) and mild coffee button (K) will then goes off. The coffee nozzle (9) will then dispense a small amount of water which is used for the rinsing.
Danger: Water comes out of the coffee nozzle is hot and is collected in the drip tray underneath. Avoid contact with splashes of water.
- After rinsing, the appliance will return to the standby condition.
CLEANING THE APPLIANCE
- Disconnect the power cord (15) from the main power outlet.
- Empty all the water in the internal (3) and external drip tray (1)
- Use a damped cloth or non-scratching cleaner to clean the water stains on the appliance.
IMPORTANT: Never use any abrasive, vinegar or descaling agents not included in the box to clean the appliance.
CLEANING COFFEE POWDER OUTLET
- Coffee grounds may stick on the wall of ground outlet of appliance, on the way to Brewing unit (17), after an extended period of use. It is suggested to clean the outlet by following steps to ensure that coffee grounds can make it to the brewer.
- Push the service door recess area (Fig 2)
- Take out the service door (Fig 3)
- Press the release knob of brewer (Fig 4)
- Take the brewing unit out (Fig 5)
- Use Cleanness Brush (18) to clean the powder outlet (Fig 12)
TROUBLESHOOTING
| PROBLEM | CAUSE | SOLUTION |
| The appliance does not work. | The appliance is not connected to the mains. | Plug in and press the switch. Check the cable and the Plug |
| No or delayed response in several trials of pressing on function key on the panel | Appliance is under an electromagnetic interference Dirt over the panel | Unplug the appliance. Restart after fewminutes Clean the panel with the cloth provided |
| The coffee is not hot enough. | The cups have not been preheated. The brewing unit is too cold. | Rinse the appliance at least 3 times before making the coffee. |
| The coffee cannot come out from spout. | Empty system function maybe used before. | Press the hot water button until water can come out from spout. |
| The first cup of coffee is poor quality. | The first run of grinder does not pour sufficient quantity coffee power into the brewing unit. | Throw the coffee away. The other coffees will always be of good quality. |
| Coffee has no cream. | Coffee bean is not fresh. | Change or using appropriate brand of coffee bean. |
| The touch buttons are not sensitive | Not pressing the touch button from the front direction of the appliance | Press the lower bottom part of the icon of the touch button from the front direction of the appliance. |
| The appliance takes too long time to warm up. | Excessive scale has built up. | Descale the appliance. |
| The water tank is removed / the water level is very low in the water tank but Icon (A) have no alert. | The area near the water tank connector is wet. | Wipe the water around the water tank connector |
| Internal drip tray is filled with a lot of water. | Coffee powder too fine which block the water to come out. | Adjust the coffee fineness to bigger dot during grinder operation. |
| Coffee is delivered too slowly or a drop at a time. | Coffee powder too fine which block the water to come out. | Adjust the coffee fineness to bigger dot during grinder operation. |
| Lack of bean indicator (B) flashes but there is still a lot of coffee bean inside the container (11). | Internal coffee powder outlet is blocked. | To follow the steps of section (Cleaning coffee powder outlet). |
| Milk foam cannot be recreated by steam nozzle | The nozzle is dirty and hole on nozzle cover (6) or metal tube (5) was blocked by milk residual | To follow the steps of section (DAILY CLEANING OF THE APPLIANCE) to clean steam nozzle |
ALGEMENE PRODUCTBESCHRIJVING
This product enjoys the recognition and protection of the legal guarantee in accordance with current legislation. To enforce your rights or interests you must go to any of our official technical assistance services.
You can find the closest one by accessing the following web link: http:// solac.com
You can also request related information by contacting us by phone.
You can download this instruction manual and its updates at http://solac.com
DE) GARANTIE UND TECHNISCHER SERVICE
Unit 25 & 26, San Croy Office Park, Die Agora Road, Croydon,
Kempton Park, 1619
Johannesburg
(+27) 0113925652


Espanol / ES
English / EN
Français / FR
Deutsch / DE
Portugues / PT
Italiano / IT
Nederlandsl/NL
6bIrapck/BG
品 一 一 一 一 一 一 一 一 一 一 一 一 /AR