
DKB5660HM - Built-in oven AEG - Free user manual and instructions
Find the device manual for free DKB5660HM AEG in PDF.
 FR
FR
 BG
BG
 CS
CS
 DA
DA
 DE
DE
 EL
EL
 EN
EN
 ES
ES
 ET
ET
 FI
FI
 HU
HU
 IT
IT
 KK
KK
 LT
LT
 LV
LV
 MK
MK
 NL
NL
 NO
NO
 PL
PL
 PT
PT
 RO
RO
 RU
RU
 SK
SK
 SL
SL
 SQ
SQ
 SR
SR
 SV
SV
 TR
TR
 UK
UK
| Product type | Built-in extractor hood |
| Brand | AEG |
| Model | DKB5660HM |
| Power supply | 220-240 V ~ 50 Hz |
| Suction power | 4 speeds (including timed speed 4 for 5 min) |
| Special function | Breeze function (ambient ventilation 60 min), Hob²Hood (wireless connection with hob) |
| Lighting | LED, do not look directly |
| Grease filter | Dishwasher safe, monthly cleaning |
| Charcoal filter | Type 20 LONG LIFE (washable) or type 15 (non-washable, replace every 4 months) |
| Filter saturation indicator | Yes, key 7: steady for grease, flashing for charcoal |
| Minimum safety distance | 50 cm (electric hob) / 65 cm (gas or mixed hob) |
| Installation | External extraction or internal recirculation |
| Maintenance | Monthly cleaning of the exterior with a damp cloth and neutral detergent |
| Control panel | Touch controls: ON/OFF, speeds 1-4, Breeze, lighting, filter saturation |
| Panel lock | Yes, key 1 in standby |
| Energy consumption | LED lighting: 90% energy saving |
| Spare parts | Use only AEG original parts |
| Repairability | AEG after-sales service, replace lamps by an approved center |
Frequently Asked Questions - DKB5660HM AEG
User questions about DKB5660HM AEG
0 question about this device. Answer the ones you know or ask your own.
Ask a new question about this device
Download the instructions for your Built-in oven in PDF format for free! Find your manual DKB5660HM - AEG and take your electronic device back in hand. On this page are published all the documents necessary for the use of your device. DKB5660HM by AEG.
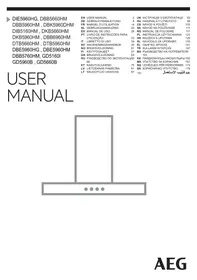
USER MANUAL DKB5660HM AEG
DIE5960HG, DBB5660HM DBB5960HM, DBK5960DHM DIB5160HM, DKB5660HM DKB5960HM, DBB6960HM DTB5660HM, DTB5960HM DBE5960HG, DBE5960HM DBB5760HM, GD5160I GD5960B, GD5660B
EN USER MANUAL 2 UK INSTRUCTIONS FOR USE 93 DE GEBRAUCHSANLEITUNG 8 HU HASZNÁLATI ÚTMUTATÓ 99 FR MANUEL D'UTILISATION 14 CS NÁVOD K POUŽITÍ 105 NL GEBRUIKSAANWIJZING 20 SK NÁVOD NA POUŽÍVANIE 111 ES MANUAL DE USO 26 RO MANUAL DE FOLOSIRE 117 PT LIVRO DE INSTRUÇÕES PARA UTILIZAÇÃO 32 HR KNJIŽICA S UPUTAMA 129 IT LIBRETTO DI USO 35 SL NAVODILO ZA UPORABO 135 SV ANVÄNDNINGSHANDBOK 45 EL ΟΔΗΓΙΕΣ ΧΡΗΣΗΣ 140 NO BRUKSVEILEDNING 51 TR KULLANIM KİTAPÇIĞI 147 FI KÄYTTÖOHJEET 57 BG РЪКОВОДСТВО ЗА ПОТРЕБИТЕЛЯ 63 DA BRUGSVEJLEDNING 153 RU РУКОВОДСТВО ПО ЭКСПЛУАТАЦИИ 69 MK УПАТСТВО ЗА КОРИСНИК 167 ET KASUTUSJUHEND 75 SQ UDHËZUES PËR PËRDORIMIN 173 LV LIETOŠANAS PAMĀCĪBA 81 SR УПУТСТВО ЗА КОРИСНИК 179 LT NAUDOTOJO VADOVAS 87 191
USER MANUAL
FOR PERFECT RESULTS
Thank you for choosing this AEG product. We have created it to give you impeccable performance for many years, with innovative technologies that help make life simpler – features you might not find on ordinary appliances. Please spend a few minutes reading to get the very best from it.
Visit our website to:

Get usage advice, brochures, trouble shooter, service information:
www.aeg.com

Register your product for better service:
www.aeg.com/productregistration

Buy Accessories, Consumables and Original spare parts for your appliance:
www.aeg.com/shop
ENVIRONMENT CONCERNS
Recycle the materials with the symbol . Put the packaging in applicable containers to recycle it. Help protect the environment and human health and to recycle waste of electrical and electronic appliances. Do not dispose appliances marked with the symbol with the household waste. Return the product to your local recycling facility or contact your municipal office department for household waste or the shop where you purchased this product.
CUSTOMER CARE AND SERVICE
We recommend the use of original spare parts.
When contacting Service, ensure that you have the following data available.
The information can be found on the rating plate. Model, PNC, Serial Number.
Warning / Caution-Safety information.
Subject to change without notice.
SAFETY INFORMATION
Before any cleaning or maintenance operation, disconnect hood from the mains by removing the plug or disconnecting the mains electrical supply. Always wear work gloves for all installation and maintenance operations. This appliance can be used by children aged from 8 years and above and persons with reduced physical, sensory or mental capabilities or lack of experience and knowledge if they have been given supervision or instruction concerning use of the appliance in a safe way and understand the hazards involved. Children shall not be allowed to tamper with the controls or play with the appliance. Cleaning and user maintenance shall not be made by children without supervision. The premises where the appliance is installed must be sufficiently ventilated, when the kitchen hood is used together with other gas
combustion devices or other fuels. The hood must be regularly cleaned on both the inside and outside (AT LEAST ONCE A MONTH). This must be completed in accordance with the maintenance instructions provided in this manual. Failure to follow the instructions provided in this user guide regarding the cleaning of the hood and filters will lead to the risk of fires. The flaming of foods beneath the hood itself is severely prohibited.
1.SAFETY INSTRUCTIONS
The use of exposed flames is detrimental to the filters and may cause a fire risk, and must therefore be avoided in all circumstances.
Any frying must be done with care in order to make sure that the oil does not overheat and ignite.

CAUTION: Accessible parts of the
hood may become hot when used with cooking appliances.
For lamp replacement use only lamp type indicated in the Maintenance/Replacing lamps section of this manual.

WARNING! Do not connect the
Do not connect the appliance to the mains until the installation is fully complete.
With regard to the technical and safety measures to be adopted for fume discharging, it is important to closely follow the regulations provided by the local authorities.
The ducting system for this appliance must not be connected to any existing ventilation system which is being used for any other purpose, such as discharging exhaust fumes from appliances burning gas or other fuels. Do not use or leave the hood without the lamp correctly mounted due to the possible risk of electric shocks.
Never use the hood without effectively mounted grids.
The hood must NEVER be used as a support surface unless specifically indicated.
Use only the fixing screws supplied with the product for installation or, if not supplied, purchase the correct screw type.
Use the correct length for the screws which are identified in the Installation Guide.
In case of doubt, consult an authorized service assistance center or similar qualified person.

WARNING! Failure to install the screws or fixing device in accordance with these instructions may result in electrical hazards.
2. USE
The hood serves to aspirate the fumes and vapors resulting from cooking.
The attached installation manual indicates the version to be used depending on the model you have, the suction version with
external evacuation or filtering with internal recirculation
3. INSTALLATION
The mains power supply must correspond to the rating indicated on the plate situated inside the hood. If provided with a plug, connect the hood to a socket in compliance with current regulations and positioned in an accessible area, after installation. If it is not fitted with a plug (direct mains connection) or if the plug is not located in an accessible area, after installation, apply a double pole switch in accordance with standards which assures the complete disconnection of the mains under conditions relating to over-current category III in accordance with installation instructions.
Warning! Before re-connecting the hood circuit to the mains supply and checking the efficient function, always check that the mains cable is correctly assembled.
The minimum distance between the supporting surface for the cooking equipment on the hob and the lowest part of the range hood must be not less than 50cm from electric cookers and 65cm from gas or mixed cookers. If the instructions for installation for the gas hob specify a greater distance, this must be adhered to.
4. MAINTENANCE
ATTENTION! Before performing any maintenance operation, isolate the hood from the electrical supply by switching off at the connector and removing the connector fuse.
Or if the appliance has been connected through a plug and socket, then the plug must be removed from the socket.
The cooker hood should be cleaned regularly (at least with the same frequency with which you carry out maintenance of the fat filters) internally and externally. Clean using the cloth dampened with neutral liquid detergent. Do not use abrasive products.
DO NOT USE ALCOHOL!
Warning! Failure to carry out the basic cleaning recommendations of the cooker hood and replacement of the filters may cause fire risks. Therefore, we recommend observing these instructions.
The manufacturer declines all responsibility for any damage to the motor or any fire damage linked to inappropriate maintenance or failure to observe the above safety recommendations.
4.1 Grease filter - The grease filter must be cleaned once a month using non aggressive detergents, either by hand or in the dishwasher, which must be set to a low temperature and a short cycle. When washed in a dishwasher, the grease filter may discolour slightly, but this does not affect its filtering capacity.
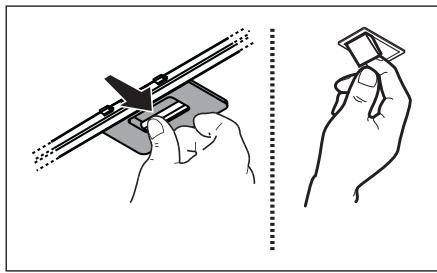
4.2 Charcoal filter
Type 20 LONG LIFE - Washable activated charcoal filter
The charcoal filter can be washed once every two months using hot water and a suitable detergent, or in a dishwasher at 65°C (if the dishwasher is used, select the full cycle function and leave dishes out).
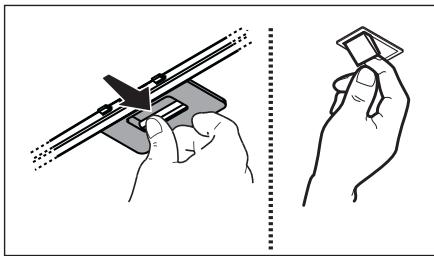
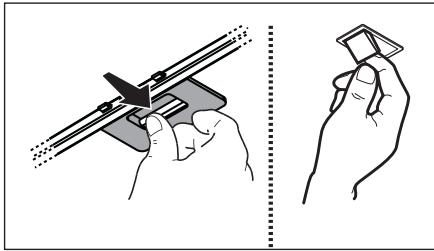
Eliminate excess water without damaging the filter, then remove the mattress located inside the plastic frame and put it in the oven for 10 minutes at 100°C to dry completely. Replace the mattress every 3 years and when the cloth is damaged.
4.3 Type 15 - NON-washable activated charcoal filter
The saturation of the charcoal filter occurs after more or less prolonged use, depending on the type of cooking and the regularity of cleaning of the grease filter. In any case it is necessary to replace the cartridge at least every four months.
The charcoal filter may NOT be washed or regenerated.
4.4 Regenerable carbon filter
The carbon filter must be regenerated every two months (or when the filter saturation indicator - if present - indicates the need for it) and in accordance with the procedure as shown here below:
- Disconnect the electrical appliance from the mains.
- Clean the filter's surface with a damp cloth to remove grease deposits.
- Put the filter in an oven at 200 degrees for 45 minutes.
- Turn off the oven and wait for an hour before taking out the filter.
Attention! Make sure the filter has cooled down before touching it.
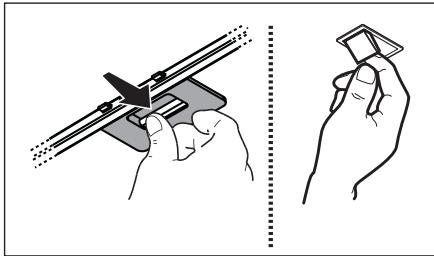
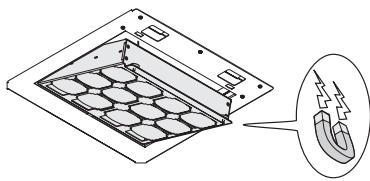
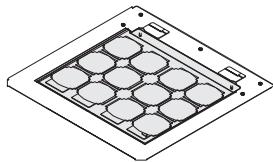
Type SUPCHARC-E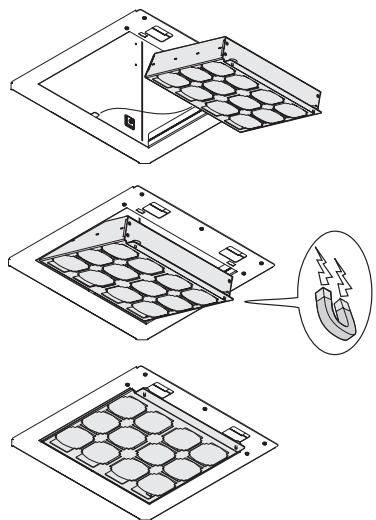
5. CONTROLS
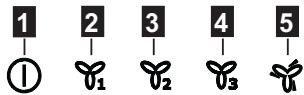
The hood is fitted with a control panel with aspiration speed selection control and a light switch to control cooking area lights. Use the high suction speed in cases of concentrated kitchen vapours. It is recommended that the cooker hood suction
is switched on for 5 minutes prior to cooking and to leave in operation during cooking and for another 15 minutes approximately after terminating cooking.
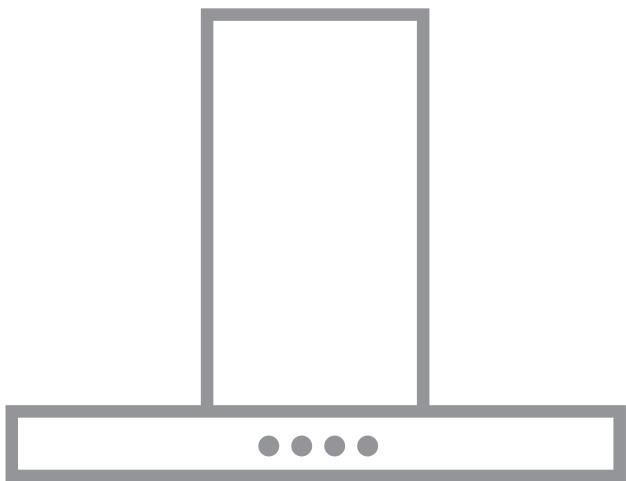
The control switches are located on the unit's front panel:


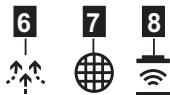
1 Speed ON/OFF button Control panel on/off key 2 Suction speed (power) key 1: 3 Suction speed (power) key 2: 4 Suction speed (power) key 3: Suction speed (power) key 4: Note: suction speed (power) key 4 has a limited duration of 5 minutes, after which the previous suction speed is reactivated. 6 "Breeze" function key (Room ventilation) The hood switches on at low suction speed (power) for 60 minutes, after which it switches off. 7 Filter saturation control and activation/deactivation key 8 Hob2Hood function indicator 9 Lights ON/OFF key
Control panel on/off function
With the hood in standby, press key 1, all LED lights will switch off: the control panel is off.
Press key 1 again, all LED lights will turn on: the control panel is active.
Carbon filter saturation control activation/deactivation function
With the hood in standby, press key 5 for longer than 3 seconds. Key 7 will flash to indicate that the carbon saturation filter has been activated. Key 7 will remain lit to indicate that the carbon saturation filter has been deactivated.
Filter saturation control and reset function
At regular intervals and depending on the hood temperature, key lights up to indicate that the filters need to be maintained in accordance with the instructions in the relative paragraphs. Key 7 on with a fixed light: maintenance is required on the grease filters. Key 7 on and flashing: maintenance is required on the carbon filter.
Filter saturation indicator reset
With the hood in standby, press key 7 for longer than 3 seconds. Repeat the operation if necessary.
5.1 Hob²Hood
The hood is equipped with a function for wireless connection with the cooktop for automatic adjustment of the most suitable speed. Refer to the instruction manual of the cooktop to verify the presence and compatibility of this function.
In the case of first connection to the mains or abrupt disconnection from power supply (blackout), wait 1 minute to allow the hood to restore the connection with the cooktop.
When the hood is working in Hob²Hood mode, key 8 is lit.
6. LIGHTING
The hood is equipped with a lighting system based on LED technology.
The LEDs guarantee an optimum lighting, a duration up to 10 times as long as the traditional lamps and allow to save 90% electrical energy.

Caution! Do not look directly into the LED light.
To replace lights, contact authorised spare part center.
www.aeg.com/productregistration

www.aeg.com/productregistration

www.aeg.com/productregistration

Warning! Do not connect the appliance to the electrical supply until the installation is completed.
As for the technical measures and safety measures in the application, the standards prescribed by local competent authorities are strictly followed. The extracted air must not be discharged into a pipe used for the exhaust of fumes from appliances that operate on gas or other fuels.
Do not use or leave the hood without lamps correctly installed, with the risk of receiving an electric shock. Never use the hood without the correctly installed grille!
The hood must never be used as a supporting surface, unless otherwise indicated. Use only screws for fixing in the kit with the product for installation, or in the kit purchased with the correct type. Use the correct screw length as indicated in the installation guide. In case of doubt, consult an authorized
service center with qualified personnel.
Attention! The installation of the fixing screws or devices in accordance with these instructions may lead to risks of electric shock.
2. USE
The hood serves to extract fumes and vapors produced during cooking.
The accompanying instructions indicate in which version you can use your model - as a hood with discharge
Hood, this is a hood with internal air recirculation.
3. INSTALLATION
The mains voltage must correspond to the voltage indicated on the rating plate, which is located inside the appliance. If the hood is supplied with a plug, connect the hood to a suitable socket, which must be located in an accessible place, which can also be done after installation. If the hood is not supplied with a plug (direct connection to the mains) and the socket is not located in an accessible place, also after installation, then use an approved two-pole switch that ensures complete disconnection from the mains under overvoltage category III conditions, in accordance with installation regulations.
Warning! Before connecting to the power supply, check the electrical system of the hood for proper functioning and make sure that the power cable is correctly installed.
The distance between the lower edge of the hood and the hob surface must be at least 50 cm for electric hobs, and at least 65 cm for gas or mixed hobs. If the installation instructions for the gas hob specify a greater distance, take that into account.
4. MAINTENANCE

Warning! Before performing any operation for maintenance or cleaning, disconnect the hood from the electrical supply by removing the plug or switching off the main switch.
The hood must be cleaned frequently both inside and outside (at least with the same frequency as the maintenance of the grease filters). For cleaning, use a cloth dampened with neutral liquid detergent. Do not use products containing abrasive materials. DO NOT USE ALCOHOL!

Warning! Failure to follow the cleaning instructions for the appliance and the replacement of filters may lead to a risk of fire. Therefore, we recommend following the instructions provided.
The manufacturer declines all responsibility for any damage to persons or property caused by fire resulting from improper maintenance or failure to follow the above warnings.
4.1 Grease filters - The grease filter must be cleaned monthly with non-aggressive detergents, either by hand or in a dishwasher at low temperature and with a short cycle. When washing in a dishwasher, some discoloration of the grease filter may occur, but its filtering characteristics remain completely unchanged.
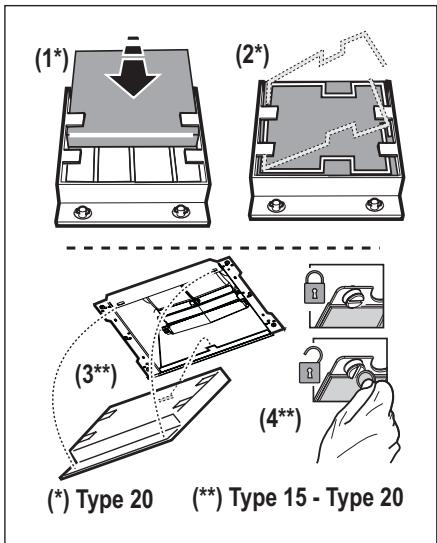
4.2 Type 20 LONG LIFE - charcoal filter
The charcoal filter can be washed every two months in hot water with suitable detergents or in a dishwasher at a temperature of 65° C (in the latter case, perform a full wash cycle without dishes inside the dishwasher).
Remove excess water carefully to avoid damaging the filter, then remove the plastic frame and let it dry in the oven for 10 minutes at a temperature of 100° C to ensure complete drying.
Replace the filter every 3 years and as soon as the fabric appears damaged.
4.3 Type 15 - Carbon filters
The carbon filter becomes saturated after a more or less long period of use, depending on the type of cooking and the frequency of filter cleaning. In any case, replace the cartridge at least every 4 months. The carbon filter cannot be washed or regenerated.
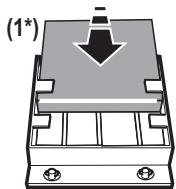
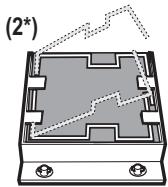
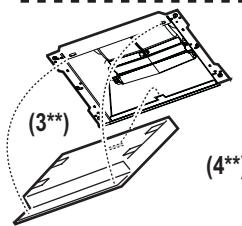
( ) Type 20 ( *) Type 15 - Type 20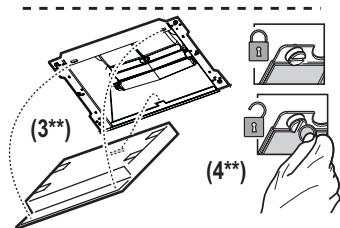
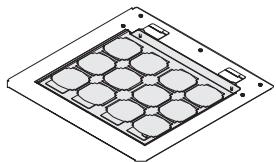
4.4 Regenerable carbon filters The carbon filter must be regenerated every two months (or when the filter saturation indicator system - if provided on the model, or at your disposal - indicates the need) and in accordance with the procedure described below:
- Disconnect the appliance from the electrical supply.
- Clean the filter surface with a damp cloth to remove grease deposits from the surface.
- Place the filter in an oven preheated to 200 degrees for 45 minutes.
- Turn off the oven and wait at least one hour before removing the filter.
Warning! Before reinstalling the filter, make sure it has cooled down.
Type SUPCHARC-E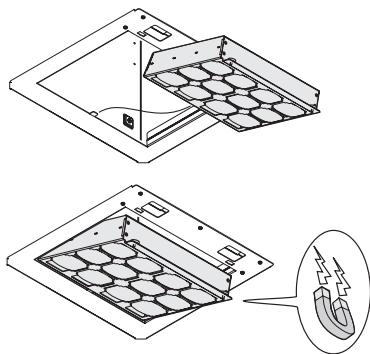
5. CONTROLS
The hood is equipped with a control unit for speed control of the extraction fan and halogen lights for the cooking surface. Use the intensive mode of the hood in case of very high concentration of cooking vapors.
We recommend turning on the hood 5 minutes before starting the cooking process and leaving it on for 15 minutes after the process ends.
The control buttons are located on the front panel of the unit:
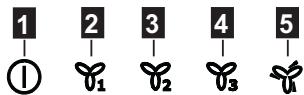
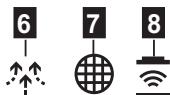

1 On/Off button speed On/Off button control panel 2 Speed (power) suction button 1 3 Speed (power) suction button 2 4 Speed (power) suction button 3 5 Speed (power) suction button 4 Note: Speed (power) suction 4 remains active for 5 minutes, after which it returns to the previous value. 6 "Breeze" function button (room ventilation) The hood turns on at low speed (power) suction for 60 minutes, after which it turns off. 7 Filter clogging signal control and on/off button 8 Hob2Hood function indicator 9 On/Off light button
Switching the hood on/off
Set the extractor to sleep mode, press button 1, all indicators go out: the hood is switched off. Press button 1 again, all indicators light up: the hood is switched on.
Switching the charcoal filter saturation alarm on/off
Set the extractor to sleep mode, press button 5 and hold for more than 3 seconds.
Button 7 starts flashing, indicating that the charcoal filter saturation alarm is switched on.
Button 7 will burn constantly, indicating that the charcoal filter saturation alarm is switched off.
Control and reset of filter saturation alarm
At regular intervals, depending on the time of use of the extractor, button 7 lights up, indicating that it is necessary to carry out filter maintenance according to the instructions given in the relevant sections.
Button 7 burns constantly: it is necessary to carry out maintenance of the grease filter. Button 7 flashes: it is necessary to carry out maintenance of the charcoal filter.
Reset of filter saturation indicator
Set the extractor to sleep mode, press button 7 and hold for more than 3 seconds.
Repeat the operation if necessary.
5.1 Hob²Hood
The extractor is equipped with a wireless connection with the hob surface for automatic adjustment of the more suitable speed. Familiarize yourself with the instructions for use of the hob surface to check the presence and compatibility of this function. At the first connection to the electrical network or in the event of a sudden interruption of electrical energy, it is necessary to wait 1 minute to allow the extractor to re-establish the connection with the hob surface.
When the extractor is working in Hob²Hood mode, button 8 is lit.
6. OCBELSEHNE
The lighting is provided by LED bulbs.
The luminaires provide optimal lighting, and their service life is 10 times longer than that of traditional bulbs, and they allow saving 90% of electrical energy.

Attention! Protect your eyes and do not look directly at the switched-on halogen lamp.
To replace the lamp, contact an authorized service center for spare parts.
FOR BEST RESULTS
www.aeg.com/productregistration

Use original spare parts, materials, and accessories for the appliance:
www.aeg.com/shop
ENVIRONMENTAL PROTECTION
Recycle materials with the symbol. Place packaging materials in appropriate containers for recycling.
Help protect the environment and human health by recycling electrical and electronic appliance waste. Do not dispose of appliances marked with this symbol with household waste. Return the product to your local recycling facility or contact your local municipality.
CUSTOMER SERVICE AND SERVICE
We recommend using original spare parts.
Register your product to receive better service: www.aeg.com/productregistration

Use the correct length for the screws which are identified in the Installation Guide.

FOR PERFECT RESULTS

For accessories and spare parts, consult the original and reserve parts for your appliance:
ENVIRONMENT PROTECTION
Recycle materials with the symbol. Put the packaging in the relevant containers for recycling.
Help protect the environment and public health, as well as the recycling of electrical and electronic appliances. Do not dispose of
appliances marked with the symbol with household waste. Return the product to your local recycling facility or contact your municipal office.
SAFETY INFORMATION
Do not use or leave the appliance without the correctly mounted filter or guard to avoid the risk of electric shock.
Never use the appliance without the correctly mounted grid!
The appliance must never be used as a support surface unless this is specifically indicated.
Press the button 1 again, all the lights light up: the control panel is activated.
The ActiveAir function on the filter control with active carbon is activated.
The appliance is in standby mode. Press button 7 for 3 seconds.
Button 7 lights up with a steady light to indicate that the filter control with active carbon is activated.
Button 7 lights up with a flashing light to indicate that the filter control with active carbon is deactivated.
The reset function for the filter saturation is activated.
At regular intervals, based on the usage time of the appliance, button 7 lights up to indicate that the filter needs to be replaced, according to the instructions in the relevant paragraphs.
Button 7 lights up with a flashing light: the filter for grease must be replaced.
Button 7 lights up with a steady light: the filter with active carbon must be replaced.
Reset of the filter saturation indicator.
The appliance is in standby mode. Press button 7 for 3 seconds.
Repeat if necessary.
5.1 Hood
The appliance is equipped with a wireless function for connection to a remote control for automatic adjustment of the suction speed. Refer to the instructions for use of the remote control to check the presence and compatibility of this function.
When connecting to the network or after an unexpected interruption of the electrical power supply (blackout), wait 1 minute to allow the appliance to re-establish the connection with the remote control.
When the appliance is operating in hood function, button 8 is activated.
The appliance is equipped with a lighting system with LEDs.
The LEDs guarantee optimal lighting, up to 10 times longer than traditional lamps, allowing 90% energy savings.

Warning! Do not look directly at the LED light!
To replace the lamps, contact the service center or a qualified electrician.
AEG is committed to protecting the environment. The innovative technology of this product - the curved panels - allows you to open the door without touching it, so you can keep the door clean. The curved panels are easy to clean and require only a quick wipe with a damp cloth.
Visit our website to:

Get advice, brochures, troubleshoot, service information:
www.aeg.com

To register your product for better service:
www.aeg.com/productregistration

To buy accessories, consumables and original spare parts for your appliance:
www.aeg.com/shop
Information about environmental protection and recycling
Do not use abrasive materials or harsh cleaning agents. Use only soft materials and mild cleaning agents for cleaning.
Do not use electric or electronic devices to clean the device, as this may cause electric shock or damage to the device.
Do not touch the device with wet hands. Do not place the device near flammable materials. If the device is damaged, contact the service center or the manufacturer.
SERVICE AND MAINTENANCE
Do not use the device for purposes other than its intended use.
If you have contacted the service center, do not attempt to repair the device yourself.
Repairs should be carried out by qualified personnel. Use only original spare parts.
The device is not intended for use by persons with reduced physical, sensory, or mental capabilities.
Do not use the device without proper supervision.
! SAFETY WARNINGS
If the device is not used for a long time or if it is not serviced, it may cause a fire or electric shock. When the device is not in use, unplug it from the power source. Do not leave the device unattended. If the device is damaged, it may cause injury or damage to property. Do not use the device if it is damaged or if the power cord is damaged.
Do not allow children to operate the device or play with it.
Do not allow children to perform cleaning or maintenance without supervision. If the device is used with gas or other flammable substances, it may cause a fire or explosion.
The device must be cleaned regularly (at least once a month). Follow the instructions provided in this manual. If the device is not cleaned as instructed, it may cause a fire.
Do not smoke while using the device.
1. SAFETY INSTRUCTIONS
Before using the device, carefully read all safety instructions and follow them strictly to avoid accidents.
To prevent fire or electric shock, do not use the device near water or in humid conditions.
CAUTION: Do not use the device in places where flammable gases or vapors may be present.
For installation and use, only refer to the instructions provided in this manual and follow them exactly.
WARNING! Do not touch the device with wet hands to avoid electric shock.
Always observe the technical and safety instructions, and follow the regulations set by local authorities.
This device is not intended for use by persons (including children) with reduced physical, sensory or mental capabilities, or lack of experience and knowledge, unless they have been given supervision or instruction concerning use of the appliance by a person responsible for their safety. Children should be supervised to ensure that they do not play with the device.
Do not use the device in ways not described in this manual. If you are unsure, contact the manufacturer or supplier for guidance.
For installation, use only the mounting accessories provided; if not provided, purchase suitable ones.
Install the device according to the instructions given in this manual.
If you have any questions, contact the service center or the manufacturer's representative for assistance.
WARNING! Installing the device or its accessories incorrectly may cause electric shock or fire.
2. OPERATION
To use the device, follow the instructions below. The type of device is indicated on the label, and the operating instructions are provided accordingly.
3. FILTERS
The filter must be checked regularly for contamination and replaced if necessary. If the filter is clogged, it must be cleaned or replaced, depending on the degree of contamination. If the filter is not clogged (new condition) or only slightly contaminated, then cleaning is not required. If the filter is heavily contaminated, it must be replaced with a new one.
Attention! When connecting the filter to the electrical network, the cable must be installed by a qualified electrician.
The filter must be installed at a distance of at least 50 cm from the electrical outlet for 220V, and 65 cm for 380V or three-phase networks.
If the gas filter is installed with additional protection, it must be checked.
4. TECHNICAL MAINTENANCE
Attention! Before carrying out any maintenance or repair work, disconnect the filter from the electrical network by unplugging it.
The filter housing and the outside of the pipes must be cleaned with a damp cloth (at least once a month). For cleaning, use only mild detergents and water. Do not use abrasive cleaners. DO NOT SPRAY!
Attention! It is possible to clean the filter without removing it from the system. Consult the manufacturer for recommendations.
Use only original spare parts or those recommended by the manufacturer. The use of other parts may damage the device.
4.1 Low-pressure filter - The filter must be cleaned with non-aggressive detergents, water, or a vacuum cleaner at room temperature. Cleaning the filter with a vacuum cleaner is possible, but it must be done carefully.
1. Disconnect the device from the power supply: unplug the power cord.
Check the filter condition and the function of the old connection.
When the filter is in operation, press and hold the reset button for 5 seconds. 7 seconds to check the old connection. 7 seconds to confirm the new connection.
The water temperature should be set according to the operating instructions.
The operating instructions should be followed carefully, taking into account the temperature of the water and the operating time. The operating time should be set according to the technical service instructions. The operating time is set: for technical service of the water heater, set the operating time and the interval: for technical service of the water heater, set the operating time.
Setting the water temperature indicator
When the water temperature is in the operating mode, the operating time should not exceed 3 seconds.
Press the button as needed.
5.1 Hob²Hood
The automatic water heater is equipped with a safety function to prevent overheating. To use this function, press the safety button and hold it for a few seconds.
If the water heater is not used for a long time or if the power is turned off (electric power failure), the safety function will activate. If the water temperature is in the operating mode, the operating time will be extended by 1 minute. The operating time will be extended by 8 periods.
6. MAINTENANCE
The housing is made of high-quality plastic based on modern technology.
The heating elements are highly efficient, providing 10 times more heat output and 90% electrical energy savings.
Do not touch the heating elements with bare hands.
For safety, consult a qualified specialist.
3A COPLSEH N PE3YJTTATN
We thank you for choosing our product. We guarantee that the product is free from defects in materials and workmanship, and that it complies with the technical specifications. We will repair or replace the product free of charge if it fails to function properly. Please allow a few minutes for us to provide you with the best service.
Please read the safety instructions on page 3 for:

Follow the tips, brochure, and guides for troubleshooting, and service information:
www.aeg.com

Register your product for better service:
www.aeg.com/productregistration

Buy accessories, consumables and original spare parts for your appliance:
www.aeg.com/shop
ENVIRONMENTAL CONCERNS
Recycle materials with the symbol. Put the packaging in relevant containers to recycle it.
Help protect the environment and human health and recycle waste of electrical and electronic appliances. Do not dispose of appliances marked with
the symbol with the household waste. Return the product to your local recycling facility or contact your municipal office.
GUARANTEE AND SERVICE
We recommend using original spare parts.
When you contact the service, make sure you have the following data available.
The information can be found on the rating plate. Model, product number, serial number.
Attention! Important information.
Possibility of use for frying.
INFORMATION FOR USE
Before operating the appliance for cleaning and maintenance, disconnect the appliance from the electrical supply by removing the plug from the socket. For all operations regarding installation and maintenance, use the appropriate tools. This appliance can be used by children aged 8 years and above and by persons with reduced physical, sensory or mental capabilities, or lack of experience and knowledge, if they have been given supervision or instruction concerning use of the appliance in a safe way and understand the hazards involved. Children shall not play with the appliance. Cleaning and user maintenance shall not be made by children without supervision. The room must be sufficiently ventilated when the hood is used together with appliances that use gas or other fuels.
The hood must be cleaned regularly, both internally and externally (at least once a month), and in any case it is necessary to follow the maintenance instructions given in this manual. Failure to follow the instructions regarding the hood and the cleaning of the filters may lead to a risk of fire. Strictly forbidden to flambé food under the hood.
1. SAFETY INSTRUCTIONS
The use of open flames is dangerous for the filters and may cause a risk of fire or damage. Any frying must be done carefully, making sure not to overheat the oil and cause it to ignite.
CAUTION: When the cooking surface is in operation, the accessible parts of the hood may become hot.
For replacing the lamp, use only the type of lamp indicated in the maintenance/replacement section of this manual.
Warning! Do not connect the appliance to the electrical supply until the installation is completely finished.
This is subject to the technical and safety measures for installation. It is important to follow the rules given by the local authorities. The exhaust air must not be discharged into an active flue used for fumes from appliances that use gas or other fuels. Do not use the hood without correctly installed mesh filters, as there is a risk of electric shock.
Never use the hood without the correctly installed mesh filter! The hood must never be used as a support surface unless explicitly indicated. Use only the fixing screws provided with the product for mounting, or if not provided, purchase the correct type of screws. Use the correct length for the screws as indicated in the installation instructions. In case of doubt, consult
the authorized technical support center or a qualified person.
WARNING! Incorrect installation of the fixing screws may lead to the risk of electric shock.
2. USE
The extractor hood must be connected to the flue and the outlet. The installation instructions specify which version can be used for the model you have, with the appropriate flue.
The air is extracted through the flue. The version with a recirculation filter does not extract the air.

3. INSTALLATION
The main electrical connection must correspond to the ONTEROT shown on the rating plate for the characteristics of the appliance. Inside the extractor hood, if the hood is not equipped with a plug, connect the plug in accordance with the technical instructions and the wiring diagram. If it is not equipped with a plug (direct connection to the electrical supply) and the plug is not located in the designated place, even during installation, apply a bipolar switch in accordance with the standards that ensure complete disconnection from the electrical supply under conditions of overvoltage category III, in accordance with the installation instructions.
!Warning! Before (re)connecting the hood to the electrical supply and checking its functionality, always check that the power cable is correctly installed.
The minimum distance between the cooking surface and the hood for electric hobs must not be less than 50 cm, and for combined or gas hobs 65 cm. If the installation instructions for the gas hob specify a greater distance, this must be taken into account.
4. MAINTENANCE
!
Warning! Before any operation on the appliance or maintenance, disconnect the hood from the electrical supply by pulling the plug or by switching off the main circuit breaker. The hood must be cleaned regularly (at least with the same frequency as the maintenance of the grease filters) both on the inside and on the outside. For cleaning, use a cloth dampened with mild neutral detergent. Do not use abrasive products. Do not use alcohol!
!
Warning! Failure to follow the instructions for cleaning the hood and replacing the filters may lead to a risk of fire. It is recommended to follow the suggested instructions. Any damage to the motor or fire hazard resulting from improper maintenance or failure to follow the instructions is the responsibility of the user.
4.1 Grease filter - The grease filter should be cleaned monthly with neutral detergents, either by hand or in a dishwasher at low temperatures and with a short cycle. When cleaning in a dishwasher, the grease filter may lose some of its filtering characteristics, but they remain unchanged.
4.2 Type 20 LONG LIFE - Filter with active charcoal that can be replaced
The charcoal filter can be replaced every two months in warm water and mild detergent, and in a dishwasher at 65°C (in case of washing in a dishwasher, run a complete wash cycle without dishes inside).
Remove the filter from the appliance and wash it in lukewarm water with a mild detergent, then place it in the dishwasher or wash it by hand. Dry it thoroughly before reinstalling.
Replace the filter every 3 years or when the indicator light comes on.
4.3 Type 15 - Activated carbon filter - this is not replaceable
The saturation of the filter occurs over time depending on the type of cooking and the regularity of cleaning the filter. In any case, it is necessary to replace the filter at least every 3 months.
It cannot be washed or reused.
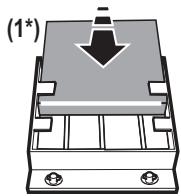
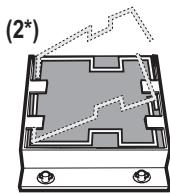
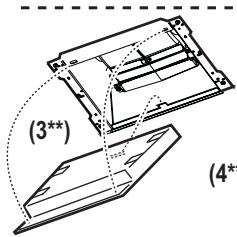
(4) (*) Type 20 ( ) Type 15 - Type 20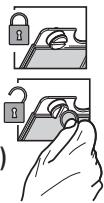
4.4 Activated carbon filter - regenerative
The filter must be cleaned every two months (or when the indicator light shows that the filter is saturated - when it is lit), according to the procedure shown below:
1. Disconnect the appliance from the power supply. 2. Clean the surface of the filter with a brush to remove grease and dirt. 3. Place the filter in an oven preheated to 200 degrees and leave it for about 45 minutes. 4. Turn off the oven and let it cool down before removing the filter. Warning! Make sure the filter is cool enough before removing it.
Type SUPCHARC-E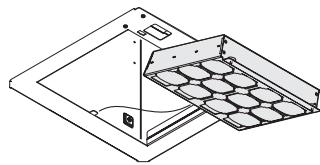
5. CONTROLS
The hood is controlled by a control panel with speed regulator for extraction and regulator for lighting the cooking area. Use the highest speed in case of high concentration of steam in the kitchen.
It is recommended to turn on the ventilation 5 minutes before starting to cook and leave it running for about 15 minutes after finishing cooking. The controls are located on the front panel of the appliance:
1 ON/OFF button - speed button for turning the control panel on/off 2 Speed button (power) for extraction 1 3 Speed button (power) for extraction 2 4 Speed button (power) for extraction 3 5 Speed button (power) for extraction 4 Note: The speed (power) of extraction 4 remains on for 5 minutes, then returns to the previous state. 6 Button for "Breeze" function (ambient ventilation) The hood turns on at low speed (power) for extraction for 60 minutes, then turns off. 7 Button for control and activation-deactivation of the filters 8 Dimming of the Hob²Hood function 9 ON (on)/OFF (off) button for lighting

Function activation - Deactivation of the control panel When the hood is in operation, press 1, the LED lights go out: the control panel is deactivated. Press button 1 again, the LED lights come on: the control panel is active.
Filter clogging indicator function - activation of the filter clogging control
When the vacuum cleaner is in operation, press and hold button 7 for more than 3 seconds. Button 7 lights up continuously to indicate that the filter clogging control is activated.
Button 7 continues to light up with a steady light to indicate that the filter clogging control is activated.
Filter clogging control and reset function
At regular intervals, depending on the usage time of the vacuum cleaner, button 7 turns on to indicate that the filters need to be cleaned according to the instructions given in the relevant section.
If button 7 lights up continuously, it is necessary to clean the motor filter. If button 7 lights up continuously: it is necessary to clean the motor filter and the HEPA filter.
Resetting the filter clogging indicator
When the vacuum cleaner is in operation, press and hold button 7 for more than 3 seconds. Repeat the operation if necessary.
5.1 Turbo mode
The vacuum cleaner is equipped with a wireless connection function to the charging base for automatic adjustment to the most suitable speed. Consult the instructions for the charging base and check the device and compatibility of this function. When connecting to electrical energy for the first time or after a power outage (short circuit), wait 1 minute to allow the vacuum cleaner to reconnect to the charging base. At the moment when the vacuum cleaner operates in Turbo mode, button 8 is turned on.
6. LIGHTING UNIT
The vacuum cleaner is equipped with a lighting system based on LED technology. LED lights guarantee optimal lighting, have about 10 times longer lifespan than traditional lights, and enable energy savings of up to 90%.

Warning! Do not look directly into the LED light.
For replacement of the lamps, contact the authorized service center for spare parts.
www.aeg.com/productregistration

Buy accessories, consumables and original spare parts for your appliance:
www.aeg.com/shop
ENVIRONMENT CONCERNS
Recycle materials with the symbol. Put the packaging in relevant containers to recycle it.
www.aeg.com/productregistration

Buy accessories, consumables and original spare parts for your appliance:
www.aeg.com/shop
ENVIRONMENTAL PROTECTION
Recycle materials with the symbol. Put the packaging in relevant containers to recycle it.
Help protect the environment and human health and to recycle waste of electrical and electronic appliances. Do not dispose appliances marked with the symbol
with the household waste. Return the product to your local recycling facility or contact your municipal office.
SERVICE AND WARRANTY
We recommend that you use original spare parts.
Connect to a 3-phase network, or to a 3-phase network with a neutral conductor.
3. INSTALLATION
Before installation, check that the data on the nameplate matches the network and that the appliance is inside the aspirator. If there is an exhaust pipe, connect the aspirator with the pipe that is in accordance with the regulations and that is placed at the accessible place and after installation. If the aspirator is without a pipe, (direct connection to the grid) or the pipe is not placed at the accessible place, after installation place a two-pole switch that ensures complete disconnection from the grid under overvoltage category III conditions, in accordance with the installation rules.
Warning! Before you reconnect the aspirator to the electrical grid and check the operation, make sure that the network cable is installed in the correct way.
The minimum distance between the surface that serves for placing the cooking vessels on the cooking appliance and the lower part of the aspirator must not be less than 50 cm if it is about electric cookers and 65 cm if it is about cookers on gas or other fuels. If the instructions for installation of the gas cooking appliance specify a greater distance, that distance must be respected.
4. MAINTENANCE

Warning! Before any operation of cleaning or maintenance, disconnect the aspirator from the mains by pulling the plug out of the socket or by switching off the main switch of the house.
The aspirator should be cleaned frequently (as often as you clean the grease filter), both inside and outside. For cleaning use a soft cloth moistened with neutral detergent. Avoid the use of products that need. DO NOT USE ALCOHOL!

Warning! Non-compliance with the regulations on the electrical appliance and the regulations on the replacement of the filter can lead to a fire. Therefore, we advise you to follow the given instructions.
We disclaim any responsibility for eventual damages caused to the motor, fire that is a consequence of incorrect maintenance or non-compliance with the given warnings.
4.4
(1)
(1*)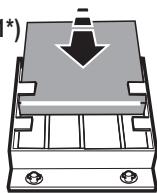
(2*)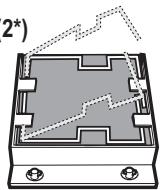
( ) Type 20 ( *) Type 15 - Type 20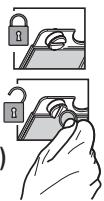
1.5


Hood2Hob 1.5
(w) bll a bll 电 b (wireless) clalll lglg j (204 aagall gail n gall (204 clall e1lglgll (204 clall 1 (blackout) (204 ablln nn bdln blln (204 HobHood a bla (204
aON/OFF 1
1 bai (s) 2
2 kii (s) 4e yj j 3
3 bai (s) 4
4 kai (s) 4e yj j 5
5 a 4 b a (g) a y a
"Breeze" 6
(a)
60 2al a bie (s) ac jue le bai jaiy
7
Hob²Hood 8
iON/OFF j9
aLi 6
aiee eae aee ae aee
.LED
jkl 10 jlll lLED
a ball 90%
∴ a + b ≤ 11
LED 1
e bai aieaia iisai jS y Juaai jaaai
∴ L = 1/2L
Jiawei 2.
.


3.
1.
a. | x - 1| = | x - 2| = ... = | x - n|
2
Clll 0
a
aalwail Clog
e 11 11 11 11 11 11 11 11
Jzll jI 8 8 8 8 8 8 8 8 8 8 8 8 8 8 8 8 8 8 8 8 8 8 8 8 8 8 8 8 8 8 8 8 8 8 8 8 8 8 8
JgallyIggyy
j 1
Aa
111111111111111111 1
Jlll lgs Jlll jlll
a 1
∴ a 1 = 2,a n + 1 = n2 + n3
e bé c i o j y lla 1 glll a ayj y aably 1 b lily laia
ba1d1
i j k l m n o p q r s t
Visit our website at www.aeg.com

Register your product at www.aeg.com/productregistration
www.aeg.com/productregistration

www.aeg.com/shop

PNC 100
Aduuull aieia auii / ayjni caijina

1
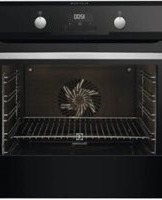
- USER MANUAL
- FOR PERFECT RESULTS
- VISIT OUR WEBSITE TO
- ENVIRONMENT CONCERNS
- CUSTOMER CARE AND SERVICE
- SAFETY INFORMATION
- SAFETY INSTRUCTIONS
- USE
- INSTALLATION
- MAINTENANCE
- CHARCOAL FILTER
- TYPE 20 LONG LIFE - WASHABLE ACTIVATED CHARCOAL FILTER
- TYPE 15 - NON-WASHABLE ACTIVATED CHARCOAL FILTER
- REGENERABLE CARBON FILTER
- CONTROLS
- CONTROL PANEL ON/OFF FUNCTION
- CARBON FILTER SATURATION CONTROL ACTIVATION/DEACTIVATION FUNCTION
- FILTER SATURATION CONTROL AND RESET FUNCTION
- FILTER SATURATION INDICATOR RESET
- HOB²HOOD
- LIGHTING
- TYPE 20 LONG LIFE - CHARCOAL FILTER
- TYPE 15 - CARBON FILTERS
- SWITCHING THE HOOD ON/OFF
- SWITCHING THE CHARCOAL FILTER SATURATION ALARM ON/OFF
- CONTROL AND RESET OF FILTER SATURATION ALARM
- RESET OF FILTER SATURATION INDICATOR
- OCBELSEHNE
- FOR BEST RESULTS
- ENVIRONMENTAL PROTECTION
- CUSTOMER SERVICE AND SERVICE
- ENVIRONMENT PROTECTION
- THE ACTIVEAIR FUNCTION ON THE FILTER CONTROL WITH ACTIVE CARBON IS ACTIVATED
- THE RESET FUNCTION FOR THE FILTER SATURATION IS ACTIVATED
- RESET OF THE FILTER SATURATION INDICATOR
- HOOD
- INFORMATION ABOUT ENVIRONMENTAL PROTECTION AND RECYCLING
- SERVICE AND MAINTENANCE
- SAFETY WARNINGS
- OPERATION
- FILTERS
- TECHNICAL MAINTENANCE
- CHECK THE FILTER CONDITION AND THE FUNCTION OF THE OLD CONNECTION
- THE WATER TEMPERATURE SHOULD BE SET ACCORDING TO THE OPERATING INSTRUCTIONS
- SETTING THE WATER TEMPERATURE INDICATOR
- A COPLSEH N PE3YJTTATN
- PLEASE READ THE SAFETY INSTRUCTIONS ON PAGE 3 FOR
- ENVIRONMENTAL CONCERNS
- GUARANTEE AND SERVICE
- INFORMATION FOR USE
- TYPE 20 LONG LIFE - FILTER WITH ACTIVE CHARCOAL THAT CAN BE REPLACED
- TYPE 15 - ACTIVATED CARBON FILTER - THIS IS NOT REPLACEABLE
- ACTIVATED CARBON FILTER - REGENERATIVE
- RESETTING THE FILTER CLOGGING INDICATOR
- TURBO MODE
- LIGHTING UNIT
- SERVICE AND WARRANTY
- HOOD2HOB
- JIAWEI
Brand : AEG
Model : DKB5660HM
Category : Built-in oven