
KUADRA - Kitchen hood ELICA - Free user manual and instructions
Find the device manual for free KUADRA ELICA in PDF.
| Product Type | Kitchen Hood |
| Brand | ELICA |
| Model | KUADRA |
| Version | Extracting (external evacuation) or Filtering (internal recirculation) |
| Minimum Safety Distance (cooking surface) | 50 cm for electric cooktops, 65 cm for gas or mixed cooktops |
| Exhaust Duct Diameter | Equal to the diameter of the connection flange (not supplied) |
| Controls | Keys: Motor On/Off, speed decrease, speed increase; 4 speeds including timed intensive |
| Speeds | 1, 2, 3 and 4 (intensive, blinking, timed) |
| Display | Numbers: 1 (speed 1), 2 (speed 2), 3 (speed 3), blinking 4 (intensive speed); temperature alarm |
| Grease Filter | Metal, monthly cleaning (or every 40 h of use); maintenance signal: 1 blinking |
| Charcoal Filter (optional) | Replace every 160 h of use (signal: 2 blinking); manual activation/deactivation |
| Lighting | LED, 2.6 W max, type GU4 |
| Power Supply | Voltage indicated on the rating plate (wall socket or circuit breaker) |
| Material | Stainless steel (likely) |
| Cleaning | Damp cloth and neutral liquid detergent; do not use alcohol or abrasives |
| Temperature Alarm | Detector activating speed 3 in case of overheating; blinking display |
| Weight | Not indicated (estimate: about 15-25 kg depending on dimensions) |
Frequently Asked Questions - KUADRA ELICA
User questions about KUADRA ELICA
0 question about this device. Answer the ones you know or ask your own.
Ask a new question about this device
Download the instructions for your Kitchen hood in PDF format for free! Find your manual KUADRA - ELICA and take your electronic device back in hand. On this page are published all the documents necessary for the use of your device. KUADRA by ELICA.
USER MANUAL KUADRA ELICA
EN Instruction on mounting and use
RU IHHCTpykuzno MOHTaJy N 3KcPJIyaTaZnN
UK IHCtpyKci3 MoHTaKy i ekCnIyaTaucii
KK MoTataKday MeH naIdaIaHy HycKaybl
Closely follow the instructions set out in this manual. All responsibility, for any eventual inconveniences, damages or fires caused by not complying with the instructions in this manual, is declined. This appliance is intended to be used in household and similar application such as: - staff kitchen areas in shop, offices and other working environments; - farm houses; - by clients in hotels, motels and other residential type environments; - bed and breakfast type environments.
The hood can look different to that illustrated in the drawings in this booklet. The instructions for use, maintenance and installation, however, remain the same.
It is important to conserve this booklet for consultation at any moment. In the case of sale, cession or move, make sure it is together with the product.
- Read the instructions carefully: there is important information about installation, use and safety.
- Do not carry out electrical or mechanical variations on the product or on the discharge conduits.
- Before proceeding with the installation of the appliance verify that there are no damaged all components. Otherwise contact your dealer and do not proceed with the installation.
Note: The parts marked with the symbol "(^)" are optional accessories supplied only with some models or otherwise not supplied, but available for purchase.
Caution
- Before any cleaning or maintenance operation, disconnect hood from the mains by removing the plug or disconnecting the mains electrical supply.
- Always wear work gloves for all installation and maintenance operations.
- This appliance can be used by children aged from 8 years and above and persons with reduced physical, sensory or mental capabilities or lack of experience and knowledge if they have been given supervision or instruction concerning use of the appliance in a safe way and understand the hazards involved.
Children shall not be allowed to tamper with the controls or play with the appliance. - Cleaning and user maintenance shall
not be made by children without supervision.
- The premises where the appliance is installed must be sufficiently ventilated, when the kitchen hood is used together with other gas combustion devices or other fuels.
- The hood must be regularly cleaned on both the inside and outside (AT LEAST ONCE A MONTH).
- This must be completed in accordance with the maintenance instructions provided. Failure to follow the instructions provided regarding the cleaning of the hood and filters will lead to the risk of fires.
- Do not flambe under the range hood.
- For lamp replacement use only lamp type indicated in the Maintenance/Replacing lamps section of this manual.
The use of exposed flames is detrimental to the filters and may cause a fire risk, and must therefore be avoided in all circumstances.
Any frying must be done with care in order to make sure that the oil does not overheat and ignite.
CAUTION: Accessible parts of the hood may become hot when used with cooking appliances.
- Do not connect the appliance to the mains until the installation is fully complete.
- With regards to the technical and safety measures to be adopted for fume discharging it is important to closely follow the regulations provided by the local authorities.
- The air must not be discharged into a flue that is used for exhausting fumes from appliance burning gas or other fuels.
-
Do not use or leave the hood without the lamp correctly mounted due to the possible risk of electric shocks.
-
Never use the hood without effectively mounted grids.
- The hood must NEVER be used as a support surface unless specifically indicated.
- Use only the fixing screws supplied with the product for installation or, if not supplied, purchase the correct screws type.
- Use the correct length for the screws which are identified in the Installation Guide.
- In case of doubt, consult an authorized service assistance center or similar qualified person.
WARNING!
- Failure to install the screws or fixing device in accordance with these instructions may result in electrical hazards.
-
Do not use with a programmer, timer, separate remote control system or any other device that switches on automatically.
-
This appliance is marked according to the European directive 2012/19/EC on Waste Electrical and Electronic Equipment (WEEE).
- By ensuring this product is disposed of correctly, you will help prevent potential negative consequences for the environment and human health, which could otherwise be caused by inappropriate waste handling of this product.

- The symbol on the product, or on the documents accompanying the product, indicates that this appliance may not be treated as household waste. Instead it should be taken to the appropriate collection point for the recycling of electrical and electronic equipment. Disposal must be carried out in accordance with local environmental regulations for waste disposal.
- For further detailed information regarding the process, collection and recycling of this product, please contact the appropriate department of your local authorities or the local department for household waste or the shop where you purchased this product.
Appliance designed, tested and manufactured according to:
- Safety: EN/IEC 60335-1; EN/IEC 60335-2-31, EN/IEC 62233.
Performance: EN/IEC 61591; ISO 5167-1; ISO 5167-3; ISO 5168; EN/IEC 60704-1; EN/IEC 60704-2-13; EN/IEC 60704-3; ISO 3741; EN 50564; IEC 62301. - EMC: EN 55014-1; CISPR 14-1; EN 55014-2; CISPR 14-2; EN/IEC 61000-3-2; EN/IEC 61000-3-3. Suggestions for a correct use in order to reduce the environmental impact: Switch ON the hood at minimum speed when you start cooking and kept it running for few minutes after cooking is finished. Increase the speed only in case of large amount of smoke and vapor and use boost speed(s) only in extreme situations. Replace the charcoal filter(s) when necessary to maintain a good odor reduction efficiency. Clean the grease filter(s) when necessary to maintain a good grease filter efficiency. Use the maximum diameter of the ducting system
indicated in this manual to optimize efficiency and minimize noise.
Use
The hood is designed to be used either for exhausting or filter version.

Extraction version
In this case the fumes are conveyed outside of the building by means of a special pipe connected with the connection ring located on top of the hood.
CAUTION!
The exhausting pipe is not supplied and must be purchased apart.
Diameter of the exhausting pipe must be equal to that of the connection ring.
CAUTION!
If the hood is supplied with active charcoal filter, then it must be removed.
Connect the hood and discharge holes on the walls with a diameter equivalent to the air outlet (connection flange).
Using the tubes and discharge holes on walls with smaller dimensions will cause a diminution of the suction performance and a drastic increase in noise.
Any responsibility in the matter is therefore declined.
Use a duct of the minimum indispensable length.
! Use a duct with as few elbows as possible (maximum elbow angle: 90^ ).
Avoid drastic changes in the duct cross-section.

Filtration version
The aspirated air will be degreased and deodorised before being fed back into the room.
In order to use the hood in this version, you have to install a system of additional filtering based on activated charcoal.
Installation
The minimum distance between the supporting surface for the cooking equipment on the hob and the lowest part of the range hood must be not less than 50cm from electric cookers and 65cm from gas or mixed cookers.
If the instructions for installation for the gas hob specify a greater distance, this must be adhered to.
! Electrical connection
The mains power supply must correspond to the rating indicated on the plate situated inside the hood. If provided with a plug connect the hood to a socket in compliance with current regulations and positioned in an accessible area, after installation. If it not fitted with a plug (direct mains connection) or if the plug is not located in an accessible area, after
installation, apply a double pole switch in accordance with standards which assures the complete disconnection of the mains under conditions relating to over-current category III, in accordance with installation instructions.
WARNING!
Before re-connecting the hood circuit to the mains supply and checking the efficient function, always check that the mains cable is correctly assembled.
The hood is provided with a special power cable ; if the cable is damaged, request a new one from Technical Service.
Mounting
Expansion wall plugs are provided to secure the hood to most types of walls/ceilings. However, a qualified technician must verify suitability of the materials in accordance with the type of wall/ceiling. The wall/ceiling must be strong enough to take the weight of the hood.
Do not tile, grout or silicone this appliance to the wall. Surface mounting only.
Operation
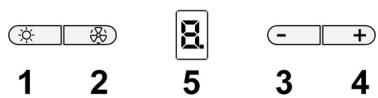
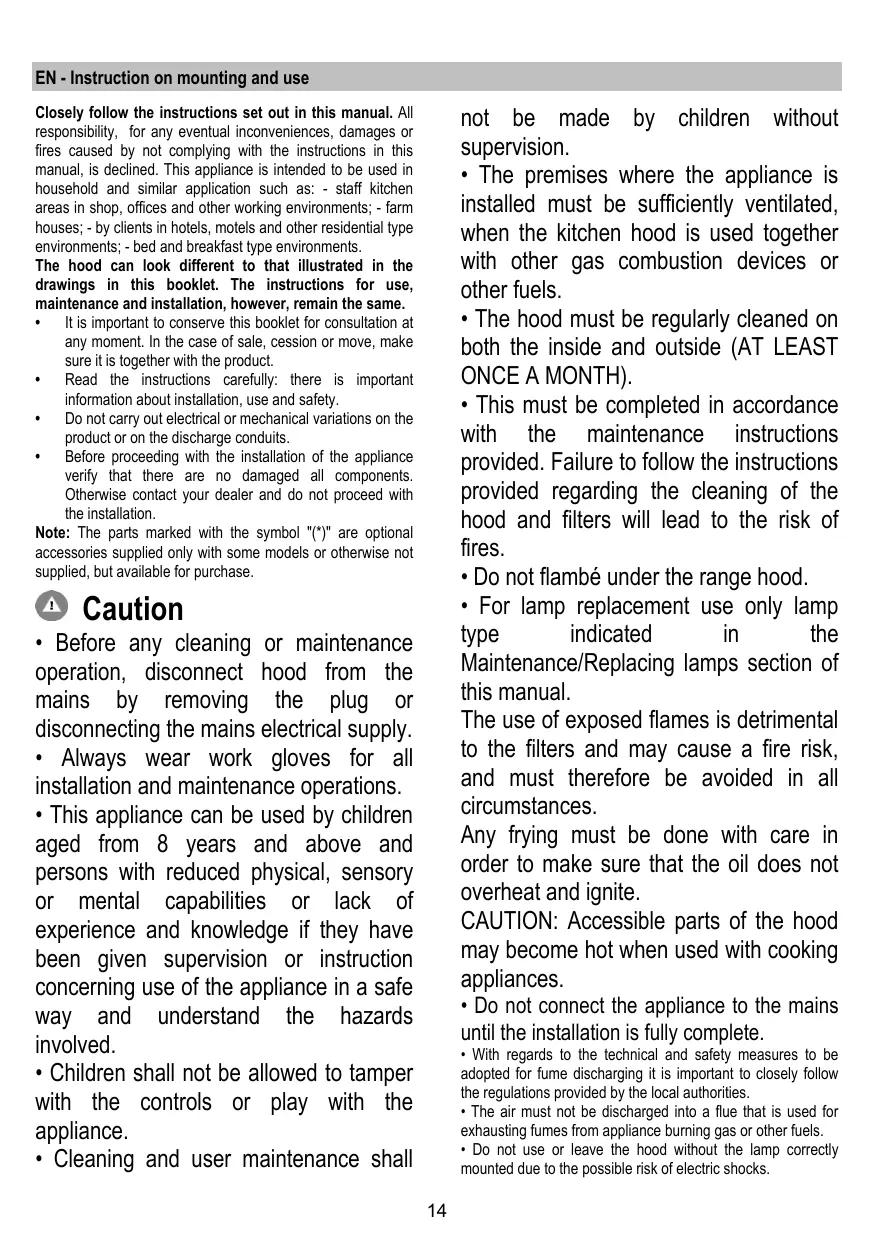
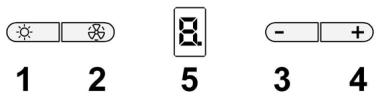
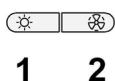
1. Lights ON/OFF
2. Motor ON/OFF
When key "2" is pressed the motor passes to speed 1.
If the key is pressed during working, the hood passes to OFF state.
3. Speed decrease
When key "3" is pressed the speed decreases from 4 (intense) to 1.
4. Speed increase
When key "4" is pressed with the hood in OFF state, the hood passes to speed 1.
If the key is pressed during working, the speed increases from 1 to 4 (intense).
The intense speed is timed. The standard timing is 5^ , at the end of which the hood sets at speed 2.
To deactivate the function before the end of the time, press key "3", the hood sets at speed 3, when key "2" is pressed the hood turns off.
A signal on the display corresponds to each speed:
OFF: No signal
Speed 1:1
Speed 2:2
Speed 3:3
Speed 4: 4 flashing
5. Display
Grease filter signalling
The grease filter is signalled by the display with number 1
flashing after 40 hours of use.
This means that the grease filter needs to be washed.
The signalling is visible with the hood in ON state.
To eliminate the grease filter signalling, press key "2" for more than 3", until it turns off.
The signalling can be eliminated with the hood in ON state.
Carbon filter signalling (only for filtering version)
The carbon filter is signalled by the display with number 2 flashing after 160 hours of use.
This means that the carbon filter installed must be replaced.
The signalling is visible with the hood in ON state.
To eliminate the carbon filter signalling, press key "2" for more than 3", until it turns off.
The signalling can be eliminated with the hood in ON state.
In case both filters are signalled at the same time, numbers 1 and 2 flash on the display alternately.
The signalling can be reset by carrying out the above-described procedure twice.
First it resets the grease filter signalling, then the carbon filter signalling.
In the standard mode the carbon filter signalling is not active.
In case the filtering version hood is used, it is necessary to enable the carbon filter signalling.
Activation of carbon filter signalling:
Set the hood to OFF and keep keys "2" and "3" pressed contemporaneously for 3".
Numbers 1 and 2 flash alternately for 2^
Deactivation of carbon filter signalling:
Set the hood to OFF and keep keys "2" and "3" pressed contemporaneously for 3".
Number 1 flashes for 2^
Temperature Alarm
The hood is equipped with a temperature sensor which activates the motor at speed 3 in case the temperature in the display zone is too high.
The alarm condition is indicated by the display with the letter t flashing.
This condition remains as such until the temperature falls below the alarm threshold.
This mode can be quit by pressing key "2", "3" or "4".
Every 30^ the sensor checks the ambient temperature of the display zone.
Display Symbols
| Symbol | State |
| 1 | Speed 1 |
| 2 | Speed 2 |
| 3 | Speed 3 |
| 4 | Speed 4 (intense) |
| 5 | Grease filter maintenance |
| 6 | Carbon filter maintenance |
| 7 | Grease filter and carbon filter maintenance |
| 8 | Temperature Alarm |
Maintenance
Cleaning
Clean using ONLY a cloth dampened with neutral liquid detergent. DO NOT CLEAN WITH TOOLS OR INSTRUMENTS. Do not use abrasive products. DO NOT USE ALCOHOL!
Panel
Fig. 19-25
Clean the perimeter aspiration panel with the same frequency as the ant-fats filter, using a cloth and not too concentrated liquid detergent. Do not use abrasive substances.
Grease filter
Fig. 20-24
Traps cooking grease particles.
This must be cleaned once a month (or when the filter saturation indication system - if envisaged on the model in possession - indicates this necessity) using non aggressive detergents, either by hand or in the dishwasher, which must be set to a low temperature and a short cycle.
When washed in a dishwasher, the grease filter may discolor slightly, but this does not affect its filtering capacity.
To remove the grease filter, pull the spring release handle.
Charcoal filter (filter version only)
Fig. 23
It absorbs unpleasant odors caused by cooking.
The charcoal filter can be washed once every two months (or when the filter saturation indication system - if envisaged on the model in possession - indicates this necessity) using hot water and a suitable detergent, or in a dishwasher at 65^ (if the dishwasher is used, select the full cycle function and leave dishes out).
Eliminate excess water without damaging the filter, then put it in the oven for 10 minutes at 100^ to dry completely. Replace the mattress every 3 years and when the cloth is damaged.
Montage
Install the carbon filter on the back of the grease filter and fix with two rods.
Attention! The rods are included in the carbon filter packing and not on the hood.
To dismantle the filter act in the reverse manner.
Replacing lamps
Fig. 26
Disconnect the appliance from the electricity.
Warning! Prior to touching the light bulbs ensure they are cooled down.
Use a small screwdriver as a lever on the borders of the lamp in order to remove the lightbulb.
- Replace the damaged lamp.
Use 2,6W-GU4 max LED lamps only. For more details, check enclosed leaflet "ILCOS D" (alfanmeric position "3c).
- Carry out the replacement and mount the new lightbulb by following instructions in the reverse.
If the lights do not work, make sure that the lamps are fitted properly into their housings before you call for technical assistance.
Signal fibre anti-graisse
Signal for fetffilter
OFF: Ikke noe signal
Hastighet 1:1
Hastighet 2:2
Hastighet 3:3
Hastighet 4: 4 blinkende
5. Display
Iapata ce OTBexJa HaBbN NocpeDCTBOM Bb3dyXOBoHa Tpb6a CbBy3aHa CbC CbeHnHTenHnF pHanue.
BHIMAHHE!
Bb3dyXOBoHATA Tpb6a He e BkIIOueHa KbMaKCeCoapTe n Tp8Ba Da 6bde 3aKypeHa OTdJIHO.
DnAmETbPT Ha B3dYXOBoHATA Tp6a Tp6Ba Da OTroBapra Ha DnAmETbPa Ha CbeDNHTeHNr npCTeH.
BHIMAHHE!
Ako acnnpatopbte cnaedcnФntpu caktnbeH BByIeH, Bnpochnte Tpba da bdat OCTpaHEn.
Cbpxte acnnpatopa KbM B3dyxoxoBOnH TpbN O TBOpN BCTehata. DnAmETbpT Ha TpbNTE Tpr6Ba Da CbOTBeTcBA Ha DnAmETpa Ha CbeDInHtEJIHrФIaHez 3a OTBeXdAHe Ha B3dyxa.
CbBp3BaHETo KbM Bb3dYxOBoHn Tpb5n n OTBOpn C noMaIbK DnAmEeTp HamaJIaBa KanaUTeHa aCInPnpaHe nYbeJIuNaba 3NaUTeHNO UyMa n BoBpeHa paBota.
B Te3n CnyuAn FnpMaTa He Noema HnKaKBa OTROBOPHOCT.
I3noJ3BaIe Tp6a C Heo6xOuMaTa DbJIKHa.
!N3noJ3BaIe TpB6a C Bb3MOxHO HaM-ManIO TpB6Hn KOJIeHa (CMakCmAlIe HbI Na H3BvBAk:90°).
He npomehaTe p3ko ceheneto Ha Tpb6nte!

Bercnca c fnntpnpane
AcnpnpanrBb3dyx ce npcehCTBa nOCBXaBA npen da Bne3 OTHBO B 06pIeHHe N pomeJeHTo. 3a Da n3o13BaCe aCnPAPota B TO3n BapnAHT Ha pa6ota Tp6Ba Da INCTANPAte DOIbnHNTHeHa PnITpnpaCa CnTeMa Ha 6aata Ha PnITPNc A KtINBEH BbrJIeN.
MOnTnUpaHe
MHHMaJIHOTo pa3CTOHRHe MEXyIOBbpxHOCTTa,Ha KOrTO ce NOCTaBRT CbDOBTe 3a TOBHe E HAI-NHCkATA qACT Ha kXhEnckn acnnpatop, Tp6Ba Da 6Be He No-MAnKo OT 50cm B cnyaH a NeEketPnuEeckn neKn H eNo-MAnKo OT 65cm, B cnyaH ra3OBn INI KOM6bHnPaHn neKn.
Ako B INCHPTyKUHnTe Ha ra3OBuYpeI 3a roTBeHe e nocOeHo no-ToJIMo pa3CToHnE, To Tp8Ba Da ce Ima npEdBn.
! En. Bpb3ka
HanpexeHneTo B en.MpeXata Tp6Ba Da OTROBapra Ha HanaPexeHneTo, KOeTo E NocOeHb Bbpy EtNKeTa C daHHnTe 3a acnnpatopa, NoCTabEn OT bBtpeWHa tMy cTpaHa. Ako e ChAbdene H cUcnen CBpbjEte aCnnpatopa KbM KOHTAK, CbOTBeCTBAu Ha DeNcTBaunite HopMN HAMnpaue Ce Ha IecHO DoCTbHNO MCTO DOpN i CNeI PrnKIOHuaHE Ha MOtaxa. AKe He e ChAbdeH cUcnen (DnpeKTHo CbP3BaHe KbM PpeXaTa), INI UeNCeBt He e Ha DoCTbHNO MRCTO CneI PrnKIOHbae HA MOtaxa, INON3BaVe DByNONOCEH PpeKbCBauch CnpoeHOPMtE, Taka Ye Da ce OCNtypn PbHNo INKIOHuaHe HA PpeXaTa Prn CbPbXHnaPexeHne III, B CbOTBeCTBne C npABINlata 3a MOHTnPaHe.
BHIMAHNE!
Ipei Da Cbpxte OTHOBO acnpaTopa KbM MPeka T da npOBepTe daHfYHKUOnHpa npabINHO, npOBepTe daJI KabeJIbT e MOHTpah KaKTo TpA6Ba.
AcnipatopbTe cahaben CbC cneuaen Kaebn 3a 3axpaHbahe; Bcnya, YeKaebntb6bJe yBpeHnOBpHete Ce kMb rapaunOHncrebpn3a da nOlyuHnte HOB.
MOHTAX
Pn BCE TOBA, Bn npenopbYBaMe Da ce nocBbETBaTe c KbaJInΦmUpaH texHnK, 3a Da CTE cnpyHn, Ye DoCTaBeHnTe akcecoapn Ca noDxOJaIz 3a CEJIa. CteHata, CbOTBeTHo TABAHbT, Tp86Ba Da 6bDat IOCTaTBuHO CTaBmHn 3a Da N3DbpKAT Ha HATOBAPBaHTo.
Haun Ha ynoTpe6a
1. ON/OFF CBeTJIHHI
2. ON/OFF MoTop
PnHaTnckaHe Ha 6yToH No “2" acnnpatopbT npemnhab Ha 1-BA ckopoCT ha pa6ota.
PnHaTnCKaHe Ha 6yToHa No BpeMe Ha pa60Ta acnnpaTopbT ce n3KnUOba (PpemHnaba B pexkM OFF).
3. HamaJIyBaHe Ha ckOpocTta
Пин haTnCKaHа hybToH №"3" ckOpOCTHa ha pa6Ota HamaJIraBa, OT YetBbPta CKOpOCT (NHTeH3nBHa) acnIPAtopbT npemHHaba Ha nbpBa CKOpOCT.
4. YBeJIuBaBaHe Ha CKOpocTtA
Пин Натиcke He 6byToH No "4" B nO3nIgA OFF acnnpaTobT ce 3aedCTBa Ha nbpBa ckopocT.
Пин Натиcke He 6уToHa NO BpeMe Ha pa60Ta Ha acnIpaTopa, ckOpoCTTa ce yBeiHnaba И npemHaba OТ 1-BA Ha 4-Ta ckOPOCT (ИнTeH3nBHa).
IHTENBnataCKOPOCTeONpeDeneHINTEpBaHa pa6oTa,KoITOnPnpHcIMN PpOdbJXkaba5MmHyTcNeKoEToACnnapOpBTIpemHabHa2-paCKOPOCT.
3a da DezaktnBnpuTe Ta3n FyHkUny npEi Da n3teye onpeIeHTo BpEme, HATNCHTe 6yTOH N“3”, acnnpatopbT npemnaba Ha 3-ta ckopoCT. PnHaNTCKAHe Ha 6yTOH No"2" acnnpatopbT ce n3KJIOUBA.
ПиAkTNBИРаHe HbCЯKa eHa ChKOpOCT BbPxyДиСппяе ceNoЯВВaT cБтВeTHnTe O603HauChENI:
OFF: Bbpydncnpe He ce n3nncba Hnso
CKOPoCT Ng 1:1
CKOPoCT N2:2
CKOPOCT Ne 3:3
Ckopoct No 4: 4 npemirba
5. Dusnnein
CnHahn3aTOp HaΦnITbpa 3a Ma3HHN
CnHaJIIm3aTOpbT 3a npeHacmIaHne Ha cHnITbpa 3a Ma3HNHH
ce 3aIeIcTbHa BceKn 40 Yaca Ha pa6Ota KaTO BbpyX DncIe Ce nOBra YncIto 1, KoTo 3anOyBa Da npemIRBa. Korato ce nOBn TOBa Cb6JeHne O3NaUba, Ye fNITbPbT 3a Ma3HHIn Tp8bDa Da bJe IN3MNT.
CbO6UeHHeTo Ce IIOBBA, KOraTo acNpuTOpbTe BkJIuOHeN (B IO3nua ON).
3a da n3tpnIte cbo6uEHNeto OT dncnIe HATNCHEt e 6yTOH No "2" u 3aIpbKTe B npOblJxKeHne Ha NOBEe O T 3"doKaTcBo6UeHNeto N3ye3He.
Cb6uHHeTo MoKe Da 6Be De n3TpInTo, KOraTo acnnpaTopbTe BkIoueh (B no3nua ON).
CnHaHn3aTOp Ha φnIITbpa c aKTINBeH BbIJIeN (cAmO 3a φnIITpnpaunBepCuN)
CnHann3atOpbT 3a npHeacnUahe Ha nIITbpa C aKTNBeH Bbltne Ce aKTHBIPA ha BCEKn 160 Yaca Ha paBoTa KaTO Bbpy DnCIIIEe Ce NOBRA Ba YNCNtO 2, KoEtO 3anoBa da npemIrBa.
Korato ce noBn TOBA CbObSeHne O3HaUaBa, Ye fNtbpT c AKTNBeH BByIeN Tp8Ba Da b6Je NoDMHeH.
CbO6UeHHeTo Ce IIOBBA, KOraTo acnIpaTOpbTe BkJIuOHeN (B IO3nua ON).
3a da n3tpnIte cbo6uheHneTo OT dncnIe HATNCHe 6yTOH No "2" u 3aIpbXTe B npOdbJxKeHne Ha NOBHe O T 3"doKATO cb06uHHeNTo N3ye3He.
Cb6uHHeMoKe Da 6BeNe 3Tpnto, KOraTo acnnpaOpbt e BkIoueh (B nO3nUg ON).
PnEeHOBpeMeHHO CnHrAHI3IpaHe 3a npEnacmuahe Ha DbTaФHITbpa Bbpxy DnCnIeNpEmIRBaT NocJeDobateHIO YncIata 1 n2.
3aHnyIbAbeTo CTaba Ype3 N3BbPbBaHe Ha rOpEnocOeHaTa npOeUpya DBA nTn.
CneiN3BpUbaHe Ha ropeNoocHeta npOeDpya 3a PbPb NtCTe3AHyIIBA CnHAnIm3aTopaHaФnITbpa3aMa3HNHnA, a CNEI NOBTOPHOTo IN3bLnHHeHne, HnФnITbpa c AKTNBc BByIeH.
B cTaHdApTeH pexMM Ha pa6Ota cnHnAm3aTOpbT Ha ФиNTbpa C aKtUBeH BbIeH He e aKtNbIpaH.
B cnya, ue nno3BaTe acnnpaTopa BbB Bapnant Ha Фиntpinaа Всрca, Tpr6ba Da akTbnpaTe CnHaJIIn3aTopa H aФиntbpa CakTNBeH BblneH.
AknBnpeHa CnHnHn3aTopa HaΦnTbpa cakTNBeH BblneH:
U3KJIyHeTe ACnIPAtopa (no3nua OFF), HATNCHeTe 6yToHn No "2" u "3" u 3aJpBkTe B npOdbIgHeHne Ha 3".
Yncnata 1 n 2 ue 3anoohat da npemirbat nocneioBateHOBnpoIbJIkeHHe Ha 2".
Ie3aKTHBnpeHa CnHnHn3aTopa HaΦnTbpa c aKTHBeH BtIeH:
U3KJIuOHeTe ACnIpaTopa (no3nua OFF), HATncHete 6yToHH No "2" u "3" u 3aJpBkTe B npOdbJxKeHne Ha 3".
YncnTo 1 3aOnueHd npemrBa B npOdbJxKeHne Ha 2".
Anapma 3a temnepaypata
AcnpatopbT pa3nolara cbc ceH3Op 3a Temnepatypata,
KoITo 3aTeiCTBa MoTopa Ha 3-Ta CkOpoCT, B cIyaua Ye TEMnepaTypaTa B o6cera Ha dncnner e MHOro BncoKa.
BTO3n CnyaB Bpxy Dncnpe 3anOyBa da npemirba 6ykBaT "t, KOTo He n34e3Ba DOkato TEMnepaTypata He cIe3e NOD OJNYCTMIMTE CTOHOCTN.
Moxete da n3ne3e ot to3n pexmHa pa60ta qe3 haTnCKaHe Ha byTOH No "2", "3" nn "4".
Ha Bcekn 30" cen3opbT OTHTa Temnepaypata B o6cera Ha dincnIIe.
V3nncBaHe Bbpxy dncnpe
- MoThnpaIte HOBaTa KpyUka KaTo 3NtBJIHInTe onepauuNTe B o6paTeH peI.
Ako en. KpyuKInTe He CBeTt, npoBepeTe DaIi Ca MOnTIpaHn npaBnHIO npedn da Notbpcnte NOMOHTa Ha cneuaJIInCT.
He IopKIOUaTb np6Op K 3JIeKtpnuecko CETn Do Tex nop, NOKa YCTaHOBka PONHOCTbIO He 3aKOHYeHa.
To TcKacaeTcayexHuecknxMepnMep6e30NaChOCTN B npIMHeHmN Do c6poca napOB cTporo npIpejXNBaTcra TORO TcPnpEDyCMtpNBaETcR no HOpMaJIOkAJIbHbIX KOMNETHTbIX opraHOB.
BcacbBaembBo3dyx He DoJnKeH BblnyckaTbcB Tpy6y, nCOnb3yemyIOIa Bbl6pocOB DblMOB npnbopamn, pa60taoummHa ra3e NIN dpyrnx TOnPiBax.
- He nCnOJb3OBAbI nIIOCTaBJIbBy BbITgKky 6e3 IaMNoeK npaBInbHO yCTaHOBJIeHHbIX C pNCKOM nIpyHt b Ydap 3NeKTpUneCKIM TOKOM.
- HnKOrJa He nCNoJb3ObAtb BbITaXkU 6e3 npaBnIbHO yCTaHOBHeHn peiEeTkn!
- BbIyXka HNOKOrHa He DoJnxHa NcNoJIb3ObaTbcra, KaK OnopHaa NoBepxHOCTb, ecn ToJIbKO He yKa3aHO HAue.
- IcnoIb3ObaT ToJIbKO BnHTbl DnI φnKcHpOBaHnB KOMPJIeKTe C npOyKTOM DnI yCTaHOBKn NIn, ecN HET B KOMPJIeKTe, npIObEpCTu BnHTbl npaBnJbHOrO Tnna.
- IcnoIb3ObaT npaBnIbHyO dInHy BnHTOB, yka3aHHyO BpykoBOCTBe no YctahOBKe.
B Cnyuae comHeHn, KOHCyIbTIpOBAbTaCBA TOpINpOBaHHOM ceHTpe no 06cJyXnBaHmIO nIN CKBaJIncuPpOBaHHbIM nepCOHaIOM.
BHIMAHHE!
- Heyctanobka COOTBeTCTByHOUxN BINTOB n npncnoc6bHeHn DnA qNKcnpoBaHnB C COOTBeTCTBnC 3TmM INHCTpyKzIaM MOKET pNBeCTN K pNCKAM 3JIeKTPnueckOTo pONCXOXDeHn.
He nCnoJb3yIte yCTpoiCTBO c npOrpamMAtopom, TaIMePOM,OTDeJIbHbIM NylbTOM dNCTaHcUHOHHORO ynpabJIeHn IIN NIObIM DpyrIM yCTpoiCTBOM, KOTOpoe BkIIHOaETcA ABtOMaTHueCKN.
Danhoe n3delen IpomapknpoBaHO B COOTBETCTBnC Ebponeckoi DnpeKTHBOI 2012/19/EC no ytniIn3aunn 3neKTPnueckoro n3neKTPoHHOrO 6opdyobAHnA (WEEE).
OeceueB npabnblny ytnlna3auNo daHnro n3denn, BbI NOMOXETe npedTbpaTb NOteHuaNbHbe HeTaNBbIe NoclectBnI dIg Okpykaioe I cpdeI 3DopobBa YelOBeka.

Cnmbol Ha camom n3dennn nInn cOnpOBoJnteJIbHOJ DOKyMentaun yKa3bIbaet, YTO npu yTuIN3aUN DaHNO rN3dennn C Hm NHeB3o ObpaatbCak CObbyHbIMn 6bIb0BIMn OTXdAMn BMeCTO 3Toro, EOR cNeDyET cDaBaTb B COOTBcTCTByUOuN PyHK TnpEKMn 3neKtpueeCKTOI
3neKtpoHHOrO 06opydoBaHnI ytniHa.
CdaHa HcNOM DoJXHa Ipon3BOJntbCBA COOTBETCTBn C MEcTHbIMN PpaBnJIaMn PO yTIN3aUIn OTXoIOB.
3a 6oJIe neIpoIb6HOn HnHOpMaJneO npabInax oxbaIeHnC TaKIMN I3dJIINMn, INx yTNIIN3aUNn INpepa60TNkOBpaauaiTeCB MeCTHbE OprAHbI BnactN, B Cnyk6y noyTNIIN3aUNn OTXODOB INN B MaraINH, B KOTOPOM BInpno6pei nn daHNO E3dJIe.
UcTpoCTBO pa3pa6oTaHO, nCnblTaHO n 3roTOBneHO B COOTBETCTBN C:
- Be3oNaChocTb: EN/IEC 60335-1; EN/IEC 60335-2-31, EN/IEC 62233.
- 3KcNJIpyaTauOHHbIe XapaKTepnCTnKn: EN/IEC 61591; ISO 5167-1; ISO 5167-3; ISO 5168; EN/IEC 60704-1; EN/IEC 60704-2-13; EN/IEC 60704-3; ISO 3741; EN 50564; IEC 62301.
EMC:EN55014-1; CISPR 14-1; EN55014-2; CISPR 14-2; EN/IEC61000-3-2; EN/IEC61000-3-3. Претложенядпарыноги И сальзовни Bцелх Chнжени Вордүстга на okryрахоую счеду:Вкннчite Бытгхони Колпak Ha Mниммальнoi CKKOPOTN,КordaHaЧИнаеТе ROTOBNTb,и OCTавtle ero paobotab Tteчени HeckОьКIN MнHyT NOСТЕТOK,КAZKONHTe ROTOBNTb.YBeILINHBAITE CKKOPCTb TOLKBO B Cnyae 60ЛБшоTO KONMHCTBa Dblma Nnapa,N npiбeraite K ИслвэЗанIO NOBbIshENHbIX CKOPOSTe TOLKBO B 3KCTpeMaIbMbIX CnTuayanx.3aMeHЯTe yrolbHbIФильtp(b),Korda 3TO Heo6xODmO,Длг NOdEpJaxHANX OChpOSeI 3ФФeKTHNBOCTN UMeHbIseHNAO.BOnuAte JxnpOBov/bieФinlbTp(b),Korda 3TO Heo6xODmO,Длг NOdEpJaxHANX OpoUSeI 3ФФeKTHNBOCTN XInpOBorO fInlbtpa.NcNoIb3yIte MaKcIMaIbHBiДnAmETP CnCTeMbI BO3dYxOBODB,YkazAHNBiB DaHHOM pyKOBODCTBE,Длг ONTmIMNaZCuN 3ФФeKTHNBOCTN MHNIMM3aZCuN yPOBHR Shyma.
Ponb3ObaHne
BbIyKka cKoHcTpyuPOba Hn pa60Tb I b pexIMe OTbOda BO3dyxa hapky nIN peunpkjIauN BO3dyxa.

IcnoJIb3ObaHnE cpeXnme OToBa BO3Dyxa
B 3TOM pexime ncapapeHnBa BbIOaTcH npayxu chee3 n6knn Tpy60npoBOi, NOOcoEINHeHHb K COeINHTeIbHOMy KOJIbCu.
BHIMAHHE!
BbIbOHa Tpy6a He BXoJIT B KOMnIeKt I DoJIxHa 6blb npNo6peTeHa OTdJIbHo.
Ckopoocb 4:4MiraHouaJ
5. Dusnnein
CnHahin3aunj KnpoBOO fNlbtpa
CnHnHa3aunJxIpOBoro QnIbTpRa BkIIOyaeTcnaocne 40
YacOB NcNoJIb3OBAHnBa BbITaKKn Ha DnCInlee HauHnaet
MrratbLppa1.
Korda nOraBnaTeC DaHnA CnHaNImaCnJxipoBOn PnIbTp Heo6XoDIMO NmblTb.
CnHaJIIN3aIcNIO BnIDNO KOrDa BbITJxKa BkJIIOueHa ON.
ДяTORO yTO6bI y6paTb CmHaJIIN3aIuXJxHPOBOrOФиNbTaP, HaxMnTe Ha KHOIIy “2"И-depKIne ee HaxaToB 6oJee 3" NOKA He OTKnIOHTcR CmHaJIIN3aIuN.
OTKJIUOyHeNcIgHAn3aunBbIOnHReTcHa BkJIUOyeHHoB BbITaKe ON.
CnHann3aun yronbHoro nIbtpa (tonko dnn
IcnoHHeNcpeunpKylnueeB03dyxa)
CnHnHa3aIy yroIbHorO qIbItpa BkInoHaeTcN oCne 160
YacOB NcNoJIb3OBAHnB BbITaXKn Hn DaNcPiee HaNuHaet
MrratbLppa2.
Korda noBraTeCnDaHna CnHaIn3auny yOrIbHbNΦnIbTp Heo6xOJIMO 3aMeHHTb.
CnHaJIIN3aIuN BOIHO, KOrDa BbITJxKa BKIOUeHa ON.
Дя toro yto6bI y6paTb CnHnHa3aUIO yOJbHorOФnBtpa, HaxMITE Ha KhoNkY “2”и DePxNtE ee HaxaToI 6oone 3" noka He OTKIIQUHTcR CnHnHa3aUIN.
OTKJIUOHeHcIgHaIIIN3aIIN BbIIOJIHReTcH aBkIIOUeHHoB bItjAKe ON.
EcnOJHOBpeMeHHo BkIIOaETcCnHaNIm3aunO60nxФnJIbTPOB,HaDnCIIee NaHyT NO OuepeEn MInrAtb ZnΦpbl 1 n2.
Ytob6bC6pocntb CnHnHa3auno, BblOnHnTe 2 pa3a BblweonncanHHyI npOeDpy.
3a nepBbI pa3 cbpaCbIbAeTcRnHaJIIm3aUg XmPoBOrO
fMbtpa, 3a BtOp0 pa3 cbpaCbIbAeTc RnHaJIIm3aUg
yrolbHOrO fMbTpA.
B cTaHdapTHOM pekmE cnHaIn3aun yroIbHoro pfNbIpa He aKTBNIpObaHa.
Ecnn nCnoIb3yetc BbITJkA B NcNoJIHeHne C peuKpyLneB03dyxa, Heo6xOdIMo AKTNBIPOBaTb CnHaIN3aUHO yrOlbHOro fNtBtpa.
AknBaunCnHann3aun yroJbHoro fNJIbTpa:
BkIIOuHTb BbITJxKky OFF n DejkaTb 3"OJHOBpeMeHNO HaxKaTbIMN KHOJIKN "2" n "3".
Ecnn cnCTema nOcBtKn He pa6oTaET, npOBepbTe KoppeKTHOCTb yctaHOBKn lamn B rHe3dax, npexde Yem ObaPntbCBy CEHTp TEXHnuecko NMOU.
Yitko doTPmyTeCn npBedeHnx B daHOMy KepiBnHTBI nIcTpykui. BnO6hNk 3Hima 3 c6e 6ydu-ky BiDnOBiDaNbHiCtB 3a HecnpabHocTi, 3bNTKn a60 noxekxy, yO MoXe MaTI MlCiE Pn BIKOPnCTAHHi npNCtpoH BnAcIIOK HeBnKOHaHH I nIcTpykui, pNBDEHcx B DAHOmY KepiBnHTBI. BuTJHKH KObnak CnpoeKToBAHN DnI BCMOKTyBaHH NIMy Ta npA, Qo YTBOpHeBcBn iDac npriOTyBaHH iKi Ta np3Haehn liue nIra No6yTOBO BIKOPnCTAHn..
Kyxohha Bnrrkka MoKe MaTn d3aH, 100 BiDpi3Hrcb8cB Bd BnrrkXn 36paXeHHoHa MaJIOHkax ciE I HCTpyKuII anE B 6yDb-RAKOy BnAaKy IHCTpyKuII 3 MOtAgKy, TexhiHoro 06cnyrobyBaHHa Ta ekcnnyatauui 3AnHsauOTc 63 3MH.
Baxknbo 36epeTn Ui hctpykui Dnra toro, uo6 moXha 6yIoo 3BepHyncrdo Hnx B yIb-kyu. Y BInpaKy npodaky, nepeaui nn peei3dy, nepeKohatncr B tomy 606 ihctpykui 6yIu pa3om 3 Bnpobom.
- YbaxHo npOHTa nI hCTpykuii: B HnX MICTNbCBA xBaxImBa iHΦopMaizir 3 BcTaHOBNeHH, BmKOpIcTAHN Ta 6e3neKn.
3a6bOpOHeHO BVKoHvBaTn eJKeTpNHi Ym MexaHHi 3MiH y BnPo6i YN YBViDnX KaHaJax.
- Persh Hix npictyntn do MOtaxy BnOby nepeBipte YN Bci KOMnoHEnTH 63 deFeKTB Ta He nOwkoJKeHHM. Y npOTnHexHOMy BnAaKy 3BepHItb Ca MicCe npoaxy Ta 3ynHt b MoTyBaHHa BnOby.
Pnmitka: Detani, no3HaHehi 3NaKOM (^*) e DoaTkoBIMn akceCyapamTa noCTaHaOTbcr Nlue 3 DeaKIMM MoJeJIIMN, a6o e Detanm, kI He noCTaHaOTbcr B KOMPiKeTI i ix notpi6Ho KyuBatn.

PonepeJxHnNo
6e3neci
Ipeed noaTkom 6ydb yko i onepauii no Ounuennu a6o obcnyrobyBaHHU, BiKluoyitb BuTjKky BiE nektpnHoi CIKN BuTayuOn BuJky 3 po3eKn a6o BiKluoyauOn 3araJIbHn BmNKauch npMiuueHH.
-Дя yix onepaiz no yctanobzi Ta obcnyrobyBaHHIO BKNOPNCOTByTe poboyi pykabnz.
- Pnpctpi MoKe BnKOpNCTOByBaTncr DaTbMn He MOJOnuHmN 8 pokIB Ta Oco6amn i3 3HnKeHmN φi3nUHmN, CEHCOPHmN a6o PO3ymOBmN 3dI6HOCTaMn, a6o 3 HeOCTaTHIM DOCBiOM Jkso 3hAxOJaTBcR NiD KOHTPOJeM, a6o 6vJIn Habuehi BnKOpNCTOByBaTn Pnpctpi B 6e3neuHi
cnocis Ta rkyu p0zmyIOb IOB'ra3aHI 3 Tm He6e3neK.
-ДiTи NOBHHI 6yTN NiД KOHTPOJEM i He NOBHHI rpaTnca 3 pNCTPOEM.
Onepaui no YnueHH Ta 6cnyrobybaHH He NOBHHI npOBODNTNCdItbMn 6e3 HargJy.
-ПрииMiueHЯ NOBHHO MaTHI DOCTaTHIO BEHTINJIaIIO KOJI N BNTJXKa BKNOPNCTOBVETBCR ODHOUacHO 3 iHsIMn IpNCtPOrMn ITO npaIooTb Ha ra3i a60 iHxix NaIINBax.
- BntjKHy Heo6xIDHO qACTO YnCTHTN JIK BCepeHNi, TaK i 33OBHI (XOUYA B ODNH PA3 HA MICaLb), DOTpIMyBaTncB 6yDb jkOMy BnPaIky TORO, IIO Bka3yETbcr B IHCTpyKcIax NO o6CnyROvBaHHo.
He DToTpmaHnHa HOpM OUnIeHHa Ta 3amIn i OUnIeHHa IJIbTpIB 36JIbWye IMOBiPHiCTb Pn3NkY 3arOpAHn.
Cybopo 3abopoheno npiroTybaHHHa BIDKpTOMy BORHI NiBNTAAKKOIO.
-ДяЗamIHлamnochN OCBITJehH BnKOpNCTOByBaTN TiIbKN TINлamnochB Bka3aHn B po3diJI o6cnyroByBaHHa/3amHa JAMNOCH NbOro nociHnka.
BnKOpNCTaHH BIDKpIToR OJyM'HaHocNTb 3bTOK pIbTpam i MoKe np3BeCTn Do 3aropAHn, TOMy nOTpiHo yHkATn B 6yd JAKOMY BnPaIky.
CmaxeHnnoBHHNO npOBODNTNcR niHaJrdom 06 yHKnHyTN 3aogpHHpo3NIto oII.
YBAFA: Koln BapnilbHa NOBepxHn npaHoe, DocTyNHI YactHm MOKyTb HarpiBaTncr.
He Niiklouatnpictpi Do eJeKTPnHoiCITKn Do Tnx nip, POKN He 6yde nobHicTIO 3aKiHcHa yctahOBka.
- LTO CTOCYETbC TEXHcHINx MIP Ta MIP 6e3neKu y BIKOpICCTAHHI 100 BiDnOCHtBcN DO BIKnDb napB, cybopo
DToPmMyTeCeHOPM MlueBnx KOMneTeHTnX OprAhIB.
Повитра сьгубс, He NOBHHNO BUNyCKATNCB Tpy6y Jka BKNOPCTOBYcSДЯ BKNUY DmMIB pNCTPOAMN 0 npaioTb Ha razi Ta iHuxn naibax.
He BnKOpNCTOByBatn a6o 3aIIuIaTn BNTAKKy 6e3 npabINbHO BCTaHOBJIeHIX JAMNOYOK 3 pN3NKOM OTPIMATnyap eJekTpUHIM CTpyMOM.
HikoJIN He BnKOpNCTOByBatn BnTjKky 6e3 npaBnIbHO BCTAHOBJIeHO peSiITKn!
BHTJkKa HIKOJI He NOBHHa BKNOpIcTOByBaTcra RaONOPHa NOBExHRA,RAUTo TIlbKn HE BKA3yETbCra.
- BmKOpNCtOByBaTN rBnHTn dIa φikcByaHnB Habopi 3 npOdyKTOM dIy UCTaHOBN, JaIIO HeMaE B Habopi, pIuIbSaTn rBnHTn npAunbIbHOrO TnIy.
Bukopnctobvatni npabnilbny doBXinhy TBnHTIB kka Bkaytbcra B nocibHky no BcTaHOBJIeHHIO.
- Y BnpiKy CymHIBiB, KOHCyIbTyBaTINcR B aBTOpN3OBAHOMy CEHTpi a60 3 KBaIipikOBAHm NepcoHApOM.

YBAGA!
- He BCTaHOBIIbAHNByIiNbOIBINHX TBnHTB i npncIpoIB dIy fikCyBaHH y BiIOBIDHOCTI 3 cIMM IHCTpyKcIaMM MOKe npNBecTN Do pu3NKIB eNEKTpUHORo NOxODJKeHN.
He cnid BnKOpNCToBvBaTn 3 nporpamatopom, TaMepom, OKpemm nyltom KepyBaHHa 6o3 6ykbKaMM iHWM nPCTPOeM, kNn npNbOuNTbcra B diHO ABTomATUHO.
DanHH Bnpi6 npomapKobAHn BiNObiDn do EbponecBkoI npeKtmbn 2012/19/EC, ytniiaazir eneKtpnHoro i eneKtpOnHoro obnaHann (WEEE).3a6e3neUoyuBn BipHy ytinl3aizio zboro Bnp6y, Bu donoMOKeTe nonepedTn notehuiHi HeraNTbhi HacniDKn Dny oTOuyOuro cepedBouia i 3doob'JIOHNH, KOTPI MOrn 6 Matn MiCue B npotnEcxHOMy BnAky.

Cnmbon ha camomy Bnpo1 a6o Ha cynpoBdoxyuOmy Horo doKoymTe Bkazc, zo npn ytniiaaui 5b0r O npboy 3 Hm He moKHa NOBODTNCRA K3i 3BnuahHMM No6yTOBIMn BiXoDAMn. BIn Mae 3daBaTnca y BiNIOBINHn PnyKT npnOmy EneKTPUHO r I eNkTPOHOro 6oaJahnHnA DnI NOaJIbWoI ytniiaaui. 3DaabAHn Ha 3NaI NobINHNO BVKOHByATnc 3riDNo 3 MicueBmnpabINAmn no ytniiaaui BIDxOdb. DnI 6bnwe DetalbHOIHOpmaui np npabINA nobODeHHN 3 TakHMn BnpobAmn,ix ytniiaaui I nepepobKn 3BeptaInTeCb MicueBi opraHN BnAdn, B Cnyk6y no ytniiaaui BIXxOdb, a6o B Mara3HN, B kOMy BN npndbaHn daHn Bpi6.
Пилад спpoeKTOBaHо, ВирpoБуBaHо i ВИROTOВNeHо 3riДно 3:
- Be3neka: EN/IEC 60335-1; EN/IEC 60335-2-31, EN/IEC 62233.
- Eknnyatauihi kocti: EN/IEC 61591; ISO 5167-1; ISO 5167-3; ISO 5168; EN/IEC 60704-1; EN/IEC 60704-2-13; EN/IEC 60704-3; ISO 3741; EN 50564; IEC 62301.
EMC: EN 55014-1; CISPR 14-1; EN 55014-2; CISPR 14-2;
EN/IEC 61000-3-2; EN/IEC 61000-3-3. Iopadn nnpabunbooi ekcnnyataui Ta dnn 3HnKHeHH BnBnBy Ha cepeoBniue: BmkaIte BnTjKky Ha MihimalbHy SwnDkiCTb nepeodouk om npirotoYBaHH Nki, i zanuuaite II npauObatn Ha deiklbKa XBNINN nicna 3akHueHH nprirotyBaHH. 36InbUyTe WbnDkiCTb tiNbKn y paai BeNkoi kIlbKOci DMy i napy Ta BnKOpNCBOyHe HADyB TiNbKn y KpaHix BnAdkac. Dnpi ndpMaHa BnCOoI eFeKTNBHOCTi BnDaHEnH 3aXab, 3a Heo6xDiHOCTi, BnKOHyTe 3amiHy ByrInbHorO(-nx) FInbtpy(-IB). Dnpi ndpMaHa HBCOKOI eFeKTNBHOCTi FInbtpy XkpB, 3a Heo6xDiHOCTi, BnKOHyTe YnctKy FInbtpy(-IB) XkpB. BnKOpNCBOyTe MAKcImaHbH ni diAMetpr CnCTeMM NOBtPOBoID, 100 BkazAHy y IHCTpykui Di ONTmisaui eFeKTNBHOCTi Ta mHimiaauiu
BukopncTaHHa
Bntjka po3po6JIeHa dI pyo6OTn B pexkMI BCMOKtBuHnRA, BnBOJ4N IOBITpr Ha3OBHI a60 B φilbtpyOCHMy pexkMI 3 peuPKyIJIcIIO nobITpr.

BapiaHT BiBedeHn
Iapn BvBODaTbCn Ha3OBHc Ypee3 BvBiDHy Tpy6y 3akpinHeNy DoФlaHua 3'EdHaHHN.

YBAGA!
BvibHa TpyBa He noctaAetbCra i Tomy Heo6xidHO II npndatn Okpem.
JiAmTp BvBjDHOI Tpy6n NobHEn BiNObiDatn DiAmTpy 3'EDHyBaJIbHOrO KInbIa.

YBARA!
Ykpo BNTaKHN KOBnak Mae ByrIbHi pInbtpn, To ix Tpe6a 3HrtN.
Пд' endat no hactinho BvBidno trpyb Ta BvBIDHoro OTbOpy 3 odHaKOBIM diaMetpom BxOxy nobitpr (3'edHyUCHnФlaheu).
BukopncTahn Hn HactiHn X BmDnX Tpy6 Ta OTbopib 3 MeHIM DiAMetpom npBBeDo 3MeHWeHH eEeKTHBOCTI BCMOKTyBaHH Ta 3Haune 3bIbWeHH pBHe My.
Tomy Mm 3Himaem 3 ce6e 6ydb-ky BiJIOBiaIbHiCt b no Bnuecka3aHOMy.
! BnKOpNCtOByTe HaKopoTUsn BnTjXKn KaHaJ.
! BnKOpNCTOByTe BnTJxHNI KaHaJI 3 HaMeHIoHO KInbKiCtIO NOBOPOTIB (MAcHMajbHNI KYT NOBOPOTy: 90^
! YHnKaIeTe pi3Knx 3mIH nlooi nepepi3y BNTJxHoro KaHaNo.

Bapiant 3 pfinbtpauieio
BTRHnye NOIBITp3 HEXKINPOE7cBa Ta OUYIyETbCBA Ta 3HOBy NOBepTaec7bca B pNIMiueHH. IJRA TORO,IO6 BVKNOPICTOBYATN KOBNAK yCbOMy pexkmi, Heo6XiDHO BCTAHOBnT IOdaTKOBY CNTeMY fJIbTpiB 3 aKTINBOBAHm ByrIjllNM.
Inctanlaic
BicntaHb HNkhBoi BiDuctnHn BNTJxKn Do nocydu Ha kxyoHHni PnTI mae 6ytne MeHne 50cm, y BNapky eIeKtpuHnx PnIT, ta 65 cm, y BNAPKy r3OBHX Ta KOMoiHOBAHIN PnIT.
Heo6xioH npimmatn do ybaru BjicTaHI, kki Bka3yHObCB B iHCTpykuii 3 iHCTanraIi raoBOoi nnTIn.

PiIcHaHHo eJekTpomepexi
Hanpyra B eNeKtpomepexi Maé BiNobiIdaTn BkazahHm
XapakTepeNtKam Ha etKeTci, Ra 3haxoDnTbCra BCEpeHni
BnTjRKn. RaIoo BV KOMPLeKT BXoNTb BVnka NiE'EdHnHBAeNEKtpomepexy, To cnI niE'EdHn BVnTjKxy Do pO3eTKn, Ioo BiNDOBlae iCHyOUMH HOPMaT Ta 3haoDnTbCBA DOCTynHOMyMiCi, Ioo MoKHa BVnKaHn Ni nCIIaHCTanJI. RaIoo J BNkAHe BXoNTb B KOMPLeKT (pIrame NiE'EdHnHBAeNEKtpomepexy), a60 po3eTKa He 3haxoDnTbCBA DOCTynHOMyMiCi, TAKO X iNicIA HCTanJIuTi, To cnI bMOHTyBaTHn HAIeXhNH DBOx-NONIOChN BIMNKau, RaIKY 3aBe3neHtB NOBHe BiKDIOUeHHa BiMepexi B yMOBax nepeHAnpyr lll kateropii, B NOBH NBIPOBIDHOCTI 3 npabINaMn IHCTanJIi.

YBARA!
nepe TmK 3HOBy NIKJIOUHTN BNTXK Ky DO eNEKTPOMEPEKJI i nepeBIPNT npabINbHicTB pOBoT, 3aBXn KOnTHPOHNe Tc06 uHyp MEPEKJI 6yB 3MOHTOBAH INBHO.
Bntaeknn KOBnak Mae cneuaIbnn npoBid XNBnHn; y BnnaIky noIkoJxHn npOBOy, 3amOBte Ioro y cnyK6i texHiHO 06cnyroByBaHH.
Inctanlaic
B komnneBtJXKBNXoABybWpynnI JnKpInnHnR, pospaxoBaHnHa 6iBbSiCtB TnIN BCTIN. Ipote Heo6xIdHO 3BepHyTnDIO KbanidipikobAoHOrO Texhika DnpepeBIPKn PnpaatNoCTi MaTePianB 3aJIeXHoCTi BiD TnY CtiHN Yc CTeni.CTIHa/CTenl NobHHb6Ty DoCTaTHb MOiHIMM,UoBtPNMaTn Bary BtJXKN.
ФункюhybaHHA

1

5

3
4
1. ON/OFF Cbitno
2. ON/OFF DvRyH
HaTnCKyHOn Ha KHOIpKy “2” DBNrHy NpeeJe Ha 1.
HatackyOuHa KhoIky NiD Yac po60Tu BHTaXHHKOBnAKepeDeB pexIM OFF.
3. 3mehuennbwnkocti
HaTnCKyOnu Ha KhoNky “3”, OTPMaEmo 3MeHHeHHaBvNkoCTi - BiD vBvNkoCTi 4 (IHTeHCMBHO) Do VBvNkoCTi 1.
4. 36ilbweHnhaBvdkocti
HaTnCKyHn Ha KHOJky “4” KOJI N BNTJxKb BIMKHeHa - OFF, BNTJxKa nepeJe Ha WBNkICTb 1.
HaTnCKyOuH Na KHOIky NiI Yac po60Tu 3bIbIbIMo
WBnDkictbBid1do4(iHTeHCNBHOi).
IHTeCNBHy 5WbNkICtB MoKHa 3aPnporpamyBaTN B yaci. CtaHapThe nporpamyBaHHA - 5', nicra 3akInueHHa zuoro uacy KOBnak nepeJde Ha WbNkICtB 2.
IooB BiKIOHHTN FyHKJIO, Do 3aKiHHeHHaCy, HATNCiTB KHOKNY «3», BNTRAKKa nepeKIOHHTbCra Ha WBIKDICTb 3, HATNCkAIOHN Ha KHOKNY «2», BNTRAKKa BIMNKaEcTbCra.
KoXhni wBvdkocsti BIDnOBiJaE 306paKeHHa Ha dIscnJIe:
OFF:3o6paXeHnB BIDcyTHe
UWBnKicTb 1:1
UwDkctb 2:2
UWBIDKICTb 3:3
UWBIDKICTb4:4(MNROTnTB)
5. Ducnnein
CnHanaiaqixKupOBoro pInbtpy
CnHai3aJgKIpOBOro fInbTpBy BMKaetbCnIe 40 roDnH pObotN BNTJHKHO KOBnaka Ta 3o6paKaetbCnHa DnCnIe i3 a DonOMorOu cnp1, Kotpa NounHae MroTITn.
KoI 3'ABnEETcRa Taka CnHaJIaZiJe HEO6xIDHO NOMITN KINPOBIOBIIHOUHoi pifIbTp.
CnHani3aJi BiDobpaKaebcHa YbIMKHyTbnBtJXU (ON).
Ipy toro, uO6 BmKHytn CnHani3aJIO JxnpOBoro pInbTpA,
HaTnCHiTb Ha KhoNkY "2" ta ytpmaJe II 6InbSe 3 cekyHd,
DOKn He BiKnIOuHTbcra CnHani3aJi.
BmKHyTcHnI3aJIO MOxJIINBO KOJIN BtJgKka y pexnMI ON.
Cunhanizaiy ByrinbHoro fInbtpy (TilbKn B pexnmi peucpkynuaii)
CunhailiajByrilbHoro pifIbtpy BMNkaetbcnicn 160
roDHN POBOTN BNTJXHORO KOBNaka Ta 3o6paKaetbcn Ha
dncnJIe 3a DonomoroIO UOpPn2, KOTpa NoOHae Mmrotitn.
KoI 3'8aBnEeTbcra TaKa CnHnI3aCi ByrInbHn FInbTp Heo6xIDHO 3amHHTN.
CnHani3aJi BiD6paKaTe bCa Na yBIMKHyT BnTBxKl (ON).
Ipy toro, 106 BmKHytn CnHani3aJIO ByrInbHorO pInbtpy,
HaTnCHiTb Ha KhoNkY "2" ta YTpmaJte ii 6Inbwe 3 cekyHd,
DOKn He BiKnIOuHTbcra CnHani3aJi.
BmKHyTn CnHnI3aJIO MOxJIINBO KOJN BtJgKka y pexnMI ON.
Kaio BMkaebcra CnHanizao 6ox φinbtpiB cnpn 1 i 2 6ydt MBroTITno cep3i.
山6cHHTn CnHnI3aJIO, BnKoHaIe 2 pa3n BnIeONncAh onepaJIO.
3a nepuip pa3 cKaiaetbca CnHaiiauajxJinpoBoro pifIbtpy, 3a npuip pa3 cKaiaetbca CnHaiiaiau jByirInbHorO pifIbtpy.
Y cTaNdApTHOMy pexIMi CnHai3aJia ByrInbHoro pfIbtpy he AKTINBOBaHa.
Kuio BnKOpNCTOByEcBcra BNTJkay BnKoHaHHI 3 peUmpKyIaJIeIO NobITp, Heo6xIdHO aKTINByBaTn CmHAnIaIIO ByrIbHorO pInbTpA.
AknBauaia CnHaJIa3auii ByrInbHoro fIbTpa:
YbIMKHyTN BITXHHN KOBNaK (OFF) Ta HATnCKaTN OHOuacHO Na KHNKN «2» Ta «3» npOTaROM 3 cekyHd.
LHpn1n2no cep3i6dytmbmroitnpoTgrom2cekyH.
BidknouenHn CnHaia3aui ByrInbHoro fInbtpy:
YBIMKHYTN BITXHHNI KOBNAK (OFF) TA HaTNUCKATN ODHOUACHO HA KHONKN «2» Ta «3» PnOTAROM 3 cekyHd.
Lüfppa 16bye MmroTITn npotraGM 2cekyHd.
AbapiHn CnHan TemnepaTpy
Bntjka oIaHaHa daBaayem TemnepaTyPi, kIyM BmKae DnHyrHa 3 5uDkocti y BnAky, KOITemnpaTypa 6IJa DnCIIeIO Docntb BnOka.
Ha taki n CTAH Bkaye Ha dncnnei nitepa "t", JAKa Mirorotntb.
Bttkka 3aIIuAeTbCBAIMKHYTOO DToN,doKn Temnepatypa He noHn3tcb HNKe pIBHa AKTbauJI abapIHorO cmHany.
IooB BnTn 3 zuo ropeKIMy Heo6xIDHO HATNCHyTN Ha KhoNky “2”,“3”uH“4”.
KoJHnX 30 ceKyHd DaBaay KOHTpOJIe TEMnepaType CepeoBnua HaBKOJIo DInCpIeIO. 3o6paXeHHHa
dncnnei
Hikojin He BIKOPnCTOByBaTn a6pa3nBHi peOuBNH.
ФильтзатурмкхириВ
Man. 20-24
3atpmyec xnpoBi cnoIyehn, 0o BnHnKaHb nIac nprirotybaHH iKi.
Повинен Уститя садд раз в міць (аоб колс Стетм индацilп полбенгь Флггь, якшу e у в buшй мосял, вka3ye Ha daHy HeobxidiHICTb), 3 BnKOpIcTahHЯ hearpecnbHnx MnOchx 3ac06B bpyHy a60 b nocydomuohy maunhi pri nH3bki Tempepatyi i kopoTOMy uKnii.
Pn MNTI B NocyDmIOH MaUHHi MOKe MaTn MicE DeKe 3He6apBLeHHa PInbTpY,npTe Ioro PInbtpyOci XapAKTePNCtIKN 3AluHaTOBcR He3MiHNHMN.
Дя 3нггд риьту 3атрмкхуnotогнь ha cebe npуннHy pyky biDyennHЯ ру.
ByrilbHnI pInbTp (TilbKn B peKmippeuRpyla) Man.23
B6npae HenpneMHI 3anax Kyxhi.
ByrlbHn FIOBtPO MOnHa MNTN KOxH N DBA MICAJI (a60 KOnCnCTema IHMDKauI IpeNoBHeHHa FIOBtPIB, JAKU O y BaUli MOeJI, BkAye HA daHy Heo6XidHcTB) B TEnNI BODI 3 BiNDOBiHMM MNOChm 3aco6Amn A60 B NocyDOMHouJ MaunHi npr TneMnepatypi 65^ (B OCTaHbOmy BnJaKy, BVOKaHte NOBHI UIKN MTTT 6e3 NocyDu BCEpeDINHO NOCYDMIOOIO MaunHi).
3nTn HADNIuKOBy Bovy 6e3 noNkoJKeHHa pInbtpy, nicIyoro 3HOBy NOCTaBHTn IYO y dyXOBky Ha 10 xB. npn 100^ dny NobHOrO OcyUBaHNr.
IpoUyku MInTn pa3 Ha TpN pOKn, a6o J KOKHOrO pa3y, KOIN TKAHnHa BnBnAeTbCn ONUKoDKeHO.
MOHTAX
BCTABITN ByrIbHn FjIbTp No3ady FjIbTp y 3aTpMKn Jxpy i 3aFikCyBatn DbOMa NpHaKamn.
Ybara! PnahanBkIIOeHI B Habip Do ByrInbHoro pInbtpy, a He KOBnaka.
BCTaBtIN HOBy IaMIOUky, BmKoHyoN II B 3bOpoTHOMy npraKy.
Kkuo cnctema niccbitkn He npaioe, nepebeipte Bipny yctahOBky lamn B rH3da, nepei TmK 3Beptatncr do ceHTpy TexhiHOI donOMOrn.
JaBnIaaybI acnantbI naIaNanhy 6apbcihda 6yn Hycayda 6enrileHren KOndany wapTtapBH cKaTamaFaHHbIH KecpiHen 6oFAN OKNblk Ept nEH 3akim yuii Xayan 6epMeNi. Copfblw TEK KaHa Ynde naIaNanlya 6onatbHdai etin XO6anaHFaH.
KaKnak ocbi KITanwada KepcetinreH cypeTepen e3rewe 6oBIn Kepiny MyMknH. DereHMeH, KonJaHy, TexNkAlbIK KbImET Kepcy XHe OPhATy HycKaynapbl 6ipJeB60nAbI.
Ke3keIreH yaKbTTa 6yn HycKayMeH naJaHaHy yuHn akTaHaN MaHbI3dI. ByhIM caTbJInFaH, TaCbIPfAH HeMece XoBInFaH Ke3de ON OHbIMe 6ipre KaNfaHbHa Ke3 KeTki3iH3.
HcyaydbmykTOKbHb3:OHa 6yamdbI KOHbipy,naJaIaHy KHe Kaybinc3dkx HInde MaHb3db MeJIMet 6ap.
BvibHbIH 3NeKTPoHdbIK Hemece MexaHnKaIbIK KOHCTpyKUyraCbIHda Hemece copfbiWeHTINJIaYraNbIK KaHaJdpbIHda eKhAhdai Da e3repicTeP JakacamaHbI3.
OphaTydbOpbHdAmac 6pbHb6epiReh 6apNbIK KypamdaactapDbH 3aKbIMdaImaFaHbIH TeKcepiH3 Hemece opHaTydb JaIrafTbIpMac 6pbH DeJaIra xa6apnAcbHbI3.
EckenTre: (^*) TaH6acbI 6ap 6JIikTeP TK Kei6ip yInepmeh 6epineTIN (6aca KaFdaJnapDa 6epimTIN), 6ipak catbn anyfa 6oJatbH KocbIMsa akceccyapnap 6Obn TaBJaNb.

Hycaynap
Ke3 KeIReH Ta3aJay HEmecTexHnKaIbIK Kbl3MeT KepCetYxMbICTapbIH opbIHdAmac 6ypbIH aShaHbI ShbIFapy HEmec XeJIiIK Kyat Ke3IH axbIpaTy apKblblcOpfbIUtBtI 3JeKtp XeJIicHeH axbIpaTbIHbI3.
OpHaTy XaHe TexHnKaIbIK Kbl3MeT KepeTy XyMbICTapbIH Kypri3reH Ke3e epaIbIM XyMbIC Kofra6bIH KniHi3.
-Бул Крьлгынь 8жастбл
ЖэHe Oдан унken балanap, DeHe,
ce3y Имece aKblN-Ои
КабileTtepi Шектулар
Hemece Tэхірибeci мен Білімi
ЖOK Тулгалap OНы Kayinci3
JOJMeH NaIdaIaHaYfA KaTbICTbl Hycay aJIbI, bIKTMaJI KayiInTePdi YfBlnFaH XaFdaNda XeHe 6akblayda 6oJFaHda NaIdaIaHa aIaNbl.
BaIaIapDbIH 6acKapy
3JIeMeHTTePiH e3reptYiHe XaHe
KpybIINfBIMeH OINHaybHa XoJ
6epMey KepeK.
Ta3aay XHe 36eTihwe TexHnKaJIbIK Kbl3MeT KOpceTy XyMbICTapbIH 6aIaanapdbIH 6aKblaycbl 6yprizye 60JMaIbI.
- Acy copfblbI baca ra3 kafy KypblfblnapbImeH HeMece baca OTbIHapMeH naJaHaNbIFaH Ke3De, Kypblfbl OPhaTbIFaH 6JIme JkETKIJIKTI Typde JeJNeTeiNyI KaKet.
CopfbIbI iWIneH De, cIptbIHaJa KyyEni Tpyde (KEM DEFEHDE AIBHA BIP PET) Ta3aJIay Kepek, əpdaIbIM TexHnKaJIbIK KbI3MeT KOpceTy HcCKayIbIFbIHDa 6epinreH HyCKayIapDbI OpbIHdAHybl3.
CopfbIbTBiH Ta3aJAY CTaHdapTTapbIH XHe cy3rInepdi aImactbipy XHe Ta3aJAY BoBbIHwa epxeJepdi
- yctaH6ay HəTnxkeiHne ept TybIHdaybl MymKIN. TamaKTbl TIkeIeN COPfblu aCTbIHda KaHdbpyfa KaTaH TblbIM caJIbHaDbI.
-ШаMDыaybICTbipy yushi TEK Ocbi
HvCKayIbIKTbIH «TexHnKaIbIK
Kbl3MeT Kepcety/ShaMapdabl
aybICTbipy> 6eImiHde
KepcetilrReh ShAM TpyiH
PaiDaIaHbIHbI3.
Ausbik KaIbIHDbI naJaIaHcy3riJep ysiH 3nH XHe ePTKayin H TybHdaTybl MymKiH,COHdbIKTaH OfAH eWkaWah KOJIbepMey KepeK.
MaIdbIH 7aMaHaTbIC Kbl3bIN Hemece XaHbIN KeTneyiH KaMTaMaCbI3 eTy yWih, TaMaKTbI a6aJIan KybIpyKaJcET.
CAK BOJbIHbI3: CopfblWtBIn
KoJxKeTImdi 6eJIikTepi TaMaK
DaIbIHday KypblJFblJaPbI
NaIdaIaHaHbIJFaH Ke3De KbI3bIN
KeTyi MymKiH.
-
Ophaty TOJIbIK aIaKTaJIMaBbIHwa KypblfblHbI 3JIeKTp JxEJIciHe KocpHaB13.
-
Bydln ZhfybHa Kapcbl KondaHbIaTbH texHnkaIbIK KHe Kayinc3ik WapanapbH eckepe OTbipIn, JepriJIkiTi BNIk OpraHdpB bekITKeH epexeIepDi MyKnT OPbIHay MaHb3DbI.
Ocb KpyblfblHbI TYtIK apKbIbI 6aftIITay KyyneCIN ra3 Hemece 6acka OTbIHbI JxafatbIH KpyblfnapdAn lBkKaH 6ynapDbI bIfapY CnKtBb 6acka Da MaKCaTcapDa naDanaHbIaNbTH Ke3 KeIreH KOndaHbCTarbJ XeJeTeY KyynciHe XaNfay KaKet. 3NeKtp TorbHbIH cory KayiNe BaJaNbHcTbI 7aMbI Dpybc 6BeiTINmERe HcPbIwTbI naDanaHbAHy3 KHe KaNdbIpMaHbI3. - TopnapbI Tnicti Typde 6ekitImereH copfbltbl eKkaan naJaAnaHa6aHb3.
- Aphaы! KepcetimmeHHe, copfblTbELIKAUAH Tipek 6eTI petiHne naIdaIaHa6bI3.
- Tek opnaty yuishen zhimmen bipte bepiinren bekitybpaHdaIapbIH naIaIaNbIbI3, erep bepiImece,6paHdaHbIH Tnicti Typih catbIN anbIbI3.
- ByapahdapanapdbiH opHaTy HcKayIbIfbIHda KepceTijreH dypbic y3bIHdbfBn naDanaHbHbI3.
KymHdaHcaHb3, ekiNetti Kbi3Met KepcTey 60bIbHa XapDem KepcTeY optaIbIbHa HeMece Tnicti MaMaHaHraH TyIraFa xaBapnaCbHb3.
ECKEPTY!
-Бураздаларди Неме Беку Крьлгссн Oсы hyckaynapra caikec opHaTNay 3NeKtpnik KayinTepre ekenyi MymkiH.
- BaFapnAmaybIme, TaMepMeH, 6eIek KaBkTah Baskapy KJYecimeh Hemece ABTomaTTb Tpyde KocblaTbIH Ke3 KeJIreH Baca KypblfBIme KOJaHaHaHbI3.
3JNeKTpNIk JxHe 3JIeKToPOnHbIK acnTapDbI KaITa naIdaFa acbpy XeHiNderi 2012/19/EC EbponaBik DnpeKtNBke (WEEE) caiKeC bepinren eHIM TaHbanaHdbI.
Bepinren eHimdi dupbic KaTaNaiDara acbipydbi kamTamacbb3 etymeH, C3 KopuHaH optFa xHe aadam DeHCaylbfHa Kepi acepi Tnir3y di 6oJIbIpMayra KEmekTececic3.

Acnantarbl HeMece KOndama Kykattarbl TaHbacb6epinreh acnantb KaTaNaIdaFa acbipyda aetteri TymbICTbK KaNbIK petIHne nirepyre 6oImaTbHIn Kepcetei. ObIH opNbHa 3NeKTpiK xHe 3NeKTpoHdbK acnantapbl KaTa Ta naIahara cbyfa apHaJIaH Ka6blday NHTIhe TaNcbpyKepek.
Byyra tancbipy acnantbI kaTaNiDara acbipy XeHInDi er XeprinikTi epexenepre caikec 1blfapblnybl Tnic.
BHydai eHIMdepi naIaIaNHy, KaTaNadara acbipy epexenepi KcHInJe TOnblk AknapaTTbl Keprilikti ekimwiinok opbHapbHaH, KandbIKTapbl KaTaNada ra acbipy Kb3MetiHeH HeMece bepiReh eHIMdi C3 catbn anfah dyKeHen ana anlaacbl3.
KypbIbI KeNecinepre caJ KObaHaHfA, CbIHAnFaH
KHe Jkacan WbIrapbIraH:
Kayinci: EN/IEC 60335-1; EN/IEC 60335-2-31, EN/IEC 62233.
- ΘΗΠДΙΙΚ: EN/IEC 61591; ISO 5167-1; ISO 5167-3; ISO 5168; EN/IEC 60704-1; EN/IEC 60704-2-13; EN/IEC 60704-3; ISO 3741; EN 50564; IEC 62301.
EMC: EN 55014-1; CISPR 14-1; EN 55014-2; CISPR 14-2; EN/IEC 61000-3-2; EN/IEC 61000-3-3.
Kopwafrn optara 0cepdi a3aayu ywiH nypbic naananaHy typabI hcykaynap:
3zipnydi bactarhaHa KaKnaKTbI eH a3 KbIaNdMbIKNeH KcBbIb3 XHe 3zipney aayTaNfAHn KeHH bpa3 MmHT BObI JxMblc icTeiH3. KbIaNdMbIKTa TEK TYtHiN HxHe 6ydbH yNkEH MeJIwepi XaFdaBbHJa apTbIbH3 XHe KYuweTy KblaNdMbIFbH(KTapbH) TEK WKeRTI XaFdaNapAa NaDanaHbH3. XaKcbI XaFbIMCbN niCTi a3aHT TImdInirH cakTay YsHIN Kaxet
60nfaHda kemip cyricih(lepih) aybictbplbHb3.
Kakcbi MaCy3rici Tmimdiniirh CaTay yuHkaxet
60nfaHda MaCy3rici(lepih) aybictbplbHb3.
TmimdiNtOHTaHaNbDpy XaHe uydbI bapbHwa
a3aInTu yuHn OcB HcckaybIKTa KepcetinreH eTKi3y
KyuNCiHnEH YJKeH DnAmETpiH naDaNaHBHb3.
PaiDanaHy
CopfblcIpaaypfbIb6ap TaTpY keIeTkiipetHne,HeMece iKia KaIa aHany cy3ri piTeHne naJaIaNHyra apHaNraH.

Copy Hyckacbi
By cbyTka biiktipuyi pfnaHeUke KocblfAH copfbll Kyobip apkblnb wblfapblnadbl.

ECKEPTY!
Copfblu Ky6bipdbH dAmetpi 6ipiKtipuyui caKHaBHy dAmetpimTeHe Dec 60ny Kepek.

ECKEPTY!
Copfblu Kbybplb copfbll XnHaKTamacbIme HkTeK3iImMeDJI, OHBI 6eNEk CaTbI any Kepek. Copfbltb Kaibpradaflb copfbll KybIpnapbMeH aya bIfapatbH TecikTepdei, con dAmetpderi TecikTepre KocbHb3 (biipktipyui pfanaeu). Kaibpradaflb copfbll KBybIpnapbMeH KEmdey dAmetpderi TecikTi naiaaany, copy Kya batn HauapnatbIn, rypinDeYH KyweiTedi.
! KaKeTTI MHHMaJIbI Y3bIHbIKTaFbI TYTikTI KOJaHbIHbI3.
!BapbHwa KEN MINIMI Bap TYtKi KOJaHbIHb3 (NIIMHI, MAKcMaJdbl6ypbUbIb:90°).
! TytkTIN KENDEHeN KIMacbIHda TV6ereeNi e3repicTePdi 60JdbIpMaHbI3.

Cy3y Hyckacbi
On yuiship kEmip cyrici kaxet, OHbl eDetteri catyubinapdah anyfa 60ana.
Cy3ri sbIfapblJFaH ayaHb! KOFapFbl sbIFbc TOpbl apKbIbnbl 6eMere KaTt Xibiepy anbda Ohbl MaM MeH icTepeH Ta3apTaBl.
KoHdbipy
Copfbltih TMeHri Kbipbl Meh bIdic actHdafti TIpeyii Ka3blTbHbHn apa KaBbIKbIbI 3NeKTP nnITacbl yHH 50cm, an ra3 hemece 6ipiktpinre HnnTanap yHH 65cm den KEM 6oJmaybl Tnic.
ErepHcyka ra3 pntacbIn opHaTyfa apTbIbpaKapa Kaibk6enrreHcBOnca,Ohbi eckepiH3.

3NeKtp Kocynapbl
KeninH Kepheyi acnantbIi iwiH opHaJaackaH
TaKaTaNsAda 6enrIneHReh TexNkAaNbIK
depeKTepeDe KepHeyre cKeKec KeNyKepeK. Erep Copfblw BNkAmeh XabDkTaNfAH BOnca,
opHaTbIaFHHan KeiH De icTeyRe 6oNaTbH, KOJ
XeTePNIK XePeDe 6Olyb Tnic, icTeu TyPhaH
epExeIepre CKeKec anMaJIc-CanMaJIb
WTeNCBte CopfblTbI Kocblb3. Erep copfblw BNkAmeh XabDkTAImFaH 6onca (Keiire Typa Kocblny), Hemece anMaJIb-CaMaJIb WTeNCelb
OpHaTbIaFHHan KeiH De KOJ XeTePNIK XePeDe 6oNMaCa, OHJa opHaty HcckayBaHa cKeKec 3- dApexeDi acBtH KepeHydi 6oNDbIpMaJIbTHn XeHe
XeJIiHiN TOblk aUbIyBn KaMTaMaccB3 eTeTIH TiICTe ekINIOJIcTik axbipatkbIITb NaJaDaIahBhlB3.

ECKEPTY!
Kopek JxeniciHe copfbltBuH 3nEeTpIiK JyueciH Kocy anDbIHda Kopek Ka6eni Dypbc MOHTaKaIaNFaHbHa Ke3 XeTki3iHi3.
Cybyy KaIIaIbI apHaIbI Hep 6epyuI cyIMKeIImeH Ka6blKTanFaH. CbIMKeI cy3blfA HkaFdaIa OHb aybCTbpy yuH Tnicti Kbi3Met KepeTy optaIbIKTapbHa6apblH3.
Bekity
Czy3i KeNTereH Ka6bIprA/Te6e TypneipHe caikec KeletIH 6eKITKIuTepMeH (fHKcaTOpnapMeH) KaMTaMaCbI3dAnHbIpynHa. AnaJa, MaTePnaIaNap 6epinre H Ka6bIPra/Te6e Typine CaeKeCTiriHe K3 eKTeK3y yUH 6iNkTi MAmHaFRA XoJIbIbIbIb. Cy3ri CanMaBIn KTepe anatbIHda Ka6bIPra/Te6e KTeKJIikTi MbIKTb 6OJybl Kepek.
PaiDanaHy

- ⅢamapdbI KOCY/ΘUIPY
- Motopdb1 KOCY/ThetaIPy
Kaah Heri3ri 《2》 MOTOP XblnamdbIfb1 1 etedi
6acblfah.
Heri3ri Kzmbic Ke3iHne 6acblnatbH 6oJca, copfblwbl
etedi OFF MemnekeTTik.
- Speed TEmeHdei
Kaaherizi 3KbIJaMdbIfb1 4 (KapKbHdbI) TEmeHdei6acblraH.
- XbIJaAMdbIKTbApTTbipy
Kaaheriri《4》OFFmemneketTytih copfbil6acblca,copfbll1Xkbldam etedi.
KInT 1-den4 (KapKbIhDb),XbIJaAMdbIK apTbIN XyMbIC Ke3iHe6acbIaTbH60ncA.
KapKbIHdbI XblJdAmdbIfb6EnrIneHreCtAHdApTbI Me3imdepi CopfblXblJdAmdbIfb2 1bIybl, OHbH
COhInDa, «5.
,yakbITcoBihAdeHHbAcnace3 nepheciHfHyHKUcBihEwipy yuii H 《》KInTi 《2》 copFbIUtBt EweDi bacblrHanXbldAmdbIfB1 3,copFbIUtBt XnbHtBtIFbl.
DcnnneIe cHn anepip XbIaMdbIfbcKec KeJIe:
OFF: Kok cnHaJIbl
Speed: 11
2KbIJaamdbik:2
Speed 3:3
Speed 4: 4 xinbInbIKtan
5. Kepcety
MaibcI cTan any fHbTpiaabbl
Фильтдп naДанану 40 carattan kein caHBI 1ЖылblkTayb6apdncn apKbIb6enr6epei.
Bym m cy3ri kyyin kacket derendi 6ijnipei.
da6bIb6oBbHwa MemJekTeTik Tytih copfblk KepiHei.
MeHCTaHdApTbI peKIMiN KEMip cy3rici da6bln 6eNceHdi emec.
KaFdaJaCy3ireny HcCa copfbln naIaIaNbIaNbI, on KEMipteri cy3ri CnHnKoc yuih KaKeT.
Kemipteri cy3ri cnHan 6enceHdpy:
OFF copfblu ohpatbHb3 xHe KInTepin caKtayfa «2» xHe «3» «3 Me3rIJIe 6acblnFAH.
Numbers 1 xəHe 2 «Ke3eKneH 2 pIeW.
Kemipteri cy3ri cnHnAn Θwipy:
OFF copfblu opnathbH3 xHe kInTepin caKtayfa «2»xHe
«3» «3 Me3rIe 6acblnfan.
2 «cahbl1 xblnbblbKtaIbI.
Temnepatypa Alarm
CopfblI DnCnIeN aIMaFbIHJa TEmNepaTy pTbIM XOFapbl 60JFaH XaFdaJa XbJIaNdMbIKNeH 3 Ko3raNTkbIUtBt Icke KocadI TeMnepaType HcHOpbl Ka6DbIKtanFaH.
da6blxafdaibxatXkblnbikTayb6ap dncneJe
KepcetiJIeI.
Temnepatypa da6bIu weiHEn TeMeH KynaiNbI deH BynuI uapT CnKtbl 60bnI Kanadbl.
By npexim nephecih 2》,3》Hemece 46btpmacbiH
6acy apkblb lbyf MyMkiH.
Op6ip 30 «ceHcOpdi HicnPiéi aiMaFbHbIH KOpShaHaH optaBH TEmpepaTypacbI TEKcepeDi.
Dncnnpe pəmi3epi
| Symbol | Мемлекет |
| 1 | Speed 1 |
| 2 | 2 кылдандык |
| 3 | Speed 3 |
| 4 | Speed 4 (Каррындан) |
| 5 | Майдистан any Фильстри Кызmet Керсету |
| 6 | Кеміртік сuzгі Т电商кал'dік Кызmet Керсету |
| 7 | Майдистан any Фильстri және Кеміртeti сuzgі Т电商кал'dік Кызmet Керсету |
| 8 | Temnéратуа Alarm |
TexHnKaJbIK KbI3MeT KOpceTy
Tazanay
Tasaay yuih TEK 6eitapan kyybsh 3atneH cyanhaf an hai bI sybepekti naDanaHbHb3.
KYPbIJIbIbHI HEMECE TA3AJAY KYPJAJIbIH
ПАДАЛАHAБИЗ! Абраэиьк Коспасы бар 3aTTbI паданбаи3. СПИPTTI
ПАДАЛAHБАнь!
PanaheIb
19-25 cypet
KymcaK 7y6epeKti Xhe apanaTbipbnfah Kxyblw 3aTtBn naDanaHbIn, TYTH nbifapy Ky6bIbpHbH NKelemDi TaTcBn H MaCy3ricMeH bIpdeN kniiknen Ta3anaHb3. Ekwaaan abpa3nBTi Ta3aayehimdeepin naDanaH6aHb3.
MaJ cy3rici
20-24 cypet
AcdaihndayafbIMa6eKeTepinycanKaJaDbI.
ФильТрд ai caын КуБИЗ 3aTTapMeH KОЛМeH Hemece
TEmen TemnepaTypada JxHe YHemDi JyU yu KInHneri bIbIC JyFbI MaunHacbHna Ta3an Typy Kepek (Hemece PbnTpdi KaHbIKbIpy JxNeci, erep ci3in yNirde BoNca, 6epiRnKKaXeTTinikTI KepcTeKeH XaFdaJa).
MaJdbI Ta3aay FJIbTpI BiDbic Kxyfblw MaunHacBImeH
KyaHaNda EhCi3deHyi MyMkiH. Bipak Ohbln Ta3aay CnataBtI
Mynde e3repMeiDi.
MaCy3icH anbIn Tactay ywiH cepinnei 6ocaty TyKacbH TaPbIHbl3
Kemip cy3riw (Tek cy3riw-copfbiW Typinde)
23 cypet
Ac nicipren Ke3de xapaMcbI3 nicti yctan KaIaNbl.
KÖMpΦnIbTpIn eki ay caIbIH (Hemece ΦnIbTpdi KaIbIKIbIpy Typanblxabapnay KjYneci -erep ci3iIN MoJIeHI3Je opHaTbIlnFaH 6o1ca -ocBHaDai KaKETTIiKiTI x6aOpIaca) bICTbIK Cyda XeHe Tnicti Jyy KypaIapbIMen, Hemece 65^ TempepaTypada bIdic KfYbIu MaunHada JyyF a60la bI (6epiIrrn Kafdma ToIbIK bIdbcIcB3 Jyy UcKnIIh OpbIHay KaJKeT).
ФильтгдзakbIM KeNTIPMéApTbIK cydbl anbIn TaCTaHb3 daФиьтрдИApTbKb6eNirihToNbIK KeNTiPy yuHIn ObI 10MHyTka 100^ ,TeMnepatypadafbl dyxOBkafa caNbHb3.
3 XbIcaiBih XeHe MaTePnAa 3aKbIMdaHFaH caBih KocbIMwa6ettiaybIcTbipblTpybIHb3.
OpHaTy
Kemip cy3ricin Man cy3ricinapTbHa opHaTbHb3 XeHe eki wTOkneh 6eKiTiH3.
Ha3ap ayadpaHbI3! 7tOKTAP KaKnaKTa eMec, KEMip cy3riciH IN XINHaFbIHda 6epijreH.
Czy3rhi 6aJIweKTe n any yuH apeKeTTi Kepi peTneH opbIHdaHbI3.
Uam aybictbipy
26 cypert
AcnantbI 3JIeKTp KJyIeciHEn eUipiH3
Eckepy! lammahby yctaydan 6ypbH, onap cybHaNbIfbHa Ke3 XeTki3iH3.
Kapbik wambiH aIbIn Tactay yuH lamnabHJ KneKTepeHde kiwi 6ypaybltbi iHtipeK petiHde naJaHaNbHbI3.
3aKbIMdaHraH 7aMdbaybIcTbipbHb3. Tek MaKC.2.6 Bt GU4 XUd 7aMdpabn naJaHaHbHb. KocbIMsa mJIImeTTepdi 6epinreH "ILCOS D" (3c" api-bi-caHdbi no3nncsby) 6yKJteiHeh KePiH3.
AbybictbipydbOpbHdaHb3XHe XaHaXkapbIK 1IaMbH KeNeci Hcckaynapra caI Kepi petneH opHaTbHb3.
Komecki Japbik icTeMeRer XaFaDnTa TEXHnKaIbIK Kbl3MeT KepCeTy OpTaIbIbHa XoJIbIKNaCTaH 6ybpIH, IaMdpDbH Dypbc OpHaTbIJFaHbIH TEKcepin KepiH3.
Ohu valjatombega version
ILCOS>> aalall aasll alwulwul wlll j
3c").»(Sj)
Aaasall aagabgcll yduy dlaal caaaal
Jusjiaacpajn jy 100s oocu JIACp a
i 1
| 3.acrull | 3 |
| .(a#k)4acrull | |
| s#i#y#a#s#h##d#o#n | |
| s#i#y#a#s#h##d#o#n | |
| s#i#y#a#s#h##d#o#n #or s#i#y#h##d#o#n | |
| d#l#r#d#y#d#j#e#d#o#y |
aill
a.b.c.
a 110 a a a a yaaag bao 111 a a a a a a a a
1.
pkiy 1. a b c d e f g h i j k l m n o p q r s t
1
山
25-19
Jg baaal bc bai jzj gaj all baai a jy biy jai aai aai ai jnai ai jzai yai yai yai
AaBaaAs algo aisauiy. jSra Jit iluuae bia
jai jia jia
24-20
aill aie 1000000000000000000000000000000000000000000000000000000000000000000000
3 1 2 3 4 5 6 7 8 9 10 11 12
lalbo jie jil
ailllll lnnn nnnn nn nnnn
()
23
a a a a a a a a a a
Lioie jy Jy 100000000000000000000000000000000000000000000000000000000000000000000000000
Jia 1i i a jao y balaill ooc Lioic ool .oai allj .say ON
(zjlljduolgla)
1111111 1111111 1111111 1111111 1111111 1111111 1111111 1111111 1
.ON
j 2"
3
Jusill aie, gblilu Jyloie jIyll oia j
.ON
1 2
0 1
a 1111111111111111
J 1
:
jlllle jaiu baiol OFF 13e" e"2
.21 2
:0j8sll 4a aai jai jai
Cjlll 1 Juiuui baii oFF 1e baii
"J3e "e 32
1 1
a
1 3 4
aaiiie 100000000000000000000000000000000000000000
",“3"2"1111 111111111111111
a 30 4
1 1 aall gl alall "2" clll all bally
OFF.
aeyal jaii .3
aejull jaliil 3" 1iall le biaally 1aejull (aik)4aejull
as yall 3j .4
ailll 4" 1 aill l blll OFF
jle JnJg will el all le bally .(i Ka) 4 aall 1 aall jnae
5 5 5 5 5 5 5 5 5 5
3 Clll al bc baii ci g y j J a aai j J aai i 3 cJy J aai J aai
ailll llll 150
1:1a
2:2a
3:3a
4:4ac
5
jglal
J 1 J 1 J 1 J 1 J 1 J 1 J 1 J 1 J 1 J 1 J 1 J 1 J 1 J 1 J 1 J 1 J 1 J 1 J 1 J 1 J 1 J 1 J 1 J 1 J 1 J 1 J 1 J 1 J 1 J 1 J 1 J 1 J 1 J 1 J
- S AOB = S COD = S_ BOC =
a 1
S AOB = S COD + S BOC - S COD
j
y j 1021/19/EC j 1000 (WEEE)
a = 1
图
aie gai gale i jiaiallege yjgaiy gli wio aie aie gai gao Jolalll 1s jgl ayuui u jayai al jiall calil lai gale 1g juyiyjuyjuyjuyjuyjuyjuyjuyjuyjuyjuyjuyjuyjuyjuyjuyjuyjuyjuyjuyjuyjuyjuyjuyjuyjuyjuyjuyjuyjuyjuyjuyjuyjuyjuyjuyjuyjuyjuyjuyjuyjuyjuyjuyjuyjuyjuyjuyjuyjuyjuyj
jgllll 1 aia ci y jai
cilllglllg jiljiojiljia jilai jilal
:
EN/IEC 60335-2- EN/IEC 60335-1:
.EN/IEC62233,31
EN/IEC 61591; ISO 5167-1; ISO
5167-3; ISO 5168; EN/IEC 60704-1; EN/IEC
60704-2-13; EN/IEC 60704-3; ISO 3741; EN
50564; IEC 62301.
EN 55014-1; CISPR: (吉 吉) EMC·14-1; EN 55014-2; CISPR 14-2; EN/IEC 61000-3-2; EN/IEC 61000-3-3.
ii iilll plabll 1y Lio gios
bolool
J 1
iililipwip
Jdall
i 1
i
J1
J 1
. jil 1 jil jil
C. aai ai 150
aiai Iblai j a jj 1j
y
- 15 jill iLac jlo Laoi el giiY I 2: Y
aLwgl aalb algai
Lolgge jll 1
124 a 11111111111111111111111111
- jjN j
y
gill jj 100
L
Jaiall gilgill jwll jbi
1
y
J 1
J 1 J 1 J 1 J 1 J 1 J 1 J 1 J 1 J 1 J 1 J 1 J 1 J 1 J 1 J 1 J 1 J 1 J 1 J 1 J 1 J 1 J 1 J 1 J 1 J 1 J 1 J 1 J 1 J 1 J 1 J 1 J 1 J 1 J 1 J
Jusuiei iiaai aai ai kai gaoa
eill lalil glll alall ilie Laiuua Lele eL
i 1
jill jai aol cagla 1gi:clalailaie
jL 1
j j 1
15 jill a la 2 g
j(*)>jJJIJIJIJIJIJIJIJIJIJIJIJIJIJIJIJIJIJIJIJIJIJIJIJIJIJIJIJIJIJIJIJIJIJIJIJIJIJIJIJIJIJIJIJIJIJIJIJIJIJIJIJIJIJIJIJIJIJIJIJIJIJIJIJIJIJIJIJIJIJIJIJIJIJIJIJIJIJIJIJIJIJIJIJIJIJIJIJIJIJIJIJIJIJIJIJIJIJIJIJI
y 25 y dLdall
-
-
-
-
-
-
-
-
-
-
-
-
-
-
-
- 1.
-
-
-
-
-
-
-
-
-
-
-
-
-
-
Jai jai gai bji Jia
= 0
Jzjiall plll clll Jlaa Jy j
15 jill l lac a 15 1
JLCLjLpkiwlilll
J 1
8 8 a Jai jabi
aall a 1
jsl 2 j jill l ai isaiia i lii
gj Lollb a o jUll a o jUall g j