
PASTAMAKER HR2355/09 - Food Processor PHILIPS - Free user manual and instructions
Find the device manual for free PASTAMAKER HR2355/09 PHILIPS in PDF.

| Product type | Food processor / Pasta machine |
| Model | HR2355/09 |
| Brand | Philips |
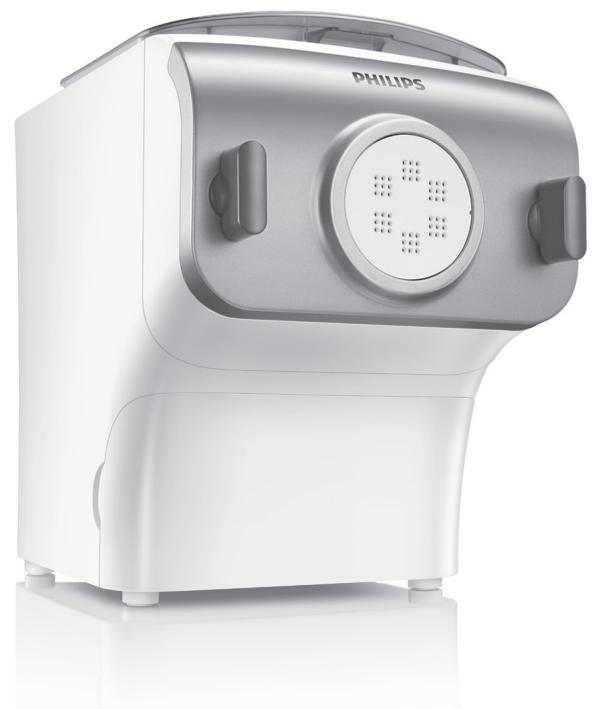
| Dimensions (L x W x H) | 215 mm x 343 mm x 300 mm (8.5 x 13.5 x 11.8 in) |
| Net weight | 6.9 kg (15.2 lb) |
| Power supply | 220-240 V ~ 50 Hz |
| Motor power | 200 W |
| Programs | Automatic, extrusion only |
| Portions | 300 g (1-2 persons) or 600 g (3-4 persons) |
| Max flour capacity | 500 g per batch |
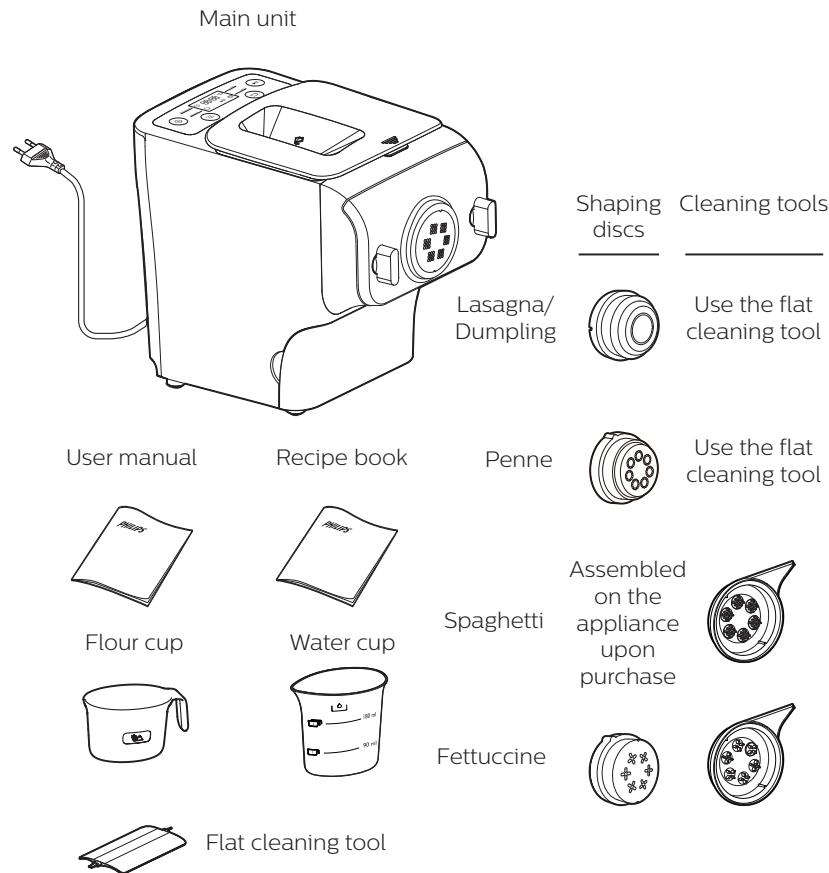
| Included shape discs | Spaghetti and Fettuccine |
| Included measuring cups and beaker | Flour cup (~250 g) and graduated water beaker |
| Included cleaning tools | Flat tool and disc cleaning tool |
| Included recipe book | Yes |
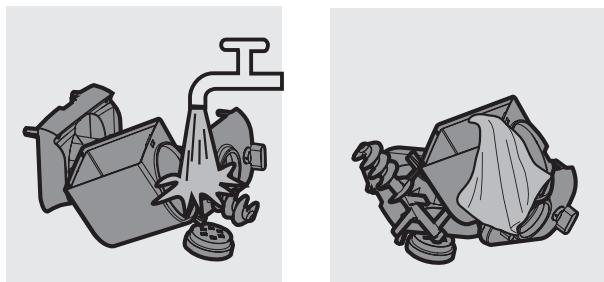
| Cleaning | Removable parts hand washable (not dishwasher safe). Main unit wipe with a dry cloth. |
| Safety | Safety button on disc holder and lid; automatic stop in case of overheating or opening |
| Overheat protection | Automatic stop after 45 min of continuous operation |
| Warranty | Consult Philips website or consumer service |
| After-sales service | Philips authorized centers |
| Household use | Yes, exclusively |
Frequently Asked Questions - PASTAMAKER HR2355/09 PHILIPS
User questions about PASTAMAKER HR2355/09 PHILIPS
0 question about this device. Answer the ones you know or ask your own.
Ask a new question about this device
Download the instructions for your Food Processor in PDF format for free! Find your manual PASTAMAKER HR2355/09 - PHILIPS and take your electronic device back in hand. On this page are published all the documents necessary for the use of your device. PASTAMAKER HR2355/09 by PHILIPS.
USER MANUAL PASTAMAKER HR2355/09 PHILIPS
Always there to help you
Register your product and get support at
www.philips.com/welcome

HR2355/09
EN User manual 2
CS Příručka pro uživotele 26
EL Eyyxepidio xpnns 50
FR Mode d'emploi 74
HU Felhasznaloi kézikonyv 98
IT Manuale utente 122
NL Gebruiksaanwijzing 146
RU PykoBOACTBO NOAb3OBaTeA 170
SK Priručka uživotelá 196
TR Kullanim klavuzu 220
Congratulations on your purchase, and welcome to Philips!
To fully benefit from the support that Philips offers, register your product at www.philips.com/welcome.
Read this user manual carefully before you install and use the unit. Save it for future reference.
What's in the box
2 English
Contents
What's in the box 2
Important 4
Overview 8
Disassembling and cleaning before first use 10
Assembling 12
Using the Pasta maker 14
Cleaning 20
Troubleshooting 23
Product information 25
Recycling 25
Guarantee and service 25
Important
Safety
- Read this user manual carefully before you use the appliance, and save it for future reference.
Warning
- Before you connect the appliance to the power, make sure that the voltage indicated on the bottom of the appliance corresponds to the local power voltage.
- Make sure that your hands are dry before you insert the plug into the power outlet.
- Make sure that the plug is firmly inserted into the power outlet.
- Never connect this appliance to a timer switch.
- Before you insert the plug into the power outlet, make sure that the appliance is assembled correctly.
- If the power cord, the plug, or other parts are damaged, do not use the appliance.
- If the power cord is damaged, you must have it replaced by Philips, a service center authorized by Philips or similarly qualified persons to avoid a hazard.
- Do not replace parts of the appliance yourself.
Warning
- This appliance shall not be used by children. Keep the appliance and its cord out of reach of children.
- This appliance can be used by persons with reduced physical, sensory or mental capabilities or lack of experience and knowledge if they have been given supervision or instruction concerning use of the appliance in a safe way and if they understand the hazards involved.
- For their safety, do not allow children to play with the appliance.
- To prevent any accidents, do not use the appliance if it is damaged for any reason.
- Always disconnect the appliance from the supply if it is left unattended and before assembling, disassembling or cleaning.
- Switch off the appliance and disconnect from supply before changing accessories or approaching parts that move in use.
Caution
- Before using the appliance for the first time, disassemble and wash the accessories thoroughly (see “Disassemble and cleaning before first use” section.)
- The appliance is intended for household use only.
- Do not use this appliance on an unstable or uneven surface.
- Do not disconnect the power cord before processing is complete. If you have to stop processing, disconnect the power cord before you perform other operations.
- To better protect the lifetime of the appliance, we recommend the continuous working time to be less than 45 minutes. You can restart using the appliance after 15 minutes.
- If you intend to use the appliance continuously, clean the shaping disc with the supplied cleaning tool each time after use. For cleaning ease, do not soak the shaping disc into the water directly.
- Do not bend the power cord forcibly, jerk, twist, bundle nor put under heavy items.
- Do not put metal or flammable objects in the mixing chamber.
- Unplug the appliance when not in use.
Caution
- Do not use the appliance near flammable objects such as table cloth or drapes.
- Pull out the power plug immediately when you detect smoke.
- When unplugging the power cord, do not pull the cable but grab the plug part.
- Keep the power plug clean.
- Do not put heavy objects on the appliance.
- This appliance is designed as consumer kitchen appliance. Do not use for any other purpose
- Do not move the appliance while it is operating.
- Disconnect the power and remove the power cord before cleaning or disassembling this appliance.
- Do not immerse the main unit in water.
- Place the appliance in a dry and well ventilated place after use.
- To prevent a short circuit or an electric shock, do not pour water or any liquid into the safety switch.
- Do not use a dishwasher to clean the machine or the accessories.
EMF
This Philips appliance complies with all applicable standards and regulations regarding exposure to electromagnetic fields.
Overview

| Abbreviations |
| g = grams |
| ~ = approximately |
| ml = milliliters |
| mm = millimeters |
| kg = kilogram |
| in = inch |
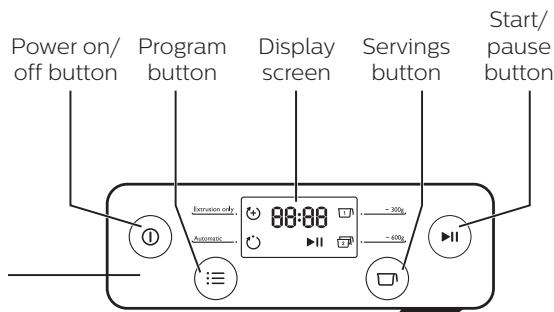
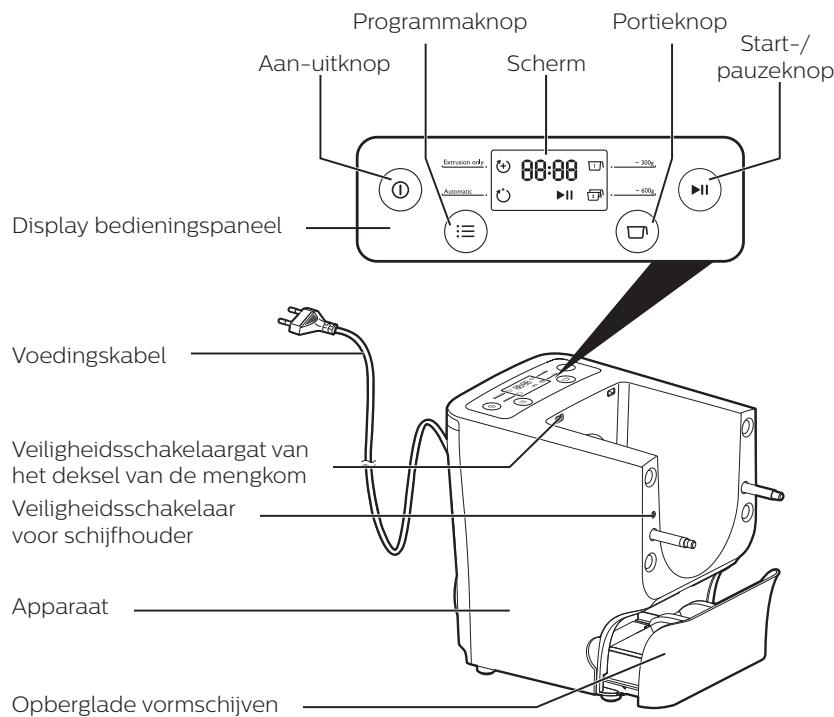
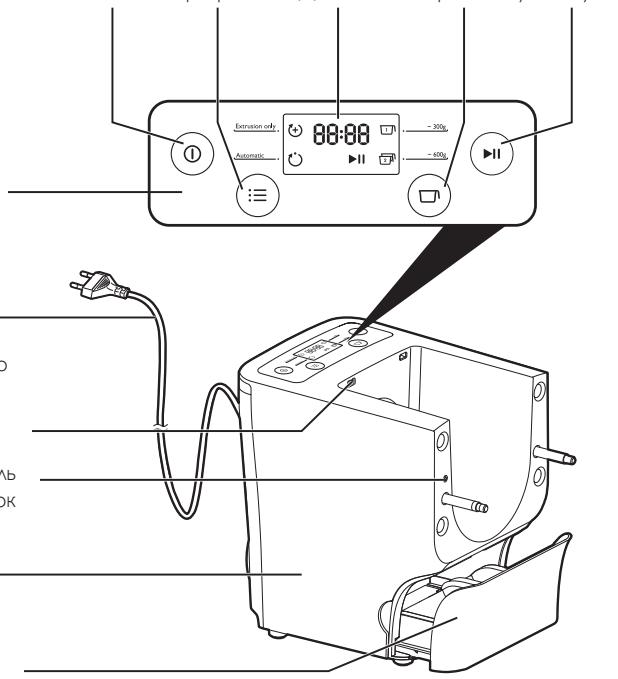
Program button - select the extrusion-only program or automatic program 念
Servings button - select 1 to make 300g, 1-2 servings or 2 to make 600g, 3-4 servings of fresh pasta.
Control panel display
Power cord
Safety switch hole of the mixing chamber lid
Disc holder safety switch
Main unit
Shaping discs storage
Disassembling and cleaning before first use
Important
- Before using the appliance for the first time, remove and safely discard any packaging material and /or promotional labels.
- Take out all the parts and accessories, wash and thoroughly dry all parts and accessories (see "Cleaning" section).
- Do not use water to rinse or soak the main unit.
- Do not use a scourer or similar cleaners as these will scratch the plastic surface and affect the lifetime of the Pasta maker.
- This appliance is intended for household use only.
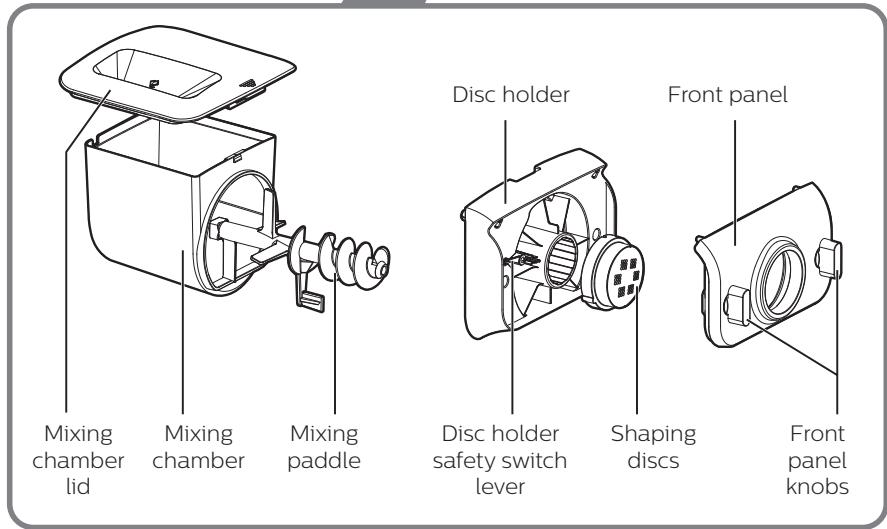
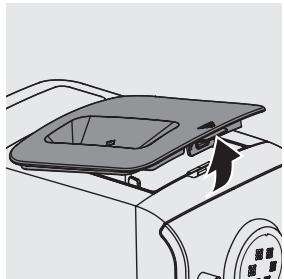
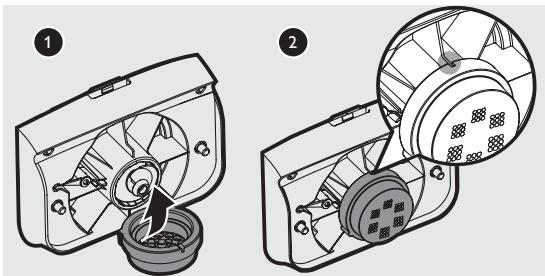
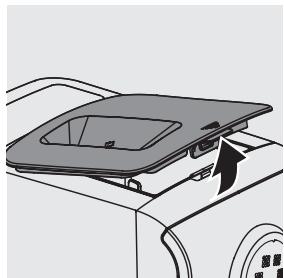
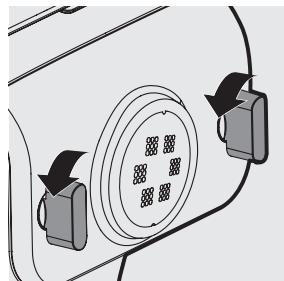
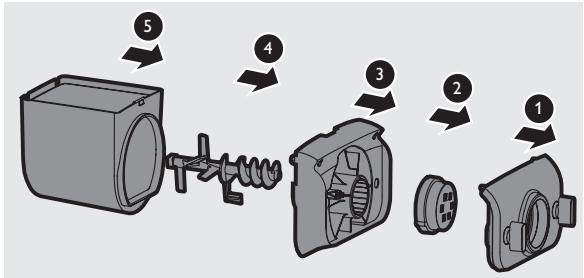
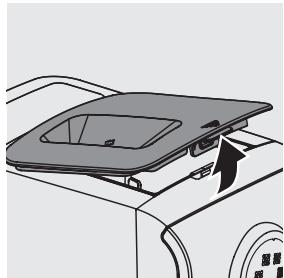
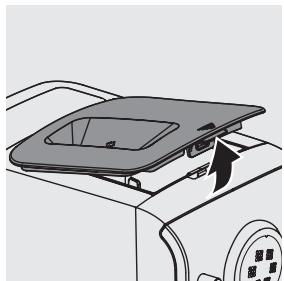
1 Remove the mixing chamber lid from the appliance.
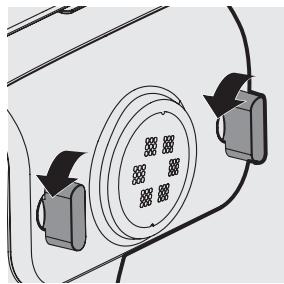
2 Loosen the front panel control knobs.
Note:
- The front panel is heavy. Take extra caution when removing it.

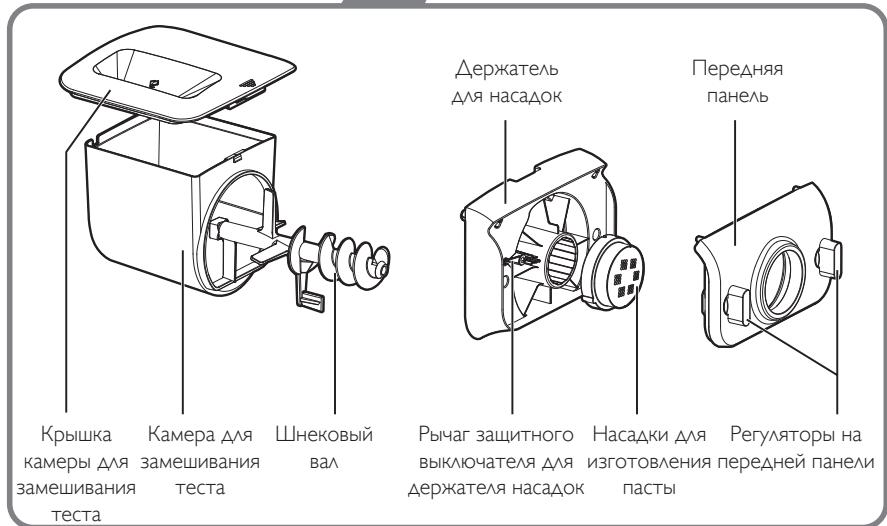
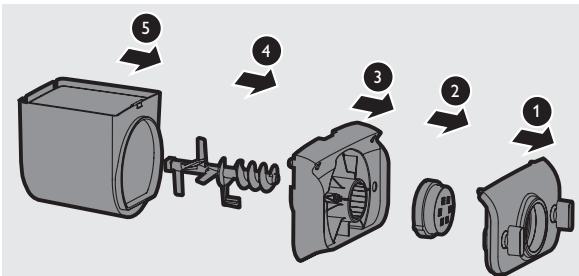
3 Disassemble the front panel, the shaping disc, the shaping disc holder, the mixing paddle, and the mixing chamber in order.

4 Clean all detachable parts, and wipe them dry.

Assembling
Follow below assembling steps to install the Pasta maker.
Important
- Make sure to tighten the front panel knobs during assembly.
- Make sure the appliance is not plugged in when assembling the appliance.
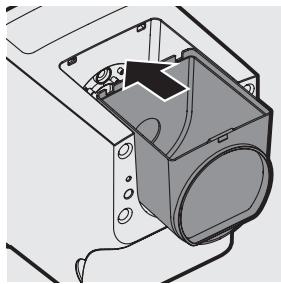
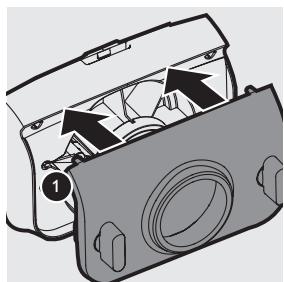
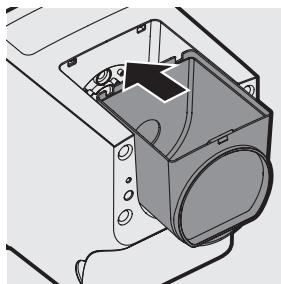
1 Push the mixing chamber into the appliance.
2 Point the mixing paddle to the hole in the main unit. Insert the mixing paddle all the way into the main unit.
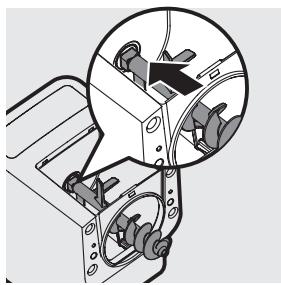
3 Attach the disc holder onto the appliance.
1 Disc holder safety switch
2 Disc holder safety switch lever
Note:
- Check that the safety switch ① and safety switch lever ② are set as shown in the illustration to the right.
12 English
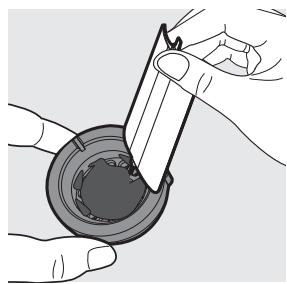
4 Put the shaping disc onto the disc holder ① , and make sure it is firmly fixed on the disc holder ② .
Note:
- Make sure the inner cavity of the shaping disc and disc holder is properly fitted.
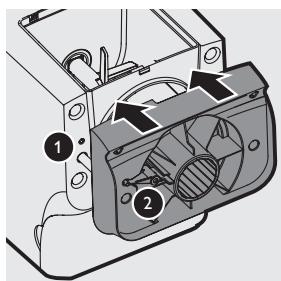
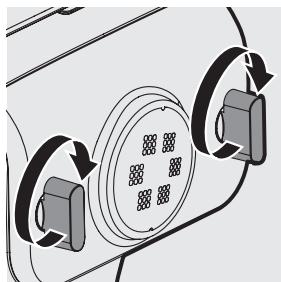
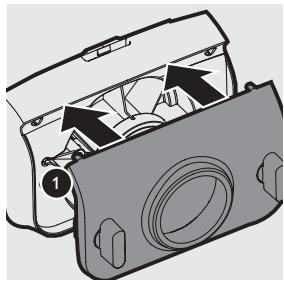
5 Attach the front panel to the main unit.
1 Disc holder safety switch lever
Note:
- Make sure the front panel is completely fastened before using the appliance.
- The front panel is heavy. Take extra caution when assembling it.
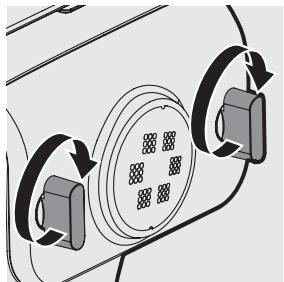
6 Fasten the front panel control knobs.
Note:
- If the front panel or the shaping disc is not properly assembled, the safety switch will prevent the appliance from working.
7 Close the mixing chamber lid properly.
Note:
- If the mixing chamber lid is not properly installed, the safety switch will prevent the appliance from working.
Using the Pasta maker
Important
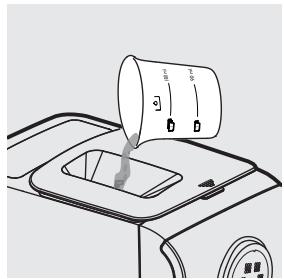
- Make sure to follow the right order to add flour and water into the mixing chamber. Put the flour into the mixing chamber first, then place the chamber lid onto the chamber. Start the Pasta maker, and then slowly pour water along the entire length of the opening in the lid.
- Never put excessive ingredients into the Pasta maker. Otherwise, it will damage the appliance. The maximum amount of flour used for each batch is 500g .
- Do not put any ingredients that are 60^ / 140^ or above into the Pasta maker, nor place the Pasta maker in surroundings with high temperature (60^ / 140^) , for instance in a high temperature sterilization. This will deform the appliance.
- Never pour water into the mixing chamber before you place the chamber lid onto the chamber. Do not pour any liquids into the safety switch hole.
- Do not pour water into the mixing chamber before turning on the Pasta maker. Follow the instruction carefully to enjoy homemade pasta.
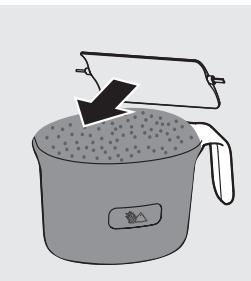
Preparing the ingredients
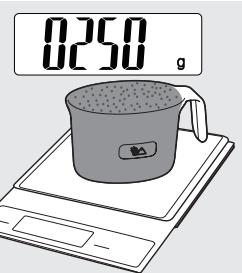
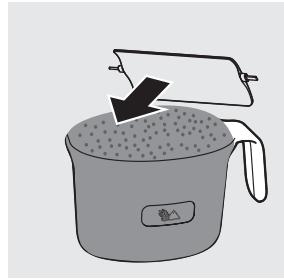
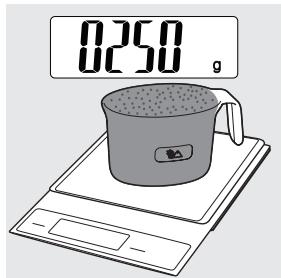
1 Measure one full cup of flour. Scrape off any excessive flour from the cup edge with the supplied flat cleaning tool. One full cup is equivalent to 1-2 servings.
Note:
- Do not shake or hit the flour cup to remove excessive flour. This will affect the flour weight.
You can also use a kitchen scale to measure the flour. For instance, 250g flour makes approximately 1-2 servings; 500g flour makes approximately 3-4 servings of fresh pasta.
14 English
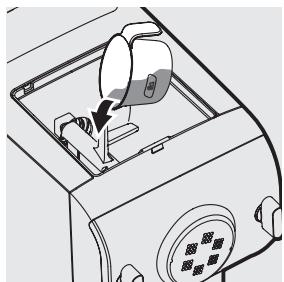
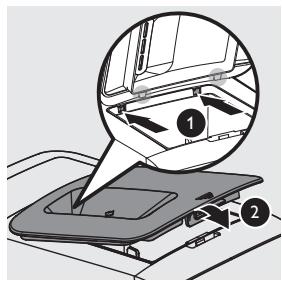
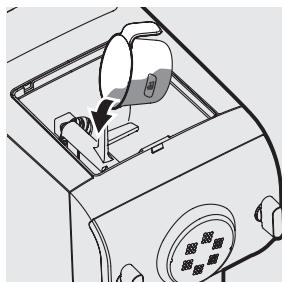
2 Remove the chamber lid.

3 Pour the flour into the chamber. If you want to make 3-4 servings, add a second cup of flour as you will need 2 cups ( 500g) of flour in total.
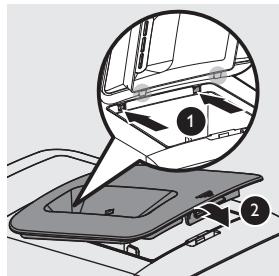
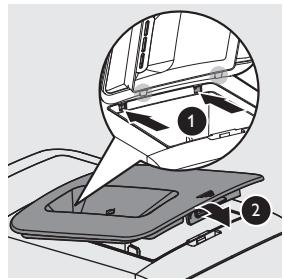
4 Close the chamber lid properly.
Note:
- Insert the two hooks into the appliance first ① , and then push the lid against the main unit ② .
- The appliance will not start working if the chamber lid is not properly closed. During the pasta making process, if the chamber lid becomes loose, the appliance will automatically stop working.
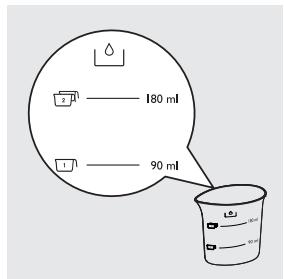
5 Use the "Pasta making recipe table" and measure the required amount of water.
Note:
- Do not pour water into the mixing chamber before turning on the Pasta maker.
- There are 2 sets of water markings on the supplied water cup. One set is for normal pasta making, and the other set is for egg pasta and other flavor pasta making.
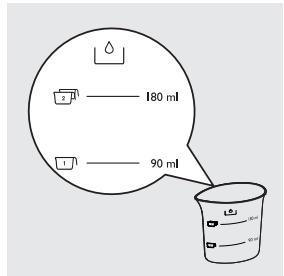
Pasta making recipe table
For more information, you can visit www.philips.com/kitchen.
| Flour/water ratio table | ||||
| Flour | Normal pasta | Egg pasta | Processing time | Output |
| Water (marking) | Water + egg mixture (marking) | |||
| 1 flour cup (~250g) | Amount of water needed for a cup of flour (~90ml) | Amount of water + egg mixture needed for a cup of flour (~95ml) | 10 minutes | ~300g fresh pasta. This is sufficient as a main meal for 1-2 persons, or as a side dish for 4-6 persons. |
| 2 flour cups (~500g) | Amount of water needed for 2 cups of flour (~180ml) | Amount of water + egg mixture needed for 2 cups of flour (~190ml) | 15 minutes | ~600g fresh pasta. This is sufficient as a main meal for 3-4 people, or as a side dish for 8-10 people. |
Important
- The pasta recipes provided in the user manual and recipe book have been tested for success. If you experiment with or use other pasta recipes, the flour and water/egg ratios will need to be adjusted to the flour and water cup ratios included with the Pasta maker. The Pasta maker will not operate successfully without adjusting the new recipe accordingly.
Note:
- To ensure the quality of the pasta, use gluten flour to make pasta. Follow the recommended proportion to add the ingredients.
- Seasonal changes and using ingredients from different regions may affect the flour/water ratio. You may adjust based on the recommended proportion.
- When making the egg pasta or vegetable pasta, make sure you whisk the egg mixture or vegetable juice evenly with the water before pouring into the chamber through the slot in the lid. When adding ingredients, make sure the ingredient is in a liquid form.
- See the recipe book provided for additional pasta recipe variations and many delicious new recipes to try.
Selecting the pasta making program
Important
- Do not select the extrusion-only program before the dough mixing is complete. Otherwise, this will damage the Pasta maker and its lifetime.
- Do not disconnect the power cord before processing is complete. If you have to stop processing, press the on/off button ⑥ to turn off the Pasta maker and then disconnect the power cord from outlet before performing other operations.
- To better protect the lifetime of the appliance, it is recommended the continuous working time be less than 45 minutes. You can restart using the appliance after a 15 minute rest.
- If you intend to use the appliance continuously, clean the shaping disc with the supplied cleaning tool each time after each pasta making session. For cleaning ease, do not soak the shaping disc directly in water.
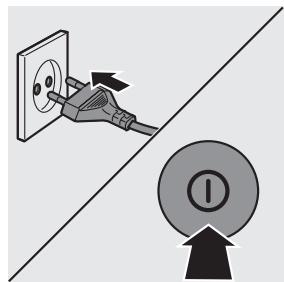
1 Connect the power plug to any 220-240V AC outlet. The Pasta maker will sound once, and all indicators will flash once. Press the power on/off button ⑥ to switch on the Pasta maker.
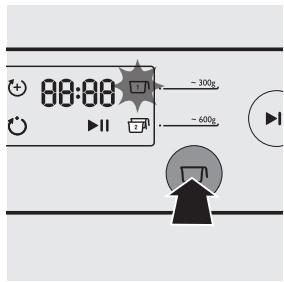
2 Based on the amount of flour, press the servings button to select 1 to make 300g or 2 to make 600g of fresh pasta.
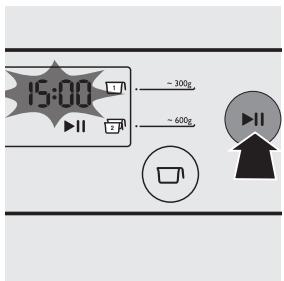
3 Press the start/pause button to start processing, and the processing time starts to count down.
Note:
- By default, the program is set as automatic. If this is not the case, press the program button to re-select.
4 After the kneading starts, slowly pour in the water or water + egg mixture along the entire length of the slot in the lid.
Note:
- During dough mixing, do not add other ingredients after you have poured in the water. Otherwise, it will affect the results of the pasta texture.
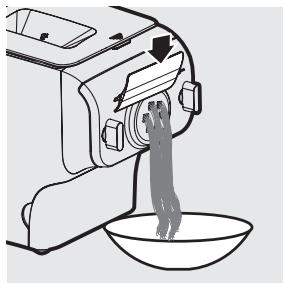
5 The pasta will start extruding out after a few minutes. Place a container right under the outlet. Cut the pasta into the desired length with the supplied cleaning tool.
Note:
- You may find some fine pasta threads on the pasta surface, especially at the beginning and the end of the extrusion.
- If you notice the program is not set as automatic while pasta is extruding, press the start/pause button to stop the program. Then, press the power on/off button and disconnect the plug from the power socket. After cleaning the shaping discs, you can restart the process.
- If the ratio of liquid and flour is not correct, the extrusion will not succeed. In this case, prepare the ingredients again.
- Move the cleaning tool downwards to cut the pasta.
6 After the pasta making is complete, if you notice there is some leftover dough inside the chamber, you can press the extrusion-only button 1 and press the start/pause button 2 for extra extrusion.
Note:
- The countdown timer of the extrusion-only program is 3 minutes.
- The cooking time of the pasta varies depending on personal preferences, pasta shapes, and number of servings.
Cleaning
Important
- Disconnect the power and remove the power cord before cleaning or disassembling this appliance.
- Do not immerse the main unit in water.
- Do not use a scourer, caustic cleaners, or abrasive cleaners (for examples, gasoline, alcohol, and propanol) to clean the appliance.
- Clean the appliance each time after use, or the appliance might not operate properly.
- Take extra caution when cleaning the appliance to avoid getting cut by any sharp edges.
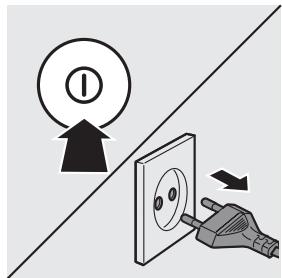
1 Press the power on/off button ⑨ to turn off the Pasta maker, and then disconnect the plug from the power outlet.
2 Remove the chamber lid from the appliance.
3 Loosen the front panel control knobs.
Note:
- The front panel is heavy. Take extra caution when removing it.
4 Disassemble the front panel, the shaping disc, the shaping disc holder, the mixing paddle, and the mixing chamber in order.
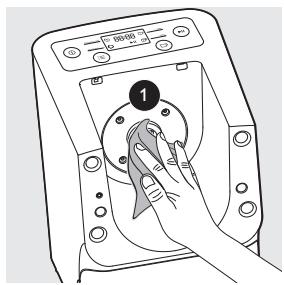
5 Use a dry cloth to clean flour residue in the hole ① where the mixing paddle is placed.
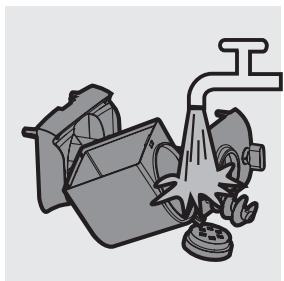
6 Clean the shaping disc with the supplied cleaning tool to remove the dough residues. After that, you can clean it with water.
Tip:
- For the spaghetti and fettuccine shaping discs, put the shaping disc into the freezer for 2 hours. Then use the corresponding cleaning tool to poke out the dough in the holes.
7 Clean all detachable parts.
8 Use a dry cloth to clean the main unit, control panel, and the exterior of the Pasta maker.
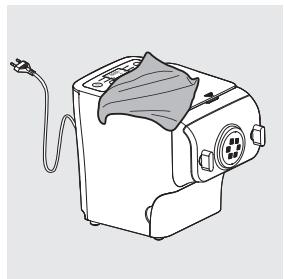
9 Store the Pasta maker in a dry, well ventilated place after use.
Note:
- After cleaning, make sure all parts and the shaping disc are completely dry before storing. Assemble the Pasta maker back for next use.
Storing the shaping discs and cleaning tools
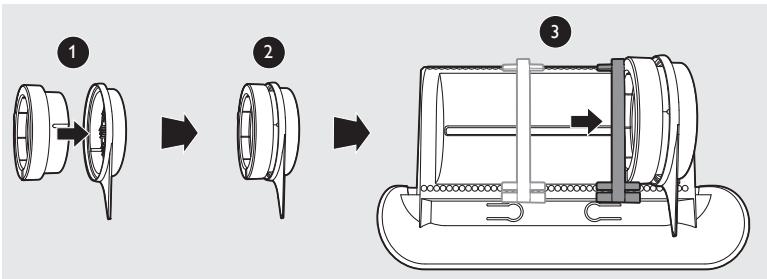
1 Insert the shaping disc ① and cleaning tool ② together. Put ① and ② into the storage drawer. Move the sliding bar ③ to secure the shaping discs and cleaning tools.
Make sure the cleaning tools and shaping discs are dry before putting them into the storage drawer.
22 English
Troubleshooting
This chapter summarizes the most common problems you could encounter with the appliance. If you are unable to solve the problem with the information below, visit www.philips.com/support.
The indicators do not light up.
- The power plug is not connected correctly.
Check whether the power plug is plugged correctly and the outlet is working properly. - The on/off button is not pressed.
Press the power on/off button (0) .
After pressing the start/pause button the appliance sounds but it does not work.
- The chamber is assembled incorrectly.
The shaping disc, or the front panel is assembled incorrectly.
Make sure you follow the user manual to assemble all parts correctly.
- The preferred servings is not selected.
Make sure you have selected the servings before pressing the start/pause button.
The safety switch is triggered and the appliance suddenly stopped or suddenly restarts during the processing.
- The front panel knob is loose.
Make sure the front panel is securely assembled.
- Excessive ingredients in the Pasta maker.
The maximum amount of flour used for each batch is 500g. If more than 500g is added, reduce the amount of flour before next batch.
During processing, the appliance stops. There is no alarm sound or flashes.
- The Pasta maker has overheated due to long continuous working time.
Disconnect from the power, and allow the Pasta maker to cool down. To better protect the lifetime of the appliance, the continuous working time should be less than 45 minutes. You can restart using the appliance after 15 minutes of rest.
The appliance stops during processing, then the indicators are flashing quickly, and the alarm sounds.
- The mixing paddle may be blocked by some foreign objects.
The dough may be too dry.
The wrong program is selected.
Disconnect from the power, clean the Pasta maker, and follow the user manual again to restart the pasta making.
Too much leftover dough inside the chamber.
- The flour is either exposed to moisture before use, or the dough is too wet.
Keep your flour dry during storage. Follow the user manual instructions to restart the pasta making.
- The chamber, the mixing paddle, the shaping disc are not cleaned properly before use.
Make sure all parts are clean before use.
- The mixing paddle or the chamber is still wet.
Make sure all parts are completely dry before use.
Water is not added in the right order.
The flour type is not suitable.
Incorrect servings was selected.
Follow the user manual instructions to make pasta.
Small amount of water is leaking out from the appliance.
Water is added before the program starts.
Follow the user manual instructions to add water right after the program starts.
The mixing paddle is running idle, and there is no pasta coming out.
- The ratio of the flour and water is incorrect.
Disconnect the plug from the power socket and discard dough. Clean the Pasta maker, re-measure ingredients correctly and follow the user manual instructions again to restart the pasta making.
| Model | HR2355/09 |
| Motor power | 200W |
| Rated voltage | AC220-240V (50Hz) |
| Dimensions (L x W x H) | 215mm x 343mm x 300mm / 8.5 in x 13.5 in x 11.8 in |
| Net weight | 6.9kg / 15.2 lb |
- For rated voltage and frequency information, refer to the typeplate on the product. Product information is subject to change without prior notice.
Recycling

- This symbol means that this product shall not be disposed of with normal household waste (2012/19/EU).
- Follow your country's rules for the separate collection of electrical and electronic products. Correct disposal helps prevent negative consequences for the environment and human health.
Guarantee and service
If you have a problem, need service or need information, see www.philips.com/support or contact the Philips Consumer Care Center in your country.
2 Retirez le couvercle du compartment.
| Afkortingen |
| g = gram |
| ~ = ongeveer |
| ml = milliliter |
| mm = millimeter |
| kg = kilogram |
| in = inch |
Portieknop - selecteer 1 of u ~ 300 g (1-2 porties) of 2 ~ 600 g (3-4 porties) verse pasta wilt make.
TOT np60p Philips cooTBcETbByet Bcem npimeHmblm cTaHapTaM n HopMa m NO BO3dEChTBnIO 3AekTpomarHHTbIX NOeI.
O630p
| Сокразецения |
| Г = Гаммbl |
| ~ = поимерно |
| МА = мIMANIMТрbl |
| ММ = мIMANIMETрbl |
| КТ = КИАОгразмbl |
| " = Дюмbl |
KhoNka BbIbopa npoRpaMMbI NO3BOAeT BbIbpaTb npoRpaMMy TOaBKO NODaun TeCTa 1 nn ABTomAtmeckyo npoRpaMMy . KhoNka Bblbopa nopui: Bbl6epnte 1 Apy npuroTOBaeHnnpimepHO 300 r (1-2 npu) n 24 Apy npuroTOBaeHn npimepHO 600 r (3-4 npu) cbEke naTbI.
Panaheb ynpabAeHnna
LUHyp nHTaHn
OTBvepCTne 3aUHTHO BbIKIOuTeAHa KaBkKe KaMepbI A3aMeuBaHnTcTa 3aUNTHbB bIKIOuTeA b AApEpaTeA HaCaADK ANaCTbl
OCHOHoe yCTpOCTBO
OTcEK DAxpaHeHnHa HacaDOK DAy N3ROTOBaeHnnaCTbI
BaXHo
-Пелетапелвим Исноьовим Рибора снимITE и утmaируITE 6e3oanchbIM cnocobm ynapokobuhm MaTePmaHn peKaAMHbIe HakaeKn.
- ɪəBæknte Bce ṅeTaʌnɪ aKCEccyapbl,ɪpOMOIte N TɪsaTeʌbHo pɒtpnte nX (cM. pa3dæl "OuHCTka").
He ouhuaite ochoBHOe yctpoiCTBO BOoH He 3aMaunBaTe erO.
He nCnoAbyte JecTKe IeTKn HAn Dpyrne NoXoxKne YnCTaIe npncnoc6bAeHna, Ta KAK 3TO MoKet NOBAnrTa Ha cPOK CAYX6bl NaCTa-MaunHbI Ha PAACTIKOBOIOBepxHOCTM OryT O6pa3OBaTbCzapainHbl.
-ПиббогпpeнэзнаненTOьКОДАДOMaшHERIOИСЮАЗOBAHЯ.
1 Chmnte KpbIuKy KaMepbl Aa 3aMeunBaHn Ta c np6opa.
2 OcIa6bTe KpeIeHene peYrAToPob Ha nepeDne NaHeN.
Приимechаиме.
- IpeaHnaeIb TaeKeIa. Co6IoJaTe oc6yIO octopoKHOCTb npn CHrTIN.
3 NOp oupeen CHMNTe nepeaHIOI NaHeA, HacKa Ky IaI 3rOToBaeHn naCTbl, AepKaTeA hacakn, uheKobbI BaN KaMepy aA 3aMeuBaHn TeCTa.
4 OuInCTIe BCE cBemHbIe AeTaAMn I npOTpNIte HAcyxo.
C6opka
BbIIOAHnTE OINcaHhble HNKe INHCTpyKuIN no c6OpKe NaCTa-MaunHbl.
BaxHo
BoBpemc60pkyn6eAnTecb,yTOpeyAToPbHa nepeAHe nAHea 3aΦnKcnpoBaHbl.
- Aa c6opKn Heo6xOaHMo OTKaIOHTb Pn6OpOT cETN.
1 YctaHOBInTe KaMepy DAn 3AmeunBaHnTecTa B npu6Op.
PbIur3aIHTHOBbIKIOUaTeAДA DePKaTeHacaOk
Примейсан.
- Парад И спюльовимуб endtecb,чTo пердяпаншьзсробана на риборе.
- IpeaHnaeTaeJae. Co6aJaTe oc6yIO octoP0xHOCTb BO Bpemr c6opKn.
6 3aФИКСИРУТe peRyAITOpbI Ha nepeDHei naHEn.
Приимеанно.
- EcnpeednnaHeNbHnHaCdkn dJa nactbYctaHOBHeHnHePaBnBHo,3aUNTHbBbIKIOaTeAbnpoTbPAHTBkUOHeHne np6opa.
7 OAnHbIM 6pa3oM 3aKpOInTe KpbIuKy KaMepeB IAA 3aMeuBaHnY TeCTa.
Примеанно.
- Ecn KpbIka KaMepb I Aa 3aMeuBaHnra TeCTa yCTaHOBHeHa HePpABybHo, 3aUHTbY BbIKIOaTeAb npeDTbPaTNT BkIOueHne np6Opa.
BaXHo
ToUHO CLeAHyIe Yka3aHnM Ipi Do6abEHN MyKu N BOAbi B KaMepy AIA 3aMeunBaHn TcTa. ChauaHa HacblbTe B KaMepy AIA 3aMeunBaHn TcTa MyKu, a 3aTeM 3akpoIte Kamepy KpbIkwOi. BkAouHte NaCTa-MaunHy N HaHnTe NOCTeNEHNO BAHBaTb BOy IO BCeI dAnHe OTBepCTnB KpbIwKe.
3aPpeaaetc npepoHaHtB nacta-MaunHy nHrpeAneHTamn. 3TO MOxET npNBecTN K NOBpeXdEHHIO np6opa.MakcmaabHoe KOAnueCTBO Myk dAra KaKdoI napTmcoCTABAAET 500 r.
3aippeaaetcnpomeaB nacta-MaunHy INHrpeAneHTb, TemepaTpyKOTopbIX npebbiaaet 60^ ,nAnNCIOABoBaTn pacta-MaunHy B yCAOBnx NOBbIweHHoN TemepaTpyb (60°C), HapnpMep npimEnraTb BICOKOTemepaTpyHyO cTeprnna3auio. 3To MoKET npINBeCTN K deOpMaunn Pn6opa.
- 06abAryte BOy TOIbKO IOCAe YCTaHOBKN KpbIiKN Ha KaMepy Aa 3aMeuBaHn Tecta. 3aIpeucaTcra HAAHBaTb KaKne-AH6O JKnAkoCTN B OTBepCTne 3aunTHoro BbIKAOHTeA.
3aippeaaetcnaBbBoy B KaMepy 4a 3aMeuBaHn Tecta,ecn nactamaHHa BbIKAUOeHa. AAn POAYeHn BKChbIX DOMaHnX MaKapOH CTporo CaeAynTe HNCTpyKUmM.
IOnrOToBkAnHrpeAneHTOB
1 OTmepbTe OndHy yaShky MyKn. C nOmoBIO npnlaeraMOrO nloCKoR oAkeccCyapa AAn OCHCTKN ydaNte BcIO MyK, BO3BbIshaOuOyIOcH Na, KpaAMn MEPHOYaShKn. OHa nOHaJ mePnaY aShka COOTBeTCTByET 1-2 nopzma.
PnmuMeuHne.
He BCTpaxnBaIte yaiky n He CTyIte no Hei, YTO6bI ydaIbTb OCTaBswIocr Myk. 3TO NOBAnreT Ha. o6uee KOANeeCTBO MYKn.
BbTaKKe MoXKeTe BOCNoA3OBAbC8a KxOHHbIMn BeCaM, uTo6bI OTMePnTb HJXHOe KOANHeCTBO MyKn. HanpImep, n3 250 r Mynn pOlyaetc npImepHo 1-2 npOuN CBexKnx MaKapOn, a n3 500 r MyKn - npImepHo 3-4 npOuN.
2 CHIMnTe KpbIuKy CKaMepebl.

3 HacbInbTe B KaMepy Myky. YTo6bI pInrOToBnTb 3-4 npuIN,do6aBbTe eue OAnHy MePhyU qAshKy MyKn, TaK KaK Bam IOTpe6ByeTcBcero 2 qAushKn MyKn (~500 r).
4 OAnKbIM o6pa3oM 3aKpOHTe KpbIiKy KaMepbI.
Приимейанно.
- ChaHa BCTaBtBe T npi6op Da KpUOKa 1, a 3aTEM HaDaBnTe Ha KpbIbky B HApBaEHHN OCHOBHOrO yCTpoCTBa 2.
- Пибор He 6удет работаь, ecn Кршka Kaempebl 3akpbity He npabunbHo. Bo ВремприroTOBAnenmaKapOH пибор abTomaTnecknпpekpaaaetpa60Tu, ecn Кршka Kaempebl OTkpBaetcra.

5 OTmepbTe Heo6xOaIMoe KOAnHeCTBO BOAbi B COOTBeTCTBnC INCTpyKUmaMn B pa3eJe "Ta6Amua peueNTOB dA NaCTa-MaunHbI".
Приимеанно.
3aIpeuaeTcHaNBaTbBODyBKaMepyA 3aMeuBaHnTeCTa,ecN NaCTa-MaunHa BbIKIOUeHa.
Ha npnlaeraemb Mephbl CtaKaH JIa KINKOCTH HaheceHO 2 Bnda OTMeTOK. IpeBbM BnD npeHa3NaueH ApyPiROTOBaeHnO6bUHbIX MaKapOH, BTOPOI -AraYnHOn LaPiHnN APyTnx MaKapOH c pa3HbIMn BKcAMn.
Ta6aHua peueeTTOB Aa Nacta-MaHHbI
HnKaTOpbI He 3aRopaIOCTa.
CetebaBnkaIPOKIAOueHaHeppaBnAho.
V6eAnTeCb,HTO cTeBaB AINa IpaBnBHo IOAknOHeHa n PO3eTka NcPbaBHa.
KHONKA BKAIOUeHINBbIKAOUeHIN He HaxKaTa.
HaKMMTe KHOIIky BIKIOHEnIy/ByIKIOHEnIy ①
IocHe HauKaTHa KHOJIKN IyCKa/Iay3bl npH6Op IoDAeT 3ByKOBoN CnHaA, HO He pa6OtaeT.
Kamepa co6paHa HnepaBnAho.
HacaKa 4nactbI nnpeAHa nAHeI npncOeAnHeHb HeBepHO.
A npabnBHOc6OpKn Bcex AeTaen CJeayTe Yka3aHnM B INCTpyKlM N O KcnAyaTaun.
HeBb6paHO KOAMueCTBO NOPcN.
Ipeed hkaTneM KhoNk n ycka/nay3b ybeaNTecb, YTO b6paHO HxHHe KOUyecTBO npu.
3aunTHbI BvIKIOuATEb 6bl AKTBNPOBaH, n pni6Op BHe3aHNO nepectaA pa6oTaB Hnpe3aNcyTnCAc BO Bpemra 6oToI.
PeryATop Ha nepeaHei paHeaH He 3aΦHKpOBAH.
Y6eAnTeCb, YTO pepeHra naHeb yCTaHOBHa npaBnBHO.
B nacta-maunHy do6abaeHO cunKOM MHORO INHrpeAneHTOB.
MaKcMmaBHoe KOnHeCTBO MykI AaKaJDo NapTmN CoCTabAeT 500 r. EcMdo6abAeH O6Mbse 500 r, yMeHbWITe KOnHeCTBO MykI nepeA o6pa6oTKo CLeayUoiE npTmN.
Pnp6op npkepaaet pa60ty. OTCyTCTByET 3ByKOBoI CNHaI ONObeHnA, HnHnAKnATOpbl He MmraIOT.
- Pácta-Maúshinha neperpeaacb B pe3yλbTaTe npoAOJXHTeλbHOr HénpépbIbHOr pa6OtbI.
OTKIOHTe np6op OT cTeN dAte nacta-MaunHe ocTb. YTO6bl np6op npabnHo pa60an I mEaINTeBhI cyk6bI, Bpem HnpepbHbO pa60bl He doAnHO npebuHaTb 45 MInyT. Upe3 15 MNHT OJIMdAHn MOxHO npoAoXaTb NcNoAb3OBAHne np60pa.
Bo Bpem o6pa60TK npH6op nepectaet pa6oTaTb, 3aTeM nHAnKaTopbI 6bICTpo MmraOT N 3Byat CnHaAbl ONObEuCEHn.
Bo3MOXHO,ShKeKOBbBaal3a6AOKnPOBaHIOCTOPOHHNIMIpeAMetOM.
Bo3MOxH0, TECTO cAunkOM cyXoe.
BbIbpaHa HnPbaHbHa nPoIpaMa.
OTKIOUHTe pnpbOp OT cETnO uHCTnTe nacta-MaunHy n CHOBA 3aynCTnTe npouccnPnroTOBHeMaKaPApOH cOrAacHO INCTpykUnn PO kCnAyTaUN.
B KaMepe cKoIIaOcB cAnIiKOM MHOrToTeCTa.
- O6aBaEHa BAaJHNa MyKa HAn TECTO CAnIJKOM XnIaKoe.
CaeiTe, yTo6bMyka ocTabaIacb cyXoB BO Bpemx XpaHEnn. YTo6bI cHOBa 3aNyctntb npoueeC
IpeaNcnoB3OBAHnem y6eAnTEcB,yTO BCE aTeAaN POANHOCTbIO CyXNE.
- Pn do6abEHH BOaH He CO6AIODeHa NOCAEoBaTeaBHOCTb.
BbI6paHa Myka HenoaOxOaIeTo Tna.
Bb6paHo He npabHbHOe KOAnYeCTBO NOpCm.
YTo6bI nprirotOBInb MaKApOHBi, BblIOHaHIne peKoMeHdAaUNB INHCTpykUnn IO kCnAyaTaun.
I3 np6opa noctyaetae He6oAioe KoAnueCTBO BOaBi.
B0da 06aBAeHa 03anycka nporpaMMbl.
AobabTBeBDOyCp3aYnOcAaNcyKa nporpaMMbI, KaK yka3aHO B INHCTpykUIN NO EKcnayTaUIM.
UHeKOBbI BaPa6oTaET BxOIOCTyIO,IMaKaPOnHbIE N3DeAeNHe NoCTyNaOTn3 np6opa.
BbI6paHO He npaBnA hoe COOTHOseHne KOAnueCTBa MyKn N BOAbI.
OTKIOUHTe CeTeBryO BVNKy OT pO3eTKM IN N3BAEKNTE TcTeO. OOnCTNe NaCTa-MaShHy, 3aHOBO OTmepbTe npabINbHOE KOJIHeCTBO INHPeAneHToB IN CHOba 3aNpyCTNe pInFOrOBaHMe MaKapOH COrlaCHO IHCTpyKlMn IO EKcnIyatauMn.