
HR7723 - Food Processor PHILIPS - Free user manual and instructions
Find the device manual for free HR7723 PHILIPS in PDF.


| Product Type | Food Processor |
| Brand | Philips |
| Model | HR7723 |
| Power | 650 W |
| Bowl Capacity | 2.1 L |
| Dimensions (H x W x D) | 25 cm x 20 cm x 30 cm |
| Weight | 4.2 kg |
| Material | Plastic body, stainless steel blades |
| Speed Settings | 2 speeds + pulse |
| Functions | Chopping, slicing, grating, kneading, blending |
| Included Accessories | Chopping blade, slicing disc, grating disc, dough blade, spatula |
| Safety Features | Locking lid, non-slip feet, overheating protection |
| Dishwasher Safe Parts | Bowl, lid, discs, blades (except motor unit) |
| Cleaning | Wipe motor unit with damp cloth; other parts dishwasher safe |
| Cord Length | 1.2 m |
| Voltage | 220-240 V |
| Frequency | 50-60 Hz |
| Replacement Parts Availability | Bowls, blades, discs available via Philips spare parts |
| Manual Included | Yes, 92 pages |
| Warranty | 2 years |
Frequently Asked Questions - HR7723 PHILIPS
User questions about HR7723 PHILIPS
0 question about this device. Answer the ones you know or ask your own.
Ask a new question about this device
Download the instructions for your Food Processor in PDF format for free! Find your manual HR7723 - PHILIPS and take your electronic device back in hand. On this page are published all the documents necessary for the use of your device. HR7723 by PHILIPS.
USER MANUAL HR7723 PHILIPS
Instructions for use
Bruksanvisning
Bruksanvisningl
Käyttöohje
Brugsanvisning
دليل الإستخدام
طرز استفاده
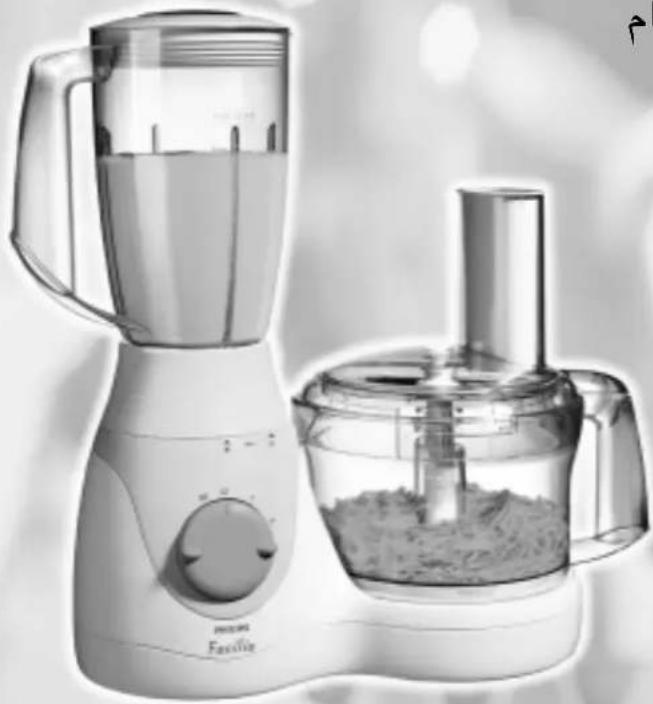
natural_image
Black-and-white photo of a kitchen blender and a side dish with powder, no visible text or symbols.
PHILIPS
English 3
Norsk 15
Svenska 27
Suomi 39
Dansk 51
75 العربية
88 قارسی
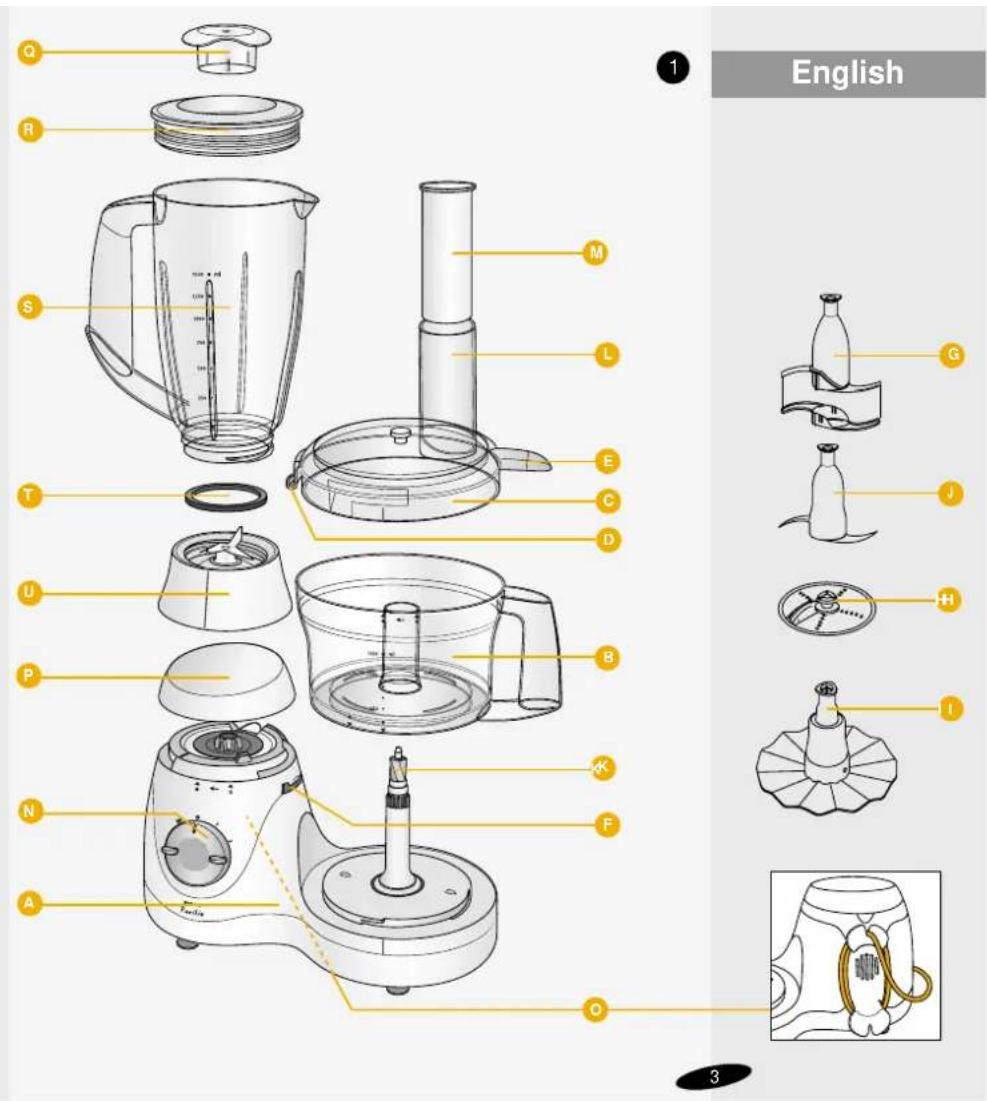
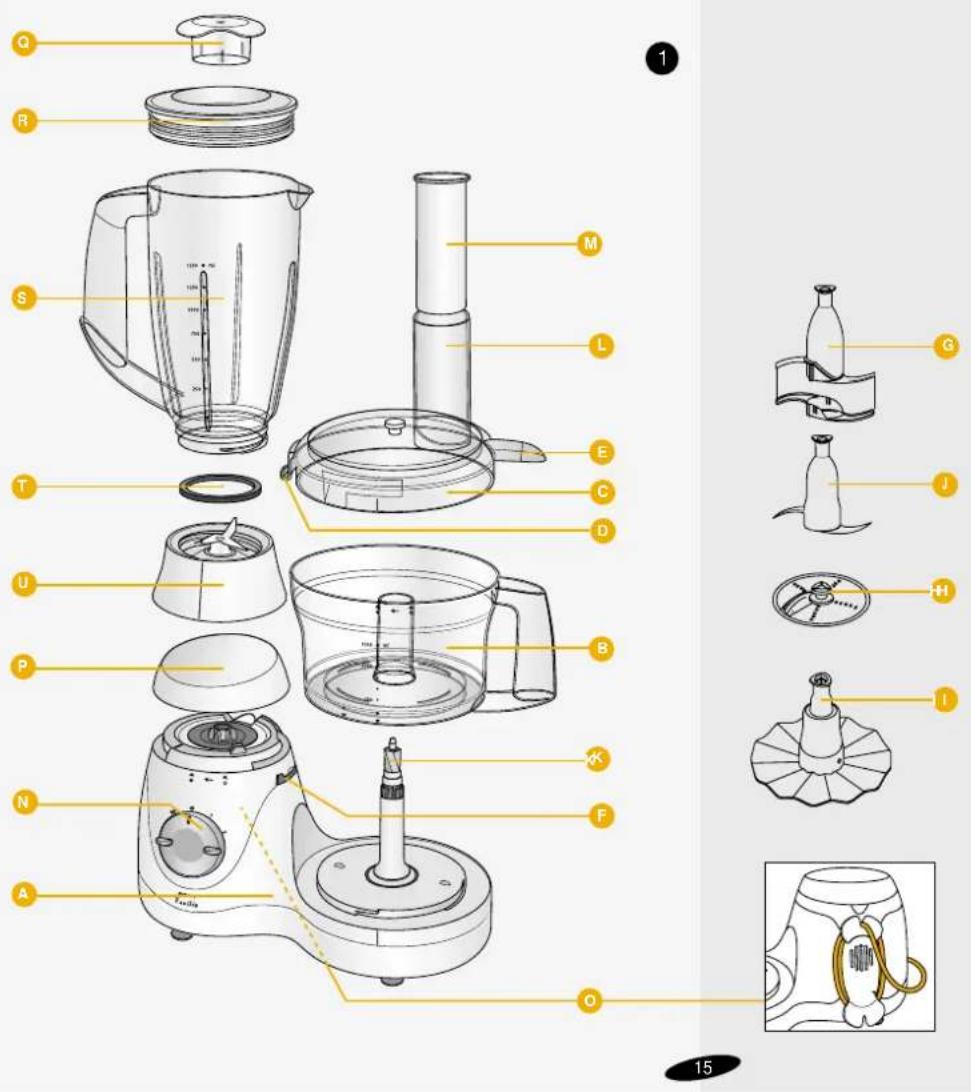
General description (fig. 1)
A Motor unit
B Bowl
©Lid of bowl
D Peg of lid (activates and deactivates the safety lock)
E Projection (covers the opening in the handle)
F Built-in safety lock
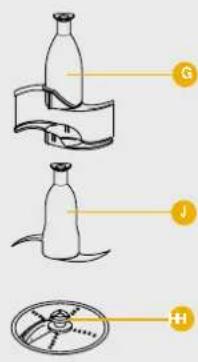
G Blade
H Slicing/shredding disc (medium fine, double-sided)
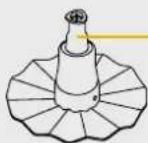
Emulsifying disc
J Kneading accessory
K Driving shaft
L Chute
M Pusher
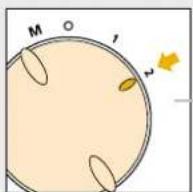
N Speed control
O = Off
1 - 2 = variable speed control
(1 = lowest speed;
2 = highest speed)
M = Moment/Pulse button
(appliance runs as long as button is pressed)
Cord clip (for fixing the cord when wrapped)
P Screw cap (for closing the attaching hole for the blender jar when it is not used)
Blender accessories
©Stopper
R Lid
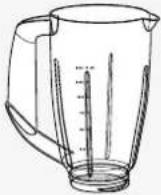
S Blender jar
T Rubber sealing ring
U Knife unit


Automatic cut-out
Read these instructions carefully before you start using the appliance
To prevent damage due to overheating, your appliance has been equipped with an automatic cut-out system. In case of overheating, this system will automatically cut off the power supply to the appliance. If you follow the instructions below, you can switch on the appliance again after you have let it cool down for 15 minutes.
If your appliance suddenly stops running:
- Pull the mains plug out of the socket
- Set the switch to position O
- Let the appliance cool down for 15 minutes
- Put the mains plug back in the socket
- Switch on the appliance again.
Please contact your Philips dealer or an authorised Philips service centre if the automatic cut-out system is activated time and again.
Important
- Read the directions for use and look at the illustrations before you start using the appliance.
- Remove the protective cover from the blade each time you use it.
- Be very careful when you pick up the blade, the knife of the blender and the slicing/grating disc. They are very sharp!
- Thoroughly clean the parts that will come into contact with food before you use the appliance for the first time.
- Place the lid on the bowl in the right position. The built-in safety lock will now be deblocked and you will be able to turn on the appliance.
- Note that if both the blender and the bowl have been correctly mounted, only the blender will function.
- Never let the appliance run unattended.
- Never let children run the appliance.
- When you are mixing or blending liquids, do not exceed the maximum content indicated on the bowl or the blender (top line of the graduation).
- Do not exceed the maximum amounts and processing times indicated in the table.
- Wait until moving parts have stopped running before you remove the lid of the appliance.
- Never put your fingers or objects (e.g. a spatula) in the chute while the appliance is running. Only the pusher is to be used for this purpose.
- Never put your fingers or objects (e.g. a spatula) in the blender unless you have unplugged the appliance first.
- Never immerse the motor unit in water or any other liquid. Do not rinse it either.
- Unplug the appliance after use.
- If the mains cord of this appliance is damaged, it must always be replaced by Philips or a service centre authorised by Philips, in order to avoid hazardous situations.
- Keep these directions for use for future reference.

Placing the bowl (B) (fig. 2)
- Put the bowl on the food processor as shown (1)
- Turn the handle in the direction of the arrow until the bowl cannot be moved any further and you hear a 'click' (2).
Placing the lid (C)
- Put the lid on the bowl as shown in fig. 3.
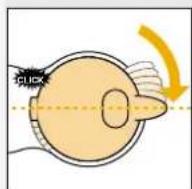
- Turn the lid with some force in the direction of the arrow until the lid will not move any further and you hear a 'click' (fig. 4-5).
- Make sure that the mark on the lid and the arrow on the bowl are directly opposite each other. The projection of the lid will now cover the opening in the handle of the bowl (fig. 6).

7

8

Chute (L) and pusher (M)
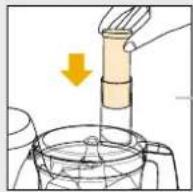
• The chute can be used to add liquid and solid ingredients (fig. 7).
- Use the pusher to push ingredients through the chute (fig. 8).
- You can also use the pusher to close the chute while the appliance is running to prevent dust or drops of liquid from escaping through the chute (fig. 9).
Built-in safety lock (F)
The motor unit as well as the lid (C) have been provided with marks. The appliance will only function if the arrow on the motor unit is placed directly opposite the mark on the lid. In this position, the projection (E) of the lid will cover the opening in the handle of the bowl.
How to use the appliance
Note: The appliance will only function if
- The screw cap (P) or the blender (Q-U) have been properly mounted onto the motor unit (A) and
• The bowl (B) and the lid (C) have been placed on the motor unit in accordance with the instructions in this booklet. - If both the blender and the bowl have been mounted correctly onto the motor unit, only the blender will function.
Set the speed control (N) to the position indicated in the table on pages 8-10 and switch the appliance on. When you have doubts about the right speed, always select the highest speed (setting 2).

10

11

12
Blade (G) 6
Be careful: the cutting edges of the blade are very sharp!
- The blade can be used for chopping, mixing, blending, pureeing and preparing puff pastry, crumble and shortcrust pastry.
- Remove the protective cover from the blade (fig. 10).
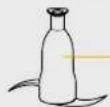
- Put the bowl on the motor unit (fig. 2) and fit the blade onto the driving shaft (fig. 11).
- Put the ingredients in the bowl (fig. 12).
- Fasten the lid onto the bowl and put the pusher in the chute.
- Set the speed control (N) to the position indicated in the table and switch the appliance on. If you have doubts about the correct speed, always select the highest speed (position 2).
- Applications/recipes, mentioned in the table, will be ready after 10-60 seconds.
Tips:
- It is better not to chop large chunks with the blade; pre-cut them into pieces of approximately 3 cm before putting them in the food processor.
• The appliance chops very quickly; let it run for short periods at a time, also when you are using the pulse setting (M), to prevent the food from becoming too finely chopped. - Do not let the appliance run for too long when you are chopping (hard) cheese; the cheese will get too hot and will start to melt and become lumpy.
-
If food sticks to the blade or to the inside of the bowl:
-
turn the appliance off;
- remove the lid from the bowl;

13

14

15

16
- remove the ingredients from the blade or the inside of the bowl with a spatula.
- Do not chop very hard ingredients like coffee beans, nutmeg and ice cubes. They could cause the blade to get blunt.
Check the table for the appropriate speed and setting.
Slicing/shredding disc (H)
Be careful: the cutting edges of the disc are very sharp!
Only grasp the plastic part in the middle of the disc.
- Put the bowl on the motor unit (fig. 2).
- Put the slicing/grating disc in place (fig. 13).
- Put the lid on the bowl (fig. 14).
- Put the ingredients in the chute (fig. 15).
- Press the pusher lightly onto the ingredients in the chute.
- For grating and slicing: set the speed control to position 2 (maximum speed).
- If you want to cut soft vegetables or fruits, you can also select a lower speed setting (see table).
- Press the ingredients slowly and steadily down with the pusher (fig. 16).
Tips:
- Pre-cut large chunks to make them fit into the chute.
- Fill the chute evenly for the best results.
- When you have to cut large amounts of food, process only small batches at a time and empty the bowl regularly between batches.

17

18

19

20

21
Emulsifying disc (I)
- You can use the emulsifying disc to prepare mayonnaise, to whip cream and to whisk egg whites.
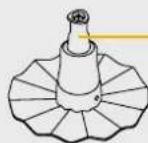
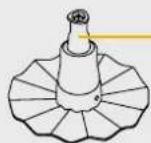
- Put the bowl on the motorunit and fit the emulsifying disc onto the driving shaft (fig. 17).
- Put the ingredients in the bowl (fig. 18) and put the lid onto the bowl (fig. 19).
- Fasten the lid onto the bowl and put the pusher in the chute (fig. 20).
- Set the speed control to the position indicated in the table and switch the appliance on (fig. 21).
Tips:
- When you want to whisk egg whites, make sure the eggs are at room temperature.
• Take the eggs out of the refrigerator at least two hours before your are going to use them - All the ingredients for making mayonnaise must be at room temperature
- If you are going to whip cream, the cream must be taken straight from the refrigerator. Please observe the preparation time in the table. Cream should not be whipped too long. Use the pulse function to have more control over the process.
22
23


25

26
Kneading accessory (J)
- The kneading accessory can be used for kneading bread dough and for mixing batters and cake mixtures.
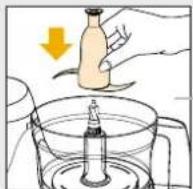
- Put the bowl on the motor unit (fig. 2) and fit the kneading accessory onto the driving shaft (fig. 22).
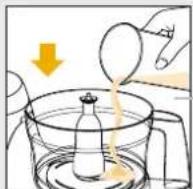
- Put the ingredients in the bowl (fig. 23) and fasten the lid onto the bowl (fig. 24).
- Put the pusher in the chute to close it (fig. 25).
- Set the speed control (N) to position 2 (= maximum speed) (fig. 26). The dough, batter or cake mixture will be ready after 1 - 3 minutes.

27

29
30
Blender (Q-U)
Important:
- The appliance can be used with or without the blender attached to the motor unit. If you use the appliance without the blender, the appliance will not function if the screw cap (P) has not been screwed onto the attaching hole for the blender.
- Before use: do not put the mains plug in the socket until you have attached the blender jar (S), the lid (R) and the knife unit (U) to the motor unit in the correct way.
• After use: unplug the appliance before you remove the blender jar from the motor unit. - The blender can be used for pureeing very finely and for blending. It can be used for e.g. soups, sauces, milkshakes, baby food, vegetables, fruit, thin batter, puree, etc. If necessary, cut solid ingredients into smaller pieces before you put them in the blender.
- Do not fill the blender jar with ingredients that are hotter than 80 °C.
• To prevent spilling, do not put more than 1.2 litres of liquid in the blender jar. - Never remove the lid while the blender is running.
Assembly and disassembly
- Put the rubber sealing ring (T) around the edge of the knife unit (U) (fig. 27).
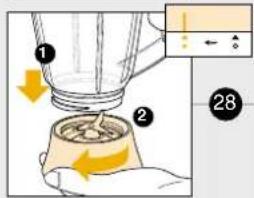
- Turn the knife unit to the left to attach it to the blender jar (fig. 28). Make sure it is firmly fixed!

31

32

33

34
35
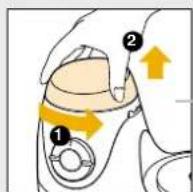
- Remove the screw cap (P) (fig. 29).
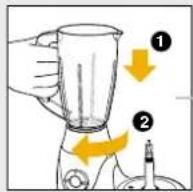
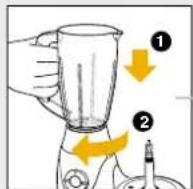
- Mount the blender jar onto the attaching hole and turn it in the direction of the arrow until it is firmly fixed (fig. 30).
Warning: do not exert too much pressure on the handle of the blender jar.
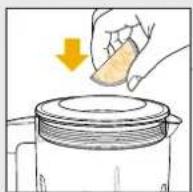
- Press the lid into place (fig. 31).
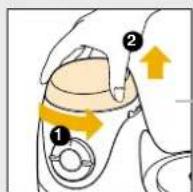
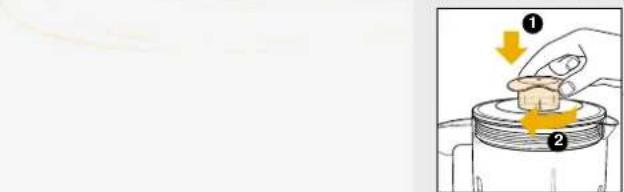
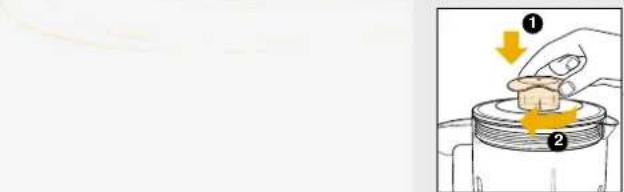
- Attach the stopper by pressing it down and turning it in the direction of the arrows until it is firmly attached (fig. 32).
- To detach the blender, follow these steps in reverse order and opposite direction.
- Applications/recipes, mentioned in the table, will be ready after 10 seconds - 2 minutes.
How to use the blender
- Put the ingredients in the blender jar (fig. 33).
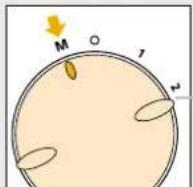
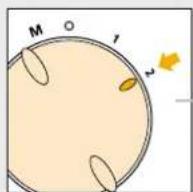
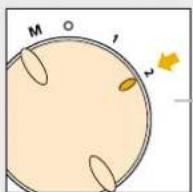
- Switch on the appliance by setting the speed control to the recommended speed (fig. 34) or by pressing the pulse button (M) (fig. 35). If you have any doubt about the correct speed, always select the highest speed (position 2). Check the table for the appropriate speed and setting.

36
37

38
Tips:
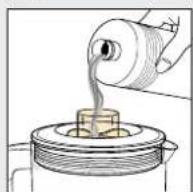
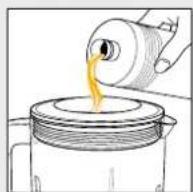
- Liquid ingredients (for example oil for making mayonnaise) can be poured into the blender jar through the hole in the stopper which has been put in the lid upside down (fig. 36).
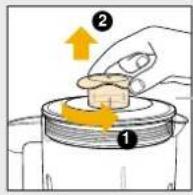
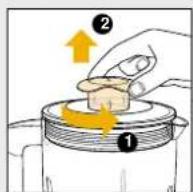
- The opening in the lid can be used to add ingredients while the appliance is running. To do so, unscrew the stopper and remove it from the lid (fig. 37-38).
- The longer you let the appliance run, the finer the blending result will usually be.
- It may be necessary to switch off the appliance from time to time to remove pieces of food sticking to the inside of the blender jar.
- Switch off the appliance and unplug it;
- Remove the stopper and the lid;
- Remove pieces sticking to the inside of the blender jar with a soft spatula. Keep the spatula at a safe distance from the knives (approximately 2 cm).
Cleaning
• Always unplug the appliance before you start cleaning the motor unit.
- You can clean the motor unit with a damp cloth. Do not immerse the motor unit in water and do not rinse it either.
• Always clean the parts that have come into contact with food in hot water with washing-up liquid immediately after use.
- Clean the blade, the knife unit of the blender and the slicing disc very carefully. The cutting edges are very sharp!
- Make sure that the cutting edges of the blade and the slicing disc do not come into contact with hard objects: this could cause them to become blunt.
39
- Certain ingredients may cause discolorations on the surface of the accessories. This does not have a negative effect; the discolorations usually disappear after some time.
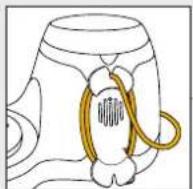
- Wrap the (excess) mains cord around the reel on the back of the appliance (fig. 39).
| Ingredients Max. Speed Accessory Procedure Applications quantity setting | |||||
| Apples, carrots, celeriac- grating/slicing | 500 g | 2 / M | Cut the fruit/vegetables into pieces that fit into the chute. Fill the chute with the pieces and grate them while pressing the pusher lightly. | Salads, raw vegetables | |
| Batter (pancake)- whisking | 500 ml milk | 2 | First pour the milk into the blender and then add the dry ingredients. Mix the ingredients approx. 1 minute. If necessary, repeat this procedure max. 2 times. Then stop for a few minutes to allow the appliance to cool down to ambient temperature. | Pancakes, waffles, crLpes | |
| Breadcrumbs- chopping | 100 g | 2 | Use dry, crisp bread | Breadcrumbsbed dishes, au gratin dishes | |
| Butter cream (crème au beurre) | 300 g | 2 | Use soft butter for a light result | Desserts, pastry, toppings | |
| Cheese (Parmesan)- chopping | 200 g | 2 | Use a piece of rindless Parmesan and pre-cut it into pieces of 2x2 cm and chop them. | Garnishing, soups, sauces, au gratin dishes | |
| Cheese (Gouda)- grating | 200 g | 1 | Cut the cheese into pieces that fit into the chute. Press carefully with the pusher. | Sauces, pizzas, au gratin dishes, fondue | |
| Chocolate- chopping | 200 g | 1 / M | Use hard, plain chocolate. Break into pieces of 2 cm. Use the pulse setting (M) during the first few seconds and then switch to max. speed to chop very finely. | Garnishing, sauces, pastry, puddings, mousses | |
| Dough (tarts, pies, dumplings)- kneading | 300 g flour | 2 | Use cold margarine and cold water. Put flour in the bowl and add the margarine cut into pieces of 2 cm. Mix at max. speed until the dough has become crumbly, then add cold water while mixing. Stop as soon the dough starts to turn into a ball. Allow the dough to cool before further processing. | Fruit tarts, apple dumplings, pies, quiches. | |
| Dough (bread)- kneading | 700 g flour | 2 | Mix warm water with yeast and sugar. Add flour, butter and salt and knead the dough for approx. 90 seconds. Leave to rise for 30 minutes. | Bread | |
| Dough (pizza)- kneading | 700 g flour | 2 | Same procedure as for bread dough. Knead the dough for approx. 1 minute. | Pizzas, tarts | |
| Dough (yeast)- kneading | 500 g flour | 2 | First mix yeast, warm milk and some sugar. Add flour, sugar, salt, eggs and soft margarine. Knead the dough until it stops sticking to the bowl.(Takes approx. 1 minute). Leave it to rise for 30 minutes. | Luxury bread | |
| Dough (shortcrust)- kneading | 500 g flour | 2 | Use cold margarine, cut into pieces of 2 cm. Put all the ingredients in the bowl and knead until the dough has turned into a ball. Allow the dough to cool before further processing. | Apple pies, sweet biscuits, open fruit flans | |
| Egg whites- whisking | 4 egg whites | 1 | Use the eggs at room temperature.Note: Use at least two egg whites | Puddings, soufflés,meringues | |
| Fruit (e.g. apples, peaches, bananas)- chopping | 500 g | M | Tip: Add a little lemon juice to prevent the fruit from discolouring | Salads | |
| - pureeing | 700 g | 2 | Add some liquid to obtain a smooth puree. | Sauces, jams,puddings, baby food | |
| Herbs (e.g. parsley)- chopping | min.75 g | 2 / M | Wash and dry the herb(s) before chopping | Sauces, soups,garnishing, herb butter | |
| Leeks, cucumbers, carrots- slicing | min.1 piece | 2 / M | Fill the chute with leeks, pieces of cucumber or carrots and press carefully with the pusher. | Soups, salads,quiches. | |
| Mayonnaise- emulsifying | 3 eggs | 1 | Use all ingredients at room temperature. Note: use at least one big egg,two smal eggs or two big egg yolks. | French fries, salads,fondue, garnishingand barbecue sauces. | |
| Meats, fish, poultry- lean meat | 500 g | 2 / M | First remove sinews and (fish) bones. Cut the meat/fish into cubes of 3 cm. Use the pulse setting for a coarser chopping result. | Steaks tartare,hamburgers | |
| - streaky meat | 400 g | 2 / M | Minced meat | ||
| Milkshakes- blending | 250 ml milk | 2 | Puree the fruit (e.g. bananas, strawberries) with sugar and lemon juice.Add milk and some ice cream and mix well. | ||
| Mixture (sponge)- whisking | 3 eggs | 2 / 1 | Ingredients at room temperature. Whisk the mixture of eggs and sugar at max. speed until stiff. Then add the sifted flour. Continue whisking carefully at speed 1. | Sponge cakes, Swiss rolls, pastry | |
| Mixture (cake)- mixing | 4 eggs | 2 | Ingredients at room temperature. Mix the softened butter and the sugar until the mixture is smooth and creamy. Then add milk, eggs and flour respectively. | Various cakes | |
| Nuts- chopping | 250 g | 2 / M | § | Use the pulse setting (M) for coarse chopping or max. speed for fine chopping. | Salads, bread, almond paste, puddings |
| Onions- chopping- slicing | 500 g | 2 / M | § | Peel the onions and cut them into 4 pieces. Note: use at least 100 g. | Salads, cooked food |
| 500 g | 2 / M | ◎ | Peel the onions and cut them into pieces that fit into the chute. Note: use at least 100 g | ||
| Peas, beans(cooked)- pureeing | 500 g | 2 | □ | Use cooked beans or peas. If necessary, add some liquid to improve the consistency of the mixture. | Purees, soups |
| Potatoes, cooked- pureeing | 750 g potatoes | 1 - 2 | § | Do not overcook the potatoes. The amount of milk necessary depends on the kind of potato used. Use warm milk (max. 80°C). Add the milk slowly while the metal blade is rotating. | Oven dishes, puree |
| Soups- blending | 500 ml | 2 | □ | Use cooked vegetables | Soups, sauces |
| Vegetables- chopping | 500 g | 2 | § | Pre-cut into cubes of 3 cm and chop them with the blade. | Soups, raw vegetables, salads |
| Vegetables and meats (cooked)- pureeing | 500 g | 2 | □ | For coarse puree, add only a little liquid. For fine puree, keep adding liquid until the mixture is smooth enough. | Baby and infant food |
| Whipping cream- whipping | 400 ml | 1/ M | ◎ | Use cream that has been cooled in the refrigerator. Note: use at least 125 ml cream. | Garnishing, cream, pastry, ice cream mixtures |
Parts
The following items are standard accessories:
- Bowl (B)
- Lid (C)
- Blade (G) §
- Slicing/shredding disc (H) ⊕
- Emulsifying disc (I)
- Kneading accessory (J)
- Pusher (M)
- Blender (Q-U)
The following additional accessories are available:
- double-sided slicing disc for thick and thin slicing (n°4203 065 61950)
- double-sided grating disc for coarse and medium fine grating (n° 4203 065 61970)
- double-sided grating disc for fine and extra fine grating (n° 4203 065 61960)
- Potato grating disc (n° 4203 065 61840)
- single-sided slicing disc for French fries and e.g. Swedish turnip HR 2912 (n° 4203 065 61830).
- Storage box for discs HR 2922 (n° 4203 065 61860).
Ask your supplier if these accessories are also available in your country. If you want to order additional parts or replacements, please mention the relevant service and/or type numbers.
SERVICE SERVICE SERVICE
| 4203 065 61830 | 4203 065 61840 |
SERVICE SERVICE SERVICE
 4203 065 64510 4203 065 64510 |  4203 065 64520 4203 065 64520 |  4203 065 60160 4203 065 60160 |
 4203 065 64530 4203 065 64530 |  4203 065 63800 4203 065 63800 |  4203 065 60170 4203 065 60170 |
 4203 065 64540 4203 065 64540 |  4203 065 64390 4203 065 64390 |  4203 065 61950 4203 065 61950 |
 4203 065 64550 4203 065 64550 |  4203 065 61890 4203 065 61890 |  4203 065 61960 4203 065 61960 |
 4203 065 64650 4203 065 64650 |  4203 065 61970 4203 065 61970 | |
 4203 065 61860 4203 065 61860 |  4203 065 64560 4203 065 64560 |  4203 065 61980 4203 065 61980 |
You are not satisfied with the way the appliance functions?
If the appliance does not function the way you expect it to, consult the following table and read the relevant sections in the directions for use!
Problem:
The switch does not function
Possible solution:
Turn bowl and/or lid in the direction indicated as far as possible (until you hear a 'click').
Make sure that the arrows on the bowl and on the appliance as well as on the bowl and on the lid are placed directly opposite each other (see fig. 2 and 6).
Make sure that the blender jar or the screw cap have been properly placed and turn them in the direction indicated as far as possible.
The appliance has suddenly stopped running
This is probably the automatic cut-out system that has cut off the power supply to the appliance because it has overheated.
- Unplug the appliance
- Set the switch to position O
- Let the appliance cool down for 15 minutes
- Put the mains plug back in the socket
- Switch on the appliance again.
If the automatic cut-out system is activated repeatedly, contact your Philips dealer or the Philips Service Centre in your country.
The chopping, slicing or grating result is not optimal
Select the correct speed. Look at the indications on the appliance and in the directions for use.
The result when whisking eggs is not optimal
You can try adding some lemon juice or salt. Make sure the emulsifying disc and the bowl are grease-free and select the right speed.
The result when whipping cream is not optimal
Use the emulsifying disc. Use cooled whipping cream (approximately 6 °C).
The dough is swung around in the bowl
Follow the instructions given in the directions for use carefully. Never add too much water.
Always use the accessory indicated in the table.
Do not exceed the maximum kneading time indicated.
Norsk

20

21

25
26
Elteutstyr (J)

29
30
Mikser (Q-U)
Viktig:
Svenska

20

21
Vispskiva (I)

25

26
Degknádaren (J)
29

30
Mixern (Q-U)
Viktigt:
Suomi

20
21
Käyttövinkkejä:

25

26
Taikinakoukku (J)

29

30
Tehosekoitin (Q-U)
Tärkeää
M = Moment/Pulse knap
19

20

21
Piskeskive (I)

25
26
Æltetilbehør (J)

29

30
Blender (Q-U)
Vigtigt:
30
36
natural_image
Hand pouring liquid into a cup with a yellow arrow indicating downward motion (no text or symbols)31
37
32
38
33

27
(Q-U) الخライト
ملاحظات هامة

25


20

21
① (1) المخفقة

3
1
العربية



سم 1 (الوصف العام
A لمحرك
Bالجرة
© الحرة
D alخطاء
الجهاز
E الغطاء
F:الحها
G.
H. قطاب
الاستحلاب
30

36
natural_image
Hand pouring liquid into a cup with a yellow arrow indicating downward motion (no text or symbols)31

37
32

38

33

27

(Q-U) الخライト
ملاحظات هامة

25

20

21
① (I) المخفقة


3
1
العربية



88
سم 1 (الوصف العام
A لمحرك
B
© الحرفية
D العطاء
الجهاز
E الغطاء
Fالحها;
© لمنحل
H詐طيم
① الاستحلاب
100% recycled paper 100% papier recyclé
www.philips.com
4203 064 13683



- General description (fig. 1)
- Blender accessories
- Automatic cut-out
- Read these instructions carefully before you start using the appliance
- If your appliance suddenly stops running:
- Important
- Placing the bowl (B) (fig. 2)
- Placing the lid (C)
- Chute (L) and pusher (M)
- Built-in safety lock (F)
- How to use the appliance
- Blade (G) 6
- Be careful: the cutting edges of the blade are very sharp!
- Tips:
- Slicing/shredding disc (H)
- Be careful: the cutting edges of the disc are very sharp!
- Emulsifying disc (I)
- Kneading accessory (J)
- Blender (Q-U)
- Important:
- Assembly and disassembly
- How to use the blender
- Cleaning
- Parts
- You are not satisfied with the way the appliance functions?
- Problem:
- The switch does not function
- Possible solution:
- The appliance has suddenly stopped running
- The chopping, slicing or grating result is not optimal
- The result when whisking eggs is not optimal
- The result when whipping cream is not optimal
- The dough is swung around in the bowl
- Norsk
- Elteutstyr (J)
- Mikser (Q-U)
- Viktig:
- Svenska
- Vispskiva (I)
- Degknádaren (J)
- Mixern (Q-U)
- Viktigt:
- Suomi
- Käyttövinkkejä:
- Taikinakoukku (J)
- Tehosekoitin (Q-U)
- Tärkeää
- Piskeskive (I)
- Æltetilbehør (J)
- Vigtigt:
Brand : PHILIPS
Model : HR7723
Category : Food Processor