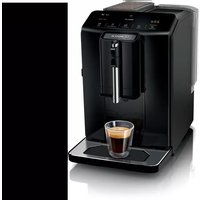
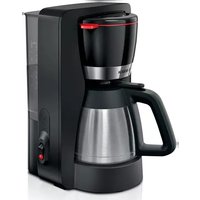
TIS30321RW - TIS30321RW - Coffee maker BOSCH - Free user manual and instructions
Find the device manual for free TIS30321RW - TIS30321RW BOSCH in PDF.
Download the instructions for your Coffee maker in PDF format for free! Find your manual TIS30321RW - TIS30321RW - BOSCH and take your electronic device back in hand. On this page are published all the documents necessary for the use of your device. TIS30321RW - TIS30321RW by BOSCH.
USER MANUAL TIS30321RW - TIS30321RW BOSCH
Register your new Bosch now: www.bosch-home.com/welcome
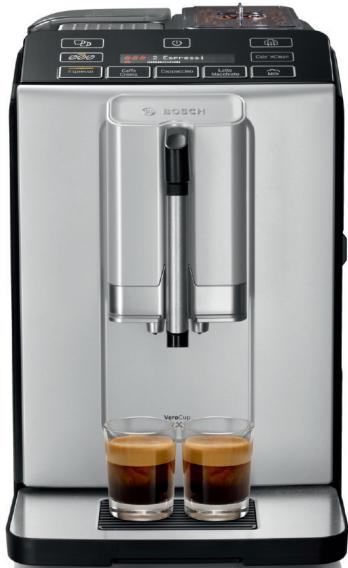
Fully automatic espresso machine
Machine à expresso automatique
Volutomatische pressomachine
Ekspres do kawy
Plné automatický kávovar
Автomatunicькя кфемашина
Kaffeevollautomat
TIS 3.3.

BOSCH
en Instruction manual 5
fr Mode d'emploi 27
nl Gebruiksaanwijzing 52
pl Instrukcja obslugi 75
cs Navod k pouziti 101
ru IpaBnla noIb3OBAHnra 123
de Gebrauchsanleitung 145
A
B
C
D
1
3
4


5

6
7
Table of contents

Intended use. 6

Important safety information . . . 6

Environmental protection . . . . . . 8
Saving energy. 8
Environmentally-friendly disposal . . . 8

Getting to know your appliance . 8
Included in delivery. 8
Assembly and components 9
Controls 9

Accessories 10

Before using for the first time. . 11
Installing and connecting the appliance 11
Commissioning the appliance . . . . 11

Operating the appliance . 12
Preparing coffee using freshly ground beans 12
Preparing drinks with milk 13
Adjusting beverage settings. 14
Water filter 15
Frost protection. 16

Settings. 16
Automatic switch-off 16
Switching the audible signal on/off. . 17
Setting the language. 17
Setting the water hardness. 17
Factory reset. 18

Daily care and cleaning 18
Cleaning agent 18
Cleaning the appliance 19
Cleaning the drip tray and coffee grounds container 19
Cleaning the milk system 20
Cleaning the brewing unit . 20

Service programmes. 21
Starting Calc'nClean 22

Trouble shooting 23

Customer service 26
Technical data. 26
E number and FD number. 26
Guarantee 26

Intended use
Check the appliance for damage after unpacking it. Do not connect the appliance if it has been damaged in transport.
This appliance is intended for domestic use only.
Only use the appliance indoors at room temperature and up to 2000m above sea level.

Important safety information
Please read carefully, follow and retain the operating instructions. When passing on the appliance, enclose these instructions.
This appliance can be used by children aged from 8 years and above and by persons with reduced physical, sensory or mental capabilities or lack of experience and knowledge if they have been given supervision or instruction concerning use of the appliance in a safe way and if they understand the hazards involved. Keep children under 8 years of age away from the appliance and connecting cable and do not allow them to use the appliance. Children shall not play with the appliance. Cleaning and user maintenance shall not be made by children unless they are older than 8 years and supervised.
Warning
Danger of electric shock!
- The appliance may only be connected to a power supply with alternating current via a correctly installed socket with earthing. Ensure that the protective conductor system of the domestic electricity supply has been correctly installed.
- Connect and operate the appliance only in accordance with the specifications on the rating plate. If the power cord of this appliance is damaged, it must be replaced by customer service.
- Do not use if the power cable or appliance is damaged. If a fault occurs, pull the mains plug or switch off the mains voltage immediately.
- To prevent hazards, the appliance may be repaired by our customer service only.
- Never immerse the appliance or mains cord in water.
Warning
Hazard due to magnetism!
The appliance contains permanent magnets which may affect electronic implants, e.g. heart pacemakers or insulin pumps. Persons with electronic implants should keep a minimum distance of 10 cm from the appliance and the water tank when removed.
Warning
Risk of suffocation!
Do not let children play with packaging material. Store small parts safely as they can be easily swallowed.
Warning
Risk of burns!
The milk system becomes very hot. After use, allow it to cool down first before touching it.
After use, surfaces such as the cup warmer may still be hot for a certain period.
Warning
Risk of injury!
- Improper use of this appliance may result in injury.
- Do not reach into the grinding unit.

Environmental protection
Saving energy
If the appliance is not being used, switch it off.
Set the interval for automatic switch-off to the smallest value.
If possible, do not interrupt coffee or milk froth dispensing. Stopping a process prematurely results in higher energy consumption and the drip tray fills up more quickly.
- Descale the appliance regularly to avoid a build-up of limescale. Limescale residue results in higher energy consumption.
Environmentally-friendly disposal
Dispose of packaging in an environmentally-friendly manner.
This appliance is labelled in accordance with European Directive 2012/19/EU concerning used electrical and electronic appliances (waste electrical and electronic equipment - WEEE). The guideline determines the framework for the return and recycling of used appliances as applicable throughout the EU.
Please ask your dealer about current disposal routes.

Getting to know your appliance
This section provides an overview of the scope of delivery, the assembly and the components of your appliance. It also introduces you to the different controls.
Note: Depending on the appliance model, individual details and colours may differ.
How to use these instructions:
The cover pages of the operating instructions can be folded out towards the front. The illustrations are identified using numbers that are referred to in the operating instructions.
Example: Fig. 1
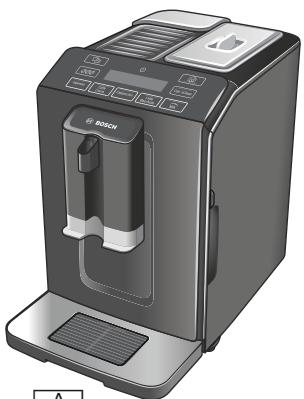
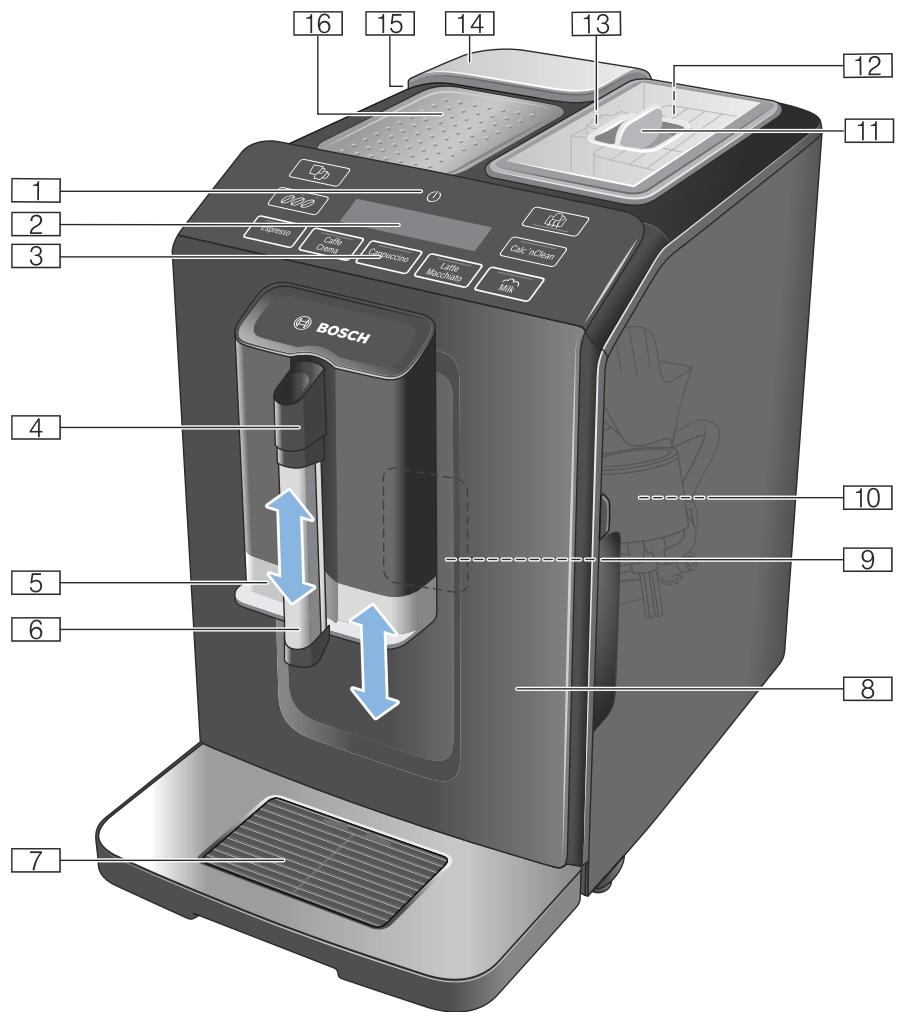
Included in delivery
Fig. 1
A Fully automatic coffee machine
B Water hardness testing strip
C Instruction manual
D Milk frother
Assembly and components
Fig. 2
1 On/off button (stand-by mode)
2 Display
3 Control panel
4 Handle of milk frother
5 Outlet system for coffee, height adjustable
6 Milk frother (holder, frother, cover), height adjustable
Drip tray (coffee grounds container, drip grate, drip plate, float)
8 Door of brewing chamber
9 Rating plate
10 Brewing unit
11 Aroma lid
12 Bean container
13 Rotary selector for setting grinding level
14 Cover for water tank
15 Water tank
16 Cup warmer
Controls
By touching the fields, you can e.g. select and start making a drink or adjust the coffee strength.
| Button | Meaning |
| Switch the appliance on and off The appliance rinses automatically when it is switched on and off. The appliance is not rinsed if: ■ it is still warm when switched on, or ■ coffee was not dispensed before the appliance was switched off. The appliance is ready for use when the LEDs of the buttons for selecting drinks light up in the control panel. The appliance has automatic switch-off. → "Selecting automatic switch-off" on page 16 | |
| Espresso | Dispensing Espresso |
| Caffe Crema | Dispensing Caffe Crema or display navigation “<” (back without saving). |
| Cappuccino | Dispensing cappuccino or display navigation “▼” (navigate down). |
| Latte Macchiato | Dispensing latte macchiato or display navigation "ok" (confirm and save). |
| Milk | Frothing up milk |
| Coffee strength Adjusting the coffee strength → "Adjusting beverage settings" on page 14 | |
| Calc'nClean | Start the service programme Flashes when the service programme needs to be performed. → "Calc'nClean service programme" on page 22 |
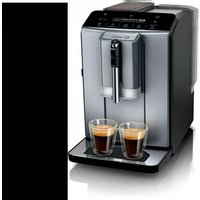
| Make 2 Espresso or 2 Caffe Crema at the same time. Position the cups next to one another under the coffee dispenser. → "Operating the appliance" on page 12 |
| The fully automatic coffee machine has a cup warmer that can be switched on or off manually with the button. When the cup warmer is on, the button lights up. Warning Risk of burns! The cup warmer becomes very hot! Note: For optimal cup warming, place them with the base on the cup warmer. |
| Display | |
| Lamps | Lights up when the water tank needs to be topped up with water, the water tank is not inserted, or the water filter needs to be changed. A message appears on the display. |
| Flashes | Lights up when trays need to be emptied. Flashes when door of brewing chamber is open. |
| Espresso | |
| is continuously lit | Ready to use, selection possible |
| is pulsing | Dispensing underway |
| is flashing | Waiting for operation, e.g. with Calc'nClean |
| off | Not available |
Display
The display 2 shows the selected drinks, settings and setting options, as well as messages about the appliance's operating status.
The display also prompts the user to perform certain actions.
The individual steps for performing the action are shown in the display.
If the action required has been carried out, e.g. "Fill water tank", the corresponding message will disappear.

Accessories
The following accessories are available from retailers or from customer service:
| Accessory | Order number | |
| Retail | Customer ser- vice | |
| Cleaning tablets | TCZ8001 | 00311807 |
| Dscaling tablets | TCZ8002 | 00576693 |
| Water filter | TCZ7003 | 00575491 |
| Care set | TCZ8004 | 00576331 |
The contact data for customer service in all countries can be found at the back of these instructions.

Before using for the first time
In this section, you will learn how to commission your appliance.
Note: Only use the appliance in frost-free areas. If the appliance was transported or stored at temperatures below 0^ , you must wait for at least 3 hours before using it.
Installing and connecting the appliance
- Remove any protective plastic film.
- Place the appliance on a level, water-resistant surface which can bear the weight.
- Using the mains plug, connect the appliance to an earthed socket that has been correctly installed.
Note: After plugging in, always wait (approx. 5 seconds).
Commissioning the appliance
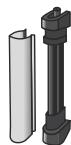
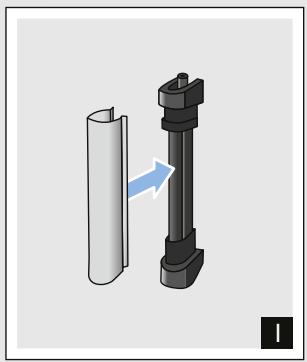
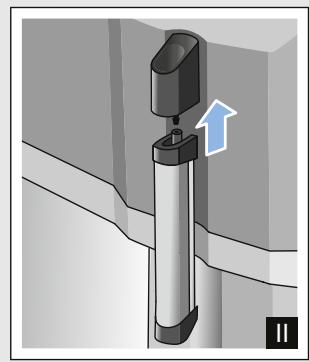
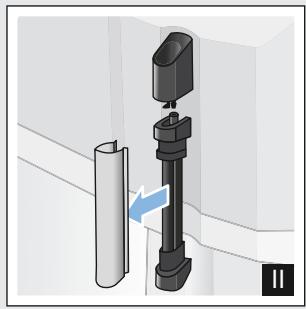
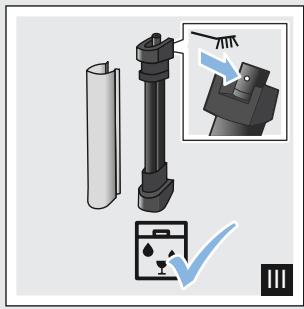
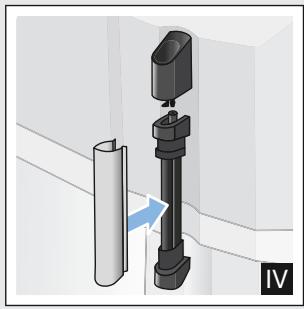
Attaching milk frother
Fig. 3
- Remove milk frother parts from the bag.
- Assemble milk frother.
- Attach the milk frother on the front of the appliance.
Filling the bean container
This appliance can be used to make coffee drinks from coffee beans.
- Open the lid 11 of the bean container 12
- Pour in coffee beans.
- Close the lid again.
Notes
- Coffee beans that have been glazed or caramelised or that contain other sugary additives block the brewing unit. Only use pure bean mixes that are suitable for use in fully automatic espresso or coffee machines.
The coffee beans are freshly ground for each brewing process. - Keep the coffee beans sealed and stored in a cool place to maintain optimum quality.
- Coffee beans can be stored in the bean container for a number of days without losing their aroma.
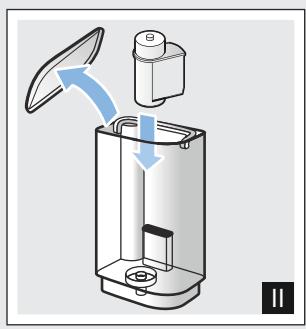
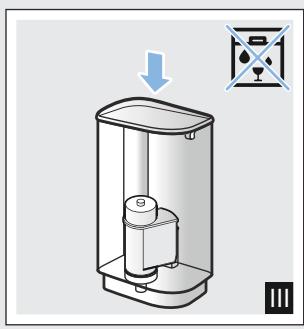
Filling the water tank
Important: Fill the water tank with fresh, cold, still water on a daily basis. Prior to operation, check whether the water tank has been sufficiently filled.
- Carefully remove the cover of the water tank.
- Use the handle to remove the water tank.
- Fill the water tank with water up to the "max" marking.
- Put the water tank back in the holder again, keeping it straight, and fit the cover of the water tank.
Setting the language
- Switch on the appliance with the button. The preset language appears in the display.
- Touch the “▼” button Cappuccino repeatedly until the required language appears on the display.
- Touch the "ok" button Latte Macchiato to confirm the setting. The appliance rinses and is ready to use when "Choose beverage" appears in the display.
Notes
Language selection only appears automatically when the appliance is switched on for the first time.
You can change the language at any time. "Settings" on page 16
General information
The factory settings of the fully automatic coffee machine are programmed for optimal performance.
The appliance switches off automatically after a specific time.
Whenever a button is pressed, a signal sounds. It can be switched off. "Settings" on page 16
- When the appliance is used for the first time, after running a service programme or has not been operated for a long period, the first beverage will not have the full aroma and should not be consumed.
After commissioning the appliance, you will only achieve a suitably thick and stable "crema" after the first few cups have been dispensed.
If the appliance is in use for a long period of time, water droplets will form on the ventilation slots. This is normal.
Escaping steam is not a fault but due to the design of the machine.
Before using your new appliance, you should check and select the water hardness. "Settings" on page 16

Operating the appliance
In this section, you will learn how to make beverages with coffee and milk. It contains information about settings, water filters and adjustment of the grinding level, in addition to frost protection.
Note: Freshly prepared beverages may be very hot.
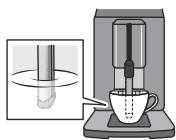
Preparing coffee using freshly ground beans
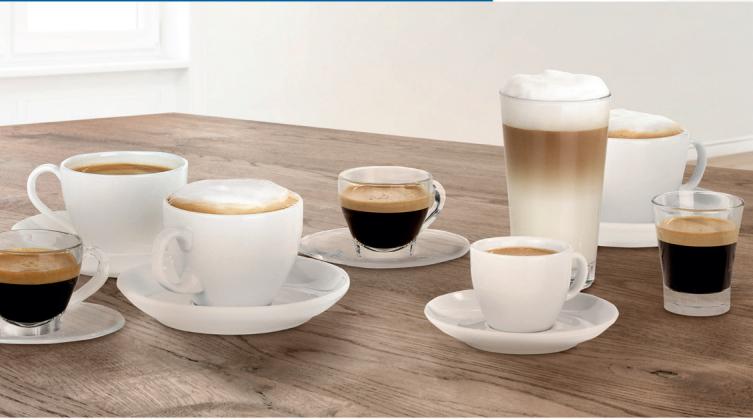
You can choose between Espresso and Caffe Crema. "Preparing drinks with milk" on page 13
The appliance is switched on. The water tank and bean container have been filled.
- Place a cup under the outlet system.
- Touch repeatedly to select the required coffee strength.
- Touch the Espresso or Caffe Crema button.
The coffee is brewed and then dispensed into the cup.
Note: To stop dispensing the drink before the end, touch Espresso or Caffe Crema again.
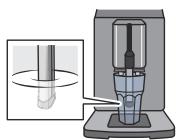
Preparing drinks with milk
This appliance has a milk frother. You can make drinks of coffee with milk or froth up milk.
Note: Dried milk residues are difficult to remove so always perform cleaning. "Daily care and cleaning" on page 18

Warning
Risk of burns!
The milk frother gets very hot. Hold only by the handle. After use, let it cool down first before touching it.
Coffee drinks with milk
You can choose between cappuccino and latte macchiato. When doing so, please check the position of the coffee dispenser and milk frother.
Cappuccino
Latte Macchiato
The appliance is switched on. The water tank and bean container have been filled.
The milk frother is installed.
- Fill a large cup or a large glass with approx. 100ml milk for cappuccino and approx. 150ml milk for latte macchiato.
- Place a cup or a glass under the outlet system.
-
Push the coffee dispenser and milk frother right down.
-
Touch repeatedly to select the required coffee strength.
- Touch the Cappuccino or Latte Macchiato button.
The milk is first frothed up in the cup or glass. The coffee is then brewed and dispensed into the cup or glass.
Note: To stop current dispensing of the drink before the end, touch Cappuccino or Latte Macchiato again.
Frothing up milk
The appliance is switched on. The water tank has been filled.
The milk frother is installed.
- Fill a large cup or a large glass with approx. 100 ml milk.
- Place a cup or a glass under the outlet system.
- Push the coffee dispenser and milk frother right down.
- Touch the Milk button. The milk is frothed up.
Note: To stop the process before the end, touch Milkagain.
Adjusting beverage settings
Preparing two cups at once
Before making a drink, you can select dispensing of two cups at once.
Touching switches the function on or off.
"Double cup on" or "Double cup off" lights up in the display for 5 seconds.
The Double cup function is only possible for Espresso and Caffe
Creme; the buttons light up. Dispensing other drinks is not possible while the Double cup function is switched on.
Notes
The drinks are prepared in two steps (two grinding operations). Please wait until the process is fully completed.
If no button is pressed within 90 seconds, the appliance automatically switches to the setting "Double cup off".
Coffee strength
Before making a drink, you can adjust the coffee strength:
To do so, touch 000 to select the strength you require.
| ● | very mild |
| ●● | mild |
| ●●● | regular |
| ●●●● | strong |
| ●●●●● | very strong |
Note: The coffee strength selected is then active for all drinks made with coffee.
Filling level
You can adjust the filling level of your drinks.
Press and hold Espresso or Caffe Crema for 3 seconds.
Dispensing takes place, with the button selected flashing.
Progress is shown on the display:
Once the required filling level is reached, touch the button selected to stop. The new filling level is only apparent after the next drink is dispensed.
Note: The filling level can be selected either for Espresso (25 - 60 ml) or Caffe Crema (80 - 200 ml). A minimum quantity is always brewed: Espresso approx. 25 ml and Caffe Crema approx. 80 ml.
Frothing time
You can adjust the frothing time of your drinks.
Press and hold Cappuccino, Latte Macchiato or Milk for 3 seconds.
The milk is frothed up, and the button selected flashes.
Progress is shown on the display:

Once the required frothing time is reached, touch the button selected to stop.
Note: Setting the frothing time has no impact on the amount of coffee.
Setting the grinding level
This appliance features an adjustable grinder. This enables the grinding level of the coffee to be individually changed.
Warning
Risk of injury!
Do not reach into the grinding unit.
Caution!
The appliance may be damaged! Only adjust the grinding level when the grinder is running!
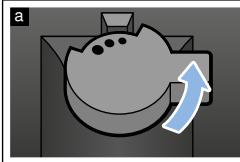
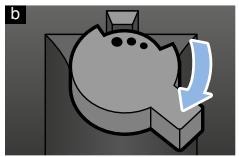
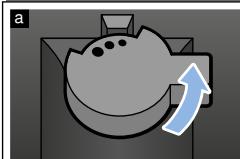
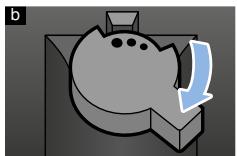
When the grinder is in operation, use the rotary selector 13 to set the grinding level.
Finer grinding level: turn anticlockwise. (Fig. a)
Coarser grinding level: turn clockwise. (Fig. b)
Notes
The new setting will not become apparent until after the second cup of coffee.
- Set a finer grinding level with dark-roasted coffee beans and a coarser grinding level with lighter coffee beans.
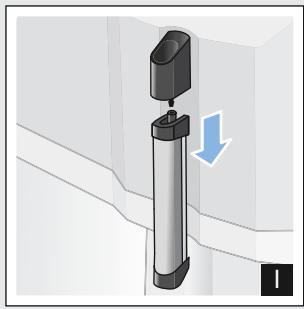
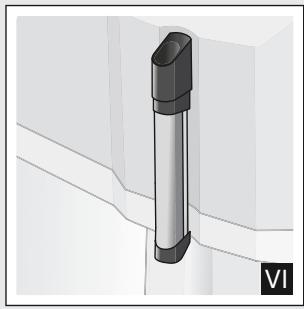
Water filter
Fig. 7
A water filter lessens limescale deposits, reduces impurities in water and improves the taste of the coffee. Water filters are available from retailers or from customer service.
Inserting or replacing a water filter
A new water filter must be rinsed before it can be used.
The appliance is switched on. The water tank has been filled.
- Press and hold and Calc'nClean for at least 3 seconds.
- Touch the "▼" button Cappuccino repeatedly until "W. hardness" appears.
- Confirm by pressing the "ok" button Latte Macchiato.
- Press the "▼" button Cappuccino repeatedly until "Water filter" appears.
- Confirm by pressing the "ok" button Latte Macchiato.
The display shows "Filter act."
$$ \longrightarrow \text {F i g .} 7 $$
- Immerse the water filter (opening facing up) in a container filled with water until no more air bubbles rise to the surface.
- Then press the water filter firmly into the empty water tank.
- Fill the water tank with water up to the "max" marking.
- Place a container with a capacity of 1.0 litre under the outlet.
- Touch the "ok" button Latte Macchiato to save the setting and start rinsing.
- Touch the < button Caffe Crema to exit the menu.
- Then empty the container. The appliance is ready for use again.
Removing the water filter
If the water filter has been removed and no new one inserted, please select the appropriate water hardness. "Setting the water hardness" on page 17
Frost protection
To prevent frost damage during transportation and storage, completely empty the appliance beforehand.
Info: The appliance must be ready for use and the water tank filled.
- Place a large container under the outlet of the milk frother and push the frother down.
- Press and hold the Milk button for at least 5 seconds. The LED in the button flashes, and the appliance now heats up.
- As soon as steam escapes from the milk frother, remove the water tank.
- Allow the appliance to cool down. Wait until "Water tank empty" appears.
- Use the button to switch the appliance off.
- Empty the water tank and the drip tray and thoroughly clean the appliance.
The appliance can now be transported or stored.
Note: The brewing unit is now secured and cannot be removed.

Settings
This appliance has different factory settings. You can customise the settings on the appliance.
Note: If no button is pressed within 90 seconds, the appliance switches to "Choose beverage" without saving. The previous setting remains unchanged.
You can select the following settings:
Automatic switch-off
The appliance switches off automatically at a specific time after the last button was pressed. This time can be selected, with settings from 15 minutes to 4 hours possible here.
- Press and hold and Calc'nClean for at least 3 seconds.
- Touch the "▼" button Cappuccinorepeatedly until "Auto Stand-by" appears.
- Confirm by pressing the "ok" button Latte Macchiato. The factory settings are activated, the language selection appears.
-
Touch the "▼" button Cappuccino and select the time. The following settings are possible:
-
after 15 min.
- after 30 min. (factory setting)
- after 1 hour
- after 2 hours
-
after 4 hours
-
Confirm by pressing the "ok" button Latte Macchiato.
The factory settings are activated, the language selection appears.
- Touch the < button Caffe Crema to exit the menu.
Switching the audible signal on/off
Whenever a button is pressed, an audible signal sounds.
This can be switched on or off.
- Press and hold and Calc'nClean for at least 3 seconds.
- Touch the "▼" button Cappuccino repeatedly until "Sound" appears.
- Confirm by pressing the "ok" button Latte Macchiato.
The factory settings are activated, the language selection appears.
- Touch the "▼" button Cappuccino and select "Sound on" or "Sound off".
- Confirm by pressing the "ok" button Latte Macchiato.
The factory settings are activated, the language selection appears.
6. Touch the < button Caffe Crema to exit the menu.
Setting the language
- Press and hold and Calc'nClean for at least 3 seconds.
- Touch the "▼" button Cappuccino repeatedly until "Language" appears.
- Confirm by pressing the "ok" button Latte Macchiato.
The factory settings are activated, the language selection appears.
- Touch the “▼” button Cappuccino and select the required language.
- Confirm by pressing the "ok" button Latte Macchiato.
The factory settings are activated, the language selection appears.
- Touch the < button Caffe Crema to exit the menu.
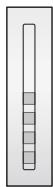
Setting the water hardness
It is important to set the water hardness correctly so that the appliance indicates in good time when the descending programme should be run. The preset water hardness is level 4.
You can check the water hardness using the enclosed test strip or by asking your local water supplier.
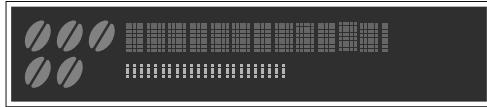
- Briefly immerse the enclosed test strip in fresh tap water, leave it to drip and read off the result after 1 minute.
The number of fields on the test strip that change colour indicate the water hardness level.
- Press and hold and Calc'nClean for at least 3 seconds.
- Touch the "▼" button Cappuccino repeatedly until "W. hardness" appears.
- Touch the "ok" button Latte Macchiato and confirm.
-
Touch the “▼” button Cappuccino and select the water hardness. The following settings are possible:
-
W. hardness 1
W. hardness 2 - W. hardness 3
W. hardness 4 (factory setting)
Water filter (when used) -
H2O-Softener (setting if water softener available)
-
Touch the "ok" button Latte Macchiato to save the setting.
- Touch the < button Caffe Crema to exit the menu.
The table shows the allocation of the levels to the different degrees of water hardness:
| Level | Degree of water hardness | |
| German (°dH) | French (°fH) | |
| 1 | 1-7 | 1-13 |
| 2 | 8-14 | 14-25 |
| 3 | 15-21 | 26-38 |
| 4 | 22-30 | 39-54 |
Subsequent changes to the water hardness can be made at any time.
Note: When using the water filter (see section "Accessories"), proceed as follows "Water filter" on page 15.
Factory reset
If you set the appliance back to the factory settings, you will lose your own settings.
- Press and hold and Calc'nClean for at least 3 seconds.
- Touch the "▼" button Cappuccino repeatedly until "Factory reset" appears.
- Confirm by pressing the "ok" button Latte Macchiato.
The factory settings are activated, the language selection appears.
- Touch the “▼” button Cappuccino repeatedly until the required language appears on the display.
- Touch the "ok" button Latte Macchiato to confirm the setting. The appliance rinses and is ready to use when "Choose beverage" appears on the display.

Daily care and cleaning
With good care and cleaning, your appliance will remain fully functioning for a long time to come. In this section, you will learn how to correctly clean and care for your appliance.
Warning
Risk of electric shock!
Before cleaning the appliance, pull out the mains plug. Never immerse the appliance in water. Do not use a steam cleaner.
Cleaning agent
Please observe the following information to ensure that the different surfaces are not damaged by using the wrong type of cleaning agent.
Do not use:
Harsh or abrasive cleaning agents.
Any cleaning agents containing alcohol or spirits.
Hard scouring pads or sponges.
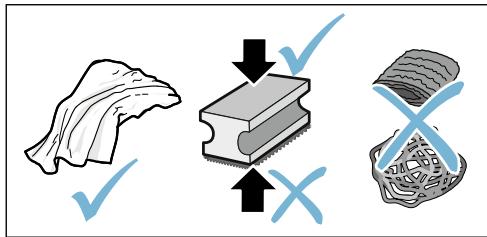
Notes
- New sponge cloths may contain salts. Salts can cause rust film on stainless steel. Wash new sponge cloths thoroughly before use.
Always remove any limescale, residues of coffee or milk, cleaning or descaling solution immediately. This residue may cause corrosion.
Caution!
Not all of the appliance's components can be cleaned in the dishwasher.
Fig. 5 - 7
Not dishwasher-safe:
| Water tank |
| Cover for water tank |
| Aroma lid |
| Brewing unit |
| Drip tray |
Dishwasher-safe:
| Drip plate |
| Drip grate |
| Coffee grounds container |
| Float |
| Milk frother |
| Cover for milk frother |
Cleaning the appliance
- Wipe the outside of the appliance with a soft, damp cloth.
- Clean the control panel using a micro-fibre cloth.
- Wipe off the coffee dispenser if required after dispensing each beverage.
Notes
If the appliance is cold when switched on, or if it is switched off after dispensing coffee, it rinses automatically. The system is therefore self-cleaning.
If the appliance has not been used for a long period of time (e.g. while you are on holiday), clean the entire appliance thoroughly, including the milk frother and brewing unit.
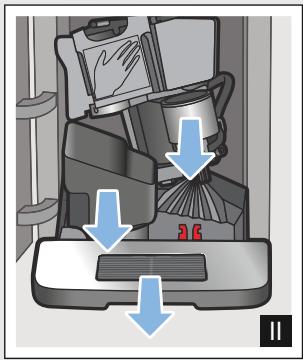
Cleaning the drip tray and coffee grounds container
Fig. 5
Note: The drip tray and coffee grounds container should be emptied and cleaned every day in order to prevent deposits. With frequent use also empty from time to time, as soon as the float is clearly visible, or the relevant message appears in the display.
- Open the door.
- Pull the drip tray with the coffee grounds container forwards and out.
- Remove the drip plate with grate.
- Empty and clean the drip tray and coffee grounds container.
- Wipe out the inside of the appliance (area of drip tray).
Cleaning the milk system
Fig. 6
The milk system must be cleaned after each use to remove residues.
Warning
Risk of burns!
The milk frother gets very hot. Hold only by the handle. After use, let it cool down first before touching it.
- Fill a glass half-full with water and place under the outlet system.
- Push the milk frother right down.
- Touch the Milk button to clean the milk system.
- Push the milk frother right up and allow it to cool down.
- Dismantle the milk frother into its individual parts and clean thoroughly.
- Dry the individual parts, reassemble and fit back onto the appliance.
Notes
To stop the process before the end, touch Milk again.
All parts of the milk system should be cleaned in the dishwasher. Detergent residues in the milk system must be thoroughly removed following the rinsing process.
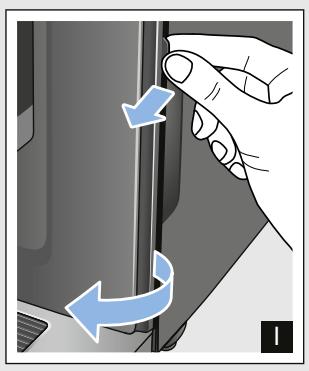
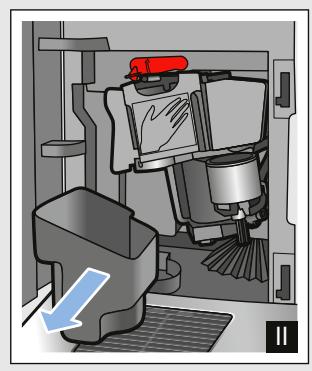
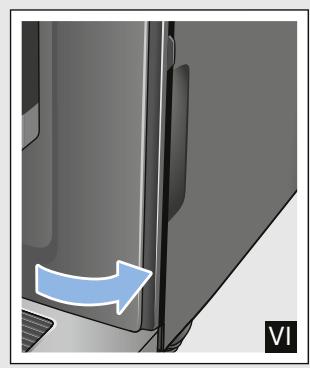
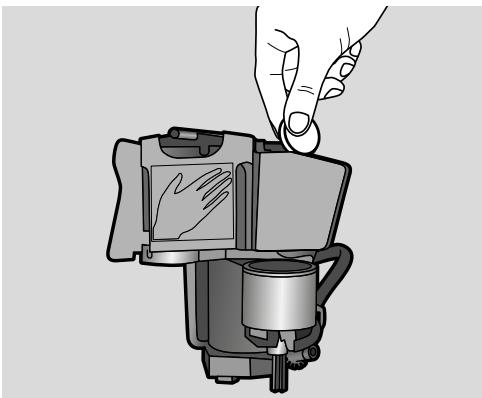
Cleaning the brewing unit
Fig. 4, Fig. 5
In addition to automatic cleaning, the.
brewing unit should be removed
regularly for cleaning.
Caution!
Clean the brewing unit without detergent or products containing vinegar or acid and do not place in the dishwasher.
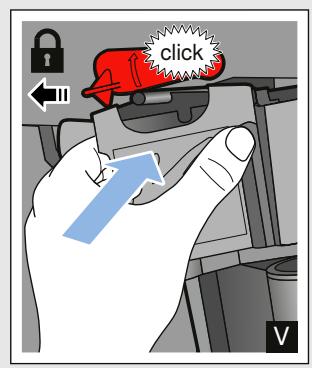
Remove the brewing unit:
- Switch off the appliance.
- Open the door to the brewing chamber.
- Remove the coffee grounds container.
- Push the red lever up, grasp the brewing unit by the handle and pull forwards carefully.
- Rinse the brewing unit thoroughly under warm, running water.
- Clean the interior of the appliance thoroughly with a damp cloth, removing any coffee residues.
- Allow the brewing unit and the interior of the appliance to dry.
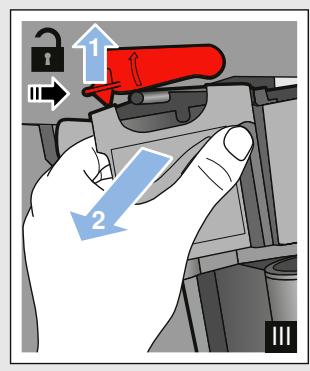
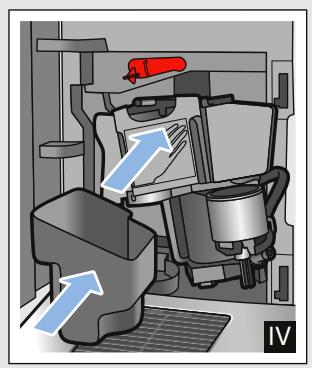
Insert the brewing unit:
- Hold the brewing unit only by the handle.
- Push the red lever up, position the brewing unit underneath and slide back as far as it will go. The lever must snap into place.
- Insert the coffee grounds container again and close the door.
Important: If the brewing unit has not been inserted, or the brewing unit or drip tray not inserted correctly, it will not be possible to close the door.

Service programmes
Every so often - with the exact frequency depending on water hardness and usage - the Calc'nClean button will light up. The display shows "Calc'nClean required".
The appliance should be immediately cleaned and descaled using the programme.
Notes
Important: If the appliance is not cleaned and descaled in good time, it may be damaged.
Important: If the appliance is not descaled and cleaned in good time, it will be locked. The display shows "Device locked"
If the appliance is locked, it can only be operated again once the service programme has been carried out.
Caution! For each of the service programmes, use Calc'nClean descending and cleaning agents as described in the instructions and observe the (relevant) safety information.
Do not drink the liquids.
- Never use vinegar, vinegar-based products, citric acid or citric acid-based products for descaling.
For cleaning and descending only use the tablets intended for such purpose. They have been specially developed for this appliance, and new stocks can be ordered through customer service. "Accessories" on page 10
- Never insert descending tablets or other products into the brewing unit.
- Never interrupt the service programme.
Prior to starting a service programme, remove, clean and re-insert the brewing unit. Clean the milk frother.
At the end of a service programme, wipe down the appliance using a soft, damp cloth to immediately remove any descaler residue. This residue may cause corrosion.
New sponge cloths may contain salts. Salts can cause rust film on stainless steel, so cloths must always be washed out thoroughly before use.
If one of the service programmes is interrupted, e.g. by a power failure, proceed as described in the section Calc'nClean from item 10.
Starting Calc'nClean
Duration: approx. 40 minutes
- Press and hold the Calc'nClean button for approx. 5 seconds.
symbol lights up. - Open the door, remove the drip tray and coffee grounds container and empty.
- Remove and clean the brewing unit.
- Place a Bosch cleaning tablet in the brewing unit and re-insert the unit.
- Re-insert the drip tray and coffee grounds container and close the door.
symbol lights up.
6. Remove the water filter (if there is one).
7. Pour 0.5 litres of lukewarm water into the empty water tank up to the mark and dissolve a Bosch descaling tablet in it.
8. Re-insert the water tank and place a large container (approx. 1 litre) under the outlet system.
9. Calc'nClean flashes, touch Calc'nClean.
The programme starts, cleans and descales the appliance. Calc'nClean pulses. Duration approx. 20 minutes.
symbol lights up.
10. Empty the container, open the door, empty the drip tray and re-insert.
11. Close the door and place a container under the outlet system.
symbol lights up.
- Clean the water tank and replace the water filter (if removed).
$$ \longrightarrow \text {F i g .} 7 $$
- Fill with fresh, still water up to the "max" mark. Place the container under the outlet system again.
- Calc'nClean flashes, touch Calc'nClean.
The programme starts and then cleans and rinses the appliance. Calc'nClean pulses. Duration approx. 20 minutes.
symbol lights up.
15. Empty, clean and re-insert the drip tray and coffee grounds container.
The programme has finished. The appliance is ready for use again.

Trouble shooting
Faults often have simple explanations. Before calling the customer service,
please refer to the fault table and attempt to correct the fault yourself.
Please read through the safety information at the beginning of these instructions.
Fault table
| Problem | Reason | Remedial action |
| The appliance no longer responds. | Fault in the appliance. | Pull out the mains plug, wait 5 seconds, plug it back in. |
| Coffee or milk froth quality varies considerably. | Build-up of limescale in the appliance. | Descale the appliance in accordance with the instructions. |
| The individually selected per-cup quantity is not reached. | Grinding level is too fine. | Set a coarser grinding level. |
| Coffee dispensing slows to a trickle or stops completely | Heavy build-up of limescale in the appliance. | Descale the appliance as described in the instructions. |
| Air in the water filter. | Immerse the water filter into water until no more air bubbles escape; insert the filter again. | |
| No coffee dispensed, only water. | An empty bean container is not detected by the appliance. | Pour in coffee beans Note: The appliance will adjust to the coffee beans upon the next dispensing process. |
| The coffee shaft on the brewing unit is blocked. | Clean the brewing unit. → "Cleaning the brewing unit" on page 20 | |
| Beans are not falling into the grinding unit (beans too oily). | Gently tap the bean container. Possibly change the type of coffee. When the bean container is empty, wipe it with a dry cloth. | |
| Coffee has no "crema". | Unsuitable type of coffee. | Use a type of coffee with a higher proportion of robusta beans. |
| The beans are no longer freshly roasted. | Use fresh beans. | |
| The grinding level is not suitable for the coffee beans. | Set a finer grinding level. | |
| The coffee is too "acidic". | Grinding level set too coarse. | Set a finer grinding level. |
| Unsuitable type of coffee. | Use a darker roast. | |
| The coffee is too "bitter". | Coffee is ground too fine. | Set a coarser grinding level. |
| Unsuitable type of coffee. | Change the type of coffee. | |
| The coffee tastes "burnt". | Coffee is ground too fine. | Set a coarser grinding level. |
| Unsuitable type of coffee. | Change the type of coffee. |
en Trouble shooting
| Milk/blended milk drinks too hot.Milk froth too thin, loud sucking noise. | Too little milk in glass or cup. | Use more milk or adjust frothing time. |
| Milk/blended milk drinks too cold. | Too much milk in glass or cup. | Use less milk or adjust frothing time. |
| No milk/milk froth dispensed. | The milk frother is soiled.The milk frother is not inserted in the milk. | Clean the milk frother in the dishwasher. → "Cleaning the milk system" on page 20.Use more milk, check whether the milk frother is inserted in the milk. Slide the outlet system right down. |
| The water filter does not stay in position in the water tank. | The water filter is not mounted correctly. | Immerse the water filter into water until no more air bubbles escape; insert the filter again.Firmly press the water filter straight down into the tank connection. |
| Water dripped onto the inner floor of the appliance when the drip tray was removed. | Drip tray removed too early. | Wait a few seconds after the last drink was dispensed before removing the drip tray. |
| The brewing unit cannot be removed. | The brewing unit is not in the removal position (e.g. frost protection activated). | Switch the appliance on again. |
| The appliance cannot be operated, display messages changing. | The appliance is in demo mode. | Hold the Ⓞ button for at least 5 seconds to deactivate demo mode. |
| The grinder will not start. | The appliance is too hot. | Wait 1 hour so the appliance can cool down. |
| Display shows "Close door" despite door closed. | The door is not properly closed. | Press the door firmly closed. |
| The appliance is too hot. | Wait 1 hour so the appliance can cool down. | |
| Display shows: "Empty trays" despite empty drip tray - what to do? | Emptying is not detected when the appliance is off. | When the appliance is switched on, remove and re-insert the drip tray. |
| Display shows "Fill water tank" despite full water tank. | Water tank wrongly inserted. | Insert water tank correctly. |
| Carbonated water in the water tank. | Fill the water tank with fresh tap water. | |
| Float is stuck in the water tank. | Remove the water tank and clean thoroughly. | |
| New water filter not rinsed according to the instructions. | Rinse the water filter according to the instructions and then switch on. | |
| Air in the water filter. | Immerse the water filter (opening up) in water until no more air bubbles escape; insert the filter again. → "Inserting or replacing a water filter" on page 15 | |
| Water filter is old. | Insert a new water filter. | |
| Display shows "Fill water tank" and LEDs flashing. | Water tank is missing or not inserted correctly. | Insert water tank correctly. |
| The pipe system in the appliance is dry. | Fill the water tank with fresh tap water. Do not fill up with carbonated water. | |
| Air in the water filter. | Immerse the water filter (opening up) in water until no more air bubbles escape; insert the filter again. | |
| Display shows "Clean brewing unit". | Brewing unit is soiled. | Clean the brewing unit. |
| The brewing unit's mechanism is stiff. | Clean the brewing unit. → "Daily care and cleaning" on page 18 | |
| Display shows "Incorrect voltage". | Incorrect voltage in building. | Operate the appliance at 220V-240V only. |
| Display shows "Device too cold". | The ambient temperature is too cold. | Operate the appliance at temperatures >5°C. |
| Display shows "Restart appliance", LEDs flashing. | Brewing unit very heavily soiled, or brewing unit cannot be removed. | Switch the appliance off and back on again. Clean brewing unit if possible. |
| Display shows "Restart appliance"; LED does not light up. | Fault in the appliance. | Restart appliance. |
If you are unable to solve the problem, always call the hotline. You will find the telephone numbers at the back of these instructions

Customer service
Technical data
| Power connection (voltage - frequency) | 220–240 V ~, 50/60 Hz |
| Power rating | 1300 W |
| Maximum static pump pressure | 15 bar |
| Maximum water tank capacity (without filter) | 1.3 l |
| Maximum capacity of the coffee bean container | ≈ 250 g |
| Length of the power cable | 100 cm |
| Dimensions (H x W x D) | 37.3 x 24.9 x 42.8 cm |
| Weight, empty | approx. 8–9 kg |
| Type of grinder | Ceramic/steel |
E number and FD number
When calling us, please give the full product number (E no.) and the production number (FD no.) so that we can provide you with the correct advice. These numbers can be found on the rating plate 9. ( Fig. 2)
To save time, you can make a note of the data for your appliance and the telephone number for customer service here, should this be required.
| E no. | FD Number |
| Customer service |
The contact data for customer service in all countries can be found at the back of these instructions.
Guarantee
The guarantee conditions for this appliance are as defined by our representative in the country in which it is sold. Details regarding these conditions can be obtained from the dealer from whom the appliance was purchased. The bill of sale or receipt must be produced when making any claim under the terms of this guarantee. Changes reserved.
Table des matieres

PnIroTOBJIeHHe HAnITKOB C MoJOKOM 131
I3MeHeHne yCTaHOBOK dIHaIHTKOB 132
ΦnIbTpДIJI BODbl 133
3aunTa oT 3amep3aHnra. 134

UcTaHOBKn 134
ABTOMaTnueckoe OTKJIoueHne 134
BkIIOUeHne IN BbIKIIOUeHne 3ByKOBOOrCnHaHa .135
YctaHOBKa r3bika. 135
YcTaHOBka JecTKOCTN BOJbl. 135
Bo3BpaT K 3aBOJcKIM HAcTPOiKaM . . 136

EeHHeBHy yXoH uOcnCTka . 136
UHCTIeE cpeCTBO 136
OuicKa npi6opa. 137
OuNTka POnDoHa N EMcKoCTn Dnla KoFeHoi rUun. 137
OuNTka cncTeMbI pOaun MoLoKa...138
OuicKa 3aBapouHoro 6Ioka.138

CepBnchbIe nporpaMMbl 139
3anyck nporpammbi Calc'nClean .140

UTo DeIaTb B cIyae HencnpaBHOCTn? 141

Cnyk6a cepBnca 144
TexHnueckne xapaKTepeNCTnKn 144
Homep E n Hoome FD. 144
YcIOBnI rapaHTnHOrO
O6ClyKuBaHnI 144

AnachocTb, CBaHnaC MaHHTbIM NOJEM!
Pn6Op CoJepKHT NOCTOHHbIMaHNT,KOTOpbM0KETBO3DeIeCTBOBaTbHa 3JIeKTPoHHbIENMMJaHTaHTbI,HaNPImEp,KapDIOCTUMyIaTOpBbINHCyLIINHOBBie NOMMbI.PpHaNUnB OPraHn3Me 3JIeKTPoHHOrO NMMJaHTaHTa HeJIb3r PpN6JIuXKaTbCkK Pn6Opuy IN BbIHytOMy pe3epByapydJIa BObI 6JIxKe,Yem Ha 10 cm.
Anachoctb yduyba!!
He pa3pe7aIte DeTAM nIrpatb C ynaKOBKOJ. XpaHNTe MeJIKNe DeTaJIb B HaJeXHOM MecTe, TaK KaK pe6eHOK MOKeT IN pOrILOTnTb.
IpeDynpexKdEHe Onachoctb oXora!!
CnCTema nOdaun MOLOka CTaHOBNTc OueHb TOpAuey. PocIe NcPOnb3OBAHn CHaUaJa IoXdntEcB OxJaXdEHHN CnCTembl, IpexJe yem 6paTbcr 3a Hee.
Iocne pa6oTbI np6opa erO IOBepxHOCtN, HApnpMep, IOnOrpeBaTeJIy aUWeK B TeueHHe HeKOTOpOTo BpeMeHn MOrYT OCTaBaTbcrTopaYIMN.
O NOIb3OBaHHn DaHHoN HnHCTpyKcHn No 3KcNlnyTaCnH:
B Naane HNCTpykCnI N O3KcnnyataCnI
mMeIOTC pa3BOPaunBaembIe CTPaHnCbl.
NIIIOCTpaCnO603NaehbI HOMepAMn,Ha
KOTOpoe COedePkaTc CcblIKn B TEKCTe
HNCTpykCnI NO 3KcnnyataCnI.
Ppimep: pnc. 1
KomnJIeKtaCna
Pnc. 1
A ABTomatnueckaKa KofoMaunHa
B INДиКaTOpHЯ ПОLOСKa ДИ ONpeDeJIeHЯ JECtKOCTN BObl
C INHCTpykUINI O N3KcNllyaTaUIN
D KaanyuHaTOp
KohctpykucnI KOMnoHeHtbl
Pnc. 2
1 KhoNka BkIIOueHnra /BbIKIOueHnra (peKIM OxNiDaHnra)
2 Dusrnnei
3 NaHeJIb ynpaBneHnIa
4 Puyka kanyuHaTopa
5 PeryunpyembI IO BbICOTe DnCpEncepDnJ KOpE
6 PeryunpyembI IO BbICOTe KaanyuHaTOp (epxKaTeJIb, BCNEHnBaTeJIb, KpbIiKA)
7 IoIIOH (eMKoCTb IJIa KoOfeHoi ryu,peWetKa,lotOK dJIa c6opa Kaenb,nonlaBOK)
8 DBepu Ka KInIaTINbHnKa
9 TnIOBaI Ta6NIuKa
10 3abapouhbl6loK
11 Kpbliuka, coxpaHoua apoMaT
12 EMKoCTbIJIa KoΦeHbIX 3epeH
13 NoboporTbI IpeKIOUaTeIb IJI HAcTPOIK CTeNEH NOMOJa
14 Kpbiuka pe3epByapa nIy BoNbl
15 Pe3epByap IJRA BObl
16 POnOrpeBaTeIb yaueK
3JIeMeHbI ynpaBJeHnA
Kacahnem noJIM MOxHO, HApumep, BbIpaTb HAnITOK, Haatb eO PO3JIb IIN yCTaHOBNTb KpeNoCTb KoFe.
IpoIorpeBaTeB yaueK cunbHo harpeBaetc!
Yka3aHHe: IJIa ONTIMMaJIbHOrO IIOOrpeBa YcTaHOBIne TaIshKn IINOM Ha IIOOrpeBaTeIb.
OTdIbHbIe 3aTbI DeIcTBn OTo6paKaIOCTHa NDCnJIee.
Haayano pa6oTbI c npH6Opom
YctaHOBka KaIyUHaTopa
Pnc. 3
- BbInbTe qactn kanyuHaTopa n3 naketa.
- BbInonHnTe c6opKy kanyuHaTaopa.
- YctaHOBInTe kanyuHaTOp cpeEn Ha npinbope.
HanoIHeHne emKocTn dJa KoFeiHbIX 3epeH
B npnbope moKHO npriGToBAIBaTb KoFeHbIe HAnITKn 3 KoFeHbIX 3epH.
- OtkpoTe KpbIshky 11 emKoCTnДля КофeHbIX 3epeH 12.
- 3a rpy3nTe KopeHbIe 3epHa.
- Choba 3aKpoIe KpbIiKy.
Yka3aHn
ГлзИрOBaHHbIe,КapamEJIIN3OBaHHbIe IINOobpaOtaHHbIeДpyrIMN COJepKaUIMM caxap IO6aBKMn KOfeyHbIe 3epHa pInBODT K 3a6NBKe 3abapouHOro 6Ioka.NcnoJIb3yIte TOJIbKO CMEcN KoFeyHbIX 3epeH, IpeJHa3NaueHHbIe IJIЯ ПОЛHOCtBu OBTOMaTHueCKO KOFeMaUNHbI.
PnncnoB3OBAHN KoΦeHbIX 3epeH BblIOJIHReTcN XCBexN IOMoJДЯ KaXdoBapKn.
XpaHnTe KoFeHbIe 3epHa B IpOxIIaIHOM MeCTe N B 3aKpbITbIX EMKOCTAX IJIY ONTUMaJIbHO CoXpaHeHnI X KauEcTbA.
B éMKoCTn Дя Кофeиньх 3epeH KOfeyHbIe 3epHa MOxHNo XpaHNTb B TeueHne HeCKoJIbKInx DHeN 6e3 IOTepn apomata.
HanoHeHne pe3epByapa DnB0dbI
BaxHo: ExeHHeBHO 3aJIbAaiTe B pe3epByap dIa BOJbl CBexkyo XOIOHyIO BOy 63 yIkeKncIoTbl. IpePeI 3KcIIyataunei npioopa npOBepbTe, IOCTaTOUHO IIN HApONHeH pe3epByap dIa BOJbl.
- ChIMMTE KpbIuKy pe3epByapa IINB OJbl.
- ПоднIMTe 3a pyuKу pe3epByap ДЯ BOДbl.
- 3aJIeIte BOyB pe3epByap IJIA BOJbI DO OTMeTkn «max»
- BCTaBbTe pe3epByap ДЯ BAДы пямов ДЕржATEЛь И YCTaHOBnTE KpbIшКу pe3epByapa ДЯ BAДы.
YcTaHOBKa Ra3bika
- BkIIOHTe np6Op KHOPTOK OHa IINCPIEE NOBNTcIpeBapITeJIbHO HAcTPOEHHbI RA3bIK.
- “▼” Пикайтесь К КнорКe Cappuccino, NOka Ha Дистпee He NOВITСН HУЖныяЗИK.
- "ok" KocHTecb KHOKN Latte Macchiato IJIa IIOITBePKeHnBbIpaHHoY UCTaHOBN.
B daHnoI rnaBe OnicaHo npiroTOBHeHne KOeHbIX MMOUChbIX HAnITKOB. OnicaHbI TaKke yCTaHOBKn pIn6opa, IcNoJIb3OBAHne 0JIbTpA dIra BObl, I3MeHeHne CTeNEH NOMoJa, a TaKke 3aUnTa OT 3aMeP3aHnI.
Yka3aHHe: CBeXePnIroTOBNeHHbIe HAnITKMOrT 6bITb OChEh TOrpAUMN.
PnHroTOBJIeHne KoΦeHOrO HAnHTKa n3 CBExMeMOJToBIX KoΦeINbIX 3epeH
Bbl moxete BblpaTb Espreeo nn Caffe Crema. "PpuroToBnEHe nHaNTKOB C MOJOKOM" Ha cTpaHnua 131
Pn6op BKJIOUeH. Pe3epByap dIa BOJbI n EMKoCTb IJIa KoFeiHbIX 3epeH HanoJIHeHbI.
- NocTaBbTe YauKy IOn DInCpeHcep.
- KocHyBUnCb HeCKoJIbKO pa3 000, yCTaHOBInTe HUxKHyIO KpeIOcTb KoPe.
- KocHTecb KHONKn Espaso nn Caffe Crema.
KoepaBapnt KoPe n 3aTeM HaJIbET erO B uAiky.
Yka3aHHe: YTo6bI npexJdeBpeMeHHO 3aKOHHTb pInFOrTOBJIeHne HAnITKa, CHOBA KOCHTecb Espanso IIN Caffe Crema.
Ipei TeM, KaK pa3JIntb HAnITOK, MOXHO yCTaHOBNTb PO3JIVB dByx cAWeK cpa3y.
ФУHKUBAKJIIOUaETcA N BbIKJIIOUaETcA KacaHnEM
Ha dncnlee 3aropaetcna 5 cekyHn «Двонан YAшka BkI.» ИИ «Двонан YAшka BbIKI.»
Функши ДBOИHОЧашКВОЗМоЖн TOЛьКОДЛЯ ESPESsoI Caffe Crema,пи 3ТOM KHOПКИ CBETATС. ПOKA BKЛЮчЕHA Функши ДBOИHОЧашК, ПИРOTOBLEнe ДрУгИХ HAINTKOB HeBO3MOXH.O.
Yka3aHn
HaNTKn nprirotabnBaIOTcB Dba 3Tana (Db npcecca CmaJIbBaHnKoΦe).POnOxJnte, POKa npcecc PONHOCTbIO He 3aKOHHTCra.
EcInBteueHne90cekyHnHOJHa KhoIkaHe6yJeT HaxaTa,piu6op aBTOMatUeCKn IepexOJNT BpeKIM «BoHna YauSKa BbIKJ.>
Kpenoctb KoΦe
IpeπTeM, KaK pa3JIntb HaIINTOK, MOXHO yCTaHOBNTb KpeIOCTb KoΦe.
ДлЯЗТOrO,KOKHyBшись 000,ВыбepиTe HУЖHyI O KpeNoCTb.
Yka3aHHe: YcTaHOBJIeHHa KpeIOCTb KOFe DeIeCTBNTeJIbHa IJr BCEx KoFeiHbIX HAINTKOB.
Kolnuectbo Hanntka
BbMOxKeI3MeHnTb KOJIuYeCTBO nprTOaBnBaEMoRo HAnITka.
YdepnBaiTe HaxkatoEn Espanso nIi Caffe Crema B TeueHne 3 cekyHd.
Indet nprirotobJIeHne HAnITka, BbIpaHHa KHOIIKA Mmraet.
Ppocecc OToObpaXaETcHa DnCnJIee.

Iocne toro, Ka6ydet DoCTnHyTo HxHoe KOInueCTBO HaNTKa, KOCHNTecb KHOPIK, UTObI IpeKpaTb IPOeCC. YcTaHOBLeHHoe 3aHOBO KOInueCTBO HAHTka peAlIN3yeTcR, TOJbKO HaUNHa CO CJeDyUOJIero PpNtOTOBHeHn HAHTKa.
Yka3aHHe: MoXHo yCTaHOBbTb
KoJIuYeCTBO HAnITKa dIa ESPSo
(25-60 mI) nIi Caffe Crema
(80-200 mI). Bcerda nprirotabInBaETcR
MNImaJIbHoe KoJIuYeCTBo, ESPSo
npIN6I. 25 mI n Caffe Crema
npIN6I. 80 mI.
ДиHTeJIbHOCtB BCnEHNBaHHA
BbMOKeTe n3MeHnTb dIInTeJIbHOCTb BCHeHnBaHnHaHNTKa.
YdepnBauTe HaxaToi Cappuccino, Latte Macchiato Wn Milk B TeueHne 3 cekyHd.
MOJOKO BCNEHnBaETc, BbIpaHHaKHOPIKA Mmraet.
Ppoeecc OToObaXaetcHa dncnlee.

Iocne TOrO, KaH NyxHnAa DInTeJIbHOCTb BCHeHnBaHHa ByeT DoCTnHyTA, KOCHNTecb KHOJKN, YTObI PpeKpaTITb Ipouecc.
Yka3aHHe: YctaHObKa dIInTeJIbHOCTN BCHeHbAHnHa He BInReT Ha KOJIueCTBO KoPe.
YctaHOBka CTeneH NOMOJa
DaHHbI npnbop o6bpyoBaH peRyInpuyemoi KoFemOnkO.3To IO3BOJnEiNIDINBnDyAlbHO 13MeHArTb CTeNEH NOMOLA KoFe.
!PpeDynpEeJdeHne OnacHocTb TpaBMnpoB
He npikacaiTecb K BHyTpehnM qactm KoΦeMOJIKN.
BHHMaHHe!
Bo3MOxHbI NOBpeJdeHnI np6Opa! CTepeHb IomOna MoKHO peYunpoBaTb ToJIbKO pRi pa6oTaIOUeI KOfEmolKe!
Ppna paoTaHOUeI KOfEmOJIke yCTaHOBInTe IOBOpOTbIM IpeKJIIOuAteJIem [13] CTENHeH NOMOJa.
ToHKnI NOMoJ:BpaueHne npOTnB yacBOiCtpeJIKN.(Pnc.a)
Bolje rpy6bI nOmoI:BpaUeHne no yacoboi cTpeJIke. (Pnc. b)
Yka3aHHa
IImeHHeHHe HactpoKn 6yDet 3amETHO IINb HaunHaC CO BTOPOuAaKu KoFe.
Длг TemHbIX JapeHbIX KofoeHbIX 3epeh Bbl6epuTE 60Jee MeIKNI NOMOJI, Длг 60Jee CBetlbx 3epeH - 60Jee KpyHbI NOMOJI.
ΦильТР ДЛЯ ВОДы
Puc. 7
ΦnIbTp DnI BOdbI 3aMeIJIeT
OBpa3OBAHHe HAKIN, YMeHbJaaET
3aIrp3HeHne BOdbI N yIyUJeaET BKYC
KoΦe. ΦnIbTpbl InB OdbI MOKHO
IpiNo6peCTN B MaRa3InHax INIuYepe3
cepBnCHyIO CnyXóy.
YcTaHOBKa HJIN 3aMeHa FJIbTpapdIy BOJbl
IpeepnCNoJIb3OBAHnEMHOBOrOΦnJIbTp a IJRA BOJbI eO HxKHO pOMblTb.
Pn6op BkIoueH. Pe3epByap HanoIHeH.
- YdepxkBaIte HaKaTbIMN Ooo n Calc'nClean MInHmym 3cekyndbl.
- "KacaiTeCb KHOJIc Kappuccino, NOKa Ha DnCJIe He IIOBNTCA «KeCTK.BoIbI>.
- Посpeпдов "ok" поТьерДиTe KhoПКу Latte Macchiato.
- "▼" KacaiTeCb KHOPIKn Cappuccino, NOKa Ha DInCIIe He NoBHTcR «DJIbTp BObl».
- Посpeядстов "ok" подтевердпту кно Ку Latte Macchiato.
Ha nucnnee noBntcAKT.>
6.ПогузnteФильТРДЯВОды (OTВерстNiemВВерх)ВнанOLнEHьИ BDOДКоНTeHepИOCtaВБТВнEM, ПOKA HeпгКрATNTСВБIXOD ПУЗьрькOB BO3Дуxa. →Pис.7 - После сTORO npouho BCTaBbTe Фильтг Дд BOДыВпуctои pe3epByap Дд BOДы.
- 3aJIeIte BOyB pe3epByap IJIA BOIbI DO OTMeTNI «max»
-
Подстаьтей EMKOCь OБьeMOM MннИМуM 1,0л пд диссер.
-
"ok" KocHTeCb KHOJKN Latte Macchiato, yTObI COxpaHNTb yCTaHOBky 3aNyCTnTb pOceCC npOMblBKn.
- “<” KCHNTecb KHONKn Caffe Crema, UTObI BbInTn IN3 MeHIO.
- ПО OKOHУЧAHИN ONOPOKHINTE EMKOCtB. Пибор снoba ГOTOB K pa6Ote.
H3BneueHnE ΦnIbItpa Ipn BODbl
EcInIΦnJIbTpДЯ BOJbI BByHyt NHOBbI
ΦnJIbTpДЯ BOJbI He BCTaBJIeH,
YCTaHOBNTe JXeCTKOCt b BOJbI. "YCTaHOBKa JXeCTKOCtN BOJbI"
Ha cTpaHnua 135
3aunTa OT 3aMep3aHnA
UTo6bI n36eKaTb IOBpeJdeHn B pe3yJIbTaTe BO3JeCTBnXOIOda BO BpeM TpaHCnOpTnPoBKn IIN XpaHeHn, npio6opbl Heo6xOIMo PpeDbapntelbHO IOJIHOCTbIO ONOPOXHrTb.
HhOpmaun. Pnpob DOnJKeH 6bITb rTOB K paOte, pe3epByap IIN BODbl HAnOJIHeH.
- Постаытей подиспсер Калунотаю EMKOCь 60льшого размера и ONустITE Bнз Калунотор.
- YdepxnBaIte HaxaToN KHOkky Milk MNHmym 5 cekyHc. CBeTOIOJ KHOJIKN MIGaET, BbIOJIHHReTcpa3OgpeB npioopa.
- KaK TOnbKO n3 KaNyuHHaTopa NaHHeT BbIXOJNTb Nap, CHIMITE pe3epByap DnRA BOJbl.
- BbIIOJIHЯETcI npOeCC npOpapINBaHnnpi6opa. IOnKInTeCb NOBLeHnIHdNkAciuN «EMKOCTb DIA BODbIpyCTa>.
- KhoKoB O BbIKJIOUHTe npioOp.
- OnopoxKHNb pe3epByap IJRA BObl IN NOIOH, TUaTeJIbHO ONUCTNTe npIbOp. TepeMoXHO TpaHCnOpTIpOBAtB npIbOp NIN yCTaHOBNb ERO Ha XpaHeHne.
Yka3aHHe: 3aBapOuHbI 6JIOK 3a6JIOKupOBaH n He BbIHMaeTcA.

YCTaHOBKN
B npiope BbIIOJIHeHb pa3JIuHbIe 3aBOIDCKne HAcTpoiKn. HAcTpoiKn npiope moKHO peYIpOBoTaB INDINBnDyAJIbHO.
Yka3aHHe: EcnB TeueHne 90 cekyHn Hn Onda H3 KHOJOK He bdyet Haxkata, Pnp6op NepexoNT B pexkmbb6opa HnITka 6e3 coxpaHnHaCTpoek. CoxpaHnHbIe do 3TOFO HaCTpOKn He MeHraOTcA.
Moxho BbIIOJIHNITb CJIeIyIOUne HAcTpoiKn.
ABTOMaTHueeCKoe OTKJIIOUeHHe
IIO nCTeueHnO npEeJIeHHOro BpeMeHn IocJIe IocJIeIHeRo KacAHN KHOPIKNI npIbOp aBTOMaTHueCKN BbIKHouaeTcR. 3TO BpeM MoXHO yCTaHOBNTb, pINuem BO3MOxHa yCTaHOBka OT 15 MmHyTdo 4 yaCoB.
- YdepxkBaIte HaKaTbIMN Ooo n Calc'nClean MHNHMYM 3ceKyHdbI.
- “▼” KacaiTeCb KHOPIKn Cappuccino, NOKa Ha DInCIIe He NoRBrTcR «ABT. OXuJaHHe».
- Посpeдстов "ok" посторпгКногку Latte Macchiato.
3aDéηCTBOBaHbI 3aBOДСКи HаCTpoiKN, ПОВЛЯТСТOKHO BblOpa r3bIka.
-
“▼” KOCHTecb KHONKn Cappuccino n yctaHOBInTe BpeMn Bo3MOxHbI cNeDyUOuNHe NaCTpOuKn:
-
uepe3 15 MInH.
- uepe3 30 MIn. (3aBoIckaYcTaHOBka)
- uepe3 1 yac
- uepe3 2 yaca
-
uepe3 4 yaca
-
Посpeдов "ok" постору Кно Ку Latte Macchiato.
3aDéηCTBOBaHbI 3aBOДСКи HaCTpoiKn, ПОВЛЯТСЕ OKHO BblOpa r3bIka.
- “<” KÖCHINTECB KHOJKN Caffe Crema, YTOObl BbIITN 3 MEHIO.
BkJIIOUeHne N BbIKJIIOUeHne 3ByKOBOrO cnHaJa
Pn Haxatnn JIOboe KHOPIK pa3daetc 3ByKOBO CNHaJ.
EFO MOxHOb BKNIOHTb NIN BBKIOHTb.
- YdepxkBaIte HaxKaTbIMN Ooo n Calc'nClean MmHmym 3cekyndbl.
- “▼” KacaiTeCb KhoPiK Cappuccino, noka Ha DiNcPiIe He NoaBNTcA «3ByK».
3.ПосpeДСТВOM"OK"ПОДТВЕРДITE KHONKу Latte Macchiato. 3aDéиCTBOBaHbI 3aBOIDCKne HAcTpoiKN,ПОВЛЯETCn OKHO Bbl Ra3bIka. - "▼" KocHTecb KHOPIKn Cappuccino N Bbl6epNTe «3Byk BkJ.» nIIN «3Byk BblKJ.».
- ПосpeДСТВOM "OK" ПОДТВЕРДИТЕ КНПКу Latte Macchiato. ЗадейСТВОВАны 3аВОДСКи НастpoйК, ПОВВЛЯETСА OKHO ВьЮра ЯЗБИкa.
- “<” KÖCHINTecb KHOJKN Caffe Crema, YTOObl BblTN N3 MeHIO.
YctaHOBka 3bIka
- YdepxkBaIte HaxaTbIMN Ooo n Calc'nClean MmHmym 3 cekyHdbI.
- “▼” KacaTecb KhoIKN Cappuccino, noka Ha dncnlee He noBtca «R3bIK’.
3.ПосpeДСТВOM"OK"ПОДТВЕРДИТЕ КНОПКу Latte Macchiato. ЗадейСТВОВАны 3аВОДСКи НастpoйК, ПОВЛЯETСА OKHO BblOpa ЯЗБИкa. - “▼” KÖCHNTECb KHOKN Cappuccino
YCTAHOBITE HJXHbI J3bI.K.
5.ПосpeДСТВOM"OK"ПОДТВЕРДИTe KHOПКу Latte Macchiato. 3aDéиCTBOBaHbI 3aBOДСКи ИСТpoIKN,ПОВЛЯETСА OKHO BblOpa Ra3bIka. - “<” KÖCHNTECb KHOPIKn Caffe Crema, YTOObl BbIITN U3 MEHIO.
YcTaHOBka HecTKOCTN BOyI
IpaBnBnaHaHacTpoNka JecCTKocTN BObI BaxKa IJIc CBOeBpeMeHHOro HAnOMnHaHnO HeoOxOIMOCtN ydaJIeHnHaKuII. PpeBapnteJbHO yCTaHOBLeH pexkM JecCTKocTN BObl 4. XEcTKOCTb BObl MOXHO y3HaTb MEcTHoB ODOCha6kaIOUeOpraHn3aUNn INOnpeJeNTb Prn NOMOUn IPnilaRaemOn IHnIKaTOPHO NOLOKN.
- Ha KOpOTKoe BpeMIOIgpy3nTe IprnilaRaemyoHNDiKAToPHyIOIPOLOCKy B CBExkyIO BOIDIOPOBOHDyIO BOdy IN CnyCTM MInHY Te PIOBepbTe pe3yJbTaT. KoJIuYeCTBO OKpaUeHHbIX IOJIeH Na HINDiKAToPHOI POLOCKe IOKa3bIBaET CTeNEH JXECTKOCTN BOIDbl.
- YdepxkBaIte HaKaTbIMN Ooo n Calc'nClean MHNmym 3 cekyHdbI.
- "▼" KacaiTeCb KHOJIc Cappuccino, NOKa Ha DnCJIe He IIOBNTcR «KeCTK. BOJbl>.
- "ok" KocHTeCb KHOPIKn Latte Macchiato I NOITBepDNTe.
-
"KochnTeCb KHOJIcN Cappuccino yCTaHOBIne JecTKOcTB BOJbl. Bo3MOxHbI cJeDyUOuNe HaCTpOJKn:
-
XKecTK. BOДы 1
- XKeCTK.BoDbl 2
- XKeCTK.BoDbl3
- XKeCT.BoNbI 4 (3aBOJcKaYcTaHOBka)
- ΦιNbTp BΟДы (eCJI N BCTaBHeN)
-
YMЯrчNT. H2O (yCTaHOBka npi NaJIInuIN yCTpOJCTBaДЯ CMЯrЧЕнЯ BOДы)
-
"ok" KocHTecb KHOPIKn Latte Macchiato, yTObI COxpaHITb yCTaHOBky.
- “<” KOCHTecb KHONKn Caffe Crema, YTO6bl BblTN N3 MeHIO.
B tablne npedTabHeo COOTBEcTBnepKIMOB pa3JIuHbIM CTePeHmJecTKOCTN BODbI:
| Рекиим | Стениьхосточи Ворbi | |
| Немецкая shkaja (°dH) | Фразецкая shkaja (°fH) | |
| 1 | 1-7 | 1-13 |
| 2 | 8-14 | 14-25 |
| 3 | 15-21 | 26-38 |
| 4 | 22-30 | 39-54 |
IocneJeUoUee N3MeHeHne JxecTKOcTIN BOJb BO3MOXHO BJIIO6OIMOMeHT.
Yka3aHHe: PnI nCNoIb3OBAHmI ΦnJIbTp a DnI BODbl (CM. rIaNBy «PpInHaJnEeKHOCTn») BbIIOJIHnTe CneIyIoUe e "DnJIbTp dNIA BOdbI" Ha cTpaHnua 133.
Bo3BpaT K 3aBOIDcKIM HacTpOiKaM
BocTaHaBJIbAIOCT3aBOIDCKHe NaCTpoiKN,co6CTBeHHbIe yCTaHOBKn TepAIOTcR.
- YdepxkBaIte HaxaTbIMN Ooo n Calc'nClean MmHmym 3cekyhbl.
- “▼” KacaiTeCb KHOPIKn Cappuccino, NOKa Ha IINCIJIe He NOBHTCA «3aB.HaCTpOJKN».
3.ПосpeДСТВOM"OK"ПОДТВЕРДИTe KHOПКу Latte Macchiato. 3aДeИСТВОВАны 3aBOДСКи ИСТpoIKN,ПОВЛЯETСА OKHO BbIбОpaЯЗыka. - “▼” Пикайтесь К.KHONKe Cappuccino, NOka Ha ДИСПЛЕЕ He ПОВИТСЕ HУЖныяЗК.
- "ok" KocHTecb KHONKi Latte Macchiato IJIa IOJTBepXJeHnBbIbpaHHoY cTaHOBKn.IpIbOp IpombIbaeTcN I rTOB Kpa6ote nOcIe TOrO, KaK Ha IINcPJIeNoRbITcA BbIbpaTb HAnITOK".

He npriogHbI IJIaMbITbB NocydomoeyHO Ma-
PnIroHbI IJIaMbITbB TocydomoeyHOJ MaHHe:
Homepa TelefoHOB npuBeDeHb Na nocJeHNx CTpaHuaX HnCTpyKu

Cnyk6a cepBnca
TexHnueckne xapaKTepeNCTNKN
Störungen, was tun? 164

Kundendienst 167
bosch-infoteam@bshg.com
Call rates depend on the network used
CZ 0251095546
DE 091170440040
DK 44898985
EE 06278730
ES 902245255
FI 0207510700
Calls charged at local or mobile rate
GR 18182 (aotn xpeowan)
HR 013028226
HU 003614895461
IE 014502655
0.03 € per minute at peak. Off peak 0.0088 € per minute.
IL 089777222
IS 05203000
IT 800 829 120 (Line Verde)
LI 052741788
LU 26349300
LV 067425232
ME 050432575
MK 022454600
NL 0884244010
NO 22660600
PL 801 191 534
PT 214250730
RO 021 203 9748
RU 88002002961
SE 0771 11 22 77 (local rate)
SK 0244452041
SL 012007017
TR 4446333
AE United Arab Emirates,
BSH Home Appliances FZE
Round About 13.
Plot Nr MO-0532A
Jebel Ali Free Zone - Dubai
Tel.: 04 881 4401
mailto:service.uae@bshg.com
www.bosch-home.com/ae
AL Republica e Shqiperise, Albania
ELEKTRO-SERVIS sh.p.k
Rr. Shkelqim Fusha, Selite,
Pallati "Matrix Konstruktion",
Kati 0 dhe +1
1023 Tirane
Tel.: 42278130, -131
Fax:42278130
mailto:info@elektro-servis.com
EXPERT SERVIS
Ruga e Kavajes,
Kulla B Nr 223/1 Kati I
1023 Tirane
Tel.: 44806061
Tel.: 42274941
Fax:42270448
Cel: +355 069 60 45555
mailto:info@expert-servis.al
Gate 1, 1555 Centre Road
Clayton, Victoria 3168
Tel.: 1300 369 744*
Fax: 1300 306 818
mailto: aftersales.au@bshg.com
www.bosch-home.com.au
*Mo-Fr: 24 hours
BA Bosnia-Hercegovina, Bosnia-Herzegovina
"HIGH" d.o.o.
Gradačačka 29b
71000 Sarajevo
Tel.: 061 10 09 05
Fax: 033 21 35 13
mailto:bosch_siemens_sarajevo@
yahoo.com
BE Belgique, Belgie, Belgium
BSH Home Appliances S.A.
European Trade Center Building, 5th floor
1784 Sofia
Tel.: 0700 208 17
Fax:028787972
mailto:informacia.servis-bg@bshg.com
www.bosch.home.bg
BH Bahrain,
Khalaifat Est.
P.O.Box 5111
Manama
Tel.: 017400553
mailto:service@khalaifat.com
BY Belarus, Benapycb
OOO“BCXБbITOBaTExHnKa
ten.: 4957372961
mailto:mok-kdl@bshg.com
CH Schweiz, Suisse, Swizzera, Switzerland
BSH Hausgeräte AG
To arrange an engineer visit , to orderspare parts and accessories or forproduct advice please visit
www.bosch-home.co.uk or call
*Calls are charged at the basic rate, please check with your telephone service provider for exact charges
GR Greece, Eλλας
BSH Ikiakes Siskeves A.B.E.
Central Branch Service
17 km E.O. Athinon-Lamias &
Potamou 20
14564 Kifisia
Unit 1 & 2, 3rd Floor.
North Block, Skyway House,
3 Sham Mong Road
Tai Kok Tsui, Kowloon
Hong Kong
Tel.: 2565 6151
Fax: 25656681
mailto:bosch.hk.service@bshg.com
www.bosch-home.cn
HR Hrvatska, Croatia
BSH kučni urežadi d.o.o.
Kneza Branimira 22
10000 Zagreb
Tel.: 015520888
Fax:016403603
mailto:informacije.servis-hr@
bshg.com
www.bosch-home.com/hr
HU Magyarorszag, Hungary
www.bosch-home.com/hu
IE Republic of Ireland
BSH Home Appliances Ltd.
Unit F4, Ballymount Drive
Ballymount Industrial Estate
Walkinstown
Dublin 12
Service Requests, Spares and
Accessories
Tel.: 01450 2655*
Fax: 01450 2520
www.bosch-home.co.uk
*0.03 € per minute at peak
Off peak 0.0088 € per minute.
IL Israel,
C/S/B/ Home Appliance Ltd.
1, Hamasger St.
North Industrial Park
Lod. 7129801
Tel.: 089777222
Fax:089777245
mailto:csb-serv@csb-ltd.co.il
www.bosch-home.co.il
IN India, Bharat,
BSH Household Appliances
Mfg.Pvt.Ltd
Arena House, 2nd Floor, Main Bldg.
Plot No. 103, Road No. 12
MIDC, Andheri East
Mumbai 400 093
Toll Free 1800 266 1880*
www.bosch-home.com/in
*Mo-Sa: 8.00am to 8.00pm
(exclude public holidays)
IS Iceland
Smith & Norland hf.
Noatuni 4
105 Reykjavik
Tel.: 0520 3000
Fax: 0520 3011
www.sminor.is
IT Italia, Italy
www.bosch-home.com/it
KZ Kazakhstan, Ka3aKCTAH
IP Turebekov Yerzhan
Nurmanovich
Jangeldina str. 15
Shimkent 160018
Tel.: 0252 31 00 06
mailto:evrika_kz@mail.ru
LB Lebanon, jliJ
Teheni, Hana & Co.
Boulevard Dora 4043 Beyrouth
P.O.Box 90449
Jdeideh, 1202 2040
Tel. 01 255 211
mailto:Info@Teheni-Hana.com
LT Lietuva, Lithuania
Senuku prekybos centras UAB
Jonavos g.62
44192 Kaunas
Tel.: 0372 12146
Fax: 0372 12165
www.senukai.lt
UAB "AG Service"
R. Kalantos q. 32
52494 Kaunas
Tel.: 0700 556 55
Fax:037331363
mailto:servisas@agservice.lt
www.agservice.lt
Baltic Continent Ltd.
Luksio g. 23
09132 Vilius
Tel.: 052741788
Fax: 05 274 1722
mailto:info@balticcontinent.It
www.balticcontinent.It
LU Luxembourg
S.R.L. "Rialto-Studio"
yn. llyceba 98
2012 KuniHHeB
TEN./φaKc:022 23 81 80
mailto:bosch-md@mail.ru
ME Crna Gora, Montenegro
Elektronika komerc
UI.Slobode17
84000 Bijelo Polje
Tel./Fax: 050432575
Mobil: 069324812
mailto:ekobosch.servis@t-com.me
MK Macedonia,Makeonna
GORENEC
Jane Sandanski 69 lok.3
1000 Skopje
Tel.: 022 454 600
Mobil: 070 697 463
mailto:gorenec@yahoo.com
MT Malta
Oxford House Ltd.
Notabile Road
Mriehel BKR 14
Tel.: 021442334
Fax:021488656
www.oxfordhouse.com.mt
MV Raajyegye Jumhooriyyaa, Maledives
Lintel Investments
Ma. Maadheli, Majeedhee Magu
Malé
Tel.: 0331 0742
mailto:mohamed.zuhuree@
lintel.com.mv
NL Nederlande, Netherlands
BSH Home Appliances Ltd
Unit F2, 4 Orbit Drive
Mairangi Bay
Auckland 0632
Tel.: 0800 245 700*
Fax:0800256535
mailto:repairaction.nz@bshg.com
www.bosch-home.co.nz
- Mo-Fr: 8.30am to 4.00pm
(exclude public holidays)
PL Polska
SA Kingdom Saudi Arabia,
i1j
Abdul Latif Jameel Electronics
and Airconditioning Co. Ltd.
BOSCH Service centre,
Kilo 5 Old Makkah Road
(Next to Toyota), Jamiah Dist.
P.O.Box 7997
Jeddah 21472
Tel.: 800 244 0043
mailto:kunnumalsp@ali.com
www.aljazeera.com.sa
SE Sverige, Sweden
BSH Home Appliances AB
Landsvagen 32
169 29 Solna
Tel.: 0771 11 22 77 local rate
mailto:Bosch-Service-SE@bshg.com
www.bosch-home.se
SG Singapore, 新加坡
BSH Home Appliances Pte. Ltd.
Block 4012, Ang Mo Kio Avenue 10
01-01 Techplace 1
Singapore 569628
Tel.: 6751 5000
Fax:67515005
mailto:bshsgp.service@bshg.com
www.bosch-home.com.sg
- Mo-Fr: 8.30am to 7.00pm, Sa: 8.30am to 5.30pm
(exclude public holidays)
SI Slovenija, Slovenia
BSH Hisni aparati d.o.o.
Litostrojska 48
1000 Ljubljana
Tel.: 015830700
Fax: 015830889
mailto:informacije.servis@bshg.com
www.bosch-home.com/si
SK Slovensko, Slovakia
www.bosch-home.com/tr
BSH Home Appliances Private Limited
台北市內湖區洲子街80號11樓
11F., No.80, Zhouzi St., Neihu Dist.
Taipei City 11493
Tel.: 0800 368 888
Fax:0226279788
mailto:bshtzn-service@bshg.com
TOB "BCX NObyToBa TexHika"
TEN:044 490 2095
mailto:bsh-service.ua@bshg.com
15th Road Randjespark
Private Bag X36, Randjespark
1685 Midrand-Johannesburg
Tel.: 086 002 6724
Fax:0866171780
mailto:applianceserviceza@bshg.com
www.bosch-home.com/zao