
BCH6L2561 - Vacuum Cleaner BOSCH - Free user manual and instructions
Find the device manual for free BCH6L2561 BOSCH in PDF.
User questions about BCH6L2561 BOSCH
0 question about this device. Answer the ones you know or ask your own.
Ask a new question about this device
Download the instructions for your Vacuum Cleaner in PDF format for free! Find your manual BCH6L2561 - BOSCH and take your electronic device back in hand. On this page are published all the documents necessary for the use of your device. BCH6L2561 by BOSCH.
USER MANUAL BCH6L2561 BOSCH
Register your new device on MyBosch now and get free benefits: bosch-home.com/ welcome

BBH5 / BBH6 / BCH6
[de] Gebrauchsanleitung 49
[en] Instruction manual 52
[fr] Mode d'emploi 55
[It] Istruzioni per l'uso 58
[nl] Gebruiksaaanwijzing 61
[da] Beskrivelse 64
[no] Beskrivelse av apparatet 67
[sv] Produktbeskrivning 69
[fi] Laitteen kuvaus 72
[pt] Instruções de service 75
[es] Instrucciones de uso 78
[el] O8nyiec Xprnnc 81
[tr] Kullanim kilavuzu 84
[p] Instrukcja uzytkowania 87
[hu] A keszülék leírsa 90
[cs] Návod k použití 93
[ru] OnilcaHne npnbopa 96
[ro] Instructiuni de utiliser 100
[zf] 您的吸塵機 103
[fa] 108
[ar] 111


16
b
17
17
b
C


17
d

e
18
a
b
C
de Sicherheitshinweise. 7 Gerätebeschreibung 49
en Safety information 9 Your vacuum cleaner. 52
fr Consignes de sécurité 11 Description de l'appareil. 55
Istruzioni di sicurezza 13
Descrizione dell'apparecchio 58
nI Veiligheidsvoorschriften 15
Beschrijving van het toestel .61
da Sikkerhedsanvisninger 17 Beskrivelse. 64
Sikkerhetshenvisninger. 19
Beskrivelse av apparatet. 67
SV Sakerhetsanvisningar 21
Produktbeskrivning 69
Turvallisuusohjeet 22 Laitteen kuvaus 72
Instruções de segurarça 24
Descrição do aparecido 75
es Consejos de seguridad 26
Descripción de los aparatos . 78
el Ynoedeileic aaoaaleiac 28
Pierypaeh nC ouakeuC 81
tr Güvenlik bilgileri 31
Kullanma kilavuzu 84
Wskazówki dotyczbe bezpieczenstwa 33
Opis urzadzenia. 87
hu Biztonsagi utmutató 35 A keszülék leirása. 90
CS BezpečnostníPokyny 37
Návod k použití 93
ru Yka3aHnI IO TexHKe 6e3OpacHocTn. 39
OncsHne npibopa . 96
ro Indicati de siguranta 41 Descrierea aparatului. 100
安全信息 43
您的吸塵機 103
46 108
48 1
111
de
Please keep this instruction manual for future reference.
When passing the vacuum cleaner on to a third party, please also pass on this instruction manual.
Intended use
Please read the information on intended use to ensure that you use the appliance correctly and safely.
Only use this appliance:
As specified in this instruction manual.
- With genuine parts and accessories. Damage caused by using third-party products is not covered under the warranty.
For cleaning surfaces.
In private households and in enclosed spaces in a domestic environment at room temperature.
Up to an altitude of max. 2000 m above sea level.
In order to prevent injuries and damage, the vacuum cleaner must not be used for:
Vacuuming persons or animals.
Vacuuming up:
- Hazardous, sharp-edged, hot or red-hot substances.
- Damp or liquid substances.
- Highly flammable or explosive substances and gases.
- Ash, soot from tiled stoves and central heating systems.
- Toner dust from printers and copiers.
Spare parts, accessories
Our original spare parts and original (special) accessories are designed to work with the features and requirements of our vacuum cleaners. We therefore recommend that you only use our original spare parts and original (special) accessories. This will ensure that your vacuum cleaner has a long service life and that the quality of its cleaning performance will remain consistently high throughout.
Please note:
- Using unsuitable or inferior-quality spare parts and (special) accessories can damage your vacuum cleaner. Damage caused by the use of such products is not covered by our guarantee.
Safety information
This vacuum cleaner complies with the recognised rules of technology and the relevant safety regulations.
The appliance may be used by children over the age of
8 years and by persons with reduced physical, sensory or mental capacity or by persons with a lack of experience or knowledge if they are supervised or have been instructed on the safe use of the appliance and have understood the potential dangers of using the appliance.
Children must never play with the appliance.
- Cleaning and user maintenance must never be carried out by children without supervision.
- Plastic bags and films must be kept out of the reach of children and disposed of. There is a risk of suffocation.
Proper use
To charge, only use the charging cable included in the scope of supply.
The charging cable must only be connected and operated as specified on the rating plate.
The appliance must only be stored and charged indoors.
- Do not expose the appliance to temperatures below 0^ or above 40^ .
- Never vacuum without the dust bag or dust container, motor protection or exhaust filter. This may damage the vacuum cleaner.
- Keep the vacuum cleaner away from your head when using nozzles and tubes. This could cause injury.
- Do not use a damaged charging cable. Replace it with an original charging cable.
- When disconnecting the charging cable from the mains, pull the plug itself to remove it; do not pull on the power cord.
- Do not pull the charging cable over sharp edges or allow it to become trapped.
Before carrying out any work on the vacuum cleaner, switch off the appliance and disconnect it from the charging cable and the mains.
- Do not operate the vacuum cleaner if it is damaged.
If a fault is detected, switch off the appliance and disconnect it from the charging cable and the mains.
- For safety reasons, only authorised after-sales service personnel are permitted to carry out repairs and fit replacement parts to the vacuum cleaner.
In the following cases, you must stop the appliance immediately and contact the after-sales service:
If you have accidentally vacuumed up some liquid or liquid has entered the inside of the appliance; If the appliance has been dropped and damaged.
- Protect the vacuum cleaner from outside weather conditions, moisture and sources of heat.
- Do not pour flammable substances or substances containing alcohol onto the filters (motor protection filter, exhaust filter, etc.).
The vacuum cleaner is not suitable for use on construction sites. Vacuuming up building rubble may damage the appliance.
Switch off the appliance when it is not in use.
For safety reasons, the appliance is fitted with an overheating protection system to safeguard the battery and motors. The appliance will switch off automatically if it or the battery is too hot.
=> The appliance will need around 30 minutes to cool down before it can be used again.
The packaging is designed to protect the vacuum cleaner from being damaged during transportation. We therefore recommend keeping the packaging for the purpose of future transportation.
Li-ion batteries
Read all the safety information and instructions.
=> Failure to act in accordance with the safety information and instructions may result in electric shock, fire and/or serious injury.
- Keep all the safety information and instructions for future reference.
- Protect the battery from heat sources, for example avoiding long periods in the sun and exposure to fire, as well as from water and moisture.
Risk of explosion.
Fumes may be released if the battery is damaged or used improperly. Circulate fresh air, and seek medical assistance in the event of physical symptoms arising as a result of exposure.
The fumes may irritate the airway.
If the battery is used incorrectly, liquid may leak out of the battery. Avoid touching the liquid. In the event of accidental contact, rinse the affected area with water. If the liquid comes into contact with the eyes, seek medical assistance.
=> If battery liquid leaks, it can irritate or burn the skin.
Transportation information
The Li-ion batteries in the appliance are subject to the requirements of dangerous goods legislation. The batteries can be transported by the user by road without any further requirements. In the event that they are shipped by a third party (e.g. transported by air or freight carrier), special requirements regarding packaging and identification must be met. In this case, a dangerous goods expert must be consulted when preparing the goods for dispatch.
Information on disposal
Vacuum cleaners, batteries, accessories and packaging should be recycled in an environmentally friendly manner.
Do not dispose of the vacuum cleaner or the batteries in the household rubbish.
Packaging
The packaging is designed to protect the vacuum cleaner from being damaged during transportation. It is made of environmentally friendly materials and can be recycled. Dispose of packaging that is no longer required at an appropriate recycling point.
Old appliances
This appliance contains rechargeable lithium-ion batteries. The appliance must therefore only be disposed of by an authorised after-sales service or dealer.
Batteries
Please follow the notes on transport.
Integrated batteries may only be removed by specialist personnel for the purpose of disposal. Opening the housing shell may damage the vacuum cleaner.
Only for qualified professional:
To remove the battery from the vacuum cleaner, press the on/off switch (Fig. 5 + Fig. 10) until the battery is fully discharged. Unscrew the screws on the housing and take off the housing shell to remove the battery.
To prevent a short circuit, disconnect the battery connections individually one after the other and then insulate the terminals.
Even in the case of complete discharge, the battery still contains a residual capacity that may be released in the event of a short circuit.
fr
=>Pn60py Heo6xOIMO OCTbITb B TeueHne npM.
30 MnHyT, npeJxJe yem OH CHOba 6ydt roTOB K ekCnnyatauH.
YnaKOBKa CnyKHT dIy 3aIunTbI nbIeNcoCA OT NOBpeKdEHN pR TpaHCnOPTnOBoKe. IOnToM yMb peKOMEH dyEM coXpAHInb YnaKOBky dIy nocneJeUoJ e TpaHCnOPTnOBoKN.
glly5 ay bgyra cll jao yao o 12000000000000000000000000000000000000000000000000000000000000000000000000000000000000
olus jzdi jgdojagao jyckl
jL jL o g u y d y Lg y g iJy Jy Lg y Lg y Jy
S
j j j j j j j j j j j j j j j j j j j j j j j j j j j j j j j j j j j j j j j j j j j j j j j j j j j j j j j j j j j j j j j j j j j j j j j j j j j j j j j j j j j j j j j j j j j j j j j
G
jlll jlll jlll jlll jlll jlll
a 1
jglal jglal jglajgljgljgljgljgljgljgljgljgljgljgljgljgljgljgljgljgljgljgljgljgljgljgljgljgljgljgljgljgljgljgljgljgljgljgljgljgljgljgljgljgljgljgljgljgljgljgljgljgljgljgl
jlll lgl 1s 1 j 1 1 1 1 1 1 1 1 1 1 1 1 1 1 1 1 1 1 1 1 1 1
eill clll 1a< = eill g a y d uu u u u u u u u u u u u u u u u u u u u u u u u u u u u u u u u u u u u u u u u u u u u u u u u u u u u uu
jagl jglal ygi jai gllg a jllg a lglg a glg
30 jell 3
< jell jll jell jell jell jell jell jell jell jell jell jell jell jell jell jell jell jell jell jell jell jell jell jell jell jell jell jell jell jell jell jell jell jell jell jell jell jell jell jell jell jell jell jell jell jell jell jell jell jell jell jell jll
1
clallllgllll 1j
ie gdi clalllg ldl 1p j p 0e <=
aally lla! g/gyw yg S
alall die llg jll clalll, glll clll g bll
jll o jll all aag aag aag aag
Jall Lgge ag aag gall
Jall glg dgg g
gol al. gol al. gol al. gol al. gol al.
gol al. gol al. gol al. gol al. gol al.
oiaeaill ayiial 1gall ylbi iwiicall oia
i
JbJ J 1 jgJgJgJg
jag jsl 8 jao
J 1
a
1 1 1 1 1 1 1 1
1
g jie jie jie jie jie jie jie jie jie jie jie jie jie jie jie jie jie jie jie jie
.
jL jJ 1
J 1
Jy Jdydually abgial llal
. 1
i 1
1
1j1i1i jbi jbi jbi jbi jbi jbi jbi jbi jbi jbi jbi jbi jbi jbi jbi jbi jbi jbi jbi jbi jbi jbi jbi jbi jbi jbi jbi jbi jbi jbi jbi jbi jbi jbi jbi jbi jbi jbi jbi jbi jbi jbi jbi jbi jbi jbi jbi jbi jbi jbi jBi
pwl1 pwn
a jaiial 1 jaiiaai 1 aaii jaiai 1 gai
Aa jll aiaill o jg, aiaill algo n nnail lalil
yssll lslslall lall
#
alall ayalal all alalall yalalall yalalall yalal alal alalaii ellil li ayalalll waliall call bao, yaiwai g aaiyai li liaiall, ayalalll caiall, ayalalll jayell plaiiyil ge jayally 0jag jaynai ayalall oaiy. li ayalall ayalall ayalall
a
4k = 3
C 100000000000000000000000000000000000000000000000000000000000
Clllial 0d Jia pui
de
Congratulations on your purchase of the Bosch BBH5/ BBH6/BCH6 vacuum cleaner.
This instruction manual describes various BBH5 / BBH6 / BCH6 models, which means that some of the equipment features and functions described may not apply to your model. You should only use original Bosch accessories, which have been specially developed for your vacuum cleaner, in order to achieve the best possible vacuuming results.
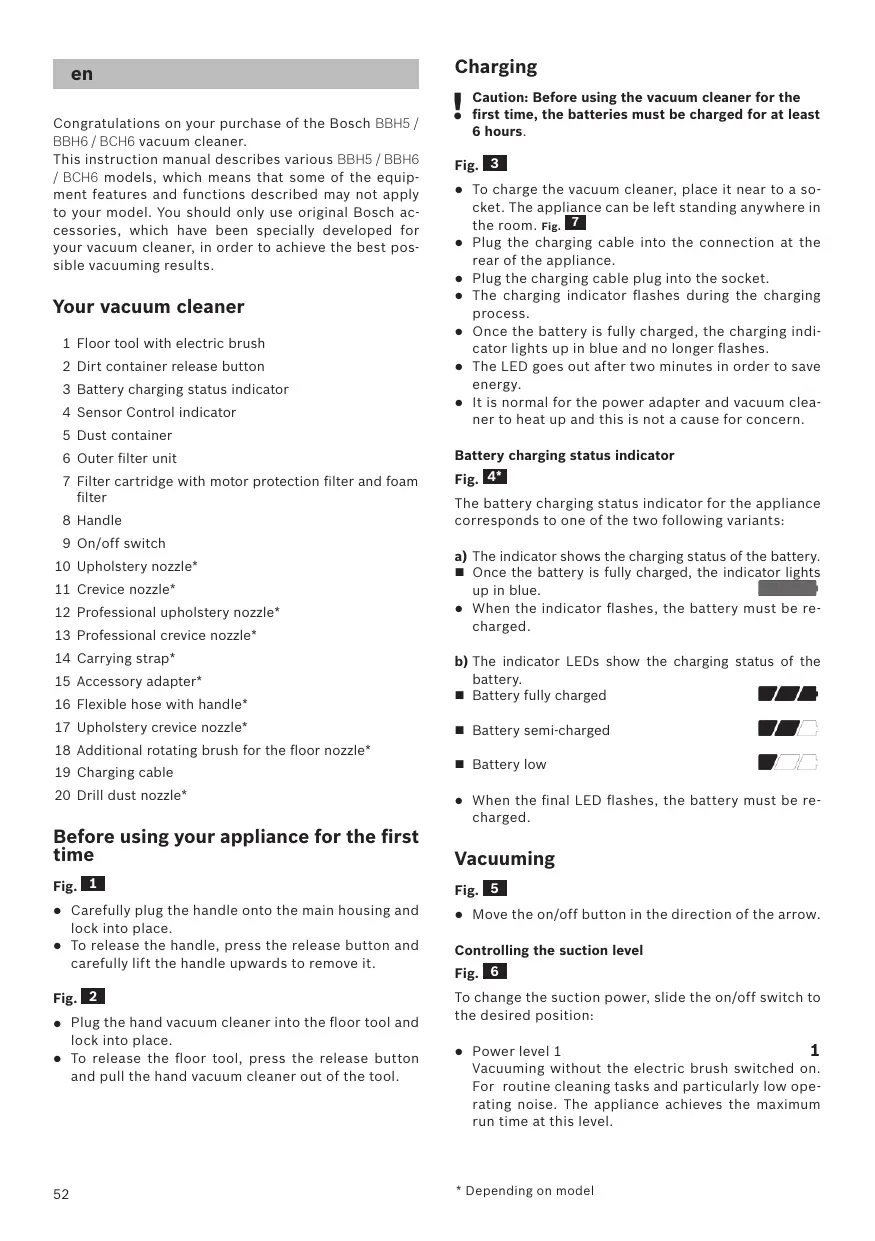
Your vacuum cleaner
1 Floor tool with electric brush
2 Dirt container release button
3 Battery charging status indicator
4 Sensor Control indicator
5 Dust container
6 Outer filter unit
7 Filter cartridge with motor protection filter and foam filter
8 Handle
9 On/off switch
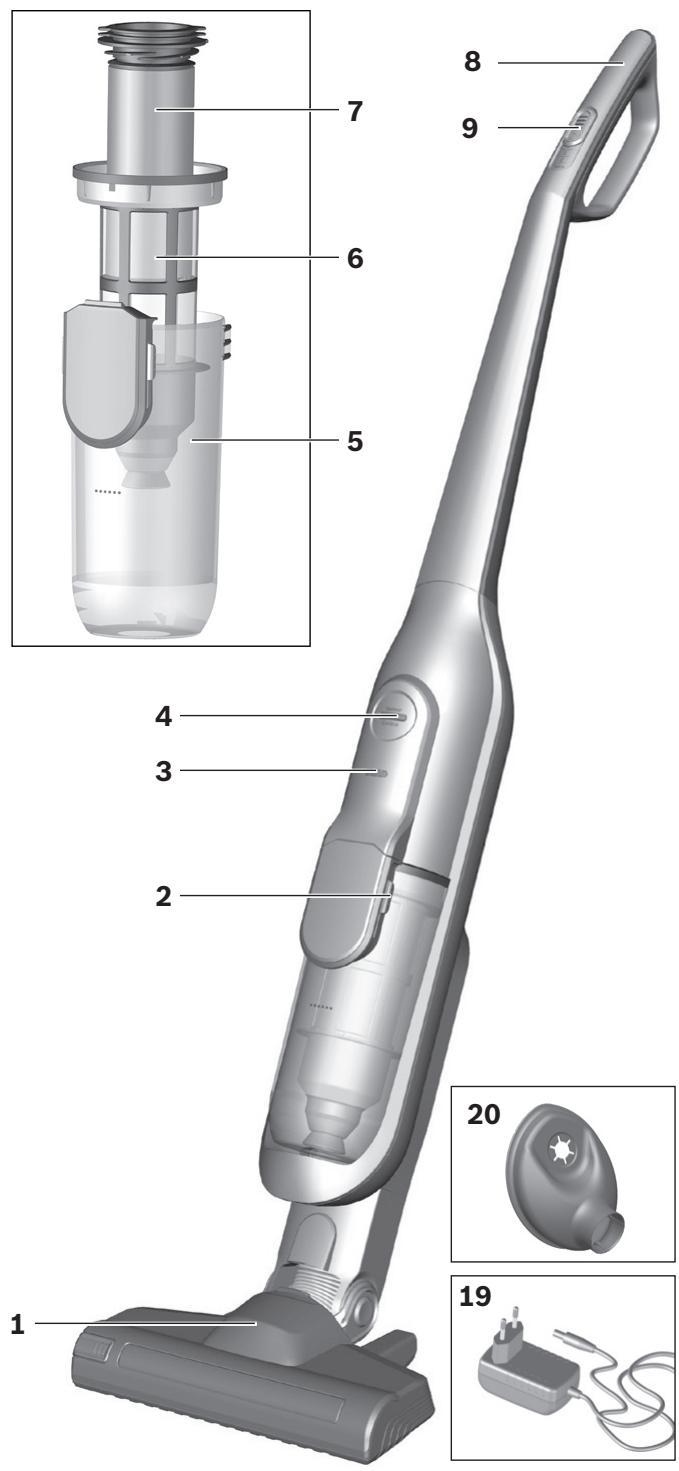
10 Upholstery nozzle
11 Crevice nozzle
12 Professional upholstery nozzle
13 Professional crevice nozzle
14 Carrying strap
15 Accessory adapter
16 Flexible hose with handle
17 Upholstery crevice nozzle
18 Additional rotating brush for the floor nozzle
19 Charging cable
20 Drill dust nozzle
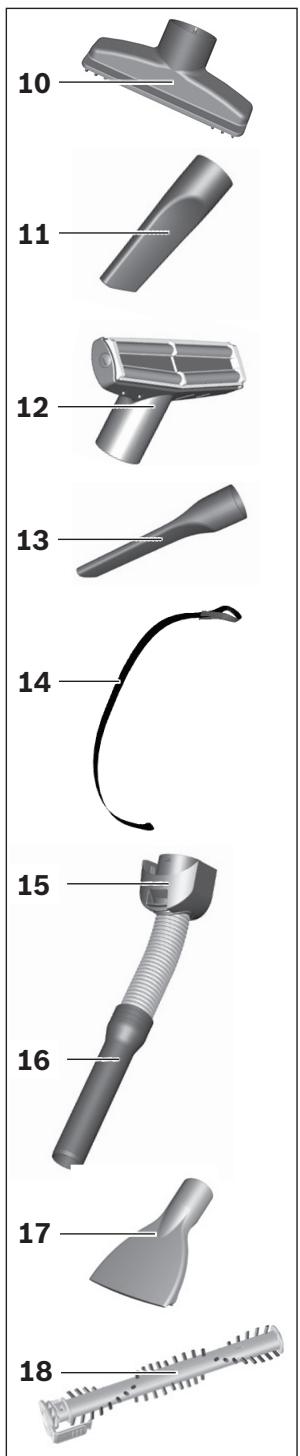
Before using your appliance for the first time
Fig. 1
- Carefully plug the handle onto the main housing and lock into place.
- To release the handle, press the release button and carefully lift the handle upwards to remove it.
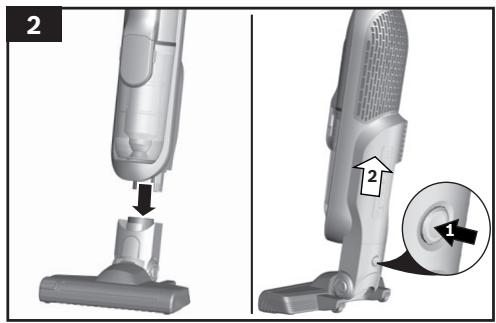
Fig. 2
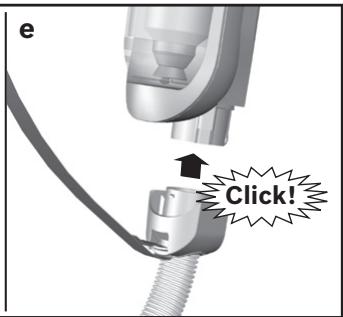
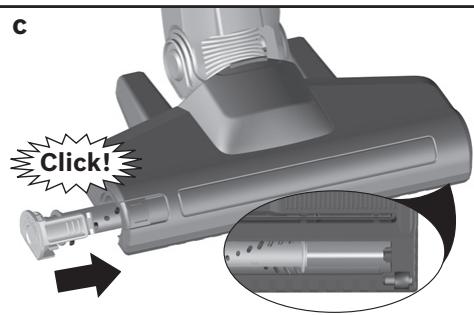
- Plug the hand vacuum cleaner into the floor tool and lock into place.
- To release the floor tool, press the release button and pull the hand vacuum cleaner out of the tool.
Charging
Caution: Before using the vacuum cleaner for the first time, the batteries must be charged for at least 6 hours.
Fig. 3
- To charge the vacuum cleaner, place it near to a socket. The appliance can be left standing anywhere in the room. Fig. 7
- Plug the charging cable into the connection at the rear of the appliance.
- Plug the charging cable plug into the socket.
- The charging indicator flashes during the charging process.
- Once the battery is fully charged, the charging indicator lights up in blue and no longer flashes.
The LED goes out after two minutes in order to save energy. - It is normal for the power adapter and vacuum cleaner to heat up and this is not a cause for concern.
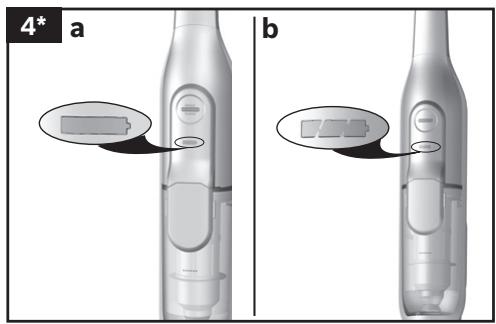
Battery charging status indicator
Fig. 4*
The battery charging status indicator for the appliance corresponds to one of the two following variants:
a) The indicator shows the charging status of the battery.
Once the battery is fully charged, the indicator lights up in blue.
- When the indicator flashes, the battery must be re-charged.
b) The indicator LEDs show the charging status of the battery.
Battery fully charged

Battery semi-charged

Battery low

- When the final LED flashes, the battery must be re-charged.
Vacuuming
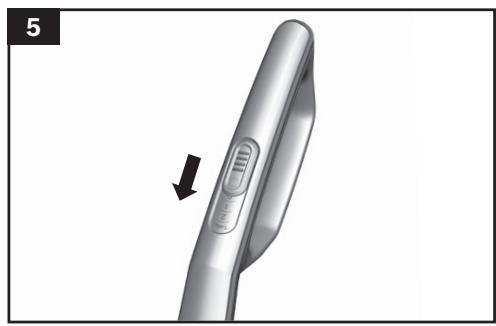
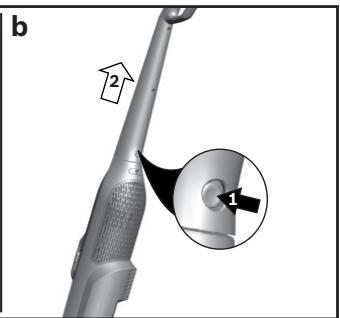
Fig. 5
- Move the on/off button in the direction of the arrow.
Controlling the suction level
Fig. 6
To change the suction power, slide the on/off switch to the desired position:
Power level 1
1
Vacuuming without the electric brush switched on. For routine cleaning tasks and particularly low operating noise. The appliance achieves the maximum run time at this level.
Power level 2
2
Vacuuming at normal power and with the electric brush switched on. For difficult cleaning tasks at an average run time.
Power Level 3 / Turbo Mode
3 / Turbo
Vacuuming at full power and with the electric brush switched on. For stubborn cleaning tasks on all surfaces (carpets, in particular) and when using an optional accessory. The appliance achieves a shorter run time at this level.
Runtime
The runtime time stated here may vary due to charge status, battery temperature and battery age etc.
| For 1,95Ah battery | |||
| Runtime | Athlet 18V | Athlet 25,2V | Athlet 28V |
| Level 1: | Up to 40 min. | Up to 60 min. | Up to 65 min. |
| Level 2: | Up to 30 min. | Up to 30 min. | Up to 30 min. |
| Level 3 / Turbo mode: | Up to 10 min. | Up to 12 min. | Up to 12 min. |
| For 2,6Ah battery | ||
| Runtime | Athlet Runtime Plus 25,2V | Athlet Runtime Plus 28V |
| Level 1: | Up to 75 min | Up to 80 min. |
| Level 2 | Up to 37 min | Up to 37 min |
| Level 3 / Turbo mode: | Up to 12 min. | Up to 12 min. |
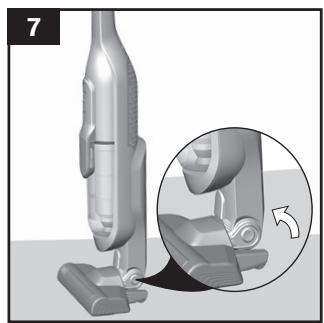
Fig. 7
- During short pauses in vacuuming, the appliance can be left standing anywhere in the room. To do this, tilt the vacuum cleaner forwards slightly in the direction of the nozzle.
Caution: When the appliance is left standing, it must be switched off, because if the brush is turning while the appliance is standing still, it could cause damage to the floor covering.
Vacuuming with accessories
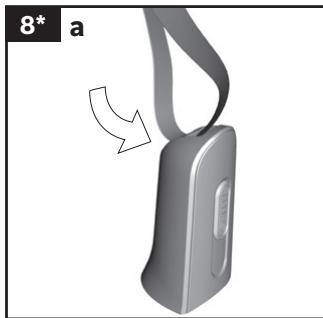
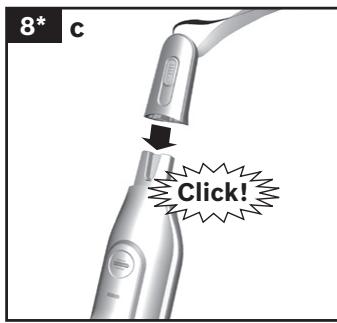
Fig. 8*
a) Fasten the carrying strap to the short handle provided.
b) Remove the long handle from the main housing.
c) Insert the short handle and lock it in place.
d) Remove the hand-held vacuum cleaner from the floor nozzle.Fig. 2
e) Plug the accessory adapter into the hand-held vacuum cleaner and lock it in place.
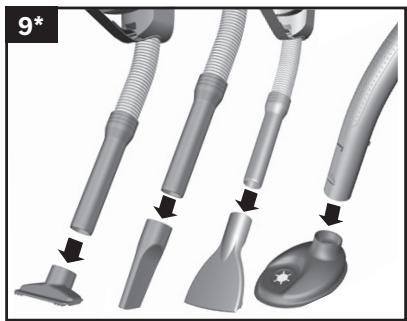
Fig. 9*
Fit nozzles as required to the flexible hose with the accessory adapter handle:
- Upholstery nozzle for vacuuming upholstered furniture, curtains, etc.
- Crevice nozzle for vacuuming crevices and corners, etc.
- Upholstery crevice nozzle for vacuuming upholstery, ideal for cleaning car seats in particular
- Secure the drill dust nozzle to the handle and then place against the wall, so that the nozzle drill hole opening sits directly over the hole to be drilled.
After using the appliance
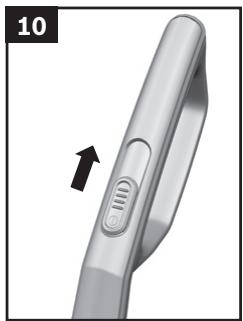
Fig. 10
- Switch off the appliance after vacuuming.
Emptying the dust container
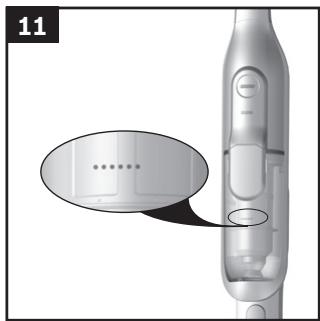
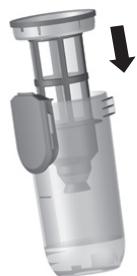
Fig. 11
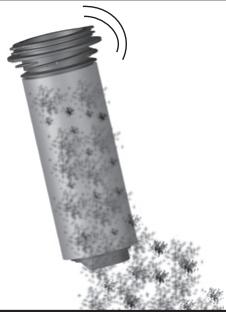
In order to achieve the best possible vacuuming results, the dust container should be emptied after every use or, at the latest, when dust at one point in the dust container has reached the marking.
We recommend that you not fill the dust container beyond the marking, as this leads to considerable soiling of the filter.
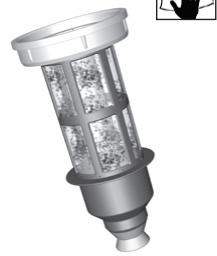
When emptying the dust container, always check how dirty the outer filter unit is and, if necessary, clean it as detailed in the "Cleaning the outer filter unit" instructions. Fig. 16
Caution: The filter can only be cleaned if the appli
- ance is switched off.
Never vacuum without the outer filter unit and its fitted filter cartridge.
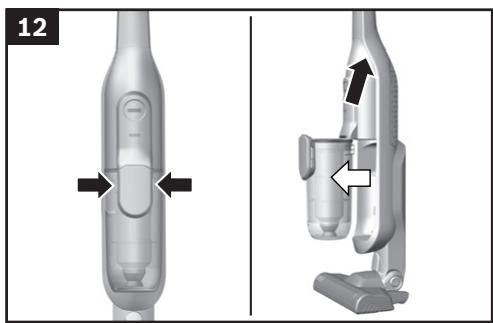
Fig. 12
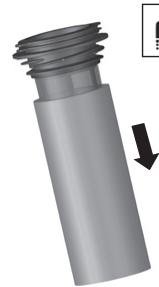
- Using the release button, unlock the dust container and remove it from the appliance.
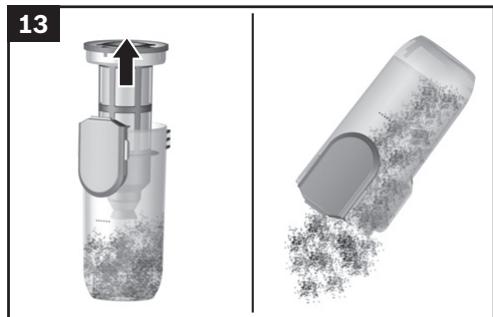
Fig. 13
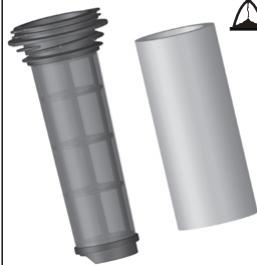
- Take the filter unit out of the dust container.
- Empty the dust container.
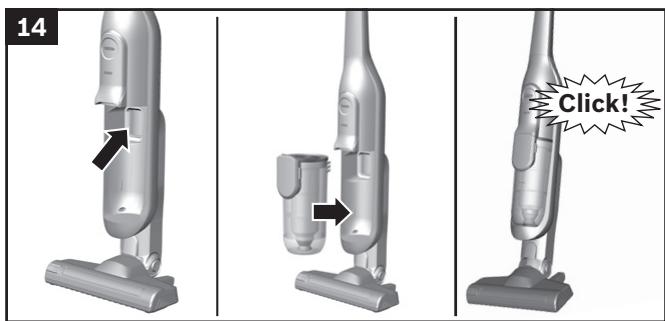
Fig. 14
- Remove any dirt which may have been lodged underneath the container ejector opening.
- Insert the filter unit into the dust container, making sure it is correctly seated.
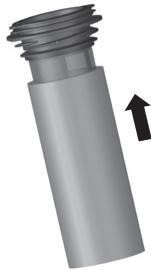
- Insert the dust container in the appliance, so that it 'clicks' audibly into place.
Caution: If you notice any resistance when inserting
- the dust container, check that the filter is complete and that the filter unit and dust container are correctly seated.
Filter care
Caution: The filter can only be cleaned if the appli
- ance is switched off.
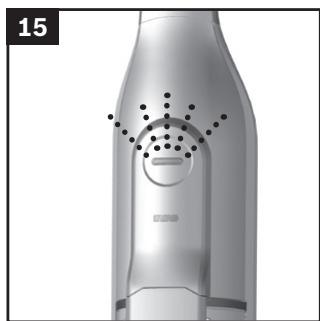
Your appliance is equipped with a "Sensor Control" function.
This function constantly monitors whether your vacuum cleaner is working at its optimum power level. The indicator light lets you know when you need to clean the filter cartridge, so that the appliance can reach its optimum power level once more.
Fig. 15 Sensor Control
The indicator lights up blue or is off when the appliance is working at its optimum level. Once the indicator turns red and flashes, the outer filter unit and filter cartridge must be cleaned.
The appliance is automatically adjusted to power level 1.
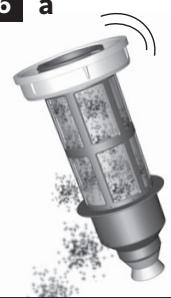
Fig. 16 Cleaning the outer filter unit
The outer filter unit should be cleaned at regular intervals in order to ensure optimum operation of the vacuum cleaner.
- Please switch off the appliance to clean the outer filter unit.
- Remove the dust container from the appliance. Fig. 12
Take the filter unit out of the dust container. Fig. 13 - Clean the outer filter unit.
a) It is usually sufficient to lightly shake or tap out the whole filter unit when the dust container is emptied in order to dislodge any particles of dirt.
b) If this is not sufficient, you can use a dry cloth to remove dirt particles from the surface.
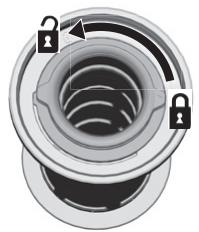
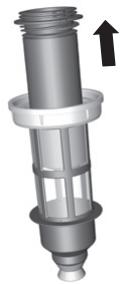
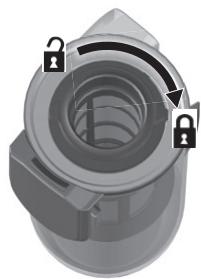
Fig. 17 Cleaning the filter cartridge
- Switch off the appliance.
- Remove the dust container from the appliance.
Fig. 12
Take the filter unit out of the dust container. Fig. 13
a) Turn the filter cartridge lid anti-clockwise and remove the filter cartridge from the filter unit.
b) Firstly, clean the filter cartridge by tapping out the dirt.
c) Pull out the foam filter from the motor protection and rinse separately.
Allow the foam filter and motor protection filter to dry completely (approx. 24 hours)
d) After fitting the foam filter, insert the filter cartridge into the dust container.
e) Insert the filter cartridge into the filter unit and lock it by turning the lid clockwise.
If, after hand-washing the filter cartridge, the "Sensor Control" indicator flashes red again, the filter cartridge is so heavily soiled that it must be washed in a washing machine. Use a gentle programme at max. 30^ and the lowest spin speed.
New filters can be obtained from our after-sales service, if required.
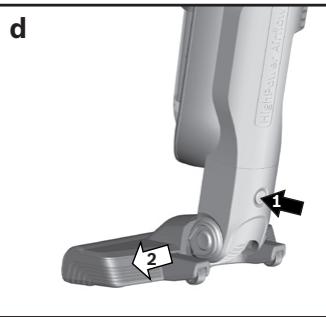
Cleaning the floor tool
Before carrying out any maintenance, switch off the vacuum cleaner and disconnect it from the charging cable.
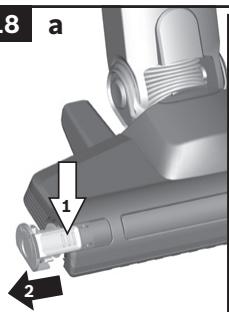
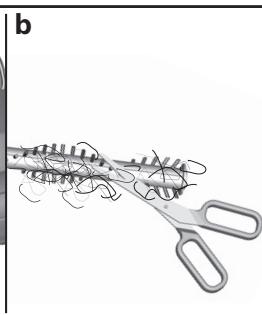
Fig. 18
a) Release the brush roller using the release button and pull it sideways out of the floor tool.
b) Using the groove provided, cut through threads and hairs wound round the rollers with scissors and then remove them.
c) Push the brush roller in sideways along the guide rod in the floor tool and lock in place using the release button.
Caution: The floor tool must only be put into operati
on with the brush roller fitted.
Care
Before cleaning the hand vacuum cleaner, it must be switched off and disconnected from the charging cable. The vacuum cleaner and plastic accessories can be cleaned with an ordinary plastic cleaner.
Caution: Do not use abrasive materials, glass
- cleaning agents or all-purpose cleaning products.
Never immerse the vacuum cleaner in water.
Subject to technical modifications.
fr
Mby paDbl, yTO Bbl octaHOBnIN CBOI Bbl6op Ha nblnecoce Bosch cepnn BBH5/BBH6/BCH6.
B 3toNnHctpyKuINNo 3KcnnyaTaauIN npedctabneHbI pa3nUHbe moJen cepIN BBH5 / BBH6 / BCH6. N03tOMy BO3MOxHO, qTo HekOTOpBe FynKuIN n pInHaJNeXHoCTn, ONncAHHe 3decb, MoryT oTCyCTBOBaTB y BaWero np6Opa. 4To6bl rapaHTnPOBaTB onTNMaIbHbI pe3yNbTaT y6opKn, Bam Heo6xOdIMO nCnONb3OBaTB TOnkO oprHNaIbHbIe npInHaJNeXHoCTn Bosch, pa3pa60taHbIe cneuaIbHo dJaBaWero nbIeCocA.
Oncanhe npnbopa
1 HacdaKa dna nona/KoBpa c 3neKtpooetKoN
2 KhoNka qKcaunn nbinec6opHnka
3 INdikatop 3aprakn akkymnytopa
4 INDINKATOP «Sensor Control»
5 KOnTeHnep dIa c6opa nblnn
6 BHeuHnI pIbTpoBaIbHbI 6nok
7 ΦиьТуюци злем ent C MOTOPHbIM n nopOLOHOBbIMФиьТрамн
8 Puyka shnaHa
9 BbiknouaTeNb
10 Hacaika dny Mrgkoi Me6en*
11IeEBAHacdaKa*
12 HacaKa dIa MrgKo Me6eN Profi
13 ΜεπεΒαγ ḀςαΚα Profi
14 PemHe*
15 PerexoDnK dIy npHaJneXHocTei
16 ⅢJaanr c pukyoik*
17 Μεneναν Ḥακακα Σρλγκοι Μεδεπη
18Дононгельнь Валк КETКИ HacaIGNДЯ NOA/ KOBpa*
19 Kaebelb 3apndHoro yctpoiCTBa
20 Hacaika dny ydaenHH nbln npn cBepneHHn*
IpeepnepBbIM nCnoB3OBaHneM
Pnc.1
-PyuKy octopoxHo BCTaBbTe B OCHOBHoi Kopnyc n 3aΦHKpUyTe.
Длг OTCoeHHeHnpyuKn HaxMnte KhoNkyФнkaCauHnOCTOpOxHcHmTepyuKdBxKeHnEMBbex.
PNC. 2
- nbIneococakKymyIaTOpbI dOJXHbI 3apKaTbcr He MeHee 6 qacob.
PNC. 3
Длгярдкnotabte bInecoc pdoM cpo3etKo.Пыlecoc MOKHO cnokoHOb octabnTb NOMeUeHHN.Phc. 7
BcTaBbTe Ka6eNb 3apAnHOro yctpoNCTBa c3aHn B pa3beM nbIneCoca.
BcTaBbTe BnKy Ka6eY 3apHOro yctpoiCTBa B po3Etky.
BoBpem3apAdknHndnkatop3apAdkmuraet.
- Посе полочи зардкн akkymлгота ИндikatopЗардкгорпсн CBetOM npekpaцael MrtaB.
- Upe3 2 MmHytbl CBeToND rachet dJa 3Kohomn 3Heprnn.
- 5nok nHTaHnHa Ka6BeNe 3aprAdHO yOCTpoiNCTBa n cam npIbOp harpeBaHOTc BO BpEma 3aprAnK. 3To HOPMaJIbHo I nePpeCTaBnEeT OAnCHoNt.
Hndkatop3apAknakkymyItopa
Pnc. 4\*
HДнКATOP 3apRANKI aKKyMnyTopa nblneCocA COOTBETCTBYET ODHOMU n3 DBYx pInbEdeHHbIX COCTOHIN:
a)Индкатор уkaыBaet Ha CTeNeHb 3apdkn akkymnytopa.
Ecnn akkymyantop nonHocbIO 3apJxHe, INndkaTOp TropNT CHHM CBetOM.
- Ecnn HndnkaTop Mmraet, Tpe6yetc3apnka aKKymyIaTopa.
b) CBeToIIOIbI INHnKaTopa yka3bIbAOT Ha CTeneHb 3aprKn aKKyMnyTopa.
AkkymyTop noIHOCTbIO 3apJxKeH
CpeHn npoBeHb octaToCHoro 3apra
Hn3kn ypoBeHb octaToHoro 3apra
- Ecni nocneHn CBeToDnOd Mnaet, Tpe6yetc3aapdkaakkymnytopa.
Y6opka
Pnc.5
- Haxmte BbiknoaTeB HnpaBneHn, yka3aHHom cTpeKo.
Perynpobka MouHocTH BCacbIBaHHa
Pnc. 6
Дярergyнорвк moцно BCaыBaHЯ CdВиБTe BbIKNoHuATEB HByxHoe NOnOKeHHe:
- YpOBeHb MoUHocTHn 1
Для NOВCEДНЕВ"HО y60рк n c o6o Hn3KmUpoBHeM WуMa n C BbIKIQUHEn OJIeKToPouTeKoJ. - YpOBeHb MoUHocTHn 2 2
Длг тцательноуборки c BknHoueHHoN 3neKtpoоштКо. - YpOBeHb MoUHcTn 3 /YpOBeHb MoUHcTnTurbo
3 / Turbo
OuNTKa HacaKn IyI Na/KOBpa
KaJdbIpa3 nepe Texo6cnyXnBaHnEM nbIneococa BbIKNoaHTe erO n OTOcEOdHnRnEOT KaBena 3aprHoro yCTpOnCTBA.
Pnc. 18
a) HaxkTHeM KhoIKN ΦHcAsuIN pa36NoKpyte BaIINK ⅢETKN N BbIHbTe H3 HacaIKN dIe IIOJa/KOBpa C6Oky.
b) HAMOTABUHNEc HNTKN H BONOCbl papaeeXbTe HOHXNcAmn BOnlb CneuaNbHO npedeymOTpeHHoI npope3n ydAaNTe.
c) 3aDbHbTeBaHnKlEeTKnC60kyBDoIbnHaPabVnOoJero ctePKHb HacaKdIy Inona/KobpaI 3aΦKnCpuyTe erO haxaTHeM KhoNkФhKCaun.
BHHMaHHe:HaCaKkyIpynona/KOBpaMOxHo
- INCNoJIb3OBAbT ToIbKO CyCTaHOBNeHHbIM BaIIHKOM ⅢEeTKN.
yxo
Ipeed kajdoy nctko nblncoc Heo6xodmo BbIKHouTb NTcoeHNHTb OT KaBEna 3apdHoro yctpoiCTBa. Nblncoc nnactMaccobbie npnHaJnekHO mOXXO nCTNb O6bHuHbIMC pcdTBamn dnynCTKn nlaactMaccbl.
BHHMaHHe: He nCnONb3aYIte a6pa3aHBbIe YNCTaJIe cpeCTBa, cpeCTBa IJN MaTbIa CTeKoI nn yHbVepcaIbIbIe MoIOUe cpeCTBa. He nOpykaIte nbIEcOC B BOy.
OctabJIem 3a co6oI npaBO Ha BHeceHne TeXnuecknx n3MeHeHH.
ro
Ne bucuram c à-àti decidis sa achizitionati un aspirator Bosch din Serbia BBH5/BBH6/BCH6.
Incarcareramasamedie

Incarcareramasaredesa

Sensor Control y lae al
L a L a L a L a L a L a L a L a L a L a L a L a L a L a L a L a L a L a L a L a L a L a L a L a L a L a L a L a L a L a L a L a L a L a L a L a L a L a L a L a L a L a L a L a L a L a L a L a L a L a L a
L a
L a
L a
L a
L a
L a
L a
L a
L a
L a
L a
L a
L a
L a
L a
L a
L a
L a
L a
L a
L a
L a
L a
L a
L a
L a
L a
L a
L a
L a
L a
L a
L a
La
L a
L a
L a
L a
L a
Sensor Control 15
j 1 j 1 j 1 j 1 j 1 j 1 j 1 j 1 j 1 j 1 j 1 j 1 j 1 j 1 j 1 j 1 j 1 j 1 j 1 j 1 j 1 j 1 j 1 j 1 j 1 j 1 j 1 j 1 j 1 j 1 j 1 j 1 j 1 j 1 j
1.25 2.35 3.45 4.55
16
j 1 j 1 j 1 j 1 j 1 j 1 j 1 j 1 j 1 j 1 j 1 j 1 j 1 j 1 j 1 j 1 j 1 j 1 j 1 j 1 j 1 j 1 j 1 j 1 j 1 j 1 j 1 j 1 j 1 j 1 j 1 j 1 j 1 j 1 j
sJ 100
12 1
13 2j
15
j 10000000000000000000000000000000000000
()
iiS 1
jz jz jz jz jz jz jz
.
12 jssj 1
13 1
a
. 15
1 1
Sds jgsa bala jilj gaiw jilldi jol
(20 24÷ 2
Sla 2j S
=
()
Jaa Jaa Jaa Jaa Jaa
Ji j 11111111111111111111111111111111111111111111111
jaiy jiaaall jss jil jz jz jz jz jz jz jz jz
16
a
12
S_ ACD = 12 · CD · AC = 12 × AC × 5
g2j jS,2j abia jie (jJ 1j aSj olaal y
ii 15 o1 j1 jj
13
4.4.4.4.4.4.4.4.4.4.4.4.4.4.4.4.4.4.4.4.4.4.4.4.4.4.4.4.4.4.4.4.4.4.4.4.4.4.4.4.4.4.4.4.4.4.4.4.4.4.4
14
juii 10004ab2a 10004y j y 10004s1 y s1s2
j 1
S1s45g2yds2jgl0e3nssJd2rS1s2
S 0000
JolS Cooia 1s jg 1g jn 1n 1
- 与 x , y , z , w , x , y , z , w , x , y , z , w , x , y , z , w , x , y , f(x, y, z)
.1sJi
iJ 100
| 1,95Ah باني ا | |||
| Athlet 28V | Athlet 25,2V | Athlet 18V | مینه کاند |
| العربية 65 | العربية 60 | العربية 40 | :1 نان |
| العربية 30 | العربية 30 | العربية 30 | :2 نان |
| العربية 12 | العربية 12 | العربية 10 | /3 نان :العربية |
| 2,6Ah باری نهام | ||
| Athlet Runtime Plus 28V | Athlet Runtime Plus 25,2V | مینه کانور |
| \( \begin{array}{l} {{\mathrm{a}}_{\mathrm{{Bd}}}\mathrm{b}} \\ {{\mathrm{a}}_{\mathrm{{Bd}}}\mathrm{b}} \\ {{\mathrm{a}}_{\mathrm{{Bd}}}\mathrm{b}} \\ {{\mathrm{a}}_{\mathrm{{Bd}}}\mathrm{b}} \\ {{\mathrm{a}}_{\mathrm{{Bd}}}\mathrm{b}} \\ {{\mathrm{a}}_{\mathrm{{Bd}}}\mathrm{b}} \\ {{\mathrm{b}}_{\mathrm{{Bd}}}\mathrm{b}} \\ {{\mathrm{b}}_{\mathrm{{Bd}}}\mathrm{b}} \\ {{\mathrm{b}}_{\mathrm{{Bd}}}\mathrm{b}} \\ {{\mathrm{b}}_{\mathrm{{Bd}}}\mathrm{b}} \\ {{\mathrm{b}}_{\mathrm{{Bd}}}\mathrm{b}} \\ {{\mathrm{b}}_{\mathrm{D}}}\end{array} \) | \( \begin{array}{l} {{\mathrm{a}}_{\mathrm{{Bd}}}\mathrm{b}} \\ {{\mathrm{a}}_{\mathrm{{Bd}}}\mathrm{b}} \\ {{\mathrm{a}}_{\mathrm{{Bd}}}\mathrm{b}} \\ {{\mathrm{a}}_{\mathrm{{Bd}}}\mathrm{b}} \\ {{\mathrm{a}}_{\mathrm{{Bd}}}\text{ }}\\ {{\mathrm{a}}_{\mathrm{{Bd}}}\mathrm{b}} \\ {{\mathrm{a}}_{\mathrm{{Bd}}}\mathrm{b}} \\ {{\mathrm{a}}_{\mathrm{{Bd}}}\mathrm{b}} \\ {{\mathrm{a}}_{\mathrm{{Bd}}}\mathrm{b}} \\ {{\mathrm{a}}_{\mathrm{{Bd}}}\mathrm{b}} \\ {{\mathrm{c}}_{\mathrm{{Bd}}}\mathrm{b}} \\ {{\mathrm{c}}_{\mathrm{{Bd}}}\mathrm{b}} \\ {{\mathrm{c}}_{\mathrm{{Bd}}}\mathrm{b}} \\ {{\mathrm{c}}_{\mathrm{{Bd}}}\mathrm{b}} \\ {{\mathrm{c}}_{\mathrm{{Bd}}}\mathrm{b}} \\ {{\mathrm{c}}_{\mathrm{D}}}\end{array} \) | :1\( {\mathrm{c}}_{\mathrm{{Bd}}} \) |
| \( \begin{array}{l} {{\mathrm{a}}_{\mathrm{{Bd}}}\mathrm{b}} \\ {{\mathrm{a}}_{\mathrm{{Bd}}}\mathrm{b}} \\ {{\mathrm{a}}_{\mathrm{{Bd}}}\mathrm{b}} \\ {{\mathrm{a}}_{\mathrm{{Bd}}}\mathrm{b}} \\ {{\mathrm{a}}_{\mathrm{{Bd}}} \mid 2\mathrm{\;L}}\end{array} \) | :2\( {\mathrm{c}}_{\mathrm{{Bd}}} \) | |
| \( \begin{array}{l} {{\mathrm{a}}_{\mathrm{{Bd}}}\mathrm{b}} \\ {{\mathrm{a}}_{\mathrm{{Bd}}}\mathrm{b}} \\ {{\mathrm{a}}_{\mathrm{{Bd}}}\mathrm{b}} \\ {{\mathrm{a}}_{\mathrm{{Bd}}}\mathrm{c}} \\ {{\mathrm{a}}_{\mathrm{{Bd}}}\mathrm{b}} \\ {{\mathrm{a}}_{\mathrm{{Bd}}}\mathrm{b}} \\ {{\mathrm{a}}_{\mathrm{{Bd}}}\mathrm{b}} \\ {{\mathrm{a}}_{\mathrm{{Bd}}}\mathrm{b}} \\ {{\mathrm{a}}_{\mathrm{{Bd}}}\mathrm{b}} \\ {{\it c}} \\ {{\it c}} \\ {{\it c}} \\ {{\it c}} \\ {{\it c}} \\ {{\it c}} \\ {{\it c}} \\ {{\it c}} \\ {{\it c}} \\ {{\it c}} \\ {{\it c}} \\ {{\it c}} \\ {{\it c}} \\ {{\it c}} \\ {{\it c}} \\ {{\it c}} \\ {{\it c}} \\ {{ \begin{array}{l} {{\mathrm{a}}_{\mathrm{{Bd}}}\mathrm{b}} \\ {{\mathrm{a}}_{\mathrm{{Bd}}}\mathrm{b}} \\ {{\mathrm{a}}_{\mathrm{{Bd}}}\mathrm{b}} \\ {{\mathrm{a}}_{\mathrm{{Bd}}}\mathrm{b}} \\ {{\mathrm{a}}_{\mathrm{{Bd}}}\mathrm{c}} \\ {{\mathrm{a}}_{\mathrm{{Bd}}}\mathrm{b}} \\ {{\mathrm{c}}_{\mathrm{{Bd}}}\mathrm{b}} \\ {{\mathrm{c}}_{\mathrm{{Bd}}}\mathrm{b}} \\ {{\mathrm{c}}_{\mathrm{{Bd}}}\mathrm{b}} \\ {{\mathrm{c}}_{\mathrm{{Bd}}}\mathrm{b}} \\ {{\it c}} \\ {{\it c}} \\ {{\it c}} \\ {{\it c}} \\ {{\it c}} \\ {{\it c}} \\ {{\it c}} \\ {{\it c}} \\ {{\it c}} \\ {{\it c}} \\ {{\it c}} \\ {{\it c}} \\ {{\it c}} \\ {{\it c}} \\ {{ \begin{array}{l} {{\mathrm{a}},\mathrm{{b}}}\end{array} }}\end{array} \) | /3\( {\mathrm{c}}_{\mathrm{{Bd}}} \) | |
7
J
y
a 1
1
a 1
JSLU 4A 4S 1J2 J2
J 1
01 1 jgl yjgl
8*
JSC
a
ii 11 i 11i
Aa 2
2 1
jll jll jll jll jll jll jll jll jll jll jll jll jll jll jll jll jll jll jll jll jll jll jll jll jll jll jll jll jll jll jll jll jll jll jll jll jll jll jll jll jll jll jll jll jll jll jll jll jll jll jll
jlll 17
jellalayp
12.
13 4
Cjzj, 1eall wJieae 4s oJzil Jsc jlll aahj zelbc (a
jiall ǎng 2018 jiall lǎngbì
aai 1 1 aai 1 aai y
Jus 1 Jus 1 Jus 1 Jus 1 Jus 1 Jus 1 Jus 1 Jus 1 Jus 1 Jus 1 Jus 1 Jus 1 Jus 1 Jus 1 Jus 1 Jus 1 Jus 1 Jus 1 Jus 1 Jus 1 Jus 1 Jus 1 Jus 1 Jus 1 Jus 1 Jus 1
e j 1j jlll a b j s j j j j j j j d (d
j 1 j 1 j 1 j 1 j 1 j 1 j 1 j 1 j 1 j 1 j 1 j 1 j 1 j 1 j 1 j 1 j 1 j 1 j 1 j 1 j 1 j 1 j 1 j 1 j 1 j 1 j 1 j
Aol wall
*9
a aaii iiaaiie
:
A. g,g jlllgljllljjll
Jlll 1 Jai Jai Jai Jai Jai Jai Jai Jai
a_bb^c = 70^
a 1
aikll 8g 0111 1111 1111 1111
aallll lalall
*8
a
aal alal alal alal (b)
aall aal 1
2 2
aall aal lal all
3
a. g. 1. 1. 1. 1. 1. 1. 1. 1. 1. 1. 1. 1. 1. 1. 1. 1. 1. 1. 1. 1. 1. 1. 1. 1. 1. 1. 1. 1. 1. 1. 1. 1. 1.
7 1
y
j 1
.
AaBlll yjgl LED aal jabbln
g a 1
yabaln
4 s
y
a 1
jgllll jnnll 1gai iaiai aiiaai ai jlll
原不等式成立
A. ball 1234567890
a 1
Lalai ayaaay

Aabuaaiaaii

Aaiaiaiaiaiaiaia
A. ball 100000000000000 LED
biul
5
alil alil (y) /jaiill llae lai
hdtii 8e b
6
aaiiie aiee iieae eae
1 1
jia jaiill jiaisie g s iue y aieyic 1i jaiill play plaill
all
2 2
aill
A
BBH5/BBH6/
.BCH6
Laaa a a a a a a a a a a a a a a a a a a a a a
Aisao 1i i 1
aiikai 1
ailllll 1
2
3
Jannnnnnaa Jaa Jaa 4
5
6
jilll 7
j 8
i 9
*10
*g 11
*Jnlll 12
*jzjjlll q jai 13
*Jalal 14
*15
* 16
*jy jy ylll lll 17
*a 18
j19
*g 20
a
1
aag jglll glll
J 1
S OBC = S BOC + S_ BOC
2
a 1
AE United Arab Emirates,
BSH Home Appliances
Round About 13, Plot Nr MO-0532A
Jebel Ali Free Zone - Dubai
Tel.: 04 881 44 01*
mailto:service.uae@bshg.com
www.bosch-home.com/ae
*Sun-Thu: 8am to 5pm (exclude public holidays)
AL Republika e Shqiperise, Albania
Elektro-Service sh.p.k
Rruga Kasem Shima, Kodi postar-1050
Prane Ures Mezezit
1023 Tirane
Tel.: 42278130; -131
mailto:info@elektro-servis.com
EXPERT Service
Rruga e Kavajes, Kulla B Nr 223/1 Kati I
1023 Tirane
Tel.: 44806061, 42274941
Cel: +355 069 60 45555
mailto:info@expert-servis.al
AM Armenia, zuiuunui
ZIG ZAG LLC
Charenci str. 25
Yerevan 375025
Tel.: 010 55 60 10
newsletter:service@zigzag.am
www.zigzag.am
Gate 1, 1555 Centre Road
Clayton, Victoria 3168
Tel.: 1300 369 744*
mailto:customersupport.au@bshg.com
www.bosch-home.com.au
*Mon-Fri 24 hours
AZ Azarbaycan Respublikasi, Azerbaijan
Baku Service Company MMC
Narimanov r-nu, Othmradecabli kuc.1, bina 50C
Baku
Tel.: 12991
mailto:info@bakuserervice.az
www.ser-cen.az
Yurd Service MMC
75-79, Bakikhanov Str.
Baku, AZ1007
Tel.: 124803301
mailto:info-service@yurd.az
www.yurdaz.az
Optimal Elektronika MMC
Hasanoghlu 7B, Narimanov discrit
Baku, AZ1072
Tel.: 12954
newsletter:STMS@optimal.az
www(optimal.az
BA Bosna I Hercegovina, Bosnia-Herzegovina
"HIGH" d.o.o.
Gradačačka 29b
71000 Sarajevo
Tel./Fax: 033 21 35 13
mailto:centralniservis@yahoo.com
BE Belgique, Belgie, Belgium
BSH Home Appliances S.A. - N.V.
Rue Picard 7, box 400
Business center FPI, floor 5,
Cherni vrah Blvd. 51B
1407 Sofia
Tel.: 0700 208 17
mailto:informacia.servis-bg@bshg.com
www.bosch-home.bg
BH Bahrain,
Khalaifat Est.
BLD 898, R 533, TASHAN 405
Manama
Tel.: 017400553*
mailto:service@khalaifat.com
*Sat-Thu 7am to 5pm (exclude public holidays)
BY Belarus,Беларсь
OOO“BCXБbITOBaTExHnKa"
ren.: 495 737 2961
mailto:mok-kdhl@bshg.com
CA Canada
BSH Home Appliances Ltd.
Tel.: 800 944 2904
mailto:bosch-canada-questions@bshg.com
www.bosch-home.ca
CH Schweiz, Suisse, Swizzera, Switzer
BSH Hausgeräte AG
Building 3, No.18 Qingjiang South Road, Gulou District.
Nanjing, Jiangsu Province
Service Tel.: 400 8855 888*
mailto:careline.china@bshg.com
www.bosch-home.cn
*phone rate depends on the network used
CY Cyprus, Kuppos
BSH Ikiakes Syskeves-Service
39, Arh. Makaariou III Str.
2407 Egomi/Nikosia (Lefkosia)
Tel.: 777 78 007
mailto:EGO-CYCustomerService@bshg.com
CYN Turkish Rep. Of North Cyprus
Argas Limited Company
To arrange an engineer visit, to order spare parts and accessories or for product advice please visit www.bosch-home.co.uk
Or call
*Calls are charged at the basic rate, please check with your telephone service provider for exact charges.
GE Georgia,
Elit Service Ltd.
Vake-Saburtalo district,
Intersection of Al. Kazbegi ave.
and Kavtaradze Str. 0186
Kavtaradze str. 1
Tbilisi
Tel.: 32 300 020
mailto:info@es.ge
GR Greece, Eλλας
BSH Ikiakes Siskeves A.B.E.
Central Branch Service
17 km E.O. Athinon-Lamias & Potamou 20
14564 Kifisia
Tnλεφωνo: 210 4277 500; -701
mailto: nkf-CustomerService@bshg.com
www.bosch-home.gr
HK Hong Kong, 香港
BSH Home Appliances Limited
Unit 07, 23/F, CDW Building,
388 Castle Peak Road,
Tsuen Wan, New Territories,
Hong Kong
Tel.: 2626 9655 (HK)
Toll free 0800 863 (Macao)
mailto:bosch.hk.service@bshg.com
www.bosch-home.com/hr
HU Magyarorszag, Hungary
www.bosch-home.com/hu
IE Republic of Ireland
BSH Home Appliances Ltd.
M50 Business Park.
Ballymount Road Upper,
Walkinstown
Dublin 12
To arrange an engineer visit, to order spare
parts and accessories or for product advice
please call
Tel.: 01450 2655*
www.bosch-home.ie
*Calls are charged at the basic rate, please check with
your telephone service provider for exact charges
IL Israel
C/S/B/ Home Appliance Ltd.
1, Hamasger St.,
North Industrial Park
Lod, 7129801
Tel.: 089777222
mailto:csb-serv@csb-ltd.co.il
www.bosch-home.co.il
IN India, Bharat,
BSH Household Appliances Mfg. Pvt. Ltd.
Arena House, Main Bldg, 2nd Floor
Plot No. 103, Road No. 12
MIDC, Andheri East
Mumbai 400 093
Toll Free 1800 266 1880*
www.bosch-home.in
*Mon-Sat: 8am to 8pm (exclude public holidays)
IS Iceland
Smith & Norland hf.
Noatuni 4
105 Reykjavik
Tel.: 05203000
www.sminor.is
IT Italia, Italy
www.bosch-home.com/it
JO Jordan,
Diab Qawasmi & Sons Co.
Khaled Ben Al-Waleed Street,
Jabal AI Hussein (11121),
P.O.Box 212292
Amman
Tel.: 064658505, -2650
Tel.: 791103430
mailto:boschjo@yahoo.com
KG Kyrgyzstan, KbIprI3 Pecny6nKacbl
OcOO Alfa Systems
Jibek Jolu str. 40
Bishkek
Tel.: 0702 98 53 53
mailto:alfas-service@mail.ru
KR Republic Korea,
Daehan Minguk, 大韓民国
Empel Co. Ltd.
1201 ACE High Tech City 1 Building
775 Gyeongin-ro Youngdeungpo-gu
Seoul 07299 South Korea
Tel.: 1899-4636
mailto:hsshim@empel.co.kr
KZ Kazakhstan, Ka3akctah
BSH Home Appliances LLP
Dostyk 117/6,
Business Center "Khan Tengri"
Almaty
Hotline: 5454*
mailto:ALA-Service@bshg.com
*Toll free from mobile only
LB Lebanon, jLiJ
TehIni, Hana & Co.
Boulevard Dora 4043 Beyrouth,
P.O.Box 90449
Jdeideh 1202 2040
Tel.: 01 255 211
mailto:Info@tehini-hana.com
LT Lietuva, Lithuania
UAB "AG Service"
R. Kalantos g. 32
52494 Kaunas
Tel.: +370 (8) 700 556 55
mailto:servisas@agservice.it
www.agservice.lt
Baltic Continent Ltd.
Lukšioq.23
09132 Vilnius
Tel.: +370 (8) 700 555 95
mailto:info@balticcontinent.It
www.balticcontinent.it
UAB Emtoservis
Savanoriu pr. 1 (Centrine būstine)
03116 Vilnius
Tel.: +370 (8) 700 447 24
mailto:svc@emtoservis.it
www.emtoservis.lt
LU Luxembourg
S.R.L. "Rialto-Studio"
Lintel Investments and Management
Services Pvt. Ltd.
Ma. Maadheli, Majeedhee Magu
Male
Tel.: 030 10 200
mailto:mohamed.zuhuree@lintel.com.mv
www.lintel.com.mv
NL Nederlande, Netherlands
Level 3, Air NZ Building
Smales Farm Business Park
74 Taharoto Road,
Takapuna
Auckland 0622
Tel.: +64 0800 245 700*
mailto: aftersales.nz@bshg.com
www.bosch-home.co.nz
*Mon-Fri: 8.30am to 5pm (exclude public holidays)
PK Pakistan,
MEGA Home Appliances
Plaza 46-A, Commercial Sector XX
Phase 3, DHA
Lahore
*Mon-Sat: 9am to 6pm (exclude public holidays)
PL Polska, Poland
SA Kingdom Saudi Arabia,
Abdul Latif Jameel Electronics and
Airconditioning Co. Ltd.
BOSCH Service centre, Kilo 5 Old Makkah
Road (Next to Toyota), Jamiah Dist.,
P.O.Box 7997
Jeddah 21472
Tel.: 800 127 9999*
mailto:ALJECC8@ALJ.COM
www.aljazeera.com.sa
*Sat-Thu: 8am to 11pm (exclude public holidays)
SE Sverige, Sweden
BSH Home Appliances AB
Landsvagen 32
169 29 Soln
Tel.: 0771 197 000
mailto:Bosch-Service-SE@bshg.com
www.bosch-home.se
SG Singapore, 新加坡
BSH Home Appliances Pte. Ltd.
38C Jalan Pemimpin, #01-01
Singapore 577180
Tel.: 6751 5000*
mailto:bshsgp.service@bshg.com
www.bosch-home.com.sg
*Mon-Fri: 9am to 6pm, Sat: 9am to 1pm
(exclude public holidays)
SI Slovenija, Slovenia
BSH Hišni aparati d.o.o.
Litostrojska 48
1000 Ljubljana
Tel.: 015830700
mailto:informacije.servis-slo@bshg.com
www.bosch-home.com/si
SK Slovensko, Slovakia
Ital Thai Tower, 2034/31-39, 1st floor
New Petchburi Road,
Bangkapi, Huay Kwang
Bangkok, 10310
Tel.: 024952424*
www.bosch-home.com/th
*Mon-Sat: 8am to 6pm (exclude public holidays)
TJ Tadschikistan, Yumxypn TooyukoctoN
P.E. Suhrob Muhitdinov
Shamsi street no: 67/A
Dushanbe
Tel.: 091 867 80 43
mailto:sino2003@list.ru
Vostok Co. Ltd.
Yakkacinarskaya street No: 144/4
Dushanbe
Tel.: 446007872
mailto:Lola.Mirzoeva@vostok.tj
www.volna.tj
TM Turkmenistan, Turkmenistan
Bayram Anna Yuryewna
Stariya marka, Atabeyeva str.
Spectrum magaza
Ashgabat
Tel.: 012 26 94 16
mailto:steptm@mail.ru
TR Türkiye, Turkey
www.bosch-home.com/tr
BSH Home Appliances Private Limited
台北市內湖區洲子街80號11樓
11F., No.80, Zhouzi St., Neihu Dist.
Taipei City 11493
Tel.: 0800 368 888
mailto:bshtzn-service@bshg.com
TOB "BCX Iobytoba Texhika"
Ten.: 0800300152*
mailto:BSH-serviceua@bshg.com
Service-General SH.P.K.
rr.Magjistralja Ferizaj Prishtine
70000 Ferizaj
Tel.: 00381 (0) 290 330 723
mailto:servicegeneral527@gmail.com
XS Srbija, Serbia
BSH Kućni aparati d.o.o.
Omladinskih brigada 90E
11070 Novi Beograd
Tel.: 011 353 70 08
mailto:informacije.servis-sr@bshg.com
www.bosch-home.rs
ZA South Africa
BSH Home Appliances (Pty) Ltd.
96 Fifteenth Road, Randjespark
1685 Midrand-Johannesburg
Tel.: 086 002 6724
mailto:bsh@iopen.co.za
mailto:applianceserviceza@bshg.com
www.bosch-home.com/za


de
This appliance is labelled in accordance with European Directive 2012/19/EU concerning used electrical and electronic appliances (waste electrical and electronic equipment - WEEE). The guideline determines the framework for the return and recycling of used appliances as applicable throughout the EU.
fr
2012/19/EU 2012/19/EU (waste electrical and electronic-WEEE)
(2012/19/EU. Cauo oooaee aee aee aee aee aee aee aee aee aee aee aee aee aee aee aee aee aee aee aee aee aee aee aee aee aee aee aee aee aee aee aee aee aee aee
ar
2012/19/
Uulu2o Uuuu uuuu uuuu uuuu uuuu uuuu
(waste electrical and electronic equipment -
WEEE).
s
GB Conditions of guarantee
For this appliance the guarantee conditions as set out by our representatives in the country of sale apply. Details regarding same may be obtained from the dealer from whom the appliance was purchased. For claims under guarantee the sales receipt must be produced.
FR Conditions de garantie
IANEAAIAKO THAEQNO EYHPETHSEI AN
01/17
Degerli Mudgetimiz
Register your new device on MyBosch now and profit directly from:
- Expert tips & tricks for your appliance
- Warranty extension options
- Discounts for accessories & spare-parts
- Digital manual and all appliance data at hand
- Easy access to Bosch Home Appliances Service
Free and easy registration – also on mobile phones:
www.bosch-home.com/welcome

Looking for help? You'll find it here.
Expert advice for your Bosch home appliances, need help with problems or a repair from Bosch experts.
Find out everything about the many ways Bosch can support you:
www.bosch-home.com/service
Contact data of all countries are listed in the attached service directory.
BSH Hausgeräte GmbH
Carl-Wery-Straße 34
81739 München, GERMANY
A Bosch Company
www.bosch-home.com

8001205247
010820
博西家用電器股份有限公司
台北市內湖區洲子街80號11樓
客服專線:0800-368-888
Valid within Great Britain:
Imported to Great Britain by
BSH Home Appliances Ltd.
Grand Union House
Old Wolverton Road
Wolverton, Milton Keynes
MK12 5PT
United Kingdom
