
EPOUR 1024-12 - Coffee maker MELITTA - Free user manual and instructions
Find the device manual for free EPOUR 1024-12 MELITTA in PDF.
| Product type | Drip coffee maker |
| Brand | Melitta |
| Model | EPOUR 1024-12 |
| Maximum capacity | 8 cups (approx. 1.2 L) |
| Dimensions (H x W x D) | Approx. 35 cm x 25 cm x 20 cm |
| Weight | Approx. 2.5 kg |
| Power supply | 220-240 V, 50/60 Hz |
| Rated power | 1100 W |
| Filter type | Paper filter size 1x4 (Melitta® recommended) |
| Brewing programs | Adjustable pre-brew (blooming), manual extraction control, custom profile (Barista Mode) |
| Keep warm function | Yes, automatic shut-off after 40 minutes |
| Automatic shut-off | Yes (40 min after brewing, 5 min if idle) |
| Anti-drip system | Yes |
| Carafe | Glass with lid, dishwasher safe |
| Filter holder | Removable, dishwasher safe |
| Water tank | Removable, level indicator |
| Descaling indicator | Yes (red CALC light) |
| Beeps | Can be deactivated |
| Maintenance | Regular descaling; clean removable parts in dishwasher |
| Safety | Hot heating plate, automatic shut-off, anti-drip system, do not immerse |
| Manufacturer's warranty | 3 years (excluding wear parts and glass) |
| Country of manufacture | Not specified but German brand |
Frequently Asked Questions - EPOUR 1024-12 MELITTA
User questions about EPOUR 1024-12 MELITTA
0 question about this device. Answer the ones you know or ask your own.
Ask a new question about this device
Download the instructions for your Coffee maker in PDF format for free! Find your manual EPOUR 1024-12 - MELITTA and take your electronic device back in hand. On this page are published all the documents necessary for the use of your device. EPOUR 1024-12 by MELITTA.
USER MANUAL EPOUR 1024-12 MELITTA
natural_image
Modern black and white industrial coffee maker with glass filter and conical flask (no visible text or symbols)GB Operating Instructions
FR Mode d'emploi
A Warmhalteplatte | Keep-warm plate | Plaque chauffante | Warmhoudplaat | Piastra riscaldante | Placa de calentamiento | Varmeplade | Varmhällningsplatta | Varmeplate | Lämpölevy | Płyta utrzymująca temperaturę | Панель для подогрева
B Glaskanne | Glass jug | Verseuse en verre | Glazen kan | Caraffa di vetro | Jarra de cristal | Glaskande | Glaskanna | Glasskanne | Lasikannu | Dzbanek szklany | Стеклянный кофейник
C Filterhalter | Filter holder | Porte-filtre | Filterhouder | Portafiltro | Portafiltros | Filterholder | Filterhållare | Filterholder | Suodatinpidike | Uchwyt filtra | Держатель фильтра
D Entnehmbarer Wassertank | Removable water tank | Réservoir d'eau amovible | Afneembare watertank | Serbatoio dell'acqua estraibie | Depósito de agua extraíble | Aftagelig vandtank | Uttagbar vattentank | Uttakbar vanntank | Irrotettava vesiáiliö | Wyjmowany pojemnik na wode | Съемный контейнер для воды
Rotierender 360°-Wasserauslauf | Rotating 360°-spout | Douchette de diffusion rotative à 360° | Roterende 360°-wateruitloop | Erogatore dell'acqua girevole a 360° | Boquilla de agua giratoria en 360° | Roterende 360°-udløbsrør | Roterande 360°-vattenutlopp | Roterende 360°-vannutlop | Pyörivä 360°-vesisuutin | Obrotowy dozownik wody | Выпускное отверстие для воды с вращением на 360°
Bedienpanel | Control panel | Panneau de commande | Bedieningspaneel | Pannello di comando | Panel de control | Betjeningspanel | Manöverpanel | Kontrollpanel | Ohjauspaneeli | Panel obsługi | Панель управления
G CALC-Anzeige | CALC display | Affichage CALC | CALC-display | Spia CALC | Indicador de CAL | CALC-visning | CALC-indikering | CALC-display | CALC-näyttö | Wskaźnik odkamieniania CALC | Индикатор CALC
PRE-BREW-Taste | PRE-BREW button | Bouton PRE-BREW | PRE-BREW-bedieningstoets | Pulsante PRE-BREW | Botón PRE-BREW | PRE-BREW-knapp | PRE-BREW-knapp | PRE-BREW-knapp | PRE-BREW-näppäin | Przycisk PRE-BREW (Parzenie wstępne) | Khonka PRE-BREW
BREW-Taste | BREW button | Bouton BREW | BREW-bedieningstoets | Pulsante BREW | Botón BREW | BREW-knap | BREW-knapp | BREW-knapp | BREW-näppäin | Przycisk BREW (zaparzanie) | Кнопка BREW
J CONTROL-Taste | CONTROL button | Bouton CONTROL | CONTROL-bedieningstoets | Pulsante CONTROL | Botón CONTROL | CONTROL-knap | CONTROL-knapp | CONTROL-knapp | CONTROL-näppäin | Przycisk CONTROL | Khonka CONTROL
natural_image
Illustration of hands pouring liquid from a kettle into a stand mixer (no text or symbols visible)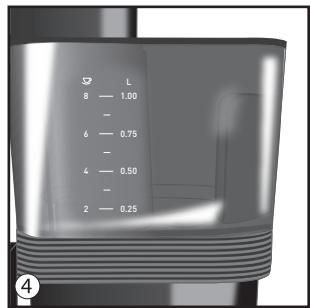
natural_image
Close-up of a hand using a pour-over machine to lift a funnel (no text or symbols visible)
natural_image
Illustration of a hand pouring granular material into a funnel (no text or symbols)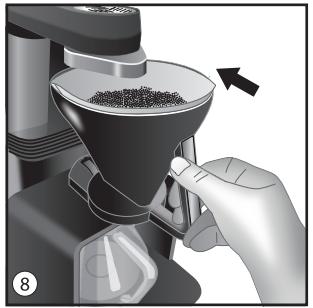
natural_image
Close-up of a hand using a coffee maker to press granular material, with no visible text or symbols.
natural_image
Mechanical component diagram showing a rotating knob with arrows indicating rotation direction (no text or symbols)
Thank you for purchasing the Melitta® epour® filter coffee machine. The operating instructions will help you discover the wide range of options offered by the appliance, prepare the best possible coffee and thus enjoy your coffee to the full.
If you require further information or have any questions, contact Melitta® or visit our website at: www.melitta-epour.co.uk. We hope you enjoy using your new filter coffee machine.
For your safety
CE The appliance complies with the valid European directives.
UK CA The appliance complies with all valid United Kingdom guidelines.
The appliance was inspected by independent test institutes and certified.
Please read the safety instructions and the operating instructions through completely. You must observe the safety and operating instructions to avoid dangers. Melitta ^® accepts no liability for damage caused by failure to observe the instructions.
1. Safety instructions
This appliance is intended for use in households and for similar applications, for example:
- Staff kitchen areas in shops, offices and other working environments
• In agricultural companies
• In motels, hotels, and other residential type environments, and in bed and breakfast establishments
Any other use is regarded as improper and may lead to personal injury and material damage. Melitta® accepts no liability for damage that arises due to improper use of the appliance.
Please follow these instructions to avoid injuries due to improper use:
- The appliance may not be operated in a cabinet.
- Only connect the appliance to a correctly installed earthed mains socket.
• Always disconnect the appliance from the mains supply when not in use and before assembling, disassembling or cleaning. - During operation, parts of the appliance, for example, the steam outlet on the filter become very hot. Avoid touching the parts and also contact with the hot steam.
- Do not remove the filter holder from its mounting during the brewing process.
- The keep-warm plate will become very hot during use and will also remain hot for a certain time after the brewing process is completed. Contact with the hot keep-warm plate can lead to burns, therefore avoid touching it.
- Make sure that the power cable does not touch the hot keep-warm plate.
- Do not use the appliance if the power cable is damaged.
- Do not let the power cable come into contact with liquids.
- Never immerse the appliance in water.
- Do not use the jug in a microwave.
-
Do not clean parts that come into contact with food with corrosive cleaning agents or scouring milk. Remove the remains of the cleaning agents with clear water. For further cleaning instructions, please refer to “6. Cleaning and care”.
-
This appliance may be used by children from 8 years of age if they are supervised or have been instructed in using the appliance safely and understand the resulting risks. Children must not perform cleaning and maintenance unless they are older than 8 years of age and supervised. Keep the appliance and power cable out of the reach of children under 8 years of age.
- This appliance may be used by persons with reduced physical, sensory or mental capabilities or a lack of experience and/or knowledge if they are supervised or have been instructed in using the appliance safely and understand the resulting risks.
- Children must not play with the appliance.
- Replacement of the mains lead and all other repairs may only be carried out by Melitta® Customer Service or an authorised workshop.
2. Before preparing coffee for the first time
- Make sure that the supply voltage in your household complies with the voltage specified on the type plate on the bottom of the appliance.
• Install the appliance on a dry, flat and stable surface. - Only connect the appliance to a correctly installed earthed mains socket.
- All appliances are tested for proper working order during production. This may leave behind traces of water, for example.
-
Rinse the appliance twice with clean water before preparing coffee for the first time. Do not use any filters while doing so and proceed as follows:
-
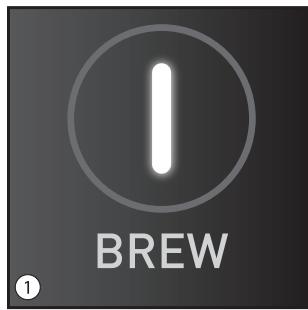
Activate the appliance. Press and hold the BREW button ① for more than 1 second. The BREW button starts to flash rapidly.
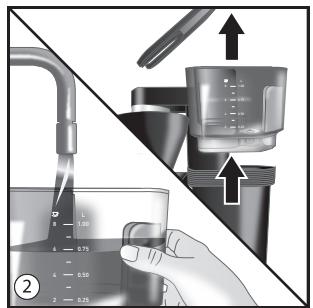
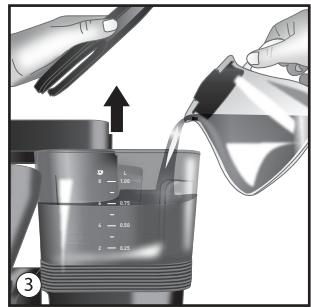
- Fill the water tank up to the 8-cup mark. The removable tank can be filled straight from the water tap ②. Alternatively, you can also fill water directly into the
tank in the appliance by using the glass jug ③. You can read the quantity of water required on the scale on the tank ④.
- Check whether the filter holder is placed correctly in the intended position underneath the outlet and has been pushed into the mount on the appliance correctly ⑤. Then start the appliance by pressing the BREW button briefly (<1 sec.). The BREW button will now flash slowly. After a brief warm-up period, water will flow out of the outlet into the filter holder.
- A signal tone will indicate that the water has flowed through completely. Empty the jug and switch off the keep-warm plate by pressing the BREW button longer (>1 sec.).
- Repeat the described steps one more time. After a brief cooling period, you can then use the appliance to prepare coffee for the first time.
3. Coffee preparation
3.1 Preparation
- Fill the water tank with the required water quantity. The removable tank can be filled straight from the water tap ②. Alternatively, you can also fill water directly into the tank in the appliance by using the glass jug ③. You can read the required quantity of water required on the scale on the tank ④.
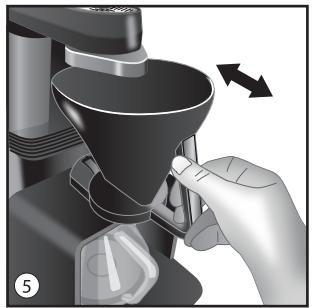
- Pull the filter holder vertically from its mounting on the appliance ⑤ and insert a filter paper ⑥. For good flavour and optimum fitting in the filter holder, we recommend using Melitta® Filter Papers® 1x4®.
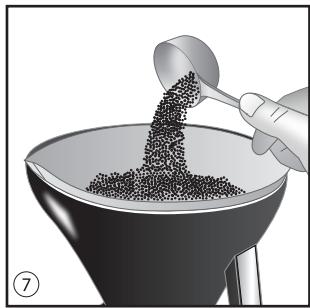
- Put ground coffee into the filter paper ⑦ according to your taste and the number of cups required. Then smooth the surface of the coffee powder as much as possible. If possible, weigh 7 to 8 g freshly ground coffee per cup.
Light to medium roasts with a medium grinding fineness are particularly suited to filter coffee preparation. epour ^® has been checked according to the ECBC standards (www.ecbc.info) and fulfils the demanding conditions of the “Coffee Brewer Certification Programme” in terms of coffee quality.
- Push the filter holder back into the appliance mounting ⑧. Make sure that it engages audibly.
3.2 Brewing
- Activate the appliance. Press and hold the BREW button ① for more than 1 second. The BREW button starts to flash rapidly.
- We recommend pre-brewing the coffee (“blooming”) for the best results. Briefly pressing (<1 sec.) the PRE-BREW button ⑨ before the start of brewing activates this setting for the subsequent coffee preparation. The PRE-BREW button lights up continuously and the water flow is stopped briefly at the start of brewing after initial damping of the coffee. Press again to deactivate pre-brewing. The last setting is stored for the next preparation.
- Start the coffee preparation by pressing the BREW button ① briefly (<1 sec.). The BREW button now starts to flash slowly.
- Note: If you hear a brief signal sound three times during this process, there is no water in the water tank. If you are unable to start brewing and hear three short signal sounds despite the water tank being full, lift the water tank slightly and fit it back
into the appliance. This removes any air bubbles which may possibly have formed during filling.
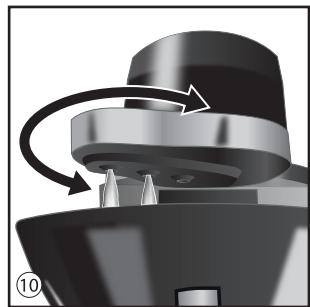
- During brewing, the water is heated and flows via the rotating outlet onto the coffee powder ⑩. Different brewing profiles are stored in the appliance for the different preparation quantities of 2 to 8 cups. Depending on the quantity of water filled, the rotation directions and times are adapted so that the coffee powder is always dampened in an optimum way.
Note: It is also possible to manually control the direction and time of the rotation during brewing (see “3.3 Manual extraction control”).
- You will hear a brief signal sound at the end of preparation. The BREW button will now light up continuously to indicate the warm-keeping phase.
- The keep-warm plate will keep the coffee hot and then switch off automatically after 40 minutes to avoid unnecessary power consumption. You can, of course, switch off the appliance manually at any time by pressing the BREW button longer (>1 sec.).
- The drip stop on the filter holder prevents coffee continuing to drip when you remove the jug from the appliance.
- The removable filter holder allows you to dispose of the filter paper easily and trouble-free.
3.3 Manual extraction control
- Manual extraction control is possible after the outlet starts to rotate
- A long press (>1 sec.) of the CONTROL button ⑪ switches on manual extraction control. The button lights up.
- Pressing the CONTROL button briefly (<1 sec.) allows you to then change the rotation direction of the outlet manually. You can change the direction of rotation as many times as you want.
- The manual extraction control is ended again by pressing the CONTROL button longer (>1 sec.). The extraction control is automatic again.
3.4 Using a custom brewing profile (“Barista Mode”)
The brewing profiles stored for the preparation quantities or number of cups are suitable for preparing numerous different types of coffee. Furthermore, the manual extraction control described in “3.3” allows the rotation direction and time to be also changed.
This change does not affect the stored brewing profiles.
You can, however, create one custom brewing profile for a specific number of cups, store it and call it up again later
- First fill the appliance with the required quantity of water and coffee.
- Activate the appliance with a long press (>1 sec.) on the BREW button. The BREW button starts to flash rapidly.
- Pressing the BREW and CONTROL buttons simultaneously for longer starts brewing to store a custom brewing profile (“Barista Mode”). The BREW and CONTROL buttons will start flashing rapidly at the same time and the outlet will start to rotate.
Important: If a custom brewing profile has previously been stored, it will be deleted by this process. - You can now control the damping of the coffee
powder yourself by pressing the CONTROL button briefly (<1 sec.) to change the direction of rotation.
- If necessary, you can also program a blooming pause. Briefly pressing (<1 sec.) the PRE-BREW button interrupts the brewing process and pressing the PRE-BREW button again restarts it. You can now continue controlling the brewing process again with the CONTROL button.
- If the water tank is empty, the heater will switch off and the BREW button will light up continuously. At the same time, the CONTROL button will start to flash for 20 seconds. Pressing the CONTROL button for longer (>1 sec.) within the 20 seconds stores the custom brewing profile.
- If you want to call up the stored custom brewing profile at a later time, first activate the appliance as usual by pressing the BREW button longer (>1 sec.). The BREW button starts to flash rapidly. Pressing the CONTROL button for longer (>1 sec.) calls up the custom brewing profile. The CONTROL button will now also start to flash rapidly.
- Brewing is started with a short press (<1 sec.) of the BREW button. The BREW and the CONTROL button both start to flash slowly.
- Final note: You can cancel the creation of an individual brewing profile in “Barista Mode” by simultaneously pressing the BREW and CONTROL buttons for longer.
4. Warm-keeping/automatic switch-off
The taste of coffee changes when it is kept warm for longer periods. To prevent this, you should enjoy your coffee as fresh as possible immediately after brewing. Furthermore, unnecessarily keeping the coffee warm costs valuable energy.
If you still want to keep the coffee warm, the appliance will automatically switch off 40 minutes after the brewing process ends.
The BREW button is lit up continuously during warm-keeping. You can also switch off the keep-warm plate manually by pressing the BREW button longer (>1 sec.).
If the appliance is not used, it will switch off automatically after 5 minutes.
You can then activate the appliance again by pressing the BREW button (>1 sec.).
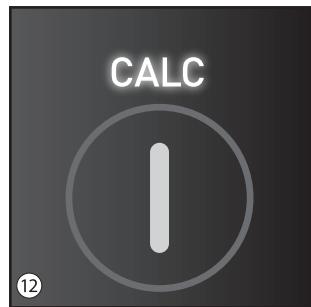
5. Descaling
Limescale in the appliance increases with each brewing process depending on the hardness of the water that is used. This is indicated by the CALC display ⑫ lighting up red. The appliance should be descaled at regular intervals or, at the latest, when the CALC display lights up. Please use a commercially available descaling agent to do this.
We recommend using Melitta® "Anti Calc Liquid for Filter Coffee & Aqua Machines".
5.1 Descaling process
- Prepare the descaling fluid as specified by the manufacturer and pour it into the water tank.
- Place the jug on the keep-warm plate and place the filter holder in the intended position underneath the outlet.
-
Activate the appliance by pressing the BREW button longer (>1 sec.) as for coffee preparation.
-
A subsequent, brief press (<1 sec.) of the BREW button starts the descaling process.
- Once about half of the liquid has run through the appliance, stop the process by pressing the BREW button again briefly (<1 sec.).
- Wait for 10 minutes to ensure that the remaining descaling fluid removes as much limescale from the appliance as possible.
- Next reactivate the appliance by pressing the BREW button longer (>1 sec.) and then briefly (<1 sec.). Allow the remaining fluid to run through the appliance.
- If you hear a signal sound, switch the appliance off by pressing the BREW button longer (>1 sec.).
- Empty the jug.
5.2 Rinsing process after descaling
- The appliance must be rinsed after descaling to remove any remaining descaling agent.
- First rinse out the water tank under running water. Then fill the water tank up to the 8-cup mark and put it back into the appliance.
- Activate the appliance, start it, as in a normal brewing process, and allow all of the water to flow through the appliance.
- If you hear a signal sound, switch the appliance off by pressing the BREW button longer (>1 sec.).
- If the appliance was completely descaled during the descaling process, the CALC lamp will no longer be illuminated during the rinsing process. If this is still the case, the limescale in the appliance was so far advanced that one descaling process was not sufficient to completely descale the heater. In this case, repeat the descaling and rinsing process one more time.
• Empty the glass jug. - Then rinse out the glass jug with water.
6. Cleaning and care
- Switch off the appliance before cleaning and disconnect the mains plug.
- Allow the appliance to cool down completely before cleaning it.
- Clean the parts that come into contact with coffee (jug, filter holder etc.) after each use.
- You can clean the housing with a soft, moist cloth.
- The glass jug with lid, the filter holder and the water tank lid are dishwasher-safe.
- When cold, the keep-warm plate can be cleaned with a soft, moist cloth.
- Do not use aggressive or abrasive cleaning agents.
7. Switching off the signal sounds
All signal sounds can be deactivated if necessary. The appliance needs to have been switched off to do this. Pressing the BREW and CONTROL buttons at the same time longer (>1 sec.) deactivates the signal sounds. Proceed in the same way to switch them on again. You will hear a brief signal sound upon activation and upon deactivation
8. Disposal information
- Appliances marked with this symbol are subject to the European Directive for WEEE (Waste Electrical and Electronic Equipment).
- Electrical appliances do not belong in domestic waste.
- Dispose of the appliance in an environmentally friendly way via suitable collection systems.
- The packaging materials are raw materials and recyclable. Please return them to the raw materials cycle.
Chère cliente, cher client,
In addition to the legal guarantee claims, to which the end user is entitled relative to the seller, for this device, if it was purchased from a dealer authorized by Melitta ^® due to his consulting competence, we grant a manufacturer's guarantee under the following conditions:
-
The guarantee period begins with the day the product was sold to the end user. The guarantee is 36 months. The purchase date of the device must be verified by a purchase receipt.
The device was designed and built for household use only. It is not dedicated for a commercial use. Guarantee performances lead neither to an extension of the guarantee period nor to a new beginning of the guarantee period for the device or installed spare parts. -
Within the guarantee period we will correct all device defects that are based on material or manufacturing errors, through repair or replacement of the device at our discretion. Replace parts become the property of Melitta ^® .
-
Defects that occurred due to improper connection, improper handling, or repair attempts by nonauthorized persons are not covered by the guarantee. The same applies for failure to comply with the use, care, and maintenance instructions as well for the use of consumables (e.g. cleaning and decalcifying agents or waterfilters) that do not correspond to the original specifications. Wear parts (e.g. seals and valves) and fragile parts like glass are excluded from the guarantee.
-
Guarantee performances are processed via the Service Hotlines for the respective country (see information below).
-
These guarantee conditions apply for devices purchased and used in UK If devices are purchased in foreign countries or brought into foreign countries, then guarantee performances will only be provided as specified in the guarantee conditions applicable for this country.
Melitta Europa GmbH & Co. KG
Ringstraße 99
32427 Minden

Melitta UK Ltd.
Hortonwood 45
Telford, Shropshire, TF1 7FA
United Kingdom
Tel: +44(0)800 0288002
www.melitta.co.uk

Consumer Service
Deutschland
Melitta Consumer Service
Melittastr. 44
32427 Minden
Tel.: 0571/861900
Mail:
Melitta Poland Sp. z o.o.
Diamond Business Park Ursus
ul. Posag 7 Panien 1
02-495 Warszawa
www.melitta.pl

No. 5, Xinglong Road.
Tongfuyu Industry Zone,
Tang Xia Yong Area,
Songgang Town, Baoan District,
518105 Shenzhen, Guangdong, China
Продавец-импортер:

- For your safety
- Safety instructions
- Before preparing coffee for the first time
- Coffee preparation
- Preparation
- Brewing
- Manual extraction control
- Using a custom brewing profile (“Barista Mode”)
- Warm-keeping/automatic switch-off
- Descaling
- Descaling process
- Rinsing process after descaling
- Cleaning and care
- Switching off the signal sounds
- Disposal information
- Chère cliente, cher client,
- Consumer Service
- Deutschland
Brand : MELITTA
Model : EPOUR 1024-12
Category : Coffee maker