
AVANZA - Coffee machine MELITTA - Free user manual and instructions
Find the device manual for free AVANZA MELITTA in PDF.
| Product type | Automatic espresso machine with grinder |
| Brand | Melitta |
| Model | Avanza |
| Dimensions (W x D x H) | 200 x 460 x 353 mm |
| Weight (empty) | 8.1 kg |
| Power supply | 220 – 240 V, 50 – 60 Hz |
| Power consumption | 1450 W |
| Pump pressure | 15 bar max. |
| Water tank capacity | 1.5 L |
| Bean hopper capacity | 250 g |
| Main functions | Espresso, lungo, 2 cups, milk froth, hot water |
| Coffee strength adjustment | 3 levels (mild, normal, strong) |
| Coffee quantity adjustment | 25 – 220 ml |
| Grind fineness adjustment | Yes, via lever during grinding |
| Cleaning program | Integrated cleaning and descaling |
| Water filter cartridge | Compatible with Melitta Pro Aqua (optional) |
| Safety | Automatic shut-off, burn protection, electrical safety |
| Maintenance and cleaning | Cleaning of the cappuccinatore, brewing chamber, drip tray |
| Ambient temperature | 10 °C – 32 °C |
| Adjustable water hardness | 4 levels (soft to very hard) |
| Rinse on shutdown | Enabled/disabled, recommended enabled |
Frequently Asked Questions - AVANZA MELITTA
User questions about AVANZA MELITTA
0 question about this device. Answer the ones you know or ask your own.
Ask a new question about this device
Download the instructions for your Coffee machine in PDF format for free! Find your manual AVANZA - MELITTA and take your electronic device back in hand. On this page are published all the documents necessary for the use of your device. AVANZA by MELITTA.
USER MANUAL AVANZA MELITTA
1 Overview of the appliance 33
1.1 Appliance at a glance 33
1.2 Overview of the control panel 34
1.3 The Cappuccinatore at a glance 35
2 For your safety. 35
2.1 Proper use 35
2.2 Danger from electric current 35
2.3 Risk of burns and scalds 36
2.4 Other dangers 36
3 First steps. 37
3.1 Unpacking the appliance 37
3.2 Checking the delivery contents 37
3.3 Installing the appliance.. 37
3.4 Connecting the appliance 37
3.5 Connecting the Cappuccinatore 37
3.6 Switching on the appliance for the first time 37
4 Basic operation 38
4.1 Switching the appliance on and off 38
4.2 Filling coffee beans into the bean container 39
4.3 Filling with water 40
4.4 Adjusting the outlet for coffee beverages 40
4.5 Using milk 40
4.6 Emptying the drip tray and coffee grounds container 41
5 Preparing beverages 41
5.1 Setting the coffee strength 41
5.2 Setting the coffee quantity 42
5.3 Preparing the coffee beverage 42
5.4 Stopping coffee preparation 42
5.5 Preparing two coffee beverages simultaneously 42
5.6 Preparing milk foam 43
5.7 Preparing hot water 44
6 Changing basic settings 44
6.1 Service mode 1. 44
6.2 Setting Auto OFF 44
6.3 Setting the water hardness.. 45
6.4 Activating/deactivating switch-off rinsing 45
6.5 Setting the brewing temperature 46
6.6 Service mode 2. 46
6.7 Resetting the appliance to the factory settings 47
6.8 Setting the grinding fineness 47
7 Care and maintenance 47
7.1 General cleaning 48
7.2 Cleaning the Cappuccinatore 48
7.3 Cleaning the brewing unit 48
7.4 Running the cleaning programme 49
7.5 Running the descending programme 50
7.6 Using a water filter 52
8 Transport, storage and disposal 54
8.1 Venting the appliance 54
8.2 Transporting the appliance 55
8.3 Disposing of the appliance 55
9 Technical data. 55
10Trouble shooting 56
1 Overview of the appliance
1.1 Appliance at a glance
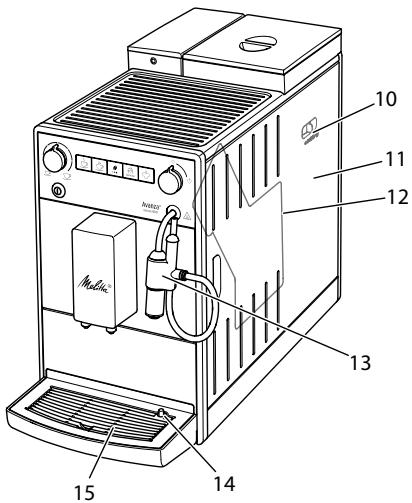
Fig. 1: Front left of the appliance
Fig.2: Front right of the appliance
1 Water tank
2 Water tank lid
3 Lid of the bean container
4 Bean container
5 Cup rest
6 Control panel
7 Outlet with 2 coffee nozzles for coffee beverages
8 Coffee grounds container (inner)
9 Drip tray
10 "Grinding fineness adjustment" lever (inner)
11 Cover
12 Brewing unit (inner)
13 Cappuccinatore
14 Float
15 Cup plate
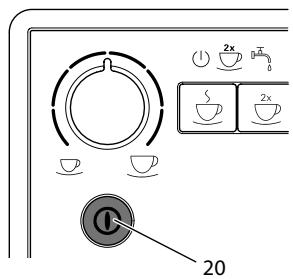
1.2 Overview of the control panel
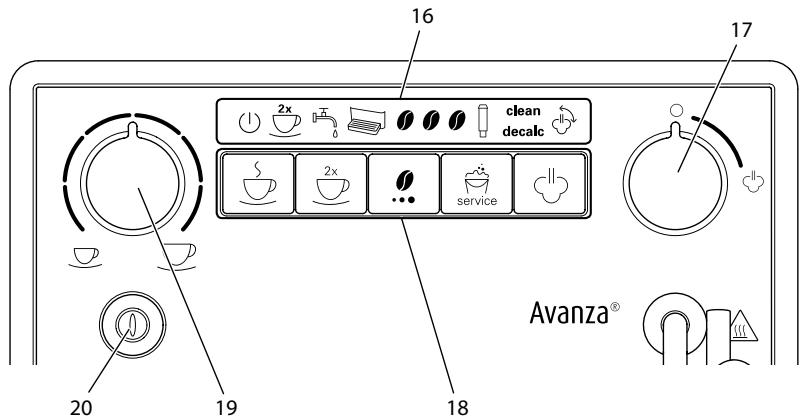
Fig.3: Control panel
16 Indications
17 "Valve"
18 Buttons
19 "Coffee quantity" rotary regulator
20 ON/OFF button
| Display | Designation |
| 1 | Ready display |
| 2x | 2 cups display |
| 5 | Water display |
| Drip tray display | |
| 0 | Coffee beans display |
| Filter display | |
| clean | Clean display |
| decalc | Dscaling display |
| Steam display |
| Control | Designation |
| S | "Coffee" direct key |
| 2x | "2 cups" button |
| "Coffees strength" button | |
| "Service" button | |
| "Steam dispenser" button |
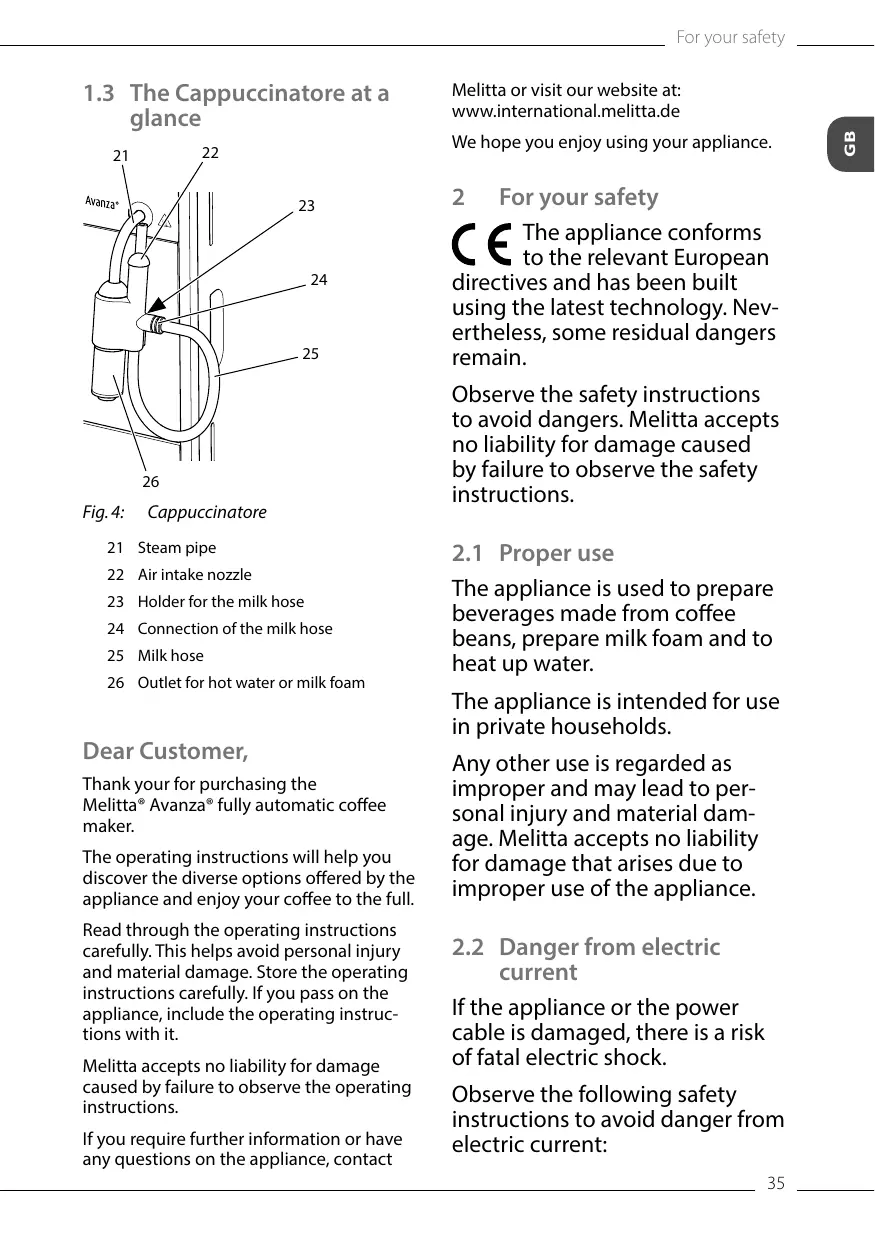
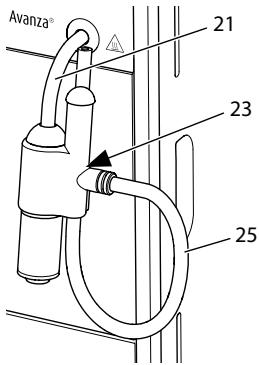
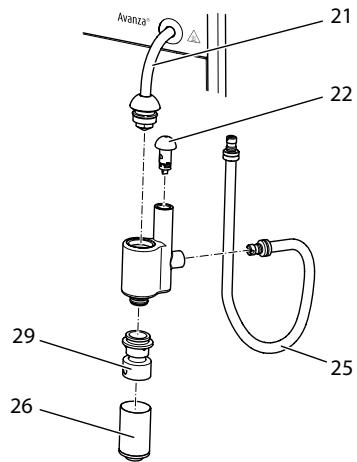
1.3 The Cappuccinatore at a glance
21 Steam pipe
22 Air intake nozzle
23 Holder for the milk hose
24 Connection of the milk hose
25 Milk hose
26 Outlet for hot water or milk foam
Dear Customer,
Thank your for purchasing the Melitta® Avanza® fully automatic coffee maker.
The operating instructions will help you discover the diverse options offered by the appliance and enjoy your coffee to the full.
Read through the operating instructions carefully. This helps avoid personal injury and material damage. Store the operating instructions carefully. If you pass on the appliance, include the operating instructions with it.
Melitta accepts no liability for damage caused by failure to observe the operating instructions.
If you require further information or have any questions on the appliance, contact
Melitta or visit our website at: www.international.melitta.de
We hope you enjoy using your appliance.
2 For your safety
The appliance conforms to the relevant European directives and has been built using the latest technology. Nevertheless, some residual dangers remain.
Observe the safety instructions to avoid dangers. Melitta accepts no liability for damage caused by failure to observe the safety instructions.
2.1 Proper use
The appliance is used to prepare beverages made from coffee beans, prepare milk foam and to heat up water.
The appliance is intended for use in private households.
Any other use is regarded as improper and may lead to personal injury and material damage. Melitta accepts no liability for damage that arises due to improper use of the appliance.
2.2 Danger from electric current
If the appliance or the power cable is damaged, there is a risk of fatal electric shock.
Observe the following safety instructions to avoid danger from electric current:
- Do not use a damaged power cable.
- A damaged power cable may only be replaced by the manufacturer or its customer service or service partner.
- Do not open any covers firmly screwed onto the appliance housing.
- Only use the appliance when it is in a technically flawless condition.
- A defective appliance may only be repaired by an authorised workshop. Do not repair the appliance yourself.
- Do not make any changes to the appliance, its components or its accessories.
- Do not immerse the appliance in water.
- Do not let the power cable come into contact with water.
2.3 Risk of burns and scalds
Escaping fluids and steam may be very hot. Parts of the appliance can also become very hot.
Observe the following safety instructions to avoid scalds and burns:
- Avoid escaping fluids and steam coming into contact with the skin.
- Do not touch the nozzles on the outlet and the steam pipe during and immediately after dispensing a beverage. Wait until the components have cooled down.
2.4 Other dangers
Observe the following safety instructions to avoid personal injury and material damage:
- Do not operate the appliance in a cabinet or similar.
- Do not reach into the interior of the appliance during operation.
- Keep the appliance and its power cable out of the reach of children under 8 years of age.
- This appliance may be used by children over 8 years of age and by persons with reduced physical, sensory or mental capabilities or a lack of experience and knowledge if they are supervised or have been instructed in using the appliance safely and understand the resulting risks.
- Children must not play with the appliance. Cleaning and maintenance must not be undertaken by children younger than 8 years of age. Children over 8 years of age must be supervised during cleaning and maintenance.
- Disconnect the appliance from the power supply when left unsupervised for a long time.
- The appliance must not be operated at altitudes over 2000m .
- Please observe the instructions in the corresponding section when cleaning the appliance and its components (Care and maintenance on page 47).
3 First steps
This chapter describes how to prepare your appliance for use.
3.1 Unpacking the appliance
- Unpack the appliance. Remove the packaging material, the adhesive strips and the protective films from the appliance.
- Keep the packaging material for transport and any return shipments.
Information
The appliance may contain traces of coffee and water. The appliance has been tested in the factory to ensure that it functions perfectly.
3.2 Checking the delivery contents
Check the completeness of delivery using the following list. If parts are missing, contact your retailer.
Cappuccinatore
Milk hose
Screw-in aid for the water filter
- Test strip for determining the water hardness.
3.3 Installing the appliance
Observe the following instructions:
- Do not install the appliance in damp rooms.
Install the appliance on a stable, flat and dry surface. - Do not install the appliance in the vicinity of sinks or the like.
- Do not install the appliance on hot surfaces.
Install the appliance at a sufficient distance (approx. 10cm ) from the wall and other objects. The space above the appliance should be at least 20cm . - Route the power cable so it cannot be damaged by edges or hot surfaces.
3.4 Connecting the appliance
Observe the following instructions:
- Check that the supply voltage matches the operating voltage specified in the technical data (see table Technical data on page 55).
- Only connect the appliance to a properly installed earthing contact socket. If in doubt, consult a specialist electrician.
- The earthing contact socket must have a fuse of at least 10A .
3.5 Connecting the Cappuccinatore
You can prepare hot water and milk foam with the Cappuccinatore.
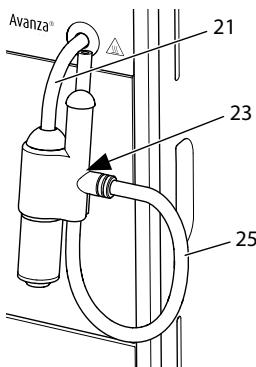
Fig.5: Connecting the Cappuccinatore
- Connect the Cappuccinatore to the steam pipe (21). Slide the connection of the Cappuccinatore to the stop of the steam pipe.
- Connect the milk hose (25) to the Cappuccinatore.
- If you do not want to use milk, clamp the milk hose in the holder (23).
3.6 Switching on the appliance for the first time
Once you switch on the appliance for the first time, the appliance performs automatic rinsing. Hot water first flows out of the Cappuccinatore, then out of the outlet. The appliance is vented.
CAUTION
Hot water and hot steam flowing out of the pipe
- Do not reach into the outflowing hot water.
- Do not touch the steam pipe during and immediately after use. Wait until the steam pipe has cooled down.
Information
- We recommend pouring away the first two cups of coffee after initial start-up.
If you want to use a water filter, only insert this after starting up for the first time.
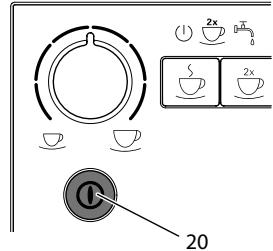
Fig.6: ON/OFF button
Requirement: The appliance has been installed and connected.
- Place a vessel beneath the Cappucci-natore.
- Press the ON/OFF button (20).
The Ready display lights up briefly.
The Water display lights up and requests you to fill the water tank.
- Open the lid of the water tank and pull the water tank upwards out of the appliance by the handle.
- Rinse out the water tank with clean water. Fill the water tank with fresh water.
- Insert the water tank into the appliance from above and close the lid.
The Steam display lights up and requests you to open the "valve".

Open the "valve".
Hot water first flows out of the Cappuccinatore.

Once no more water flows he Cappuccinatore, close the
» Hot water flows out of the outlet.
The appliance is vented.
- Fill coffee beans into the bean container (see section 4.2 Filling coffee beans into the bean container on page 39).
- As required, you can now either a) set the water hardness (see section 6.3 Setting the water hardness on page 45) or
b) screw in a water filter (see section 7.6 Using a water filter on page 52).
4 Basic operation
4.1 Switching the appliance on and off
Before switching on after starting up the appliance for the first time, read section 3.6 Switching on the appliance for the first time on page 37.
Information
- When switched on and off, the appliance performs automatic rinsing.
During rinsing, rinsing water is also conducted into the drip tray.
Switching on the appliance
- Place a vessel beneath the outlet.
- Press the "ON/OFF" button (20).
The appliance heats up and performs automatic rinsing.
The appliance is ready for operation.
Information
If the appliance was only switched off briefly, there is no automatic rinsing after switching on.
Switching off the appliance
- Place a vessel beneath the outlet.
- Press the "ON/OFF" button (20).
The appliance performs automatic rinsing.
The appliance switches off.
Information
- The appliance switches off automatically when it is not operated for a long time. Automatic rinsing is also carried out in this case.
- You can set the off time in Service mode 1 (see section 6.2 Setting Auto OFF on page 44).
If no beverage has been prepared since switching on or if the water tank is empty, no rinsing takes place.
4.2 Filling coffee beans into the bean container
Roasted coffee beans lose their aroma. Only fill the bean container with as many coffee beans as you will consume over the next 3 to 4 days.
ATTENTION
The use of unsuitable types of coffee can lead to clogging of the grinder.
- Do not use freeze-dried or caramelised coffee beans.
- Do not use any coffee powder or instant products.
Information
When changing the type of beans, remains of the old type of beans can still be in the grinder.
Even if the bean container runs empty and a new type of bean is filled in, there
are still remains of the old type of bean in the grinder. For this reason, the first two coffees dispensed can contain remains of the old type of bean.
The flashing Coffee bean display requests you to refill coffee beans.
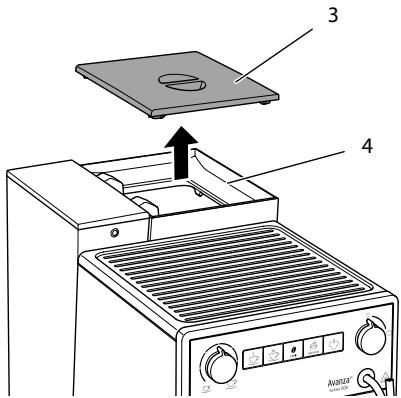
Fig. 7: Opening the lid of the bean container
- Open the lid (3) of the bean container (4).
- Fill coffee beans into the bean container.
- Close the lid of the bean container. The next time a coffee is dispensed, the display no longer flashes.
If the bean container runs empty during beverage preparation, output is interrupted and the Coffee bean display flashes. When you fill the bean container with coffee beans, the display will initially continue to flash. After pressing the "Coffee" direct key, coffee beans fall into the grinder.
Coffee is prepared and the display stops flashing. The Ready display and the Coffee beans display light up.
4.3 Filling with water
Only use fresh, cold water without carbon dioxide for optimum coffee enjoyment. Change the water daily.
Information
The quality of the water largely determines the flavour of the coffee. Therefore, use a water filter (see section 6.3 Setting the water hardness on page 45 and section 7.6 Using a water filter on page 52).
The Water display lights up and requests you to refill water.
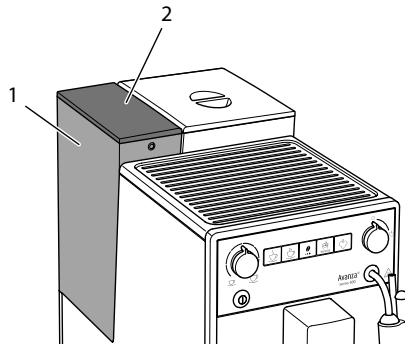
Fig.8: Removing the water tank
- Open the lid (2) of the water tank (1) and pull the water tank upwards out of the appliance by the handle.
- Fill the water tank with water.
- Insert the water tank into the appliance from above and close the lid.
4.4 Adjusting the outlet for coffee beverages
The outlet (7) is height-adjustable. Set the greatest possible distance between the outlet and the vessel. Depending on the vessel, push the outlet up or down.

Fig. 9: Adjusting the outlet for coffee beverages
4.5 Using milk
Use cooled milk for optimum coffee enjoyment.
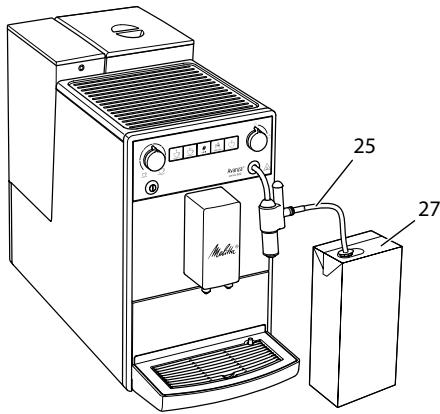
Fig. 10: Commercial milk pack
- Remove the milk hose (25) from the holder.
- Insert the milk hose into a conventional milk pack (27) or into a vessel filled with milk.
To ensure that sufficient milk can be drawn in, the end of the hose must not touch the bottom of the vessel.
4.6 Emptying the drip tray and coffee grounds container
When the drip tray (9) and the coffee grounds container (8) are full, the Drip tray display lights up and requests you to empty the container. The display appears after preparing approx. 8 beverages.
The projecting float (14) also indicates that the drip tray is full.
Always empty both containers. When the drip tray is pulled out, the Drip tray display flashes.
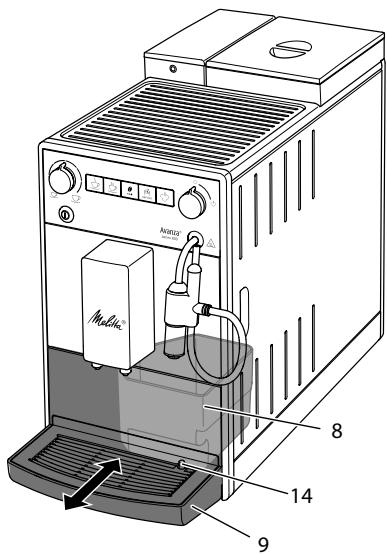
Fig. 11: Emptying the drip tray and coffee grounds container
- Pull the drip tray (9) forwards out of the appliance.
- Remove the coffee grounds container (8) and empty it.
- Empty the drip tray.
- Insert the coffee grounds container.
- Push the drip tray into the appliance up to the stop.
Information
If you empty the drip tray and the coffee grounds container while the appliance is switched off, the appliance does not register this process. Therefore, it is possible that you are requested to empty the containers although the drip tray and the coffee grounds container are not yet full.
5 Preparing beverages
There are two options for preparing beverages:
Preparing coffee beverages at the outlet for coffee beverages or
Preparation of hot water and milk foam at the Cappuccinatore.
Please note:
- There should always be sufficient water in the water tank. If the filling level is too low, the appliance requests you to refill it.
- There should always also be sufficient coffee beans in the bean container. If there are no longer any coffee beans present, the appliance stops the preparation of a coffee beverage.
The appliance does not indicate a lack of milk. - The vessels for the beverages should be sufficiently large.
The maximum coffee quantity is 220 ml.
5.1 Setting the coffee strength
As soon as the appliance is ready for operation, it displays the current setting of the coffee strength.
The following settings for the coffee strength are possible:
| Display | Coffee strength |
| 0 | Mild |
| 1 0 | Normal |
| 1 0 0 | Strong |
You can adjust the coffee strength by pressing the "Coffee strength" button one or more times.
You can adjust the coffee strength before the beverage is dispensed or during the grinding process.
Information
When switching off the appliance, the last set coffee strength is stored.
5.2 Setting the coffee quantity
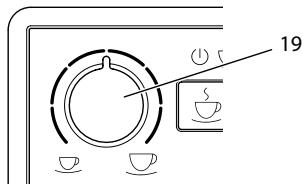
Fig. 12: Setting the coffee quantity
You can set the coffee quantity with the "Coffee quantity" (19) rotary regulator.
You can adjust the coffee quantity before the beverage is dispensed or during the grinding process.
Coffee quantities are continuously adjustable between 25ml and 220ml .
5.3 Preparing the coffee beverage
Requirement: The appliance is ready for operation.
- Place a vessel beneath the outlet.

Press the "Coffee" direct key.
The grinding process and beverage dispensing start.
Beverage dispensing ends automatically.
- Remove the vessel.
5.4 Stopping coffee preparation
If you want to stop the preparation of a coffee beverage prematurely, press the direct key again.
5.5 Preparing two coffee beverages simultaneously
You can prepare two coffee drinks simultaneously with the "2 cups" button. For two-cup dispensing, the appliance carries out two grinding processes.

Fig. 13: Two-cup dispensing
- Place two vessels beneath the outlet.
- Press the"2 cups" button (28).

The 2 cups display lights up.

Press the "Coffee" direct key.
The grinding process and beverage dispensing start.
Beverage dispensing ends automatically.
- Remove both vessels.
Information
- The setting only applies to the single beverage that is prepared.
If a coffee beverage is not prepared within 1 minute, the appliance switches to single-cup dispensing.
5.6 Preparing milk foam
You prepare milk foam on the Cappuccinatore. Steam is required for the preparation of milk foam.
CAUTION
Outflowing steam and hot steam pipe
- Do not reach into the steam that is flowing out.
- Do not touch the steam pipe during and immediately after use. Wait until the steam pipe has cooled down.
Requirement: The appliance is ready for operation. The Cappuccinatore is connected to the appliance and milk is connected.
- Place a vessel beneath the Cappuccinatore.
- Press the "Steam dispenser" button.
The flashing Steam display indicates that the appliance is heating up for the steam dispenser.
» Afterwards, the lit Steam display indicates that the steam dispenser is ready.
Open the "valve".
Beverage dispensing starts.

Close the "valve".
» Beverage dispensing stops.
- Remove the vessel.
- Prepare further beverages or rinse the Cappuccinatore:
a) Prepare further beverages and rinse the Cappuccinatore later.
b) Rinse the Cappuccinatore as described below.
Information
After 30 seconds the appliance automatically switches from steam mode to ready mode. Press the "Steam dispenser", button to switch to ready mode beforehand.
Rinsing the Cappuccinatore
- Fill a vessel with clear water.
- Immerse the milk hose in the filled vessel.
To ensure that sufficient water can be drawn in, the end of the hose must not touch the bottom of the vessel.
- Place an empty vessel beneath the Cappuccinatore.
- Press the "Steam dispenser" button.
The flashing Steam display indicates that the appliance is heating up for the steam dispenser.
» Afterwards, the lit Steam display indicates that the steam dispenser is ready.
- Open the "valve".
- As soon as a clean water/steam mixture flows into the empty vessel, close the "valve".
The Cappuccinatore is rinsed.
Information
We recommend:
- Not only rinsing the Cappuccinatore, but dismantling and cleaning it at regular intervals (see section 7.2 Cleaning the Cappuccinatore on page 48).
Rinsing the Cappuccinatore each week with the Melitta® PERFECT CLEAN milk system cleaning agent for fully automatic coffee makers. Use the milk system cleaning solution instead of fresh water.
5.7 Preparing hot water
You prepare hot water on the Cappuccinatore.
CAUTION
Hot water and hot steam flowing out of the pipe
- Do not reach into the hot water that is flowing out.
- Do not touch the steam pipe during and immediately after use. Wait until the steam pipe has cooled down.
Requirement: The appliance is ready for operation. The Cappuccinatore is connected.


- Place a vessel beneath the Cappucci-natore.
Open the "valve".Beverage dispensing starts.
Close the "valve".
Beverage dispensing stops. - Remove the vessel.
6 Changing basic settings
You can change the basic settings of the appliance with several functions. The functions are divided into two service modes.
6.1 Service mode 1
Each function is assigned a display.
| Service mode 1 | |
| Display | function |
| 2x | Auto OFF |
| Water hardness | |
| Switch-off rinsing | |
| Filter programme | |
| clean | Cleaning programme |
| Service mode 1 | |
| Display | function |
| decalc | Dscaling programme |
| ←→ | Brewing temperature |
To call up Service mode 1, proceed as follows:
Requirement: The appliance is ready for operation.
- Press the "Service" button for more than 2 seconds to call up Service mode 1. 山 ^ 2 x The Ready display flashes rapidly and the 2 cups button lights up.
- Press the "Service" button one or more times to access the desired function.
» A display lights up according to the function selected, see Service mode 1 table.
The number of lit bean symbols indicates the current setting of the function.
Press the "Coffee" direct key to exit the service mode without saving the settings.
Information
If no further input is made within 1 minute, the appliance returns to Ready mode.
6.2 Setting Auto OFF
If you do not operate the machine for a long time, it initially switches to energy save mode. After a further preset time, the appliance switches off.
The following settings are possible:
| Display | Energy save mode after: | Switch off after: |
| 0 | 3 minutes | 30 minutes |
| 10 | 10 minutes | 1 hour |
| 20 | 20 minutes | 4 hours |
| 0001 flash | 30 minutes | 8 hours |
Information
Press any button to exit Energy Save mode.
Requirement: The appliance is ready for operation.
- Press the "Service" button for more than 2 seconds to call up Service mode 1.
- Press the "Service" button repeatedly until the display for the Auto Off function appears.
- Press the "Coffee strength" button repeatedly until the desired time is set.
- You can call up the next function or exit Service mode:
a) Briefly press the "Service" button to navigate to the next function.
b) Press the "Service" button for more than 2 seconds to save the setting and exit the service mode.
6.3 Setting the water hardness
Setting the water hardness regulates how frequently you are requested to descale the appliance. The harder the water, the more frequently the appliance has to be descaled.
Information
Water hardness cannot be set while using a water filter (see section 7.6 Using a water filter on page 52). If a water filter is used, the water hardness is set to soft.
Determine the water hardness with the enclosed test strip. Observe the instructions on the test strip packaging and in the table Water hardness range on page 56.
The following settings are possible:
| Display | Water hardness |
| 0 | soft, descale after 150 litres |
| 0 0 | medium, descale after 100 litres |
| 0 0 0 | hard, descale after 70 litres |
| 0 0 0 flash | very hard, descale after 30 litres |
| no coffee beans | A water filter is used. No adjust-ment is possible. |
Requirement: The appliance is ready for operation.
- Press the "Service" button for more than 2 seconds to call up Service mode 1.
- Press the "Service" button repeatedly until the display for the Water hardness function appears.
- Press the "Coffee strength" button repeatedly until the desired water hardness is set.
- 3 You can call up the next function or exit Service mode:
a) Briefly press the "Service" button to navigate to the next function.
b) Press the "Service" button for more than 2 seconds to save the setting and exit the service mode.
6.4 Activating/deactivating switch-off rinsing
Rinsing is always carried out immediately after switching on the coffee system. Only switch-off rinsing can be activated or deactivated. If it is activated, the coffee system is rinsed after being switched off.
Information
We recommend that you do not permanently deactivate switch-off rinsing, because switch-off rinsing cleans the coffee system.
The following settings are possible:
| Display | Switch-off rinsing |
| 0 | activated |
| no coffee beans | deactivated |
Requirement: The appliance is ready for operation.
- Press the "Service" button for more than 2 seconds to call up Service mode 1.
- Press the "Service" button repeatedly until the display for the Switch-off rinsing function appears.
- Press the "Coffee strength" button repeatedly until switch-off rinsing is activated or deactivated.
- 2 You can call up the next function or exit Service mode:
a) Briefly press the "Service" button to navigate to the next function.
b) Press the "Service" button for more than 2 seconds to save the setting and exit the service mode.
6.5 Setting the brewing temperature
The brewing temperature influences the flavour of the coffee beverage.
The following settings are possible:
| Display | Brewing temperature |
| 1 | Low |
| 1 1 | Medium |
| 1 1 1 | High |
Requirement: The appliance is ready for operation.
-
Press the "Service" button for more than 2 seconds to call up Service mode 1.
-
Press the "Service" button repeatedly until the display for the Brewing temperature function appears.
- Press the "Coffee strength" button repeatedly until the desired brewing temperature is set.
- You can call up the next function or exit Service mode:
a) Briefly press the "Service" button to navigate to the next function.
b) Press the "Service" button for more than 2 seconds to save the setting and exit the service mode.
6.6 Service mode 2
Each function is assigned a display.
| Service mode 2 | |
| Display | function |
| 2x | Factory settings |
| Venting | |
To call up Service mode 2, proceed as follows:
Requirement: The appliance is ready for operation.
- Press the "Service" button as well as the "Coffee" direct key for more than 2 seconds to enter Service mode 2.
The Ready display and the 2 cups display flash rapidly. - Press the "Service" button one or more times to access the desired function.
» A display lights up according to the function selected, see Service mode 2 table.
The number of lit bean symbols indicates the current setting of the function.
Press the "Coffee" direct key to exit the service mode without saving the settings.
Information
If no further input is made within 1 minute, the appliance returns to Ready mode.
6.7 Resetting the appliance to the factory settings
The appliance can be reset to the factory settings. When resetting, your settings in the functions will be lost.
Requirement: The appliance is ready for operation.
- Press the "Service" button as well as the "Coffee" direct key for more than 2 seconds to enter Service mode 2.
- Press the "Service" button repeatedly until the display for the Factory settings function appears.
- Press the "Coffee strength" button repeatedly until the display of one coffee bean appears.
- Press the "Service" button for more than 2 seconds to reset the appliance to the factory settings and exit the service mode.
6.8 Setting the grinding fineness
The grinding fineness of the coffee powder influences the flavour of the coffee.
If the grinding fineness is set finer, the coffee flavour is stronger.
ATTENTION
Very finely ground coffee powder can clog the brewing unit.
- The grinding fineness has been optimally set prior to delivery. Adjust grinding fineness at the earliest after about 100 coffees are dispensed (after
approx. 1 month, depending on coffee consumption).
- Do not set the grinding fineness too fine. The grinding fineness is optimally set when the coffee flows evenly out of the outlet and a fine, dense crema appears.
Adjust the grinding fineness while the grinder is running.
Requirement: The appliance is ready for operation.
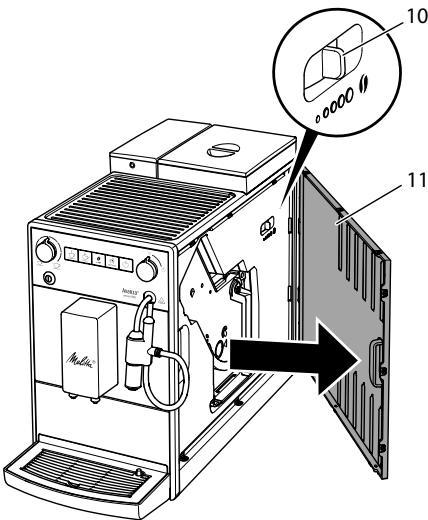
Fig. 14: Setting the grinding fineness
- Open the cover (11). To do this, reach into the recess on the right of the appliance and pull the cover off sideways.
- Prepare any coffee beverage.
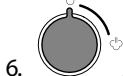
- Move the lever (10) to the left or right while the grinder is running. To the left = grinding fineness finer To the right = grinding fineness coarser
- Insert the cover (11) sideways until it engages.
7 Care and maintenance
Regular care and maintenance of the appliance ensure the consistent high quality of your beverages.
7.1 General cleaning
Clean the appliance regularly. Immediately remove external soiling caused by milk and coffee.
ATTENTION
The use of unsuitable cleaning agents may lead to scratched surfaces.
- Do not use any abrasive cloths, sponges or cleaning agents.
Requirement: The appliance is switched off.
Clean the outside of the appliance with a soft, damp cloth and normal washing-up liquid.
- Rinse off the drip tray, the coffee container and the cup plate. Use a soft, damp cloth and normal washing up liquid for this. The coffee container is dishwasher-safe.
Clean the bean container with a soft, dry cloth.
7.2 Cleaning the Cappuccinatore
To avoid damage to the appliance, we recommend regularly cleaning the Cappuccinatore and the milk hose.
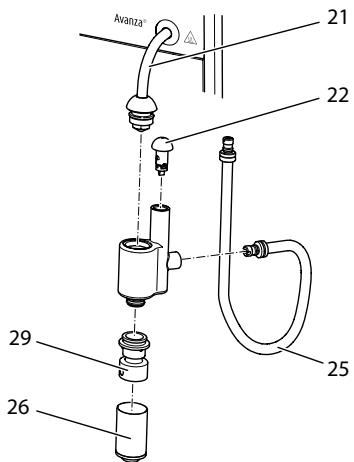
Fig. 15: Dismantling the Cappuccinatore
- Detach the Cappuccinatore from the steam pipe (21).
- Detach the following individual parts from the Cappuccinatore:
Milk hose (25)
Air intake nozzle (22),
- Outlet for milk foam (26)
Insert outlet (29).
- Clean the Cappuccinatore and the individual parts with warm water.
- Re-assemble the Cappuccinatore.
- Connect the Cappuccinatore to the appliance (see section 3.5 Connecting the Cappuccinatore on page 37).
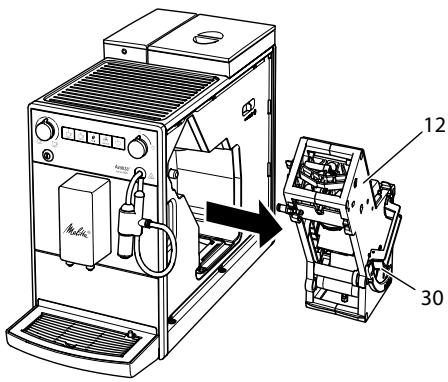
7.3 Cleaning the brewing unit
To avoid damage to the appliance, we recommend cleaning the brewing unit once a week.
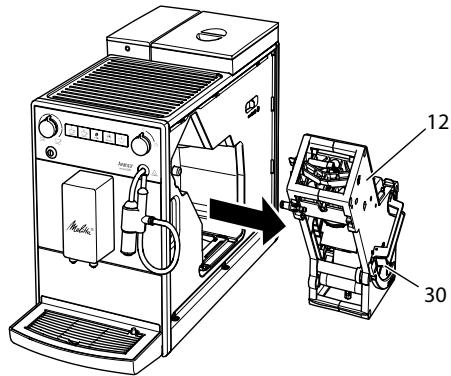
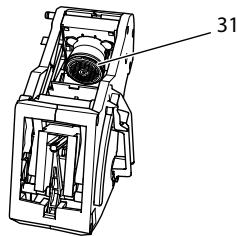
Fig. 16: Removing the brewing unit
Fig. 17: Cleaning the brewing unit
Requirement: The appliance is switched off.
- Open the cover (11). To do this, reach into the recess on the right of the appliance and pull the cover off sideways.
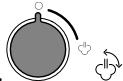
- Press and hold the red lever (30) on the brewing unit handle (12) and turn the handle clockwise until it engages at the stop.
- Pull the brewing unit out of the appliance by the handle.
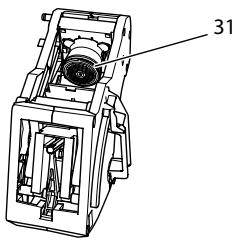
- Rinse the entire brewing unit thoroughly from all sides under running water. In particular, make sure that coffee residues are removed from the sieve (31).
- Allow the brewing unit to drip dry.
- Use a soft, dry cloth to remove coffee residues from the surfaces inside the appliance.
- Insert the brewing unit into the appliance. Press and hold the red lever on the handle of the brewing unit and turn the handle anticlockwise until it engages at the stop.
- To do this, insert the cover sideways until it engages.
When the appliance is switched on, an alternating flashing of the Ready display and the Clean display indicates a missing brewing unit. After the brewing unit has been inserted, the appliance switches to Ready mode.
7.4 Running the cleaning programme
This cleaning programme is used to remove residues and coffee oil residues with the aid of fully automatic coffee maker cleaning agents.
To avoid damage to the appliance, we recommend running the cleaning programme every 2 months or as requested by the appliance.
clean The Clean display light requests you to clean the unit.
CAUTION
Contact with fully automatic coffee maker cleaning agent may lead to eye and skin irritation.
- Observe the processing instructions on the packaging of the fully automatic coffee maker cleaning agent.
ATTENTION
The use of unsuitable fully automatic coffee maker cleaning agent can damage the appliance.
Only use Melitta® PERFECT CLEAN cleaning tablets for fully automatic coffee machines.
The cleaning programme takes approx. 15 minutes and should not be interrupted.
The cleaning programme runs in several stages. Progress is indicated by the number of coffee beans displayed.
The appliance performs several rinsing operations during the cleaning programme. The drip tray is also rinsed.
Requirement: The appliance is ready for operation.
- Press the "Service" button for more than 2 seconds to call up Service mode 1.
- clean Press the "Service" button repeatedly until the display for the cleaning programme appears.
- Press the "Service" button for more than 2 seconds to start the cleaning programme.
clean The Clean display flashes until the cleaning programme is finished.
The first stage of the cleaning programme starts. One coffee bean lights up.
The Drip tray display lights up and requests you to empty the drip tray and the coffee grounds container.
- Empty the drip tray and the coffee grounds container.
- Insert the drip tray without the coffee grounds container.
- Place the coffee grounds container beneath the outlet.
The appliance rinses twice.
» clean The Clean display flashes rapidly and requests you to remove the brewing unit and insert a cleaning tablet.
- Remove the brewing unit. Do not switch off the appliance.
- Rinse the brewing unit under running water (see section 7.3 Cleaning the brewing unit on page 48).
- Place a cleaning tablet in the brewing unit. Insert the brewing unit into the appliance.
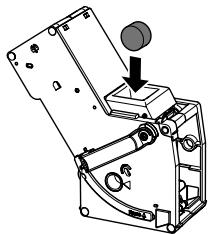
Fig. 18: Placing a cleaning tablet in the brewing unit.
The second stage of the cleaning programme starts. Two coffee beans light up.
The appliance performs several rinsing operations.
The Drip tray display lights up and requests you to empty the drip tray and the coffee grounds container.
The third stage of the cleaning programme starts. Three coffee beans light up.
- Empty the drip tray and the coffee grounds container.
11.Insert the drip tray without the coffee grounds container.
The fourth stage of the cleaning programme starts. The three coffee beans flash.
- Place the coffee grounds container beneath the outlet.
The appliance performs several rinsing operations.
The Drip tray display lights up and requests you to empty the drip tray and the coffee grounds container.
- Empty the drip tray and the coffee grounds container.
- Insert the drip tray and the coffee grounds container.
The cleaning programme is finished.
The Clean display goes out.
The appliance is ready for operation.
Information
If the cleaning programme has been interrupted, e.g. because you unintentionally switched off the appliance, you must switch the appliance on again and follow the instructions from step 10. The appliance is then ready for operation, even if it has not been completely cleaned. For complete cleaning, you must run the cleaning programme from the beginning.
7.5 Running the descending programme
The descending programme is used to remove limescale deposits in the interior of the appliance with fully automatic coffee maker descending agents.
To avoid damage to the appliance, we recommend running the descending programme every 3 months or as requested by the appliance, unless you regularly use a water filter.
decalc The Descaling display light requests you to descale the appliance.
CAUTION
Contact with descending agent may lead to eye and skin irritation.
- Observe the processing instructions on the packaging of the descaling agent.
CAUTION
Hot water and hot steam flowing out of the pipe
- Do not touch the steam pipe during and immediately after use.
Wait until the steam pipe has cooled down.
ATTENTION
Use of unsuitable descending agents and failure to observe the processing instructions may damage the appliance.
Only use Melitta® ANTI CALC liquid descaling agent for fully automatic coffee machines.
- Observe the processing instructions on the packaging of the descaling agent.
ATTENTION
A water filter may be damaged if it is screwed in during the descending programme.
- Remove the water filter (see Fig. 19 on page 53).
- Place the water filter into a vessel filled with tap water during the descaling programme.
- The water filter can be reinserted and reused when the descending programme is complete.
The descending program lasts approx. 25 minutes and should not be interrupted.
The descending programme runs in several stages. Progress is indicated by the number of coffee beans displayed.
The appliance performs several rinsing operations during the descending programme. The drip tray is also rinsed.
Requirement: The appliance is ready for operation.
- Press the "Service" button for more than 2 seconds to call up Service mode 1.
- decalc Press the "Service" button repeatedly unit the display for the descending programme appears.
- Press the "Service" button for more than 2 seconds to start the descending programme.
decalc The Descaling display flashes until the descending programme is finished.
The first stage of the descending programme starts. One coffee bean lights up.
The Drip tray display lights up and requests you to empty the drip tray and the coffee grounds container.
- Empty the drip tray and the coffee grounds container.
- Insert the drip tray without the coffee grounds container.
- Place the coffee grounds container beneath the Cappuccinatore.
The Water display lights up and requests you to fill the water tank with descending fluid.
- Remove the water tank.
- Fill 0.5 litres of descending fluid into the water tank. Observe the corresponding instructions for use of the fully automatic coffee maker descending agent.
- Insert the water tank again.
The second stage of the descending programme starts. Two coffee beans light up.
The descaler needs approx. 20 minutes to take effect, Several rinsing operations are carried out during this time.
The Steam display then lights up and requests you to open the "valve".

- Open the "valve".
The Steam display flashes. The appliance performs several rinsing operations.
The Drip tray display lights up and requests you to empty the drip tray and the coffee grounds container.
- Empty the drip tray and the coffee grounds container.
- Insert the drip tray without the coffee grounds container.
- Place the coffee grounds container beneath the Cappuccinatore.
The Water display lights up and requests you to fill the water tank.
- Remove the water tank.
- Thoroughly rinse out the water tank and fill it with fresh water.
16.Insert the water tank.
The third stage of the descending programme starts. Three coffee beans light up.
Hot water flows into the coffee grounds container.
The Steam display flashes.
Once the Steam display lose the "valve".
» The Drip tray display lights up and requests you to empty the drip tray and the coffee grounds container.
Empty the drip tray and the coffee grounds container.
Insert the drip tray and the coffee grounds container.
The descending programme is finished.
The Descaling display goes out.
The appliance is ready for operation.
Information
If the descending programme has been interrupted, e.g. by unintentionally switching the appliance off, you must switch the appliance on again and follow the instructions from step 11. The appliance is then ready for operation, even if it has not been completely descaled. For complete descending, you must run the descending programme from the beginning.
7.6 Using a water filter
The use of a water filter extends the service life of the appliance and the appliance has to be descaled less frequently. The water filter filters calcium and other pollutants out of the water.
Only use Melitta® Pro Aqua filter cartridges for fully automatic coffee machines. Observe the processing instructions on the packaging of the water filter.
Information
When using and regularly replacing the Melitta® Pro Aqua filter cartridge, the appliance only needs to be descaled once a year.
This information is based on an average of 6 coffee beverages with 120ml per day and 6 filter changes per year.
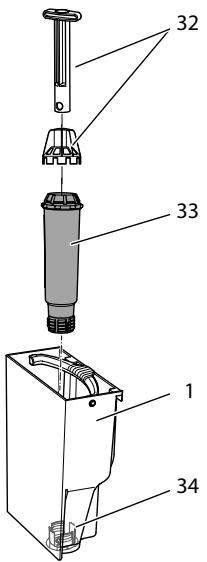
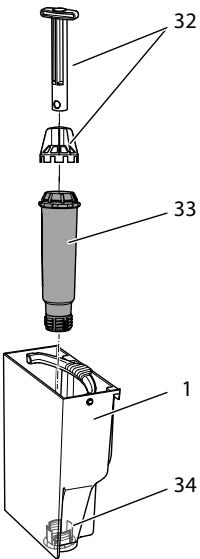
Fig. 19: Screwing/Unscrewing the water filter
The water filter (33) is screwed in and unscrewed from the thread (32) on the base of the water tank (1) using the screwing aid (32).
Information
The water filter should not be left standing dry for a long period of time. When it is not used for a long time, we recommend storing the water filter in a vessel filled with tap water in the refrigerator.
Inserting the water filter
Requirement: The appliance is ready for operation.
- Press the "Service" button for more than 2 seconds to call up Service mode 1.
-
Press the "Service" button repeatedly unit the display for the filter programme appears.
-
Press the "Coffee strength" button until one bean lights up.
- Follow the instructions from step 3 in section Changing the water filter.
Changing the water filter
In order to maintain a constant effect of the water filter, we recommend changing the water filter every 2 months – or when the device requests you to do so.
The Filter display light requests you to change the water filter.
Information
- The water hardness cannot be set if you use a water filter. The water hardness is automatically set to soft (see section 6.3 Setting the water hardness on page 45).
- Place the water filter into a vessel filled with fresh tap water for a few minutes before inserting it.
Requirement: The appliance is ready for operation.
- Press the "Service" button for more than 2 seconds to call up Service mode 1.
- Press the "Service" button repeatedly unit the display for the filter programme appears.
» One bean lights up.
- Press the "Service" button for more than 2 seconds to start the filter programme.
The Filter display flashes until the filter programme is finished.
The Drip tray display lights up and requests you to empty the drip tray and the coffee grounds container.
-
Empty the drip tray and the coffee grounds container.
-
Insert the drip tray without the coffee grounds container.
- Place the coffee grounds container beneath the Cappuccinatore.
The Water display lights up and requests you to remove the water tank and insert the water filter.
- Remove the water tank.
- Empty the water tank.
- Insert a new filter in the water tank (see Fig. 19).
- Fill the water tank.
- Insert the water tank again.
The Steam display lights up and requests you to open the "valve".

- Open the "valve".
If the appliance requests you to fill the water tank during this procedure, close the "valve" first. Fill the water tank and afterwards open the "valve".
The filter is rinsed with water.
Water flows into the vessel beneath the Cappuccinatore.
The Steam display lights up and requests you to close the "valve".

- Close the "valve".
The filter programme is finished.
The Filter display goes out.
The appliance is ready for operation.
Permanently de-registering the water filter
If you have removed an inserted water filter and want to continue operating the appliance without a water filter, deactivate the water filter on the appliance:
- Remove the water tank.
- Empty the water tank.
- Remove the water filter (see Fig. 19).
- Fill the water tank.
-
Insert the water tank again.
-
Press the "Service" button for more than 2 seconds to call up Service mode 1.
- Press the "Service" button repeatedly until the display for the Filter function appears.
- Press the "Coffee strength" button repeatedly until no coffee beans are lit.
- Press the "Service" button for more than 2 seconds to save the setting and exit the service mode.
The water filter is de-registered.
The water hardness is reset to the water hardness that the appliance had stored prior to inserting a water filter.
- Adjust the water hardness if necessary (see section. 6.3 Setting the water hardness on page 45).
8 Transport, storage and disposal
8.1 Venting the appliance
We recommend venting the appliance when it is not used for a long period, prior to transport and when there is a risk of frost.
During venting, residual water is removed from the appliance.
If you put the appliance back into operation, automatic rinsing is carried out after switching on and the appliance vented (see section 3.6 Switching on the appliance for the first time on page 37).
CAUTION
Outflowing steam and hot steam pipe
- Do not reach into the steam that is flowing out.
- Do not touch the steam pipe during and immediately after use. Wait until the steam pipe has cooled down.
Requirement: The appliance is ready for operation.
- Press the "Service" button as well as the "Coffee" direct key for more than 2 seconds to enter Service mode 2.
- Press the "Service" button repeatedly until the display for the Venting function appears.
- Press the "Service" button for more than 2 seconds to start venting.
The Ready display flashes until venting is ready to start.
The Water display lights up and requests you to remove the water tank.
- Remove the water tank and empty it.
The Steam display lights up and requests you to open the "valve".

Open the "valve".
Water and steam escape from the Cappuccinatore.
The Steam display flashes.
The Steam display lights up and requests you to close the "valve".
- Close the "valve".
The appliance is vented and switches off automatically.
8.2 Transporting the appliance
ATTENTION
Freezing residual water can damage the appliance.
Prevent the appliance from being exposed to temperatures below 0^ C .
Transport the appliance in the original packaging. This avoids damage in transit.
Before transporting the appliance, carry out the following activities:
- Vent the appliance (see section 8.1 Venting the appliance on page 54).
- Empty the drip tray and the coffee grounds container.
- Empty the water tank.
- Empty the bean container.
- Clean the appliance (see section 7.1 General cleaning on page 48).
- Package the appliance.
Information
- When sending the appliance to Melitta's service centres, it is not necessary to send in the cup plate. This prevents scratches during transport.
- Do not use commercially available adhesive and packing tapes to attach loose parts. When detached, adhesive residues remain on the appliance which are difficult to remove.
8.3 Disposing of the appliance

Appliances marked with this symbol are subject to European Directive 2002/96/EC for WEEE (Waste Electri
cal and Electronic Equipment).
Electrical appliances do not belong in domestic waste.
Dispose of the appliance in an environmentally friendly manner via suitable collection systems.
9 Technical data
| Technical data | |
| Operating voltage | 220 V – 240 V, 50 Hz – 60 Hz |
| Power consumption | 1450 W |
| Pump pressure | max. 15 bar |
| Dimensions | |
| Width | 200 mm |
| Depth | 460 mm |
| Height | 353 mm |
| Capacity | |
| Bean container | 250 g |
| Water tank | 1.5 l |
| Weight (empty) | 8.1 kg |
| Ambient conditions | |
| Temperature | 10 °C – 32 °C |
| Relative humidity | 30 % – 80 % (non-condensing) |
| Water hardness range | °dH | °e | °fH |
| Soft | 0 to 10 | 0 to 13 | 0 to 18 |
| Medium | 10 to 15 | 13 to 19 | 18 to 27 |
| Hard | 15 to 20 | 19 to 25 | 27 to 36 |
| Very hard | >20 | >25 | >36 |
10 Trouble shooting
If the actions listed below fail to rectify the problems or other problems not listed here occur, contact our hotline (local rate).
You will find the hotline number in the lid of the water tank or in the Service section on our website.
| Problem | Cause | Action |
| Coffee only emerges from the outlet in drips. | Grinding fineness is too fine. | ■ Set a coarser grinding fineness (see section 6.8 on page 47). |
| Appliance is soiled. | ■ Clean the brewing unit (see section 7.3 on page 48).■ Run the cleaning programme (see section 7.4 on page 49). | |
| Appliance is covered inside with limescale. | ■ Run the descaling program (see section 7.5 on page 50). | |
| Coffee does not flow. | Water tank is not filled or is not correctly inserted. | ■ Fill the water tank and ensure it is positioned correctly (see section 4.3 on page 40). |
| Brewing unit is clogged. | ■ Clean the brewing unit (see section 7.3 on page 48). | |
| When foaming milk, there is not enough milk foam. | Cappuccinatore is soiled. | ■ Clean the Cappuccinatore (see section 7.2 on page 48). |
| Although the bean container is full, the appliance indicates that coffee beans must be filled. | Coffee beans do not drop into the grinder. | ■ Press a direct key.Tap lightly on the bean container.Clean the bean container.Coffee beans are too oily. Use different coffee beans. |
| Loud grinder noise. | Foreign objects in the grinder. | ■ Contact the hotline. |
| Brewing unit cannot be inserted after removing. | Handle for the locking mechanism of the brewing unit is not in the correct position. | ■ Check that the handle for the locking mechanism is correctly engaged (see section 7.3 on page 48). |
| Drive is not in the correct position. | ■ Press the "Coffee" direct key and the "2 cups" button simultaneously for more than 2 seconds.The appliance initialises. | |
| Rapid alternate flashing of the displays:☐☐ | Software problem. | ■ Switch the appliance off and on again (see section 4.1 on page 38).■ Contact the hotline. |
| Rapid alternate flashing of the displays:☐clean | Brewing unit is not inserted. | ■ Insert and lock the brewing unit. |
| The display lights up without having been activated:☐ | Appliance is not fully vented. | ■ Vent the appliance, turn the rotary regulator clockwise to the stop for this. Once the Steam display lights up permanently, turn the rotary regulator anti-clockwise up to the stop.Clean the brewing unit (see section 7.3 on page 48). |
Sommaire
Chère clientele, cher client,
www.melitta.nl of www.melitta.be
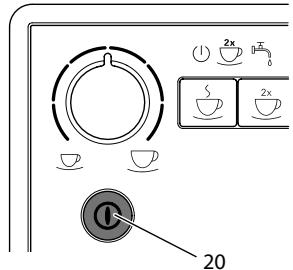
Fig.6: Tasto "ON/OFF"
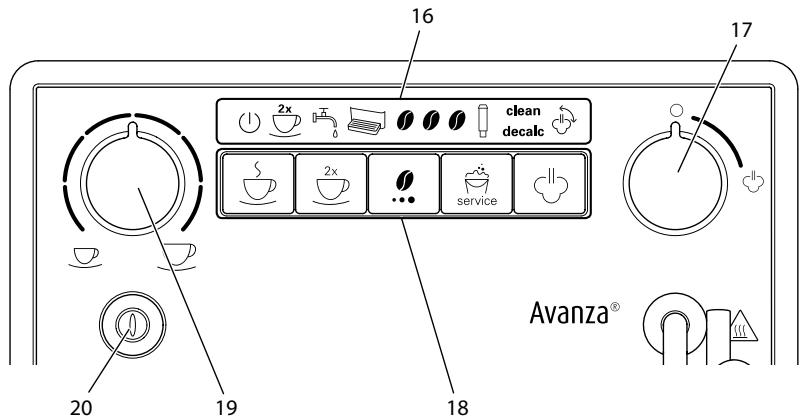
Fig.3: Panel de control
- Retire el recipient.
3.5 Tilmutting of cappuccinatore
Med cappuccinatoren kan du tilberede varmt vand eller maelkeskum.
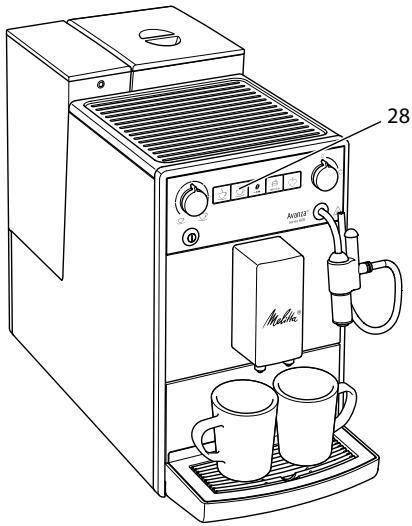
Fig. 13: Brygning of to kopper
- Stil to kopper under udlbet.
- Tryk på betjeningsknappen "2 kopper" (28).
2 kops-symbolet lyser.
- Tryk på brygknappen "Kaffe".
8.2 Transport of maskinen
OBS
Frossent restvand kan medfore skader pa maskinen.
(Waste Electrical and Electronic Equipment).
Sette inn vannfilter
Forutsetning: Apparatet er driftsklart.

Trykk pa betjeningsknappen
"Service" longer enn 2 sekunder for Å apne Servicemodus 1.

Trykk pa betjeningsknappen
Unngå a utsette apparater for temperaturer under 0^
Transporter apparatet i originaleballasjen. Dermed unngar du transportskader.
for WEEE (Waste Electrical and Electronic Equipment).
4 OchoBhIe npHcunbly npabLeHHa 293
4.1 BkIIOueHne I BBKIOUeHne aIInapaTa. 293
4.2 3acbinaHne KofoeHbIX 3epeH B KOHTeHep 294
4.3 HanoJIHeHne BDOJ 295
4.4 HacrpoiKa BblnyckHoro OTBepCTnJa HaNTKOB. 295
4.5 IcnoIb3OBAHne MoIoka 295
4.6 OuNTka pOДОHa dIa c6opa KaIeNb n EMcKoCTn dIra KoΦeHOrO XMbIXa 296
5 PnpuroToBHeHne HAnrKOB 296
5.1 Hacrpoika kpeooctn Kofoe 297
5.2 Hacroika koiueCTBa Kofoe 297
5.3 PnpuroBneHne HauNTka 297
5.4Перьване пиютовеля Кофe 297
5.5ПригOTOBJIeHneДБУнHaNTKOB OndOBpeMeHHO 297
5.6 PnpuroToBnHeMmIoUHnIeHbI 298
5.7 PnpiroToBleHne ropeuB BObl 299
6 Ⅰ3meHeHne OCHOBbIX HacTpoek 299
6.1 Pekim o6cnyxmbnna 1. 299
6.2 HacrpoKa aBtOMaTnueCKOro BbIKNoUeHnra 300
6.3 HacrpoJa KecTKoCTN BOJbl 300
6.4 BkIIOueHne/ByIKIOueHne npOMbIKn npBbIKIOueHn 301
6.5 HacrpoKa TempepaTpybI npiroToBJIeHnI 302
6.6 Pekimm obcnyxmbnna 2... 302
6.7 BocstahOBHeHne 3aBODCKnx yCTaHOBOK aannapaTa 303
6.8 Hacrpoika ToHKoCTn NOMOla 303
7 Yxod n Texnueckoe o6cnyuBaHne 304
7.1 067a ynctka 304
7.2 Ouchstka kanyuHaTopa 304
7.3 YIcTka 6Joka 3aBapuBaHnra 304
7.4 BbIopJIHeHne npoRpaMMbl OUcTkn 305
7.5 BbIopHeHne nporpaMMblIyuaJIeHnHaKuIN 307
7.6 IcnoIb3OBAHne fInIbTpA dIa BOIbl 309
8 TpaHcnpTnpOBka, xpaHene n yTuInn3aunna 311
8.1 BbIapuBaHne annapaTa 311
8.2 TpaHcnpotnpoBka annapaTa 312
8.3 Ytulnizauia aannapata 312
9 TexHnueckne xapaKTepeNCTnKn 313
10 HenncpabHocTn 313
1 063op annapata
1.1 06uHnBnAn annapata


Puc.1: Bu annapama cnepedu cneba
Puc.2: Buə annapama cnepeodu cnpaea
1 KoHTeHepIaIbOdbI
2 KpbiIka KOHTeHepa Ira BObl
3 KpbIiKa KOHTeHepa DnKoFeiHbIX 3epeH
4 KoHTeHep dIg KoFeiHbIX 3epeH
5 NpOOrpeBaemn noCTabKa nlaaew
6 NaHeIb ynpaBLeHnIa
7 BbIyckHoe OTBepCTne IJRA HAnITKOB C DByMHaCaJaKMn
8 EMKoCTbДЯ KOFeHOrO XMbIXa (BHyTpnu)
9 PoiDOn dIa c6opa KaIeIb
10 Pbyar «PeRyIINPOBka TOHKOCTn NOMOJa» (BHyTpni)
11 CbemHa nHaHeIb
12 BLOK 3aBapuBaHnA (BHyTpN)
13 KanyuHaTOp
14 PonnabOK
15 PndorpeBaemn noctabka nryawek
1.2 06uBn BnD nAHeN ynpaBneHna

Puc.3: PanaheynynpaBneHua
1NnKaTOpbl
17 «KlaanH»
18 KhoNkn
19Поворотьн рерунлар «Количесв Ккфe»
20 Khonka «Bkn./BbIK.»
| Инданашия | Назване |
| 1 | Инданашия zomobnocMu к paбOME |
| 2x | Индана_TOP 2 чашки |
| 五 | Индана_TOP Boda |
| Индана_TOP Пodedон дlya сбора kanelь | |
| Индана_TOP Кофейнoe зерно | |
| Индана_TOP Фльmbp | |
| clean | Индана_TOP Oчесма |
| decalc | Индана_TOP удаlefене накуни |
| Индана_TOP пap |
Ybaxaemblnokynatelb,
BlarodaPIM BAC 3a NOKyNk KofoeHoro abTomata Melitta Avanza.
Данhoe руковоствно Экплuyaатци ПOMOЖET BAM O3HaKOMTbCЯ pa3HOO- бpa3HBIMN BO3MOЖHOCTЯМaN apapataи пригOTOBNTb Koфe,doCTоHbI BOCXnue- ня.
BhimateIbHo npOuTnTe daHHe o pyKoBOCTBO. 3To IIOZBoIIT Bam NCKJIouHTb ONaCHOCTb IOnyEHHa TpaBMbl nI prUnHHeHHaMaTePnaIahOBoro uJep6a.XpaHIne TaHHOpyKOBOCTBO BHaIeXaUeM BnJe.DaHHOpyKoBOIDCTBO DOJxHoo 6bITb nepedaHOHOBOMByBaJaIeNbCu BYMeCTe c aIppapaTOM.
KomnaHnMa Melitta He Hecet OTBeTCTBENHOCTN 3a NOBpeKdEHHa, OBCNLOBHeHHbIe
Hec6JIIOJeHHeM Tpe6OBAHn DaHHORo pyKOBOdCTBa.
PnHneO6xOdomocTnNoJyueHn6oJIe neopro6HOHnHΦOpMauIINPiNHaJIuYn BOnpocOB oBauaaTeCbB OΦuIaJIbHbIe PpeCTaBnteJIbCTBa KOMNaHIn Melitta nII niocTeHaaw caIT: www.melitta.ru
Kenaem Bam npnTHoro BpemnpoBOKeHnC KOe, pnproTOBneHHbIM C NOMOuBo Hauero HOBOra annapata.
2ДЯВашев6e3oNaChOCTN
C E AnnapaT COOTBeTCTByeT DeiCTBvUoIIM eBpOneiCKIM DInpeKtNBam N npOn3BeJeH B COOTBeTCTBnC COBpeMeHHbIM yPoBHeM TexHnKn. Tem He MeHee, cyuectByIOT OCTaToUHbIe PNCKn.
Bo n36eXaHne onaCHOCTn Heo6xOIMo CO6JIOpAToB yKa3aHNy ITO TexHnke 6e3OnaCHOCTN. KompanHaMelitta He Hecet OTBeTCTBeHHOCHTn 3a NOBpeKJdeHnry, O6yCNoBLeHhble Heco6JIOpDeHnem yKa3aHnI PO TexHnke 6e3OnaCHOCTn.
KanyuHaTOp MOxHO NcNoB3OBaTb dIa HarpeBa BODbl I pNiroTOBNeHnro MOnoH OH NeHb.
Puc.5: PpucoeduHeHue kanyuHaMaopa
- CoeHInHte KaynuHaTop c Tpy6koJ DnI npaunapa (21).Ppi 3tOM BCTaBbTe coeHNHeHne KaynuHaTopa do ynpa Tpy6kn npaunapa.
- CoeHHte Tpy6ky dny MoIoka (25) c KaIyHHaTOPOM.
- EcIN Bbl eue He XOTnTe NcNoIb3OBA Tb MOLOKO, TO MOXHO 3aKaTb Tpy6Ky dIy MoLOKA B depKaTeNe (23).
3.6 Перboaевский annapaata
При первом BKЛЮЧЕни annapараз OH BылОнягд ATВOMATNUECKYIO npOMbIBKY. Горчая ВODA BHAQUE BblTeKaeT N3 KanyuHaTopa, a 3aTeM n3 BblNyCKHOrO OTBepCTnI. При NTOM n3 annapapa ydaJIЯ-ETcR BO3dUx.
A OCTOPOXHO
BbIXoJaIaI rOpaua BOa n rOpaua Tpy6ka dIpaNn npa
He kacaitec bIbouie cra ropey BOdbI.
He kacaiTeCb Tpy6Kn IJn Ipoaun npap BO BpeMn cpa3y JKe Iocne IcnoJIb3OBAHn. IoKdntecb, noka Tpy6Ka IJn Ipoaun npa OXJaIITcJ.
①Информацья
-
PekomehnyetcH He ynoTpe6nIb nepBbIe DBe YauKIn KoΦe nocIe nepBOrO BkJIuOyehn.
-
EcIN Bbl XOTIne INCNoIb3OBAbT ΦnIbTp ДЯ BODbl, TO eRO peKOMeHnyETc YCTaHOBnTB TOLbKO NOCNe ПepBOrO BKJIQUHeHnA.
Puc.6: Khonka «Вкл./Выкл.»
Heo6xoJnMoeyCNoBne:annapat ycta-HOBJIeH I NOJKNIOUeH.
- Noidctabbte emkoctb noi KaynuHaTOp.
- HaxmTe KhoNkY «BKn./BbIKn.» (20).
》 KpaTkoBpeMeHHo 3aRopaetcnaHdkaTop TomobHocmb Ka6ome.
3aropaeTcHnDnKaTOpBoda, cnHann3npyOHeo6xOaMocTn HanoHNbKoHTeHepdIyBObl.
- Řткроче кршу контейнера за воры и вьнбтешег за ручу Вьерх за ппара. [ \text{Ворчы} = \frac{\text{Pursky}}{\text{Pursky}} ]
- Помоше erо чсто ВОДи. HanолиНITE KOHTeHep CBexKe WOdoI.
- Bctabte KohteHep dIa BObI aIannapat Cbepxu n 3akpoTe KpbIkuy.
3aropaeTcHnDnKaTOp Nap, cmHann3npyO Heo6xOaMocTOn OTKpbITb KJanaH
- OTKpoIte KlaHn
» TogryaB Oda BbIteKaeT n3 KaIyuHaTopa.

- 3akpoIte «KlaanH», KaT OToIbKO BOda IpeceTaHET BbTeKaTb N3 KaNyUnHaTopa.
》TopyaB Oda BbITEKaET N3 BblnyCKHOrO OTBepCTnY.
Bo3dyx n3 annapata ydaJIeH.
- HanonHnTe 3epHaMn KOHTeHep Iyra KofoehhIX 3epeH (CM. rnaBy 4.2acbI- nahue Kofoeuhix 3epeH B KOHmeuHep Ha cTp. 294).
- Пи НEOбхдмocг Tepeь Bbl MOжete
a) HactpoNTb JceTkoCTb BObl (CM. rnaBy 6.3 HacmpouKa JecmKocmu BObl Ha cTp. 300) nnn
b) yCTaHOBnTb ΦnIbTp nIa BOblc (cM. rnaBy 7.6 IVcnOJIb3OeAHeue fUInbmpa dIra BObl Ha cTp. 309).
4 OchoBhIe npHcunbly npaBHeHn
4.1 BkIIOUeHne N BBIKIOUeHne aannapata
IpeepnepBbIM BkLIOUeHnEM annapaTa npOHTte rnaBy 3.6 IpeBoe BkLIOUeHue annapama Ha cTp.292.
iHΦopMaun
-Прив BKЛIOЧЕнИ ВБКЛIOЧЕнИ annapaT BbIIOJIHЯТ aBTOMaTIчeCKYIO npOMblKу.
IcnoJIb3yeMaJ npn npomblke BODa BblBOJNTC8 B NOJDOH nla c6opa KaJIeJIb.
BkIIOueHne annapapaT
1.Подстаьтеб EMKOCt b NOД BblnyCKHoe OTBepCTne.
2. Haxmte KhoNkY «BKn./Bbikn.» (20).
》AnnapaT HarpeetcN BbIOnHnT aBtOMaTnueckyIO npomblkY.
» AnnapaT nepexoIIT B pexkIM rOTOB-HOCTN.
UHΦopMaunu
Ecn annapat 6bl BbKIOUeH NnB Ha KOpOTKoe Bpem,TO NocJIe BKIOUeHn He BbIOnHReTcABTomATuYeCKa IpOMbIBKa.
BbiklueHne annapaTa
- Повстаьтеб EMKOCTB по ВынчКhoe OTВерстne.
- HaxmTe KhoNkY «BKn./BbIKn.» (20).
» AnnapaT BbIOnJIHIT aBtOMaTHueCKyIO npomblkY.
》3aTeMaannapatBbIKIOUHTcA.
UHΦopMaunu
- AnnapaT aBTOMaTnueckN BbIKIouHITcB CnUyae npoJOnJXnTeJIbHOrO npocToJ. B daHHom cNyuae taKke 6yJeT BblONHeHa aBTOMaTnuecka npomblBa.
BpeMBAkIIOueHnMoJHOHaCTpoNTbBpeKIMeO6CnyKINBaHN1(CM.rnaBy6.2HacmpouKaabmomamuecko20BbIKIOueHnHa cTp.300). - Ecni nocle BkIIOueHnHaNITKn He roTOBUNICb, IIN KOHTeHep DInA BObl OCTaBaCLy NcytBIM, IpOMbIBKa He BblONHAreTc.
4.2 3acbIaHne KofoeHbIX 3epenB KOHTeHep
06xapenHbIe KofeiHbIe 3epHa TepaOT CBOI apOMaT. 3acblbTe B pe3epByap CTolbKO KofeiHbIX 3epH, CKoJIbKO CMOKeTe yOnTp6nTB 3a 6nXkaiuNe 3-4 dHa.
BHIMMAHNE
IcnoJIb3ObaHne HenoXoJaunx COPTOB KOeMOxET PnVBecTu K 3aCopeHIO KOeOMONK.
He nCnoIb3yIte KofoeHbIe 3epHa, BbICyuIeHHbIe MeToIDom cy6IIMaUIN, IJI KApAMeJIn3OBAHbIe 3epHa.
He nCnoIb3yIte MoIOTbI Kofoe nnI 6bIcTpopaCTBOpMbIe npOdyKTbl.
UHΦopMaunu
5 PnPuroToBJIeHneHaNTKOB
ПИРИТОВЛЕNHЯнITKOВHaBbIyCKHOMOTBepCTNДЯHAHITKOB,ИИN
HarpeB BoIy I npiroTOBHeHne MoIOuHoN PHeBb KanyuHaTope.
06paTInTe BHHMaHHe:
B KOHTeHHepe DnI BODbI BcERda DOJXHO HAXOINbCЯ DOCTaTOUHO BObl. Ecnu yPoBeHb HAnOIHeHn HeIOCTaTOueH, aannapat NOdAcT CnHaN O Heo6xoDnMOCTn Do6abJeHn.
B KOHTeHepnJa KooeHbIX 3epe TaKke Bcerda DOJIKNHO IMTeBcra DOCTaToHoe KOJInueCTBO KooeHbIX 3epe. EcIn 6Oblwe He NMeETcRA Ko0eiHbIX 3epeH, To apnapat npepbIbAet npuROTOBJIeHne KooeiHoro HAnITka.
Инданаши на слунай Oстутства молoka He пе demaТрпваeТС.
- EMKOCTNДЯнHaNTKOBДОЛЖHbI 6bITbdoCTaTOUHO6OJIbшIMN.МakcmaJIbHoe KOJNUeCTBO KoΦecocTAbJIeT 220 mI.
5.1 Hac tropona kpenoctn kofoe
Kak toIbKO aIppaT rOToB, OH oTo6paKaET KeKyUHOHcTpoNky KpeNoCTn KoΦe.
Bo3MoJHbI cIeNyUoUne HacTpoiKn KpeNoCTn KoΦe:
Heo6xoImoe ycNoBne: annapaT roTOB K pa60Te. KaynHaTOP npncOeDInHeN.
- NoidctaBte eMKoCTb noK kanyuHaTOp.

ОткpoITE «Кланн».
HauHaetc npdaa HauNTka.

- 3akpoiteKnaanaH
》ПолачahannTka npekpaataetc. - ChIMITE emKoctb c noDCTaBKn.
6 I3MeHeHne OCHOBbIX HacTpoEK
CyuectByeT HeckoJbKO fYHKnI dJa n3MeHEnN OCHOBhIx HaCTpoEk aPnApata. 3Tu fYHKnI paCnpedeJeHb I Ha Dba pexkma o6cnyKBaHNJ.
Heo6xoJumoe ycNoBne: annapaT roTOB K pa6ote.

HaKmTe KhoNkY «O6cnyKuBa n yapedKuBaIte ee 60onee yHd, YTO6blpeeiTuB pexum yKuBaHn1.
2x 6bIcTpo Mmraet nHdNkaTOP romoehocmb pa6ome n ropnt nHdNkaTOP 2aawku.

OdHnn HeckoIbKO pa3
mTe KHOKNy O6cLyKuBaHne》,
blpeeHTN K Tpe6yEmo fYHKUIN.
B COOTBETCTBUN C BbIbpaHHoH ΦyHKUIN roPHT INHdNkaUN, CM. Ta6NIuY PeXUM 06cLyKUbaHua 1.
》KoJIuYeCTBO ropIux KoFeiHbIX 3epeH CnIHaIIIN3IpyeT o6 aKTINBHOJ HAcTpOKe yHKUIN.
Haxmte KhONky npiroTOBHeNRA «KoFe》,T06bl BbITn n3 pexIma 06cLyXuBaHn8e3 coxpaHeHn HAcTpoEk.

INΦopMaζηa
EcnB TeueHne 1 MmHyTbI He 6yJeT hKaTa Hn Onda KhoNka, aannapat nepexoJNT B peXIM rOTOBHOCTN.
6.2 HactpoJa aBTOMaTnueCKOTO BbIKJIOUeHnA
Ecnn annapat He nCNoIb3yETcB TeueHne DInTeIbHoro BpeMeHn, ChauJa OH nepeXoJNT B pexm 3HePrc6epeKeHn. 3aTeM nOcNe onPeJeIeHHoro HAcTpoEHHO BpeMeHn annapat BbIKNIOuaeTcR.
Bo3mOxHbI cIeIyUoIe HaCTpoIKn:
Heo6xOumoe ycNoBne: annapaT roTOB K pa6ote.
- HaxmTe KhoNky «O6cnyxmbaHne» n ydepXnBaIte ee 60onee2 cekynd, uTo6bl nepeiTu B pexmmO6cnyxmbaHna 1.
- Heckolbko pa3 HaxMMte KhoNky «O6CnyKnbAHne», noka He NOBNTc3HaQOK fYHKunn Abmomamuueckoe bIKIOueHue.
- Heckolbko pa3 haxMMTE KhoNky «KpenocTb KoΦe», NOKA He 6yndet HacTpOeHO Tpe6yEmoe Bpemr.
- Bbl MojkeTe nepeTn K cIeNyUoSei yHKuIN NII IN BbIITN n3 peXIma 06cIyXnBaHn:
a) KpaTkoBpeMeHHo HaxMnte KhONKy «O6cIyJxNBAHne», YTO6bI nepeiTuK cJeDuOuSe fYHKuIN.
b) Hαχmnte KhoNkIy «O6cnyxuBaHnE» n yndeprKuBaJte ee 6o0ee 2 cekynD, YTO6bI coXpaHnTb HAcTpOky n BblTN n3 peKmMa o6cnyxuBaHnJ.
6.3 HactpoJa XeCTKocTn BOdBi
Ipyem HacTroKn JcckTkoCTN BOblpeyI npyETc, KaK qacto aannapat CunHaN3npyeTo Heo6xOaMnOCTN ydaJeHnaHaKnPi.Em jceTche BOda, TeM caaue aannapat HykDaetcB ydaJeHmHaKnPi.
iHΦopMaun
Ecn nCnOJb3yETc HnIbTp dIy BObl,To NaCTPOJka JecTKOCTN BObl HeBO3MOXHa (CM. rIaBy 7.6 VcnOJb3ObaHue funIbmpa dJIy BObl Ha cTp. 309).Pnp yCTaHOBJIeHNOM HnIbTpE Iy BObl JecTKOCTb BObl yCTaHOBJeHa Ha «MraKaJr
Дяо nppeelenenna JecTKOCTN BObl nCnoIb3yIte npnilaraemyIO nHdNKaTOPHyIO NOLOCKy. Co6nIOdaIte INHcTpkyUu, yKa3aHHbIe Ha ynaKOBKe INHdNKaTOPHOI NOLOCKN, nВ tabniue Duana3OH JecmKocMu BObI Ha cTp. 313.
Bo3MOxKbI cIeDyUOuIe HAcTpoiKn:
Heo6xoJumoe ycNoBne: annapaT roTOB K pa6ote.
- Haxmte KhoNky «O6cnyKbA-Hne» uyepeXnBaIte ee 60Jee 2 cekynd, yTo6bl nepeiTn B pexm o6cnyKbAHn 1.
- HeckoIbko pa3 haxMnte KhoNkU «O6cnyKmbaHne», NOKa He NOBNTc3HaQOK fYHKuIN IpombIeKa npu BvIKIQUeHuU.
- HeckoIbko pa3 haoMnte KhoIky «KpeNoctb KoΦe», noka He 6yndeT
BKVJIIOUeHa NIN BbIKJIIOUeHa PpOMbIBKa PnBbIKJIIOUeHIn.

BbIMoKTepeeTnKcIeDyUoSei KcUN NIN BbIITN N3 pexkMa lyxknBaHna:
a) KpaTkoBpeMeHHo HaxMnte KhONKy «O6cIyJxNBAHne», uTO6bI nepeiTuK cnJeDyUoSei fYHKuIN.
b) Hαχmnte KhoNkU «O6cnyxuBaHnne» U ydeprxuBaIte ee 6olee 2 cekyHd, UTO6bI coXpaHnTb NaCTpOnKy U BbiTn n3 peKIma o6cnyxuBaHnra.
6.5 Hac tropona TempeaTpybI npuroTOBLeHnA
TempepaTpa npnroTOBneHnBblnEeHa Bkyc HaNITKa.
Bo3mOxHbI cIeIyUoIe HaCTpoIKn:
He nCnoIb3yIte a6pa3nHBbIe TkaHIn, rY6Kn uNCTaJIne CpeIcTBA.
Heo6xoJumoe ycNoBne: annapaT BbIKIO-ueH.
BbIOnHnYe HapxKyU qNCTky annapata npi NOMOuMЯrKoB, BlaJXHOtTKaHN i CTaNapTbIX CpeDCTB JIaby TbYIOcCybl.
BbIMOnTe POnDoN Dnla C6opa KaIenb, eMKoCTb Dnla KoOeHnoro JXMbIXa N NOCTabKU PNO CaXkU. PpN ATOM NCNoB3yInTe MraKyU, BnaJxHyU caJFeTKU n CTaHdApTHoe CpeDCTBO Dnla MbITb Iocybl. EMKoCTb Dnla KoOeHnoro JXMbIXa MOxHO MbITb B NocydomOeHuOH MaSInHe.
Дячstки кOTeHepaДЯЗернИСпОЛьЗУТЕ МЯгКУЮ,CUXYU TkaHb.
7.2 Ounchka kanyuHaTopa
Bo n36eXaHne noBpeXdEnn aannapatapeKoMeHnyeTcpeYyraPHO BbIOnJIHTbOuNCTky KaNyUHaTopa N Tpy6Kn dIyMOJOKa.
Puc.15:Pa36opka kanyuhamopa
- OToeINHInTe KaIyUnHaTOp OT Tpy6Kn Ia npa (21).
- Chmnte c kanyuHaTopa cneyuOuNe DeTaJIn:
Tpy6ka dnia moIoka (25)
- Patapy6ok Дя BCaCbIbAHnB BO3-Dyxa (22),
BbIpyckHoe OTBepCTne dIy MoOnOu-HoI neHbI (26)
Bctabka BblnyckHoro OTbepCTn8 (29).
- BbINOHNHe YnCTky KaNYuHaTopa N OTeJIbHbIX DeTanei TeIIOI BOIOI.
- Co6epnTe kaynuHaTOp.
- ПобсоевинITE кanyуннатор кappapaty (cM. rnaBy 3.5 ПрUCOeDUnHeue kanyuHa mopa ha ctrp. 292).
7.3Чистka 6лoka 3aВарИВаня
Bo n36eKaHne NOBpeJdeHn aappapaTa peKOMeHnyeTcBAIIOJIHrTb YNCTKy 6Ioka 3aBaPUNBaHnOdIN pa3 B HeJeIIO.
Puc.16:Демонмжблoka 3abapueaHua
Puc.17: Yucmka 6noka 3a8apu8aHua
Heo6xoJumoe ycnoBne: annapaT BbIKnO-ueH.
- OtkpoTe CbemHyIO naHeJIb (11).ДЯЗТOrO BO3bMITEcB 3a yIy6JIeHne CпраВо CTOpOnbI aannapaTa NNotAHnTe CbemHyIO NaHeJIb B CTOpOHy.
- Haxmnte u yedePxnbaiTe hkaTbIM KpaChbI pyuar (30) Ha puYe 6noka 3aBapuBaHnra (12), nobepHnte pykoTky no yacoboi cTreJIke do ynpora co ⅢeJyKOM.
- BbItaIe 6LoK 3aBapuBaHn8 3a pyUky n3 aannapaTa.
4.OchOBaTeIbHO npOMoIte 6IoK 3aBapINBaHnIeJIkOM IOI npOTOuHO BODo co BCex cTOpOH. B nepByIO oupeIb CJeIte 3a TEM, UTo6b I B CnTe (31) He 6blIO OCTaTKOB Kofoe. - Пождпг, пoka с 6лoka заразива-hя CTeчET BDA.
- C nOMOuI MOrKoI cyXoTkaHn ydaJIte oCTaTKn KoΦe c NOBepxHOCTeB HByTpI aIInapaTa.
- BctaBte 6nok 3aBapuBaHna B aannapat. HaxmTe u ydepXnBaIte HaxaTbIM
KpaChbI pyUar Ha pyUke 6LoKa 3aBapuBaHnI, NOBepHnTe pyUKy npOTIN YacOBoI CTpeKNI Do ynpopa co ueJyKom.
- BCTaBbTe cbeMHyIO paHeIb c6Oky Do ee _NKcauN
PnB BKHIOUeHHOM annapaTe nonepemEHoe MINGAHNE INHINKATOPOB FomOBHocmb Kpa6ome n OucmcKa yka3blyaot HaOTcyTCTBne 6Joka 3abapuBaHnia. PocJe YcTaHOBKn 6Joka 3abapuBaHnia annapaT nepexoDNT B pexIM rOTOBHOCTN.
7.4 BbInOpHeHne nporpaMMbl OuNCTKl
ПрогамmaЧИСТКИ NOЗВOLAЕТУДАЛТБ ПЯТHA И OCTАТКИ KOФЕНО ГМСla C ПOMOШьЮ С redeCTBA ДЯЧИСТКИ KOФЕHых abTomatOB.
Bo n36exkaHne NOBpeJxHeHnna aannapaTa peKOMeHNyETcBA BbIIOJIHrTb IpOprAMMy OuchTkn KaXdbie 2 Meca na nn npn pOABLeHHn COOTBeCTByUoSei NHdNkauHn Ha aannapate.
clean ToprauHnDnKaTOp Oucmka CnHann3npyeTo Heo6xOumOCTN BbIOnJI-HNTb OcNCTKy aannapata.
OCTOPOXHO
KoHTaKT CO cpeDCTBOM dIy UNCTKn KOeHbIX ABTOMaTOB MOXET CTAb npuHnO pa3dpaKeHnCIn3nCTbIX 06JOnueK rna3 n Koxn.
Co6IouaIte HNCTpyKcH NIO npIMHeHnIO, yKa3aHHbIe Ha yNaKOBKe cpeIcTBa DnIyNCTKn.
BHUMAHVE
Ucnolb3ObaHne HenoDxOJaux CpeIcTB dIy NCTKN KoFeiHbIX aBtOMaTOB MoKet cTaTb npuHoiN IOBpeXdHn annapata.
IcnoJIb3yIteToJIbKOuNCTaIeTa6JIeTKnMelittaPERFECTCLEANJIA KOeHbIXABTOMaTOB.
BbIIOJIHeHHe IpOgPamMbI OUcIcTKn 3aHmMaet OKoI 15 MInHyT n erO HeJb3a IIpepbIbTaB.
To yka3aHne OCHOBaHO Ha Tom donyueHnn, TTO B cpeHem exeJHeBHO npriroTabnBaetc6 HAnITKOB no 120 Mn, a HnIbTp 3aMeHraTc8 Wectb pa3 B rO.
Puc.19: 3abunubaHue u ombuHuaHue unbmpa dna BOdbi
Фильт дя BOДы (33) 3aBинчиBaetся n OTBинчиBaETcя C NOMOцью Cneцаль-HORO npincnocoblenia (32)В pe3b6oboe OTBepctne (32)Ha dHe KOHTeHepa dIЯ BOДы (1).
UHΦopMaunu
He octabJnTe ΦnIbTp nIy BoNbl CyxM B TeueHne nnTeNbHorO BpeMeHN. B cnlyae
IpoJIoJXnTeJbHOro npocToR peKOMeHN dyETc XpaHnTb fNtBtp B EMKoCTN C Tpy6OpnoBOHO BOIO, NOMEcTNB ee B XOJOnJIbHNK.
BCTaBkaΦnIbItpa
Heo6xoJumoe ycNoBne: annapaT rOToB K pa6ote.

HaKMMTe KhoNkY «O6cnyKuBa n yapedKuBaIte ee 60onee yHd, YTO6bI nepeiTu B pekm yKuBaHn 1.
1. Haxmnte KhoNky «06cnyKuBaHne» uyepeXnBaIte ee 6oJee 2 cekyHd, uTo6bl nepeiTu B pexm o6cnyKuBaHn 1.
2. Heckonbko pa3 haxMnte KhoNky «O6cnyKunBaHne», noka he noyBntcra 3haOK nporpammbi fnlbTpa.
3. Heckonbko pa3 HaXMnte KhoNk Ky «KpeNoctb KoFe》,Noka He 3aRopntc KaOeHoe 3epHo.
4. Cnedyte yka3aHnMaB rIabe 3aMeHa funbmpa dna bOdbi hauHHa c wara 3.
3aMeHaΦnIbTpA Dnla Bovbl
Для coхраения Низмehнов зф ekТивhoeТи Фильта ДЯ ВОд Bi pekomeHdyeTc 3amehaTb erO kaxdIbe 2 MecauaIIN NOcIe COOTBETCTByUoero CnHaHa aannapata.
Togpaun nHdkaTop OuIbmp CnHaJn3npyET O Heo6xOdNMOCTn 3aMeHnTbΦnBtp DЯ BODbl.
iHΦopMaunia
EcnHcNoJIb3yETcHJNbTpIaI B0Dbl TO HeJIb3HaCTPOITb JxEcTKOCTb BOBbl XecTKOCTb BObl ABTomAtueckn YctaHOBHeHa Ha «MaRka" (CM. rJaBy 6.3 Hacmpouka JxcemKocmu Bobl Ha cTp. 300).
Ipeep npimmeHnem onyctnte hInbTp Ha HeckoJIbKO MInHT B EMKOCTb CO CBexKe Tpy6OpnoBoHOB BOIOI.
Heo6xoIumoe ycIobne: aIInapaT rOTOB K pa6Ote.
- HaxmTe KhoNky «O6cnyKnBaHne» n ydepXnBaIte ee 60onee 2 cekyHd, YTO6bl nepeiTu B pexm O6cnyKnBaHn1.
- HeckoIbko pa3 haxMnte KhONKy «O6cnyKuBaHne», noka He nOyBntcra 3Haouk npOrpaMMbl fNlbTpa.
» Topint OndHO KOeHoe 3epHO.
3. HaxmTe KhoNky «O6cnyxmbaHne» n ydepxmbaIte ee 60onee2 cekynd, uTo6bI 3aNyctntb nporpaMMyfNbTpa.
VHdNkaTop Ounbmp Muraet do 3aBepweHn nporpaMbl oNlbtpa.
3aropaeTcHnDnKaTOpIooDOn
dЯ c6opaKanEnb,CuHnHaNImPryo
Heo6XoDMOCTn ONOPOXHNTb NOJ
DOH dЯ c6opa Kaenb n EMKOCTb
dЯ KoΦeHOrO JxMbIXa.
- CneTe JnDIOKoCTb n3 NOJDOHa dIa c6Opa KaIeJIb I eMKOCTb dIa KoΦeHHO rXMbIXa.
- UctaHOBITe NODDON JIJI c6Opa KaIeB 6e3 eMKoCTn IJI KOFeHOrO XMbIXa.
- Повставытей EMKоctь Дял KoфeinHoroЖмьixa поkanуунHaTOp.
五 3aropaetcHnDnkaTopBoda, cnHaJIINpryo Heo6xOJIMOCtN CHaTb KOHTeHep DnA BODbl N BCTaBNTbΦNJbTp DnA BObl.
- CHIMITE KOHTeHep dJa BOdJI.
- CneiTe BOyu n3 KOHTeHepa dIy BoDbI.
- BCTaBbTe HObIy ΦnIbTp B KOHTeHep DIIa BObl (CM.Puc.19).
- HanonHnTe KOHTeHep DЯ BOybI.
- YctaHOBNTe KOHTeHep DJIa BOdBi Ha MecTo.
3aropaeTcNnDnKatOp Nap, cnHaJn3npyO Heo6xOaMocTOn OTKpbITb «KJaanaH».
OtkpoTe «KlaanH
EcnB Bo Bpem 3TOro npoccea annapat CnHnIIm3npyTe O HeOxOJIMOCtNOTKpbITNA KOHTeHepa IJa BObl, ChaJana 3aKpOte «Klanah». HanolHnTe
KoHTeHepIJI BOblI 3aTeM OTKpoIte «KlaPAnH
》 ΦильТр помь淋巴TСВДОИ.
» Borda bblteKaetB eMKocTb nOД kany- yHaTopOM.
3aropaeTcHnDnKaTOp Nap, cmHann3npyO Heo6xOaMocTn 3aKpbItb KJanaH

3aKpoIte «KlaanH.
》BbIOpJIHeHHe npOrpaMMbI ΦNlbTpap3aBepeHo.
》ИнданkaTOpФиьmp rachet.
》AnnapaT roTOB K pa6oTe.
Otmeha pernctpaunn nibtpa Jy Bodbl
EcnBbIByHnBCTaBHeHHbIΦnIbTp nIy BObl N XOTNTe IPOJOnJkaTb NCIOJb3OBA Tb annapat 6e3 ΦnIbTpa, Heo6xOJIMO OTMeHNrB perncTpaNIO ΦnIbTpa B annapate:
- CHIMMTE KOHTeHepДЯВ OBObl.
- BbIeIte n3 Hero Body.
3.ИЗВЕКИТЕФИЛБТРДЛЯВОДBI(CM.Puc.19). - HanonHnTe KOHTeHep DJIa BObl.
- YctaHOBNTe KOHTeHep DJIa BOdJI Ha MecTO.

Haxmnte KhoNkY «06cIyKuBa-n yapedxmbaTe ee 6oee
2 cekynd, cytobi nepeienBpekmOBcnykBaHn1.

HeckoJIbKO pa3 NaXMMTe KHOKNyKJYKMBaHNe》,POKa He NIOBNTcK yHKUIN Dunbp.
KeCKoJIbKO pa3 HaxMMte KHOJKNyOCTb Kofo》,NOKa He 6yIeH N OJHO KOeHnOe 3epHO.
HaXMMTe KHONky «O6cnyKbAHne» uYdePxNBAite ee 60onee 2ceKyI, yTO6bI coxpaHnTB HAcTpoi N BbInn n3 peXmMa o6cnyKbAHnIa.
》 Otmeha pernctpaunu nIbtpa JBAOdbi BbINOnHeHa
》KectKocb BObbl HaCtpoehoHa CTeneHb KecTkoCTn, KOTopaa 6bla
coxpaHaHa B nAmrTn aannapata nepeq yCTaHOBko fNbIbTpra dJRA BObl.
10.Пи Heo6xOДIMOCtN HAcTpoIKe JecTkoCTb BOdI (CM.ГЯВу 6.3 Hacmpouka JecmKocMu BOdI Ha cTp.300).
8 TpaHcnpTnpoBka, xpaHeHne n yTuIn3aun
8.1 Bbɪnapɪbaɪnne aɪnpaɪta
B cnyae npoJolKnteIbHoro npocToer peKOMeHdyETcBblnapITb annpaT nepeTpaHCnOpTnPOBkO, a TaKxe npu BepoRTHOCTN 3aMep3aHnBO Bpemx XpaHeHn npn Hn3KnX TempepaTypax.
PnBbInapuBaHm n3 annpaTa ydaJyIOTcOCTaTKn BObl.
Korda Bbl CHOba BBOInde aannapat B pa60ty,TO nocLe BKJIIOUeHnBbIIOJ HnEeTcABTOMaTHueCKa IpOMbIBKa, U ydaJIeTcBA3DyX n3 annapata (CM. rnaBy 3.6 PepBoe BKnIOUeHne annapama Ha cTp.292).
OCTOPOXHO
BbXoJaun BOJHO np n ropyra Tpy6ka dna noaun npa
He BBOInTe pyKn B BbIXOJaIyIO CTpyIO napa.
He kacaiTeCb Tpy6Kn IJnpoaun npa BO BpeMn cpa3y JKe Iocne IcnoJIb3OBAHn. IOnkuiTeCb, noka Tpy6Ka IJn poaun npa OXJaUNTCsI.
Heo6xoIumoe ycIobne: annapaT rOTOB K pa6ote.
HaXMMTe KhoNky «O6cnyKuBaHne» n DoOpJHnTeIbHo KhoNky «KoΦe» n yJepeKuBaIte Ix 60JIe2 cekyHd, uTo6bl nepeiTu B pexmM o6cnyKuBaHn4 2.
2. Heckolbko pa3 haXmTe KhoNky «O6cnyxnbAHne», noka He
IORBNTc3HaOK yHKunn BbInapuBaHue.

HaKMMTe KhoNkY «06cIyXuBa-n yJePxNBAaTe ee 6oJee
2 cekyH, yTo6bI Haatb BbInapnBaHne.
》 ①Инданкатор Гомовсмь К paбOME мURAET до ТЕХ пор, РOKA annapaT He 6удт ROTOB K Bыпари-Ваню.
3aropaeTcHnDnKAtOp Boda, cnHann3npyO Heo6xOaMocTo ChrTb KOHTeHep DnB OBObl.
- Chmnte koHTeHep n cIeTe n3 HeRo BODy.
》 3aropaeTcHnDnKatOp Nap, cnHaHn3npyO Heo6xOaMocTOn OTKpbITb «KJanaH».
OtkpoTe «KlaanH
» Bóda n nanop BBIXOJr N3 KaIyuHa-topa.
» ΙнданkaTop Nap muraet.
》3aropaetcIuHnDkaTOpPap,cuHa- IIn3npyo Heo6xoDmOCTn 3akpbItb «KlananH».

3aKpoIe «KlaanH
》Annapat BbInapeH n aBTOMaTnueCKN BbIKJIIOHaETcR.
8.2 TpaHcnpTnpoBka annapaTa
BHIMAHVE
3aMep3aHHe OCTaTkoB BOdBi B aannapate MoKTe npNBecTu K NOBpeKdeHIO annapata.
He octablaIte annapat npu Tempe-type Hnke 0^
TpaHcnpOpTuPyIte annapaT B opunHaJIbHOI yIaNokBKe. 3TO nOMOKe TpeIoTbPaTnTB NOBpeJdeHne annapaTa BO Bpemr TpaHCnpOpTuOBKn.
Ipeep TeM KaK TpaHcnpOpTnpoBaTb annapaT, BbINOHHTe CNeDyUOuNe DeiCTBnA:
- BbINOJIHnTE BbInapuBaHne BObln3 annapata (cm. rnaBy 8.1 BbInapueaHue annapama Ha cTp. 311).
- Cneite XnndKoCTb n3 nopdoHa dIy c6opa KaIeJIb I eMKoCTb dIy KofoHoro XmbiXa.
- Cneite Body n3 KOHTeHepa Jnla BObl.
- OuHCTnTe KOHTeHep IJIa KoOeINbIX 3epen.
- BbIOnHInTe OUnCTKy aNnapata (cM. rnaBy 7.1 ObuaJ yucmka Ha cTp. 304).
- YnakyuTe annapaT.
UHΦopMaunia
- Пи OTnpaBke apnapaTa B cepBncHbI
цentp KOMpaHm Melitta He Tpe6y-
etc TaKxe OTnpaBnTb NOdCTaBky
noJ yauKy. 3To IO3BOJNT N36EkaTb
BO3MOxHbIX capaAnH pri TpaHCnOp-
TnpOBKe.
He nCnOJb3yIte cTaHdapTHyIO KJIeKJYIO yNaKOBouHyIO JeHTy dIraΦHKCaunu He3aKpePenneHbIX DeTale.Ipn CnTmN JeHTbI Ha aannapaTe OCTaOTc SJeDbI KJIe, KOtOpbie OueHb CLOXHO ydaJIITb.
8.3Утллзаць annapaata

Длг OTмочьд даньс CMBOJOM annapaTOB DeiCTbBye Ebponeckay ДиpeKTbBa 2002/96/EC дя WEEE
(otpa6oTaHHoe 3neKtpnueckoe n 3neKtpoHnOe o6OpydoBaHne).
3JNeKtpOnpns6OpbyyTuInn3npyUoTcO TDeJIbHOOT 6bIToBbIX OTOxOIOB.
Ytuiu3nyte annapat 6e3oNaChbIM JIg OkpykaUoSei cpebl o6pa3OM C nOmoIbIO CneuaJIbHbIX CNTem C6opa.
9 TexHnueckne xapaKaTepunctuKu
2.4 Diger tehl likeler
uz WEEE (Waste Electrical and Electronic Equipment).
Elektrioerices aizliegs izmest sadzives atkritumos.
Utilizejiet ieri videi draudziga veida pie-merotasavaksanaspunkta.
9 Tehniskie dati
Division Household Products
Ringstr. 99
D-32427 Minden
Germany
www.melitta.de
Editorial department:
ZINDEL AG
www.zindel.de
- Care and maintenance 47
- Transport, storage and disposal 54
- Technical data. 55
- 10Trouble shooting 56
- Overview of the appliance
- Appliance at a glance
- Overview of the control panel
- The Cappuccinatore at a glance
- Dear Customer,
- For your safety
- Proper use
- Danger from electric current
- Risk of burns and scalds
- Other dangers
- First steps
- Unpacking the appliance
- Information
- Checking the delivery contents
- Installing the appliance
- Connecting the appliance
- Connecting the Cappuccinatore
- Switching on the appliance for the first time
- CAUTION
- Hot water and hot steam flowing out of the pipe
- Basic operation
- Switching the appliance on and off
- Switching on the appliance
- Switching off the appliance
- Filling coffee beans into the bean container
- ATTENTION
- The use of unsuitable types of coffee can lead to clogging of the grinder.
- Filling with water
- Adjusting the outlet for coffee beverages
- Using milk
- Emptying the drip tray and coffee grounds container
- Preparing beverages
- Please note:
- Setting the coffee strength
- Setting the coffee quantity
- Preparing the coffee beverage
- Stopping coffee preparation
- Preparing two coffee beverages simultaneously
- Preparing milk foam
- Outflowing steam and hot steam pipe
- Rinsing the Cappuccinatore
- We recommend:
- Preparing hot water
- Changing basic settings
- Service mode 1
- Setting Auto OFF
- Setting the water hardness
- Activating/deactivating switch-off rinsing
- Setting the brewing temperature
- Service mode 2
- Resetting the appliance to the factory settings
- Setting the grinding fineness
- Very finely ground coffee powder can clog the brewing unit.
- Care and maintenance
- General cleaning
- The use of unsuitable cleaning agents may lead to scratched surfaces.
- Cleaning the Cappuccinatore
- Cleaning the brewing unit
- Running the cleaning programme
- Running the descending programme
- Using a water filter
- Inserting the water filter
- Changing the water filter
- Permanently de-registering the water filter
- Transport, storage and disposal
- Venting the appliance
- Requirement: The appliance is ready for operation.
- Transporting the appliance
- Freezing residual water can damage the appliance.
- Disposing of the appliance
- Technical data
- Trouble shooting
- Sommaire
- Chère clientele, cher client,
- Tilmutting of cappuccinatore
- Transport of maskinen
- OBS
- Frossent restvand kan medfore skader pa maskinen.
- Sette inn vannfilter
- OchoBhIe npHcunbly npabLeHHa 293
- PnpuroToBHeHne HAnrKOB 296
- Ⅰ3meHeHne OCHOBbIX HacTpoek 299
- Yxod n Texnueckoe o6cnyuBaHne 304
- TpaHcnpTnpOBka, xpaHene n yTuInn3aunna 311
- TexHnueckne xapaKTepeNCTnKn 313
- HenncpabHocTn 313
- 063op annapata
- 06uHnBnAn annapata
- 06uBn BnD nAHeN ynpaBneHna
- Ybaxaemblnokynatelb,
- 2ДЯВашев6e3oNaChOCTN
- Перboaевский annapaata
- A OCTOPOXHO
- BbIXoJaIaI rOpaua BOa n rOpaua Tpy6ka dIpaNn npa
- ①Информацья
- OchoBhIe npHcunbly npaBHeHn
- BkIIOUeHne N BBIKIOUeHne aannapata
- iHΦopMaun
- BkIIOueHne annapapaT
- UHΦopMaunu
- BbiklueHne annapaTa
- 3acbIaHne KofoeHbIX 3epenB KOHTeHep
- BHIMMAHNE
- IcnoJIb3ObaHne HenoXoJaunx COPTOB KOeMOxET PnVBecTu K 3aCopeHIO KOeOMONK.
- PnPuroToBJIeHneHaNTKOB
- 06paTInTe BHHMaHHe:
- Hac tropona kpenoctn kofoe
- I3MeHeHne OCHOBbIX HacTpoEK
- INΦopMaζηa
- HactpoJa aBTOMaTnueCKOTO BbIKJIOUeHnA
- HactpoJa XeCTKocTn BOdBi
- Hac tropona TempeaTpybI npuroTOBLeHnA
- Ounchka kanyuHaTopa
- 7.3Чистka 6лoka 3aВарИВаня
- BbInOpHeHne nporpaMMbl OuNCTKl
- OCTOPOXHO
- BHUMAHVE
- BCTaBkaΦnIbItpa
- 3aMeHaΦnIbTpA Dnla Bovbl
- iHΦopMaunia
- Otmeha pernctpaunn nibtpa Jy Bodbl
- TpaHcnpTnpoBka, xpaHeHne n yTuIn3aun
- Bbɪnapɪbaɪnne aɪnpaɪta
- BbXoJaun BOJHO np n ropyra Tpy6ka dna noaun npa
- Heo6xoIumoe ycIobne: annapaT rOTOB K pa6ote.
- TpaHcnpTnpoBka annapaTa
- BHIMAHVE
- 3aMep3aHHe OCTaTkoB BOdBi B aannapate MoKTe npNBecTu K NOBpeKdeHIO annapata.
- UHΦopMaunia
- 8.3Утллзаць annapaata
- TexHnueckne xapaKaTepunctuKu
- Diger tehl likeler
- Tehniskie dati
Brand : MELITTA
Model : AVANZA
Category : Coffee machine