
RMB76121NX - Fridge Freezer AEG - Free user manual and instructions
Find the device manual for free RMB76121NX AEG in PDF.
| Product type | Fridge-freezer |
| Brand | AEG |
| Model | RMB76121NX |
| Overall height (without handle) | 1770 mm |
| Overall width (without handle) | 912 mm |
| Overall depth (without handle) | 699 mm |
| Height with handle | 1820 mm |
| Width with handle | 940 mm |
| Depth with handle | 800 mm |
| Total required space (door open) | W 1654 mm, D 1125 mm |
| Refrigerant type | R600a (isobutane, flammable) |
| Power supply | 220-240 V ~ 50 Hz |
| Lighting energy efficiency class | F |
| Water and ice dispenser | Yes (on models with dispenser) |
| Xpress Can Chiller (rapid cooling) | Yes |
| Multi Plus Zone | Yes (for medicines/cosmetics) |
| Magic Cool Zone | Yes (settings Fresh, Vegetables, Fish, Meat) |
| Super Freeze function | Yes |
| Super Cool function | Yes |
| Open door alarm | Yes, audible after 1 minute |
| Control lock | Yes (LOCK button) |
| Digital display | Yes (temperature) |
| Interior maintenance | Soft cloth and mild detergent |
| Rear cleaning (grille) | Vacuum at least once a year |
| Water filter replacement | Every 6 months |
| Spare parts availability | 7 years (electronic parts), 10 years (door seals) |
Frequently Asked Questions - RMB76121NX AEG
User questions about RMB76121NX AEG
0 question about this device. Answer the ones you know or ask your own.
Ask a new question about this device
Download the instructions for your Fridge Freezer in PDF format for free! Find your manual RMB76121NX - AEG and take your electronic device back in hand. On this page are published all the documents necessary for the use of your device. RMB76121NX by AEG.
USER MANUAL RMB76121NX AEG
EN User manual Side by Side Refrigerator
CS Návod k použití
Americká chladnick
Frigorffico Side by Side
ET Kasutusjuhend
Kahe poolega kulmutuskapp
Frigorifero Side by Side
Thank you for choosing this AEG product. We have created it to give you impeccable performance for many years, with innovative technologies that help make life simpler – features you might not find on ordinary appliances. Please spend a few minutes reading to get the very best from it.
Visit our website to:

Get usage advice, brochures, trouble shooter, service and repair information: www.aeg.com/support

Register your product for better service: www.registeraeg.com

Buy Accessories, Consumables and Original spare parts for your appliance: www.aeg.com/shop
CUSTOMER CARE AND SERVICE
Always use original spare parts.
When contacting our Authorised Service Centre, ensure that you have the following data available: Model, PNC, Serial Number.
The information can be found on the rating plate.

Warning / Caution-Safety information.

General information and tips

Environmental information.
Subject to change without notice.
1. SAFETY INFORMATION
Before the installation and use of the appliance, carefully read the supplied instructions. The manufacturer is not responsible if an incorrect installation and use causes injuries and damages. Always keep the instructions with the appliance for future reference.
Children and vulnerable people safety
- This appliance can be used by children aged from 8 years and above and persons with reduced physical, sensory or mental capabilities or lack of experience and knowledge if they have been given supervision or instruction concerning use of the appliance in a safe way and understand the hazards involved.
- Do not let children play with the appliance.
- Keep all packaging away from children.
- Cleaning and user maintenance shall not be made by children without supervision.
General Safety
- This appliance is for storing food and beverages only.
- This appliance is designed for single household domestic use in an indoor environment.
- This appliance may be used in offices, hotel guest rooms, bed & breakfast guest rooms, farm guest houses and other similar accommodation where such use does not exceed (average) domestic usage levels.
- Keep ventilation openings, in the appliance enclosure or in the built-in structure, clear of obstruction.
- Do not use mechanical devices or other means to accelerate the defrosting process, other than those recommended by the manufacturer.
- Do not damage the refrigerant circuit.
- Do not use electrical appliances inside the food storage compartments of the appliance, unless they are of the type recommended by the manufacturer.
- Do not use water spray and steam to clean the appliance.
- Clean the appliance with a moist soft cloth. Only use neutral detergents. Do not use abrasive products, abrasive cleaning pads, solvents or metal objects.
-
Do not store explosive substances such as aerosol cans with a flammable propellant in this appliance.
-
If the supply cord is damaged, it must be replaced by the manufacturer, its service agent or similarly qualified persons in order to avoid a hazard.
- If the appliance is equipped with an ice maker or a water dispenser, fill them with potable water only.
- If the appliance requires a water connection, connect it to potable water supply only.
- The inlet water pressure (minimum and maximum) must be between 1 bar (0,1 MPa) and 10 bar (1 MPa)
2. SAFETY INSTRUCTIONS
Service
To repair the appliance contact the Authorised Service Centre. Use original spare parts only.
- Please note that self-repair or non-professional repair can have safety consequences and might void the guarantee.
- The following spare parts will be available for 7 years after the model has been discontinued: thermostats, temperature sensors, printed circuit boards, light sources, door handles, door hinges, trays and baskets. Please note that some of these spare parts are only available to professional repairers, and that not all spare parts are relevant for all models.
- Door gaskets will be available for 10 years after the model has been discontinued.
Installation

WARNING!
Only a qualified person must install this appliance.
- Remove all the packaging.
- Do not install or use a damaged appliance.
-
Obey the installation instruction supplied with the appliance.
Always be careful when you move the appliance because it is heavy. Always wear safety gloves.
Make sure the air can circulate around the appliance. -
Wait at least 4 hours before connecting the appliance to the power supply. This is to allow the oil to flow back in the compressor.
- Do not install the appliance close to radiators or cookers, oven or hobs.
- The rear of the appliance must stand against the wall.
- Do not install the appliance where there is direct sunlight.
- Do not install this appliance in areas that are too humid or too colds, such as the construction appendices, garages or wine cellars.
- When you move the appliance, lift it by the front edge to avoid scratching the floor.
Electrical connection

WARNING!
Risk of fire and electrical shock.
The appliance must be earthed.
- All electrical connections should be made by a qualified electrician.
- Make sure that the electrical information on the rating plate agrees with the power supply. If not, contact an electrician.
Always use a correctly installed shockproof socket.
- Do not use multi-plug adapters and extension cables.
- Make sure not to cause damage to the electrical components (e.g. mains plug, mains cable, compressor). Contact the Service or an electrician to change the electrical components.
- The mains cable must stay below the level of the mains plug.
- Connect the mains plug to the mains socket only at the end of the installation. Make sure that there is access to the mains plug after the installation.
- Do not pull the mains cable to disconnect the appliance. Always pull the mains plug.
Use

WARNING!
Risk of injury, burns, electrical shock or fire.
- Do not change the specification of this appliance.
- Do not put electrical appliances (e.g. ice cream makers) in the appliance unless they are stated applicable by the manufacturer.
- Be careful not to cause damage to the refrigerant circuit. It contains isobutane (R600a), a natural gas with a high level of environmental compatibility. This gas is flammable.
- If damage occurs to the refrigerant circuit, make sure that there are no flames and sources of ignition in the room. Ventilate the room.
- Do not let hot items to touch the plastic parts of the appliance.
- Do not put soft drinks in the freezer compartment. This will create pressure on the drink container.
- Do not store flammable gas and liquid in the appliance.
- Do not put flammable products or items that are wet with flammable products in, near or on the appliance.
- Do not touch the compressor or the condenser. They are hot.
- Do not remove or touch items from the freezer compartment if your hands are wet or damp.
- Do not freeze again food that has been thawed.
- Obey the storage instructions on the packaging of frozen food.
Internal light

WARNING!
Risk of electric shock.
This product contains a light source of energy effi ciency class F.
- Concerning the lamp(s) inside this product and spare part lamps sold separately: These lamps are intended to withstand extreme physical conditions in household appliances, such as temperature, vibration, humidity, or are intended to signal information about the operational status of the appliance. They are not intended to be used in other applications and are not suitable for household room illumination.
Care and cleaning

WARNING!
Risk of injury or damage to the appliance.
- Before maintenance, deactivate the appliance and disconnect the mains plug from the mains socket.
- This appliance contains hydrocarbons in the cooling unit. Only a qualified person must do the maintenance and the recharging of the unit.
- Regularly examine the drain of the appliance and if necessary, clean it. If the drain is blocked, defrosted water collects in the bottom of the appliance.
Disposal

WARNING!
Risk of injury or suffocation.
- Disconnect the appliance from the mains supply.
- Cut off the mains cable and discard it.
- Remove the door to prevent children and pets to be closed inside of the appliance.
- The refrigerant circuit and the insulation materials of this appliance are ozone-friendly.
- The insulation foam contains flammable gas. Contact your municipal authority for information on how to discard the appliance correctly.
- Do not cause damage to the part of the cooling unit that is near the heat exchanger.
3. INSTALLATION

WARNING!
Refer to Safety chapters.
Location
- This appliance is not intended to be used as a built-in appliance.
- In case of different installation from freestanding respecting space required in use dimensions, the appliance will function correctly but energy consumption might increase slightly.
- To ensure appliance's best functionality, you should not install the appliance in the nearby of the heat source (oven, stoves, radiators, cookers or hobs) or in a place with direct sunlight. Make sure that air can circulate freely around the back of the cabinet.
- This appliance should be installed in a dry, well ventilated indoor position.
- To ensure best performance, if the appliance is positioned below an overhanging wall unit, the minimum distance between the top of the cabinet shall be maintained. Ideally, however, the appliance should not be positioned below overhanging wall units. One or more adjustable feet at the base of the cabinet ensure that the appliance stands level.

WARNING!
If you position the appliance against the wall, use back spacers provided or keep the minimum distance indicated in the installation instructions.

WARNING!
If you install the appliance next to a wall, refer to the installation instructions to understand the minimum distance between the wall and the side of the appliance where door hinges are to provide enough space to open the door when the internal equipment is removed (e.g. when cleaning).
- This appliance is intended to be used at ambient temperature ranging from 10^ to 43^ .

Note: The correct operation of the appliance can only be guaranteed within the specified temperature range.
If you have any doubts regarding where to install the appliance, please turn to the vendor, to our customer service or to the nearest Authorised Service Centre.
- It must be possible to disconnect the appliance from the mains power supply. The plug must therefore be easily accessible after installation.
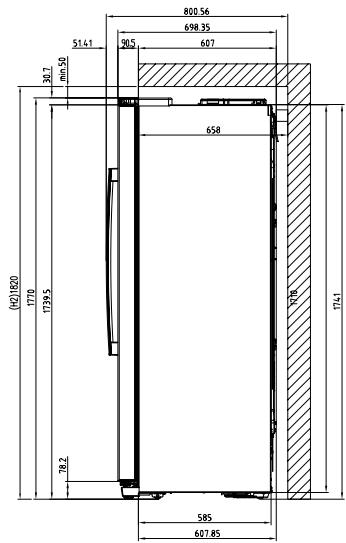
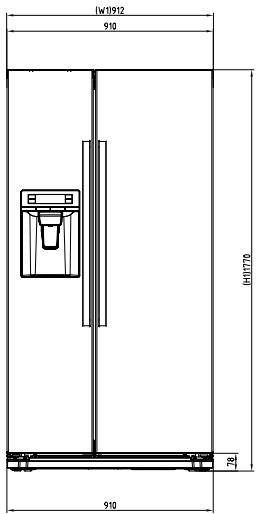
Dimensions
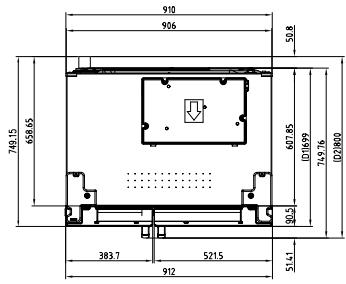
| Overall dimensions1 | ||
| H1 | mm | 1770 |
| W1 | mm | 912 |
| D1 | mm | 699 |
1 the height, width and depth of the appliance without the handle and feet
| Space required in use2 | ||
| H2 | mm | 1820 |
| W2 | mm | 940 |
| D2 | mm | 800 |
2 the height, width and depth of the appliance including the handle, plus the space necessary for free circulation of the cooling air
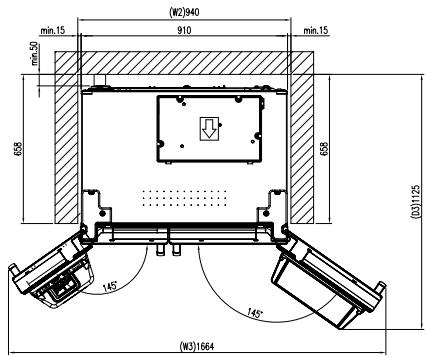
| Overall space required in use3 | ||
| H2 | mm | 1820 |
| W3 | mm | 1654 |
| D3 | mm | 1125 |
3 the height, width and depth of the appliance including the handle, plus the space necessary for free circulation of the cooling air, plus the space necessary to allow door opening to the minimum angle permitting removal of all internal equipment
4. PRODUCT DESCRIPTION
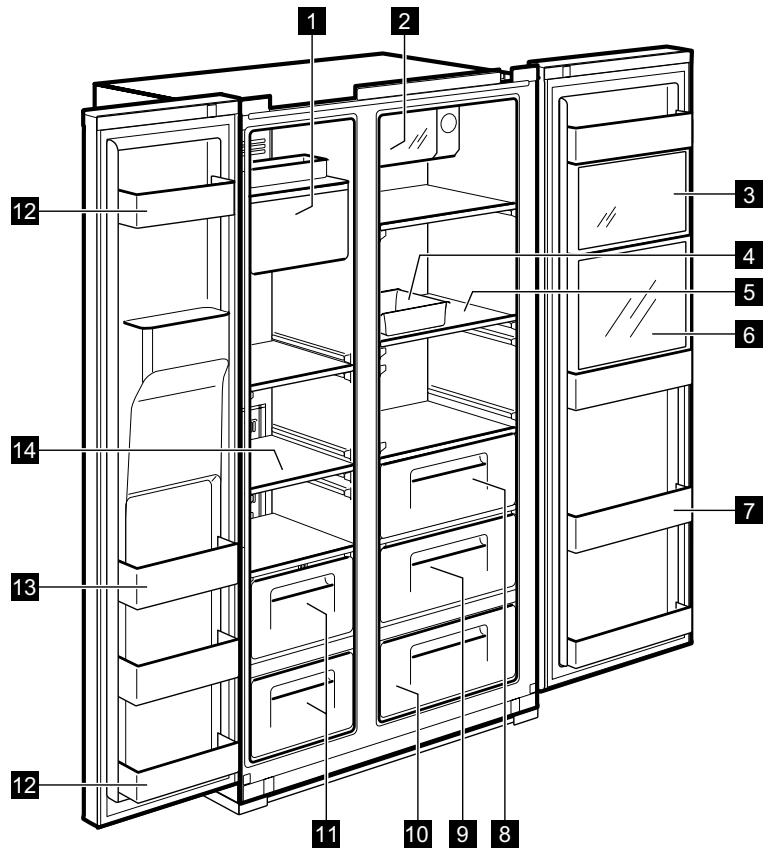
dispensersER MODEL
1 Ice Maker and Storage
2 Xpress Can Chiller (quick cooling compartment) For storing beverages.
3 Multi Plus Zone
For storing general medicines or cosmetic products. Safekeeping is not guaranteed for products such as academic sampling or medicine which require a specific temperature range.
4 Egg Case
Do not use this case for storing ice cubes nor place it in the freezer compartment.
5 Refrigerator Shelf (tempered glass)
For storing common foods.
6 Refreshment Compartment (selected models only)
For frequently used cans, drinking water and beverages.
7 Refreshment Pocket
For storing refrigerating foods, milk, juice, beer bottles etc.
8 Vegetable Case
9 Fruit Case
Magic Cool Zone (selected models only)
11 Freezer Case
For storing dried meat or fish for a longer period of time.
12 Door Storage Compartment (2-star compartment) For short-term storage of food and icecream.
13 Door Storage Compartment
For storing frozen food.
14 Freezer Shelf (tempered glass)
For storing frozen foods as meat, fish, ice-cream.
NON DISPENSER MODEL
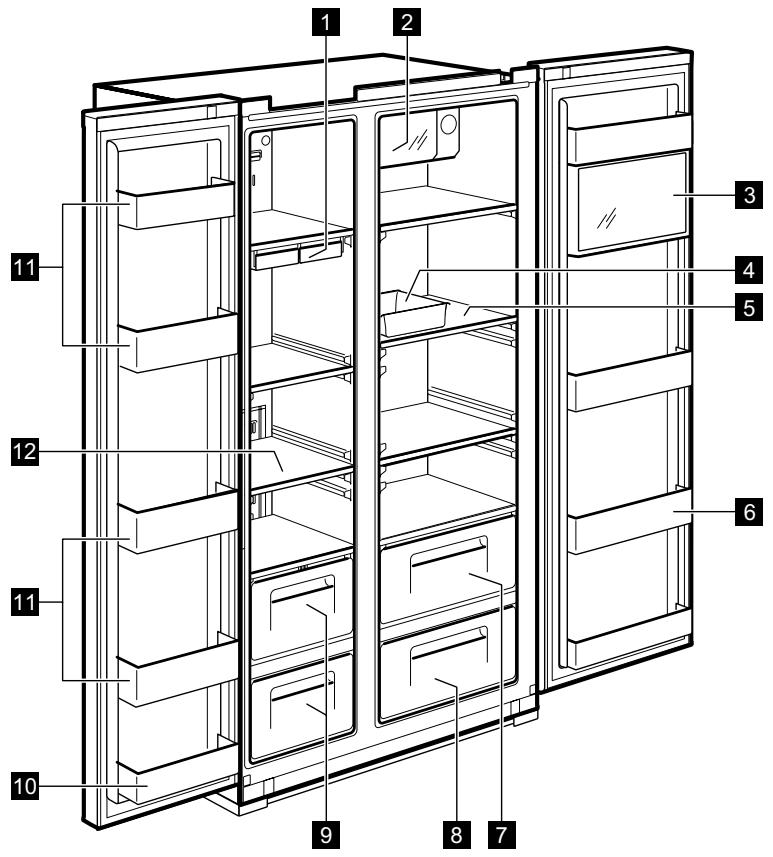
1 Ice Cube Tray
2 Xpress Can Chiller (quick cooling compartment)
For storing beverages.
3 Multi Plus Zone
For storing general medicines or cosmetic products. Safekeeping is not guaranteed for products such as academic sampling or medicine which require a specific temperature range.
4 Egg Case
Do not use this case for storing ice cubes nor place it in the freezer compartment.
5 Refrigerator Shelf (tempered glass)
For storing common foods.
6 Refreshment Pocket
For storing refrigerating foods, milk, juice, beer bottles etc.
7 Vegetable Case
8 Fruit Case
9 Freezer Case
For storing dried meat or fish for a longer period of time.
10 Door Storage Compartment (2-star compartment) 122 For short-term storage of food and icecream.
Door Storage Compartment
For storing frozen food.
12 Freezer Shelf (tempered glass)
For storing frozen foods such as meat, fish, ice-cream.
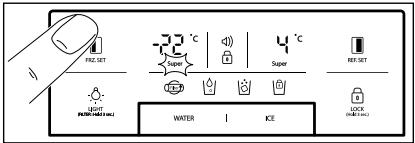
5. CONTROL PANEL
dispensersER MODEL
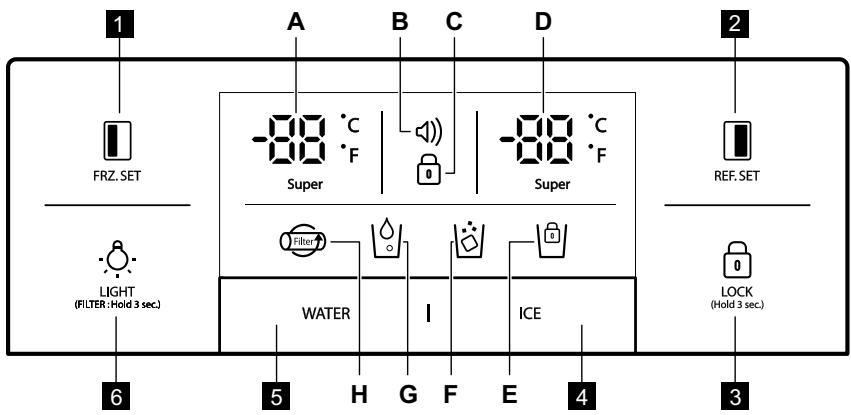

FRZ. SET
Selection button for freezer compartment temperature.

REF. SET
Selection button for refrigerator compartment temperature.

LOCK (Hold 3 sec.)
Press this button to prevent settings from being accidentally changed. To release the button, press it for longer than 3 seconds. The display switches off.
4 A. Click the ice button: Cube ice function on l
B. After No. 1 click the ice button again: Crushed ice function on | ·s |
C. After No. 2 click the Ice button again: Cube ice function on | |
D. If you click the Ice button for seconds: Ice lock on .
Selection button for Water Dispensing
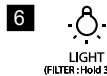
LIGHT/FILTER button:
- Button for switching on a dispenser light.
- Button for filter exchange or reset. After exchanging filter or in order to reset, press this button for 3 seconds.
| Indicators (A-H) | Description |
| A. Super | Freezer temperature indicator |
| B. | Alarm display (no sound) Customers can be informed of tem- perature status when it normally rises due to accidents (e.g. blackouts) 1. Alarm icon blinks displaying the highest inner temperature 2. Alarm stops when button is pressed and display shows tem- perature control value |
| C. | Lock indicator |
| D. Super | Refrigerator temperature indicator |
| E. | Lock for Ice Maker indicator |
| F. | Ice Dispensing indicator |
| G. | Water Dispensing indicator |
| H. | Filter Exchange display After 6 months of the first power input, the icon will flicker. |
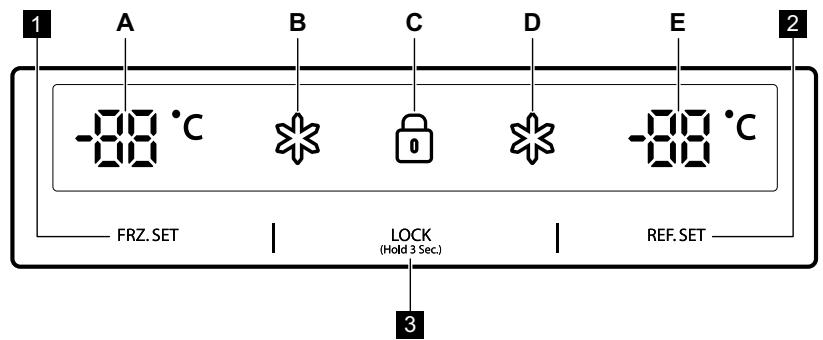
NON DISPENSER MODEL
1 FRZ. SET
Selection button for freezer compartment temperature
2 REF. SET
Selection button for refrigerator compartment temperature
3 LOCK
(Hold 3 Sec.)
Lock button Press this button to prevent settings from being accidentally changed. To release the button, press it for longer than 3 seconds. For further technical information please refer to the rating plate on the internal leftside of the appliance and in the energy label.
| Indicators (A-E) | Description |
| A. -80 °C | Freezer temperature indicator |
| B. * | “Super “indicator for freezer” |
| C. ☑ | Lock indicator |
| D. * | “Super” indicator for refrigerator |
| E. -80 °C | Refrigerator temperature indicator |
6. BEFORE FIRST USE
INSTALLING WATER LINE
1. For models with Automatic Ice Maker
- The water pressure should be 2.0 12.5 ~kgf/cm^2 or more to run the Automatic Ice Maker.
- Check your tap water pressure. If a cup of 180 cc is full within 10 seconds, the pressure is appropriate.
-
If the water pressure is not high enough to run the Automatic Ice Maker, call the local plumber to get an additional water pressure pump.
-
When installing the water tubes, ensure they are not close to any hot surfaces.
- The water filter only "filters" water. It does not eliminate any bacteria or microbes.
- The filter life depends on the amount of use. We recommend you replace the filter at least once every 6 months. When attaching the filter, place it for an easy access (to remove and replace).

Note: After 6 months of first power input, icon is flickering. To eliminate the icon flickering, press the light button for 3 seconds after exchanging the water filter.
- After installing refrigerator and water line system, select WATER on your control panel and press it for 2-3 minutes to supply water into the water tank and dispense water.
7. DAILY USE
TEMPERATURE CONTROL
When the appliance is plugged in for a first time, the temperature mode is set to Middle.
DISPENSER MODEL
Freezer Compartment

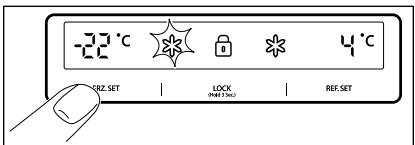
For temperature setting push FRZ_SET button, until desired value displays.
For Faster Freezing function hold FRZ. SET button until super LED turns on. To stop this function, just push the button again.
Refrigerator Compartment

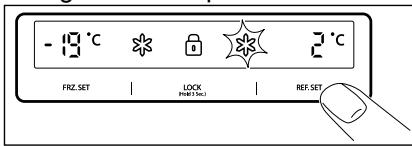
For temperature setting push REF:SET button, until desired value displays.
For Faster Cooling function hold REF. SET button until super LED turns on. To stop this function, just push the button again.

Temperature indicator convert function (Fahrenheit-Celsius)
Default setting is Celsius. Press lock button to enter locked mode. Under the locked mode, press and WATER button at the same time for 10 seconds to swap temperature scale.
NON DISPENSER MODEL
Freezer Compartment
For temperature setting push
FRZ. SET button until desired temperature displays.
For Faster Freezing function hold
FRZ. SET button until super LED
turns on. To stop this function, just push the button again.
Refrigerator Compartment
For temperature setting push
REF. SET button until desired temperature displays.
For Faster Cooling function hold
REF. SET button until super LED
turns on. To stop this function, just push the button again.

CAUTION!
Food in refrigerator can be frozen if the ambient temperature of the refrigerator is below 5^ C.
HIGH TEMPERATURE MODE
dispensenser MODEL
An increase in temperature in freezer or refrigerator compartment is indicated by:
- flashing the alarm icon (buzzer does not sound)
- electronic system shows the maximum temperature reached inside the compartments

Even though normal operation of the appliance is restored and inner temperature reaches a normal range, alarm icon still blinks and display indicator shows the highest temperature reached.

When you press Lock button alarm mode is terminated and alarm icon goes off. The display shows adjusted temperature value.
NON DISPENSER MODEL
An increase in temperature in freezer or refrigerator compartment is indicated by:
- flashing of a display of freezer or / and refrigerator compartment
- electronic system shows the maximum temperature reached inside the compartments

Even though normal operation of the appliance is restored and inner temperature reaches a normal range, the display still flashes and the highest temperature reached is indicated.

When you press Lock button LOCK (Hold 3 Sec.) high temperature mode is terminated and the display shows adjusted temperature value.
SWITCHING ON
To switch on the appliance, insert the plug into the main socket.
"OFF" FUNCTIONS
- Interior lights of the appliance turn off when the door is open for more than 10 minutes
-
Display Off function:
-
5 minutes after no button is pressed or no doors are open, all the display LED lamps switch off except for WATER, ICE and icon
-
After the LED off mode, the appliance returns to a normal display mode when you press any button or open the door.
-
System Off function (Power Off function):
you can stop operating the appliance without unplugging it, especially during holiday
- pressing FRZ. SET and REF. SET button at the same time for 5 seconds result in switching off the appliance
- during the "OFF" mode freezer and refrigerator temperature displays ——. Other LED lights go off and the whole operation of your appliance stops.
- on the contrary, hold button FRZ. SET and REF. SET together for 5 seconds to clear the "OFF" function
DOOR OPEN ALARM
An acoustic alarm will sound if refrigerator or freezer door is left open for 1 minute. The alarm will stop after 5 minutes. When normal conditions are restored (door is closed), the alarm stops.
OPTIONS
MAGIC COOL ZONE

When you plug the appliance for a first time FRESH LED is ON.
For changing settings step by step use SELECT button.
| Step | Display | Target Temperature |
| 1. | FRESH | +5°C to +6°C. |
| 2. | VEGETABLE | +3°C to +4°C. |
| 3. | FISH | -1°C to +0°C. |
| 4. | MEAT | -3°C to -2°C. |
dispensenser
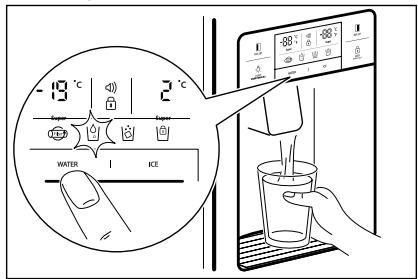
Select WATER or ICE button and smoothly push the lever with you cup, after 2 seconds:
If you pressed WATER button, icon will light up
If you pressed ICE button, icon will light up.
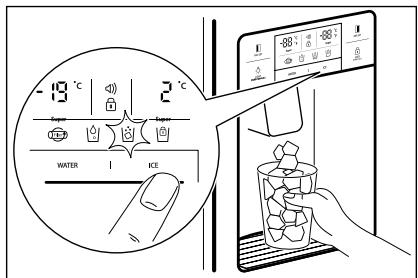
When cleaning the ice cubes case assembly or you do not use it for a longer time, remove the ice cubes from the Ice Storage Case and lock the Ice Maker by pushing ICE button for 3 seconds. will light up.

CAUTION!
Avoid using thin fragile cups or crystal glasses while collecting ice cubes.

CAUTION!
If the ice is discoloured, stop using the dispenser and call a service agent.

Use only ice from this appliance.
AUTOMATIC ICE MAKER
- About 10 ice cubes are made at one time, 14-15 times a day. If the Ice Storage Case is full, ice making stops.
- It is normal for Ice Maker to make banging sounds when ice cubes are falling into Ice Storage Case.
- To prevent a bad odour or smells, regularly clean the Ice Cube Storage Case.
- If the amount of ice in the storage case is not sufficient, the ice may not be dispensed. Wait a day or so to make more ice.
- If the ice does not dispense easily, ensure the dispenser outlet is not blocked.
- If ice cubes get stuck and do not dispense, pull out the Ice Storage Case and separate the ice cubes which may have stuck together.

CAUTION!
If the amount of water which is supplied to Ice Maker needs adjusting, call for a service agent.
8. HINTS AND TIPS
8.1 Hints for energy saving
- Freezer: The internal configuration of the appliance is the one that ensures the most efficient use of energy.
- Fridge: Most efficient use of energy is ensured in the configuration with the drawers in the bottom part of the appliance and shelves evenly distributed. Position of the door bins does not affect energy consumption.
- Do not open the door frequently or leave it open longer than necessary.
- Freezer: The colder the temperature setting, the higher the energy consumption.
- Fridge: Do not set too high temperature to save energy unless it is required by the characteristics of the food.
- If the ambient temperature is high and the temperature control is set to low temperature and the appliance is fully loaded, the compressor may run continuously, causing frost or ice formation on the evaporator. In this case, set the temperature control toward higher temperature to allow automatic defrosting and to save energy this way.
- Ensure a good ventilation. Do not cover the ventilation grilles or holes.
8.2 Hints for freezing
- Activate FastFreeze function at least 24 hours before placing the food inside the freezer compartment.
- Before freezing wrap and seal fresh food in: aluminium foil, plastic film or bags, airtight containers with lid.
- For more efficient freezing and thawing divide food into small portions.

CAUTION!
In case of power failure ice cubes may melt and flow down to the floor. If you expect such situation to last for long hours, pull out the case and remove the ice cubes from it, then replace it back.
- It is recommended to put labels and dates on all your frozen food. This will help to identify foods and to know when they should be used before their deterioration.
- The food should be fresh when being frozen to preserve good quality.
- Especially fruits and vegetables should be frozen after the harvest to preserve all of their nutrients.
- Do not freeze bottles or cans with liquids, in particular drinks containing carbon dioxide - they may explode during freezing.
- Do not put hot food in the freezer compartment. Cool it down at room temperature before placing it inside the compartment.
- To avoid increase in temperature of already frozen food, do not place fresh unfrozen food directly next to it.
- Place food at room temperature in the part of the freezer compartment where there is no frozen food.
- Do not eat ice cubes, water ices or ice lollies immediately after taking them out of the freezer. Risk of frostbites.
- Do not re-freeze defrosted food. If the food has defrosted, cook it, cool it down and then freeze it.
8.3 Hints for storage of frozen food
- Fresh food compartment is the one marked (on the rating plate) with
- Good temperature setting that ensures preservation of frozen food products is a temperature less than or equal to -18^ .
Higher temperature setting inside the appliance may lead to shorter shelf life.
- The whole freezer compartment is suitable for storage of frozen food products.
- Leave enough space around the food to allow air to circulate freely.
- For adequate storage refer to food packaging label to see the shelf life of food.
- It is important to wrap the food in such a way that prevents water, humidity or condensation from getting inside.
8.4 Shopping tips
After grocery shopping:
- Ensure that the packaging is not damaged - the food could be deteriorated. If the package is swollen or wet, it might have not been stored in the optimal conditions and defrosting may have already started.
- To limit the defrosting process buy frozen goods at the end of your grocery shopping and transport them in a thermal and insulated cool bag.
- Place the frozen foods immediately in the freezer after coming back from the shop.
If food has defrosted even partially, do not re-freeze it. Consume it as soon as possible. - Respect the expiry date and the storage information on the package.
8.5 Shelf life for freezer compartment
| Type of food | Shelf life (months) |
| Bread | 3 |
| Fruits (except citrus) | 6 - 12 |
| Vegetables | 8 - 10 |
| Leftovers without meat | 1 - 2 |
| Dairy food: | |
| Butter | 6 - 9 |
| Soft cheese (e.g. mozzarella) | 3 - 4 |
| Hard cheese (e.g. parmesan, cheddar) | 6 |
| Seafood: | |
| Fatty fish (e.g. salmon, mackerel) | 2 - 3 |
| Lean fish (e.g. cod, flounder) | 4 - 6 |
| Shrimps | 12 |
| Shucked clams and mussels | 3 - 4 |
| Cooked fish | 1 - 2 |
| Meat: | |
| Poultry | 9 - 12 |
| Beef | 6 - 12 |
| Pork | 4 - 6 |
| Lamb | 6 - 9 |
| Sausage | 1 - 2 |
| Ham | 1 - 2 |
| Leftovers with meat | 2 - 3 |
8.6 Hints for fresh food refrigeration
- Freezer compartment is the one marked with
- Good temperature setting that ensures preservation of fresh food is a temperature less than or equal to +4^ .
Higher temperature setting inside the appliance may lead to shorter shelf life of food.
- Cover the food with packaging to preserve its freshness and aroma.
Always use closed containers for liquids and for food, to avoid flavours or odours in the compartment. - To avoid the cross-contamination between cooked and raw food, cover the cooked food and separate it from the raw one.
It is recommended to defrost the food inside the fridge. - Do not insert hot food inside the appliance. Make sure it has cooled down at room temperature before inserting it.
- To prevent food waste the new stock of food should always be placed behind the old one.
8.7 Hints for food refrigeration
- Meat (all types): wrap in a suitable packaging and place it on the glass shelf above the vegetable drawer. Store meat for at most 1-2 days.
- Fruit and vegetables: clean thoroughly (eliminate the soil) and place in a special drawer (vegetable drawer).
- It is advisable not to keep the exotic fruits like bananas, mangos, papayas etc. in the refrigerator.
- Vegetables like tomatoes, potatoes, onions, and garlic should not be kept in the refrigerator.
Butter and cheese: place in an airtight container or wrap in an aluminium foil or a polythene bag to exclude as much air as possible. - Bottles: close them with a cap and place them on the door bottle shelf, or (if available) on the bottle rack.
Always refer to the expiry date of the products to know how long to keep them.
9. CARE AND CLEANING
CLEANING OF THE INTERIOR PARTS
Use cloth with water and mild (neutral) detergent to clean.
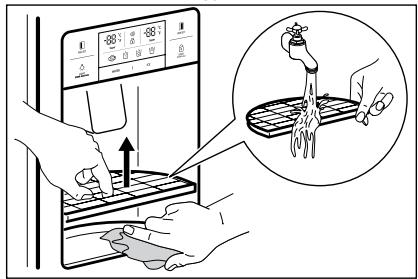
1. Dispenser Water Shelf
Remove the spill grill and clean the water shelf regularly (the spill shelf is not self-draining).
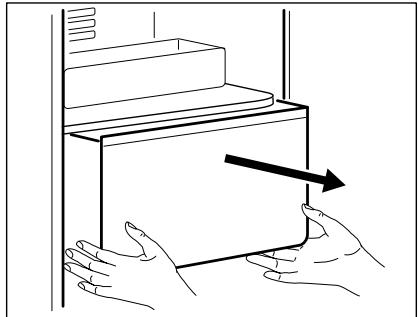
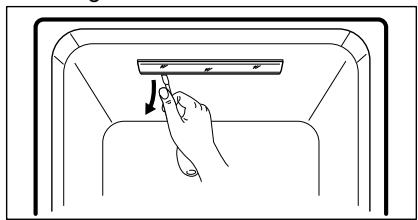
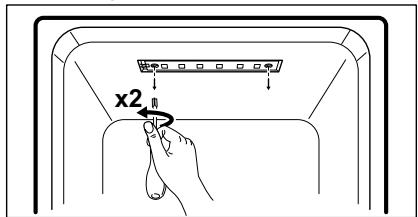
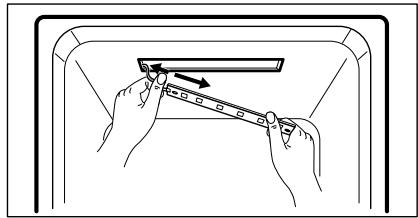
2. Ice Cube Storage Case
- Removing: pull up the case assembly forward to remove.
- Replacing: fit to the side grooves and insert to the end. If it is difficult to fully insert the case, remove it, rotate the swirl coil in the case or drive mechanism a quarter turn and insert again.
- Do not store ice cubes for too long.
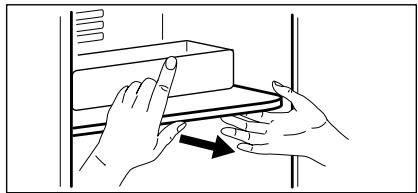
- Freezer and Refrigerator Pockets Hold both ends and pull up.
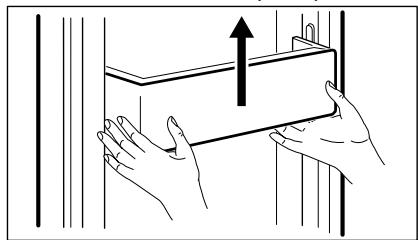
- Freezer and Refrigerator Shelves Open the door completely, then pull shelves forward to remove.

5. Vegetable and Fruit Case
Pull forward and lift up a bit to remove.

CLEANING OF DOOR PACKAGING
Use cloth with mild (neutral) detergent.
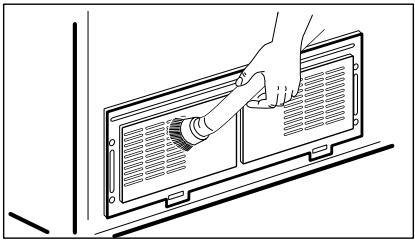
CLEANING OF THE BACK OF THE APPLIANCE (MACHINE ROOM)
Remove dust on a grill with a vacuum cleaner at least once a year.
CHANGING THE INTERIOR LED LIGHT

CAUTION!
LED light should be replaced only by a service agent or similarly qualified person.

CAUTION!
Be sure to unplug the appliance first!
Freezer and refrigerator LED changing
- Separate a back side of a LED cover using a screwdriver.
- Separate the LED cover and loosen 2 fixing screws for a LED plate.
- Disconnect a harness of the LED plate and change LED.

An assembly method is the opposite of a disassembling sequence
10. TROUBLESHOOTING
WHAT TO DO IF…

Please check up the following troubleshooting tips before you call for service!
| Problem | Possible cause | Solution |
| It never gets cold inside. Freezing and refrigerating is not sufficient. | ·Is the appliance unplugged? ·Is temperature set to LOW mode? ·Is the appliance under a direct sunlight or is any heat appliance placed near it? ·Is the space between the back of the appliance and the wall too small? | ·Plug in the appliance. ·Set temperature mode to MIDDLE or HIGH. ·Move to a place where there is no direct sun-light, no heat appliances around. ·Keep sufficient space (more than 10 cm) between the back of the appliance and the wall. |
| Foods in the appliance get frozen. | ·Is temperature set to STRONG mode? ·Is surrounding temperature too low? ·Is the food with much moisture stored close to the cold air spout? | ·Set temperature to MID-DLE or LOW mode. ·Foods can be frozen if ambient temperature is below 5 °C. Move to a place where the temperature is over 5 °C. ·Place foods with moisture on the shelves close to the doors. |
| Strange sound from the appliance. | ·Is floor beneath the appliance uneven? ·Is the space between the back of the appliance and the wall too small? ·Do any objects or other stuff touch the appliance? | ·Move the appliance to a level and even floor. ·Keep sufficient space. ·Remove any object away which touches the appliance. |
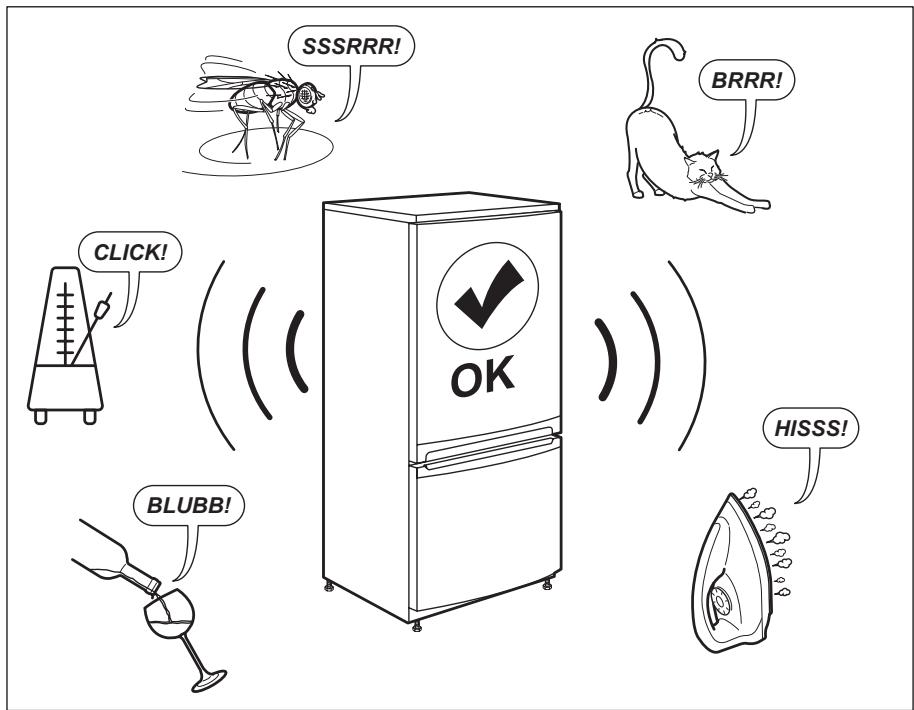
| Strange sounds: cracking, clicking, water flowing, humming or buzzing. | It is normal (if the appliance is not leveled, the sound can be louder). | |
| Odour or disgusting smell from the inside. | • Is the food stored uncovered or unwrapped? • Are the shelves and pockets stained with food stuff? • Is the food stored for too long? | • Be sure to cover and wrap the foods. • Clean the interior parts of the appliance regularly. Once smell gets soaked to those parts, it is not easy to remove. • Do not store foods for too long. • The appliance is neither a perfect nor a permanent food keeper. |
| Door do not open easily. | • Was the door closed and open again immedi-dately? | • In this case wait for a minute, then it will open easily. |
| Frost and dew inside the appliance and on the cabinet surface. | • Was the door open for too long? • Were the foods with much moisture stored uncovered or un-wrapped? • Is temperature and/or humidity around the appliance high? | • Do not leave the door open for a long time. • Be sure to cover and wrap the foods. • Install the appliance in a drier and cooler place. |
| Front and side of the appliance feels warm or hot. | It is normal. |
AMBIENT TEMPERATURE
This appliance is designed to operate in ambient temperature specified by its category marked on the rating plate.
This appliance is intended to be used at ambient temperature ranging from 10^ to 43^ .

Internal temperature may be affected by factors such as location of the appliance, ambient temperature or frequency of door opening.
ACCESSORIES
Filter Box
Water Supply Kit
- User Manual
11. NOISES
12. TECHNICAL DATA
- The technical information is situated in the rating plate on the internal side of the appliance and on the energy label.
- The QR code on the energy label supplied with the appliance provides a web link to the information related to the performance of the appliance in the EU EPREL database. Keep the energy label for reference together with the user manual and all other documents provided with this appliance.
- It is also possible to find the same information in EPREL using the link https://eprel.ec.europa.eu and the model name and product number that you find on the rating plate of the appliance. See the link www.theenergylabel.eu for detailed information about the energy label.
13. INFORMATION FOR TEST INSTITUTES
Installation and preparation of the appliance for any EcoDesign verification shall be compliant with EN 62552. Ventilation requirements, recess dimensions and minimum rear clearances shall be as stated in this User Manual at Chapter 3. Please contact the manufacturer for any other further information, including loading plans.
ENVIRONMENTAL CONCERNS
Recycle the materials with the symbol Put the packaging in applicable containers to recycle it. Help protect the environment and human health and to recycle waste of electrical and electronic appliances.
Do not dispose appliances marked
with the symbol with the household waste. Return the product to your local recycling facility or contact your municipal office.
OBSAH
- BEZPEČNOSTNI INFORMACE 26
- BEZPEČNOSTNI POKNY 27
- INSTALACE 29
- POPIS SPOTREBICE 31
- OVLÁDACÍ PANEL 33
- PRED PRVNIM POUZITIM 35
7.DENNIPOUZIVANI 36 - TIPY A RADY 39
9.CISTENIA UDRZBA. 42 - ODSTRANOVÁNÍ ZÁVAD 44
11.ZVUKY. 46 - TECHNICKÉ UDAJE 47
- INFORMACE PRO ZKUSEBNY 47
PRO DOKONALÉ VÍSLEDKY
12 Balconnet de porte (compartment
8.4 Consels vos courses
Après vos courses :
4. PRODUCTBESCHRIJVING

DISPENSERMODEL
"OFF" (UIT)-FUNCTIONS
9. MANUTENÇÂO E LIMPEZA
LIMPEZA DO INTERIOR
2. BEZPEČNOSTNÉ POKNY
Servis
REŽIM S VYSOKOU TEPLOTOU
MODEL S DÁVKOVACOM
- Visit our website to:
- CUSTOMER CARE AND SERVICE
- SAFETY INFORMATION
- Children and vulnerable people safety
- General Safety
- SAFETY INSTRUCTIONS
- Service
- Installation
- WARNING!
- Electrical connection
- Use
- Internal light
- Care and cleaning
- Disposal
- INSTALLATION
- Location
- Dimensions
- PRODUCT DESCRIPTION
- NON DISPENSER MODEL
- CONTROL PANEL
- dispensersER MODEL
- LIGHT/FILTER button:
- FRZ. SET
- REF. SET
- LOCK
- BEFORE FIRST USE
- INSTALLING WATER LINE
- For models with Automatic Ice Maker
- DAILY USE
- TEMPERATURE CONTROL
- DISPENSER MODEL
- Freezer Compartment
- Refrigerator Compartment
- Temperature indicator convert function (Fahrenheit-Celsius)
- CAUTION!
- HIGH TEMPERATURE MODE
- dispensenser MODEL
- SWITCHING ON
- "OFF" FUNCTIONS
- DOOR OPEN ALARM
- OPTIONS
- MAGIC COOL ZONE
- dispensenser
- AUTOMATIC ICE MAKER
- HINTS AND TIPS
- Hints for energy saving
- Hints for freezing
- Hints for storage of frozen food
- Shopping tips
- Shelf life for freezer compartment
- Hints for fresh food refrigeration
- Hints for food refrigeration
- CARE AND CLEANING
- CLEANING OF THE INTERIOR PARTS
- Dispenser Water Shelf
- Ice Cube Storage Case
- Vegetable and Fruit Case
- CLEANING OF DOOR PACKAGING
- CLEANING OF THE BACK OF THE APPLIANCE (MACHINE ROOM)
- CHANGING THE INTERIOR LED LIGHT
- Freezer and refrigerator LED changing
- TROUBLESHOOTING
- WHAT TO DO IF…
- AMBIENT TEMPERATURE
- ACCESSORIES
- NOISES
- TECHNICAL DATA
- INFORMATION FOR TEST INSTITUTES
- ENVIRONMENTAL CONCERNS
- OBSAH
- PRO DOKONALÉ VÍSLEDKY
- Consels vos courses
- PRODUCTBESCHRIJVING
- "OFF" (UIT)-FUNCTIONS
- MANUTENÇÂO E LIMPEZA
- LIMPEZA DO INTERIOR
- BEZPEČNOSTNÉ POKNY
- Servis
- REŽIM S VYSOKOU TEPLOTOU
- MODEL S DÁVKOVACOM
Brand : AEG
Model : RMB76121NX
Category : Fridge Freezer