TASSIMO VIVY2 - Coffee maker BOSCH - Free user manual and instructions
Find the device manual for free TASSIMO VIVY2 BOSCH in PDF.
User questions about TASSIMO VIVY2 BOSCH
0 question about this device. Answer the ones you know or ask your own.
Ask a new question about this device
Download the instructions for your Coffee maker in PDF format for free! Find your manual TASSIMO VIVY2 - BOSCH and take your electronic device back in hand. On this page are published all the documents necessary for the use of your device. TASSIMO VIVY2 by BOSCH.
USER MANUAL TASSIMO VIVY2 BOSCH
Register your new Bosch now: www.bosch-home.com/welcome

TCA 53..

BOSCH
de Gebrauchsanleitung
en Instruction manual
fr Mode d'emploi
nl Gebruiksaanwijzing
es Instrucciones de uso
pt Instruções de serviços
ru HnctpykunrTO 3Kcnyatauinn
it Istruzioni per l'uso
pl Instrukcja obslugi
| de | Deutsch | 2 |
| en | English | 14 |
| fr | François | 25 |
| nl | Nederland | 37 |
| es | Espanol | 49 |
| pt | Português | 62 |
| ru | Yüscény | 74 |
| it | Italiano | 87 |
| pl | Polski | 99 |
A
B
C
D

8

E
Sicherheitshinweise
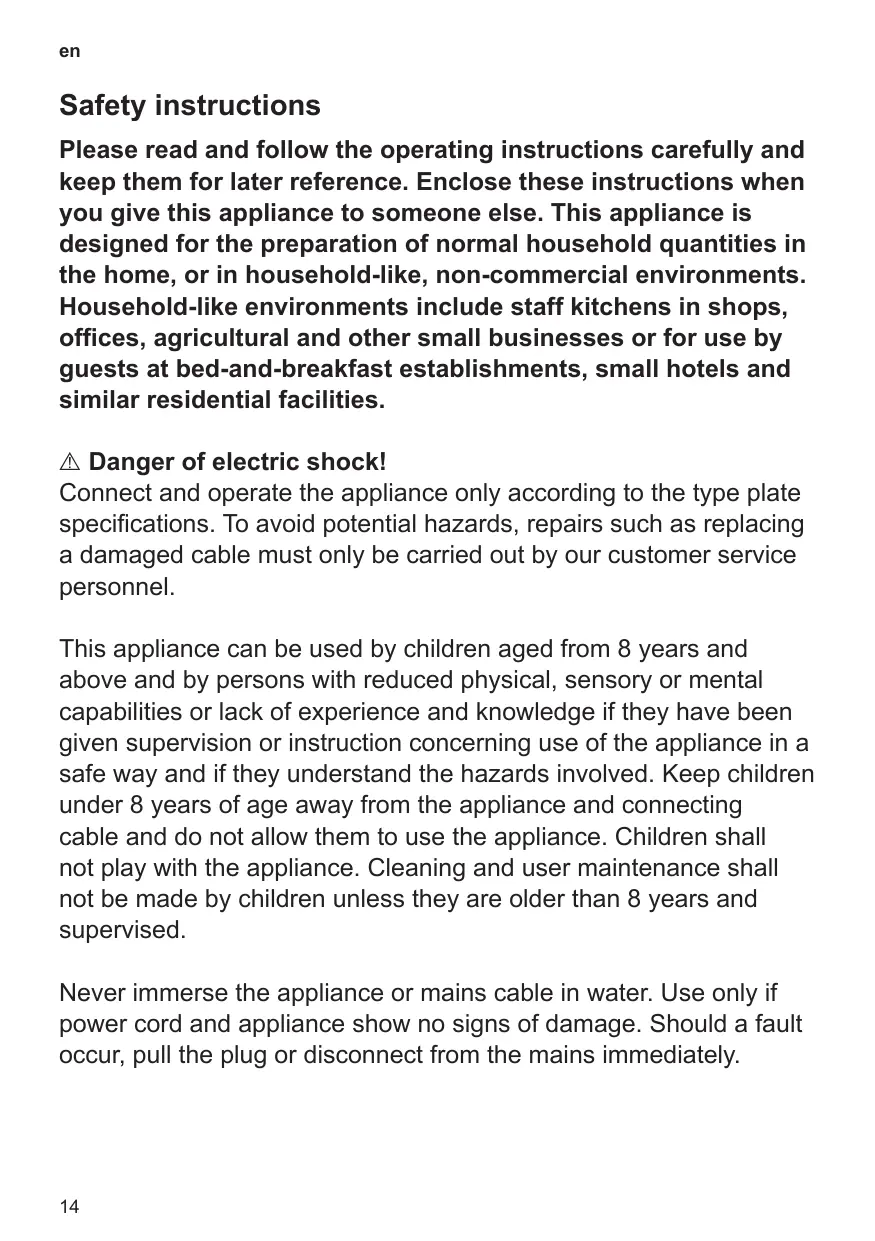
Please read and follow the operating instructions carefully and keep them for later reference. Enclose these instructions when you give this appliance to someone else. This appliance is designed for the preparation of normal household quantities in the home, or in household-like, non-commercial environments. Household-like environments include staff kitchens in shops, offices, agricultural and other small businesses or for use by guests at bed-and-breakfast establishments, small hotels and similar residential facilities.
Danger of electric shock!
Connect and operate the appliance only according to the type plate specifications. To avoid potential hazards, repairs such as replacing a damaged cable must only be carried out by our customer service personnel.
This appliance can be used by children aged from 8 years and above and by persons with reduced physical, sensory or mental capabilities or lack of experience and knowledge if they have been given supervision or instruction concerning use of the appliance in a safe way and if they understand the hazards involved. Keep children under 8 years of age away from the appliance and connecting cable and do not allow them to use the appliance. Children shall not play with the appliance. Cleaning and user maintenance shall not be made by children unless they are older than 8 years and supervised.
Never immerse the appliance or mains cable in water. Use only if power cord and appliance show no signs of damage. Should a fault occur, pull the plug or disconnect from the mains immediately.
Risk of suffocation!
Do not allow children to play with packaging material.
Risk of scalding!
The nozzle for hot water and steam gets very hot. Hold the nozzle by the plastic part only, not by the metal parts. When steam or hot water is released, the nozzle may initially sputter.
Risk of injury!
Do not reach into the grinding unit.
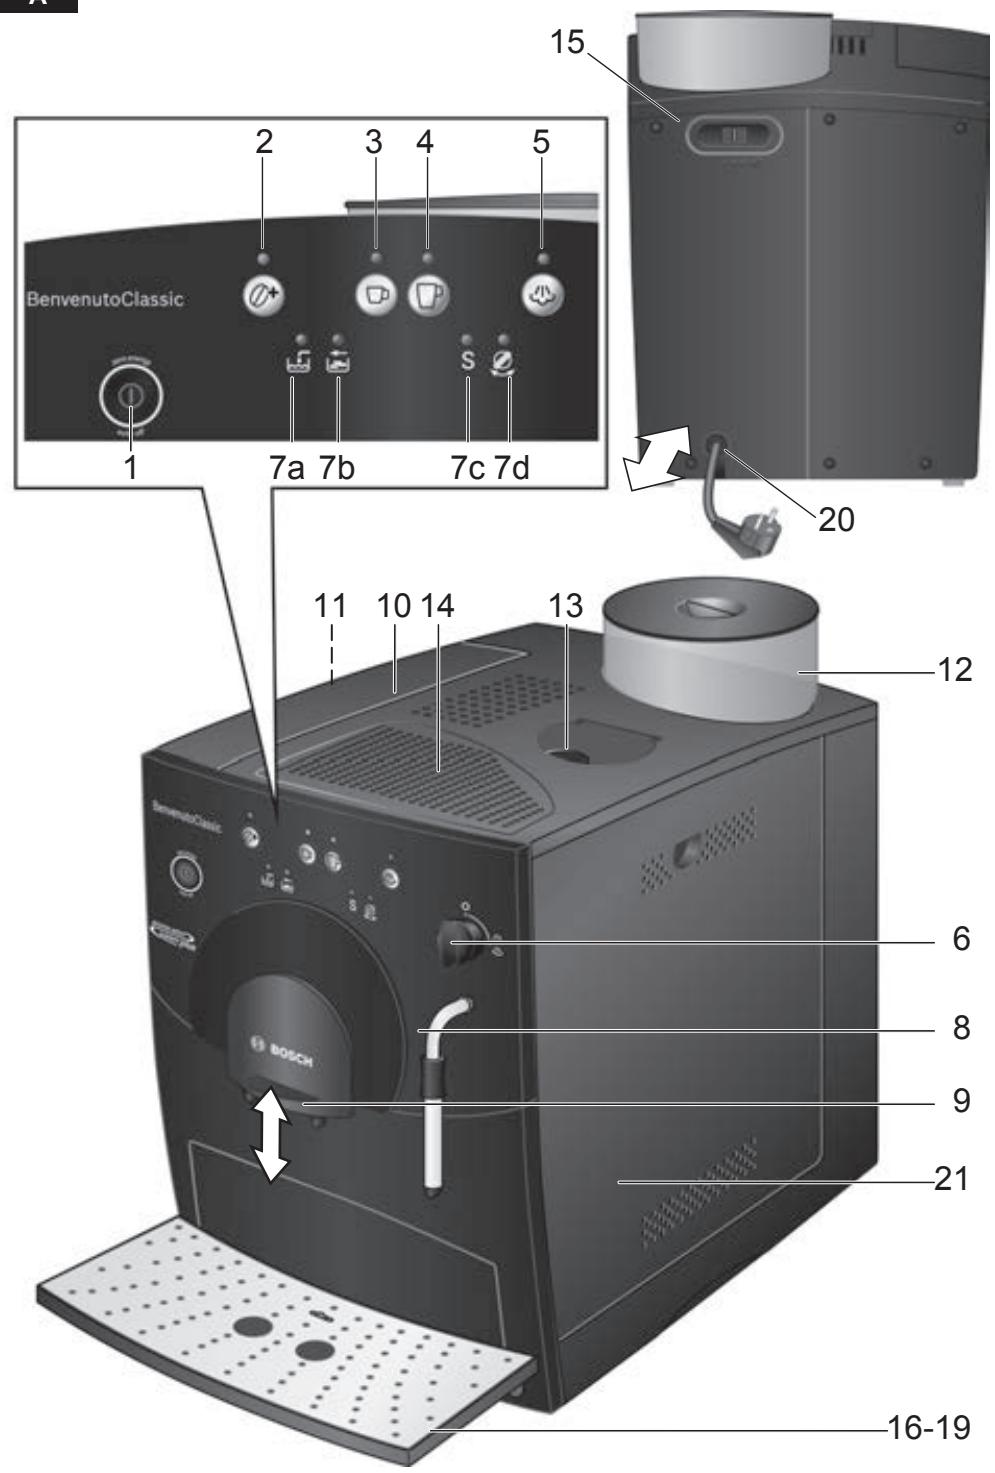
Overview
Figures A-E
1 Power switch (on/off) auto off
2 Coffee strength button ^+
3 Coffee dispensing button
4 Coffee dispensing button
5 Steam generation button 必
6 Hot water/steam dial 小/少
7 LED display
a Add water
b Empty tray
c Run service programme S
d Turn dial
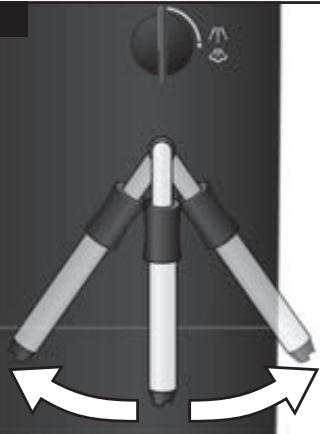
8 Nozzle (for hot water/steam)
a Plastic mounting
b Sleeve
c Nozzle tip
9 Height-adjustable coffee outlet
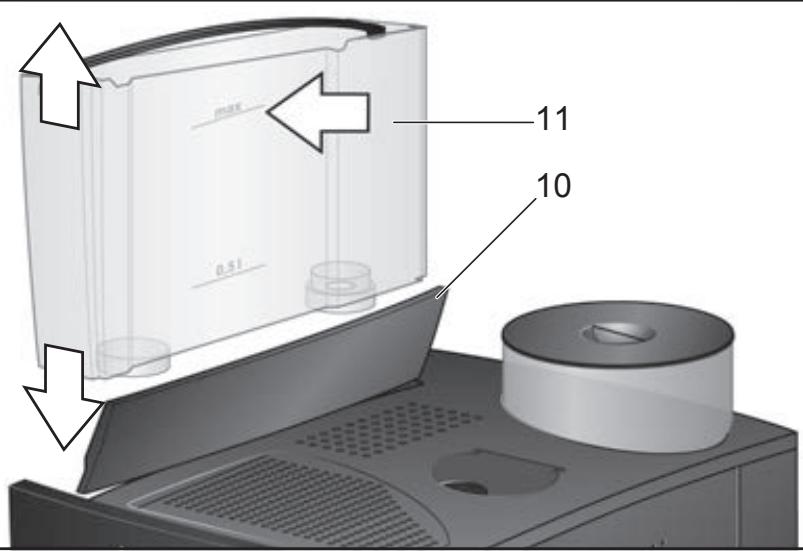
10 Lid for water tank
11 Removable water tank
12 Bean container with aroma cover
13 Cleaning tablet duct
14 Cup shelf (warming function)
15 Sliding switch for adjusting grind
16 Grade
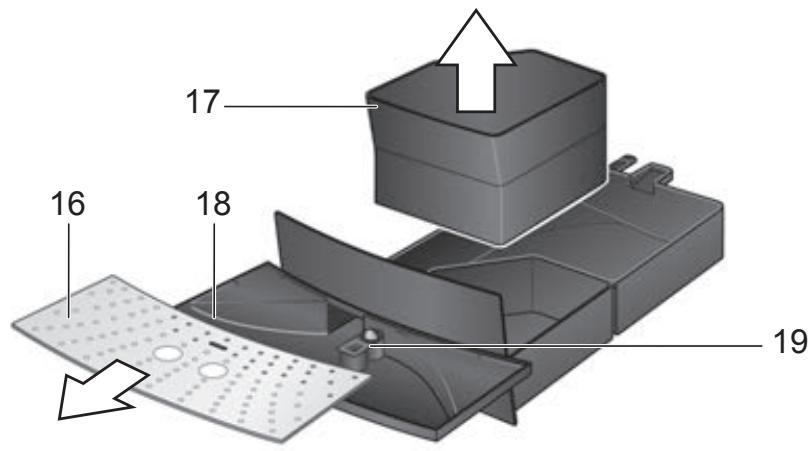
17 Coffee grounds tray
18 Residual water tray
19 Float
20 Cord storage compartment
21 Doors to brewing unit
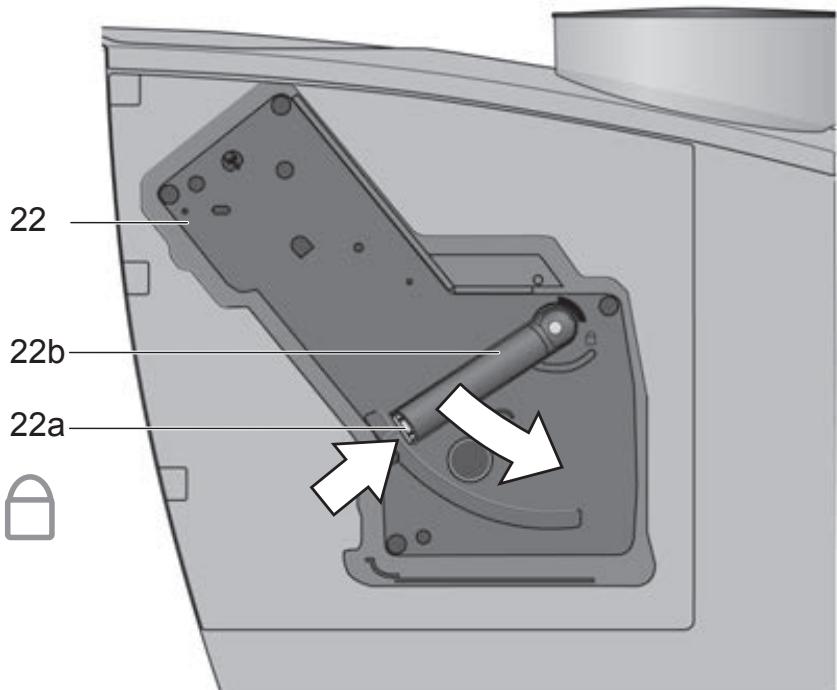
22 Brewing unit
a Button (red)
b Handle
Before using for the first time
General
Fill the appropriate container using only pure, cold, uncarbonated water and only roasted beans (preferably espresso or coffee bean blends for fully automatic coffee machines). Do not use coffee beans that have been glazed, caramelized or treated with other additives containing sugar, since they will block the grinding unit.
This appliance can be adjusted for use with different water hardness values (see "Setting the water hardness").
Switching on the appliance
- Place the appliance on a flat, water-resistant surface.
- Pull enough of the power cord out of the storage compartment and plug it into the electrical socket.
- Remove and rinse the water tank 11 and fill it with fresh cold water. Do not fill above the "max" mark.
- Replace the water tank 11 and push it firmly down into place.
- Fill the bean container with coffee beans.
- Make sure that the hot water/steam dial 6 is at "O".
- Press the power switch 1 auto off to switch on the appliance.
Filling the system
When switched on for the first time, the water pipes in the appliance must be filled.
- Place a cup under the nozzle 8.
- Turn the dial 6 to /ɪv/ɪs. Water runs into the cup.
As soon as flashes, turn the rotary knob 6 to "O".
- The coffee dispensing buttons 3 and 4 now flash, the appliance rinses automatically and heats up.
The appliance is ready for use as soon as both LEDs light up.
Controls
1 Power switch auto off
The auto off power switch can be used to turn the power supply on or off.
After switching on the power supply, the appliance heats up, rinses and is then ready for use. The dispensing buttons 3 and 4 both light up.
The appliance does not rinse if it is still warm when switched on.
If the appliance is not manually switched off, it will switch off automatically after approx. 10 minutes after the last dispensing operation and then rinse. The pre-set switch-off time can be changed (see section "Automatic Switch-Off auto off").
The appliance will not rinse if:
- there was no coffee drawn after switching on the machine.
steam was drawn shortly before switching off the machine. - only hot water or steam were drawn.
2 Coffee strength button ^+
By pressing the button ^+ , the coffee strength can be set:
^+ LED does not light = Normal setting
^+ LED lights = Strong setting
^+ LED flashing = Bean container empty
3 Dispensing button Small coffee
With this button, a small cup (approx. 40ml ) of coffee can be dispensed.
- Press the button 3. The LED will start to flash. The coffee is ground, brewed and poured into the cup. Both LEDs light up as soon as the process is finished.
The beverage size can be changed (see section "Changing volume dispensed").
4 Dispensing button Large coffee
With this button, a large cup (approx. 125ml) of coffee can be dispensed.
- Press the button 4 . The LED will start to flash. The coffee is ground, brewed and poured into the cup. Both LEDs light up as soon as the process is finished.
The beverage size can be changed (see section "Changing volume dispensed")
5 Steam generation button
The steam button 心 generates steam for foaming or warming.
6 Steam dispensing dial
Hot water or steam can be dispensed by turning the dial to 山 or 山 . To dispense steam, the steam generation button must be pressed first (see "Steam for foaming milk").
7 LED display
The various LEDs indicate the following:
on The water tank is empty and needs to be filled
on Trays full:
Empty and replace them
flashing Trays missing:
Reinsert them
S on Run the service programme (see "Service programme")
S flashing Service programme in operation
on Turn dial to /'
flashing Turn dial to "0"
Settings and displays
Setting the water hardness
It is important that the water hardness be set correctly, so that the appliance indicates accurately when the descending programme should be run. The factory setting is a water hardness of 4.
You can check the water hardness by asking your local water supplier.
| Degree | Water hardness | |
| German (°dH) | French (°fH) | |
| 1 | 1-7 | 1-13 |
| 2 | 8-15 | 14-27 |
| 3 | 16-23 | 28-42 |
| 4 | 24-30 | 43-54 |
The appliance must be ready for use.
- Hold down the steam button for at least 5 seconds. The number of LEDs 7a, b, c, d that light up indicates the selected water hardness.
- Press the steam button repeatedly until the correct number of LEDs is lit; e.g. for a hardness of 3, the LEDs 7a, b and c (F, F, S) light up.
- Press the button 20^ once. The selected number of LEDs should light up briefly; this indicates that the desired setting has been saved successfully.
If a water filter (optional extra Order No. 461732) is used, the water hardness should be set to 1.
Note: If no button is pressed within 90 seconds, the appliance switches to stand-by mode without saving the new settings. In this case, the previous water hardness setting is retained.
The appliance must be rinsed when a filter is first used and after changing the filter.
- Fill the tank with water up to the "0,5l" mark.
- Place a suitable container (approx. "0,5l") under the nozzle 8.
- Set the dial 6 to /ɪs/
- When water stops coming out of the nozzle 8, set the dial back to "O".
- Fill the water tank and the water pipes (see "Switching on the appliance / Filling the system").
Adjusting the grinding unit
Sliding switch 15 adjusts the degree of grinding, from coarse to fine.
Warning
Adjust the grinding unit only while it is running! Otherwise the appliance may be damaged.
-
Press dispensing button 4 .
-
While the grinding unit is running, move the sliding switch 15 to the desired position: the smaller the dots, the finer the grind.
The new setting will not become apparent until the second or third cup is brewed.
Tip: For dark roast coffee beans, choose a coarser grind; for light roast beans, select a finer grind.
Automatic switch-off auto off
The pre-set automatic switch-off time of approx. 10 minutes can be changed.
To do this, press and hold the dispensing button 3 and the button 5 山 at the same time for at least 5 seconds. The LEDs that light up, 7a, b, c and d (S, ), represent the switch-off time set. By pressing the button 5 山 , the switch-off time can be selected:
LED 7a (5) lights up
= Appliance switches off after approx. 10 minutes.
LED 7a and 7b (,) light up
= Appliance switches off after approx. 30 minutes.
LED 7a, 7b and 7c (L, S) light up
= Appliance switches off after approx. 1 hour.
LED 7a, 7b, 7c and 7d (S, S, S) light up
= Appliance switches off after approx. 4 hours.
Pressing button 2^+ saves the selection.
Setting the temperature
This fully automatic coffee machine allows the user to change the temperature of the coffee.
- To do this, press and hold the dispensing buttons 3 and 4 at the same time for at least 5 seconds. The LEDs that light up, 7a, b and c ( , , S), represent the temperature set. By pressing the button 5, the temperature can now be selected: LED 7a ( ) lights up
= Low temperature.
LED 7a and 7b (5, 6) light up
= Medium temperature.
LED 7a, 7b and 7c (L, S) light up
= High temperature.
Pressing button 2^+ saves the selection.
Float
The float 19 in the water tray 18 shows when the tray needs emptying.
- If the float 19 is clearly visible, empty the water tray 18.
Using coffee beans
This fully automatic espresso/coffee machine grinds beans freshly for each brew. If possible, use only beans for fully automatic coffee and espresso machines. Deep-freeze or store in a cool place in sealed, airtight containers. Coffee beans can be ground while frozen.
Important: Fill the water tank with fresh water every day. The tank must always contain sufficient water for operating the appliance. Do not allow it to become empty.
Tip: Pre-warm cups, especially small, thick.
espresso cups, by placing on the cup shelf
14 or rinsing with hot water.
The appliance must be ready for use.
- Place the prewarmed cup(s) under the coffee outlet 9.
Depending on the amount of coffee required, press either dispensing button 3 or 4. The coffee is brewed and then dispensed into the cup(s). - The appliance automatically stops dispensing the coffee as soon as the set quantity has been reached.
1 The brewing process can be terminated at any time by pressing the coffee dispensing button 3 or 4.
Extra coffee
It is possible to dispense the same amount of coffee a second time.
- Press the dispensing button 3 or 4 once again within 3 seconds of brewing.
Note: The second cup is brewed using the previously ground coffee.
Changing volume dispensed
The pre-set quantities for dispensing button
3 (approx. 40ml) and dispensing button
4 (approx. 125 ml) can be changed.
- Press and hold the coffee dispensing button 3 or 4 until the desired volume of coffee has been delivered (range approx. 30 - 220ml ).
The quantity can be changed again at any time. By pressing "Reset", the factory settings are restored.
Reset: The appliance must be ready for use.
- Pull out trays 17 and 18. Press and hold dispensing buttons 3 and 4 at the same time for at least 5 seconds.
- The LEDs 7a, b, c and d (S, S, f) flash briefly as confirmation.
- Reinsert trays 17 and 18.
The standard factory settings have now been reactivated.
Preparing hot water
The appliance must be ready for use.
This function allows water to be heated for a cup of tea, for example.
Risk of burns
The nozzle gets very hot. Do not touch the metal parts.
- Place an appropriate cup under the nozzle 8.
- Push the sleeve on the nozzle 8 all the way down.
- Turn the dial 6 to /ɪʌ/ /əs.
Risk of scalding
When the dial is set to [4]12 ,the nozzle may sputter a little. Do not touch the nozzle 8 or point it at anyone.
- End the process by turning the dial 6 back to "O".
Steam for foaming milk
The appliance must be ready for use. You can foam the milk first and add the coffee on top, or foam the milk separately and pour it into the coffee.
Risk of burns
The nozzle gets very hot. Do not touch the metal parts.
- Push the sleeve on the nozzle 8 all the way down.
- Fill the cup approximately 1/3 full of milk.
- Press the steam button. The LED will start to flash.
1 The appliance will heat up for approx. 20 seconds.
- Immerse the nozzle 8 deep into the milk, but do not let it touch the bottom of the cup.
- As soon as the LED lights up, turn the rotary button 6 to /11/0.
Risk of scalding
When the dial 6 is set to /'ɪ/./, the nozzle 8 may sputter. Escaping steam is very hot and may cause liquids to sputter. Do not touch the nozzle 8 or point it at anyone.
- Rotate the cup slowly until the milk is fully foamed.
- End the process by turning the dial 6 back to "O".
To foam more milk, press the steam button again and repeat the whole process.
Note: When the nozzle 8 has cooled down, clean immediately. Dried residue is difficult to remove.
Tip: If possible, use cold low-fat (1,5% fat) milk.
Steam for heating drinks
Risk of burns
The nozzle gets very hot. Do not touch the metal parts.
The appliance must be ready for use.
- Push the sleeve on the nozzle 8 all the way up.
- Press the steam button. The LED will start to flash.
1 The appliance will now heat up for approx. 20 seconds.
- Immerse the nozzle 8 deep into the liquid you want to heat.
- As soon as the LED lights up, turn the rotary button 6 to /!/心.
Risk of scalding
When the dial 6 is set to /ɪʌ/ 心, the nozzle 8 may sputter a little. Escaping steam is very hot and may cause liquid to sputter. Do not touch the nozzle 8 or point it at anyone.
- End the process by turning the dial 6 back to "O".
To generate more steam, press the steam button 必 again and repeat the whole process.
Note: When the nozzle 8 has cooled down, clean immediately. Dried residue is difficult to remove.
Maintenance and daily cleaning
Risk of electric shock!
Unplug the appliance before cleaning it.
Never immerse the appliance in water.
Do not use a steam cleaner.
- Wipe the outside of the appliance with a damp cloth. Do not use scouring agents.
Always remove any limescale, coffee, milk or descaling fluid residue immediately. Such residue can cause corrosion. - New sponge cloths may contain salts. Salts can cause rust film on stainless steel and must therefore be washed out thoroughly before use.
- Wash all removable parts by hand only.
- Rinse out the water tank 11 with water only.
- Remove, empty and clean the trays for coffee grounds 17 and residual water 18.
- Wipe out the inside of the appliance (tray holders).
- Open the door to the brewing unit 21 and remove any coffee residues. Close the door.
Note: If the appliance is cold when switched on, or if it is switched off after dispensing coffee, it rinses automatically; in other words the system cleans itself.
Nozzle 8 for hot water/steam
- Unscrew the nozzle 8 from the steam pipe.
- Dismantle all parts (Fig. D).
- Clean with a caustic cleaning solution and a soft brush. Clean the tip of the nozzle 8c with a blunt needle.
- Thoroughly rinse and dry all parts.
Brewing unit
The brewing unit can be removed for cleaning (Fig. E).
- Switch off the appliance using the power switch 1 auto off.
- Open the door 21 to the brewing unit 22.
- Hold the red button 22a down and push the handle 22b up until you hear it engage.
- Grasp the brewing unit 22 by the handle, remove carefully, and rinse under running water. Do not use cleaning agents. Do not place in the dishwasher.
- Vacuum the inside of the appliance, or clean it with a damp cloth.
- Reinsert the brewing unit 22 all the way into the appliance.
- Hold the red button 22a down and push the handle 22b down as far as it goes, until you hear it engage. The brewing unit is now secure.
- Close the door of the brewing unit.
Service programme: Combined cleaning and descaling process
If the S LED lights up while the appliance is on, the service programme must be run immediately to clean and descale the appliance. If the service programme is not run as instructed, the appliance may be damaged.
Specially developed descending (Order No. 310967) and cleaning agents (Order No. 310575) can be obtained from our customer service department.
Warning
Each time you run the service programme, follow the instructions for using the cleaning and descending agents.
Never interrupt the service programme!
Do not drink the liquids!
Never use vinegar or vinegar-based products!
Never put descending tablets or other descending materials into the duct for cleaning tablets!
The S LED flashes while the service programme is running (approx. 40 minutes).
Important: If there is a filter in the water tank, it must be removed before the service programme is run.
Starting the service programme
The appliance must be ready for use.
- Empty and replace the trays 17 and 18.
- Press and hold the buttons 4 and 5 必 for at least 5 seconds.
The S LED starts to flash and the appliance rinses the coffee dispenser through twice.
- Empty and reinsert the grounds tray 17.
The LEDs for button and "Add water" light up.
- Place one cleaning tablet in the duct 13.
- Fill the water tank with lukewarm water, add descaling agent and dissolve completely (total liquid 0,5 litres)
or
pour prepared descaling mixture into the water tank (total liquid 0,5 litres).
- Press the steam button 心. The descending process begins. Duration approx. 10 minutes. The descending solution flows into the water tray 18.
The LED lights up.
- Place a suitable container (approx. 0,5 litres) under the nozzle 8.
- Set the dial 6 to /ɪʌ/ 心. The descending process begins. Duration approx. 5 minutes. The descending solution flows into the container.
The LED lights up.
- Empty and reinsert the grounds tray 17.
The steam button LED lights up.
- Empty and clean the water tank 11, fill with fresh water up to the "max" mark and reinsert.
- Place a suitable container (approx. 0,5 litres) under the nozzle 8.
- Press the steam button 心. The cleaning process begins. Water flows into the container.
The LED flashes.
- Turn the dial 6 to "O". The cleaning process begins. Duration approx. 10 minutes. Liquid flows into the coffee grounds tray 17 inside the appliance, then out through the coffee outlet.
The LED lights up.
- Empty, clean and reinsert the trays 17 and 18.
The appliance starts to heat up and is ready for use once the LEDs for dispensing buttons 3 and 4 light up.
Important: If the service programme is interrupted, e.g. due to a power cut, it is vital that the appliance be rinsed before it is used again.
The appliance must be ready for use.
The ^+ and steam button LEDs flash.
- Rinse the water tank 11 thoroughly and fill with fresh water.
- Press the steam button 心. The appliance is rinsed and liquid flows into the tray.
The LED lights up.
- Hold a cup under the nozzle 8 and turn the dial 6 to /ɪʌ/./ɪə. Water runs into the cup.
The LED flashes.
- Turn the dial 6 back to "O".
The appliance rinses and is ready for use again.
Anti-freeze
In order to avoid damage through cold during transportation and storage, the appliance must be emptied completely first.
The appliance must be ready for use.
- Remove, empty, and replace water tank.
- Place a large, narrow container under nozzle 8.
- Press button.
- As soon as the LED lights up, turn the rotary button 6 to /!:/. The appliance will release steam for a while.
- When nozzle 8 stops releasing steam, turn dial back to "O".
- Turn off the appliance.
Disposal

Dispose of packaging in an environmentally-friendly manner. This appliance is labelled in accordance with European Directive 2012/19/EU concerning used electrical and electronic appliances (waste electrical and electronic equipment - WEEE). The guideline determines the framework for the return and recycling of used appliances as applicable throughout the EU. Please ask your specialist retailer about current disposal facilities.
Guarantee
The guarantee conditions for this appliance are as defined by our representative in the country in which it is sold. Details regarding these conditions can be obtained from the dealer from whom the appliance was purchased. The bill of sale or receipt must be produced when making any claim under the terms of this guarantee.
Changes reserved.
Troubleshooting
| Problem | Possible cause | Solution |
| No hot water or steam discharge. | Nozzle 8 is blocked. | Clean nozzle 8. |
| Foam insufficient or too runny. | Sleeve b on nozzle 8 not in correct position. | Push down sleeve b on nozzle 8. |
| Milk not suitable for foaming. | Use cold low-fat (1,5% fat) milk. | |
| Coffee dispensing slows to a trickle. | Coffee is ground too fine. | Adjust the grinding unit to a coarser setting. |
| Coffee not dispensed. | Water tank not filled or not correctly positioned. | Fill water tank and make sure it is in the right position. If necessary, fill water pipes (see “Switching on the appliance”). |
| Coffee has no “crema” (creamy foam). | Unsuitable type of coffee. Beans no longer fresh. | Change type of coffee used. Use fresh beans. |
| Degree of grinding inappropriate for beans. | Optimize degree of grinding. | |
| Grinding unit does not grind the beans. | Beans are not falling into the grinding unit (beans too oily). | Gently tap the bean container. |
| Grinding unit makes a loud noise. | Foreign objects in the grinding unit (e.g. grit, which can be found even in superior types of coffee). | Call the hotline. |
| LED S and button Ø+ flash alternately. | The brewing unit 22 is missing, or is not properly inserted or secured. | Insert and secure the brewing unit 22. |
| If you are unable to solve the problem, please call the hotline. You will find the telephone numbers at the back of these instructions. | ||
He npikacaiTecb K BHyTpeHHIM Yactm Kofoemolkn.
KpaTkni 063op
Pucykn A-E
1 CeTeBOB BbIKHouaTeJIb (BKl/BbIKJ) auto off
2 Knapuwa kpenoctn kope ^+
3 KlaBnna nOdaun D
4 KnaBnHa noaun
5 KnaBnwa 心 (HarpB napa)
6 NIOBOPOTHbI peYyIaTOp /I:/心 (ropeyra BODa/nap)
7 CBeToIOHbIe INdKaTOpbl a 3aJIeTe BOy
bOnopoxHNITeNoIIOHObl c npOBeHnTe cepBnCHyIO npoRpaMMy S d NOBepHnTe pepyIaTOp
8 Hacaika (Дя подачи ratraye Bovbl/napa)
aПл actMaccobarpyka
bBtynka
C HAKOHeuHnK HaCaKn
9 PeryunipyeMoE no BbICoTe ycTpoiCTBO nOdaHn KoFe
10 KpbIiKa eMKoCTn IJIY BoDbl
11 CbemHa eMKoCTb IJI BODbl
12 EmKocTb IaI KoFeiHbIX 3epeH c KpbIuKoI, CoXpaHJUoIeI apOMaT
13 Ⅲaxta dIy 3aIpy3kn IcIeTJnx TabJeTeK
14 Pndctabka dnia yauwek (fynku nnooIgeba)
15 Плзунковий ретуларстени
помona кофе
16 PeWetka
17 POnDOn dJa KoOeHNo rUuN
18 POnDOn DnIa c6opa OCTaTKOB BObl
19 PonnnaBOK
20 Otcek dans xpaHnna Ka6eIa
21Дверцаблoka3abapubаня
22БLOK3aBapuBaHnna KlaBnHa (KpaCha)
b pykOraTka
1 CeteBOB BbIKHouaTeIb auto off
CetBoB BbIKIIOUaTeJIb auto off ClyKNT DnIe BKIIIOHeHn IIN OTKIIIOHeHn IOJaHn 3JKeTpo3Heprnn.
Iocne BkIIOHeHnCeTeBOrBbIKJIIOuTaTeI np6Op HArpeBaet BOy, IpOn3BOIDN IpoMbIKy I rOTOB K 3KcPJIyATAuIM, KaT ToJIbKO 3aRopaIOTcOoba CBeToIDNOHbIX INDnKaTopa KJlAINI NODaCh 3 Pn4P.
Ppi6op He 6ydt npOn3BOuTb npOMbIBKy, ecn npBKnOChm OH bIe TcNbIM.
EcIn npB6op He BbIKJIOUaETcBpyHyU,To npImepHOn uepe3 10 MNHT nocIe nocJeHero OTbopa HAnITka OH OTKJIIOUaETcABTOMaTIuHeckn I pOIN3BOdIT nPOMbIBky. PpeBaPntelbHO hAcTPOeHHoe BpEmr OTKJIIOUeHn MOXHO N3MeHnITb (CM. pa3DeI N «ABTOMaTIuCeCKOE OTKJIIOUeHnE - auto off').
Pπp6op He npOn3BODnT npOMbIKy, ecN:
- NOCJIe BKNIOUeHnKoPe He NoIaBaJcra,
- He3aOJIOI Go BbIKHoueHn IoJaBaJIcR nap,
- IOДаВАПИСТОЛБКО Горая ВODА ИПИ nap.
2 KlaBnua kpenoctn Kope ^+
HaxaTneM KJIaBnUIN ^+ MOKHO HAcTpOnTb KpeNoCTb KoPe:
空 ^ + CBETOДИОДнБИ INДИКATOP He CBETNTcR = 06bIuHaHacTpOka
空 ^ 空 CBEToDIOHbI INHINKaTOP CBeNTcra = HAcTpoiKa Ha KpeNkN KoΦe
^+ CBETOIDNOHbIN HDNKATOP MnraET
=EMKOCtBДПЯ KOFeHbIX 3epeH NycTa
3 KnaBnHa nOaHn D - MaJIeHbKa YaIka KoΦe
3Ta KlnaBnua CnyxNIT JIJI pIPIROTOBNeHnMaIeHbKoYaUKn KoOe (OK. 40 MЛ).
- HaxMMTe KlnaBnUy 3 D, CBeToNDnOHDbI INHdNkATOp NaI HeN Miraet. KoPe MeJeTcR, BapNTcR I TeCET B UaIKy, Oba CBeTONDnOHDbIX INHdNkATOpa 3aRopaHTcR cpa3y NO 3aBePseHIn npoCecca.
Obem HauNTka MoXHO N3MeHHTb (CM. pa3dien «I3meHeHne obbema nOlyuHaemoro KoPe>).
4 KnaBnHa nOdaun P- 6oNbwa YaSha KaOcfe
3Ta KnaBnua CnyxNIT IJIЯ pIpiROTOBHeHnRA 6OJIbwoI yauKn KoPe (OK.125M).
- HaxMMTe KlaBnUy 4 P, CBeTOnIOHbI INHdNkATOp HaI HeN MItaET. KoPe MeJIeTc3, 3aBapINBaEcTc I HAInBaETC B YauShKy, Oba CBeToDIOHbIX INHdNkATopa 3aRopAOTc cpa3y No 3aBepWeHm npocecca.
O6bem HauNTka MoXHO 3MeHHTb (CM. pa3dien «I3meHeHne obbema nolyuamoro KoΦe>).
5KnaBnua nOaunnapa
7 CBeToDnOuNbIe INHdNkaTopbI
CBeueHne mMIRaHHe COOTBeTCTByUOuNX CBETOIOIOnHbIX INDnKATOPOB COO6uaet O CJeNyUoIeM:
CBETNTCA EMKOCbI JnBBOblNyCTa, ee CneJeT CHOBA HANONHHTb
CBETITcI POnIOHOJI 3aONJIHeHJI: ONOPOXHNTE POJIOHOJI IN CHOBAyCTaHOBIne INx HA MecTO
Mnraet IOnIOHObl OTCYCTBYOT: CHOBA yCTaHOBITE IOIOHObl Ha MecTO
S CBETITCA CJIeIyET BbIIOJHnTb cepBnCHyI IO npOrpaMMy, CM. pa3JeI «CepBnCha npOrpamMa»
S Mmraet BbIIOJIHЯETc cepBnchA nporpaMa
CBeTNTc CneNyetyCTaHOBnTB NOBOpOTbI pyyJrTop B NoIOKe-Hne /1:/
Mnraet CJeNyET yCTaHOBtB NOBOPOTbI peYJrTOp B IIOJoxHe «O»
HactpoRn Bn3yaJIbHa nHdNkaZna
YctaHObKa JecTkoCTN BObl
Правиьная установka ќесTKOCТ N BОД baxна ДЯ ообсячени ССБЕВРЕМНо CИнhalизаши N HeOBxODIMOCТУДАLEHIN HAKINI. ПрдварптELBO YCTAHOBЛЕHa CTENEHB ќесTKOCТ N BОД 4. O CTENEH ќесTKOCТ N BОД Bы можete y3HaTb Ha MeCTHOM пpeДпрЯТи N BODOCHa6ЖЕHIN.
Hnkorga He noprjkaTe npnbOp B Body. He nCnoB3yIte napObIe ouHCTnTeJI.
-ПрOTPnTe KOpNc PpIbOpa BnaJXHOITpIkoH.He nCnoJIb3yIte a6pa3INBhIeYnCTaIuIne cpeDCTBa.
Heo6xOIMo He3aMeIITeHbHO ydaJIaTb octaTKn 3BecTN, KoFe, MOJOKa n paCTBopa dIyuaJeHnHaKInn. 3Tu ocTaTKn MOryt npNBecTN K Koppo3nn.
B HOBbIX ry6aTbIX caΦeTKax MoryT coepKaTbC aOni. CoN mOryT npuBecTu K O6pa3OBAHnHO HaJIeta pXaBUnHbI Ha CTaNbHbIX DeTaJIAX, N03tOMy nepeINcNoJb3OBAHnEM ry6aTbIX caΦeTOK INx CLeNyET TuaTeNbHO npONoLOCKaTb.
- PpOMbIbKa BcEs He3aKpeIJIeHHbIX DeTaJIeN IpOu3BOIDITcA NCKHIOHTeJIbHO BpyHyIO.
-ДляпомьвКЕмкOTNIOЛБ3уNTToJIbKO BODY.
- CHNIMITE, ONOPOXHNTE IN NOUHCNTTE NODDHObl IINKoPeyHOnIyU 17 n OCTaTKOB BObl 18.
-ПютпгЕВнтурений постразсво npибopa (ншдя подогов).
- OTKpoIte DBepy 6Ioka 3aBapuBaHnA 21
N yJaJIte OCTaTkn KoPe n3 BHyTpEnHei KaMepbl. DBepy ChOba 3akpoIte.
Yka3aHne: EcIn npnbop BkIIOucaETcB XOJIODHOM COCTOAHIN INN BbIKJIOUaETcN ONCJe npnroTOBLeHn KoFe, IpombIBKa npnbopa npOn3BOIDTCa ABtOMaTNUeCKN. Tem camblm npOn3oJET cAMOOUcNTKa CNTeMbI.
HacaKa 8 dIra ropeyei Bobl/napa
He neIte nCOnb3yEmbIe XKnDkOCTn!
Hn B Koem cnyae He nCnoIb3yIte yKcyc IJIN cpeIcTbHa Na yKcCCHoOCHOBE!
Hn B koem cnyae He 3arpykaite Ta6neTkn DnryyaIeHna Haknnn IIN nDpyrne CpeCTBa DnryaIeHna Haknnn B WaxTy Dnry 3arpy3Kn YnCTraIuXn Ta6neTOK!
Bo Bpemy BbIOnHHeNnCePbUcHoi nporpaMMbl (npIMepHO 40 MmHyT) Mmraet CBToIOIOHbI INDnKaTop S.
Baxhna HnOpmaun: Ecnn B emkoctn I nra BOdbI yCTaHOBneH qINbTp, To nepei 3anyckom cepBcHOn nporpaMMbI erO HeoXoIMO ydaJIHTb.
3anyck cepBnchOn nporpamMbI
AE United Arab Emirates,
BSH Home Appliances FZE
Round About 13,
Plot Nr MO-0532A
Jebel Ali Free Zone – Dubai
Tel.:048814401
mailto:service-uae@bshg.com
www.bosch-home.com/ae
AL Republika e Shqiperise, Albania
AERTECH SH.P.K.
Rruga Qemal Stafa
Pallati ri perball Prokuroris se
Pergjithshme
Hyrja C Kati 10
Tirana
Tel.:0662064794
mailto:g.volina@aertech.al
HEATHERTON, Victoria 3202
Tel.: 1300 368 339
mailto:bshau-as@bshg.com
www.bosch-home.com.au
BA Bosna i Hercegovina, Bosnia-Herzegovina
"HIGH" d.o.o.
Gradačačka 29b
71000 Sarajevo
Info-Line: 061 100 905
Fax: 033 213 513
mailto:delicnanda@hotmail.com
BE Belgique, Belgie, Belgium
BSH Home Appliances S.A.
European Trade Center
Building, 5th floor
1784 Sofia
Tel.: 02 892 90 47
Fax: 02 878 79 72
newsletter:informacia.servis-bg@
bshg.com
www.bosch.home.bg
BH Bahrain,
Khalafat Company
Manama
Tel.:017400553
mailto:service@khalaifat.com
BY Belarus, Benaapycb
OOO"ECX BbITOBaTexHnka"
TeJ.: 495 737 2961
mailto:mok-kdhl@bshg.com
CH Schweiz, Suisse,
+7snt/min (alv 24%
Old Wolverton Road
Wolverton
Milton Keynes MK12 5PT
To arrange an engineer visit, to order spare parts and accessories or for product advice please visit www.bosch-home.co.uk or call
*Calls are charged at the basic rate, please check with your telephone service provider for exact charges
GR Greece, Eλας
BSH Ikiakes Siskeves A.B.E.
Central Branch Service
17 km E.O. Athinon-Lamias &
Potamou 20
14564 Kifisia
PaveAAnvio TnAeawo: 181 82
(AOTIKnXpEwo)
www.bosch-home.gr
HK Hong Kong, 香港
BSH Home Appliances Limited
Unit 1 & 2, 3rd Floor
North Block, Skyway House
3 Sham Mong Road
Tai Kok Tsui, Kowloon
Hong Kong
Tel.: 2565 6151
Fax: 2565 6681
mailto:bosch.hk.service@bshg.com
www.bosch-home.cn
HR Hrvatska, Croatia
BSH kučni urežaj di.o.o.
Kneza Branimira 22
10000 Zagreb
Tel.:016403609
Fax:016403603
mailto:informacije.servis-hr@
bshg.com
www.bosch-home.com/hr
www.bosch-home.com/hu
IE Republic of Ireland
BSH Home Appliances Ltd.
Unit F4, Ballymount Drive
Ballymount Industrial Estate
Walkinstown
Dublin 12
Service Requests, Spares and
Accessories
Tel.: 01450 2655*
Fax: 01450 2520
www.bosch-home.cu.uk
*0.03 € per minute at peak.
Off peak 0.0088 € per minute.
IL Israel,
C/S/B Home Appliance Ltd.
Uiel Building
2, Hamelacha St.
Industrial Park North
71293 Lod
Tel.: 089777222
Fax: 089777245
mailto:csb-serv@zahav.net.il
www.bosch-home.co.il
IN India, Bharat,
BSH Customer Service
Front Office
Shop No.4, Everest Grande,
Opp. Shanti Nagar Bus Stop,
Mahakali Caves Road, Andheri East
Mumbai 400 093
IS Iceland
Smith & Norland hf.
Noatuni 4
105 Reykjavik
Tel.: 0520 3000
Fax: 0520 3011
www.sminor.is
IT Italia, Italy
www.bosch-home.com/it
KZ Kazakhstan, Ka3akCTah
IP Turebekov Yerzhan
Nurmanovich
Jangeldina str. 15
Shimkent 160018
Tel.:0252310006
mailto:evrika_kz@mail.ru
LB Lebanon,
Teheni, Hana & Co.
Boulevard Dora 4043 Beyrouth
P.O.Box 90449
Jdeideh 1202 2040
Tel.: 01 255 211
mailto:Info@Teheni-Hana.com
LT Lietuva, Lithuania
Senuku prekybos centras UAB
Jonavos g.62
44192 Kaunas
Tel.: 0372 12146
Fax: 0372 12165
www.senukai.it
LU Luxembourg
General Serviss Limited
Bullu street 70c
1067 Riga
Tel.: 07424137
mailto:bt@olimpeks.lv
MD Moldova
S.R.L. "Rialto-Studio"
yn. UyceBa 98
2012 KIshnHeB
TeJ./ΦaKc:022 23 81 80
mailto:bosch-md@mail.ru
ME Crna Gora, Montenegro
Elektronika komerc
UI.Slobode 17
84000 Bijelo Polje
Tel./Fax: 050 432 575
Mobil: 069324812
mailto:ekobosch.servis@
t-com.me
MK Macedonia, MaKeDoHnJa
GORENEC
Jane Sandanski 69 lok.3
1000 Skopje
Tel.: 02 2454 600
Mobil: 070 697 463
mailto:gorenec@yahoo.com
MT Malta
Oxford House Ltd.
Notabile Road
Mriehel BKR 14
Tel.: 021 442 334
Fax: 021 488 656
www.oxfordhouse.com(mt
MV Raajyegge Jumhooriyyaa, Maledives
Lintel Investments
Ma. Maadheli, Majeedhee Magu Malé
Tel.: 0331 0742
mailto:mohamed.zuhuree@
lintel.com.mv
NL Nederlande, Netherlands
Unit F2, 4 Orbit Drive
Mairangi Bay
Auckland 0632
Tel.: 094770492
Fax: 094772647
mailto:bshnz-cs@bshg.com
www.bosch-home.co.nz
PL Polska, Poland
Bin Hamran Commercial Centr.
6th Floor 603B
Jeddah 21481
Tel.: 800 124 1247
mailto:service.ksa@bshg.com
www.bosch-home.com/sa
SE Sverige, Sweden
BSH Hushallsapparater AB
Landsvagen 32
169 29 Solna
Tel.: 0771 11 22 77 local rate
mailto:Bosch-Service-SE@bshg.com
www.bosch-home.se
SG Singapore, 新加坡
BSH Home Appliances Pte. Ltd.
TECHPLACE I and
Mo Kio Avenue 10
Block 4012 #01-01
569628 Singapore
Tel.: 6751 5000
Fax: 6751 5005
mailto:bshsgp.service@
bshg.com
www.bosch-home.com.sg
SI Slovenija, Slovenia
BSH Hišni aparati d.o.o.
Litostrojska 48
1000 Ljubljana
Tel.: 01 583 07 01
Fax: 01 583 08 89
mailto:informacije.servis@bshg.com
www.bosch-home.com/si
SK Slovensko, Slovakia
www.bosch-home.com/tr
Achelis Taiwan Co. Ltd
4th floor, No. 112, Sec 1
Chung Hsiao E Road
Taipei ROC 100
Tel.: 02 2321 6222
mailto:Bosch@achelis.com.tw
UA Ukraine, YkpaHa
gama-electronics.com
XS Srbija, Serbia
BSH Kučni aparati d.o.o.
Milutina Milankovića 11^a
11070 Novi Beograd
Tel.: 011 205 23 97
Fax: 011 205 23 89
mailto:informacije.servis-sr@
bshg.com
www.bosch-home.rs
ZA South Africa
BSH Home Appliances (Pty) Ltd.
15th Road Randjespark
Private Bag X36, Randjespark
1685 Midrand-Johannesburg
Tel.: 086 002 6724
Fax: 086 617 1780
mailto:applianceserviceza@
bshg.com
www.bosch-home.com/zao
Call rates depend on the network used
CZ 0251095546
DE 091170440040
DK 44898985
EE 06278730
ES 902245255
FI 0207510700
Calls charged at local or mobile rate
GR 18 182 (aotri xpeo)
HR 013028226
HU 003614895461
IE 014502655
0.03 € per minute at peak. Off peak 0.0088 € per minute.
IL 08977222
IS 05203000
IT 800 829 120 (Line Verde)
LI 052741788
LT 052741788
LU 26349300
LV 067425232
ME 050432575
MK 022454600
NL 0884244010
NO 22660600
PL 801 191 534
PT 214250730
RO 021 203 9748
RU 88002002961
SE 0771 11 22 77 (local rate)
SK 0244452041
SL 012007017
TR 4446333
Cagri merkezini sabit hatlardan aramanin bedeli gehir ici
ücretlendirme, Cep Telefonlarndan ise kullanilan tarifeye gore
degiskenlik gostermedtekdir
US 800 944 2904
XK 044172309
XS 0112139552