
TKA8013 - Coffee maker BOSCH - Free user manual and instructions
Find the device manual for free TKA8013 BOSCH in PDF.
| Product type | Drip coffee maker |
| Brand | BOSCH |
| Model | TKA8013 |
| Maximum capacity | 10 cups (approx. 1.25 L) |
| Minimum quantity | 3 cups (approx. 375 ml) |
| Coffee type | Ground coffee (medium grind) |
| Water reservoir | Removable with level indicator |
| Carafe | Glass with lid, dishwasher safe |
| Filter holder | Swivel, dishwasher-safe filter basket |
| Anti-drip device | Yes |
| Automatic shut-off | Yes, after approx. 2 hours |
| Automatic descaling | Yes, with indicator light (calc) |
| Energy saving function | Yes (automatic shut-off) |
| Exterior cleaning | Damp cloth, no harsh cleaner |
| Reservoir cleaning | Running water, no hard brush |
| Included accessories | Measuring spoon |
| Cable length | Approx. 0.8 m |
| Net weight | Approx. 1.5 kg |
| Dimensions (W x D x H) | Approx. 250 x 200 x 350 mm |
| Warranty | According to distributor's terms |
Frequently Asked Questions - TKA8013 BOSCH
User questions about TKA8013 BOSCH
0 question about this device. Answer the ones you know or ask your own.
Ask a new question about this device
Download the instructions for your Coffee maker in PDF format for free! Find your manual TKA8013 - BOSCH and take your electronic device back in hand. On this page are published all the documents necessary for the use of your device. TKA8013 by BOSCH.
USER MANUAL TKA8013 BOSCH
Congratulations on purchasing this Bosch appliance. You have acquired a high-quality product that will bring you a lot of enjoyment.
Please read the operating instructions carefully and keep them for future reference!
Safety instructions
This appliance is designed for domestic use or for use in non-commercial, household-like environments, such as staff kitchens in shops, offices, agricultural and other small businesses or for use by guests at bed-and-breakfast establishments, small hotels and similar residential facilities.
Risk of electric shock
Connect and operate the appliance only in accordance with the specifications on the rating label.
Do not use if either the power cord or the appliance is damaged.
Keep children away from the appliance. Children should be supervised to ensure that they do not play with the appliance. This appliance is not intended for use by persons (including children) with reduced physical, sensory or mental capabilities, or lack of experience and knowledge, unless they have been given supervision or instruction concerning use of the appliance by a person responsible for their safety.
Unplug after every use or if defective. Repairs to the appliance, such as replacing a damaged power cord, may only be carried out by our customer service in order to avoid risks.
The power cord should not:
-
touch hot parts,
-
be pulled over sharp edges,
-
be used as a carrying handle.
Do not place the appliance on or near hot surfaces such as a cooker or hob.
Never cover the hotplate.
During operation, only touch the machine parts using the handles provided. Never leave the coffee machine unattended while it is in use!
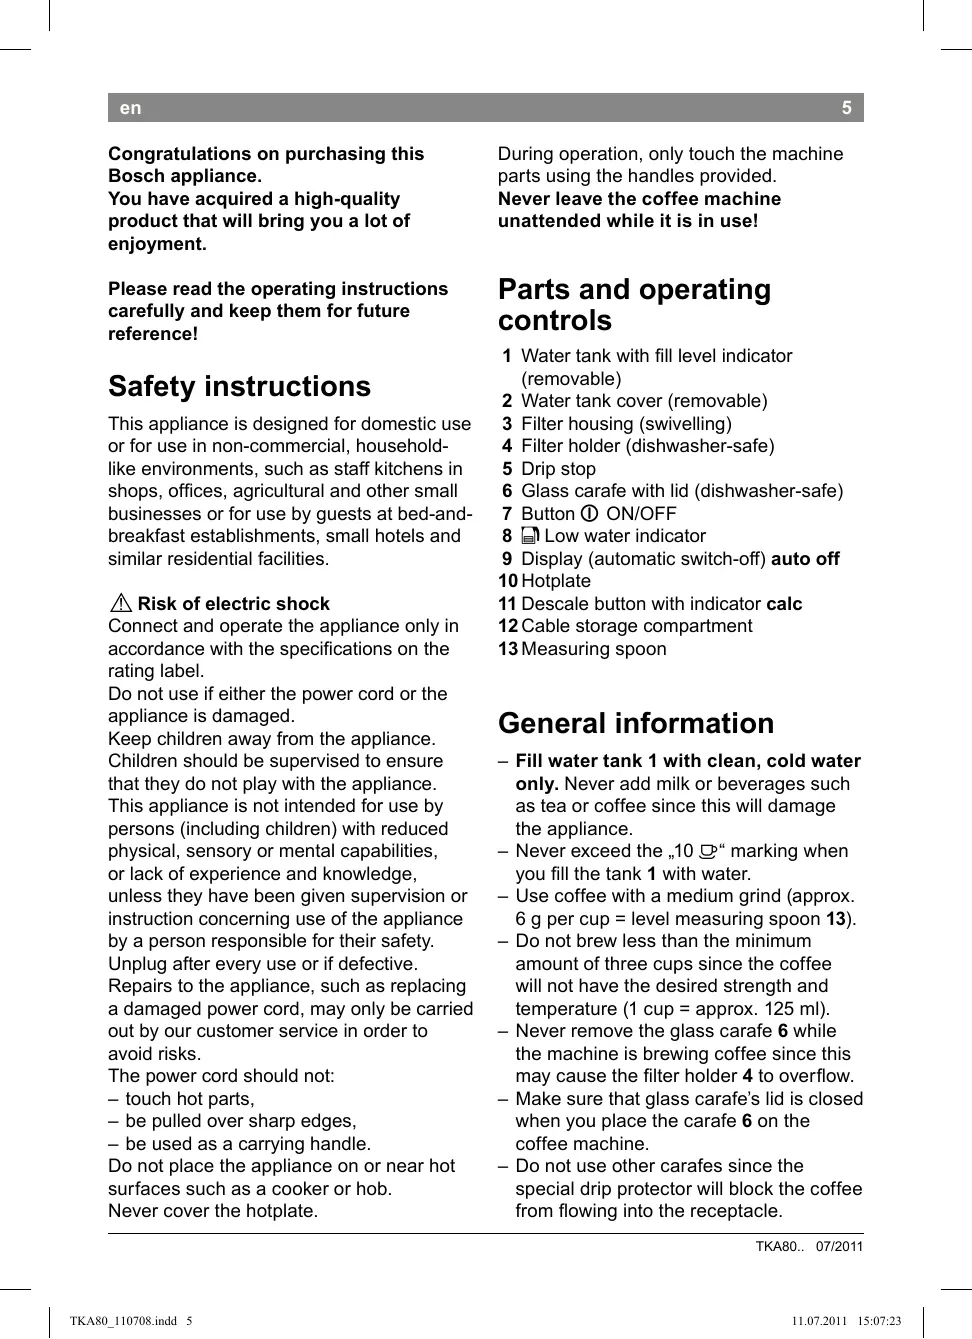
Parts and operating controls
1 Water tank with fill level indicator (removable)
2 Water tank cover (removable)
3 Filter housing (swivelling)
4 Filter holder (dishwasher-safe)
5 Drip stop
6 Glass carafe with lid (dishwasher-safe)
7 Button ① ON/OFF
8 Low water indicator
9 Display (automatic switch-off) auto off
10 Hotplate
11 Descale button with indicator calc
12 Cable storage compartment
13 Measuring spoon
General information
- Fill water tank 1 with clean, cold water only. Never add milk or beverages such as tea or coffee since this will damage the appliance.
- Never exceed the 10 ② marking when you fill the tank 1 with water.
- Use coffee with a medium grind (approx. 6 g per cup = level measuring spoon 13).
- Do not brew less than the minimum amount of three cups since the coffee will not have the desired strength and temperature (1 cup = approx. 125 ml).
- Never remove the glass carafe 6 while the machine is brewing coffee since this may cause the filter holder 4 to overflow.
- Make sure that glass carafe's lid is closed when you place the carafe 6 on the coffee machine.
-
Do not use other carafes since the special drip protector will block the coffee from flowing into the receptacle.
-
Some water accumulation on the filter holder 4 is normal; it does not indicate that the coffee machine is defective.
Before using for the first time
- Remove any stickers or film.
- Pull enough of the power cable out of the storage compartment 12 and plug in.
- To clean, fill water tank with 6 cups of water and replace it. Press the ON/OFF switch 7 ① ; cleaning program starts.
- Repeat the cleaning process.
Note: You may notice a „new machine“ smell; this is normal. If this is the case, fill with a vinegar solution (1 cup of vinegar for 5 cups of water) and run the cleaning program. Next, rinse the machine twice with 6 cups of water.
- Clean the carafe thoroughly.
Brewing coffee
- Remove the water tank 1, fill it with water and replace it.
- Swivel out filter housing 3.
- Insert a 1x4 paper filter in the filter holder 4 and add the desired amount of coffee.
- Flip back the filter housing 3 until it engages.
- Place the glass carafe 6 with the lid closed under the filter housing 3.
- Press the ON/OFF switch 7 ① to start the brewing cycle. At the same time, the auto off function is activated; the display lights up.
Note: The machine has an auto off (power save) function, which switches it off after approximately two hours.
Important: When the brewing process is complete, wait a moment until all the coffee has run through the filter and into the carafe.
Let the machine cool down for five minutes before brewing a fresh pot.
Low water indicator
This coffee machine senses if the water volume in the water tank is low (less than approx. 4 cups).
If the water level is low, lights up and the machine automatically increases the brewing time. This ensures that the coffee retains its ideal flavour.
Coffee-making tips
Store ground coffee in a cool place; you can also freeze it.
Once a package of coffee has been opened, close it tightly to maintain its aroma.
How the coffee beans are roasted affects their taste and aroma.
Darker roast = more flavour
Lighter roast = more acidity
Cleaning
Never immerse the device in water or place it in the dishwasher!
Don't steam-clean the appliance.
Unplug the appliance before cleaning it.
- Clean all parts that came into contact with coffee after each use.
- Clean the coffee machine's exterior with a damp cloth; do not use strong or abrasive cleaning agents.
- Clean the water tank 1 under running water; don't use a firm brush.
- The glass carafe 6 and its lid are dishwasher-safe.
Dscaling
This appliance is equipped with an automatic descending indicator. If calc indicator lights up, the machine needs to be descaled.
Regular descaling
- makes your appliance last longer
- ensures proper function
- prevents excessive steam
- speeds up the brewing process
- saves energy
Descale the machine with a commercial.
descaling agent.
- Switch off the machine and allow it to cool.
- Place the glass carafe 6 with the lid closed on the coffee machine.
- Prepare the descaling solution according to the manufacturer's instructions and pour it into the water tank 1.
Warning: Do not fill with more than 6 cups.
- Switch the machine on using the ① ON/OFF button.
- Press and hold down the button descale 11 calc for at least 2 seconds. The descaling process starts.
- The program interrupts the process several times for a few minutes in order to let the descending agent penetrate the deposits. The entire descending process takes about 30 minutes.
- When the descending process is complete, the display calc will no longer light up. Operate the machine twice using clean water, without coffee. Do not fill the tank with more than 6 cups of water.
- Thoroughly rinse all removable parts and the carafe.
Troubleshooting
The machine takes noticeably longer or switches itself off before the brewing process is complete.
The machine needs descaling.
- Descale the machine as per the instructions. To start the descending program, press and hold button 11 calc for at least two seconds.
Tip: If your water is very hard, descale the coffee machine more frequently than requested by the calc indicator.
The drip stop 5 leaks.
It needs to be cleaned.
- Clean drip stop 5 (in filter holder 4) under running water while cleaning it several times with your finger.
Disposal

This appliance is labelled in accordance with the European Directive 2002/96/EG relating to waste electrical and electronic equipment - WEEE. The directive provides the framework for the EU-wide take-back and disposal of end-of-life appliances. Please ask your specialist retailer about current disposal facilities.
Guarantee
The guarantee conditions for this appliance are as defined by our representative in the country in which it is sold. Details regarding these conditions can be obtained from the dealer from whom the appliance was purchased. The bill of sale or receipt must be produced when making any claim under the terms of this guarantee.
Right of modification reserved.
OnachOCT OT TOKOB yap!
BkIIOUbaIte n I3nO13BaIte ypeDa cAmo CbO6pa3HNO IOCOeHNTe Bbpxy fIpMeHaTa Ta6eNka daHHN.
I3noJI3BaIte caMo, aKo 3axpaHbAunrKa6eJ n ypeIbT caB u3npaBHOCT.
He octabraye liuca (cbuo n deca) c HamaIeHN 3nueckn CetNBHn IJIn yMCTBeHN Bb3npTnA NIN C HeIOCTaTBueH ONIT N 3HaHn, Da OBCnyKbAT ypeDa,OCBeH aKO He bDat OByeHn IN Jn He Ca NOnyHIn Yka3AHN BvB Bp3Ka C OBCnyXbaHTo Ha ypeDa OT liue, KOEtO OTROBapr 3a TxHaTa 6e30napCHOCT.
IpaTe ypeDa daJeU OT deua. He ocTaBn-Te 6e3 NaD3Op deua, 3a da npEDoTbPaTnTe Bb3MOxHNoCTTa Te da cn IrpaTc ypeDa.
TbMHO n3neyeHO =c npraTeH Bkyc
IIO-CBETJIO n3neueHO = C KnCeJI BKyc
Почистванe
Hnkora He notanayte ypea BbB BOda nIHe noctabryte B cbDOMnYHaTa MaunHa!He n3non3BaTe napouncTauka.
OTctpaHЯBaHe Ha KOTJIeH KaMbK
UpeIbTe o60pyBaH C aBTOMaTHuHa NHДИКaцЯ 3a OTCpaHbAHeTO Ha KOTJIeHnKaMbK. Ako CBetHe calc, KOTJIeHnT KaMbK Tp6Ba Da ce OTCTpaHn OT ypea.
PeIOBHOTo OTcPaHЯBaHe Ha KOTJIeHnKaMbK
- yDbJkBaBA npoIbJXnTeHNOCTTa Ha ekCnNoaTaunHa ypeDa;
-ocnrypba6e3npo6IemHo 0yHKUHOHpaHe;
-праздовраява пекомернообразува на за; - CkbcraBa BpeMeTo Ha CBapraBaHe;
- INKOHOMCBA eHepnra.
KotJIeHnIa KaMbK TpI6Ba Da ce OTCpaHnBa OT KaFe-MaunHaTa C obuainHe cpeiCTBa 3a OTCTpaHraBe Ha KOTJIeHnKaMbK.
- I3knHoyTe ypeDa n ro octaBeTe da ce oxnaI.
- IIOCTaBete CTbKJIeHaTa KaHa 6 B ypeJa Cbc 3aTBOpEh KanaK.
-Дозирaite cpeicTBOTa OTCpaHЯBaHe Ha KOTJIeHnKaMbK CbIpaCHO DaHHITE Ha Ipon3BOiNTeNHaHbJIHHeT BCbda 3a BOJa 1.
BhimaHne: He HanbIbaIte noBuee ot 6 yaun TeuHOCT.
BknHouTe ypea c 6yToH 7 ① BKn./M3Kn.
-ДькTe HATNCHaT 6bToHa 3a OTcTaHЯBaHe Ha KOTJIeHnKaMbK 11 calc MmHmym2 cekyHd, npOuCeBt Ha OTcPaHЯBaHe Ha KOTJIeHn KaMbK ce CTapTupa.
- PporgpaMaTa npeKbCba MHorokpaTHO 3a HrKOJko MHyTn, 3a Da OCTaBn Da NODeIcTb CaPeIcTBOTo 3a OTCTpaHraBaHe Ha KOTJIeHn KaMbK. IpoUecbT Ha OTCTpaHraBaHe Ha KOTJIeHn KaMbK npOdbJxkaba npi6bn3ntenHO 30 MNHyTn.
- INДикuaиЯ ta calc yragBa cnei npNKluOuBaHe Ha npOrpaMaTa 3a OTCTpaHЯBaHe Ha KOTJIeH KaMbK. IyCheteypeda DBA PtN C YIcTbA BoDa 6e3 KaFe. He HAnbIbAaTe NOBce O6 YaAn BOna.
- ɪənʌŋaɪkHete OCHOBHO BCNUK N CBOOdH N UaCTN N CTbKJIeHaTa KaHa.
CamaocToTeJIHo OTcTaHЯBaHe Ha MaJIKN HeN3PpaBHOCTN
UpeIbT CBapraBa 3a6eJekmIO NO-6aBHO IIN Ce N3KJIIOvBa IpeDN pNkJIIOvBaHeTo Ha npOueCa Ha CBapraBaHe.
YpeabT eHaTpynA MHOrO KOtJIeH KaMbK.
- OTeTpaHete KOTJIeHnKaMbK OT KaFeMaUHaTa CbIaChO yKa3aHHeTo. 3aCTapTnpaHene Ha npoRpaMaTa 3a OTCTpaHnBaHe Ha KOTJIeHnKaMbK DpbXTe HATNCHaT6yToHa 11 calc MmHIMym 2 cekyHdN.
CbBET:Писиновваровпа Вда OТСТРЯнБайтЕКOTЛЕнЯКAMьКОТуpeда NO-ЧECTO,ОТКOLIKOTO NOДКАнВИНДИКAZИТa calc (OTСТРЯнБаHe NaKOTЛЕня KAMьК).
CnCTemata 3a 6IOKupahe 6pa3yBaHeto Ha KaIKN 5e HexepMeTnHa.
→3amþrcyaBaHe Ha cnCTeMaTa 3a 6nOKnpaHe o6pa3yBaHTo Ha KaKn 5.
-Почисте симtemа за 3а 6лOKирахеобразуваhtо Ha KaNKu 5(BдьржачаHaФиЛтьра 4)пд Teчаша ВОда пи ТовamMHOROKpaTHO 3aДeиCTBaIte CпьСТИСЧTemа за 6лOKирахеобразуваhtоHa KaNKu 5.
OTBexKdane

To3n ypeJe o6o3NaeHc b8IaNo
DInpeKtNbBa 2002/96/EO 3a cTapn
eNeKtpnueckn u eNeKtpOnHHu ypeDN
(waste electrical and electronic equipment
-WEEE).DInpeKtNbBaTa 3aJaBa Hacokn
3a npneMaHe o6paTHo n peuKnIpaHe
Ha cTapHTe ypeDN, BaJIaNHO 3a CEJIy
EC.MoJra INΦOpMnPaIte ce 3a
akTyaNHNTe NaHIn 3a OTBExDaHe npi
CneZnaJIIN3nPaHnY TbProBeU.
TapaHcNoHH yCNoBna
3aTo3n ypei ca BaIiDHiyCNoBnIa 3a rapaHcIy, KOInTO ca N3daJeHn OT HaIHTe npedCTaBnteNCTBa B CbOTBeTHaTc TpaHa. Iopro6HoCTn Ue Bn DaTe BaIuYr TbproBeU, OTKbDeTo Cte 3akynIIy ypeDa, no BCraKO Bpeme pni 3aIITBaHe OT BaIa CTpHa. Ppi n3PON3BaHe ha rapaHcIyTa Ha ypeDa e Heo6XoDMIO BvB BCEk cIyauJa da npedCTaBnTE bEnEckKaTa 3a NOKyPkA.
3ana3BaMe cn npaBTo 3a npomeHn.
I03dpabnem c npno6pehenem daHHoro npnbopa kOMnaHnn Bosch. Bbl npno6peJIN BBICOKokaueCTBeHHoe n3dJIne, KOtOpoe dOcTaBn Bam maccy ydoBOJbCTBnJ.
BHHMaTeJIbHO O3HaKOMbTEcB c HCTpyKcneI IO 3KcNpyaTaun, npia6oTe pyKOBOdCTByNTecb yKa3aHnmaDNaHNo IHCTpyKcIn N COxpaHnTe ee dJaDaJIbHeJwero nCnOJIb3OBaHnI
Yka3aHnI NO TexHnKe 6e3OpacHOCTN
He hakpbBaIte HaraPeBaTeIbHyIO pIITky.
Bo Bpem 3KcnpIyaTaunn 6paTbCra TOnbko 3a npedymOTpeHHbIe dIpyTO rH Yaactx npnbopa.
HnkOrda He ocTabJnTe pa6oTaIoUkoFeBaKy 6e3 npncMToPa!
OchOBhble DeTaJIH N 3JIeMeHTbI ynpaBJIeHnra
1 Pe3epByap Дя BODыс ИнданКOTOMурьну habOnJIHeHЯ (cbeMHbI)
2 KpbIka pe3epByapa nla BOIbI (CbeMHa)
3 Kopnyc phnJIbItpa (IOBOPOTHbI)
4 DepeKaTeIb ΦnIbTpra (PnIroDnBn I nIyMbITbBy B NocyDomOeHOn MaunHe)
5 KanJIe3aUHTbI 3aTBOp
6 CTeKJIaHHbI KOpeHnK C KpbIuKOJ (PnIroHbI dJIa MblTbB B NocydomoeyHO MaunHe)
7 ① CTeBOB BbIKJIOUaTeNb
8 INHdNkATOp HN3KOrO yPoBnBa BoDbl
9 INHДИКaTOp (aBtOMaTHUeCKOe OTKIHOUeHne) auto off
10 HarpeBaTeIbHa IJIaCTInHa
11 KhoPka pexkma ydaJIeHnHaKpIc HndKaTopom calc
12 OTeK dIa cTeBoro shHya
13 Mepna Joxka
OsshajnHopmaun
- HanBaIe B pe3epByap IJRA BObI 1 TOJIbKO YNCTUO XOJODHyO BOy. Hn B KOem CJlyae He DoabJYte MOJOKO JINI DpyrHe HAnITKn (HanpIMep, qai INI KoΦe), TAK KAK 3TO MOXET NOBpeDITb npi6Op.
- He pnevblaante OTmETky «10» >> prn 3anONHeHn pe3epByapa dIy BoDbl 1.
- PekomeHdyeTcNcNoIb3ObaTb KoPe cpeHrero Nomona (okono 6 rHa qaUKy = MEPnA loKka 6e3 ropkn 13).
- CneIyET rOToBnTb, KaK MmHmym, Tpru KaIkn KoFe, HNaYe HAnITOK NOpIyNTcR HeIOCTaTOUHO KpeKNM m RopYUm (1 KaIka = np6n. 125 m).
- HnKoIa He ChImaTe CTeKJIaHHbIKoPeHnK 6, KOrJa npNbOp BapNT KoPe, nOckOJIbKy 3To MoXeT npNBecTn KpepeOnHeHHIO DePkaTeJ aHbTp a4.
-П配电дуем уетановпь кошнк 6В Кошеварку,убадитесьВТOM,чTO CTeKлянная Крblшka Кошеннka 3akpbita.
-He nCnoIb3yIte npyrne KoFeHnKn, NocKoNbky CneuNaIbHOe KaJIpe3aUHTHOe yCTpoiCTBO 6yDet npenTCTBOBaTb HaINBaHnIO B HIX KoFe. - CkONJIeHHe He3HaHTeJIbHOrO KOJIuYeCTBa BObl B DePKaTeIe QnJIbTpA 4 RaBJIeTcH HOpMaJIbHbIM RaJIeHHeM N He Yka3bIbAet Ha HeNCnPpABHoCTb KoPeBapKn.
PpeKe Yem roTOBnTb HOByIO nopCNUO, DaTe KOpEeBaPKe OCTbITb B TeYeHne IaTN MInyT.
HnDnKaTOP Hn3KOrO ypoBn BODbl
KoΦeBapKa OChaUeHa DaTUnKOM Hn3KOrO yPoBnBa BOnB Bpe3epByape (MeHee, Yem OKoJIo 4-X YaAweK).
EcIn ypoBeHb BOBb B pe3epByape Hn3Km, 3aRopntcA INDnKaTOp N KoFeBapKa aBTOMaTnueeCKN YBEInuHT BpeM npiroTOBJIeHnRA KoPe. BlaroApra 3Tomy KoPe coXpaHNT CBOI npeBOxCoJHbI BKyc.
Pekomehdaци попрноTOBJIeHIO Kofo
XpaHnte MoNtBk KoFe B npOxIaDHOM MeTe. KoFe TaKKe MOxHOb 3aMOpaxNBaTb. PocJe BCKpItnA yNaKOBKn PnOTHO 3akpblBaHTe ee, YTObI COxPaHNTb apOMat KoFe. CTepeh obXapNBaHn KaOeHbIX 3epen BInraET Ha BKc N apOMAT HAnITka. Boone TeMHa o6XapKa = 60one HAcblueHHbIK Bkyc JIerKa a O6XapKa = BKyC KNClnHKoJ
YnCTka
Hnkorga He noprjkaTe np6op B Body n He moTe ero B nocydomouehno MaunHe! He noDbepraTe np6op ouncTke c nOMOsbIO napoounchnteJIa.
Ipeed uicTKo npbopa oKIOUHTe erO OT cETn nITAHN.
- Pocne npriroTOBJIeHnKaXdoI npCnn HAnNTka Heo6xOJIMo TtzaTeJIbHO npOMbIBaTb BCE 3JIeMeHTb I KoΦeBapKn, KOHTaKTIpyUOUIc C KoΦe.
-Поверхность корпуca кофеварки можно потираь влажно Тканью. He ИспользуITE сильнодстВуОше Или a6ра3иВьtle чстяше cpeДстBA.
-ОполочиpepeByapДЯВODы 1 ПОД пpoToHNo BODо. He ИсpoЛьЗунTe ЖecETКУTO UeTКY.
-CTeKJIaHHbI KOΦeHnIK 6 C KpbIuKOIpNIOHbI IJI MaITbY B NOCyDOMoeUHOMaUSHHe.
OuInctka OT HaKINN
Pn6bOp OchaueH aBtOMaTneckm HnDnKaTOpOM OChCTKn OT HaKnN. EcIn Ha DnCJIeep NoBJeTc3HaQk calc, np6bOp HxKdAeTcB OChCTKe OT HaKnN.
Perynpa Ounchka OHaKnn
- npoJnT cpoK cnykbI KoepeBapKn;
- o6ecpeuH ee HaJIeKaUyO pa6oTocnOC6HoCTb;
-празоватичрзмерhoeобразовене napа; - yckopnt npocecc npnroTOBneHnKope;
- IO3BOJNT C3KOHOMITb 3JIeKTpo3HeprIIO.
OuHuaTe KoFeBapKy OT HaKnPi CneUaJIbHbIM CpeDCTBOM, IMeHOUsMcB IpoDaJKe.
- BbiklHouHtB npHbOp n DaTb emy octbltB.
- YctaHOBInTe CTEKJIaHHbI KOΦeHnK 6c 3aKpbIToI KpbIuKOI B KOΦeBaPky.
-Пи���TOBbTe pactbOp cpeIcTba IJyUdaJIeHnHaKINII, CJIeDy INHCTpyKlIaMero n3rOToBHTeJI, n HajeIte pactbOp Bpe3epByap 1. PpeIOocTepeXeHne: He HaJIbaiTe 60JIbIe 6 YAseK.
BkHouNtbpn6OpceTeBbIM BbIKHouaTeIeM7①.
Hakmte u ydepknaBai Te KhoNky ydaIe- HnHaKnPi 11 calc B TeueHne MInHmym 2-x cekynd. NaHcTcra npoecc ydaIeHn HaKnPi.
B TeueHne 3Toro npocecca nporpamma 6yDen TnpepbIbTaBcra Ha HeCKoJIbKO MInHyT, YTO6bI N03BOJNTb CpeDCTBy DnA ydaJeHnHa KaIIIN BCTUInTB B peakCIO C OTNoXeHnMa. BeCb npoecc ydaJeHnHa KaIIIN 3aHmaeT OkOTo 30-Tn MInHyT.
- ПО OKOHани удаленя НаКИп 3HAчOK calc HaДиСПлee rachet. ВьINONHITE pa6Oчи цкл Двжды, пponуCTNB uepe3 рпбор чстую BODу 6e3 KoPe. He HAnBaIte B pe3epByap 6oJbIe 6ЧашЕВ OДbl.
TuaTeBHO npOMoIe BCE cbeMHbIe DeTaJIu NKoPeHnK.
CamocToTeIbHoe yCTpaHenne MeJKNX HenCnpaBHOCTeI
Ppoecc npiroTOBJIeHnKoFe 3aHmMaet 6OJIbSe BpeMeHN, INI KoFeBapKa OTKIIou- yaeTcdo ero 3aBepWeHn.
Heo6xoJIMO OCHCTnTb KoΦeBapKy OT HAKIN.
OuHCTbTe npB6Op OT haknIn, cIeDy BblIeN3IOXeHHbIM HNCTpyKUma.ДЯ aKTINBaCm INpOrpaMMbI ydaJIeHnHaKnIn NahkMITE uYdePjKBaIte KHOJky 11 calc (ydaJIeHne haknIn) He MeHee 2 cekyHd.
Pone3HbI COBET: EcIn B BaSei MeCTHO BAJa «JecTkaR», OUnsaiTe KoFeBapKy OT HAKINu YaSe, Yem 6tOM CnHaJI3NpyEt INDnKaTOp calc (ydaJIeHne HAKIN).
KanJne3aunThbI 3atBOp 5 npoteKaet.
→Ero Heo6xOДIMO npOuHCTnTb.
-Помоу Te KaIpe3aunTHbI 3aTbOp 5 (В држateNeФиьТа 4) nOД пpoToUHoi BOdО,HaIaBnBa H a Hero HeCKoNbKO pa3 PaJIbUeM.
YTNJIIN3aIIN

Данньий пибор Имeel Маркировky corlacho ebponeeCKOДиpeKТиBE 2002/96/EC no yTuInn3aun CstapbIX 3NeKtpnuecknxИЗЕКТрОньxпибopOB (waste electrical and electronic equipment - WEEE).3ToI dupeKTHBOI ONpeJelenbI DeiCTByUoUne Ha BceI TeppITOpN EC npaBnla pInema n yTuINn3aun CTapbIX npi6ob.ИнфорmauO ob aKTyaJIbHbIX BO3MOxHocTEx yTuINn3aun Bbl MoKeTe IOnyUnb B MaRa3InHe, B KOTOpOM Bbl npino6peJIn ppi6ob.
YcNoBna rapaHTnHOro 06cIyXnBaHn
IOnyuHTb NcYeepbIBaIOUyIO INΦOpMaUIO 06 yCNoBnIX rapaHTnHOrO OcCnyKbAHnB Bb MoKeTe B BaUeM 6nJaWem aBTopn3OBaHHOM cepBnCHOM ueHTpe nJIN B cepBnCHOM ueHTpe OT npON3BOInTeJI OOO "BCX BbITobAraTexnKa" nJIN B cOpBoNDteJBHO JOKyMeHTaUIN. Mbl octabJnE m 3a co6oI npABo Ha BHeceHne n3MeHeHn.
Jaaal
jia jia jiaall iial jiaaiil buiy
jie jie jie jie jie jie jie jie jie jie jie jie jie jie jie jie jie jie jie jie jie jie jie jie jie jie jie jie jie
j. jia a i j gall
Jus 1j
. jlaalall 4jbi yjbl syl jlg> jlai
i
1g jgljll jiljill jj
calc 11 jill lcl jaii y biai
J 15
jiall Jol 1× 4 jia
4
jgllll 3 jill
AilSo jaiiu
- jilali
()ON/OFF jllbe
a. gall 1
auto off a b u
aaiw 1
.
aaiiaieiiee iieae iieae iieae iieae iieae iieae iieae
.
aai juii iuiuui auiac uoi 12:paia
J 1
Jg 1
.
12 La oia geall ayi la jai
olall jj jldjodgall olall jda
()
G
jz jz jz jz jz jz jz
12c! a5lo 6 yy jai loic
.
e iio 0
Jus 10
S = S
Jolalglalalllssj
4 jlll
0gall 2a2aiSlo aJis
a
a b c d e f g h i j k l m n o p q r s t
y
12 11
A
6 6
glbniil . 420 801 golal no
()ON/OFF
7 ①7
aill jieailj gai bali d:
Jall no 2015) Jll no 1015
CooJ Jn Jn Jn Jn Bosch
gss
aieial no
1 1
1d
Jalal
j gl jiaill plaiiuiu liuaa 20 jieill lia
lll 1
Jjdiy
1
y
Lililall aagl glc ai jzaii lililall laib
- | x - 2| = 1 .
J (Jia)
i
AE United Arab Emirates,
BSH Home Appliances FZE
Round About 13
Plot Nr MO-0532A
Jebel Ali Free Zone - Dubai
Tel.: 04 881 4401
mailto:service-ua@bshg.com
www.bosch-home.com
HEATHERTON, Victoria 3202
Tel.: 1300 368 339
Fax: 1300 306 818
valid only in AUS
mailto:bshau-as@bshg.com
www.bosch-home.com.au
BA Bosna i Hercegovina, Bosnia-Herzegovina
"HIGH" d.o.o.
Odobasina 57
71000 Sarajewo
Info-Line: 061 100 905
Fax: 033213513
mailto:delicnanda@hotmail.com
BE Belgique, Belgie, Belgium
BSH Home Appliances S.A.
+7snt/min (alv 23%
Grand Union House Old Wolverine Road
Wolverton
Milton Keynes MK12 5PT
To arrange an engineer visit, to order spare parts and accessories or for product advice please visit
www.bosch-home.co.uk or call
*Calls from a BT landline will be charged at up to 3 pence per minute. A call set-up fee of up to 6 pence may apply.
GR Greece, Eλλας
BSH Ikiakes Siskeves A.B.E.
Central Branch Services
17 km E.O. Athinon-Lamias &
Potamou 20
145 64 Kifisia
Greece - Athens
Tel.: 2104 277 701
Fax: 2104 277 669
North-Greece - Thessaloniki
Tel.: 2310 497 200
Fax: 2310497220
South-Greece - Heraklion/Kreta
Tel.: 2810 325 403
Fax: 2810 324 585
Central-Greece - Patras
Tel.: 2610 330 478
Fax: 2610331832
mailto:cs_gr_helpdesk@bshg.com
www.bosch-home.gr
HK Hong Kong, 香港
BSH Home Appliances Limited
Unit 1 & 2, 3rd Floor
North Block, Skyway House
3 Sham Mong Road
Tai Kok Tsui, Kowloon
Hong Kong
Tel.: 2565 6151
Fax: 2565 6252
mailto:bshhkg.service@bshg.com
HR Hrvatska, Croatia
Andabaka d.o.o.
Gunduliceva 10
21000 Split
Info-Line: 021 481 403
Info-Fax: 021 481 402
mailto:servis@andabaka.hr
IE Republic of Ireland
BSH Home Appliances Ltd.
Unit F4, Ballymount Drive
Ballymount Industrial Estate
Walkinstown
Dublin 12
Service Requests,
Spares and Accessories
Tel.: 01450 2655
Fax: 01450 2520
www.bosch-home.cu.uk
IL Israel,
C/S/B Home Appliance Ltd.
Uiel Building
2, Hamelacha St.
Industrial Park North
71293 Lod
Tel.: 089777222
Fax: 08 9777 245
mailto:csb-serv@zahav.net.il
IS Iceland
Smith & Norland hf.
Noatuni 4
105 Reykjavik
Tel.: 0520 3000
Fax: 0520 3011
www.sminor.is
IT Italia, Italy
LT Lietuva, Lithuania
Senuku prekybos centras UAB
Jonavos g.62
44192 Kaunas
Tel.: 0372 12146
Fax: 0372 12165
www.senukai.it
LU Luxembourg
General Serviss Limited
Bullu street 70c
1067 Riga
Tel.: 07424137
mailto:bt@olimpeks.lv
Elkor Serviss
Brivibas gatte 201
1039 Riga
Tel.: 067 0705 20; -36
Fax: 067 0705 24
mailto:domoservice@elkor.lv
www.servisacentrs.lv
MD Moldova
S.R.L. "Rialto-Studio"
yn. LycceBa 98
2012 KuniHneB
TeJ./ΦaKc: 022 23 81 80
mailto:bosch-md@mail.ru
ME Crna Gora, Montenegro
Elektronika komerc
Ul. 27 Mart br.2
81000 Podgorica
Tel./Fax: 020 662 444
Mobil: 069324812
mailto:ekobosch.servis@t-com.me
MK Macedonia, MaKeDoHnJa
GORENEC
Jane Sandanski 69 lok.3
1000 Skopje
Tel.: 02 2454 600
Mobil:070697463
mailto:gorenec@yahoo.com
MT Malta
Oxford House Ltd.
Notabile Road
Mriehel BKR 14
Tel.: 021 442 334
Fax: 021 488 656
www.oxfordhouse.com.mt
MV Raajjeyge Jumhooriyyaa, Maledives
Lintel Investments
Ma. Maadheli, Majeedhee Magu
Malé
Tel.: 0331 0742
mailto:mohamed.zuhuree@
lintel.com.mv
NL Nederland, Netherlands
Unit F 2, 4 Orbit Drive
Mairangi BAY
Auckland 0632
Tel.: 094770492
Fax: 094772647
mailto:bshnz-cs@bshg.com
www.bosch-home.co.nz
PL Polska, Poland
OOO"5CX BbITOBaTExHnKa"
Union Industrial Building
Block A, #01-03
577177 Singapore
Tel.: 6751 5000
Fax: 6751 5005
mailto:bshsgp.service@bshg.com
SI Slovenija, Slovenia
BSH Hišni aparati d.o.o.
Litostrojska 48
1000 Ljubljana
Tel.: 01 583 08 87
Fax: 01 583 08 89
4th floor, No. 112 Sec 1
Chung Hsiao E Road
Taipei ROC 100
Tel.: 02 2321 6222
mailto:Bosch@achelis.com.tw
UA Ukraine, YkpaHa
TOB "BCX Побутoba Тхиka"
TeN.: 044 4902095
www.bosch-home.com
XK Kosovo
NTP GAMA
Rruga Mag Prishtine-Ferizaj
70000 Ferizaj
Tel.: 038502448
Fax: 029 021 434
mailto:gama_mm@yahoo.com
XS Srbija, Serbia
15th Road Randjespark
Private Bag X36, Randjespark
1685 Midrand - Johannesburg
Tel.: 086 002 6724
Fax: 086 617 1780
mailto:applianceserviceza@
bshg.com
www.bosch-home.com