
CTL636ES6 - Coffee maker BOSCH - Free user manual and instructions
Find the device manual for free CTL636ES6 BOSCH in PDF.


| Product type | Automatic coffee machine with grinder |
| Brand | Bosch |
| Model | CTL636ES6 |
| Dimensions (W x D x H) | 39.5 x 28.5 x 46.5 cm |
| Weight | 10.2 kg |
| Power supply | 220-240 V, 50-60 Hz, 1450 W |
| Water tank | 2.4 liters |
| Bean hopper | 300 g |
| Pump pressure | 15 bars |
| Main functions | Whole beans, ground coffee, integrated milk frother, 2 cups simultaneously, grind adjustment, intensity and temperature |
| Special programs | Long coffee, espresso, cappuccino, latte macchiato |
| Cleaning and maintenance | Automatic descaling, rinsing, cleaning of removable brewing unit |
| Safety | Auto shut-off, child lock, overheat protection |
| Display | Color TFT touchscreen |
| Connectivity | Wi-Fi, Home Connect compatible |
| Spare parts | Available (filters, seals, tank, brewing unit) |
| Repairability index | 7.5/10 |
| Warranty | 2 years (parts and labor) |
Frequently Asked Questions - CTL636ES6 BOSCH
User questions about CTL636ES6 BOSCH
0 question about this device. Answer the ones you know or ask your own.
Ask a new question about this device
Download the instructions for your Coffee maker in PDF format for free! Find your manual CTL636ES6 - BOSCH and take your electronic device back in hand. On this page are published all the documents necessary for the use of your device. CTL636ES6 by BOSCH.
USER MANUAL CTL636ES6 BOSCH
natural_image
Interior view of a modern kitchen appliance with a digital display and control panel (no visible text or symbols)Register your new Bosch now: www.bosch-home.com/welcome

natural_image
Close-up of a glass cup filled with dark liquid, showing yellow and orange layers (no text or symbols visible)
natural_image
Two glass glasses with cream and mint, placed on a striped tray against a black background (no text or symbols visible)CTL636E.6

BOSCH
Included in delivery (see page 33)


natural_image
Four labeled diagrams showing different household appliances or fixtures (m, n, o, p) without any text or symbols.




natural_image
3D rendering of a black plastic enclosure with lid and base, labeled '8a' and '8' (no text or symbols on the main subject)
natural_image
3D rendered mechanical component with no visible text or symbols

natural_image
3D model of a black plastic enclosure with labeled parts (7a and 7), no text or symbols present.

Inhalt
Lieferumfang....2
Herzlichen Glückwunsch....3
natural_image
Pure electrical circuit lines without any symbolsnatural_image
Two diagrams showing a mechanical device with downward arrows indicating force or movement (no text or symbols present)natural_image
Diagram of a mechanical or electrical component with bidirectional arrows indicating movement or flow (no text or symbols present)natural_image
Illustration of a hand pouring liquid into a container with an arrow indicating process (no text or symbols)natural_image
Diagram showing a hand inserting a device into a container while pouring liquid from a showerhead (no text or symbols present)natural_image
Mechanical assembly diagram showing a lever and pin with warning symbol (no text or labels)natural_image
Two-panel illustration showing hands installing or adjusting a wall-mounted electrical socket, with arrows indicating the process (no text or symbols present)natural_image
Illustration showing a hand holding a device with rotational arrows, alongside a 3D mechanical component diagram (no text or symbols)natural_image
Diagram of a mechanical or electrical component with curved ends and directional arrows indicating movement (no text or symbols)natural_image
Diagram showing a cylindrical container with a cross symbol and an open lid with an arrow indicating rotation (no text or labels)natural_image
Two-panel illustration showing a hand cleaning a mechanical component and pouring liquid into a showerhead (no text or symbols)natural_image
3D mechanical component with internal channels and a close-up inset showing internal structure (no text or symbols visible)natural_image
Mechanical assembly diagram showing a component being inserted into a housing with a close-up view of the internal part (no text or symbols present)
Included in delivery....33
Congratulations ....34
Safety instructions ....35
Overview....37
Controls 37
Initial use 38
Control panel 40
Preparing drinks ....40
Preparation using coffee beans....43
Preparation using milk....43
Preparation using ground coffee .....44
Dispensing hot water....44
Personalised drinks 45
Adjusting the grind setting 46
Child-proof lock....46
Menu....46
Home Connect....48
Care and daily cleaning....51
Service programmes ....54
Tips on energy saving 56
Frost protection....57
Storing accessories....57
Accessories 57
Disposal....57
Guarantee....57
Simple troubleshooting....58
Technical specifications....61
Included in delivery
(Figure A on the fold-out pages)
a Fully automatic coffee machine
b Instruction manual
© Filter instructions
d Installation instructions
e Connecting cable
f Assembly bracket
9 Spacer
h 5 fastening screws (silver)
i 2 fastening screws (long/black)
j 2 fastening screws (short/black)
k 1 sleeve (black)
① 2 sleeves (white)
m Quick reference guide
n Measuring spoon
- Water hardness testing strip
p Milk tube (set)
9 Milk container
r Suction pipe
Congratulations ...
... on purchasing this fully automatic coffee machine! You have now acquired a high-quality and modern kitchen appliance. It combines innovative technology with a range of functions and is easy to use. It will enable you to prepare a variety of delicious hot drinks quickly and simply – whether you're in the mood for an invigorating espresso, a creamy cappuccino, a smooth latte macchiato or white coffee, or a traditional cup of coffee. At the same time the appliance offers you a wide range of options for adapting it to your individual taste.
To ensure that you can use this fully automatic coffee machine with all its functions and features reliably and safely, we would like you to familiarize yourself with its components, functions, displays and controls. These instructions are designed to help you. So please take the time to read them before you switch on the appliance.
How to use these instructions
You can open up the front cover of this instruction manual. There you will find illustrations of the appliance with each part numbered. These numbers will be referred to throughout the text.
Example: brewing unit (15)
These instructions also show display texts and symbols in a special way. These enable you to clearly see where we refer to texts or symbols that are marked or displayed on the appliance.
Display indicators:
"Espresso"
Buttons and controls on the display:
[▷]
The appliance comes with a quick reference guide where you can find the most important functions at a glance. It can be stored in the accessory drawer of the appliance.
Safety instructions
Please read and follow the operating instructions carefully and keep them for later reference. Enclose these instructions when you give this appliance to someone else. This appliance is designed for the preparation of normal household quantities in the home, or in household-like, non-commercial environments. Household-like environments include staff kitchens in shops, offices, agricultural and other small businesses or for use by guests at bed-and-breakfast establishments, small hotels and similar residential facilities.
Danger of electric shock!
The appliance may only be connected to a power supply with alternating current via a correctly installed socket with earthing. Ensure that the protective conductor system of the domestic supply has been correctly installed. Connect and operate the appliance only according to the type plate specifications. To avoid potential hazards, repairs must only be carried out by our customer service personnel. If the supply cord is damaged, it must be replaced by a special cord or assembly available from the manufacturer or its service agent.
This appliance can be used by children aged from 8 years and above and by persons with reduced physical, sensory or mental capabilities or lack of experience and knowledge if they have been given supervision or instruction concerning use of the appliance in a safe way and if they understand the hazards involved. Keep children under 8 years of age away from the appliance and connecting cable and do not allow them to use the appliance. Children shall not play with the appliance.
Only use the appliance indoors at room temperature and up to 2000 m above sea level.
Cleaning and user maintenance shall not be made by children unless they are older than 8 years and supervised.
Never immerse the appliance or mains cable in water. Use only if power cord and appliance show no signs of damage. Should a fault occur, pull the plug or disconnect from the mains immediately.
The appliance contains permanent magnets that may influence electronic implants such as pacemakers or insulin pumps. Persons wearing electronic implants must maintain a minimum distance of 10 cm from the front of the appliance and from the following parts upon removal: milk container, milk system, water tank and brewing unit.
Risk of suffocation!
Do not allow children to play with packaging material. Store small parts safely as they can be easily swallowed.
Risk of injury!
Do not reach into the grinding unit. Be careful not to jam your fingers when closing the door. A misuse of the appliance can potentially lead to injury.
Risk of burns!
The beverage outlet gets very hot. After use, allow to cool down first before touching.
⚠️ Risk of scalding (Home Connect)!
If an unattended remote start takes place, third parties might be scalded if they reach under the coffee dispenser during drinks dispensing. You should therefore make sure that with an unattended remote start that there is no risk to other people, in particular not to children, or to property.
Overview
(Figures B to E on the fold-out pages)
1 Appliance door
a Recessed grip (for opening the door)
b Drip plate
2 Control panel (see next page)
a Control ring
b Information display
c Touch display (left and right)
3 Outlet system (coffee, milk, hot water), height-adjustable
a Cover
4 Milk system
a Snap lever
b Beverage outlet (upper part, lower part)
c Milk tube (2 pieces)
d Connecting element, metal (for magnet holder)
5 Mains switch [O/I] (power supply)
6 Accessory drawer
(for quick reference guide and accessories)
a Quick reference guide
b Measuring spoon
c Water hardness strip
d Milk tube (set)
7 Removable water tank
a Lid for water tank
8 Removable bean container
a Lid for bean container
9 Slide regulator for grinding degree setting
10 Magnet holder (for connecting element)
11 Removable drawer (for ground coffee/cleaning tablet)
12 Holder (for milk tube)
13 Protective cover (for brewing unit)
14 Brewing unit
a Locking mechanism
b Cover
15 Eject lever
16 Removable Drip tray
a Drip tray cover
b Coffee grounds container
17 Collecting tray
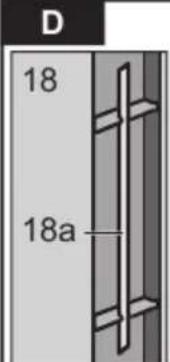
18 Holder (for long suction pipe)
a Suction pipe
19 Rating plate (E number, FD)
20 Shelf with sensor (for milk container)
21 Milk container
a Stainless steel container
b Lower part of the lid
c Upper part of the lid

Further information about the appli- ance, such as how to change the opening angle of the door, can be found in the assembly instructions.
Controls
The appliance features user-friendly menu navigation to ensure that operation is as easy as possible while at the same time offering a wide range of functions. That means a range of options can be selected with just a few operating steps.
Mains switch [O/I]
The power switch [O/I] (with the door open) is used to switch the appliance on, or to switch it off fully (power supply off).

Important: Do not press the mains switch while the appliance is in use. Switch off the appliance only when it is in energy saving mode, so that it can rinse automatically.
Control panel (touch field)

Important: These operating instructions refer to several models. In some models [①] and [▷] are touchscreen elements.
[①] on/off
Press [①] to switch on the appliance or put it into energy saving mode. The appliance is rinsed automatically.
The appliance does not rinse if:
■ if it is still warm when switched on, or
■ if no coffee was dispensed before it was switched off.
The appliance is ready for use as soon as the symbols for the drinks selection appear on the display.
[ ] start/stop
Press [ ▷ ] for either beverage preparation or to launch a service programme.
Press [ ] again while the drink is being prepared to prematurely halt dispensing.
There are four menu fields in the control panel which can be activated by touching. The active menu field lights up red.
[ coffee menu ]
[ coffee menu ] lights up as soon as the appliance is in operation. Drinks can be selected and dispensed or settings for the drinks can be changed.
[☆] MyCoffee
Touch [☆] to open the selection of "Personalised beverage preparation".
Personal settings for coffee drinks can be saved and called up (see the section "Personaliseddrinks").
[ ] Menu
Touch [ʃ] to call up the menu. Settings can be made, information called up or the appliance connected with "Home Connect" (see section "Menu").
[ ] Service
Touch [ 🔊 ] to open the selection of service programmes. Run the desired programme as described in the section “Service programmes”.
![BOSCH CTL636ES6 - [ ] Service - 1](/content/2026/06/1272000/images/7f94838aa391a525364eb7f011c1cf408be7b9f8619a102da790fb74c1cf5b5a.jpg)
Press [ 🔍 ], [ 🔍 ] or [ ☆ ] again to exit the respective menu.
Control ring
Turn the control ring to navigate in the display or to change parameters.
Information display
The round display shows the drink selected, the settings or information.
Touch display (left and right)
Depending on the setting, different fields are shon in both the touch displays. A field is activated when touched either to enter settings or change values.
Initial use
General
Fill the appropriate container using only pure, cold, uncarbonated water and solely roasted beans. Do not use coffee beans that have been glazed, caramelised or treated with other additives containing sugar, since they will block the brewing unit.

Before the appliance can be switched on and used, it must be assembled and connected according to the enclosed assembly instructions.
Setting up the appliance
■ Remove any protective plastic film.

Important: Only use the appliance in a frost-free room. If it has been transported or stored at temperatures below 0^ C, wait at least 3 hours before initial use.
■ Take hold of the appliance door by the recessed grip and open.
■ Remove the water tank, rinse it and fill it with fresh water up to the “max.” mark.
■ Replace the water tank and click into place.
■ Remove the bean container, fill with coffee beans and replace.
■ Set the mains switch to [①] and close the appliance door.
The appliance heats up and is rinsed.
The control panel is activated.
"Language" appears.
■ Turn the control ring with your finger to select the desired language and touch the [Water hardness] field.

It is important to set the water hardness correctly to enable the appliance to accurately indicate when the descaling programme should be run. The preset water hardness is level 4. If a water softener is installed in the house, please set the water hardness to level 3. You can also check the water hardness by asking your local water supplier.
■ Use the enclosed test strip to determine the water hardness. Briefly dip the test strip in water and check the result after one minute.
Level Water hardness
| German (°dH) | French (°fH) | |
| 1 | 1-7 | 1-13 |
| 2 | 8-14 | 14-25 |
| 3 | 15-21 | 26-38 |
| 4 | 22-30 | 39-54 |
■ Turn the control ring with you finger to set the water hardness determined.
■ [Home Connect] appears on the left and on the right [Set-up complete].
■ To now connect the appliance to the WLAN network (home network), touch [Home Connect].
■ To connect the appliance to the WLAN network later on, touch [Set-up complete]. The settings for Language and Water hardness are saved.

When selecting [Home Connect] please read the detailed description in the section "Home Connect".
The appliance is ready to use as soon as the drink symbols are shown and the [coffee menu] lights up.
The integrated fan switches on each time a drink is dispensed and switches off again after a few minutes.
When the appliance is used for the first time after running a service program, or if it has not been operated for a long period, the first beverage will not have the full aroma and should not be consumed.
When the fully automatic coffee machine is first used, a suitably thick and stable "crema" is only achieved after the first few cups have been dispensed.
Switch off appliance
■ Press [①].
The appliance rinses and switches to energy saving mode.
Exception: If only hot water is dispensed, the appliance switches off without rinsing.
■ To switch the appliance off completely, open the appliance door and set the mains switch to [O].

Important: Do not press the mains switch while the appliance is in use. Switch off the appliance only when it is in energy saving mode, so it can rinse automatically.
The factory settings of the fully automatic coffee machine are programmed for optimal performance. The appliances switches automatically to the energy saving mode after a configured time and rinses (duration can be set, see “Switch off after” in the section “Menu”).
The appliance is equipped with a sensor. If there is a milk container, this will be correspondingly shown on the display when switching to the energy saving mode. If there is milk in the container, please keep in the fridge.
Control panel
Information is shown on the display or settings can be entered by touching the touchscreen and the control ring.
Display
The control panel shows the selected drinks, settings and setting options, as well as messages about the appliance's operating status.
e.g. Drink selection

e.g. Information

Information disappears after operating the appliance or after a short time.
The information remains however in the information display in the form of a small symbol.
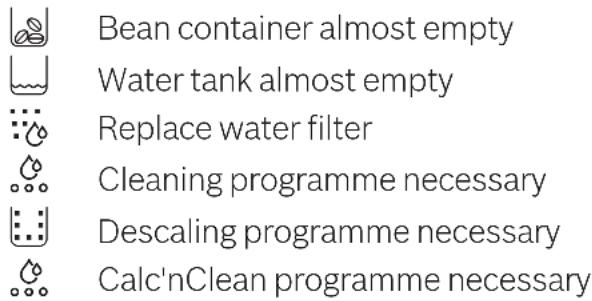
Prompts to take action

If the action required was carried out, e.g. filling the water tank, the corresponding message and symbol will disappear.
Operation
Touch texts or symbols combined with turning the control ring to navigate in the control panel (for an example, see section "Drink adjustment").
An audible signal is heard when touching the touch display. These audible signals can be switched on or off (see the section "Menu – Key tones").
Preparing drinks
This fully automatic coffee machine can be operated using coffee beans or ground coffee (but not instant coffee).
If using coffee beans, they will be freshly ground for each brewing. For optimum quality, store the beans in a cool place in sealed containers.
i Important: Fill the water tank with fresh, uncarbonated, cold water every day. The tank should always contain sufficient water for operating the appliance.
Tip: Cups should be prewarmed, e.g. with hot water. This applies particularly to small thick-walled espresso cups.
For some settings, coffee is prepared in two stages (see the section "Aroma Double Shot" and "Two cups at once"). Please wait until the process is completely finished.
Beverage selection
Turn the control ring to select different drinks: The symbol and the name of the selected drink will appear in the middle of the information display.
Preparing drinks
The values currently set, e.g. for the coffee strength and temperature are shown on the left and right of the touch display.

The following drinks can be selected:
Ristretto
Espresso
Espresso Macchiato
Coffee
Cappuccino
Latte Macchiato
Caffe Latte
Milk froth
Warm milk
Hot water
The drink selected can be directly prepared with the pre-set values or first adjusted to individual taste.
Drink adjustment
Touch one of the fields shown on the touch display, e.g. [] to activate the field, [] turns red.
Turn the control ring to change the setting.
Touch [∅] again to save the setting.
An example:
The values for a cup of Coffee can be changed as follows:
■ Turn the control rind and select "Coffee".

■ Touch the field, e.g. [∅] to active, [∅] lights up red.

■ Turn the control ring and set the desired coffee strength in the middle of the information display, e.g. to "very strong".

■ Touch the field [◇].
■ Turn the control ring to set the required amount of coffee, e.g. "160 ml".

■ Touch the field [💡].
■ Turn the control ring and set the desired temperature, e.g. "very high".
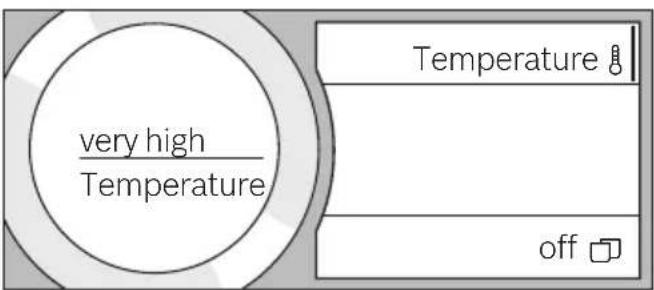
■ Save the settings by touching the active field or by starting to dispense the drink.
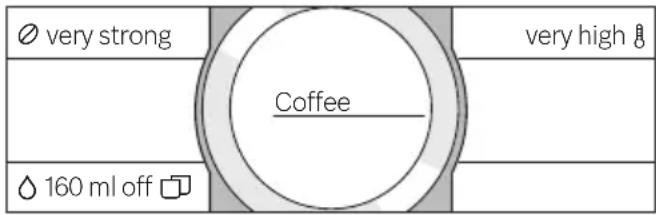

There are different setting options depending on the type of drink. For coffee drinks, for example, the strength, temperature and quantity can be set, for milk only the volume.
The following settings are possible: Coffee strength
very mild
mild
normal
strong
very strong
Double Shot strong
Double Shot strong +
Double Shot strong ++

Aroma Double Shot
The longer the coffee is brewed, the more bitter substances and undesired aromas are released. This has a negative effect on the taste and makes the coffee less easily digestible. For extra strong coffee, the appliance has therefore a special Aroma Double Shot function. When half the quantity has been prepared, it grinds and brews fresh coffee beans so that only the pleasant, aromatic scents are released.
The Aroma Double Shot function is not available for ristretto, espresso macchiato, and when ground coffee is used.
Volume
The volume differs depending on the type of drink and can be set in ml steps.

The volume dispensed can fluctuate depending on the quality of the milk.
Drink temperature
Values for coffee drinks:
normal
high
very high
Values for hot water:
70°C White tea
80°C Green tea
90°C Black tea
Max Fruit tea

If no controls are activated for approx. 30 seconds, the appliance will automatically exit the settings mode. The settings made will be automatically stored.
Two cups at once
Touch [ ] to prepare two cups of the selected drink simultaneously. The setting is shown as text, e.g. "2 x Espresso".
■ Touch [ ] .

■ Place two cups left and right underneath the beverage outlet.
■ Press [ ▷ ] to start dispensing.
The selected drink is prepared and then dispensed into both cups.

The drink is prepared in two stages (two grinding operations).
Please wait until the process is completely finished.
Two cups at once cannot be dispensed for the settings
"Aroma Double Shot" or "ground coffee".
Preparation using coffee beans
The appliance must be ready for use.
■ Place a cup underneath the beverage outlet.
■ Turn the control ring and select
"Ristretto", "Espresso" or "Coffee".
The display shows the selected drink along with the preset values for the drink.


The settings can be changed as described in the section "Drink adjustment".
■ Press [ ▷ ] to start dispensing.
The coffee is brewed and then dispensed into the cup.
Press [ ] again to prematurely halt dispensing.
Preparation using milk
This fully automatic coffee machine has an integrated beverage outlet. This can be used to prepare coffee drinks with milk or also milk froth and warm milk.

Risk of burns!
The beverage outlet gets very hot. After use, always let it cool down before you touch it.
Milk container
The milk container has been designed especially for use together with this fully automatic coffee machine. It is intended solely for use in the household and for storing milk in the refrigerator. The insulated container keeps milk cool for a number of hours.

Important: Remove cups or glasses before opening the door in case they fall.
Connecting the milk container or a milk carton:
■ Open the appliance door.
■ Remove the cover of the beverage outlet towards the front.
■ Connect and fix the milk tubes and connecting elements as illustrated.

natural_image
Mechanical assembly diagram showing a bracket with directional arrows indicating force or movement (no text or symbols present)■ Attach the cover firmly from the front on to the beverage outlet.
■ Attach the suction pipe and insert into the milk container or a milk carton.

natural_image
Two diagrams showing a mechanical device with downward arrows indicating force or movement (no text or symbols present)■ Close the appliance door.

Dried milk residues are difficult to remove, therefore always clean (see the section "Cleaning the milk system").
Coffee drinks with milk
■ Place a cup or glass underneath the beverage outlet.
■ Turn the control ring and select "Espresso Macchiato", "Cappuccino", "Latte Macchiato" or "Caffe Latte".
The display shows the selected drink along with the preset values for this drink.
The settings can be changed as described in the section "Drink adjustment".
■ Press [ ▷ ] to start dispensing.
The milk is dispensed into the cup or glass first. Then the coffee is brewed and runs into the cup or glass.
Press [ ] again to stop the current step of the process prematurely.
Milk froth or warm milk
■ Place a cup or glass underneath the beverage outlet.
■ Turn the control ring and select "Milk froth" or "Warm milk".

The settings can be changed as described in the section "Drink adjustment".
■ Press [ ▷ ] to start dispensing.
Milk froth or warm milk is dispensed from the beverage outlet.
Press [ ] again to prematurely halt the dispensing process.
Preparation using ground coffee

When using ground coffee, the setting for the strength of the coffee and dispensing two cups at once is not available.
Important: Remove cups or glasses before opening the door in case they fall.
The appliance must be ready for use.
■ Open the appliance door.
■ Remove the ground coffee drawer. The removable drawer must be dry.
■ Put in coffee powder (maximum 2 level measuring spoons); do not press firmly.

Caution!
Do not use whole beans or instant coffee.
■ Replace the ground coffee drawer.
■ Close the appliance door.

If coffee is not dispensed within 90 seconds, the brewing chamber empties automatically to avoid an overflow. The appliance is then rinsed.
■ Place a cup underneath the beverage outlet.
■ Turn the control ring and select a coffee drink or a coffee drink with milk.
The display shows the selected drink, a measuring spoon and the preset values for this drink.

The settings can be changed as described in the section "Drink adjustment".
For coffee drinks with milk, please observe the instructions in the section "Preparation using milk".
■ Press [ ▷ ] to start dispensing.
The coffee is brewed and then dispensed into the cup. When selecting coffee drinks with milk, the milk is first dispensed and then the coffee brewed.

For another drink with ground coffee, repeat the procedure.
Dispensing hot water

Risk of burns!
The beverage outlet gets very hot. After use, always let it cool down before you touch it.
The appliance must be ready for use.
■ Remove the milk tube from the milk container.
■ Remove any milk or coffee residue from the outlet.
■ Place a cup or glass underneath the beverage outlet.
■ Turn the control ring and select "Hot water".

The settings can be changed as described in the section "Drink adjustment".
■ Press [ ▷ ] to start dispensing.
■ The message appears “Milk hose separated from milk container?”.
■ If still connected, remove the milk tube and touch [Yes] on the display.
Hot water flows out of the beverage outlet. Press [ ▷ ] again to prematurely halt the dispensing process.
Personalised drinks
Touch [ ☆ ] to open the selection for personalised drinks.
Up to 8 storage spaces can be used. Save your favourite drinks that are frequently dispensed here with all their settings.

Touch [ ☆ ] to exit the menu without saving at any time.
Entering or changing drinks
■ Touch [☆]. The selection of memory locations appears.
■ Turn the control ring to choose an empty memory location (empty glass) to make a new entry, change an occupied memory location, or delete a favourite drink.
■ Select [new] at an empty memory location or [Details] at an occupied memory location.

The menu for adjusting the drinks opens. The last drink dispensed is shown with the last settings selected.
■ If you do not wish to save last drink dispensed, turn the control ring and select another drink.
■ Touch each setting to be changed and turn the control ring to adjust the values as desired.
Other setting options appear depending on the selection.
■ Touch [Further details | Save] to enter other settings.

For milk drinks, the mixing ratio of coffee and milk can be set.
■ The settings can be stored under an individual name. Touch [Name]. The mask for entering the name opens.
| Back to Details | Anna m | Delete letter |
| Save letter | ||
| SaveName |
■ Turn the control ring and select a letter or a symbol.
■ Touch [Save letter] to confirm the letter selected or [Delete letter] to delete it.
■ Select other letters or symbols and confirm.
■ With [Save] the entry is adopted. The selection menu opens.
■ Touch [☆] to exit the menu.
Deleting a drink
■ Touch [☆]
■ Turn the control ring and select the occupied memory location.
■ Touch [Details] and [Further details | Save].
■ Touch [Delete beverage] and then [Delete].
The memory location is again free.
Select a personalised drink and dispense
Touch [☆]. The selection of memory locationsopens.
■ Turn the control ring and select the desired memory location.
■ Place a cup or glass underneath the beverage outlet.
■ Press [ ▷ ] to start dispensing.
Adjusting the grind setting
This fully automatic coffee machine has an adjustable grinding unit. This enables the grinding level of the coffee to be individually changed.
■ Open the appliance door.
■ Slide the regulator to select the grinding degree setting between finely ground coffee ⚙️ and coarsely ground coffee ⚙️.

natural_image
Diagram of a mechanical or electrical component with bidirectional arrows indicating movement or flow (no text or symbols present)■ Close the appliance door again.

For dark roast coffee beans, choose a finer grind, for lighter beans a coarser grind.
Tip: Only make small changes to the grinding degree setting.
The new setting will not become apparent until after the second cup of coffee.
If the display shows the message "Select a coarser degree of grinding", this means that the beans are being ground too finely. Adjust the grinding level to a coarser setting.
Child-proof lock
The appliance can be locked to protect children against scalding and burns.
■ Press and hold [ √ ] for at least
4 seconds. "Child-proof lock activated" briefly appears on the display.
No further operation is now possible; only [ ] can be pressed.
■ To deactivate the child lock, press and hold [ ] for at least 4 seconds.
"Child-proof lock deactivated" briefly appears on the display.
Menu
The menu is used for changing individual settings, accessing information and launching processes.
■ Touch [ ] to open the menu.
The different setting options will appear in the touch display and the current setting in the round information display.
Navigating through the menu:
By touching e.g. language the corresponding setting option is activated and highlighted red.
Turn the control ring to enter the settings, e.g. "English". By touching [Next], other setting options will appear.
| Language | English | Illumination |
| Water hardness | Brightness illumination | |
| Switch off after | Next> |
For example:
Set the appliance at 15 minutes to switch off automatically:
■ Touch [ʃ]. The menu opens.
■ Touch [Switch off after], the field is highlighted red.
■ Turn the control ring and select "00h15m".
■ Touch [ʃ]. [Save] and [Do not save] appears.
■ Touch [Save]. The setting is saved.
The drink selection appears on the display.

Press [ 🔍 ] to exit the menu at any time. If no entry is made within approx. 30 seconds, the menu closes automatically and the settings are not saved.
The following settings can be made:
Language
Set the desired language to show the display texts.
Water hardness
Set this to the local water hardness.
Level "1 (soft)" to "4 (very hard)" can be selected. The preset water hardness is "4 (very hard)".
i It is important to set the water hardness correctly to enable the appliance to accurately indicate when the descaling programme should be run.
You can check the water hardness using the enclosed test strip or by asking your local water supplier. If a water softening system is installed in the house, please select the “Softening device” setting.
Water filter
If a water filter is inserted, renewed or removed, the setting "insert", "replace" or "remove" must be made in the menu.
A water filter lessens limescale deposits, reduces impurities in water and improves the coffee taste. Water filters are available from retail outlets or from customer services (see the section “Accessories”).
Inserting or renewing a water filter: A new water filter must be rinsed before it can be used.
■ Turn the control ring to select either "insert" or "replace".
■ Press the water filter firmly into the opening of the water tank.

natural_image
Illustration of a hand pouring liquid into a container with a downward arrow, next to a 3D model (no text or symbols)- Fill the water tank with water up to the "max" mark.
■ Remove the milk tube from the milk container and close the door.
i Caution: Do not jam the tube when closing the door.
■ Place a container with a capacity of 0.5 litre under the outlet.
■ Press [ ▷ ].
Water will now flow through the filter to rinse it.
■ Then empty the container.
The appliance is ready for use again.
i Rinsing the filter simultaneously activates the setting for the change filter display.
The filter is no longer effective when the "Replace water filter – Press [ ]" display appears, or at the latest after two months. It needs to be replaced for reasons of hygiene and to prevent a build-up of limescale (which could damage the appliance).
■ If a new filter is not inserted, select the setting [remove] and press [▷].
The message “Remove filter, reinsert water tank, close door” appears.
If the appliance has not been used for a prolonged period (for example, while you are on holiday), the existing filter should be rinsed before the first time the appliance is used again. To do this, simply dispense a cup of hot water.
Detailed information about the water filter can be found in the manual supplied with the filter.
Home Connect
Settings for connection to WLAN network (home network) and mobile devices (see section "Home Connect").
Switch off after
To set how long the appliance should wait after the last drink was prepared before it automatically rinses and switches itself off. You can specify values from 15 minutes to 8 hours. The factory setting is 30 minutes.
Illumination
Setting the illumination of the beverage outlet. "on", "when in use" or "off" can be selected.
Brightness illumination
Setting the illumination lightness of the beverage outlet. “Level 1” to “Level 10” can be selected.
Brightness display
Setting the illumination lightness of display.
Key tones
Switch the signal tones on or off.
Clock displ.
Display option for time Off or Digital (on). The setting for this can be changed in the Clock menu option.

If the appliance is switched off at the mains or there is a power failure, the settings for the time will be lost.
Clock
Setting for the current time.
Frost protection
Service programme to prevent frost damage during transportation and storage.
This programme completely empties the appliance.
■ Empty the water tank and reinsert.
■ If available remove the milk container and close the door.
The appliance automatically empties all its pipes.
■ Empty the drip tray and re-insert.
Beverage info
Display shows how many drinks have been prepared since its initial use.
Factory settings
Resets your own settings to the condition when delivered.
■ Touch [Reset] or [Do not reset] to either confirm or interrupt.
Home Connect
This fully automatic coffee machine is Wi-Fi-capable and can be remotely controlled using a mobile device (e.g. tablet PC, smartphone). The Home Connect App offers additional functions which are a perfect complement to the networked appliance. If the appliance is not connected to the WLAN network (home network), it functions in the same way as a fully automatic coffee machine with no network connection and can be operated as usual via the display.

Please ensure that you follow the safety instructions given at the beginning of this instruction manual and that these are also observed when operating the appliance via the Home Connect app and when away from home. Please also follow the instructions in the Home Connect App.

Operation on the appliance itself always takes priority, and during this time it is not possible to operate the appliance using the Home Connect App.
Setting up
To implement settings via Home Connect, you must have installed the Home Connect App on a mobile device (e.g. tablet PC, smartphone). Please observe the supplied Home Connect documents with regard to this.
Follow the steps specified by the app to implement the settings.
Login of the appliance in the WLAN network can be carried out on initial set-up of the fully automatic coffee machine either directly or using the menu (first touch [ √ ] to open the menu):
■ Touch [Home Connect].
■ Touch [Wi-Fi] to start the wireless connection. "Wi-Fi on" appears in the display.
■ Touch [Connect network]. The following selection appears: [Connect automatically] and [Manually connect].

If the router has WPS functionality, please select [Connect automatically].
Connect automatically in the WLAN network (home network)
■ Touch [Connect automatically]. The display shows [Automatic network connection].
ehome Connect
■ Press the WPS button on the home network router within a few minutes and wait until the display of the fully automatic coffee machine shows “Network connection successful”.
■ Open the app on the mobile device.
■ Touch [Connect with app]. The fully automatic coffee machine connects with the app.
■ Wait until [Successfully connected with app] lights up briefly in the display.
■ Touch [Remote start]. A warning message appears.
■ Touch [Next] and read the warning message.
■ Touch [confirm].
With the mobile device the functions of the fully automatic coffee machine can now be used to their full extent via the app.

If [Remote start] - [Deactivate] is selected, only the modes of the fully automatic coffee machine are displayed in the Home Connect app. You can specify settings but not start drinks dispensing.
Connect manually in the WLAN network (home network)
■ Touch [Manually connect]. The fully automatic coffee machine sets up a separate WLAN network which can be accessed with a tablet or smartphone. The display shows the SSID (the name) and the key (the password) of this network.
- Log the mobile device in to the network of the fully automatic coffee machine with the “HomeConnect” SSID and the “HomeConnect” key.
■ Start the app on the mobile device and follow the instructions for network login in the app and the supplied Home Connect documents.
The login process is complete when “Network connection successful” lights up briefly in the display of the fully automatic coffee machine.
■ Touch [Connect with app]. The app must also be opened on the mobile device. The fully automatic coffee machine connects with the app.
■ Wait until [Successfully connected with app] lights up briefly in the display.
■ Touch [Remote start]. A warning message appears.
■ Touch [Next] and read the warning message.
■ Touch [confirm].
With the mobile device the functions of the fully automatic coffee machine can now be used to their full extent via the app.

If [Remote start] - [Deactivate] is selected, only the modes of the fully automatic coffee machine are displayed in the Home Connect app. You can specify settings but not start drinks dispensing.
Switching Wi-Fi on and off
Wi-Fi can be switched "On" or "Off" as required (e.g. when on holiday).

Network information is retained after the appliance is switched off.
After switching on, wait a few seconds until the fully automatic coffee machine has connected to the WLAN network again.
In networked standby mode the appliance requires a maximum of 2 W.
■ Touch [ ] to open the menu.
■ Touch [Home Connect].
■ Touch [Wi-Fi] to switch the wireless module "On" and "Off".
Additional settings
Home Connect can be adapted to your individual needs at any time.
Note: The fully automatic coffee machine must be connected to the WLAN network.
Disconnecting
The fully automatic coffee machine can be disconnected from the WLAN network at any time.

If the fully automatic coffee machine is disconnected from the WLAN network, it cannot be operated using Home Connect.
■ Touch [ ∫ ] to open the menu.
■ Touch [Home Connect].
■ Touch [Disconnect from network].
The connection to the network and app is disconnected. Wi-Fi and remote start are switched off.

Information about the WLAN network is cleared.
Connecting with app
The Home Connect app can be installed on any number of mobile devices, which can then be used to connect to the fully automatic coffee machine.
The fully automatic coffee machine must already be connected to the WLAN network.
■ Open the app on the mobile device.
■ Touch [ ] to open the menu.
■ Touch [Home Connect].
■ Touch [Connect with app] to connect to the appliance with the app.
Remote start
If you wish e.g. to start drinks dispensing on the fully automatic coffee machine via a mobile device, Remote start must be activated.

Risk of burns!
If an unattended remote start takes place, third parties might be scalded if they reach under the coffee dispenser during drinks dispensing. You should therefore make sure that with an unattended remote start that there is no risk to other people, in particular not to children, or to property.

The [Remote start] text field is is only visible if connection with Home Connect has been successfully completed.

If Remote start is switched off, only the modes of the fully automatic coffee machine are displayed in the Home Connect app.
■ Touch [ ] to open the menu.
■ Touch [Home Connect].
■ Touch [Remote start] to switch the function Remote start "On" and "Off".
Device Info
Display for network and device information
■ Touch [ ] to open the menu.
■ Touch [Home Connect].
■ Touch [appliance Info]. The SSID, IP, MAC address and serial number of the appliance are displayed for a few seconds.
Information on data protection
When the fully automatic coffee machine is connected for the first time to a WLAN network which is connected to the Internet, the appliance transmits the following categories of data to the Home Connect server (initial registration):
■ Unique appliance identification (consisting of appliance codes as well as the MAC address of the installed Wi-Fi communication module).
■ Security certificate of the Wi-Fi communication module (to ensure a secure IT connection).
■ The current software and hardware version of the fully automatic coffee machine.
■ Status of any previous resetting to the factory settings.
This initial registration prepares the Home Connect functions for use and is only required when you want to use these Home Connect functions for the first time.

Please note that the Home Connect functions can only be used in conjunction with the Home Connect app. Information on data protection can be accessed in the Home Connect app.
Declaration of Conformity
Robert Bosch Hausgeräte GmbH hereby declares that the appliance which features Home Connect functionality is in accordance with the essential requirements and the other relevant provisions of the directive 1999/5/EC. A detailed R&TTE Declaration of Conformity can be found online at www.bosch-home.com among the additional documents on the product page for your appliance.
Care and daily cleaning

Risk of electric shock!
Never immerse the appliance in water. Do not steam-clean the appliance.
■ Wipe the outside of the appliance with a soft, damp cloth.
■ Clean the control panel using a micro-fibre cloth.
■ Do not use any cleaning agents containing alcohol or spirits.
■ Do not use abrasive cloths or cleaning agents.

■ Always remove any limescale, residues of coffee or milk, cleaning or descaling solution immediately. It is possible for corrosion to form underneath such deposits.

New sponge cloths may contain salts. Salts can cause rust film on stainless steel and must therefore be washed out thoroughly before use.
■ Open the door and pull the drip tray out forwards.
■ Remove drip tray cover and coffee grounds container.
■ Empty, clean and dry individual parts.

Important: The drip tray and coffee grounds container should be emptied and cleaned every day in order to prevent deposits.
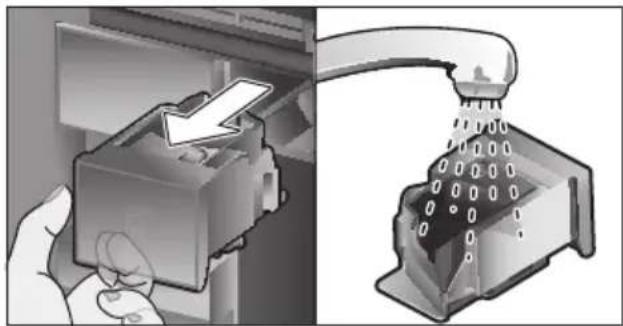
■ Remove the ground coffee drawer, clean under running water and dry well.
natural_image
Illustration of a hand inserting a plastic into a device, with a magnified view showing liquid being poured into a container (no text or symbols present)■ Wipe and dry the inside of the appliance (support, drip tray and the ground coffee drawer) and collecting tray.
■ Replace the dried parts, e.g. the ground coffee drawer.

Do not put the following parts in the dishwasher:
Accessory drawer, water tank, lid of the water tank, beverage outlet cover, bean container, lid of the bean container, metal connecting element, ground coffee drawer, protective cover of the brewing unit and the milk container.

The following parts may be cleaned in the dishwasher:
Drip plate, collecting tray, drip tray, drip tray cover, coffee grounds container, milk tubes, suction pipes, individual parts of the beverage outlet, measuring spoon and individual parts of the milk container lid.

If the appliance is cold when switched on, or if it is switched off after dispensing coffee, it rinses automatically. The system is therefore self-cleaning.
Important: If the appliance is not used for a lengthy period (e.g. while you are on holiday), clean the entire appliance thoroughly, including the milk system, the ground coffee drawer and the brewing unit before use.
Cleaning the milk system
The milk system is automatically cleaned with a short jet of steam directly after preparing a milk drink.

Tip: For particularly thorough cleaning, the milk system can be additionally rinsed with water (see the section "Rinsing the milk system").
Important: Clean the milk system manually every week and, if required, also more often (see the section "Cleaning the milk system manually").

Risk of burns!
The beverage outlet gets very hot. After use, always let it cool down before you touch it.
Rinsing the milk system
■ Touch [ 。].
■ Touch [Rinse milk system] to select the programme.
■ Open door and remove suction pipe from the milk tube.
■ Wipe the suction pipe and insert the end of the suction pipe into the hole on the coffee grounds container.

natural_image
Mechanical assembly diagram showing a lever and pin with warning symbol (no text or labels)■ Close the door. Be careful not to jam the milk tube.
■ Place an empty glass underneath the beverage outlet.
■ Press [ ▷ ].
The milk system is rinsed with water.
■ Then empty the glass.
■ Touch [ 🔊 ] to exit the programme.
Cleaning the milk system manually
Take the milk system apart to clean it:
■ Push the beverage outlet down completely and pull the cover forward to remove.
■ Press the snap lever to the left of the beverage outlet downwards and pull the beverage outlet forward.

natural_image
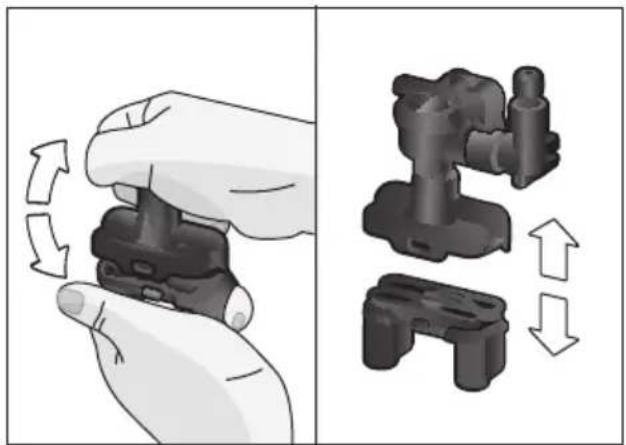
Two-panel illustration showing hands installing or adjusting a wall-mounted electrical socket, with arrows indicating the process (no text or symbols present)■ Remove the milk tube. Dismantle the top and bottom sections of the beverage outlet.
natural_image
Illustration showing a hand holding a device with rotational arrows, alongside a close-up of a mechanical component with directional arrows (no text or symbols)■ Separate the milk tubes, connecting element and suction pipe.

natural_image
Diagram of a mechanical component with curved ends and directional arrows indicating motion (no text or symbols)■ Clean the individual parts with a detergent solution and a soft cloth.
are and daily cleaning
■ Rinse all parts with clean water and dry them.

All parts of the milk system can also be put in the dishwasher.
■ Put the individual parts back together again (see also the quick reference guide).

■ Attach the beverage outlet directly from the front firmly to the three connections.
■ Replace the cover.
Cleaning the milk container
For reasons of hygiene, the milk container should be cleaned regularly. Only the individual parts of the lid are suitable for being cleaned in the dishwasher. Clean the stainless steel milk container by hand with a mild detergent.

natural_image
Diagram showing a cylindrical container with a crosshair symbol and an open lid with an arrow indicating rotation (no text or labels)Cleaning the brewing unit
(see also the Quick reference guide) In addition to the automatic cleaning programme, the brewing unit should be removed regularly for cleaning.
■ Open the appliance door.
■ Use the mains switch [O/I] to switch off the appliance completely.
■ Remove the protective cover of the brewing unit.
■ Remove the coffee grounds container.
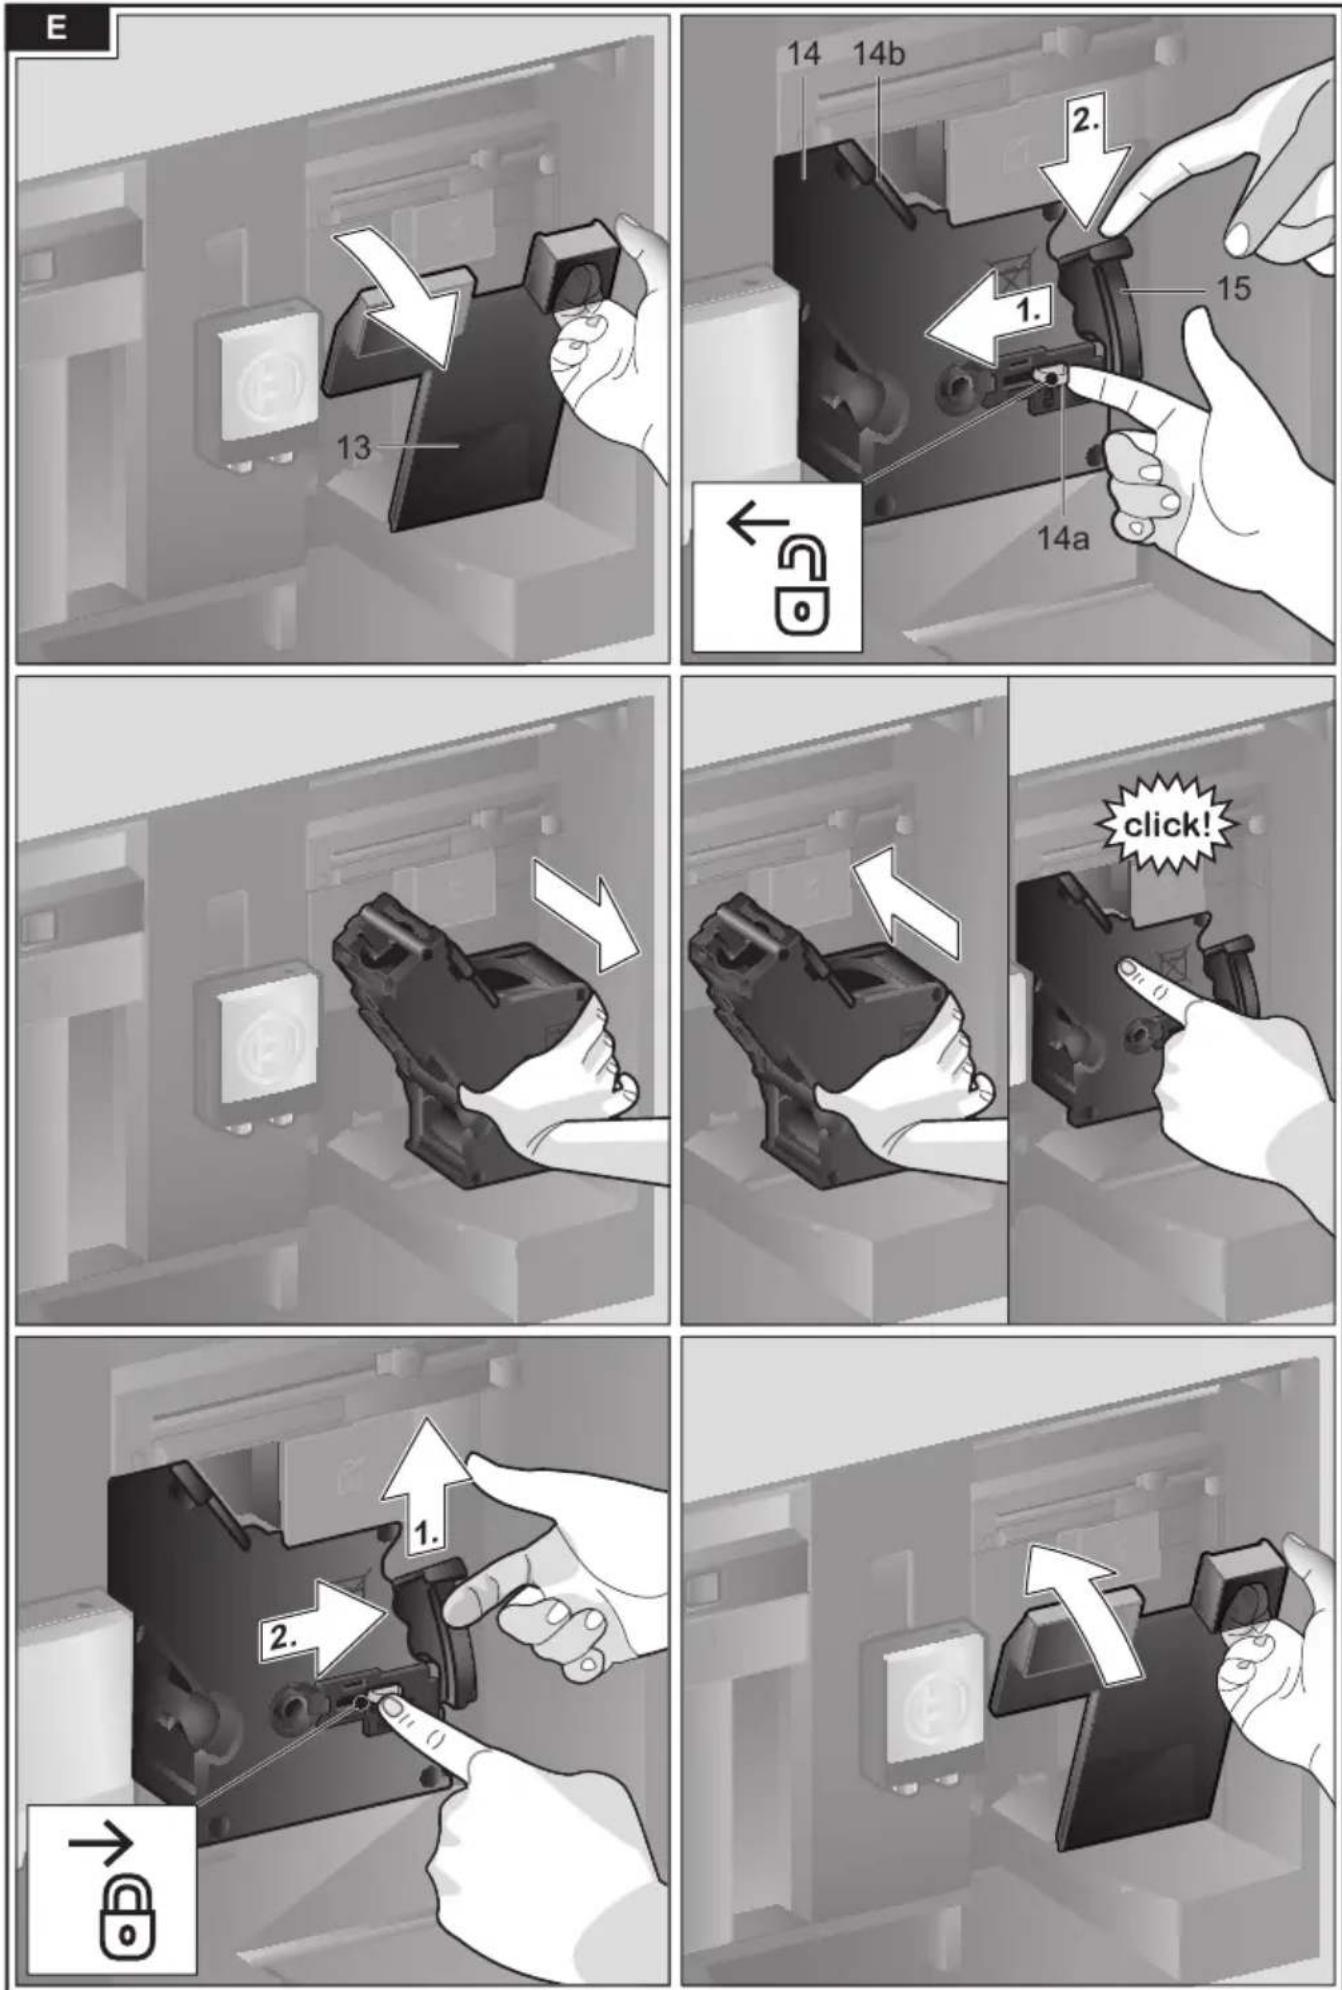
■ Slide the red latch on the brewing unit all the way to the left ☐.
■ Press the eject lever right down. The brewing unit will be released.
■ Take hold of the brewing unit by the recessed grips and carefully remove it.
■ Remove the cover of the brewing unit and clean thoroughly under running water.

natural_image
Two-panel illustration showing a hand cleaning a mechanical component and pouring liquid into a wash bottle (no text or symbols)■ Clean the strainer of the brewing unit thoroughly under the water jet.

natural_image
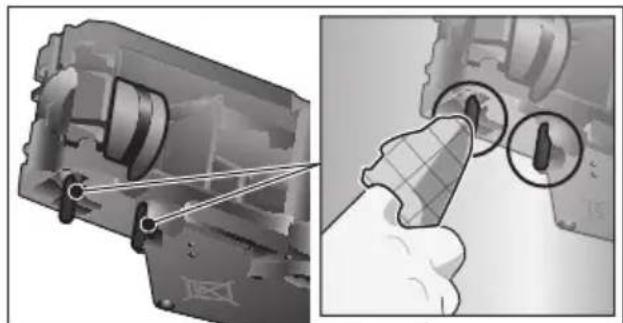
Mechanical assembly diagram showing internal components and a close-up of a component with a curved pipe or connector (no text or symbols visible)■ Thoroughly clean the connecting nozzles of the brewing unit.
natural_image
Mechanical assembly diagram showing a disassembly of a component with a tool inserted (no text or symbols visible)
Important: Clean it without using washing-up liquid and do not put it in the dishwasher.
■ Clean the inside of the appliance thoroughly with a moist cloth, removing any coffee residues.
■ Leave the brewing unit and the inside of the appliance to dry.
■ Place the cover back on the brewing unit.
■ Push the brewing unit all the way into the appliance and press on the middle until it audibly clicks into place.

Important: The red latch must be right over at the left at ☐ before replacing (see diagram E).
■ Press the eject lever right up and push the red latch right over to the right to ☐.
■ Insert the coffee grounds container.
■ Replace the protective cover.
■ Close the appliance door.
Service programmes
(see also the Quick reference guide) The following messages will appear on the display at certain intervals, either
"Descaling programme urgently required!" or "Cleaning programme urgently required!" or "Calc'nClean programme urgently required!".
The unit should immediately be cleaned or descaled using the appropriate programme. Alternatively, the two processes Descale and Clean can be carried out together using the Calc'nClean function (see the section "Calc'nClean"). Failure to carry out the service programme according to the instructions may damage the appliance.

Important: If the appliance is not descaled when it is supposed to be, the message “Descaling programme is overdue. Device will shortly be locked.” will appear. Immediately perform the descaling process in accordance with the instructions. If the appliance is locked, it can only be operated again once the descaling process has been carried out.
To display how many beverages can still be prepared before one of the service programmes needs to be run, proceed as follows:
■ Touch [ 。].
The service programmes appear. The counter, e.g. "Clean after approx. 28 cups" provides information on when to perform the respective programme next.

Warning!
For each of the service programmes, use descaling and cleaning agents as described in the instructions and observe the (relevant) safety information. Never interrupt a service programme. Do not drink liquids! Never use vinegar, citric acid or any vinegar-based or citric acid-based agents. Never place descaling tablets or other descaling materials in the coffee drawer!
Important:
Before starting each service program (Descale, Clean or Calc'nClean) remove the brewing unit, clean as instructed and replace it.
Be careful not to jam the milk tube when closing the door.
After completion of each service programme, wipe the appliance immediately with a soft, damp cloth to remove any residues from the descaling and cleaning solution. It is possible for corrosion to form underneath such deposits.
New sponge cloths may contain salts. Salts can cause rust film on stainless steel and must therefore be washed out thoroughly before use.
Clean the beverage outlet, milk tubes and connecting piece thoroughly.
Specially developed, suitable descaling and cleaning tablets are available from retail outlets or from customer services (see the section "Accessories").
Descaling
Takes about 21 minutes.
■ Touch [ 。].
■ Touch [Descale] to select the programme.
■ The display indicates the progress of the programme.
■ Empty drip trays and replace.
■ Remove the water filter (if there is one) and press [ ▷ ].
■ Pour lukewarm water into the empty water tank up to the "0.5 l" mark and then dissolve one Bosch descaling tablet TCZ8002 in it. For the TCZ6002 you should always dissolve two tablets.
If there is not enough descaling solution in the water tank, you will be asked to do the following. Refill using uncarbonated water and press [ ] again.
■ Remove the suction pipe from milk container, wipe it and insert the end of the suction pipe into the hole on the coffee grounds container.
■ Close the appliance door.
■ Place a container with a capacity of 0.5 litre under the beverage outlet.
■ Press [ ▷ ]. The descaling programme will now run for about 19 minutes.
■ Remove the container and press [ ▷ ].
■ Rinse the water tank and (if removed) replace the water filter.
- Fill the tank with fresh water up to the "max" indicator.
■ Replace the water tank and close the door.
■ Place the container underneath the beverage outlet again.
■ Press [ ▷ ]. The descaling programme will now run for about 2 minutes and rinse the appliance.
■ Remove the container, empty the drip trays, replace and close the appliance door.
■ Press [▷]. The appliance has finished descaling and is ready for use again.
■ Touch [ 🔊 ] to exit the program.
Cleaning
Takes about 5 minutes.
■ Touch [ 。].
■ Touch [Clean] to select the programme.
■ The display indicates the progress of the programme.
■ Clean the beverage outlet and replace, empty the drip trays and replace.
■ Open the ground coffee drawer, drop in a cleaning tablet and close the coffee drawer again.
■ Close the appliance door.
■ Place a container with a capacity of 0.5 litre under the beverage outlet.
■ Press [ ▷ ]. The cleaning programme will now run for about 5 minutes.
■ Remove the container, empty the drip trays, replace and close the appliance door.
■ Press [ ▷ ]. The appliance has finished cleaning and is ready for use again.
■ Touch [ 🔊 ] to exit the program.
Calc'nClean
Takes about 26 minutes.
Calc'nClean combines the functions Descale and Clean. If both programmes are due to be carried out close together, the fully automatic coffee machine will automatically suggest this service programme.
■ Touch [ 。].
■ Touch [Calc'nClean] to select the programme.
■ The display indicates the progress of the programme.
■ Clean the beverage outlet and replace, empty the drip trays and replace.
■ Open the ground coffee drawer, drop in a cleaning tablet and close the coffee drawer again.
■ Remove the water filter (if there is one) and press [ ▷ ]
■ Pour lukewarm water into the empty water tank up to the “0.5 l” mark and then dissolve one Bosch descaling tablet TCZ8002 in it. For the TCZ6002 you should always dissolve two tablets.

If there is not enough descaling solution in the water tank, you will be asked to do the following. Refill using uncarbonated water and press [ ▷ ] again.
■ Remove the suction pipe from milk container, wipe it and insert the end of the suction pipe into the hole on the coffee grounds container.
■ Close the appliance door.
■ Place a container with a capacity of 0.5 litre under the beverage outlet.
■ Press [ ▷ ]. The programme will now run for about 19 minutes.
■ Remove the container and press [ ▷ ].
■ Rinse the water tank and (if removed) replace the water filter.
- Fill the tank with fresh water up to the "max" indicator.
■ Replace the water tank and close the door.
■ Place the container underneath the beverage outlet again.
■ Press [ ▷ ]. The programme will now run for about 7 minutes and rinse the appliance.
■ Remove the container, empty the drip trays, replace and close the appliance door.
■ Press [ ▷ ]. The appliance is descaled, cleaned and ready for use again.
■ Touch [ 🔊 ] to exit the program.
Special rinsing

Important: If any of the service programmes is ever interrupted, for instance by a power failure, please proceed according to the information on the display:
- Rinse the water tank and refill it with fresh water up to the “max” mark.
■ Press [ ▷ ]. The programme will now run for about 2 minutes and rinse the appliance.
■ Empty the drip trays, replace and close the appliance door. The appliance is ready for use again.
■ Touch [ 🔊 ] to exit the program.
Tips on energy saving
■ Press [①] to switch the appliance to "energy saving mode". The appliances uses very little power when in "energy saving mode", but monitors all safety-relevant functions so as to avoid damage.
In the menu under "Switch off after", set the automatic switch off period to 15 minutes.
■ Reduce the brightness of the display and the illumination in the menu to save energy.
■ If possible, do not interrupt the dispensing of coffee or milk froth. Stopping a process prematurely results in higher energy consumption and the drip tray fills up more quickly.
■ Descale the appliance regularly to avoid a build-up of limescale. Limescale residues cause higher energy consumption.
Frost protection
To prevent frost damage during transport and storage, completely empty the appliance beforehand (see the section "Menu – Frost protection").
Storing accessories
The fully automatic coffee machine has a special accessory drawer for storing the Quick reference guide and the accessories in the appliance.
■ Put the measuring spoon and the water filter into the accessory drawer.
■ Put the Quick Reference Guide into the special support at the front of the accessory drawer.
■ The long suction pipe can be stored in the holder on the inside of the door.
■ The connecting element can be fixed to the magnetic holder above the ground coffee drawer.
Accessories
The following accessories are available from retailers or from customer service:
Accessories Order number
| Retail/Customer service | |
| Cleaning tablets TCZ8001/00311808 | |
| Descaling tablets TCZ8002/00576694 | |
| Water filter TCZ7003/00575491 | |
| Care set TCZ8004/00576331 | |
| Milk container with “FreshLock” lid | TCZ8009N/00576165 |
| Restrictors for opening angle 92° | 00636455 |
Disposal

Dispose of packaging in an environmentally-friendly manner. This appliance is labelled in accordance with European Directive 2012/19/EU concerning used electrical and electronic appliances (waste electrica and electronic equipment – WEEE). The guideline determines the framework for the return and recycling of used appliances as applicable throughout the EU. Please ask your specialist retailer about current disposalfacilities.
Guarantee
The guarantee conditions for this appliance are as defined by our representative in the country in which it is sold. Details regarding these conditions can be obtained from the dealer from whom the appliance was purchased. The bill of sale or receipt must be produced when making any claim under the terms of this guarantee.
Changes reserved.
Simple troubleshooting
| Problem Cause Solution | ||
| Strongly fluctuating coffee or milk froth quality (e.g. fluctuation in quantity or milk froth spraying). | Build-up of limescale in the appliance. | Descale the appliance according to the instructions, see the section “Service programmes”. |
| The suction pipe is blocked. Clean the suction pipe. | ||
| Drinks cannot be dispensed. | Beverage outlet or one of the 3 connections are blocked. | Clean the beverage outlet and the connections. |
| The drink runs out at the entire outlet during dispensing. | Lower part of the beverage outlet is missing. | Attach the lower part, see the section “Cleaning the milk system”. |
| Too little milk froth, none at all, or the milk system is not taking in any milk. | Build-up of limescale in the appliance. | Descale the appliance according to the instructions, see the section “Service programmes”. |
| Beverage outlet or one of the 3 connections are blocked. | Clean the beverage outlet and the connections. | |
| Milk not suitable for foaming. Do not use milk that has already been boiled. Use cold milk with a fat content of at least 1.5%. | ||
| Beverage outlet or the milk tubes are not correctly assembled. | Moisten the individual parts and put them together again. | |
| The suction pipe is blocked. Clean the suction pipe. | ||
| The personally selected volume is not reached. Coffee dispensing slows to a trickle or stops completely. | Coffee is ground too finely. Preground coffee is too fine. | Adjust the grinding level to a coarser setting. Use a coarser ground coffee. |
| Heavy build-up of limescale in the appliance. | Descale the appliance according to the instructions, see the section “Service programmes”. | |
| The brewing unit is soiled. Clean brewing unit, see chapter “Cleaning the brewing unit”. | ||
| Hot water milky or tastes of coffee. | Milk tube has not been removed. | Remove the milk tube from the milk container. |
| Milk or coffee residue in the beverage outlet. | Clean the beverage outlet. | |
| Coffee has no “crema”. Unsuitable type of coffee. | Use a type of coffee with a higher proportion of robusta beans. | |
| Use fresh beans. | ||
| Adjust the grinding unit to a finer setting. | ||
| Coffee is too “acidic”. The grinding level is too coarse. Preground coffee is too coarse. | Adjust the grinding unit to a finer setting. Use a finer ground coffee. | |
| Unsuitable type of coffee. Change the type of coffee. | ||
| Coffee is too “bitter”. Coffee | is ground too finely.Preground coffee is too fine. | Adjust the grinding level to a coarser setting. Use a coarser ground coffee. |
| Unsuitable type of coffee. Change the type of coffee. | ||
| Coffee tastes burnt. The brewing temperature is too high. | Reduce the temperature, see the section “Drink adjustment”. | |
| Coffee is ground too finely.Preground coffee is too fine. | Adjust the grinding level to a coarser setting. Use a coarser ground coffee. | |
| Unsuitable type of coffee. Change the type of coffee. | ||
| Coffee is too “weak”. Coffee | e strength selected is too weak. | Raise the strength of the coffee, see the section “Drink adjustment”. |
| Ground coffee jammed in the coffee drawer. | Remove the ground coffee drawer, clean and dry thoroughly. | |
| Ground coffee sticks in the coffee drawer. | Ground coffee sticks together. | Do not press the ground coffee firmly into the coffee drawer. |
| Coffee drawer is damp. Remove the ground coffee drawer, clean and dry thoroughly. | ||
| The water filter does not stay in position in the water tank. | The water filter is not mounted correctly. | Firmly press the water filter straight down into the tank connection. |
| Bean container sticks when inserting. | There are beans in the housing. | Remove the beans. |
| The coffee grounds are not compact and are too wet. | The grinding setting is too fine or too coarse, or not enough ground coffee has been used. | Adjust the grinding unit to a coarser or finer setting, or use 2 level measuring spoons of ground coffee. |
| Grinding level adjustment is stiff. | Too many beans in the grindingunit. | Dispensing a drink from coffee beans. Only make any sub sequent changes to the grinding level in small steps. |
| Brewing unit cannot be inserted. | Brewing unit is in the wrong position. | Insert the brewing unit according to the instructions, see the section “Cleaning the brewing unit”. |
| Brewing unit is locked. Unlock the brewing unit, see the section “Cleaning the brewing unit”. | ||
| Protective cover of the brewing unit cannot be properly attached. | Brewing unit is not locked. Lock the brewing unit, see the section “Cleaning the brewing unit”. | |
| There is water under the drip tray. | This water is condensed. Do not insert drip tray without cover. | |
| Display shows “12:00” | Power failure or appliance switched off at mains. | Re-enter values; do not switch the appliance off at the mains or select the “off” option in the Clock displ. menu. |
| Display shows “Milk container connected?” despite connected milk container. | Container is outside the range of the sensor. | Position the container at the right edge. |
| Material e.g. milk carton is not recognised. | Confirm the display request with “Yes” or use the enclosed milk container. | |
| Display shows “Overvoltage or undervoltage” | Voltage too high or too low. Co | Contact electricity or grid provider. Have the power supply checked by an expert. |
| Display shows “Leave device to cool” | Appliance is too hot. Switch off | appliance for 30 minutes. |
| Display shows, for example: “Fault: E0510” | The appliance has a fault. Pro | eed according to the display screen. |
| Display shows “Fill bean container” although the container is already full, or the grinder is not grinding any beans. | Beans are not falling into the grinding unit (beans too oily). | Gently tap the bean container. Possibly change the type of coffee. When the bean con-tainer is empty, wipe it with a dry cloth. |
| Display shows “Clean brewing unit” | Brewing unit is soiled. Clean the | the brewing unit. |
| Too much ground coffee in the brewing unit. | Clean the brewing unit. Do not place more than two level measuring spoons of ground coffee in the drawer. | |
| The mechanism of the brewing unit is stiff. | Clean the brewing unit, see the section “Care and daily cleaning”. | |
| Display shows “Refill with still water or remove filter” | Water tank wrongly inserted In | ert water tank correctly |
| Carbonated water in the water tank. | Fill the water tank with fresh tap water. | |
| Float is stuck in the water tank. | Remove the tank and clean thoroughly. | |
| New water filter not rinsed according to instructions, or water filter used or defective. | Rinse the water filter according to the instructions and then switch on, or use a new water filter. | |
| Air in the water filter. Dip the w | water filter into water until no more air bubbles escape, replace the filter. | |
| Display shows“Empty drip trays”despite them being empty. | Drip tray is soiled and wet. Clean and dry the drip tray thoroughly. | |
| Emptying is not detected when the appliance is switchedoff. | When the appliance is switched on, remove and re-insert the drip tray. | |
| Display shows“Insert drip trays”even though drip tray in use. | Inside of appliance (tray holder) dirty. | Clean the inside. |
| The coffee grounds container is not fully inserted. | Push the coffee grounds container all the way in. | |
| Water dripped onto the inner floor of the appli-ance when the drip tray was removed. | Drip tray was removed too soon. | Wait a few seconds after the last drink was dispensed before removing the drip tray. |
| Display shows“Switch off with power switch, then back on after 30 sec!” | Appliance is too warm. Leave the appliance to cool down. | |
| Dirty brewing unit. Clean the brewing unit. | ||
| Home Connect does not work correctly. | Go to www.home-connect.com | |
| If you are unable to solve the problem, always call the hotline!You will find the telephone numbers at the back of these instructions. | ||
Technical specifications
Power connection (voltage - frequency) 220-240 V - 50/60 Hz
| Heater wattage 1600 W | |
| Maximum static pump pressure | 19 bar |
| Maximum water tank capacity (without filter) | 2.4 l |
| Maximum capacity of the coffee bean container | 500 g |
| Length of power cable | 1.7 m |
| Dimensions (H x B x D) | 455 x 495 x 375 mm |
| Weight, empty | 19-20 kg |
| Type of grinding unit | Ceramic |
Sommaire
natural_image
Mechanical assembly diagram showing a bracket with directional arrows indicating movement or force (no text or symbols present)natural_image
Two diagrams showing a mechanical device with arrows indicating downward motion, no text or symbols present.natural_image
Diagram of a mechanical or electrical component with bidirectional arrows indicating movement or force (no text or symbols present)natural_image
Illustration of a hand pouring liquid into a container with a downward arrow, showing mechanical components (no text or symbols)natural_image
Illustration of a hand inserting a device into a container while pouring liquid from a drain (no text or symbols present)natural_image
Mechanical assembly diagram showing a lever and pin with warning symbol (no text or labels)natural_image
Two-panel illustration showing hands installing or adjusting a wall-mounted electrical socket, with arrows indicating the process (no text or symbols present)natural_image
Illustration showing a hand holding a camera with rotational arrows indicating motion (no text or symbols)natural_image
Diagram of a mechanical or electrical component with curved ends and directional arrows indicating motion (no text or symbols)natural_image
Diagram showing a cylindrical container with a cross symbol and an open lid with an arrow indicating rotation (no text or labels)natural_image
Two-panel illustration showing a hand pouring liquid into a device, and a close-up of a mechanical component with a drain shower (no text or symbols)natural_image
Mechanical assembly diagram showing internal components and a close-up of a connector detail (no text or symbols visible)natural_image
Mechanical assembly diagram showing a component being inserted into a housing with a tool (no text or symbols visible)
① 2 Stuks hulzen (wit)
m Korte handleiding
n Maatlepel
natural_image
Diagram of a mechanical or electrical component with directional arrows indicating flow or movement (no text or symbols present)natural_image
Two diagrams showing a mechanical device with downward arrows indicating force or movement (no text or symbols present)natural_image
Pure mechanical component diagram with bidirectional arrows indicating movement or force (no text or symbols)natural_image
Illustration of a hand pouring liquid into a container with an arrow indicating downward motion (no text or symbols)natural_image
Diagram showing a hand inserting a device into a container while pouring liquid from a drain into a rack (no text or symbols present)natural_image
Mechanical assembly diagram showing a lever and pin with warning symbol (no text or labels)natural_image
Two-panel illustration showing hands installing or adjusting a component with arrows indicating direction (no text or symbols present)natural_image
Illustration showing a hand holding a game controller and its three views of a mechanical device with directional arrows indicating motion (no text or symbols)natural_image
Diagram of a mechanical or electrical component with curved ends and directional arrows indicating movement (no text or symbols)natural_image
Diagram showing a cylindrical container and its side view with a lid and arrow indicating rotation (no text or symbols)Zetgroep reinigen
natural_image
Two technical illustrations showing a hand pouring liquid into a device, with no visible text or symbols.natural_image
3D mechanical assembly diagram showing internal components and a close-up of a component with grid pattern (no text or symbols)natural_image
Mechanical assembly diagram showing a component being inserted into a housing with a tool (no text or symbols visible)
Jebel Ali Free Zone – Dubai
Tel.: 04 881 4401
mailto:service-uae@bshg.com
www.bosch-home.com/ae
AL Republika e Shqiperise, Albania
AERTECH SH.P.K.
Rruga Qemal Stafa
Pallati i ri perball Prokuroris se
Pergjithshme
Hyrja C Kati 10
Tirana
Tel.:066 206 47 94
mailto:g.volina@aertech.al
HEATHERTON, Victoria 3202
Tel.: 1300 368 339
mailto:bshau-as@bshg.com
www.bosch-home.com.au
BA Bosna i Hercegovina, Bosnia-Herzegovina
"HIGH" d.o.o.
Gradačačka 29b
71000 Sarajevo
Info-Line: 061 100 905
Fax: 033 213 513
mailto:delicnanda@hotmail.com
European Trade Center
Building, 5th floor
1784 Sofia
Tel.: 02 892 90 47
Fax: 02 878 79 72
mailto:informacia.servis-bg@
bshg.com
www.bosch.home.bg
Old Wolverton Road Wolverton
Milton Keynes MK12 5PT
To arrange an engineer visit, to order spare parts and accessories or for product advice please visit www.bosch-home.co.uk or call
*Calls are charged at the basic rate, please check with your telephone service provider for exact charges
GR Greece, Ελλάς
BSH Ikiakes Siskeves A.B.E. Central Branch Service
17 km E.O. Athinon-Lamias & Potamou 20
14564 Kifisia
Unit 1 & 2, 3rd Floor
North Block, Skyway House
3 Sham Mong Road
Tai Kok Tsui, Kowloon
Hong Kong
Tel.: 2565 6151
Fax: 2565 6681
mailto:bosch.hk.service@bshg.com
www.bosch-home.cn
HR Hrvatska, Croatia
BSH kućni uređaji d.o.o.
Kneza Branimira 22
10000 Zagreb
Tel:. 01 640 36 09
Fax: 01 640 36 03
mailto:informacije.servis-hr@
bshg.com
www.bosch-home.com/hr
www.bosch-home.com/hu
IE Republic of Ireland
BSH Home Appliances Ltd.
Unit F4, Ballymount Drive
Ballymount Industrial Estate
Walkinstown
Dublin 12
Service Requests, Spares and
Accessories
Tel.: 01450 2655*
Fax: 01450 2520
www.bosch-home.cu.uk
*0.03 € per minute at peak.
Off peak 0.0088 € per minute.
IL Israel,
C/S/B/ Home Appliance Ltd.
1, Hamasger St.
North Industrial Park
Lod, 7129801
Tel.: 08 9777 222
Fax: 08 9777 245
mailto:csb-serv@csb-ltd.co.il
www.bosch-home.co.il
IN India, Bhārat, भारत
BSH Household Appliances
Mfg. Pvt. Ltd.
Arena House, 2nd Floor, Main Bldg,
Plot No. 103, Road No. 12,
MIDC, Andheri East
Mumbai 400 093
Toll Free 1800 266 1880
www.bosch-home.com/in
IS Iceland
Smith & Norland hf.
Noatuni 4
105 Reykjavik
Tel.:0520 3000
Fax: 0520 3011
www.sminor.is
IT Italia, Italy
www.bosch-home.com/it
IP Turebekov Yerzhan
Nurmanovich
Jangeldina str. 15
Shimkent 160018
Tel.:0252 31 00 06
mailto:evrika_kz@mail.ru
LB Lebanon, لبنان
Teheni, Hana & Co.
Boulevard Dora 4043 Beyrouth
P.O. Box 90449
Jdeideh 1202 2040
Tel.: 01 255 211
mailto:Info@Teheni-Hana.com
LT Lietuva, Lithuania
Senuku prekybos centras UAB
Jonavos g. 62
44192 Kaunas
Tel.: 0372 12146
Fax: 0372 12165
www.senukai.lt
LU Luxembourg
General Serviss Limited
Bullu street 70c
1067 Riga
Tel.: 07 42 41 37
mailto:bt@olimpeks.lv
MD Moldova
S.R.L. "Rialto-Studio"
ул. Щусева 98
2012 Кишинев
тел./факс: 022 23 81 80
mailto:bosch-md@mail.ru
ME Crna Gora, Montenegro
Elektronika komerc
UI. Slobode 17
84000 Bijelo Polje
Tel./Fax: 050 432 575
Mobil: 069 324 812
mailto:ekobosch.servis@
t-com.me
Unit F2, 4 Orbit Drive
Mairangi Bay
Auckland 0632
Tel.: 09 477 0492
Fax: 09 477 2647
mailto:bshnz-cs@bshg.com
www.bosch-home.co.nz
PL Polska, Poland
SA Kingdom Saudi Arabia,
and Airconditioning Co. Ltd.
BOSCH Service centre,
Kilo 5 Old Makkah Road
(Next to Toyota), Jamiah Dist.
P.O.Box 7997
Jeddah 21472
Tel.: 800 244 0043
mailto:kunnumalsp@alj.com
www.aljelectronics.com.sa
SE Sverige, Sweden
www.bosch-home.com/tr
BSH Home Appliances Private Limited
台北市內湖區洲子街80號11樓
11F., No.80, Zhouzi St., Neihu Dist.
Taipei City 11493
Tel.: 0800 368 888
Fax: 02 2627 9788
mailto:bshtzn-service@bshg.com
我們期盼您不斷的鼓勵與指導,
任何咨詢或服務需求,
歡迎洽詢客服專線
gama-electronics.com
XS Srbija, Serbia
BSH Kućni aparati d.o.o.
Milutina Milankovića 11 ^4
11070 Novi Beograd
Tel.: 011 205 23 97
Fax: 011 205 23 89
mailto:informacije.servis-sr@
bshg.com
www.bosch-home.rs
ZA South Africa
BSH Home Appliances (Pty) Ltd.
15th Road Randjespark
Private Bag X36, Randjespark
1685 Midrand – Johannesburg
Tel.: 086 002 6724
Fax: 086 617 1780
mailto:applianceserviceza@
bshg.com
www.bosch-home.com/za
bosch-infoteam@bshg.com
Call rates depend on the network used
CZ 0251 095 546
DE 0911 70 440 040
DK 44 89 89 85
EE 0627 8730
ES 902 24 52 55
FI 020 7510 700
Calls charged at local or mobile rate
0.03 € per minute at peak. Off peak 0.0088 € per minute.
IL 08 9777 222
IS 0520 3000
IT 800 829 120 (Line Verde)
LI 05 274 1788
LU 26 349 300
LV 067 425 232
ME 050 432 575
MK 02 2454 600
NL 088 424 4010
NO 22 66 06 00
PL 801 191 534
PT 21 4250 730
RO 021 203 9748
RU 8 800 200 29 61
SE 0771 11 22 77 (local rate)
SK 02 444 520 41
SL 01 200 70 17
TR 444 6333



- Inhalt
- Included in delivery
- Congratulations ...
- How to use these instructions
- Safety instructions
- Danger of electric shock!
- Risk of suffocation!
- Risk of injury!
- Risk of burns!
- ⚠️ Risk of scalding (Home Connect)!
- Overview
- Controls
- Control panel (touch field)
- [ ] start/stop
- [☆] MyCoffee
- [ ] Menu
- [ ] Service
- Control ring
- Information display
- Touch display (left and right)
- Initial use
- General
- Setting up the appliance
- Switch off appliance
- Control panel
- Display
- Prompts to take action
- Operation
- Preparing drinks
- Beverage selection
- The following drinks can be selected:
- Drink adjustment
- An example:
- The following settings are possible: Coffee strength
- Aroma Double Shot
- Volume
- Drink temperature
- Two cups at once
- Preparation using coffee beans
- Preparation using milk
- Milk container
- Coffee drinks with milk
- Milk froth or warm milk
- Preparation using ground coffee
- Caution!
- Dispensing hot water
- Personalised drinks
- Entering or changing drinks
- Deleting a drink
- Select a personalised drink and dispense
- Adjusting the grind setting
- Child-proof lock
- Menu
- Navigating through the menu:
- For example:
- The following settings can be made:
- Home Connect
- Switch off after
- Illumination
- Brightness illumination
- Brightness display
- Key tones
- Setting up
- Connect automatically in the WLAN network (home network)
- ehome Connect
- Connect manually in the WLAN network (home network)
- Switching Wi-Fi on and off
- Additional settings
- Disconnecting
- Connecting with app
- Remote start
- Device Info
- Information on data protection
- Declaration of Conformity
- Care and daily cleaning
- Risk of electric shock!
- Do not put the following parts in the dishwasher:
- The following parts may be cleaned in the dishwasher:
- Cleaning the milk system
- Rinsing the milk system
- Cleaning the milk system manually
- are and daily cleaning
- Cleaning the milk container
- Cleaning the brewing unit
- Service programmes
- Warning!
- Important:
- Descaling
- Cleaning
- Calc'nClean
- Special rinsing
- Tips on energy saving
- Frost protection
- Storing accessories
- Accessories
- Disposal
- Guarantee
- Technical specifications
- Sommaire
- Zetgroep reinigen
- AL Republika e Shqiperise, Albania
- BA Bosna i Hercegovina, Bosnia-Herzegovina
- GR Greece, Ελλάς
- HR Hrvatska, Croatia
- IE Republic of Ireland
- IL Israel,
- IN India, Bhārat, भारत
- IS Iceland
- IT Italia, Italy
- LB Lebanon, لبنان
- LT Lietuva, Lithuania
- LU Luxembourg
- MD Moldova
- ME Crna Gora, Montenegro
- PL Polska, Poland
- SA Kingdom Saudi Arabia,
- SE Sverige, Sweden
- XS Srbija, Serbia
- ZA South Africa
Brand : BOSCH
Model : CTL636ES6
Category : Coffee maker