USER MANUAL ALPHA 7 SONY
The model and serial numbers are located on the bottom. Record the serial number in the space provided below. Refer to these numbers whenever you call your Sony dealer regarding this product.
Model No. WW328261 (ILCE-7R)/WW328262 (ILCE-7)
Serial No.
Model No. AC-UB10C/AC-UB10D
Serial No.
ILCE-7R Model No. WW328261
ILCE-7 Model No.WW328262
WARNING
To reduce fire or shock hazard, do not expose the unit to rain or moisture.
IMPORTANT SAFETY INSTRUCTIONS
-SAVE THESE
INSTRUCTIONS
DANGER
TO REDUCE THE RISK OF FIRE OR ELECTRIC SHOCK, CAREFULLY FOLLOW THESE
INSTRUCTIONS
If the shape of the plug does not fit the power outlet, use an attachment plug adaptor of the proper configuration for the power outlet.
CAUTION
Battery pack
If the battery pack is mishandled, the battery pack can burst, cause a fire or even chemical burns. Observe the following cautions.
- Do not disassemble.
- Do not crush and do not expose the battery pack to any shock or force such as hammering, dropping or stepping on it.
- Do not short circuit and do not allow metal objects to come into contact with the battery terminals.
- Do not expose to high temperature above 60^ (140^) such as in direct sunlight or in a car parked in the sun.
- Do not incinerate or dispose of in fire.
- Do not handle damaged or leaking lithium ion batteries.
- Be sure to charge the battery pack using a genuine Sony battery charger or a device that can charge the battery pack.
- Keep the battery pack out of the reach of small children.
- Keep the battery pack dry.
- Replace only with the same or equivalent type recommended by Sony.
- Dispose of used battery packs promptly as described in the instructions.
AC Adaptor
Use the nearby wall outlet (wall socket) when using the AC Adaptor. Disconnect the AC Adaptor from the wall outlet (wall socket) immediately if any malfunction occurs while using the apparatus.
The power cord (mains lead), if supplied, is designed specifically for use with this camera only, and should not be used with other electrical equipment.
For Customers in the U.S.A. and Canada
RECYCLING LITHIUM-ION BATTERIES
Lithium-Ion batteries are recyclable. You can help preserve our environment by returning your used rechargeable batteries to the collection and recycling location nearest you.

For more information regarding recycling of rechargeable batteries, call toll free 1-800-822-8837, or visit http://www.call2recycle.org/
Caution: Do not handle damaged or leaking Lithium-Ion batteries.
Battery pack and lens (if lens supplied)
This device complies with Part 15 of the FCC Rules. Operation is subject to the following two conditions: (1) This device may not cause harmful interference, and (2) this device must accept any interference received, including interference that may cause undesired operation.
CANICES-3B/NMB-3B
This equipment complies with FCC/IC radiation exposure limits set forth for an uncontrolled environment and meets the FCC radio frequency (RF) Exposure Guidelines in Supplement C to OET65 and RSS-102 of the IC radio frequency (RF) Exposure rules. This equipment has very low levels of RF energy that are deemed to comply without testing of specific absorption radio (SAR).
For Customers in the U.S.A.
UL is an internationally recognized safety organization.
The UL Mark on the product means it has been UL Listed.
If you have any questions about this product, you may call: Sony Customer Information Center 1-800-222-SONY (7669). The number below is for the FCC related matters only.
Trade Name:SONY
Model No.: WW328261
Responsible Party: Sony Electronics Inc.
Address: 16530 Via Esprillo, San Diego, CA 92127 U.S.A.
Telephone No.: 858-942-2230
This device complies with Part15 of the FCC Rules. Operation is subject to the following two conditions: (1) This device may not cause harmful interference, and (2) this device must accept any interference received, including interference that may cause undesired operation.
Trade Name:SONY
Model No.: WW328262
Responsible Party: Sony Electronics Inc.
Address: 16530 Via Esprillo,
San Diego, CA 92127
U.S.A.
Telephone No.: 858-942-2230
This device complies with Part15 of the FCC Rules. Operation is subject to the following two conditions: (1) This device may not cause harmful interference, and (2) this device must accept any interference received, including interference that may cause undesired operation.
This equipment must not be co-located or operated in conjunction with any other antenna or transmitter.
CAUTION
You are cautioned that any changes or modifications not expressly approved in this manual could void your authority to operate this equipment.
Note:
This equipment has been tested and found to comply with the limits for a Class B digital device, pursuant to Part 15 of the FCC Rules.
These limits are designed to provide reasonable protection against harmful interference in a residential installation. This equipment generates, uses, and can radiate radio frequency energy and, if not installed and used in accordance with the instructions, may cause harmful interference to radio communications. However, there is no guarantee that interference will not occur in a particular installation. If this equipment does cause harmful interference to radio or television reception, which can be determined by turning the equipment off and on, the user is encouraged to try to correct the interference by one or more of the following measures:
Reorient or relocate the receiving antenna.
- Increase the separation between the equipment and receiver.
- Connect the equipment into an outlet on a circuit different from that to which the receiver is connected.
- Consult the dealer or an experienced radio/TV technician for help.
The supplied interface cable must be used with the equipment in order to comply with the limits for a digital device pursuant to Subpart B of Part 15 of FCC Rules.
For Customers in Canada
This device complies with Industry Canada licence-exempt RSS standard(s).
Operation is subject to the following two conditions: (1) this device may not cause interference, and (2) this device must accept any interference, including interference that may cause undesired operation of the device.
For Customers in Europe
Notice for the customers in the countries applying EU Directives
Manufacturer: Sony Corporation, 1-7-1
Konan Minato-ku Tokyo, 108-0075 Japan.
For EU product compliance: Sony
Deutschland GmbH, Hedelfinger Strasse 61, 70327 Stuttgart, Germany
CE
Hereby, Sony Corporation, declares that this WW328261/WW328262
Interchangeable Lens Digital Camera is in compliance with the essential requirements and other relevant provisions of Directive 1999/5/EC. For details, please access the following URL:
http://www.compliance.sony.de/
Notice
If static electricity or electromagnetism causes data transfer to discontinue midway (fail), restart the application or disconnect and connect the communication cable (USB, etc.) again.
This product has been tested and found compliant with the limits set out in the EMC regulation for using connection cables shorter than 3 meters (9.8 feet).
The electromagnetic fields at the specific frequencies may influence the picture and sound of this unit.
Disposal of Old Electrical & Electronic Equipment (Applicable in the European Union and other European countries with separate collection systems)


This symbol on the product or on its packaging indicates that this product shall not be treated as household waste. Instead it shall be handed over to the applicable collection point for the recycling of
electrical and electronic equipment. By ensuring this product is disposed of correctly, you will help prevent potential negative consequences for the environment and human health, which could otherwise be caused by inappropriate waste handling of this product. The recycling of materials will help to conserve natural resources. For more detailed information about recycling of this product, please contact your local Civic Office, your household waste disposal service or the shop where you purchased the product.
Disposal of waste batteries (applicable in the European Union and other European countries with separate collection systems)

This symbol on the battery or on the packaging indicates that the battery provided with this product shall not be treated as household waste.
On certain batteries this symbol might be used in combination with a chemical symbol. The chemical symbols for mercury (Hg) or lead (Pb) are added if the battery contains more than 0.0005% mercury or 0.004% lead.
By ensuring these batteries are disposed of correctly, you will help prevent potentially negative consequences for the environment and human health which could otherwise be caused by inappropriate waste handling of the battery. The recycling of the materials will help to conserve natural resources. In case of products that for safety, performance or data integrity reasons require a permanent connection with an incorporated battery, this battery should be replaced by qualified service staff only. To ensure that the battery will be treated properly, hand over the product at end-of-life to the applicable collection point for the recycling of electrical and electronic equipment.
For all other batteries, please view the section on how to remove the battery from the product safely.
Hand the battery over to the applicable collection point for the recycling of waste batteries.
For more detailed information about recycling of this product or battery, please contact your local Civic Office, your household waste disposal service or the shop where you purchased the product.
For Customers in Singapore
Complies with IDA Standards DB00353
For customers who purchased their camera from a store in Japan that caters to tourists
Note
Some certification marks for standards supported by the camera can be confirmed on the screen of the camera.
Select MENU (Setup) 6 [Certification Logo].
If display is not possible due to problems such as camera failure, contact your Sony dealer or local authorized Sony service facility.
For details on Wi-Fi functions, see the flyer "Wi-Fi Connection/One-touch (NFC) Guide."
This manual covers several models.
The available model varies depending on the countries/regions.
| Model name | Lens |
| ILCE-7 | Not supplied |
| ILCE-7K | Supplied |
| ILCE-7R | Not supplied |
Notes on using your camera
Screen language
You can select the language displayed on the screen using the menu.
Shooting procedure
This camera has 2 modes for monitoring subjects: the LCD screen mode using the LCD screen, and the viewfinder mode using the viewfinder.
Functions built into this camera
- This manual describes 1080 60i-compatible devices and 1080 50i-compatible devices.
To check whether your camera is a 1080 60i-compatible device or 1080 50i-compatible device, check for the following marks on the bottom of the camera.
1080 60i-compatible device: 60i
1080 50i-compatible device: 50i
- This camera is compatible with 1080 60p or 50p-format movies. Unlike standard recording modes up to now, which record in an interlacing method, this camera records using a progressive method. This increases the resolution, and provides a smoother, more realistic image.
Creating an image database file
If you insert a memory card that does not contain an image database file into the camera and turn on the power, the camera automatically creates an image database file using some of the memory card's capacity.
The process may take a long time and you cannot operate the camera until the process is completed. If a database file error occurs, export all images to your computer using "PlayMemories Home," and then format the memory card using the camera.
Shooting with an E-mount lens compatible APS-C size
This camera is equipped with a 35~mm full-frame CMOS sensor. However, the image size is automatically set to that of the APS-C size setting and the image size is smaller when an E-mount lens compatible APS-C size is used (default settings).
No compensation for damaged content or recording failure
Sony cannot compensate for failure to record or loss or damage of recorded content due to a malfunction of the camera or recording media, etc.
Back up recommendation
To avoid the data loss, always copy (back up) data to other media.
Notes on the LCD screen, electronic viewfinder, lens, and image sensor
- The LCD screen and electronic viewfinder are manufactured using extremely high-precision technology so over 99.99% of the pixels are operational for effective use. However, there may be some tiny black points and/or bright points (white, red, blue or green in color) that constantly appear on the LCD screen and electronic viewfinder. These points are normal in the manufacturing process and do not affect the images in any way.
- Do not hold the camera by the LCD screen.
- When using the power zoom lens, be careful not to draw your fingers or any other objects caught in the lens.
-
Do not expose the camera to sunlight or shoot sunward for a long time. The internal mechanism may be damaged. If sunlight is focused on a nearby object, it may cause a fire.
-
Images may trail across on the screen in a cold location. This is not a malfunction. When turning on the camera in a cold location, the screen may become temporarily dark. When the camera warms up, the screen will function normally.
- The recorded image may be different from the image you monitored before recording.
Notes on recording for long periods of time
- Depending on the camera and battery temperature, you may be unable to record movies or the power may turn off automatically to protect the camera. A message will be displayed on the screen before the power turns off or you can no longer record movies. In this case, leave the power off and wait until the camera and battery temperature goes down. If you turn on the power without letting the camera and battery cool enough, the power may turn off again or you may be unable to record movies.
- Under high ambient temperatures, the temperature of the camera rises quickly.
- When the temperature of the camera rises, the image quality may deteriorate. It is recommended that you wait until the temperature of the camera drops before continuing to shoot.
- The surface of the camera may get warm. This is not a malfunction.
Notes on importing AVCHD movies to a computer
When importing AVCHD movies to a computer, download and use the software "PlayMemories Home" from the following website:
http://www.sony.net/pm/
Notes when playing movies on other devices
-
This camera uses MPEG-4 AVC/H.264 High Profile for AVCHD format recording. Movies recorded in AVCHD format with this camera cannot be played with the following devices.
-
Other devices compatible with AVCHD format that do not support High Profile
Devices incompatible with the AVCHD format
This camera also uses MPEG-4 AVC/ H.264 Main Profile for MP4 format recording. For this reason, movies recorded in MP4 format with this camera cannot be played on devices other than those that support MPEG-4 AVC/H.264.
- Discs recorded with HD (high definition) image quality can be played back only on AVCHD format-compatible devices. DVD-based players or recorders cannot play back HD image quality discs, as they are incompatible with the AVCHD format. Also, DVD-based players or recorders may fail to eject HD image quality discs.
Movies recorded in 1080 60p/1080 50p format can be played back only on 1080 60p/1080 50p-supported devices.
Warning on copyright
Television programs, films, videotapes, and other materials may be copyrighted.
Unauthorized recording of such materials may be contrary to the provisions of the copyright laws.
The pictures used in this manual
The photographs used as examples of pictures in this manual are reproduced images, and are not actual images shot using this camera.
On the data specifications described in this manual
The data on performance and specifications are defined under the following conditions, except as described in this manual: at an ordinary ambient temperature of 25^ (77^) , and using a battery pack that has been fully charged until the charge lamp has turned off.
Notes on shooting with the viewfinder
This camera is equipped with an Organic Electro-Luminescence viewfinder with high resolution and high contrast. This viewfinder achieves a wide viewing angle and a long eye relief. This camera is designed to provide an easily viewable viewfinder by appropriately balancing various elements.
- The image may be slightly distorted near the corners of the viewfinder. This is not a malfunction. When you want to check every detail of the entire composition, you can also use the LCD screen.
How to turn off wireless network functions (Wi-Fi and NFC, etc.) temporarily
When you board an airplane, etc., you can turn off all wireless network functions temporarily.
Select MENU [Wireless] [Airplane Mode] [On].
If you set [Airplane Mode] to [On], an (airplane) mark will be displayed on the screen.
Notes on wireless LAN
If your camera is lost or stolen, Sony bears no responsibility for the loss or damage caused by illegal access or use of the registered access point on the camera.
Checking the supplied items
The number in parentheses indicates the number of pieces.
- Camera (1)
- AC Adaptor AC-UB10C/UB10D (1)

- Power cord (mains lead) (1)^* (not supplied in the U.S.A. and Canada)

- Multiple power cords may be supplied with your camera. Use the appropriate one that matches your country/region.
- Rechargeable battery pack NPFW50 (1)


Shoulder strap (1)

For how to attach the shoulder strap to the camera, refer to page 15.
- Body cap (1) (Attached on the camera)
- Shoe cap (1) (Attached on the camera)
- Eyepiece Cup (1) (Attached on the camera)
- Instruction Manual (1) (this manual)
ILCE-7K:
- Zoom lens FE 28-70 mm F3.5-5.6 OSS (1)/Front lens cap (1)/Rear lens cap (1)/Lens hood (1)
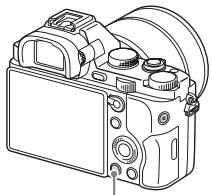
Identifying parts
See the pages in parentheses for details on operation for the parts.
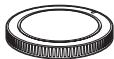
Front side

When the lens is removed
7 Image sensor*2
8 Mount
9 Contacts*2
1 Do not cover this part during movie recording.
Doing so may cause noise or lower the volume.
2 Do not directly touch these parts.
AF illuminator/Self-timer lamp
2 Front dial
Remote sensor
4 Lens release button
[5] Built-in microphone*1
6 Mount index
Rear side


Eyepiece cup
Viewfinder
3 MENU button (25)
4 Eyepiece sensors
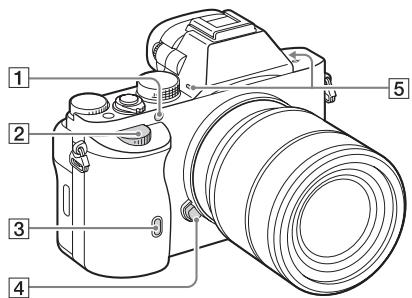
⑤ LCD screen
- You can adjust the LCD screen to an easily viewable angle and shoot from any position.
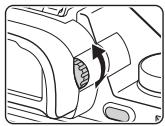
6 Diopter-adjustment dial
- Adjust the diopter-adjustment dial to your eyesight until the display appears clearly in the viewfinder.
For shooting: C2 (Custom2) button For viewing: (Enlarge) button
AF/MF/AEL switch lever
9 Rear dial
For shooting: AF/MF (Auto focus/manual focus) button/AEL button For viewing: (Image index) button
MOVIE button (41)
For shooting: Fn button (24) For viewing: (Send to Smartphone) button
13 Control wheel
For shooting: C3 (Custom3) button For viewing: (Delete) button (43)
15 Access lamp
16 (Playback) button
GB
Top side/Side view
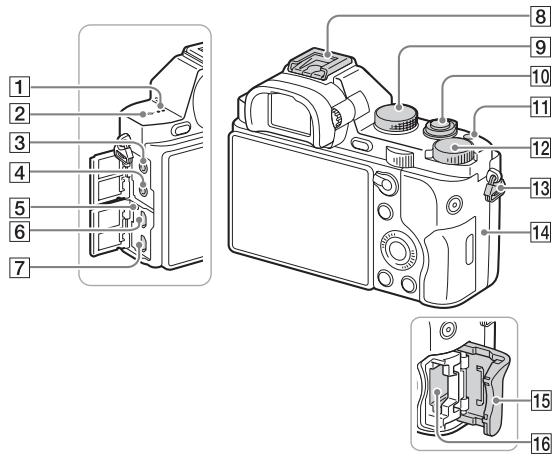
Speaker
2 Image sensor position mark
3 (Microphone) jack
- When an external microphone is connected, the microphone is turned on automatically. If the external microphone is a plug-in-power type, the power of the microphone is supplied by the camera.
4 (Headphones) jack
Charge lamp
6 Multi terminal
Supports Micro USB compatible device.
7 HDMI micro jack
8 Multi interface shoe*
- Some of the accessories may not be inserted fully and protrude backward from the Multi interface shoe. However, when the accessory reaches the front end of the shoe, the connection is completed.
9 Mode dial (44)
10 Power switch/Shutter button
C1 (Custom 1) button
12 Exposure compensation dial
13 Hooks for shoulder strap
- Attach both ends of the strap onto the camera.

14 N (N mark)
- This mark indicates the touch point for connecting the camera and an NFC-enabled Smartphone. For details on the location of the N mark on your Smartphone, refer to the operating instructions of the Smartphone.
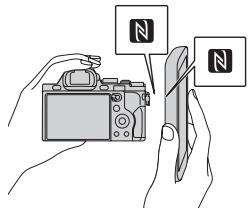
- NFC (Near Field Communication) is an international standard of short-range wireless communication technology.
15 Memory card cover
16 Memory card slot
- For details on compatible accessories of the Multi interface shoe, visit the Sony web site in your area, or consult your Sony dealer or local authorized Sony service facility.
Accessories for the Accessory Shoe can also be used.
Operations with other manufactures' accessories are not guaranteed.
Multi Interface Shoe
Accessory Shoe
Bottom view

1 Battery insertion slot (27)
2 Battery cover (27)
③ Tripod socket hole
- Use a tripod with a screw less than 5.5mm (7/32 inches) long. Otherwise, you cannot firmly secure the camera, and damage to the camera may occur.
Connection plate cover
Use this when using an AC-PW20 AC Adaptor (sold separately). Insert the connection plate into the battery compartment, and then pass the cord through the connection plate cover as shown below.

- Make sure that the cord is not pinched when you close the cover.
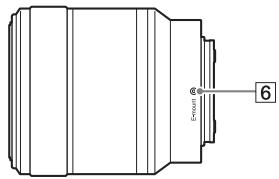
Lens FE 28-70 mm F3.5-5.6 OSS (Supplied with ILCE-7K)

1 Focusing ring
2 Zoom ring
3 Focal-length scale
4 Focal-length index
Lens contacts*
6 Mount index
- Do not touch this part directly.
GB
List of icons on the screen
The status of the LCD screen is set to [Display All Info.] in the default settings.
When you change [DISP Button] setting, and then if you press DISP on the control wheel, the screen status will change to "For viewfinder" mode. You can also display the histogram by pressing DISP.

For the LCD screen mode
For playback (Basic information display)

For the viewfinder mode

In Auto Mode or Scene Selection mode

P/A/S/M/Sweep Panorama mode
1
| Display | Indication |
| i o i + P P* A S M 1234567890123456789012345678901234567890123456789012345678901234567890123456789012345678901234567890123456789123456789012345678901234567890123456789012345678901234567890123456789012345678901234567890123456789 | Shooting mode (44) |
| 12 | Register number (44) |
| Scene Recognition icons |
| OFF | Memory card (32)/Upload |
| 100 | Remaining number of recordable images |
| 32 169 | Aspect ratio of still images |
| 24M 10M 6.0M 20M 8.7M 5.1M 10M 6.0M 2.6M 8.7M 5.1M 2.2M WIDE STD | ILCE-7:Image size of still images (55) |
| 36M 15M 9.0M 30M 13M 7.6M 15M 9.0M 3.8M 13M 7.6M 3.2M WIDE STD | ILCE-7R:Image size of still images (55) |
| Display | Indication |
| RAW
RAW+J
X.FINE
FINE
STD | Image quality of still images |
| 60p 60i 24p
50p 50i 25p | Frame rate of movies |
| FX: FTH
PS: H0808
VGA: | Image size of movies |
| 100% | Remaining battery (31) |
| Remaining battery warning |
| Flash charge in progress |
| APS-C Size Capture |
| VIEW | Setting Effect OFF |
| ON | AF Illuminator |
| N | NFC is activated |
| Airplane Mode |
| OFF | No audio recording of movies |
| Wind Noise Reduction |
| SteadyShot/Camera shake warning |
| Overheating warning |
| FULL ERROR | Database file full/
Database file error |
| S C D | Smart Zoom/Clear Image Zoom/Digital Zoom |
| ○ | Spot metering area |
| Digital level gauge |
| Audio level |
GB
| Display | Indication |
| MP4AVCHD | View Mode |
| 100-0003 | Folder - file number |
| ○n | Protect |
| AVCHDMP4 | Recording mode of movies |
| DPOF | DPOF set |
| □□AUTO OFF | Auto Object Framing |
2
| Display | Indication |
| S3
S10
S3
S3C
S3V
S3W
S3B
H1
SLOW
REAR
WL
S@ | Drive mode |
| FLASH mode/Red-eye reduction |
| Flash compensation |
| AFS
AFC
MF
DMF | Focus mode |
| AF area |
| Face Detection/Smile Shutter |
| Metering mode |
| AWB
S
S1
S10
S12
S13
S14
S15
S16
S17
S18
S19
S20
S21
S22
S23
S24
S25
S26
S27
S28
S29
S30
S31
S32
S33
S34
S35
S36
S37
S38
S39
S40
S41
S42
S43
S44
S45
S46
S47
S48
S49
S50
S51
S52
S53
S54
S55
S56
S57
S58
S59
S60
S61
S62
S63
S64
S65
S66
S67
S68
S69
S70
S71
S72
S73
S74
S75
S76
S77
S78
S79
S80
S81
S82
S83
S84
S85
S86
S87
S88
S89
S90
S91
S92
S93
S94
S95
S96
S97
S98
S99
S100
S101
S102
S103
S104
S105
S106
S107
S108
S109
S110
S111
S112
S113
S114
S115
S116
S117
S118
S119
S120
S121
S122
S123
S124
S125
S126
S127
S128
S129
S130
S131
S132
S133
S134
S135
S136
S137
S138
S139
S140
S141
S142
S143
S144
S145
S146
S147
S148
S149
S150
S151
S152
S153
S154
S155
S156
S157
S158
S159
S160
S161
S162
S163
S164
S165
S166
S167
S168
S169
S170
S171
S172
S173
S174
S175
S176
S177
S178
S179
S180
S181
S182
S183
S184
S185
S186
S187
S188
S189
S190
S191
S192
S193
S194
S195
S196
S197
S198
S199
S200
S201
S202
S203
S204
S205
S206
S207
S208
S209
S210
S211
S212
S213
S214
S215
S216
S217
S218
S219
S220
S221
S222
S223
S224
S225
S226
S227
S228
S229
S230
S231
S232
S233
S234
S235
S236
S237
S238
S239
S240
S241
S242
S243
S244
S245
S246
S247
S248
S249
S250
S251
S252
S253
S254
S255
S256
S257
S258
S259
S260
S261
S262
S263
S264
S265
S266
S267
S268
S269
S270
S271
S272
S273
S274
S275
S276
S277
S278
S279
S280
S281
S282
S283
S284
S285
S286
S287
S288
S289
S290
S291
S292
S293
S294
S295
S296
S297
S298
S299
S300
S301
S302
S303
S304
S305
S306
S307
S308
S309
S310
S311
S312
S313
S314
S315
S316
S317
S318
S319
S320
S321
S322
S323
S324
S325
S326
S327
S328
S329
S330
S331
S332
S333
S334
S335
S336
S337
S338
S339
S340
S341
S342
S343
S344
S345
S346
S347
S348
S349
S350
S351
S352
S353
S354
S355
S356
S357
S358
S359
S360
S361
S362
S363
S364
S365
S366
S367
S368
S369
S370
S371
S372
S373
S374
S375
S376
S377
S378
S379
S380
S381
S382
S383
S384
S385
S386
S387
S388
S389
S390
S391
S392
S393
S394
S395
S396
S397
S398
S399
S400
S401
S402
S403
S404
S405
S406
S407
S408
S409
S410
S411
S412
S413
S414
S415
S416
S417
S418
S419
S420
S421
S422
S423
S424
S425
S426
S427
S428
S429
S430
S431
S432
S433
S434
S435
S436
S437
S438
S439
S440
S441
S442
S443
S444
S445
S446
S447
S448
S449
S450
S451
S452
S453
S454
S455
S456
S457
S458
S459
S460
S461
S462
S463
S464
S465
S466
S467
S468
S469
S470
S471
S472
S473
S474
S475
S476
S477
S478
S479
S480
S481
S482
S483
S484
S485
S486
S487
S488
S489
S490
S491
S492
S493
S494
S495
S496
S497
S498
S499
S500
S501
S502
S503
S504
S505
S506
S507
S508
S509
S510
S511
S512
S513
S514
S515
S516
S517
S518
S519
S520
S521
S522
S523
S524
S525
S526
S527
S528
S529
S530
S531
S532
S533
S534
S535
S536
S537
S538
S539
S540
S541
S542
S543
S544
S545
S546
S547
S548
S549
S550
S551
S552
S553
S554
S555
S556
S557
S558
S559
S560
S561
S562
S563
S564
S565
S566
S567
S568
S569
S570
S571
S572
S573
S574
S575
S576
S577
S578
S579
S580
S581
S582
S583
S584
S585
S586
S587
S588
S589
S590
S591
S592
S593
S594
S595
S596
S597
S598
S599
S600
S601
S602
S603
S604
S605
S606
S607
S608
S609
S610
S611
S612
S613
S614
S615
S616
S617
S618
S619
S620
S621
S622
S623
S624
S625
S626
S627
S628
S629
S630
S631
S632
S633
S634
S635
S636
S637
S638
S639
S640
S641
S642
S643
S644
S645
S646
S647
S648
S649
S650
S651
S652
S653
S654
S655
S656
S657
S658
S659
S660
S661
S662
S663
S664
S665
S666
S667
S668
S669
S670
S671
S672
S673
S674
S675
S676
S677
S678
S679
S680
S681
S682
S683
S684
S685
S686
S687
S688
S689
S690
S691
S692
S693
S694
S695
S696
S697
S698
S699
S700
S701
S702
S703
S704
S705
S706
S707
S708
S709
S710
S711
S712
S713
S714
S715
S716
S717
S718
S719
S720
S721
S722
S723
S724
S725
S726
S727
S728
S729
S730
S731
S732
S733
S734
S735
S736
S737
S738
S739
S740
S741
S742
S743
S744
S745
S746
S747
S748
S749
S750
S751
S752
S753
S754
S755
S756
S757
S758
S759
S760
S761
S762
S763
S764
S765
S766
S767
S768
S769
S770
S771
S772
S773
S774
S775
S776
S777
S778
S779
S780
S781
S782
S783
S784
S785
S786
S787
S788
S789
S790
S791
S792
S793
S794
S795
S796
S797
S798
S799
S800
S801
S802
S803
S804
S805
S806
S807
S808
S809
S810
S811
S812
S813
S814
S815
S816
S817
S818
S819
S820
S821
S822
S823
S824
S825
S826
S827
S828
S829
S830
S831
S832
S833
S834
S835
S836
S837
S838
S839
S840
S841
S842
S843
S844
S845
S846
S847
S848
S849
S850
S851
S852
S853
S854
S855
S856
S857
S858
S859
S860
S861
S862
S863
S864
S865
S866
S867
S868
S869
S870
S871
S872
S873
S874
S875
S876
S877
S878
S879
S880
S881
S882
S883
S884
S885
S886
S887
S888
S889
S890
S891
S892
S893
S894
S895
S896
S897
S898
S899
S900
S901
S902
S903
S904
S905
S906
S907
S908
S909
S910
S911
S912
S913
S914
S915
S916
S917
S918
S919
S920
S921
S922
S923
S924
S925
S926
S927
S928
S929
S930
S931
S932
S933
S934
S935
S936
S937
S938
S939
S940
S941
S942
S943
S944
S945
S946
S947
S948
S949
S950
S951
S952
S953
S954
S955
S956
S957
S958
S959
S960
S961
S962
S963
S964
S965
S966
S967
S968
S969
S970
S971
S972
S973
S974
S975
S976
S977
S978
S979
S980
S981
S982
S983
S984
S985
S986
S987
S988
S989
S990
S991
S992
S993
S994
S995
S996
S997
S998
S999
S1000 | |
| Display | Indication |
| OFF DRR AUTO | D-Range Optimizer/Auto HDR |
| AUTO | |
| On On On On On | Creative Style/Contrast, Saturation, Sharpness |
| On On On On On | Lock-on AF |
| ON OFF | |
| OFF | Picture Effect |
| Off Off | Smile detection sensitivity indicator |
3
| Display | Indication |
| ● Lock on AF | Lock on AF guide |
| →←, →←, ←←, ←←, ←←, ←← | EV scale |
| 区 W | Exposure compensation/Metered Manual |
| REC 0:12 | Recording time of the movie (m:s) |
| ● (◎) (◎) | Focus |
| 1/250 | Shutter speed |
| F3.5 | Aperture Value |
| ISO400
ISO AUTO | ISO sensitivity |
| * | AE lock |
| L W H S L, L W T S | Shutter speed indicator |
| D W A L M, D W L, D W T | Aperture indicator |
| Histogram |
| D D T | Auto HDR image
warning |
| D D T | Picture Effect error |
| 2013-1-1
10:37PM | Date of recording |
| 3/7 | File number/Number of
images in the view mode |
GB
Operating the camera
How to use the control wheel
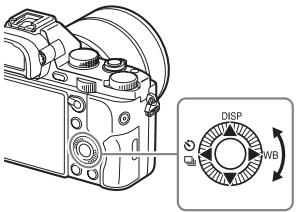
- You can turn the control wheel or press up/down/left/right on the control wheel to move the selection frame. Press in the center of the control wheel to set the selected item. In this manual, the action of pressing the up/down/left/right side of the control wheel is indicated by / / / .
- The following functions are assigned to / on the control wheel. You can also change the ISO sensitivity immediately by turning the control wheel.
| ▲ | DISP | Changes the screen display. |
| ► | WB | White Balance |
| ← | /→ | Drive Mode
• Cont. Shooting/Bracket
• Self-timer |
- You can assign a desired function to the / / / buttons and to the control wheel turning position in shooting mode.
- When you turn the control wheel or press on the control wheel in playback mode, you can display the previous or next image.
How to use the front dial/rear dial
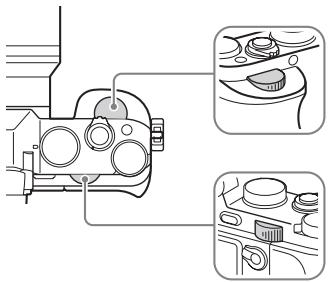
You can turn the front dial or rear dial to change the settings required for each shooting mode with immediate effect.
GB
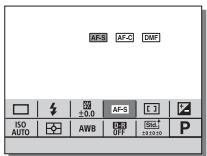
This button is used for setting up or executing functions used frequently in shooting, except for functions from the Quick Navi screen.
1 Press the DISP on the control wheel to set the screen mode to other than [For viewfinder].
2 Press the Fn button.

3 Select the desired item using / / on the control wheel.
The setting screen appears.
4 Select the desired setting by turning the front dial, then press on the control wheel.
- Some setting values can be finely adjusted by turning the rear dial.
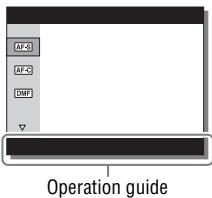
To set the individual settings in the dedicated screen
In step 3, select a setting item and press on the control wheel to switch to the dedicated screen for the setting item. Set the items according to the Operation guide.
You can set up the basic settings for the camera as a whole, or execute functions such as shooting, playback, or other operations.
2 Select the desired setting item using / / / on the control wheel or by turning the control wheel, and then press on the center of the control wheel.
- Select an icon at the top of the screen and press the / on the control wheel to move to another MENU item.

3 Select the setting value, then press to confirm.
Allows you to select whether to always display the first screen of the menu when you press the MENU button.
MENU (Setup) 2 [Tile Menu] [On]
Using the In-Camera Guide
You can use [Custom Key Settings] to assign In-Camera Guide to the desired button.
The In-Camera Guide displays explanations for the currently selected menu function or setting.
Press the MENU button and use the control wheel to select a MENU item whose explanation you want to read, and then press the button to which [In-Camera Guide] is assigned.
Charging the battery pack
When using the camera for the first time, be sure to charge the NP-FW50 battery pack (supplied).
The "InfoLITHIUM" battery pack can be charged even when it has not been fully depleted.
It can also be used when it has not been fully charged.
The charged battery pack is discharged little by little, even when you do not use it. To avoid missing an opportunity to shoot, charge the battery pack again before you shooting.
1 Set the ON/OFF (Power) switch to OFF.

2 Slide the lever to open the cover.
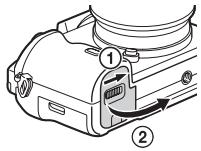
3 Insert the battery pack completely, using the tip of the battery to press the lock lever.
Lock lever

4 Close the cover.

5 Connect the camera to the AC Adaptor (supplied) using the micro USB cable (supplied), and connect the AC Adaptor to the wall outlet (wall socket).

For customers in countries/regions other than the USA and Canada
The charge lamp lights orange, and charging starts.
- Turn off the camera while charging the battery.
- When the charge lamp flashes and charging is not finished, remove and re-insert the battery pack.

Charge lamp
Lit: Charging
Off: Charging finished
Flashing:
Charging error or charging paused temporarily because the camera is not within the proper temperature range
Notes
- If the charge lamp on the camera flashes when the AC Adaptor is connected to the wall outlet (wall socket), this indicates that charging is temporarily stopped because the temperature is outside the recommended range. When the temperature gets back within the appropriate range, the charging resumes. We recommend charging the battery pack in an ambient temperature of between 10^ to 30^ ( 50^ to 86^ ).
- Connect the AC Adaptor (supplied) to the nearest wall outlet (wall socket). If malfunctions occur while using the AC Adaptor, disconnect the plug from the wall outlet (wall socket) immediately to disconnect from the power source.
- When the camera is being used for the first time or when you use a battery pack that has not been used for a long time, the charge lamp may flash quickly when the battery is charged for the first time. If that happens, remove the battery pack from the camera and then re-insert it to recharge.
- Do not continuously or repeatedly charge the battery without using it if it is already fully charged or close to fully charged. Doing so may cause a deterioration in battery performance.
- When charging is finished, disconnect the AC Adaptor from the wall outlet (wall socket).
- Be sure to use only genuine Sony brand battery packs, micro USB cable (supplied) and AC Adaptor (supplied).
Charging time (Full charge)
The charging time is approximately 310min using the AC Adaptor (supplied).
Notes
- The above charging time applies when charging a fully depleted battery pack at a temperature of 25^ ( 77^ ). Charging may take longer depending on conditions of use and circumstances.
Charging by connecting to a computer
The battery pack can be charged by connecting the camera to a computer using a micro USB cable.

Notes
-
Note the following points when charging via a computer:
-
If the camera is connected to a laptop computer that is not connected to a power source, the laptop battery level decreases. Do not charge for an extended period of time.
-
Do not turn on/off or restart the computer, or wake the computer to resume from sleep mode when a USB connection has been established between the computer and the camera. The camera may cause a malfunction. Before turning on/off, or restarting the computer or waking the computer from sleep mode, disconnect the camera and the computer.
-
No guarantees are made for charging using a custom-built computer or a modified computer.
Checking the remaining battery charge
A remaining charge indicator appears on the screen.
High

Low
Notes
- The remaining charge indicator may not be correct under certain circumstances.
To remove the battery pack

Turn off the camera. Slide the lock lever after confirming that the access lamp (page 12) is off, and remove the battery pack.
Be sure not to drop the battery pack.
Inserting a memory card (sold separately)
1 Slide the lever to open the cover.
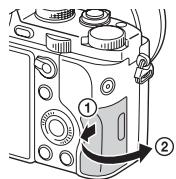
2 Insert the memory card (sold separately).
- With the notched corner facing as illustrated, insert the memory card until it clicks into place.
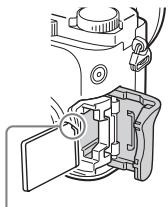
Ensure the notched corner faces correctly.
3 Close the cover.

To remove the memory card
Make sure that the access lamp (page 12) is not lit, then push the memory card in once.
Memory cards that can be used
You can use the following types of memory cards with this camera. However, proper operation cannot be guaranteed for all types of memory cards.
| Memory card | For still images | For movies |
| A | Memory Stick PRO Duo | ✓ | ✓ (Mark2 only) |
| Memory Stick PRO-HG Duo | ✓ | ✓ |
| Memory Stick XC-HG Duo | ✓ | ✓ |
| B | SD memory card | ✓ | ✓ (Class 4 or faster) |
| SDHC memory card | ✓ | ✓ (Class 4 or faster) |
| SDXC memory card | ✓ | ✓ (Class 4 or faster) |
- In this manual, the products in the table are collectively referred to as follows:
A: "Memory Stick PRO Duo" media
B: SD card
Notes
- Images recorded on a "Memory Stick XC-HG Duo" media or an SDXC memory card cannot be imported to or played on computers or AV devices that are not compatible with exFAT*. Make sure that the device is compatible with exFAT before connecting it to the camera. If you connect your camera to an incompatible device, you may be prompted to format the card.
Never format the card in response to this prompt, as doing so will erase all data on the card.
- exFAT is the file system used on "Memory Stick XC-HG Duo" media and SDXC memory cards.
Attaching a lens
Set the power switch of the camera to OFF before you attach or remove the lens.
1 Remove the body cap from the camera and the rear lens cap from the rear of the lens.
- When changing the lens, quickly change the lens away from dusty locations to keep dust or debris from getting inside the camera.
- When shooting, remove the front lens cap from the front of the lens.
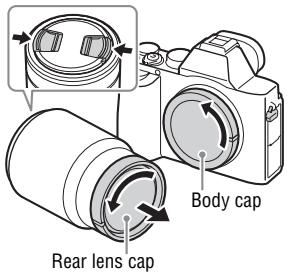
Front lens cap
2 Mount the lens by aligning the white index marks (mounting indexes) on the lens and camera.
- Hold the camera with the lens facing down to prevent dust from entering into the camera.
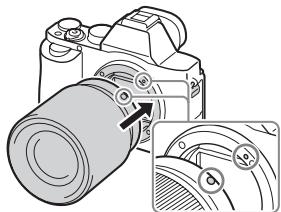
White index marks
3 While pushing the lens lightly toward the camera, turn the lens clockwise until it clicks into the locked position.
- Be sure to put the lens on straight.

Notes
- When attaching a lens, do not press the lens release button.
- Do not use force when attaching a lens.
- The Mount Adaptor (sold separately) is required to use an A-mount lens (sold separately). To use the Mount Adaptor, refer to the operating manual supplied with the Mount Adaptor.
- When you want to shoot full-frame images, use a lens designed for a full-frame camera.
- When carrying the camera with a lens attached, hold both the camera and the lens firmly.
- Do not hold the part of the lens that is extended for the zoom or focus adjustment.
To remove the lens
1 Press the lens release button all the way in and turn the lens counterclockwise until it stops.

GB
2 Attach the caps to the front and rear of the lens and the body cap to the camera.
- Before you attach them, remove any dust from them.

Notes on changing the lens
When changing the lens, if dust or debris gets inside the camera and adheres to the surface of the image sensor (the part that converts the light to an electric signal), it may appear as dark spots on the image, depending on the shooting environment.
The camera is equipped with an anti-dust function to prevent dust from landing on the image sensor. However, always make sure to quickly change the lens away from dusty locations when attaching/removing a lens.
Setting the date and time
When you turn on the camera for the first time or after you initialize the functions, the screen to set the date and time appears.
1 Set the power switch to ON to turn on the camera.
The screen to set the date and time appears.
- To turn the camera off, set the power switch to OFF.

GB
2 Check that [Enter] is selected on the screen, then press on the control wheel.
![SONY ALPHA 7 - Check that [Enter] is selected on the screen, then press on the control wheel. - 1](/content/2020/11/192625/images/9e0ea666b9e9ff2f57427739b5e5a75f5f2d7149cc51cf619c482475dc089869.jpg)
3 Select a desired geographic location, then press .
4 Press / on the control wheel, or select a setting item by turning the control wheel, then press .
5 Press / / , or select a desired setting by turning the control wheel, then press .
6 Repeat steps 4 and 5 to set other items, then select [Enter] and press on the control wheel.
To cancel the date and time setting operation
Press the MENU button.
Setting the date/time and area again
The date and time setup screen appears automatically when the power is turned on for the first time or when the internal rechargeable backup battery has been discharged. To reset the date and time, use the menu.
![SONY ALPHA 7 - MENUButton (Setup) 4 [Date/Time Setup] or [Area Setting] - 1](/content/2020/11/192625/images/4bc64ebebb0a83da3425d3994b00a4167b3a1a162cceba7ccbd1352a8099bd08.jpg)
Maintaining the date and time setting
This camera has an internal rechargeable battery for maintaining the date and time and other settings regardless of whether the power is on or off, or the battery is installed or not.
Shooting still images
In auto mode, the camera analyzes the subject and allows you to shoot with the appropriate settings.
1 Set the power switch to ON to turn on the camera.
2 Set the mode dial to Auto (Auto Mode).
GB
3 Look into the viewfinder and hold the camera.
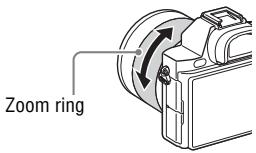
4 Determine the size of a subject.
When using a lens with a zoom lever: Move the zoom lever.
When using a lens with a zoom ring:
Turn the zoom ring.
- The optical zoom is not available when a fixed focal length lens is mounted.
- If the zoom range of the optical zoom is exceeded when a Power zoom lens is mounted, the camera automatically switches over to the camera side zoom.
5 Press the shutter button halfway down to focus.
- When the image is in focus, a beep sounds and the or () indicator lights.
- If [Auto Obj. Framing] is set to [Auto], when shooting faces, close-up (macro) subjects, or subjects tracked by [Lock-on AF], the camera analyzes the scene and automatically trims the captured image into a suitable composition. Both the original and the trimmed images will be saved.

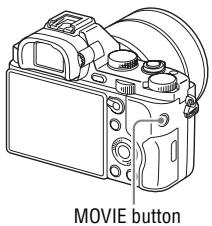
Recording movies
- Since the [MOVIE Button] is set to [Always] in the default setting, movie recording can be started from any shooting mode.
GB
Notes
- The sound of the camera in operation may be recorded while recording a movie. You can disable the sound recording by setting [Audio Recording] to [Off].
- To prevent the operating sound of the zoom ring from being recorded during movie recording when a Power zoom lens is used, we recommend recording movies using the zoom lever. When you move the zoom lever, place your finger lightly on the lever and operate it without flicking.
- The continuous recording time of a movie depends on the ambient temperature or the condition of the camera. See "Notes on continuous movie recording" (page 59).
- When the [E] icon appears, the temperature of the camera is too high. Turn the camera off and wait until the temperature of the camera decreases.
- When you are recording continuously for a long time, you may feel that the camera is warm. This is normal. Also, "Internal temp. high. Allow it to cool." may appear. In such cases, turn the camera off and wait until the camera is ready to shoot again.
Playing back images
按钮
2 Select an image by pressing the on the control wheel.
-
To play back movies, press on the control wheel.
-
If you press on the control wheel while playing back a movie, the control panel will be displayed.
| Control panel | Action during movie playback |
| ▶ | Playback |
| || | Pause |
| ▶▶ | Fast forward |
| ←← | Fast rewind |
| || | Forward slow playback |
| <| | Rewind slow playback |
| ▶▶ | Next movie |
| |←| | Previous movie |
| ||| | Frame advance |
| <||| | Frame rewind |
| ||) | Volume settings |
| C | Closes the control panel |
Notes
- Movies recorded using other devices may not play back on this camera.
Deleting images
Once you have deleted an image, you cannot restore it. Be sure that you want to delete the image before proceeding.
1 While displaying the image you want to delete, press the (Delete) button.

Delete) button
GB
2 Select [Delete] with / on the control wheel, then press .
- To delete several images at a time, select MENU button
(Playback) 1 [Delete].
Notes
- Protected images cannot be deleted.
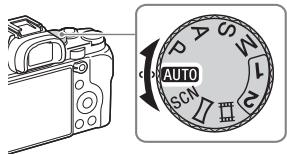
Selecting a shooting mode
Turn the mode dial and set to the desired shooting mode.
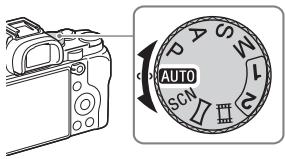
The following shooting modes are available.
| AUTO (Auto Mode) | Allows you to shoot still images with the settings adjusted automatically. |
| P (Program Auto) | Allows you to shoot with the exposure (the shutter speed and the aperture value) adjusted automatically. The other settings can be adjusted manually. |
| A (Aperture Priority) | Shoots by adjusting the aperture and changing the focus range, or by defocus the background. |
| S (Shutter Priority) | Adjusts the shutter speed to show the movement of the subject. |
| M (Manual Exposure) | Allows you to shoot after manually adjusting the exposure (the shutter speed and the aperture value) using the front or rear dial. |
| 1/2 (Memory recall) | Calls up settings pre-registered in [Memory] in the Camera Settings). |
| SCN (Scene Selection) | Allows you to shoot with preset settings according to the scene. |
| (Sweep Panorama) | Allows you to shoot panoramic images by combining multiple images. |
| (Movie) | Allows you to change shooting settings and shoot a movie. |
Using the Wi-Fi and NFC one-touch functions
You can perform the following operations using the camera's Wi-Fi and NFC One-touch functions.
Saving images to a computer.
Transferring images from the camera to a smartphone.

Using the smartphone as a remote control for the camera.

Viewing still images on a TV.
GB


For details on the Wi-Fi and NFC One-touch functions, refer to the attached document "Wi-Fi Connection/One-touch (NFC) Guide" or to the Help Guide (page 54).
Connecting the camera to a wireless access point
Connect the camera to your wireless access point. Before starting the procedure, make sure you have the SSID (name of the access point) and password of your wireless access point with you.
1 MENU (Wireless) 2 [Access Point Set.].
2 Use / on the control wheel to select the access point you want to connect to. Press in the center of the control wheel and enter the password if a key icon is displayed with a wireless access point, then select [OK].
![SONY ALPHA 7 - Use / on the control wheel to select the access point you want to connect to. Press in the center of the control wheel and enter the password if a key icon is displayed with a wireless access point, then select [OK]. - 1](/content/2020/11/192625/images/3e91b8042e9ddf2d3b914f86578ad3bc62f5f261b1daf270ec5450165a7a5237.jpg)
Notes
- If a connection is not established, see the wireless access point operating instructions or contact the administrator of the access point.
- To save images to a computer, install the following dedicated software on your computer.
When using Windows: Play Memories Home www.sony.net/pm/
When using Mac: Wireless Auto Import
http://www.sony.co.jp/imsoft/Mac/
Adding applications to the camera (Application downloading)
You can add the desired functions to your camera by connecting to the application downloading website (PlayMemories Camera Apps) via the Internet. For example, the following functions are available:
- You can use various effects for shooting images.
- You can upload images to network services directly from the camera.
Downloading applications
1 Access the application downloading website.
http://www.sony.net/pmca
GB
2 Follow the instructions on the screen and acquire a service account.
- If you have an account, sign in to the application download site.
3 Select the desired application and download the application to the camera following the instructions on the screen.
- To connect the camera to a Mac computer, perform the following setting on the camera.
① To a USB terminal of the computer

③ Multi Terminal
Notes
- The application downloading function may not be available in some countries and regions. For details, refer to the application downloading website above.
How to download applications directly using the Wi-Fi function of the camera
You can download applications using the Wi-Fi function without connecting to a computer.
Select MENU (Application) [Application List]
(PlayMemories Camera Apps), then follow the instructions on the screen to download applications.
Acquire a service account in advance.
Select MENU (Wireless) 2 [Access Point Set.] access point to be connected change [IP Address Setting] to [Auto] if it is set to [Manual].
Using the software
Use the following applications to optimize use of the images shot with your camera.
Image Data Converter
"PlayMemories Home"
"Remote Camera Control"
For details on installation, see pages 51 to 53.
Recommended computer environment (Windows)
The following computer environments are recommended when using the software and importing images via a USB connection.
| OS (pre-installed) | Windows Vista* SP2/Windows 7 SP1/Windows 8 |
| “PlayMemories Home” | CPU: Intel Pentium III 800 MHz or faster
(For playing/editing the High Definition movies: Intel Core Duo 1.66 GHz or faster/Intel Core 2 Duo 1.66 GHz or faster, Intel Core 2 Duo 2.26 GHz or faster (AVC HD (FX/FH)), Intel Core 2 Duo 2.40 GHz or faster (AVC HD (PS)))
Memory: 1 GB or more
Hard Disk: Disk space required for installation—approximately 600 MB
Display: Screen resolution—1024 × 768 dots or more |
| “Image Data Converter Ver.4”/ “Remote Camera Control Ver.3” | CPU/Memory: Pentium 4 or faster/1 GB or more
Display: 1024 × 768 dots or more |
- Starter (Edition) is not supported.
Recommended computer environment (Mac)
The following computer environments are recommended when using the software and importing images via a USB connection.
| OS (pre-installed) | Mac OS X v10.6 – v10.8 |
| “PlayMemories Home” | CPU: Intel processors (Intel Core Solo/Core Duo/Core 2 Duo, etc.) |
| Hard Disk: Disk space required for installation—approximately 100 MB |
| Display: Screen resolution—1024 × 768 dots or more |
GB
"Image Data Converter Ver.4"/ "Remote Camera Control Ver.3"
CPU: Intel Core Solo/Core Duo/Core 2 Duo or faster
Memory: 1 GB or more is recommended.
Display: 1024 × 768 dots or more
Notes
- Operation cannot be assured in an environment that is based on an upgrade of the operating systems described above or in a multi-boot environment.
- If you connect 2 or more USB devices to a single computer at the same time, some devices, including the camera, may not operate, depending on the types of USB devices you are using.
- Connecting the camera using a USB interface that is compatible with Hi-Speed USB (USB 2.0 compliant) allows advanced transfer (high speed transfer), as the camera is compatible with Hi-Speed USB (USB 2.0 compliant).
- When your computer resumes activity from suspend or sleep mode, communication between the camera and your computer may not recover at the same time.
Using "Image Data Converter"
With "Image Data Converter", you can do the following:
- You can play back and edit images recorded in RAW format with various corrections, such as tone curve and sharpness.
- You can adjust images with white balance, exposure, and [Creative Style], etc.
- You can save the images displayed and edited on a computer.
You can either save the image as RAW format or save it in a general file format.
- You can display and compare the RAW images and JPEG images recorded by this camera.
- You can rank images in 5 grades.
- You can apply color labels.
To use "Image Data Converter," refer to Help.
Click [Start] [All Programs] [Image Data Converter] [Help] [Image Data Converter Ver.4].
"Image Data Converter" support page (English only)
Installing "Image Data Converter"
1 Download the software from the following URL and install it on your computer.
Windows:
http://www.sony.co.jp/imsoft/Win/
Mac:
GB
Using "PlayMemories Home"
The software "PlayMemories Home" allows you to import still images and movies to your computer and use them. "PlayMemories Home" is required for importing AVCHD movies to your computer.


Importing images from your camera
Playing back imported images

For Windows, the following functions are also available.

Viewing images on Calendar

Creating movie discs

Uploading images to network servi
You Tube
Sharing images on "PlayMemories Online"

PlayMemories Online


Notes
- An Internet connection is required to install "PlayMemories Home".
- An Internet connection is required to use "PlayMemories Online" or other network services. "PlayMemories Online" or other network services may not be available in some countries or regions.
Refer to the following URL for Mac software: http://www.sony.co.jp/imsoft/Mac/
- If the software "PMB (Picture Motion Browser)," supplied with models released before 2011, has already been installed on your computer, it will be overwritten by "PlayMemories Home" during the installation. Use "PlayMemories Home," the successor software of "PMB."
- Movies recorded using the [60p 28M(PS)]/[50p 28M(PS)], [60i 24M(FX)]/[50i 24M(FX)] or [24p 24M(FX)]/[25p 24M(FX)] setting in [Record Setting] are converted by "PlayMemories Home" to create an AVCHD recording disc. This conversion can take a long time. Also, you cannot create a disc with the original image quality. If you want to keep the original image quality, store your movies on a Blu-ray Disc.
Installing "PlayMemories Home"
1 Using the Internet browser on your computer, go to the following URL, then click [Install] [Run].
www.sony.net/pm/
2 Follow the instructions on the screen to complete the installation.
Using "Remote Camera Control"
Connect the camera to your computer. With "Remote Camera Control" you can:
- Set up the camera or record an image from the computer.
- Record an image directly to the computer.
- Perform an Interval Timer Shooting.
Set up the following before use: MENU (Setup) 4 [USB Connection] [PC Remote]
Installing "Remote Camera Control"
1 Using the Internet browser on your computer, go to the following URL.
Windows:
http://www.sony.co.jp/imsoft/Win/
Mac:
2 Follow the instructions on the screen to download and install "Remote Camera Control."
GB
Notes
- An Internet connection is required to install "Remote Camera Control."
Learning more about the camera ("Help Guide")

"Help Guide" is an on-line manual. Refer to it for in-depth instructions on the many functions of the camera.
1 Access the Sony support page.
http://www.sony.net/SonyInfo/Support/
2 Select your country or region.
3 Search for the model name of your camera within the support page.
- Check the model name on the bottom of your camera.
Checking the number of images and recordable time of movies
When you insert a memory card into the camera and set the power switch to ON, the number of images that can be recorded (should you continue to shoot using the current settings) is displayed on the screen.

(100)3224M
Notes
- When "0" (the number of recordable images) flashes in yellow, the memory card is full. Replace the memory card with another one, or delete images from the current memory card (page 43).
- When "NO CARD" (the number of recordable images) flashes in yellow, it means no memory card has been inserted. Insert a memory card.
The number of images that can be recorded on a memory card
The table below shows the approximate number of images that can be recorded on a memory card formatted with this camera. The values are defined using Sony standard memory cards for testing. The values may vary depending on the shooting conditions and the type of memory card used.
ILCE-7:
Image Size: L: 24M
Aspect Ratio: 3:2*
Memory card formatted with this camera
(Units: Images)
| Capacity
Size | 2 GB | 4 GB | 8 GB | 16 GB | 32 GB | 64 GB |
| Standard | 280 | 560 | 1100 | 2250 | 4600 | 9200 |
| Fine | 195 | 395 | 800 | 1600 | 3200 | 6400 |
| Extra fine | 105 | 215 | 435 | 870 | 1700 | 3450 |
| RAW & JPEG | 54 | 105 | 215 | 435 | 870 | 1750 |
| RAW | 74 | 145 | 295 | 600 | 1200 | 2400 |
ILCE-7R:
Image Size: L: 36M
Aspect Ratio: 3:2*
Memory card formatted with this camera
(Units: Images)
| Capacity
Size | 2 GB | 4 GB | 8 GB | 16 GB | 32 GB | 64 GB |
| Standard | 215 | 440 | 890 | 1750 | 3550 | 7000 |
| Fine | 145 | 295 | 600 | 1200 | 2400 | 4800 |
| Extra fine | 78 | 150 | 310 | 630 | 1250 | 2500 |
| RAW & JPEG | 37 | 75 | 150 | 300 | 610 | 1200 |
| RAW | 50 | 99 | 200 | 405 | 810 | 1600 |
- When [Aspect Ratio] is set to [16:9], you can record more images than the numbers shown in the table above (except when [RAW] is selected).
The number of images that can be recorded using a battery pack
Note that the actual numbers may differ depending on the conditions of use.
ILCE-7:
| Battery life | Number of images |
| Shooting (still images) | Approx. 135 min. | Approx. 270 images |
| Actual shooting (movies) | Approx. 60 min. | — |
| Continuous shooting (movies) | Approx. 100 min. | — |
| Viewing (still images) | Approx. 280 min. | Approx. 5600 images |
GB
ILCE-7R:
| Battery life | Number of images |
| Shooting (still images) | Approx. 135 min. | Approx. 270 images |
| Actual shooting (movies) | Approx. 60 min. | — |
| Continuous shooting (movies) | Approx. 90 min. | — |
| Viewing (still images) | Approx. 280 min. | Approx. 5600 images |
Notes
- The above number of images applies when the battery pack is fully charged. The number of images may decrease depending on the conditions of use.
-
The number of images that can be recorded is for shooting under the following conditions:
-
The battery pack is used at an ambient temperature of 25^ (77^) .
- Using the lens FE 28-70 mm F3.5-5.6 OSS
- Using Sony "Memory Stick PRO Duo" (Mark2) media (sold separately)
- [Viewfinder Bright.] is set to [Manual] [± 0] .
- [Monitor Brightness] is set to [Manual] [± 0] .
-
[Display Quality] is set to [Standard] (ILCE-7)/[High] (ILCE-7R).
-
The number for "Shooting (still images)" is based on the CIPA standard, and is for shooting under the following conditions:
(CIPA: Camera & Imaging Products Association)
- [Focus Mode] is set to [Single-shot AF].
- Shooting once every 30 seconds.
-
The power turns on and off once every ten times.
-
The number of minutes for movie shooting is based on the CIPA standard, and are for shooting under the following conditions:
-
[Record Setting] is set to [60i 17M(FH)]/[50i 17M(FH)].
- Typical movie shooting: Battery life based on repeatedly shooting, zooming, shooting stand-by, turning on/off, etc.
- Continuous movie shooting: Battery life based on non-stop shooting until the limit (29 minutes) has been reached, and then continued by pressing the MOVIE button again. Other functions, such as zooming, are not operated.
Available recording time for a movie
The table below shows the approximate total recording times using a memory card formatted with this camera.
Memory card formatted with this camera
(h (hour), m (minute))
| Capacity Record Setting | 2 GB | 4 GB | 8 GB | 16 GB | 32 GB | 64 GB |
| 60i 24M(FX)/50i 24M(FX) | 10 m | 20 m | 40 m | 1 h 30 m | 3 h | 6 h |
| 60i 17M(FH)/50i 17M(FH) | 10 m | 30 m | 1 h | 2 h | 4 h 5 m | 8 h 15 m |
| 60p 28M(PS)/50p 28M(PS) | 9 m | 15 m | 35 m | 1 h 15 m | 2 h 30 m | 5 h 5 m |
| 24p 24M(FX)/25p 24M(FX) | 10 m | 20 m | 40 m | 1 h 30 m | 3 h | 6 h |
| 24p 17M(FH)/25p 17M(FH) | 10 m | 30 m | 1 h | 2 h | 4 h | 8 h |
| 1440×1080 12M | 20 m | 40 m | 1 h 20 m | 2 h 45 m | 5 h 30 m | 11 h |
| VGA 3M | 1 h 10 m | 2 h 25 m | 4 h 55 m | 10 h | 20 h | 40 h |
- Continuous shooting is possible for approximately 29 minutes (a product specification limit). The maximum continuous recording time of an MP4 (12M) format movie is about 20 minutes (limited by the 2 GB file size restriction).
Notes
- The recordable time of movies varies because the camera is equipped with VBR (Variable Bit Rate), which automatically adjusts image quality depending on the shooting scene. When you record a fast-moving subject, the image is clearer but the recordable time is shorter because more memory is required for recording.
The recordable time also varies depending on the shooting conditions, the subject or the image quality/size settings.
- The values shown are not for continuous recording time.
- The recording time may differ depending on shooting conditions and the memory card used.
- When [12] is indicated, stop recording the movie. The temperature inside the camera has increased to an unacceptable level.
- For details on movie playback, see page 42.
Notes on continuous movie recording
GB
- It requires a lot of power to perform high quality movie recording or continuous shooting using the image sensor. Therefore, if you continue to shoot, the temperature inside the camera will rise, especially that of the image sensor. In such cases, the camera turns off automatically since higher temperatures affect the quality of the images or affect the internal mechanism of the camera.
- The duration of time available for movie recording varies with the temperature or condition of the camera before you start recording. If you frequently recompose or shoot images after the power is turned on, the temperature inside the camera will rise and the recording time available will be shorter.
- If the camera stops recording due to the temperature, leave it for several minutes with the power turned off. Start recording after the temperature inside the camera drops fully.
-
If you observe the following points, the recording time will be longer.
-
Keep the camera out of direct sunlight.
-
Turn the camera off when it is not being used.
-
The maximum size of a movie file is about 2 GB. When the file size is about 2 GB, recording stops automatically when [File Format] is set to [MP4], and a new movie file is created automatically when [File Format] is set to [AVCHD].
- The maximum continuous recording time is 29 minutes.
Specifications
Camera
[System]
Camera Type: Interchangeable Lens Digital Camera
Lens: E-mount lens
[Image sensor]
Image format:
ILCE-7: 35mm full size
(35.8mm× 23.9mm) , CMOS
image sensor
ILCE-7R: 35mm full size
(35.9mm× 24.0mm) , CMOS
image sensor
Total pixel number of camera:
ILCE-7:
Approx. 24.7 Megapixels
ILCE-7R
Approx. 36.8 Megapixels
Effective pixel number of camera:
ILCE-7:
Approx. 24.3 Megapixels
ILCE-7R
Approx. 36.4 Megapixels
[Anti-Dust]
System: Charge protection coating on
Optical Filter and ultrasonic
vibration mechanism
[Auto focus system]
System:
ILCE-7:
Phase detection system/Contrast
detection system
ILCE-7R:
Contrast detection system
Sensitivity Range: 0 EV to 20 EV (at ISO 100 equivalent with F2.8 lens)
[Electronic viewfinder]
Type: Electronic viewfinder
Total number of dots: 2359296 dots
Frame coverage: 100%
Magnification: 0.71× with 50~mm lens at infinity, -1m^-1 (diopter)
Eye Point: Approximately 27mm from the eyepiece, 22mm from the eyepiece frame at -1m^-1
Diopter Adjustment: -4.0m^-1 to +3.0m^-1 (diopter)
[LCD screen]
LCD panel: 7.5cm (3.0 type) TFT drive
Total number of dots: 921 600 dots
[Exposure control]
Metering method: 1 200-zone
evaluative metering by the image sensor
Metering Range: 0 EV to 20 EV (at ISO 100 equivalent with F2.8
lens)
ISO sensitivity (Recommended exposure index):
Still images: [ISO AUTO], ISO
50 to 25600 (1/3 EV step)
Movies: [ISO AUTO], ISO 200 to
25600 (1/3 EV step)
Multi frame noise reduction: [ISO]
AUTO] / ISO 100 to 51200 (1 EV
step)
Exposure compensation: ± 5.0 EV (switchable between 1/3 and 1/2 EV steps)
[Shutter]
Type: Electronically-controlled, vertical-traverse, focal-plane type
Speed range: Still images: 1/8000 second to 30 seconds, bulb
Movies: 1/8 000 second to 1/4 second (1/3 step)
1080 60i-compatible device up to 1/60 second in AUTO mode (up to 1/30 second in Auto slow shutter mode)
1080 50i-compatible device up to 1/50 second in AUTO mode (up to 1/25 second in Auto slow shutter mode)
Flash sync speed:
ILCE-7: 1/250 second
ILCE-7R: 1/160 second
File format: JPEG (DCF Ver. 2.0, Exif Ver. 2.3, MPF Baseline) compliant, RAW (Sony ARW 2.3 format)
Movie (AVCHD format): AVCHD format Ver. 2.0 comtable Video: MPEG-4 AVC/H.264
Audio: Dolby Digital 2ch, equipped with Dolby Digital Stereo Creator
Manufactured under license from Dolby Laboratories.
Movie (MP4 format): Video: MPEG-4 AVC/H.264
Audio: MPEG-4 AAC-LC 2ch
"Memory Stick PRO Duo" media, SD card
Multi Terminal*: Hi-Speed USB (USB 2.0)
HDMI: HDMI type D microjack
(Microphone) Terminal: 3.5mm Stereo minijack
(Headphones) Terminal: 3.5mm Stereo minijack
- Supports Micro USB compatible devices.
[Power, general]
Used battery pack: Rechargeable battery pack NP-FW50
[Power consumption]
When using an FE 28-70 mm F3.5-5.6 OSS*
ILCE-7:
When using the viewfinder:
Approx. 3.5W
When using the LCD screen:
Approx. 2.7 W
ILCE-7R:
When using the viewfinder:
Approx. 3.5W
When using the LCD screen:
Approx. 2.7 W
[Others]
Exif Print: Compatible
PRINT Image Matching III: Compatible
DPOF: Compatible
Dimensions: Approx. 126.9mm× 94.4mm× 48.2mm (Approx.5 inches × 37 / 10 inches × 19 / 10 inches)W/H/D,excluding protrusions)
Mass: ILCE-7:
Approx. 474g (1 lb 0.7 oz) (with battery and "Memory Stick PRO Duo" media)
Approx. 416g (14.7 oz) (body only)
ILCE-7R:
Approx. 465g (1 lb 0.4 oz) (with battery and "Memory Stick PRO Duo" media)
Approx. 407g (14.4 oz) (body only)
Operating temperature: 0^ to 40^ (32^ to 104^)
[Wireless LAN]
Supported format: IEEE 802.11 b/g/n
Frequency band: 2.4 GHz bandwidth
Security: WEP/WPA-PSK/WPA2-PSK
Connection method: WPS (Wi-Fi Protected Setup)/Manual
Access method: Infrastructure mode
NFC: NFC Forum Type 3 Tagcompliant
AC Adaptor AC-UB10C/UB10D
Power requirements: AC 100 V to 240V 50Hz / 60Hz 70mA
Output voltage: DC 5 V, 0.5 A
Operating temperature: 0^ to 40^ (32^ to 104^)
Storage temperature: -20^ to +60 ^ C(-4^ Fto + 140^ F)
Dimensions (Approx.): 50mm× 22mm× 54mm (2 inches × 7 / 8 inches × 21/4 inches) (W/H/D)
Rechargeable battery pack NP-FW50
Used battery: Lithium-ion battery
Maximum voltage: DC 8.4 V
Nominal voltage: DC 7.2 V
Maximum charge voltage: DC 8.4 V
Maximum charge current: 1.02 A
Capacity: Typical 7.7 Wh (1080 mAh)
Minimum: 7.3 Wh (1020 mAh)
Maximum dimensions:
Approx. 31.8mm× 18.5mm× 45~mm (1 5/16 inches × 3 / 4
inches × 1 13/16 inches) (W/H/D)
Lens FE 28-70 mm F3.5-5.6 OSS (Supplied with ILCE-7K)
Focal length: 28mm - 70mm
Lens groups-elements: 8-9
Angle of view: 75^ - 34^
Minimum focus*: 0.3m - 0.45m (0.99 ft. -1.48 ft.)
Maximum magnification: 0.19×
Minimum f-stop: f / 22 - f/36
Filter diameter: 55mm
Dimensions (max. diameter × height):
Approx. 72.5mm× 83mm (Approx. 2 7/8 inches × 3 3/8 inches)
Mass: Approx. 295g (Approx. 10.5 oz.)
SteadyShot: Available
*Minimum focus is the shortest distance from the image sensor to the subject.
Design and specifications are subject to change without notice.
On image data compatibility
- This camera conforms with DCF (Design rule for Camera File system) universal standard established by JEITA (Japan Electronics and Information Technology Industries Association).
- Playback of images recorded with your camera on other equipment and playback of images recorded or edited with other equipment on your camera are not guaranteed.
Trademarks
- The following marks are trademarks of Sony Corporation.
, "Memory Stick," "Memory Stick PRO," MEMORY STICK PRO, "Memory Stick Duo,"
MEMORY STICK DUO "Memory Stick PRO Duo," MEMORY STICK PRO DUO "Memory Stick PRO-HG Duo,"
MEMORY STICK PRO-HG Duo "Memory Stick XC-HG Duo,"
MEMORY STICK XC-HG DUO
"MagicGate," MAGICGATE, "BRAVIA," "InfoLITHIUM,"
PlayMemories Camera Apps,"
"PlayMemories Home,"
"PlayMemories Online,"
"PlayMemories Mobile"
- "AVCHD Progressive" and "AVCHD Progressive" logotype are trademarks of Panasonic Corporation and Sony Corporation.
- Dolby and the double-D symbol are trademarks of Dolby Laboratories.
- Microsoft, Windows and Windows Vista are registered trademarks of Microsoft Corporation in the United States and/or other countries.
- The terms HDMI and HDMI High-Definition Multimedia Interface, and the HDMI Logo are trademarks or registered trademarks of HDMI Licensing LLC in the United States and other countries.
Mac, Mac OS are registered trademarks of Apple Inc.
-
iOS is a registered trademark or trademark of Cisco Systems, Inc. and/or its affiliates in the United States and certain other countries.
-
iPhone and iPad are trademarks of Apple Inc., registered in the U.S. and other countries.
- Intel, Intel Core, and Pentium are trademarks or registered trademarks of Intel Corporation.
- SDXC logo is a trademark of SD-3C, LLC.
- Android, Google Play are trademarks of Google Inc.
- Wi-Fi, the Wi-Fi logo, Wi-Fi PROTECTED SET-UP are registered trademarks of the Wi-Fi Alliance.
- The N Mark is a trademark or registered trademark of NFC Forum, Inc. in the United States and in other countries.
- DLNA and DLNA CERTIFIED are trademarks of Digital Living Network Alliance.
- "PlayStation" and "PlayStation" are registered trademarks of Sony Computer Entertainment Inc.
- Facebook and the "f" logo are trademarks or registered trademarks of Facebook, Inc.
YouTube and the YouTube logo are trademarks or registered trademarks of Google Inc.
- Eye-Fi is a trademark of Eye-Fi, Inc.
- In addition, system and product names used in this manual are, in general, trademarks or registered trademarks of their respective developers or manufacturers. However, the TM or ® marks are not used in all cases in this manual.

Works with PlayStation®3
- Add further enjoyment with your PlayStation 3 by downloading the application for PlayStation 3 from PlayStation Store (where available.)
- The application for PlayStation 3 requires PlayStation Network account and application download. Accessible in areas where the PlayStation Store is available.
GB

InfoLITHIUM

SERIES

MEMORY STICK TM

CLASS④

HIGH-DEFINITION MULTIMEDIA INTERFACE

Progressive

Additional information on this product and answers to frequently asked questions can be found at our Customer Support Website.
http://www.sony.net/
Français
Monture E
Aide-memoire
ILCE-7R Model No. WW328261
ILCE-7 Model No. WW328262
AVERTISSEMENT
Responsible : Sony Electronics Inc.
Adresse: 16530 Via Esprillo, San
Diego, CA 92127 E.-U.
Responsible : Sony Electronics Inc.
Adresse: 16530 Via Esprillo, San
Diego, CA 92127 E.-U.
Complies with IDA Standards DB00353
| Affichage | Indication |
| i i i + P P* A S M | Mode de prise de vue (47) |
| i i i i i p H A H s H M |
| 1 2 | Numero d'enregistrement (47) |
| J J J J J J J J J J J J J J J J J J J J J J J J J J J J J J J J J J J J J J J J J J J J J J J J J J J J J J J J J J J J J J J J J J J J J J J J J J J J J J J J J J J J J J J J J J J J J J J J J J J J J | Icônes de Reconnaissance de scène |
| OFF | Carte mémoire (35)/Téléchargement |
| 100 | Nombre restant d'images enregistrables |
| 8:2 16:9 | Ratio d'aspect des images fixes |
| 24M 10M 6.0M 20M 8.7M 5.1M 10M 6.0M 2.6M 8.7M 5.1M 2.2M WIDE STD | ILCE-7 :Taille des images fixes (58) |
| Affichage | Indication |
| 10 S3C 0.3EVPW BLO Hi AUTO SLOW REAR WLP | Mode d'acquisition |
| 4 AUTO S S S S S S S S S S S S S S S S S S S S S S S S S S S S S S S S S S S S S S S S S S S S S S S S S S S S S S S S S S S S S S S S S S S S S S S S S S S S S S S S S S S S S S S S S S S S S S S S S S S S | Mode Flash /Attenuationdes yeux rouges |
(CIPA: Camera & Imaging Products Association)
Audio: MPEG-4 AAC-LC 2 can.
(boitier unquipment)
ILCE-7R:
Environ 465g (Environ 1 lb
0,4 oz) (battery et support
(boitier unquipment)
Batterie rechargeable NPFW50
Works with PlayStation®3
ILCE-7R Model No. WW328261
ILCE-7 Model No.WW328262
WARNING
(CIPA: Camera & Imaging Products Association)
Verbindungsmethode: WPS (Wi-Fi Protected Setup)/Manuell
Works with PlayStation®3
ILCE-7R Model No. WW328261
ILCE-7 Model No. WW328262
AVISO
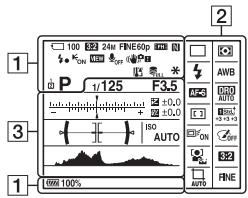
Modo P/A/S/M/Barrido panoramic
1
Image Data Converter
"PlayMemories Home"
- "Remote Camera Control"
Cread discos depellicules

You Tube
Subir imagens a增值服务 de la red
Compartir imagens en "PlayMemories Online"

PlayMemories
Online


Notas
(CIPA: Camera & Imaging Products Association)
Dimensiones (Aprox.):
50mm× 22mm× 54mm (An/Al/Pr)
Works with PlayStation®3
ILCE-7R Model No. WW328261
ILCE-7 Model No.WW328262
AVVERTENZA
A: "Memory Stick PRO Duo"
B: Scheda SD
Note
Image Data Converter
"PlayMemories Home"
- "Remote Camera Control"
(CIPA: Camera & Imaging Products Association)
Circa 24,3 megapixel
ILCE-7R
Circa 36,4 megapixel
[Antipolvere]
F-stop minimo: f/22 - f/36
Diametro del filtro: 55mm
"Stick PRO", MEMORY STICK PRO,
"Memory Stick Duo",
MEMORY STICK DUO "Memory Stick
PRO Duo", MEMORY STICK PRO DUO
"Memory Stick PRO-HG Duo",
MEMORY STICK PRO-HG DUO "Memory
Stick XC-HG Duo",
MEMORY STICK XC-HG DUO
"MagicGate", MAGICGATE,
"BRAVIA", "InfoLITHIUM",
"PlayMemories Camera Apps",
"PlayMemories Home",
"PlayMemories Online",
"Play Memories Mobile"
Works with PlayStation®3
ILCE-7R Model No. WW328261
ILCE-7 Model No.WW328262
AVISO
| Visualização | Indicação |
| São Paulo | Modo deavanço |
| São Paulo
BCF
CEBV
CECV
CHB
CHU
LDO | Modo de flash/Reducao dos olhos vermelhos |
| São Paulo
SLOW
REAR
WL
S# | Compensacao do flash |
| São Paulo
AFS
AFC
AMF
DMF | Modo de focagem |
| São Paulo
C
C
C
C
C
C
C
C
C
C
C
C
C
C
C
C
C
C
C
C
C
C
C
C
C
C
C
C
C
C
C
C
C
C
C
C
C
C
C
C
C
C
C
C
C
C
C
C
C
C
S | Área AF |
| São Paulo
OFF
ON
ON
ON
ON
ON
ON
ON
ON
ON
ON
ON
ON
ON
ON
ON
ON
ON
ON
ON
ON
ON
ON
ON
ON
ON
ON
ON
ON
ON
ON
ON
ON
ON
ON
ON
ON
ON
ON
ON
ON
ON
ON
ON
ON
ON
ON
ON
ON
ON
ON
S
S
S
S
S
S
S
S
S
S
S
S
S
S
S
S
S
S
S
S
S
S
S
S
S
S
S
S
S
S
S
S
S
S
S
S
S
S
S
S
S
S
S
S
S
S
S
S
S
S
C
C
C
C
C
C
C
C
C
C
C
C
C
C
C
C
C
C
C
C
C
C
C
C
C
C
C
C
C
C
C
C
C
C
C
C
C
C
C
C
C
C
C
C
C
C
C
C
C
c
c
c
c
c
c
c
c
c
c
c
c
c
c
c
c
c
c
c
c
c
c
c
c
c
c
c
c
c
c
c
c
c
c
c
c
c
c
c
c
c
c
c
c
c
c
c
c
c
c
S
S
S
S
S
S
S
S
S
S
S
S
S
S
S
S
S
S
S
S
S
S
S
S
S
S
S
S
S
S
S
S
S
S
S
S
S
S
S
S
S
S
S
S
S
S
S
S
S
c
c
c
c
c
c
c
c
c
c
c
c
c
c
c
c
c
c
c
c
c
c
c
c
c
c
c
c
c
c
c
c
c
c
c
c
c
c
c
c
c
c
c
c
c
c
c
c
c
C
C
C
C
C
C
C
C
C
C
C
C
C
C
C
C
C
C
C
C
C
C
C
C
C
C
C
C
C
C
C
C
C
C
C
C
C
C
C
C
C
C
C
C
C
C
C
C
C
s
S
S
S
S
S
S
S
S
S
S
S
S
S
S
S
S
S
S
S
S
S
S
S
S
S
S
S
S
S
S
S
S
S
S
S
S
S
S
S
S
S
S
S
S
S
S
S
S
S
s
S
S
S
S
S
S
S
S
S
S
S
S
S
S
S
S
S
S
S
S
S
S
S
S
S
S
S
S
S
S
S
S
S
S
S
S
S
S
S
S
S
S
S
S
S
S
S
S
c
S
S
S
S
S
S
S
S
S
S
S
S
S
S
S
S
S
S
S
S
S
S
S
S
S
S
S
S
S
S
S
S
S
S
S
S
S
S
S
S
S
S
S
S
S
S
S
S
c
s
S
S
S
S
S
S
S
S
S
S
S
S
S
S
S
S
S
S
S
S
S
S
S
S
S
S
S
S
S
S
S
S
S
S
S
S
S
S
S
S
S
S
S
S
S
S
S
S
s
c
c
c
c
c
c
c
c
c
c
c
c
c
c
c
c
c
c
c
c
c
c
c
c
c
c
c
c
c
c
c
c
c
c
c
c
c
c
c
c
c
c
c
c
c
c
c
c
c
s
S
S
S
S
S
S
S
S
S
S
S
S
S
S
S
S
S
S
S
S
S
S
S
S
S
S
S
S
S
S
S
S
S
S
S
S
S
S
S
S
S
S
S
S
S
S
S
s
c
s
c
c
c
c
c
c
c
c
c
c
c
c
c
c
c
c
c
c
c
c
c
c
c
c
c
c
c
c
c
c
c
c
c
c
c
c
c
c
c
c
c
c
c
c
c
c
c
c
s
s
s
s
s
s
s
s
s
s
s
s
s
s
s
s
s
s
s
s
s
s
s
s
s
s
s
s
s
s
s
s
s
s
s
s
s
s
s
s
s
s
s
s
s
s
s
s
s
s
S
S
S
S
S
S
S
S
S
S
S
S
S
S
S
S
S
S
S
S
S
S
S
S
S
S
S
S
S
S
S
S
S
S
S
S
S
S
S
S
S
S
S
S
S
S
S
S
C
S
S
S
S
S
S
S
S
S
S
S
S
S
S
S
S
S
S
S
S
S
S
S
S
S
S
S
S
S
S
S
S
S
S
S
S
S
S
S
S
S
S
S
S
S
S
S
S
S
T
T
T
T
T
T
T
T
T
T
T
T
T
T
T
T
T
T
T
T
T
T
T
T
T
T
T
T
T
T
T
T
T
T
T
T
T
T
T
T
T
T
T
T
T
T
T
T
T
T
t
s
s
s
s
s
s
s
s
s
s
s
s
s
s
s
s
s
s
s
s
s
s
s
s
s
s
s
s
s
s
s
s
s
s
s
s
s
s
s
s
s
s
s
s
s
s
s
s
s
c
c
c
c
c
c
c
c
c
c
c
c
c
c
c
c
c
c
c
c
c
c
c
c
c
c
c
c
c
c
c
c
c
c
c
c
c
c
c
c
c
c
c
c
c
c
c
c
C
S
S
S
S
S
S
S
S
S
S
S
S
S
S
S
S
S
S
S
S
S
S
S
S
S
S
S
S
S
S
S
S
S
S
S
S
S
S
S
S
S
S
S
S
S
S
S
S
s
s
s
s
s
s
s
s
s
s
s
s
s
s
s
s
s
s
s
s
s
s
s
s
s
s
s
s
s
s
s
s
s
s
s
s
s
s
s
s
s
s
s
s
s
s
s
s
s
C
C
C
C
C
C
C
C
C
C
C
C
C
C
C
C
C
C
C
C
C
C
C
C
C
C
C
C
C
C
C
C
C
C
C
C
C
C
C
C
C
C
C
C
C
C
C
C
C
G
G
G
G
G
G
G
G
G
G
G
G
G
G
G
G
G
G
G
G
G
G
G
G
G
G
G
G
G
G
G
G
G
G
G
G
G
G
G
G
G
G
G
G
G
G
G
G
G
G
C
C
C
C
C
C
C
C
C
C
C
C
C
C
C
C
C
C
C
C
C
C
C
C
C
C
C
C
C
C
C
C
C
C
C
C
C
C
C
C
C
C
C
C
C
C
C
C
C
L100000000000000000000000000000000000000000000000000000000000000000000000000000000000000000000000000001000000000000000000000000000000000000000000000000000000000000000000000000000000000000000000000000001200000000000000000000000000000000000000000000000000000000000000000000000000000000000000000000000000080000000000000000000000000000000000000000000000000000000000000000000000000000000000000000000000000005000000000000000000000000000000000000000000000000000000000000000000000000000000000000000000000000000600000000000000000000000000000000000000000000000000000000000000000000000000000000000000000000000000032555555555555555555555555555555555555555555555555555555555555555555555555555555555555555555555555555549555555555555555555555555555555555555555555555555555555555555555555555555555555555555555555555555555625555555555555555555555555555555555555555555555555555555555555555555555555555555555555555555555555547555555555555555555555555555555555555555555555555555555555555555555555555555555555555555555555555555.
C 12 12 12 12 12 12 12 12 12 12 12 12 12 12 12 12 12 12 12 12 12 12 12 12 12 12 12 12 12 12 12 12 12 12 C 12 12 12 12 12 12 12 12 12 12 12 12 12 12 12 12 12 12 12 12 12 12 12 12 12 12 12 12 12 12 12 12 12 S 12 12 12 12 12 12 12 12 12 12 12 12 12 12 12 12 12 12 12 12 12 12 12 12 12 12 12 12 12 12 12 12 12 | |
A: "Memory Stick PRO Duo"
B:Cartao SD
Notas
Image Data Converter
"PlayMemories Home"
- "Remote Camera Control"
Instalar "PlayMemories Home"
Instalar "Remote Camera Control"
(CIPA: Camera & Imaging Products Association)
Método de ligation: WPS (Wi-Fi Protected Setup)/Manual
PRO Duo", MEMORY STICK PRO DUO "Memory Stick PRO-HG Duo",
MEMORY STICK PRO-HG Duo "Memory Stick XC-HG Duo",
MEMORY STICK XC-HG DUO
"MagicGate", MAGICGATE, "BRAVIA", "InfoLITHIUM",
"PlayMemories Camera Apps",
"PlayMemories Home",
"PlayMemories Online", "PlayMemories Mobile"
Works with PlayStation®3
ILCE-7R Model No. WW328261
ILCE-7 Model No.WW328262
WAARSCHUWING
Applications downloaden
"Image Data Converter"
"PlayMemories Home"
"Remote Camera Control"

Beelden uploaden na networkservices
(CIPA: Camera & Imaging Products Association)
Ong. 24,7 megapixels
ILCE-7R
Ong. 36,8 megapixels
Ong. 24,3 megapixels
ILCE-7R
Ong. 36,4 megapixels
[Stofprevention]
Systeem: Antistatische laag op optisch filter en ultrason trillingsmechanisme
Aansluitmethode: WPS (Wi-Fi)
Protected Setup)/handmatig
Toegangsmethode:
Infrastructureurmodus
"Memory Stick PRO-HG Duo",
MEMORY STICK PRO-HG Duo "Memory Stick XC-HG Duo",
MEMORY STICK XC-HG DUO "MagicGate",
MAGICGATE, "BRAVIA",
"InfoLITHIUM", PlayMemories
Camera Apps", "PlayMemories
Home", "PlayMemories Online", "PlayMemories Mobile"
Works with PlayStation®3
ILCE-7R Model No. WW328261
ILCE-7 Model No.WW328262
Ostrzeżenie
Elementary apparatus
(CIPA: Camera & Imaging Products Association)
Works with PlayStation®3
ILCE-7R Model No. WW328261
ILCE-7 Model No.WW328262
WARNING
Utsatt inte eheten for regn ellukf telfersom det kan medfora risk for brand eller elstotar.
VIKTIGA
SAKERHETS-ANVISNINGAR
-SPARA DESSA
ANVISNINGAR
VARNING
FÖLJ DESSA
ANVISNINGAR
NOGGRANT FÖL
MINSKA RISKEI
BRAND OCH
ELSTÖTAR
WARNING!
Batteri
"Image Data Converter"
"PlayMemories Home"
"Remote Camera Control"
Se sidan 32 till 35 for narmare detailjer om installationen.
ILCE-7R Model No. WW328261
ILCE-7 Model No.WW328262
VAROITUS
"Image Data Converter"
"PlayMemories Home"
"Remote Camera Control"
ILCE-7R Model No. WW328261
ILCE-7 Model No.WW328262
ADVARSEL!
For a redusere brannfaren og faren for a fa elektrisk stot, ma du ikke utsette dette encheten for regn eller fuktigkeit.
VIKTIGESIKKERHETSINSTRUKSER-TA VARE PÄ DISSEINSTRUKSENFAREFOR A REDUSEREFAREN FOR BRANNELLER ELEKTRISKSTØT,MA DU FØLGIDISSE INSTRUKSENENOYE
Forsiktig
Batteri
"Image Data Converter"
"PlayMemories Home"
"Remote Camera Control"
ILCE-7R Model No. WW328261
ILCE-7 Model No.WW328262
ADVARSEL
"Image Data Converter"
"PlayMemories Home"
"Remote Camera Control"
Installation of "Image Data Converter"
Installation of "PlayMemories Home"