CONTACT - Webcam DICOTA - Free user manual and instructions
Find the device manual for free CONTACT DICOTA in PDF.
| Product type | Laptop webcam |
| Brand | DICOTA |
| Model | CONTACT |
| Sensor | CMOS 1/4", 640×480 pixels |
| Frame rate | 30 fps (640×480, 800×600, 320×240, 160×120) |
| Lens | F=2.4, f=4.9 mm, viewing angle 54° |
| Focus | Autofocus (30 cm to infinity) |
| Supported resolutions | 800×600, 640×480, 352×288, 320×240, 176×144, 160×120 |
| Connection | USB |
| Minimum system requirements | Pentium 166 MHz, USB port, Windows 98/ME/2000/XP/Vista, CD-ROM drive |
| Package contents | Webcam, USB cable, installation CD, manual, mounting clip |
| Power supply | Via USB port |
| Special features | 15 special effects, 10 focus functions (CIF 352x288), digital zoom |
| Instant messaging compatibility | Resolutions 352×288, 320×240, 176×144, 160×120 |
| Advanced settings | Brightness, contrast, white balance, automatic illumination |
| Warranty | 2 years |
Frequently Asked Questions - CONTACT DICOTA
User questions about CONTACT DICOTA
0 question about this device. Answer the ones you know or ask your own.
Ask a new question about this device
Download the instructions for your Webcam in PDF format for free! Find your manual CONTACT - DICOTA and take your electronic device back in hand. On this page are published all the documents necessary for the use of your device. CONTACT by DICOTA.
USER MANUAL CONTACT DICOTA
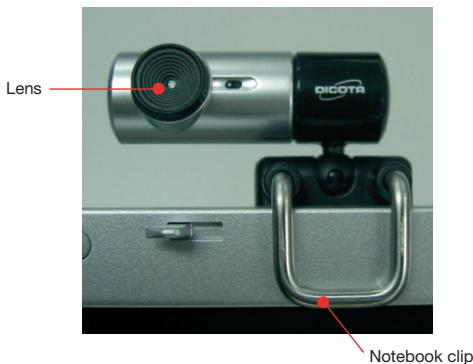
Thank you for purchasing Contact Notebook Webcam from DICOTA.
The following information will guide through the installation and use of Contact.
System requirements
- Minimum Pentium 166 MHz.
- USB port.
- Windows 98/ME/2000/XP/Vista, CD-ROM drive, color monitor, mouse and keyboard. For video conferences, an internet connection must be available.
Scope of supply
- DICOTA Contact (with USB cable)
- Installation CD & User's Guide


Specification
| Image sensor: | 1/4" CMOS, 640×480 pixels |
| Frame rate: | 30 fps@640×480, @600×800, @320×240, @160×120 |
| Lens: | F=2.4, f=4.9 mm |
| View angle: | 54 degree |
| Focus range: | Automatic focus, 30 cm to infinity |
| Exposure control: | Automatic |
| White balance: | Automatic |
| Still image capture res.: | 800×600, 640×480, 352×288, 320×240, 176×144, 160×120 |
| Flicker control: | 50 Hz, 60 Hz and none |
| Computer port: | USB port |

Driver installation
NOTE: Please uninstall all previously installed webcams BEFORE installing DICOTA Contact. DO NOT CONNECT DICOTA Contact TO THE COMPUTER UNTIL ITS DRIVER IS INSTALLED!
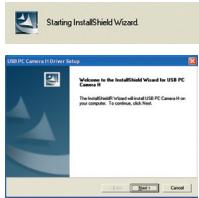
- Insert the included CD into the CD-ROM: The auto-run menu window will pop-up, click "next" to confirm the driver installation.

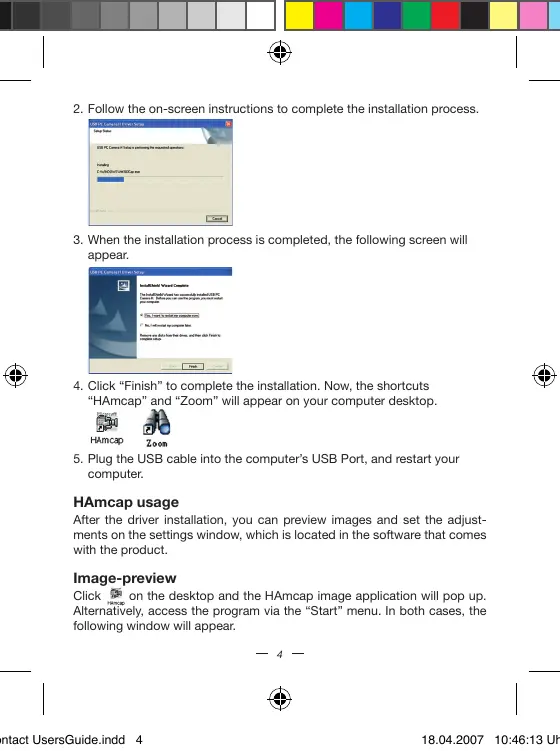
- Follow the on-screen instructions to complete the installation process.
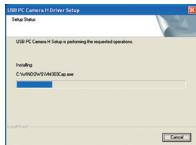
- When the installation process is completed, the following screen will appear.
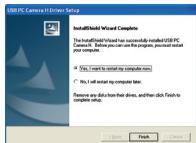
- Click "Finish" to complete the installation. Now, the shortcuts "HAmcap" and "Zoom" will appear on your computer desktop.

HAMcap

Zoom
- Plug the USB cable into the computer's USB Port, and restart your computer.
HAmcap usage
After the driver installation, you can preview images and set the adjustments on the settings window, which is located in the software that comes with the product.
Image-preview
Click on the desktop and the HAmcap image application will pop up. Alternatively, access the program via the "Start" menu. In both cases, the following window will appear.


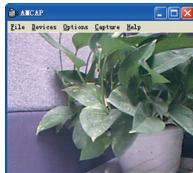
If HAmcap image fails to appear, please select the "Preview" options located in the "Options" menu:
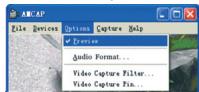
Device description
Go to "Devices" and select "USB PC Camera H".
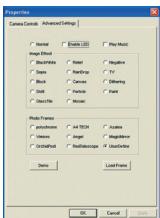
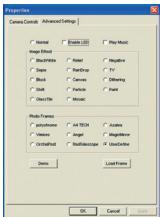
Properties page configuration
Go to "Options", then select "Video Capture Filter".
The Properties configuration page will pop-up as shown below:


Most settings can be adjusted here.
Advanced settings
DICOTA Contact offers special effects for images and special effect for videos. You will find there are 15 special effect settings, and it will allow you to operate easily and edit the images more efficiently.
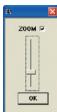
Adjustable focus description
DICOTA Contact can provide 10 different adjustable focus functions under CIF(352x288) resolution, accompanying digital adjustable control pole; Level-sliding zoom image and the special filter make images more clear. See the control page and select the options after adjusted focus ^+ or select digital adjustable focus control pole.
NOTE: It totally supports Instant Messenger software under 352 × 288 , 320 × 240 , 176 × 144 , 160 × 120 etc. resolutions.
Checking the camera connection
- Plug the USB cable into the computer's USB port.
- Restart your computer when installation is completed.
- Double click "My Computer" > Control Panel > System > Device Manager > Imaging Devices; if you see "USB PC Camera H", then your camera is now installed.
For Windows 2000/XP:
Double click "My Computer" icon->Control Panel->System->Hardware->Device Manager->Imaging Device; if you see "USB PC Camera H", then your camera is installed.
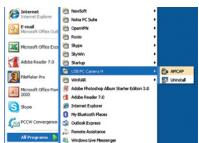
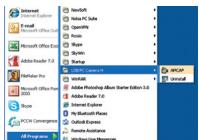
Uninstalling driver
Click "Start" from the task bar and choose "Programs". Select "USB PC Camera H"> "Uninstall" and follow the instructions.


Troubleshooting
Question 1: Computer cannot detect DICOTA Contact
Solution: Check if the computer's operating system, BIOS or USB port are malfunctioning or if errors occurred during the installation.
Steps: Windows 95 does not support USB ports. You have to update your operating system to Windows 98 or above to support USB ports and ensure BIOS setup and USB settings are available. If the problem still occurs, please try connecting DICOTA Contact to your computer via another USB socket.
Question 2: My video image is too dim or too bright
Solution: Adjust the brightness and background contrast.
Steps: As DICOTA Contact can easily be affected by light, we suggest increasing the object brightness or moving the light source.
Question 3: Color is defective
Problem: After installation, you find the image quality not to be as expected. Is the color part defective?
Solution: Adjust the color settings related to video snapping course options or have the color settings related set as "default".
Question 4: Blank screen or black screen
Symptom: During the usage course after the image frame pops up, a blank or black screen will occur.
Method 1: Make sure the driver is properly installed.
Method 2: Ensure the "Preview" under "Option" tab is selected and applied.
Method 3: If your computer's operating system is the first version of Windows® 98, then you need to update it to Windows® SE or higher or download DirectX.0 or a higher version, install it and restart your computer.
Question 5: Blue screen occurs during the course of usage
Method 1: Check if the USB power is constant, as DICOTA Contact is easily affected by power fluctuations. If the USB power wave is too large, then such a problem can occur. You may use another computer to test it.
Method 2: Check if the driver conflicts with other computer hardware devices.


Question 6: Internet video isn't as smooth as expected
This issue is caused by two reasons:
1) The actual internet bandwidth is not enough and you are suggested to modify the conference properties to decrease the video occupying bandwidth or to reduce the number of programs running on your computer.
2) Please check the computer CPU rate and if it is too high then please decrease it by reducing the number of programs running on your computer.
Question 7: Why does the system always ask me to install the driver after I have already done that?
Because you plugged in DICOTA Contact before the driver installation.
Please follow the steps below to repeat the installation.
- Unplug the DICOTA Contact from your computer;
- Uninstall the former HAmcap driver;
- Restart your computer;
- Install the driver;
- Restart your computer;
- Connect DICOTA Contact to your computer and let it search the hardware;
- Restart your computer, and you should find it is ok now!
Disclaimer
Information in this document is subject to change without notice. The manufacturer does not make any representations or warranties (implied or otherwise) regarding the accuracy and completeness of this document and shall in no event be liable for any loss of profit or any commercial damage, including but not limited to special, incidental, consequential, or other damage. No part of this document may be reproduced or transmitted in any form by any means, electronic or mechanical, including photocopying, recording or information recording and retrieval systems without the express written permission of the manufacturer.
Customer Service:
If you encounter any problem with your DICOTA Contact, please contact our local subsidiary, partner or dealer, or send us your inquiry to info@dicota.com.
2 years warranty. Please find the complete text in our guarantee on the internet: www.dicota.com.
All the products and software mentioned above are registered trademarks of their respective owners. Errors and omissions excepted.

N1879


This symbol (crossed out bin wheelie symbol according to WEEE Annex IV) indicates separate collection of waste electrical and electronic equipment in the EU countries. Please do not throw the equipment into the domestic refuse. Please use the return and collection systems available in your country for the disposal of this product.
deutsch
Einführung
Specifications techniques:
KoHpIpyaunCTpaHnucb Properties/cBoiCTBa
BOJINTEB“Options”,N.由b6epnTe“VideoCaptureFilter/ΦuIbTpOuHΦpOBKNu3o6paKhenIPOBNTCSTcPaHmUca KOHΦmpyaunCB0CTB,KAKn3o6paKhenHOHKe:


3Decb MoXHO OTperynipoBaTb 60JIbUHnHCTBO HaCtpoek.
PpOdBnHytBe HaCTpoKn
DICOTA Contact npednaraet cneuunbHie 3e0fkeTbI dIy I3o6paKeHn I n cneunbHie 3e0fkeTbI dIy BNDc. 3decb Bbl HAIETe HACrpoHn 15 cneunbHix 3e0fkeTob, KOtporbIOI NOBONBET Bam 6Ooe 3e0fkeTbHO paoTbTc N3o6paKeHnIMN u peJAKTIPOBAt bX.
Oncanhe peynpmyoKocnpOBKn
DICOTA Contact Moket o6ecneuHb 10 pa3nHbX fpyHKm nperynpyemOfokcHpOBeK b pamK a3pe7aoueI cnooc6oHtCIF (352×288), conpoBoxdAooxN drrntabHy perynypEmNoIoc ynpaBHeN. N3meHene Macst4aba 3o6paeKeHH co CkObl3aum yopBHeM n cceuaHbI

CMMTOM:B xode nIcNb3OaBnHn oNce NoBnBHeHn KaPa I3O6pBeHnA, NOBnBaTec TcyToN IInu ChePbN 3kApA.
Metod 1: PpOBepbTe, npabnIbHo IINHcTaJIIpOBAH dpaiBep.
Bonpoc 6: Bndeo B INHTepHe He TaKoe rnaikoe, KaK Okndaioocb
Takoe MoXeT npOn3OHTn NO DBYM npUHAm:
1)ФakTneckaI shPnHa nOncbI hHTepHeta HeOpctatoHa N Bam npednaraeCT MoDnΦmOBpBAT CBOiCTBa KOHpeRcHnI DnI yEmhBSeHnA 3AHmApMaOH shPnHb I NOncbI BnDE O INI KCOpaTbKoINHECTBO nORpAmM,PAobTaOuHN HkOMNbKtePe.
2)Iooanayncta,npoeBpTe cKOpOCTbJeHTpanbHOro npouecoppa,n eCIN OHa CmNtKOM BbCOKA, cOKaTne ee, yMeHbUINB KOnlueCTBO nporpAMM,pAO7OtaoXH Na KCMIOtepe.
BONPC:7OChyE CCHTEMCA BCE BPEM IPOCINT MNEH INHTANIPOBATb DApBepBOncoT NOrO, KAK yke dEnanl 3To?
TOMOTYTOBbIPOKINHINDICOTAContactnepeIHCTANJIENeIaIPBepa.1OxayuCTBa,ByIOnNHITe,JeCTBnE,pepeHCNEHbE HNKeJIOIPOTEHPNHEHTAJIUNyI.
- OToeHInTe DICOTA Contact or BaWero KOMnBIOTepa
- OTmeHnTe HnctaJIpyIIO npdeIduyIero dpaIbepa HAmcap
3.Перетаузпту сбов комьютep
4.Инсталларупдраьер - Ipe3arpy3nte cBoi KOMnIbHOTep
6.ПсИСЕДИНITE DICOTA Contact K Comпьотеру И поЗвлты EMY Найниannapathoe - Ipeze3arpz3nte CBoi KOMnIbIOpTe yBvIaIte, UTo Tenepb BCE B nopAikke!
CcbiJka
HnΦOPMAUINB 3TOM DOKYMHTeMOYr BtB NcPABNeHb63 npdynpexdHn. POn13BOIeINb HeBbcklaN HnKaKmX pTepeH3n a Hn rapaHTC B3rrJDMHO TaTOHOCTb KOMPNkEHTOCH2 TTORO DOKMENTHa, Hne HeceT OTBeTcBHeHcOIN3a KaKyIO JIn6o NToepIO pN6bln INnn MaTepeAHNbYuEp6 (CneuaMaHbYuEp6, CnyuBnH, HenpMaOH, n.T. d.) Hn Onda Chactb ETO DOKUMNTHa HEMOKeT b6yKoNipOBaHa, nepeCbIHa, NepeDaHa, HN B KAKoFOpMe NHKAKIMn CpeDCTBaMn (B eNEKTPoHOMB BdE nIe MEXAHueck), BKIINaHae KONIPOBaHne, ZaIinCbBaHne, NIn6o nepENICbBAHHe MHOpMAUINB NbIKcKBaHMe B INhΦOpMAUHOHHbX CNTEmax, 6e3 npMRTO NcMbMeHHOrO corlAACn.
KIneHTckn cepBnc:
Ecnj 6bdeTmeMb tKaKHe npOsbNMe b c npOkytOM Contact, KOnhakTIpye hac noxaycta h: dicota@dicota.cz uHn Hc stpaIauX www.dicota.com.
Garapthnia 2 roda. Bolee noopobna HnΦoPmaia nHa nHTepnet cTpaHuaX: www.dicota.com.
Bce pOykmu oCfoMepeyI ykaaHbne bIe IaeIraIeMaIc3apeIeumpuo aenHOHmKapou coomemcmeUooXoc6MeHNIOke.

N1879


This symbol (crossed out bin wheelie symbol according to WEEE Annex IV) indicates separate collection of waste electrical and electronic equipment in the EU countries. Please do not throw the equipment into the domestic refuse. Please use the return and collection systems available in your country for the disposal of this product.
hungarian
Bevezető
NOTE: It totally supports Instant Messenger software under 352 × 288 , 320 × 240 , 176 × 144 , 160 × 120 etc. resolutions.
Double click "My Computer" icon->Control Panel->System->Hardware->Device Manager->Imaging Device; if you see "USB PC Camera H", then your camera is installed.
A meghajto eltavolitasa
Kattintzon as azstal "Start" gombjara, majd valassza a "Programok"-at. Valassza az kovetkez' gombokat:"USB PC Camera H"> "Uninstall" es kovesse a tovabbi instrukciokat.