
FLEXSCAN HD2441W - Monitor EIZO - Free user manual and instructions
Find the device manual for free FLEXSCAN HD2441W EIZO in PDF.

| Product type | Color LCD monitor |
| Brand | EIZO |
| Model | FLEXSCAN HD2441W |
| Screen size | 24 inches (diagonal) |
| Native resolution | 1920 × 1200 (WUXGA) |
| Connectors | DVI-D (PC1), D-Sub 15-pin (PC2), HDMI ×2 (VIDEO1/VIDEO2) |
| USB ports | 2 upstream ports, 2 downstream ports (USB 2.0) |
| Built-in speakers | Yes (with amplifier, stereo mini-jack audio output) |
| Adjustable stand | ArcSwing 2: height and tilt adjustment |
| Brightness sensor | Yes (BrightRegulator, adjusts brightness according to ambient light) |
| PiP function | Image overlay (Picture in Picture) via the INPUT button |
| Color modes | Text, Image, Movie, Custom, sRGB (PC); Standard, Light, Dynamic, Custom (VIDEO) |
| Compatible video formats (HDMI) | 480i/p, 576i/p, 720p, 1080i/p (50/60 Hz) |
| Power saving functions | Standby mode (orange indicator) |
| Security | Kensington lock slot |
| Supplied accessories | Power cable, DVI-D cable (FD-C39), CD-ROM (manual + software), M4 mounting screws |
| Power requirement | 100-120 / 200-240 V AC, 50/60 Hz |
| Care and cleaning | Disconnect before cleaning; use a soft, dry cloth; avoid solvents |
| Included software | ScreenManager Pro for LCD (Windows), screen adjustment, ICC profiles |
| Compatible USB operating systems | Windows 2000/XP/Vista, Mac OS 8.5.1 or later |
Frequently Asked Questions - FLEXSCAN HD2441W EIZO
User questions about FLEXSCAN HD2441W EIZO
0 question about this device. Answer the ones you know or ask your own.
Ask a new question about this device
Download the instructions for your Monitor in PDF format for free! Find your manual FLEXSCAN HD2441W - EIZO and take your electronic device back in hand. On this page are published all the documents necessary for the use of your device. FLEXSCAN HD2441W by EIZO.
USER MANUAL FLEXSCAN HD2441W EIZO
Important: Please read this Setup Manual and the User's Manual stored on the CD-ROM carefully to familiarize yourself with safe and effective usage. Please retain this manual for future reference.
Installationshandbuch
Important: Please read this Setup Manual and the User's Manual stored on the CD-ROM carefully to familiarize yourself with safe and effective usage. Please retain this manual for future reference.
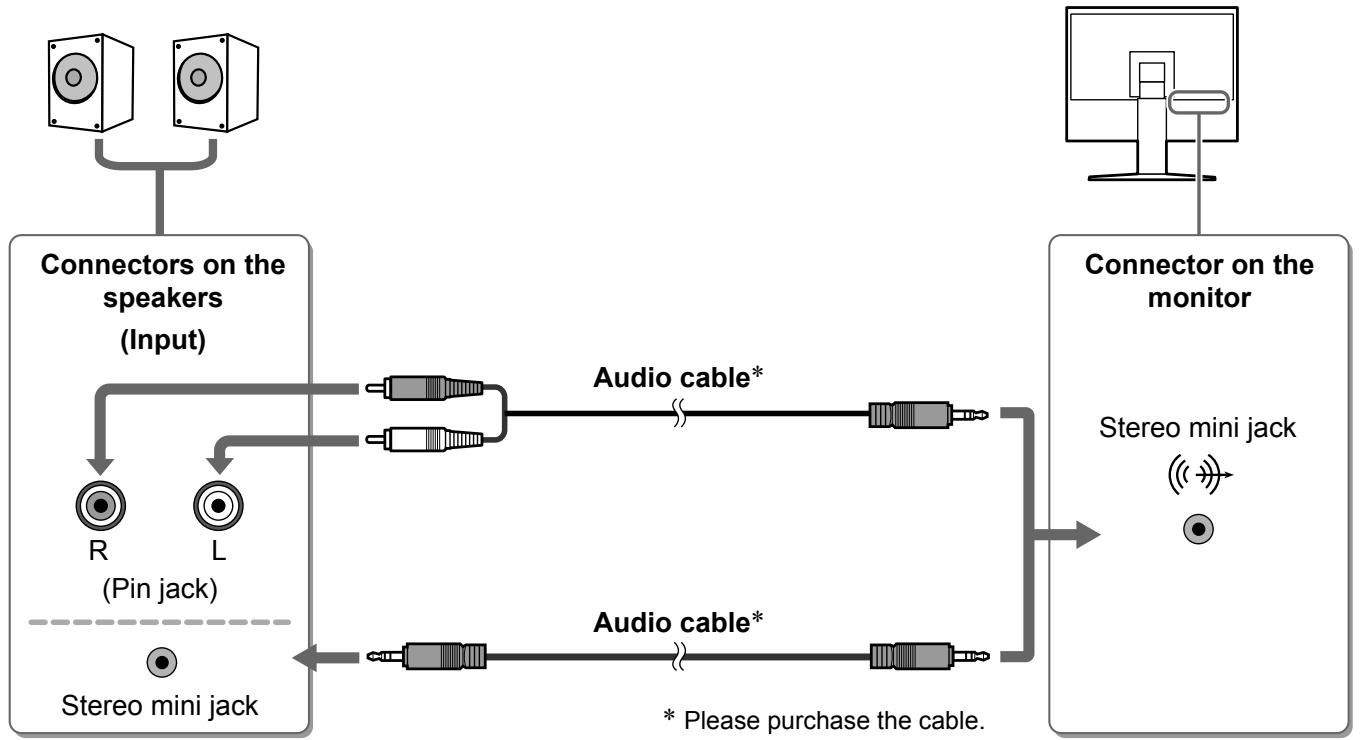
HD2441W can be connected to the following devices.
Speakers
(with built-in amplifier)
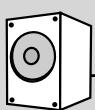
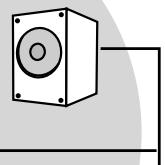
Allows you to enjoy sound from a connected PC or AV equipment, etc.
- Connection methods......page 10
NOTE
- Enables you to adjust the speaker volume connected to the monitor using the volume adjustment function of the monitor. . page 13
- Enables you to enjoy sound by connecting a headphone to the headphone jack.... page 10
USB devices
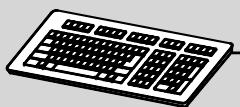
Keyboard
Mouse
- Connection methods ..... page 9 (Also available to connect a printer or a scanner, etc.)
Attention
- Use a PC/OS applicable to USB devices. [Applicable OS]
-Windows2000/XP/Vista - Mac OS 8.5.1 or later
HD2441W

PC
Enables you to use as a monitor by connecting to a Windows PC or a Macintosh.
Applicable resolution page 3
- Connection methods......page 8
Attention
- The USB setting is required to change depending on a PC used. .....page 13
AV equipment

HDMI connector
DVD player, etc.
Game, etc.
Enables you to display projected images by connecting a DVD, Video, game, etc.
Applicable signal format.. page 3
- Connection methods ..... page 10
Compatible Resolutions/Signal Format
The monitor supports the following resolutions and signal format.
PC Input
| Resolution | Frequency | Remarks | Digital Input Signal | Analog Input Signal |
| Dot Clock (~162 MHz) | Dot Clock (~162 MHz) | |||
| 640 × 400 | 70 Hz | NEC PC-9821 | — | ✓ |
| 640 × 480 | 67 Hz | Apple Macintosh | — | ✓ |
| 640 × 480 | ~75 Hz | VGA, VESA | ✓ (60Hz) | ✓ |
| 720 × 400 | 70 Hz | VGA TEXT | ✓ | ✓ |
| 720 × 480 | 60 Hz | VESA | ✓ | ✓ |
| 848 × 480 | 60 Hz | VESA | ✓ | ✓ |
| 800 × 600 | ~75 Hz | VESA | ✓ (60Hz) | ✓ |
| 832 × 624 | 75 Hz | Apple Macintosh | — | ✓ |
| 1024 × 768 | ~75 Hz | VESA | ✓ (60Hz) | ✓ |
| 1152 × 864 | 75 Hz | VESA | — | ✓ |
| 1152 × 870 | 75 Hz | Apple Macintosh | — | ✓ |
| 1280 × 768 *1 | 60 Hz | VESA CVT RB | — | ✓ |
| 1280 × 768 *1 | ~75 Hz | VESA CVT | — | ✓ |
| 1280 × 960 | 60 Hz | VESA | ✓ | ✓ |
| 1280 × 960 | 75 Hz | Apple Macintosh | — | ✓ |
| 1280 × 1024 | ~75 Hz | VESA | ✓ (60Hz) | ✓ |
| 1360 × 768 | 60 Hz | VESA | — | ✓ |
| 1600 × 1200 | 60 Hz | VESA | ✓ | ✓ |
| 1680 × 1050 *1 | 60 Hz | VESA CVT | ✓ | ✓ |
| 1680 × 1050 *1 | 60 Hz | VESA CVT RB | ✓ | ✓ |
| 1920 × 1200 *1 *2 | 60 Hz | VESA CVT RB | ✓ | ✓ |
| 1280 × 720p *3 | 50, 60 Hz | 720p | ✓ | ✓ |
| 1920 × 1080p *3 | 50, 60 Hz | 1080p | ✓ | ✓ |
1 When displaying the wide format input signal, a graphics board in conformance with VESA CVT standard is required.
2 Recommended resolution (Set this resolution.)
*3 Resolution for some AV equipment
HDMI Input
Video signal
-
525i (480i) / 525p (480p) / 1125i (1080i) / 750p (720p) / 1125p (1080p) : 60Hz
-
625i (576i) / 625p (576p) / 1125i (1080i) / 750p (720p) / 1125p (1080p) : 50Hz
Audio signal
2ch linear PCM (32kHz / 44.1kHz / 48kHz / 88.2kHz / 96kHz / 176.4kHz / 192kHz)
SAFETY SYMBOLS
This manual uses the safety symbols below. They denote critical information. Please read them carefully.
| WARNING Failure to abide by the information in a WARNING may result in serious injury and can be life threatening. | CAUTION Failure to abide by the information in a CAUTION may result in moderate injury and/or property or product damage. | |
| Indicates a prohibited action. | ||
| Indicates a mandatory action that must be followed. | ||
PRECAUTIONS

WARNING
If the unit begins to emit smoke, smells like something is burning, or makes strange noises, disconnect all power connections immediately and contact your dealer for advice.
Attempting to use a malfunctioning unit may result in fire, electric shock, or equipment damage.

Keep small objects or liquids away from the unit.
Small objects accidentally falling through the ventilation slots into the cabinet or spillage into the cabinet may result in fire, electric shock, or equipment damage. If an object or liquid falls/spills into the cabinet, unplug the unit immediately. Have the unit checked by a qualified service engineer before using it again.
Use the enclosed power cord and connect to the standard power outlet of your country.
Be sure to remain within the rated voltage of the power cord. Not doing so may result in fire or electric shock.
"Power Supply: 100-120/200-240 Vac 50 / 60Hz "

Set the unit in an appropriate location.
Not doing so may result in fire, electric shock, or equipment damage.
- Do not place outdoors.
- Do not place in the transportation system (ship, aircraft, trains, automobiles, etc.).
- Do not place in a dusty or humid environment.
- Do not place in a location where the steam comes directly on the screen.
- Do not place near heat generating devices or a humidifier.

The equipment must be connected to a grounded main outlet.
Not doing so may result in fire or electric shock.

CAUTION

Do not block the ventilation slots on the cabinet.
- Do not place any objects on the ventilation slots.
- Do not install the unit in a closed space.
- Do not use the unit laid down or upside down. Blocking the ventilation slots prevents proper airflow and may result in fire, electric shock, or equipment damage.

Use an easily accessible power outlet.
This will ensure that you can disconnect the power quickly in case of a problem.
Package Contents
Check that all the following items are included in the packaging box. If any items are missing or damaged, contact your local dealer.
NOTE
- Please keep the packaging box and materials for future movement or transport of the monitor.
Monitor
Power cord

Digital signal cable (FD-C39)

Analog signal cable (MD-C87)

EIZO HDMI cable (00M0J261/00M0J262)

EIZO USB cable (MD-C93)

EIZO LCD Utility Disk (CD-ROM)
- User's Manual
Setup Manual (this manual)
□ Limited warranty
Recycling Information
Mounting Screws (M4 x 12, 4 pcs)
About Setup Manual and User's Manual
| Setup Manual (this manual) | Describes basic information ranging from connection of the monitor to external equipment, such as a PC, etc., to using the monitor. |
| User's Manual (•PDF file on the CD-ROM*) | Describes application information such as screen adjustments, settings, and specifications. |
- Installation of Adobe Reader is required.
- Product specifications vary with sales areas. Confirm that the manual is written in the language of the area of purchase.
About EIZO LCD Utility Disk (CD-ROM)
- Disk Contents
- Disk contents and software overview
The following is included in the disk. Refer to the "Readme.txt" or the "Readme" file on the disk for software startup procedures or file access procedures.
| Item | Overview | For Windows | For Macintosh |
| A “Readme.txt” or “Readme” file | ✓ | ✓ | |
| Color Profiles (ICC Profiles) | Color profiles | ✓ | ✓ |
| Screen Adjustment Program | Available for easy adjustments of the monitor screen by following adjustment patterns and procedures on the screen. | ✓ | ✓ |
| ScreenManager Pro for LCD (for Windows) | A utility software program to control monitor adjustments from a PC using its mouse and keyboard. | ||
| WindowMovie Checker Software* | WindowMovie is a function of ScreenManager Pro for LCD. For more information, refer to the User’s Manual of ScreenManager Pro for LCD on the disk. | ✓ | - |
| User's Manual of this monitor (PDF file) | |||
- WindowMovie Checker Software is not applicable to Windows Vista.
- To use ScreenManager Pro for LCD
For the installation and use of ScreenManager Pro for LCD, refer to its User's Manual on the disk.
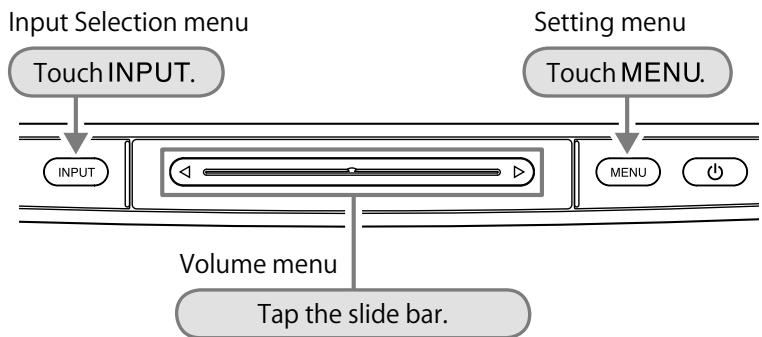
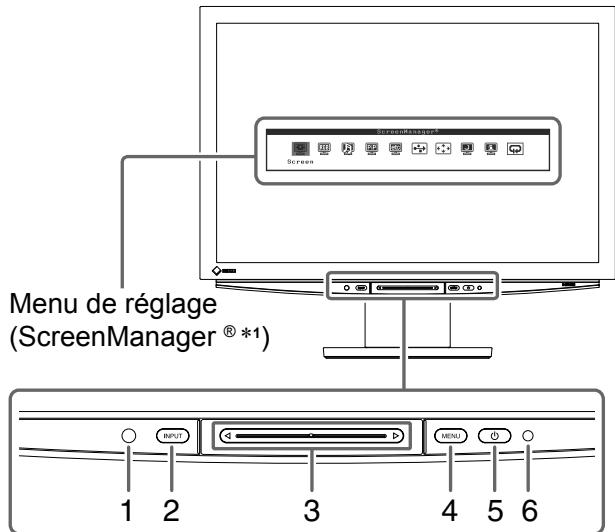
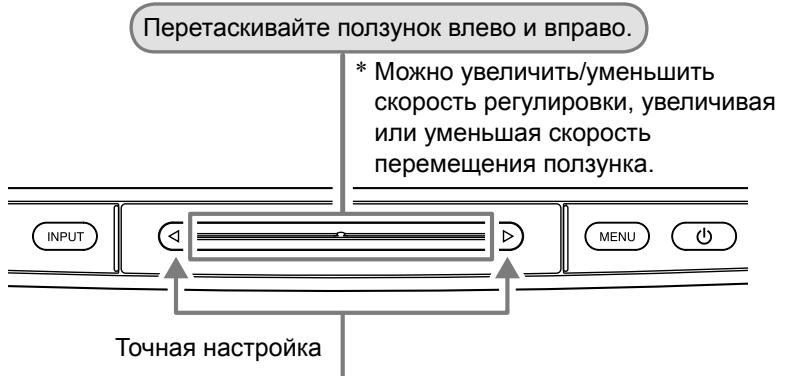
Controls and Functions
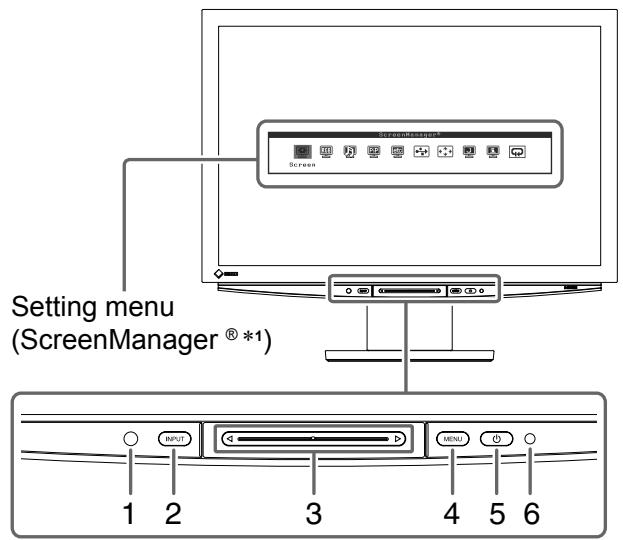
| 1 | Sensor | Detects the environmental brightness. BrightRegulator function (see page 15). |
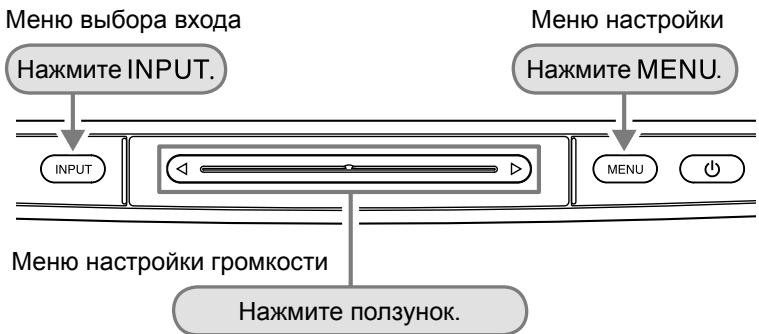
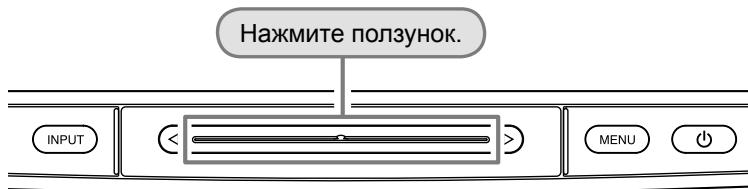
| 2 | Input Signal Selection Switch (INPUT) *2 | • Displays/Quits the Input Selection menu. • When touching for approx. 2 sec. while using the PC input signal, a video display appears on the monitor. PinP (Picture in Picture) function. |
| 3 | Slide bar *2 | • Uses when the setting/adjustment is performed on each menu. • When touched it while the menu is not displayed, the Volume menu appears. |
| 4 | Menu switch (MENU) *2 | Displays/Quits the Setting menu. |
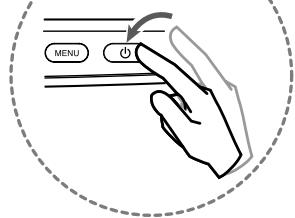
| 5 | Power switch (▲) | Turns the power on or off. |
| 6 | Power indicator | Indicates monitor's operation status. Blue : The screen is displayed Orange : Power saving Off : Power off |
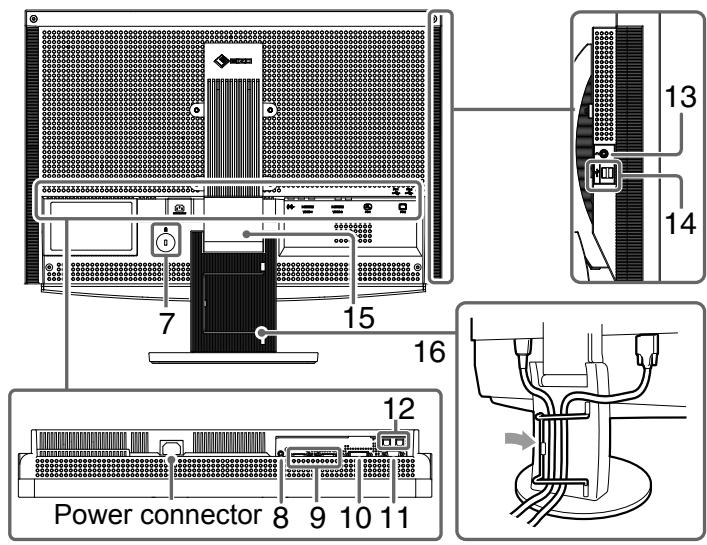
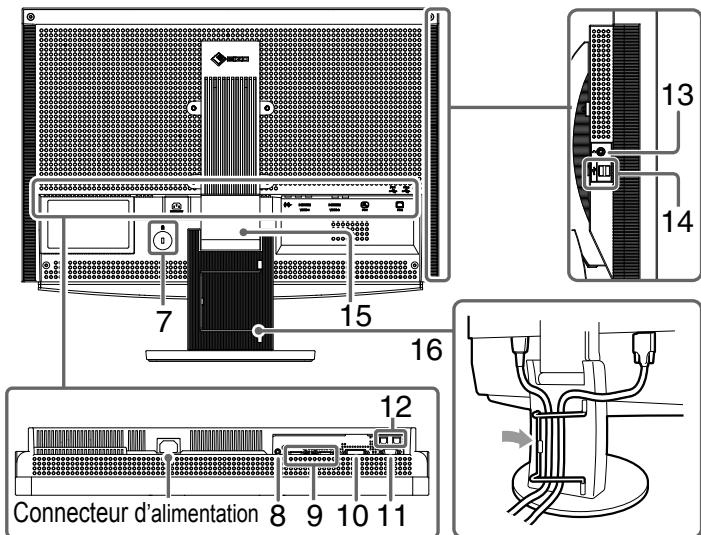
| 7 | Security lock slot | Complies with Kensington's MicroSaver security system. |
| 8 | Audio output terminal | [Stereo mini jack] Connects the built-in amplifier speakers, etc. |
| 9 | Input signal connectors (VIDEO 1/2) | [HDMI connector × 2] Connects AV equipment. |
| 10 | Input signal connector (PC 1) | [DVI-D connector] Connects a PC. |
| 11 | Input signal connector (PC 2) | [D-Sub mini 15-pin connector] Connects a PC. |
| 12 | USB ports (Up) | [Upstream × 2] Connects a PC. |
| 13 | Headphone jack | [Stereo mini jack] Connects headphones. |
| 14 | USB ports (Down) | [Downstream × 2] Connects a peripheral USB device. |
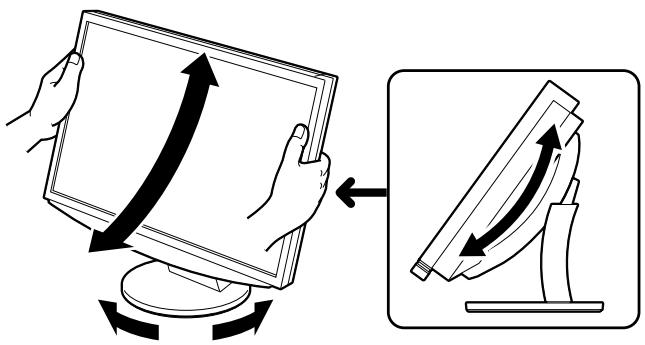
| 15 | ArcSwing 2 Stand | Used to adjust the height and angle of the monitor screen. |
| 16 | Cable holder | Covers the monitor cables. |
1 ScreenManager® is an EIZO's nickname of the Setting menu.
(In this manual, the setting/adjustment item names in the Setting menu are put in angle brackets < . (ex. :
Using the Operation Switch
Operation panel
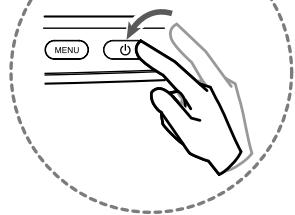
Turning the power On/Off
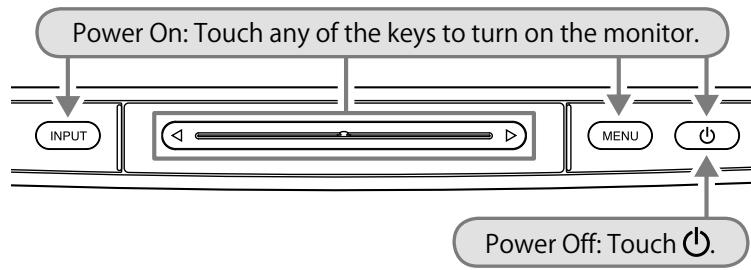
Displaying/Quitting a menu
(When the menu is not displayed on the screen)
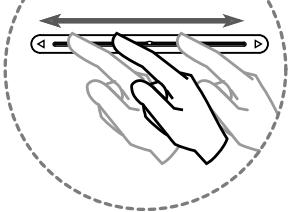
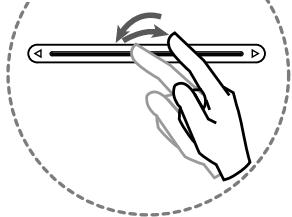
There are three methods of operation:
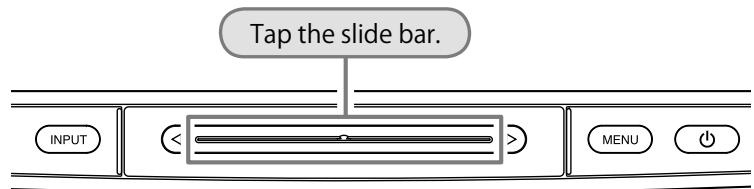
- Touching the switch
- Tapping the slide bar
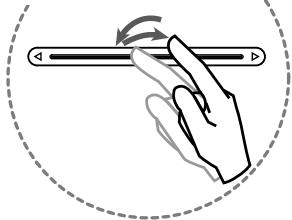
- Tracing the slide bar
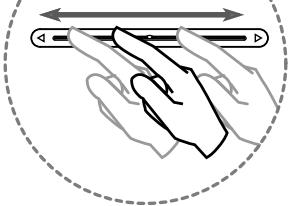
Selecting a menu item Setting and Adjusting
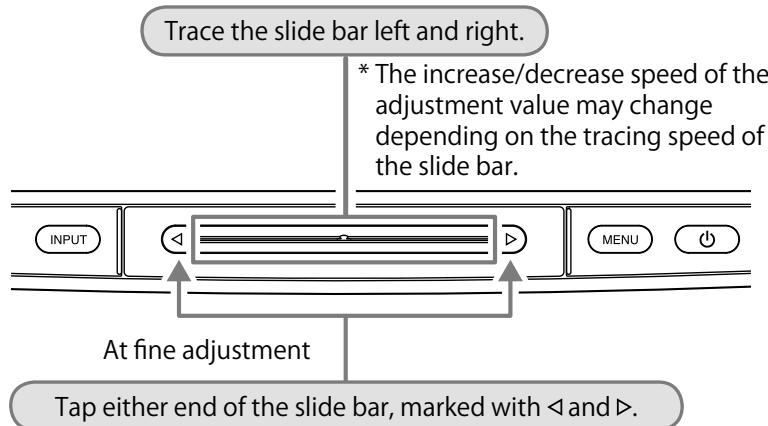
* Tapping once changes the adjustment value to one step up or down. Touching the slide bar continuously may change the value serially.
Fixing an item Deciding the setting and adjusting value
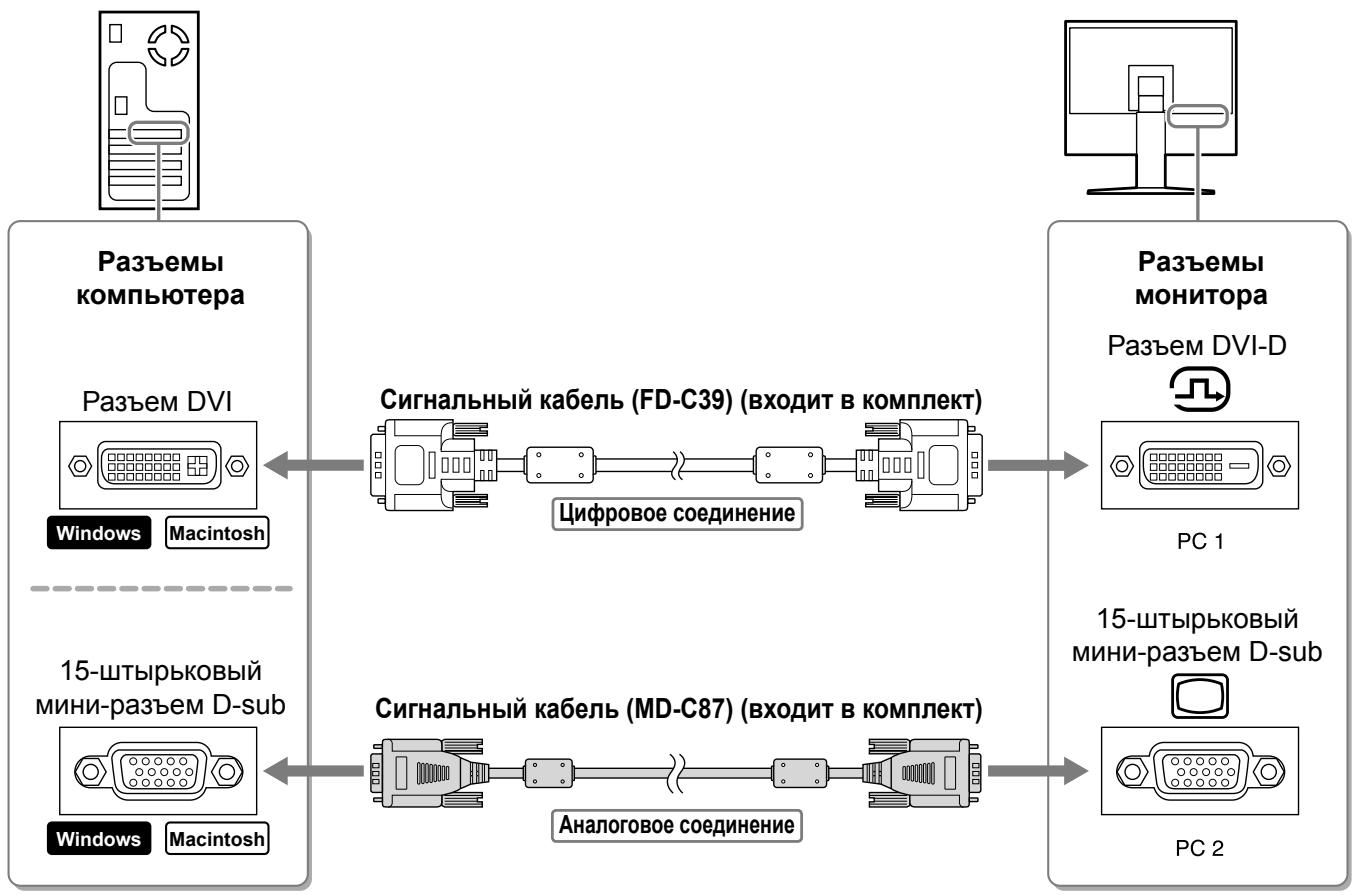
Connecting Cables
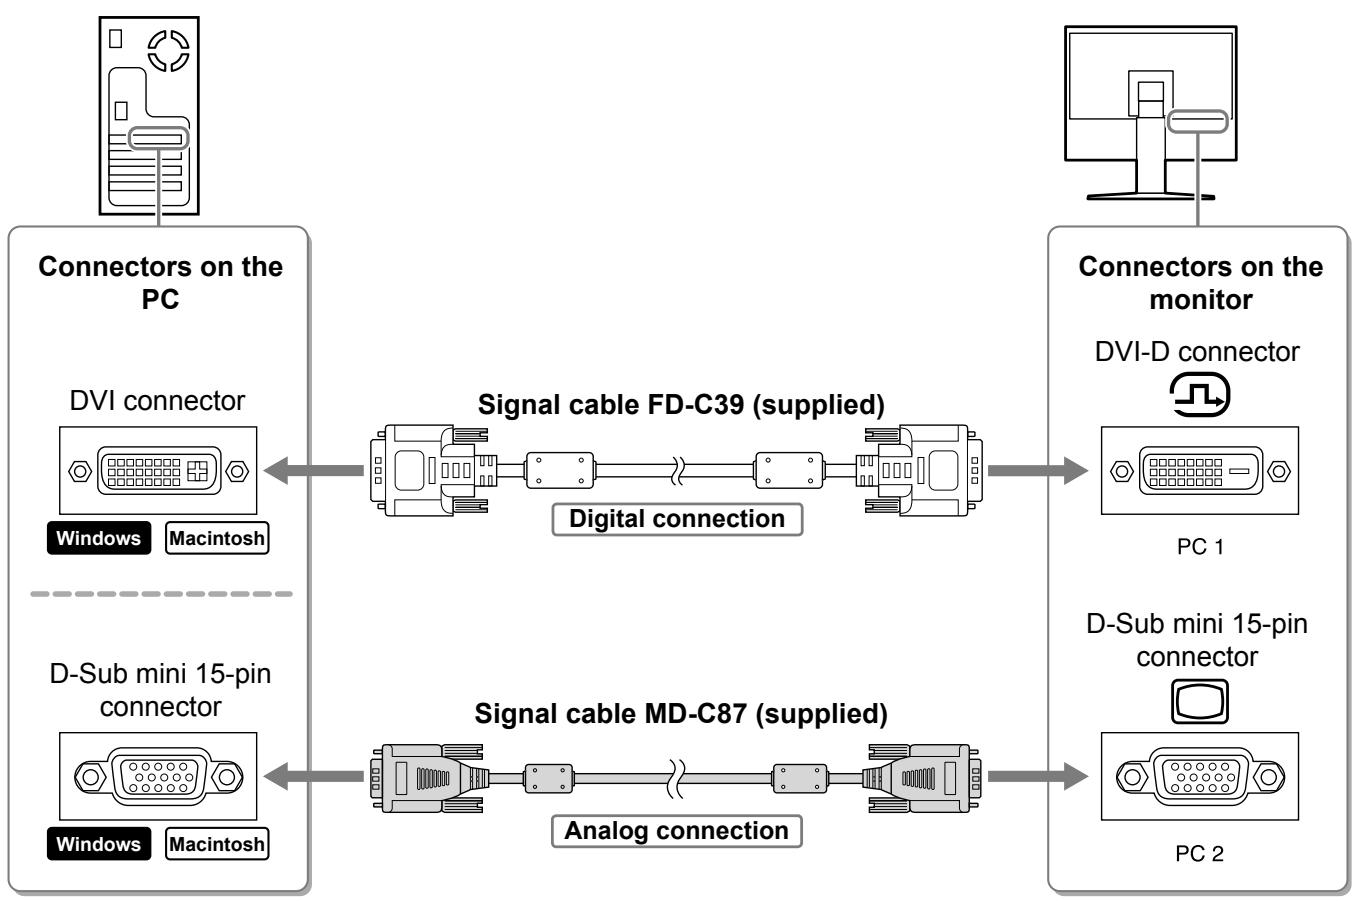
1 Check that the monitor is powered off.
2 Connect a PC.
Attention
-
When replacing the current monitor with an HD2441W monitor, be sure to change the PC settings for resolution and vertical frequency to those which are available for the HD2441W monitor referring to the resolution table (see page 3) before connecting the PC.
-
Check that the PC is powered off.
- Connect the monitor to the PC with a signal cable that matches the connectors.
After connecting the cable connectors, tighten the screws of the connectors to secure the coupling.
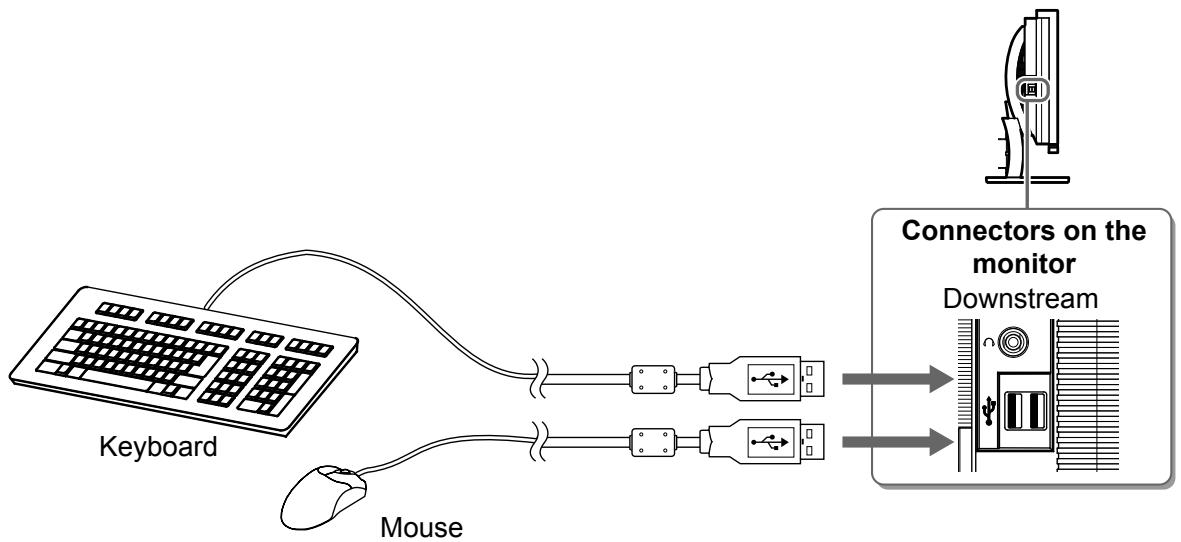
3. Connect the USB cable to the USB ports on the PC (downstream) and the monitor (upstream).
Be sure to connect to the USB port (upstream) that complies to the PC (PC 1/PC 2).
- DVI-D connector (PC 1): PC 1 USB port is used.
D-Sub mini 15-pin connector (PC 2): PC 2 USB port is used.

Attention
- When connecting the monitor to a PC using a USB cable, the USB setting on the monitor should be changed corresponding to the PC used (see page 13).
NOTE
- The monitor is equipped with the USB audio function. You may enjoy sound from PC with speakers by connecting the USB cables.
3 Connects USB devices.
- Connect USB devices (keyboard, mouse, etc.) to the USB port (downstream) on the monitor.
Attention
- After connecting the USB devices and turning on the monitor, the USB function is set up automatically.
- This monitor may not work properly depending on the PC, OS or USB devices used. (For USB compliance of the respective devices, consult their manufacturers.)
4 Connect AV equipment.
- Check that the AV equipment is powered off.
- Connect the monitor to the AV equipment with a HDMI signal cable.

5 Connect speakers.
- Connect the monitor to the speaker with an audio cable that matches the connectors.
NOTE
- When using headphones, connect the headphones to the headphone jack on the monitor.
6 Plug the power cord of the monitor into a power outlet.
- Plug the power cord into a power outlet and the Power connector on the monitor.
Adjusting the Screen Height and Angle
Adjust the screen height, tilt and swivel the screen to the best condition for working.
Displaying the Screen
1 Touch to turn on the monitor.
The monitor's Power indicator lights up blue.
2 Turn on the external equipment.
3 Switch the input signal to display the desired image sent from the equipment.
- Touch INPUT.
The Input Selection menu appears.
- Trace the slide bar left and right to select the input signal and tap the slide bar.
The screen image appears.

Input Selection menu
4 After the image appears on the screen, perform the following operations according to the monitor status.
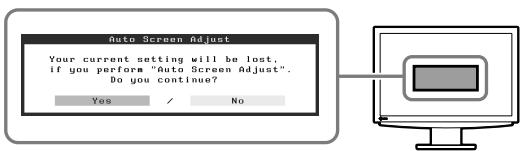
■ When receiving an analog signal from the PC (at PC 2 input selection) [Auto Screen/Range Adjust]
Perform the auto adjustment function. The screen (clock, phase, position) and the signal output range are adjusted automatically.
The auto adjustment function is not required when digital signals are input (at PC 1 input selection) because images are displayed correctly based on the preset data of the monitor.
- Touch MENU.
The Setting menu appears.
- Select the
icon and tap the slide bar.
The
- Select the
icon and tap the slide bar.
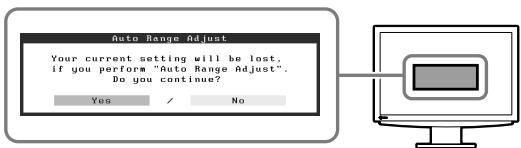
A message window appears.
- Select "Yes" and tap the slide bar.
The Auto Screen Adjust function is activated and clock, phase and screen position are adjusted automatically.
- Select the
icon and tap the slide bar.
A message window appears.
- Select "Yes" and tap the slide bar.
The Auto Range Adjust function is activated and the signal output range is adjusted automatically.
- Touch MENU.
The Setting menu quits.

Screen menu
Attention
- The Auto Screen Adjust function works correctly when an image is fully displayed over the display area of the monitor. It does not work properly when an image is displayed only on a part of the screen (DOS prompt window, for example) or when a black background (wallpaper, etc.) is in use.
The Auto Screen Adjust function may not work properly with some graphics boards.
■ When connecting a PC with USB connection [USB]
Switch the USB setting of the monitor to either "PC 1" or "PC 2", according to the PC used.
If it is not set properly, the USB devices connected to the monitor may not work or no sound may come out from the speakers.
Attention
- When switching the USB setting, a message window may appear.
Message:
"If the USB setting is changed, the USB connection to the selected PC will be lost. Do you change the setting?"
When the message is displayed, note the following.
- When connecting a memory device such as a USB memory to the monitor, do not change the setting. The data may be lost and damaged. Be sure to change the USB setting after removing the memory device.
-
When an application such as a sound playback, etc. works, do not change the setting. The sound may not output when the setting is returned to the original. Be sure to change the USB setting after exiting from the application.
-
Touch MENU.
The Setting menu appears.
- Select the
icon and tap the slide bar.
The
- Trace the slide bar left and right to select the setting.
- After the setting is completed, tap the slide bar.
The USB setting is completed.
- Touch MENU.
The Setting menu quits.

USB menu
Sound volume is too high/too low [Volume]
Adjust the volume.
- Tap the slide bar.
The Volume menu appears.
- Trace the slide bar left and right to adjust the volume.
Tracing the slide bar to the left makes the sound volume low and right makes it high.

Volume menu
Attention
- Turn off the monitor if you do not use the monitor for a long time. Unplugging the power cord completely shuts off power supply to the monitor.
Selecting Display Mode
Switching the color mode allows you to set the appropriate display mode easily.
Color Mode
(For PC input signal)
| Text | Suitable for displaying text for word processing or spreadsheets. |
| Picture | Suitable for displaying images such as photos or picture images. |
| Movie | Suitable for playing back animated images. |
| Custom (PCx*) | Available for making desired settings. |
| sRGB | Suitable for color matching with sRGB compatible peripherals. |
(ForVIDEO input signal)
| Standard | Standard video display. |
| Soft | Suitable for cinema effect, etc. |
| Dynamic | Suitable for a clearly outlined image. |
| Custom (VIDEOx*) | Available for making desired settings. |
- The input selected at that time is displayed.
1 Touch MENU.
The Setting menu appears.
2 Select the
The
3 Select the
The
4 Trace the slide bar left and right to select the mode.
5 Tap the slide bar at the desired color mode.
The selected mode is set.
6 Touch MENU.
The Setting menu quits.


Color Mode menu
Adjusting Brightness
BrightRegulator
The screen brightness is automatically adjusted corresponding to both the brightness of the image and the environmental brightness detected by the sensor at the lower side of the monitor.
Manual Setting
1 Touch MENU.
The Setting menu appears.
2 Select the
The
3 Select the
The
4 Trace the slide bar left and right to adjust the brightness.
Tracing the slide bar to the left makes the brightness dark and right does it bright.
5 Tap the slide bar at the desired brightness.
The specified brightness is saved.
6 Touch MENU.
The Setting menu quits.
Attention
- Do not cover the sensor.


Brightness menu
The basic settings and adjustments are completed. For advanced settings/adjustments, refer to the User's Manual on the CD-ROM.
No-Picture Problem
If no picture is displayed on the monitor even after the following remedial action is taken, contact your local dealer.
1. Check the Power indicator.
| Symptom | Status | Possible cause and remedy |
| No picture | Power indicator does not light up. | Check whether the power cord is correctly connected. Touch Ⓞ. |
| Power indicator lights orange. | Switch the input signal with INPUT. | |
| (When PC signal is input,) Press a key on the keyboard or click the mouse. | ||
| Turn on the PC. | ||
| (When VIDEO signal is input,) Turn on the AV equipment. | ||
| Power indicator lights blue. | Check whether the external equipment is properly connected to the monitor. | |
| (When PC signal is input,) Check the gain* setting. | ||
| (When VIDEO signal is input,) Check the field rate* setting. |
- For details of the gain adjustment and field rate setting, please refer to the User's Manual on the CD-ROM.
2. Check the error message that remains on the screen.
These messages appear when the input signal is incorrect even if the monitor is functioning.
| Symptom | Status | Possible cause and remedy |
| PC 1 Signal Error fD:162.0MHz fH:75.0kHz fU:60.0 Hz | The frequency of the signal sent from the PC is outside the specification. (Such signal frequency is displayed in red.) | Change the mode appropriately using the graphics board's utility software. Refer to the manual of the graphics board for details. |
| VIDEO 1 Signal Error | The frequency of the signal sent from the AV equipment is outside the specification. | (When VIDEO signal is input,) Confirm the digital signal format by referring to the manual of the equipment connected. |
FlexScan HD2441W
LCD-Farbmonitor
Installationshandbuch
Wichtig:
Cable de signal analogue (MD-C87)

Cable Eizo HDMI (00M0J261/00M0J262)

Cable EIZO USB (MD-C93)

Controls and Functions
Xpńoŋ tou ScreenManager Pro for LCD
TtynvEykaTaosnKai Tn xhnoTou ScreenManager Pro for LCD,avatpεxiεo tOeYxepiox npotn sto dioko.
"If the USB setting is changed, the USB connection to the selected PC will be lost. Do you change the setting?"
Otau eepaviciotu mnuua, oneiuote taakolouha.
- Otav ouvééte μia oukeun μvnμns, oπως μia μvnμn USB, σε μia oθóνη, μnv aλλαετe tη ρuθμiση. Evéxétaiv xaθouv n va kataoatpapouv ta δεδομéva. Mny aλλαετe tη ρuθμiση USB πριν αφaipéσεte tη oukeun μvnμns.
-
Otav mia eapauoyn oTWC n.x. eapauyn avanapaywyns hou kAaIaCETe Tn puOuian. Evexetai va mnu npayetai nxos, otav eTavaqepTe Tnv apxikn puOuion. Bebaiowte OaAaZcTe Tn puOuon USB apoou kAeioe Tnv eapauyn.
-
AyyiE to MENU.
Euavizeta to evou puthetaionc.
Euavicetai to evou Evtaoons.
MEPbI INPEIOCTOPOXHOCTN

PPEyPPEKDEHNE
Pn NOBHeHn DbIma, NcXoJaIeRo n3 yCTpoiCTBa, 3anaxa rapn nn Heo6bIyHbIX 3ByKOB HemeJeHNO oEtoCyte YcTPOiCTBO n 06paTntecb K npOdaBu 3a NOMOuHIO.
Пиьтka 3ксллуацин HeHcnpaBHOуycTpOHTBA MOKeT IIpNBeCTN K IIOKApY, IIopaKeHHO 3JIeKtpnueckm TOKOM HJIN IIOBpeKdEHHO 6ObopyDObAHII.
IcnoIb3yIte BXOJaIeN B KOMnJIeK T Hyp nTahN, NOkJIIOHaeMbI K CTaHdApTHoI dJa BaWe cTpaHbI WTeNCJIbHO p03eTke.
Y6eIHTecB C06JIIODeHNN IpeJeJIOB HOMHHaJIbHOHO HAIIpyKeHHa KOTOpoe paccHTaH IIHYP IITaHHa. HeBbIIOJIHeHne 3TOTO Tpe6OBaHHa MoKet IprNBeCTn K IIOkApy HIN IOPaKeHHIO 3JIeKTPnuYeCKHM TOKOM.
"HcToUHnK nITaHnI: 100-120/200-240 B 50/60 T"

XpaHnTe MeJIKne IpeDMeTbI JxNdkOcTbBdaJIbOT yCtpoiCTBa.
ClyuhaHoe IIOIaHaHHe MeJIKNX IIpeIMTeOB HINIIPOJIHTOJ KHNKOCTHB HByTpB KOPIyCaYepe3BEHTNJIIOHOHHbE OTBepCTHmOKeT IIpHBecTHKIOKApY, IopAkeHHIO 3JIeKTPnueCeHM TOKOM HINIOBpeKJDeHHIO O6OpUIOBaHH. B Clyuae IIOIaHaHHKaKOTO-JHbO IIpeIMTa HIN JIKNKOcTHB HByTpB KOPIyCaHEMeJIeHHo O6eTOchte yCTpoiCTBO.IpeIIOJIeYIOUIe 3KcIIyataIuceo6paTHTecb KKBaIHΦHIIrPoBAHHOMy cIIeIIaJIHCTy IO peMOHTY INTEXHHueCKOMy O6JIyKHNBAHHIO DJIIBbIIIOJIHeHHIPOBepKH.

YctaHOBnTe yCTPOINCTBO B NOxOJaEM MeCTe. HebIIOJIHeHne 3TOI Tpe6OBaHH MoKET IpiNBecTN K IOKApy, IopajKeHHIO 3JIeKtPrHueCKHM TOKOM HJIN IOBpeKJDeHHIO O6OpUOBaHH.
- He yctaHaBJIbAaIte Ha oTKpbITOM BO3JyXe.
- He yctaHaBJIbAaIeT B TpaHcIopTHbIX cpeIcTBax (Ha Kopa6JIAx, B caMOJIeTAX, IIOE3dAX, aBTOMO6NJIX H.T.I.).
- He yctaHaBJIbBaIte B IIbIbHbIX IN BIIaJKBbIX MecTax.
- He yctaHabJIHbAte B MeCe, Ie 3KpaH IODbBepKeH IIpRMOy DeIcTBnIO Iapa.
- He yctaHaBJIHbAaTe B6JIH3n ycTpoIcTB, BblJeJIaHOIIHX TeJIIO, HJIIN YBJIAJXHHTeJI.

ObopydOBaHne doJxHo 6bTb noKlOyeHO K 3a3emHeHHo 7TeNceJIbHO p03eTke nHTaHoei ceTI.
HeBbIIOJIHeHne 3TOrO Tpe6OBaHHMOKeT IIpNBecTH K IIOKApy IIN IIOpaJKeHHO 3JIeKtpNuecKHM TOKOM.

BHIMAHNE

He 3aKpbIbAitte BeHTnlaCIOHHbIe OTBepCTNBA KOpnyce.
- He IIOmeIaIaIe KaKHe-JIb6 OIIpeIMTeBHa BeHTNJIaIIOHHbE OTBepCTHIA.
- He yctaHaBJIHbAityeYcTpoNCTBO 3aMKHyTom IPOCTpaHCTBE.
He 3KcIIpyaTHpye yCTPOIcTBO B ROpH3OHTaJIbHOM HJIN IIpeBepHyTOM IIOJIOKeHHN.
3aKpbIITHe BeHTHJIaHIOHHbIX OTBepCTn HApYIIaET IIpaBHIbHI B03dUHbI IIOTK M MoKTe IpiHBcTn IIOKApY, IopAkeHHIO 3JIeKtpHueCKHM TOKOM HIN IOBpeKDeHHIO O6OpyIOBaHHJ.

NcnoB3yIte wTeNCeIbHyIO po3eTKy c BO3MOXHOCTbIO JERKORO DOCTyna.
BlaroIapra 3TOMy Iprn Heo6xOJHMOCTN MOKHO 6yIeT 6bICTPO 06ecTOHTb ycTPOIcTBBO CJIyuae BO3HNKHOBeHHa KaOJ-JIN6O IIpo6JIembl.
Copepkmoeynakobkn
Y6eIHTecb, YTO BCE CJJeIyIOUINE KOMIOHENTbI HMEIOCTcB YIaKOBKe. IOnkaJIyIcTa, O6paIIaIITecb K IpoIaBIy 3a IOMOIIbIO, ecJIN YTO-JIbO H3 IIpeueHcJIeHHORO HNKe OTcyTCTByET HJIN IOBpeKJDeHO.
ПОНМЕЧАНЕ
- Coxpanhte ynapokBky n MaTePnAblI dnybUyIero nepMeIeHn IIN nepeBo3KMOHITopa.
MoHHTop
□山Hyp nntaHn

LcnpoBoCnHaNbHbKabEnb(FD-C39)

AnJorOBbI CNHaJIbHbI Ka6JIb (MD-C87)

Ka6eHbHDMI EIZO (00M0J261/00M0J262)

Ka6eIb USB EIZO (MD-C93)

EIZO LCD Utility Disk (CD-ROM)
PykoBoIcTBO noJIb3ObaTeIa
PykoBOdCTBO no yctahOBke (daHHoe pykoBOdCTBO)
OrpahueHHra rapaHTn
CBeHeHnIOyTNJIN3aun
KpeNekHbIe BnHTbl (M4 x 12, 4 mT.)
O pykoBODCTBe nO yctaHOBKe i pykoBODCTBe nOJIb3OBaTeJIa
(Korla MeHIO He OTo6paKaetcHa 3KpaHe)
CuyecTByet Tprn cnocoba DeiCTBni:
- HαkaTne IpepeKJIIOUaTeIa
- HαKaTne ΜΟΙЗΥΝΚΑ
-пемеценье плзунка
BbI6Op 3JeMeHTa MeHIO
BbInoJIHeHne n peryInpobKa HacTpoeK
HaximaiTe Ha JIObOM I3 KOHcOB DOpOxKINoI3yHka, NOMEeHHbIX 3NauchAm n>
*PnOJHOKpaTHOM HaxKaTIN yPOBeHb peRyIpyeMOro napaMeTp aCTaHOBITcra Ha OOnH WaBbIe NIn HNKe. Pn npOdoJInxTeNbHom HaxKaTIN pON3yHka MOxHo npOn3BecTu nocJeIOBaTeNbHyOppeRyIpoBkY.
IcnpaBJIeHne 3JemeHTa
BbI6op 3NaueHnHaCTpOuKn N peYJInpOBKn
Поклоченье kaбелей
1 Y6eIntecb, yTO nHTaHne MOHITopa BbIKJIouyeHo.
2 Повлочи Комьтep.
BhimaHne
-
Ппз замею Tekyшero MOHITOP ha MOHITOP HD2441W nepeiod ero nodkluoyehnem K kombHTepy oba3aTeIbHO yCTaHOBITE Ha KOMMbIOTpe TaKne napamETpbI pa3peSeHnI uacTOTbI BepTnKaJIbHO pa3BepTKn, KOtOpbie noDxOJrДЯ MOHITOP aHD2441W B COOTBeTCTBnC tabniuee pa3peSeHn (CM. cTp. 3).
-
y6eHNTecb, yTO nHTaHne KOMNbIbTepa BbIKNIOueHO.
- ПОДКЛЮЧИТЕ MOHHTOP K KOMMbIOTepy, ИСПОЛБ3УСИнHAJIbHbI KAbeJIb ДЯ COOTBeTCTBvUOxN pa3beMOB.
Iocne nodklouhenpa3bemOB ka6eJra 3aTAHNTe BnHTbI pa3bemOB, yTo6bl oecneHTb HndexHoe coeINHeHne.
"If the USB setting is changed, the USB connection to the selected PC will be lost. Do you change the setting?"
Pn noBHeHm 3tOro coo6eHn8 o6paTnte BnImaHne Ha cIeDyUoee:
- Installationshandbuch
- Speakers
- NOTE
- USB devices
- Attention
- AV equipment
- Compatible Resolutions/Signal Format
- HDMI Input
- SAFETY SYMBOLS
- PRECAUTIONS
- WARNING
- CAUTION
- Package Contents
- About Setup Manual and User's Manual
- About EIZO LCD Utility Disk (CD-ROM)
- - Disk Contents
- - To use ScreenManager Pro for LCD
- Controls and Functions
- Using the Operation Switch
- Turning the power On/Off
- Displaying/Quitting a menu
- Selecting a menu item Setting and Adjusting
- Fixing an item Deciding the setting and adjusting value
- Connecting Cables
- Connect the USB cable to the USB ports on the PC (downstream) and the monitor (upstream).
- Connects USB devices.
- Connect AV equipment.
- Connect speakers.
- Plug the power cord of the monitor into a power outlet.
- Adjusting the Screen Height and Angle
- Displaying the Screen
- Touch to turn on the monitor.
- Turn on the external equipment.
- Switch the input signal to display the desired image sent from the equipment.
- After the image appears on the screen, perform the following operations according to the monitor status.
- ■ When connecting a PC with USB connection [USB]
- Selecting Display Mode
- Color Mode
- Adjusting Brightness
- BrightRegulator
- Manual Setting
- No-Picture Problem
- Check the Power indicator.
- Check the error message that remains on the screen.
- FlexScan HD2441W
- Wichtig:
- Xpńoŋ tou ScreenManager Pro for LCD
- MEPbI INPEIOCTOPOXHOCTN
- PPEyPPEKDEHNE
- BHIMAHNE
- Copepkmoeynakobkn
- ПОНМЕЧАНЕ
- O pykoBODCTBe nO yctaHOBKe i pykoBODCTBe nOJIb3OBaTeJIa
- BbI6Op 3JeMeHTa MeHIO
- BbInoJIHeHne n peryInpobKa HacTpoeK
- IcnpaBJIeHne 3JemeHTa
- BbI6op 3NaueHnHaCTpOuKn N peYJInpOBKn
- Поклоченье kaбелей
Brand : EIZO
Model : FLEXSCAN HD2441W
Category : Monitor