
500 ST E - Electric saw KRESS - Free user manual and instructions
Find the device manual for free 500 ST E KRESS in PDF.
| Product type | Jigsaw |
| Brand | KRESS |
| Model | 500 ST E |
| Rated voltage | 230 V~ |
| Input power | 500 W |
| Output power | 270 W |
| No-load speed | 600 - 3400 min⁻¹ |
| Stroke | 19 mm |
| Pendulum motion | 3 levels (0, I, II) |
| Max. cutting depth in wood | 80 mm |
| Max. cutting depth in non-alloy steel | 5 mm |
| Bevel cuts | 22.5° and 45° on each side |
| Weight | 2.3 kg |
| Sound pressure level (LpA) | 78 dB(A) |
| Sound power level (LWA) | 89 dB(A) |
| Vibration (cutting wood) | 11.9 m/s² (K=2.5 m/s²) |
| Vibration (cutting sheet metal) | 9.4 m/s² (K=2.2 m/s²) |
| Double insulation | Yes (no grounding required) |
| Anti-interference | Yes (EN 55014-1) |
| Blade clamping system | Tool-free (tension lever) |
| Dust extraction device | Yes (diameter 35 mm) |
| Anti-restart protection | Yes (model 500 ST E) |
| Parallel guide included | Yes |
| Warranty | 24 months |
| Maintenance | Regular cleaning and oiling of the blade roller |
Frequently Asked Questions - 500 ST E KRESS
User questions about 500 ST E KRESS
0 question about this device. Answer the ones you know or ask your own.
Ask a new question about this device
Download the instructions for your Electric saw in PDF format for free! Find your manual 500 ST E - KRESS and take your electronic device back in hand. On this page are published all the documents necessary for the use of your device. 500 ST E by KRESS.
USER MANUAL 500 ST E KRESS
Original instructions "Jig saw"
1. Symbols and abbreviations
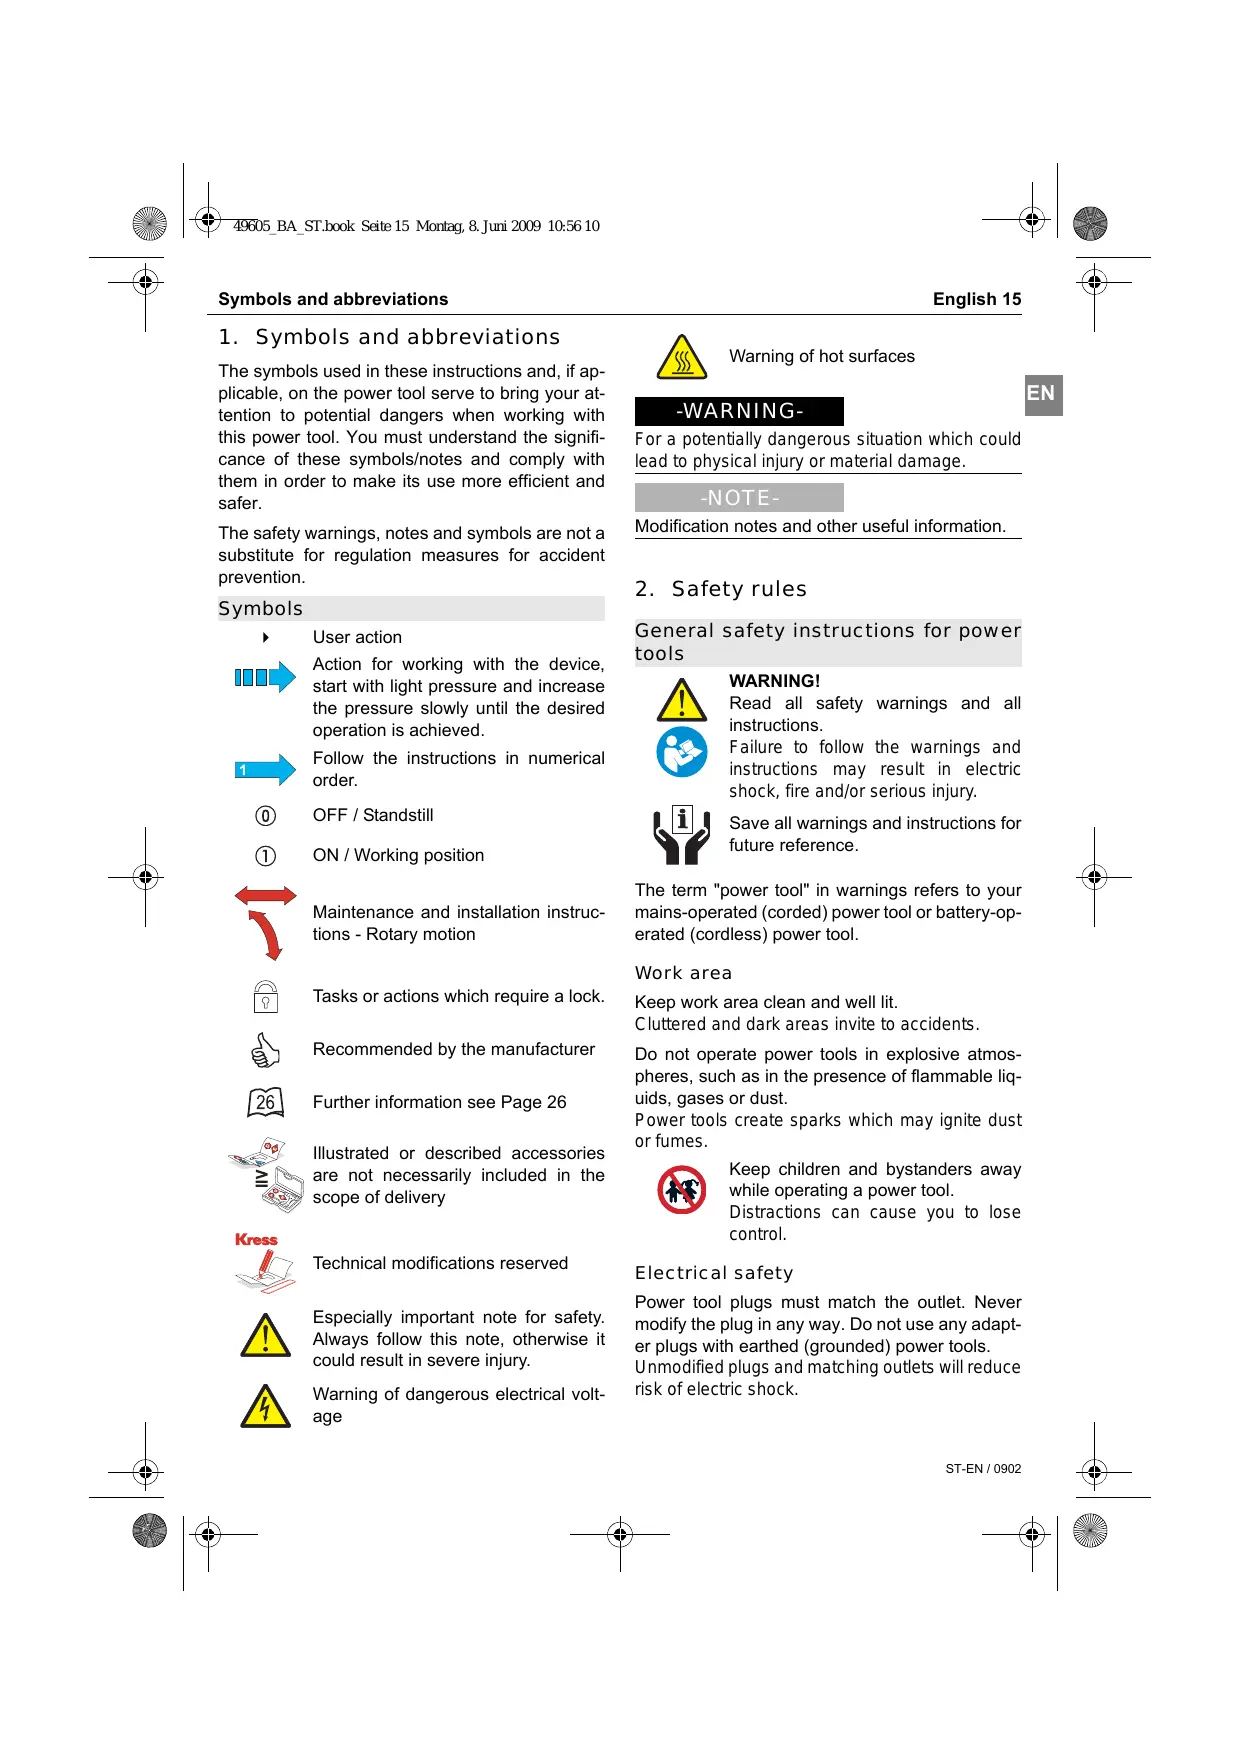
The symbols used in these instructions and, if applicable, on the power tool serve to bring your attention to potential dangers when working with this power tool. You must understand the significance of these symbols/notes and comply with them in order to make its use more efficient and safer.
The safety warnings, notes and symbols are not a substitute for regulation measures for accident prevention.
Symbols
User action

Action for working with the device, start with light pressure and increase the pressure slowly until the desired operation is achieved.

Follow the instructions in numerical order.
OFF/Standstill
① ON / Working position

Maintenance and installation instructions - Rotary motion

Tasks or actions which require a lock.

Recommended by the manufacturer

Further information see Page 26

Illustrated or described accessories are not necessarily included in the scope of delivery

Technical modifications reserved

Especially important note for safety. Always follow this note, otherwise it could result in severe injury.

Warning of dangerous electrical voltage

Warning of hot surfaces
-WARNING-
For a potentially dangerous situation which could lead to physical injury or material damage.
-NOTE-
Modification notes and other useful information.
2. Safety rules
General safety instructions for power tools

WARNING!
Read all safety warnings and all instructions.

Failure to follow the warnings and instructions may result in electric shock, fire and/or serious injury.

Save all warnings and instructions for future reference.
The term "power tool" in warnings refers to your mains-operated (corded) power tool or battery-operated (cordless) power tool.
Work area
Keep work area clean and well lit.
Cluttered and dark areas invite to accidents.
Do not operate power tools in explosive atmospheres, such as in the presence of flammable liquids, gases or dust.
Power tools create sparks which may ignite dust or fumes.

Keep children and bystanders away while operating a power tool.
Distractions can cause you to lose control.
Electrical safety
Power tool plugs must match the outlet. Never modify the plug in any way. Do not use any adapter plugs with earthed (grounded) power tools.
Unmodified plugs and matching outlets will reduce risk of electric shock.
Avoid body contact with grounded surfaces such as pipes, radiators, ranges and refrigerators.
Do not expose power tools to rain or wet conditions.
Water entering a power tool will increase the risk of electric shock.
Do not abuse the cord. Never use the cord for carrying, pulling or unplugging the power tool. Keep cord away from heat, oil, sharp edges or moving parts.
Damaged or entangled cords increase the risk of electric shock.
When operating a power tool outdoors, use an extension cord suitable for outdoor use.
Use of a cord suitable for outdoor use reduces the risk of electric shock.
If operating a power tool in a damp location is unavoidable, use a residual current device (RCD) protected supply.
Use of an RCD reduces the risk of electric shock.
Personal safety
Stay alert, watch what you are doing and use common sense when operating a power tool. Do not use a power tool while you are tired or under the influence of drugs, alcohol or medication.
A moment of inattention while operating power tools may result in serious personal injury.


Use safety equipment. Always wear eye protection.
Safety equipment such as dust mask, non-skid safety shoes, hard hat, or hearing protection used for appropriate conditions will reduce personal injuries.

Prevent unintentional starting.
Ensure the switch is in the off-position before connecting to power source and/or battery pack, picking up or carrying the tool.
Carrying power tools with your finger on the switch or energising power tools that have the switch on invites accidents.
Remove any adjusting key or wrench before turning the power tool on.
A wrench or a key left attached to a rotating part of the power tool may result in personal injury.
Do not overreach. Keep proper footing and balance at all times.
This enables better control of the power tool in unexpected situations.
Dress properly. Do not wear loose clothing or jewellery. Keep your hair, clothing and gloves away from moving parts.
Loose clothes, jewellery or long hair can be caught in moving parts.
If devices are provided for connecting dust extraction and collection facilities, ensure these are connected and properly used.
Use of these devices can reduce dust related hazards.
Power tool use and care
Do not force the power tool. Use the correct power tool for your application.
The correct power tool will do the job better and safer at the rate for which it was designed.
Do not use the power tool if the switch does not turn on and off.
Any power tool that cannot be controlled with the switch is dangerous and must be repaired.

Disconnect the plug from the power source and/or the battery pack from the power tool before making any adjustments, changing accessories, or storing power tools.
Such preventive safety measures reduce the risk of starting the power tool accidentally.
Store idle power tools out of the reach of children and do not allow persons unfamiliar with the power tool or these instructions to operate the power tool.
Power tools are dangerous in the hands of untrained users.
Maintain power tools. Check for misalignment or binding of moving parts, breakage of parts and any other condition that may affect the power tools operation. If damaged, have the power tool repaired before use.
Many accidents are caused by poorly maintained power tools.
Keep cutting tools sharp and clean.
Properly maintained cutting tools with sharp cutting edges are less likely to bind and are easier to control.
Use the power tool, accessories and tool bits etc. in accordance with these instructions and in the manner intended for the particular type of power tool, taking into account the working conditions and the work to be performed.
Use of the power tool for operations different from those intended could result in a hazardous situation.
Service

Have your power tool serviced by a qualified repair person using only original spare parts.
This will ensure that the safety of the power tool is maintained.
Machine-specific SafetyWarnings
Keep hands away from the sawing range. Do not reach under the workpiece.
Contact with the saw blade can lead to injuries.
Apply the machine to the workpiece only when switched on.
Otherwise there is danger of kickback when the cutting tool jams in the workpiece.
Pay attention that the base plate rests securely on the material while sawing.
A jammed saw blade can break or lead to kickback.
When the cut is completed, switch off the machine and then pull the saw blade out of the cut only after it has come to a standstill.
In this manner you can avoid kickback and can place down the machine securely.
Use only sharp, flawless saw blades.
Bent or unsharp saw blades can break or cause kickback.
Do not brake the saw blade to a stop by applying side pressure after switching off.
The saw blade can be damaged, break or cause kickback.
Use suitable detectors to determine if utility lines are hidden in the work area or call the local utility company for assistance.
Contact with electric lines can lead to fire and electric shock. Damaging a gas line can lead to explosion. Penetrating a water line causes property damage or may cause an electric shock.
Hold the power tool only by the insulated gripping surfaces when performing an operation where the cutting tool may contact hidden wiring or its own cord.
Contact with a "live" wire will also make exposed metal parts of the power tool "live" and shock the operator.

Secure the workpiece.
A workpiece clamped with clamping devices or in a vice is held more secure than by hand.

Do not work on materials containing asbestos.
Asbestos is considered carcinogenic!
Take protective measures if there is danger of formation of combustible or explosive dust during operation that can be hazardous to health.
Example: Some dusts can be carcinogenic. Wear a dust mask and work with a dust/chip extraction unit, if possible to connect.
Always wait until the machine has come to a complete stop before placing it down.
The tool insert can jam and lead to loss of control over the power tool.

Tools not in use must be locked away safely in a dry place out of the reach of children.
Keep your workplace clean.
Blends of materials are particularly dangerous. Dust from light alloys can burn or explode.
Never use the machine with a damaged cable. Do not touch the damaged cable and pull the mains plug when the cable is damaged while working.
Damaged cables increase the risk of an electric shock.
Residual risk. Although this information sheet and the operating manuals for our electrical tools contain extensive instructions on safe working with electrical tools, every electrical tool involves
certain residual risks that cannot be completely prevented through safety mechanisms. Therefore, electrical tools must always be operated with the necessary caution.
3. Device description

Read all the warnings and instructions before using the equipment. Failure to follow the warnings and instructions may result in electric shock, fire and/or serious injury.
While reading the operating instructions, unfold the graphics page for the machine and leave it open.
Device components
1 On/off switch
2 Electronic adjusting dial
3 Dust hood
4 Base plate
5 Saw bench mounting
6 Clamping wheel
7 Sawblade
8 Clamping lever
9 Dust extractor 35mm
10 Chip-flyoff guard
11 Parallel fence
12 Mains cable module 500 ST E Fixed supply 420 ST E
13 Interlock button mains cable module
14 Pendulum stroke adjusting knob 500 STE
Scope of supply
See packaging
Specified conditions of use
The machine is intended for making separating cuts and cut-outs in wood, plastic, metal, ceramic plates and rubber while resting firmly on the workpiece. It is suitable for straight and curved cuts with metre angles to 45^ . The saw blade recommendations are to be observed.
Requirements for the user
The tool must only be operated, maintained and serviced by authorised trained personnel. The personnel must be made aware of the relevant dangers.
| Technical data | |||
| Jig saw | 420 ST E | 500 ST E | |
| Nominal voltage | V~ | 230 | 230 |
| Input power | Watt | 420 | 500 |
| Output power | Watt | 215 | 270 |
| Idling speed stroke number n0 | min-1 | 500..2700 | 600...3400 |
| min-1 | 3600 | ||
| Stroke height | mm | 19 | 19 |
| Pendulum stroke levels | -- | 3 | |
| Mitre cut | ° | 22,5 | 22,5 |
| ° | 45 | 45 | |
| Cutting capacity, max. in wood | mm | 70 | 80 |
| Cutting capacity, max. in non-alloy steel | mm | 4 | 5 |
| Weight | kg | 1,8 | 2,3 |
| Your power tool is double-insulated in accordance with EN 60745; For this reason an earth wire is not required. | |||
The device is suppressed against radio and TV broadcasts, in accordance with EN 55014-1 and is immune to disturbances in accordance with EN 55014-2.
Noise/vibration Information
Noise levels
Measured values determined according to EN 60 745.
Typically the A-weighted noise levels of the machine are:
sound pressure level (L_pA) 78 dB (A)
sound power level (L_WA) 89 dB (A)
Measurement uncertainty K = 3dB

The noise level can exceed 85 dB(A) during operation.
Wear ear protection!
Vibration
Triaxial vibration emission level determined in accordance with EN 60745.
| Jig Saw | 420 ST E | 500 ST E |
| Cutting wood; ah: m/s² 13,1 | 11,9 | |
| Measurement uncertainty K m/s² 2,5 | 2,5 | |
| Cutting sheet metal; ah: m/s² 19,3 | 9,4 | |
| Measurement uncertainty K m/s² 2,8 | 2,2 |

The vibration emission level given in this information sheet has been measured in accordance with a standardised test given in EN 60745 and may be used to compare one tool with another.
The vibration emission level will vary because of the ways in which a power tool can be used and may increase above the level given in this information sheet. This could lead to underestimation of vibration when the tool is used regularly in such a manner.
Note: To be accurate, an estimation of the level of exposure to vibration experienced during a given period of work should also take into account the times when the tool is switched off and when it is running but not actually when doing the job.
This may significantly reduce the exposure level over the total working period.
4. Operation


Before carrying out any work on the machine, pull the mains plug.
Putting into operation

Observe correct main voltage!
Before putting into operation, check that the mains voltage and frequency on the identification plate match the details of your mains supply.
Connect mains cable module if necessary

If using an extension cable: Only use extension cables specifically approved for the application with the required cross-section. Otherwise the power of the tool can be reduced and the cable can overheat. Replace damaged cables.
Mains cable

If the mains cable is damaged while working, pull the mains plug immediately.
Fixed power supply

Fixed power supply
Damaged mains cables must not be used. They must be replaced immediately by an expert technician.
Mains cable module (500 ST E)

Mains cable module with Patent Quick Interlock.
Connect the mains cable module 12 to the handle. The plug must snap in.
Use the mains cable module 12 only for Kress electric tools. Do not attempt to operate other machines with the module.
Damaged mains cable modules must not be used. They must be replaced by a new Kress mains cable module immediately.
Push the two unlocking buttons 13 and remove the mains cable module 12 from the handle.
Use only an original Kress mains cable module and at least a heavy rubber tube cable (H07RN-F).
Operation
Switching On and Off
Caution! Before switching on the sabre jig saw, the dust cover 3 in front of the tappet must be lowered again to the saw bench 4.
To switch on the device, slide the circuit closer/breaker 1 to the front.
Pressing the swung-out front edge of the circuit closer/breaker 1 will move it back to the Off position.
Restarting protection (500 ST E)

X
The restarting protection feature prevents uncontrolled restarting of the machine after an interruption in the power supply.
To restart the operation, switch the On/Off switch 1 to the Off position and start the machine again.
Full-wave control electronics (420 ST E)
The electronics are switched off by turning the adjusting wheel to the max. position. The jigsaw then operates at the max. idle running stroke rate.
Presetting the Stroke Rate
In devices with a setting dial 2, you can select the speed using the setting dial 2 depending on the area of application.
When under load, the digital electronic control provides for more power.
1-2: Low stroke rate
3-4: Medium stroke rate
5-6: High stroke rate
-NOTE-
After longer periods of work at low stroke rate, the machine can heat up considerably. Remove the saw blade from the machine and allow the machine to cool down by running it for approx. 3 minutes at maximum stroke rate.
Pendulum stroke setting (500 ST E)
The change-over from setting 0 to II is effected by means of the pendulum-stroke adjusting knob 14. The coloured mark indicates the pendulum stroke setting selected.
0 No orbital action for glass, ceramics, soft steel, nonferrous metals, aluminium and pressed materials.
Small orbital action for plastics for plywood.
Large orbital action for hardwood,soft wood,chipboard.
It should be noted that the values given are standard values which may vary according to thickness and hardness of material, grain direction, and also to the condition of the saw blade.
The optimal orbital action setting for the respective application can be determined through practical testing. The following recommendations apply:
- Select a lower orbital action setting (or switch it off) for a finer and cleaner cutting edge.
For thin materials such as sheet metal, switch the orbital action off.
For hard materials such as steel, work with low orbital action.
For soft materials and when sawing in the direction of the grain, work with maximum orbital action.
Mitre cuts
The base plate can be adjusted in both directions by 22.5^ and 45^ . 0^ , 22.5^ and 45^ angles can be fixed securely. Adjustments are made by loosening the clamping wheel 6 beneath the handle. As soon as the toothed wheel work of the saw bench mounting is released, the base plate 4 can be turned to positions 22.5^ or 45^ and be tightened again with the clamping wheel 6.
Chip-flyoff guard
The splinter guard 10 can prevent fraying of the surface while sawing wood.
This application can only be used when cutting at a right angle (90^) .
Press the splinter guard 10 from below into the base plate 4 shown in the figure).
Dust extractor
The jigsaw is equipped to be connected to a commercially available vacuum cleaner.
In order to keep the cut free of shavings, the flexible suction tube is inserted from the back into the housing opening 9.
The dust hood 3 is to be pushed downwards until it locks into place.
In the case of litre cuts, the dust hood is to be pushed upwards.
Changing the tool

Disconnect the plug from the power source before making any adjustments, changing accessories, or storing power tools.
Such preventive safety measures prevent accidental start of the power tool.

Wear safety gloves for tool changing.
The tool insert can become very hot after working for long periods and/or the cutting edges of the tool insert are sharp.
The advantage of the clamping system is that saw blades can be changed without tools.
The protection roller, which prevents the saw blade from moving and serves to unburden the mechanical parts (tappet), automatically produces a clamping angle of 90^ as a positive stop. Naturally, this only applies when original saw blades are used.
Inserting the Saw Blade "B"
First push the dust hood 3 up.
- Rotate clamping lever 8 as far as it will go and hold in place.
Insert saw blade 7 as far as it will go.
Release clamping lever 8.
-WARNING
Press jigsaw against saw blade tip on wooden board, until clamping lever 8 springs back to its starting position.
It is only by doing this that the secure clamping of the saw blade 7 can be ensured and the hood 3 can be closed.
-NOTE-
Check the tight seating of the saw blade.
A loose saw blade can fall out and lead to injuries.
Unclamping saw blade
- Rotate clamping lever 8 as far as it will go and hold in place.
Remove saw blade 7.
-NOTE-
Do not press back turned clamping levers as this makes it very difficult to remove the saw blade.
Operating tips
Operation of pendulum jigsaw
When sawing, make sure that the base plate is sitting securely on the workpiece. The jigsaw can now be easily operated by hand. To achieve clean cuts and optimal cutting performance, make sure the correct pendulum stroke for the material has been selected on the feed, which should also be adjusted for the material (e.g. pendulum stroke setting 0 and slow feed when sawing metals).
The built-in blower keeps the cut continuously free of chips for perfect visibility.
Recommended stroke numbers
The optimal speed setting is to be determined in tests at the beginning of the sawing job, as several factors such as material, thickness of material, condition of the saw blade, may influence the results of the job.
Low stroke number when sawing glass, ceramics, metal.
Medium-range stroke number when sawing plastic, pressed material and plywood.
High stroke number when working hardwood, soft wood and chipboard.
Cutting metal
When sawing metal, coolant/lubricant should be applied alongside cutting line because of the material heating up.
Sheet metal is to be clamped to a suitably solid base (clamping plate or plywood plate). This eliminates as far as possible the risk of the material springing back and forth.
Cutouts
For cutouts, drill a hole i.e. a starting point where the saw can be inserted.
Plunge Cutting "A"
Plunge cuts may only be applied to soft materials, such as wood, gypsum plaster boards, etc.!
Use only short saw blades for plunge cutting.
Plunge cutting is possible only with the metre angle set at 0^ .
Place the machine with the front edge of the base plate 4 on to the workpiece without the saw blade 7 touching the workpiece and switch on. For machines with stroke rate control, select the maximum stroke rate. Firmly hold the machine against the workpiece and by tilting the machine, slowly plunge the saw blade into the workpiece.
When the base plate 4 fully lays on the workpiece, continue sawing along the desired cutting line.
5. Tools and accessories
Selecting a Saw Blade
Only original Kress saw blades as listed in the operating manual or in accordance with the following sketch with a max. thickness of 1.5mm may be used. This is the only way to guarantee that the saw blade is securely fastened and reduce as far as possible the risk of accidents caused by the jigsaw blades becoming loose.

The saw blade should not be longer than required for the intended cut.
Use a thin saw blade for narrow curve cuts.
Parallel fence (optional accessory)
For perfect results with parallel cuts use the graduated parallel fence 11.
Once the clamping wheel 6 is loosened, the parallel fence 11 is inserted from the side into the slot in the base plate 4, set according to scale, and fixed with the clamping wheel 6.
Circular cutter (optional accessory)
For circular cuts a graduated circular cutter is available (assembly as for parallel fence). The threaded pin of the knobtype handle permits readjustment if a greater downward pressure is required according to material, or if the tip of the threaded pin has been re-ground. Make sure that the counter nut is always well-tightened.
Optional Accessory
Do not use accessories made by other manufacturers, as these are not tested by KRESS.
It can be dangerous to use such accessories.
To avoid injury and damage, use only accessories recommended by KRESS.
6. Maintenance and Service
Maintenance and Cleaning

Before carrying out any work on the machine, pull the mains plug.
Always keep the machine and ventilation slots clean.
Wipe off the accessible plastic parts regularly with a cloth without cleaning agent.
Always keep the tool holder clean.
The movable supporting roller for the saw blade should be given a drop of oil from time to time.
-NOTE-
In extreme working conditions, conductive dust can accumulate in the interior of the machine when working with metal. The protective insulation of the machine can be degraded. The use of a stationary extraction system is recommended in such cases as well as frequently blowing out the ventilation slots and installing a residual current device (RCD).
Replacing brushes
Worn carbon brushes should be replaced by an authorised customer service organisation.
Service


After heavy use over a long period, the machine should be taken to a Kress service location for inspection and thorough cleaning.
The relevant service centres are listed in the enclosed appendix "SERVICE" or on the website www.kress-elektrik.de.
Spare parts / exploded view
Exploded views and spare parts lists are available on our home-page http://spareparts.kress-elektrik.de
Environmental Protection

Recycle raw materials instead of disposing them as waste. The machine, accessories and packaging should be sorted for environmental-friendly recycling.
The plastic components are labelled for categorised recycling.

Only for EC countries.
Do not dispose of electric tools together with household waste material!
In observance of the European Directive 2002/96/ EC for waste electrical and electronic equipment and its implementation in accordance with national law, electric tools that have reached the end of their life must be collected separately and returned to an environmentally compatible recycling facility.
Warranty
- This power tool has been carefully tested and has been subjected to a strict quality control process.
- We guarantee the free-of-charge repair of faults in the power tool that arise within 24 months from the date of purchase at the end user's premises and which can be attributed to a material or manufacturing defect. In certain countries there are special regulations concerning the warranty terms. We reserve the right to repair faulty components or to replace them. Replaced items become our property.
- Inappropriate use or handling and opening up the device by unauthorised repair centres leads to the warranty becoming void. The warranty does not cover: mechanical damage due to falls etc., damage caused by penetration of water or other fluids, cut and damaged cables, motor damage and mechanical damage caused by inappropriate overloading, wear parts e.g. carbon brushes, drill chucks, chuck keys, worn drilling spindles, motors, mains cables, batteries, saw blades, grinding discs, dust bags, accessories in general (drill bits, chisels etc.). Details of the various toll wear parts can be obtained from http:// spareparts.kress-elektrik.de or from one of our service centres.
- The warranty may only be enforced when defects are reported without undue delay (including shipping damage). Warranty implementation does not extend the warranty period.
- If you need to apply the warranty, send the original purchase receipt together with the device to us or to the relevant service centre.
- The warranty obligations assumed by us shall exclude any further claims on the part of the buyer, in particular the right to cancellation of a sale, reduction and the assertion of damage claims.
- However, the buyer shall have the right to either a reduction (in the purchase price) or the cancellation of the sales agreement should we fail to eliminate any defects within a reasonable period of time.
- This does not exclude compensation claims in accordance with §§ 463, 480 Para. 2, 635 BGB caused by the failure of assured properties.
- The provisions defined in Items 7 and 8 only apply to the Federal Republic of Germany.
Recommendation cycle
Durante el trabajo, el nivel acústicoSEOSEOSEOSEOSEOSEOSEOSEOSEOSEOSEOSEOSEOSEOSEOSEOSEOSEOSEOSEOSEOSEOSEOSEOSEOSEOSEOSEOSEOSEOSEOSEOSEOSEOSEOSEOSEOSEOSEOSEOSEOSEOSEOSEOSEOSEOSEOSEOSEOSEOSEOSEOSEOSEOSEOSEOSEOSEOSEOSEOSEOSEOSEOSEOSEOSEOSEOSEOSEOSEOSEOSEOSEOSEOSEOSEOSEOSEOSEOSEOSEOSEOSEOSEOSEOSEOSEOSEOSEOSEOSEOSEOSEOSEOSEOSEOSEOSEOSEOSEO SEO
Dermed sikres storst mulig maskinsikkerhed.
Sagbladets montering "B"
YToBcEiEic XpnoC Kai aAeC XpnoiueS TAnpoopopec.
2. YIIOBcIeIcI aOpaAeiaC
Epyaoies th eya taalavwns
Kata nV KOITn TpETeVA TPOOExTe WOTe TO TEIAva akoumu TcTgEpa OTo TPOCS TEESEpyaia uIko.H Oya mTopeiTwpa va oBnynEi EUKoLa e To xepi. Iia ia Kaapn KOTn kai yia 1aavikn anTO DOan TpETe, avalya uTo ULIKo,va Yivetai n Owotn puOuian Tns TAIvOpunons kai n Owotn wOon Tns mXavns (T.X. P0UHn TAIIVOpunons 0 kai apyn TpoWOnn kata nTv KOITn tAALWv).
Me tov evowmuevo mnxavioe ekpuonons n KOTn eivai kaapn kai Tavta aTaaayevn ano OKanepes.
Euviotwuevos aipoos naiivopounoewv
PpTei va biatiotwoete to 1oavko apioo taivopounoeuw kat a tnv evapn twv epyaowkotns eokic, ka0oov TIOloi npayovtes mtopouv va etinpaeauov to atotelaoa nTc epyaiaoc, otwC TTX. uIko, TAOuO kataotaon ts laac kottns.
Mikpoc apioos yia tnv kottyn yuaaiou, Kepaikwv,
Meaoa o apioo yia Tnv KOTn TTAAOTIKwv, ouvTeikwv, kovtpa Tlaké.
Meyalos apiouyia nvy Eeepyaia oKlnpou eulou, maakou xulou kai voBottav.
Pnioo aapiva
Otau KoBETe tataa 0 Ta TpTei, yia va Eogoudepeoote Tnv avantuooevni Oxupn ThepOtnTa,va aalekpete kata mKoc ts ypaumns Kotnc eva meo yuGns n liTavon.
Olaapivecthetaptteiaivalotepeewevesoe tnapkwsapea bao (voBottav n Kovtpa Tlambda).ETOI aTPOEUYETAI IKAVOTIOINTIKA n taavwn tou uikou.
Kotn aoivymuw
Tia nTv KOITn avoiymuWv TpETe va avoiEe tia TpuTTa, ONaN vao Nmoupynoe Eva onueio EkkivnOg sTo oToio 0a ToTIOeTNOe Tn Lapa KOTnC.
H xpnon touc mTnpE va TpokaLeoEi Kivouous.
Tia Tny aTnTpoTn TpaUaTIOuW KAI XPOIIOIEITE ATOKIAOTiKa ta AVtAAkTikA Tou OuvioTowTai aTRO Tny KRESS.
Móvo yia tics xwpecs tnc EE
Mny TETATE Ta nAekptiKa epyaIeia OTOV KAOO OIKIAKwv aToppmuTsw!
PeKOMeHIOBaHO n3rOToBtTeJIeM
26 Ioppo6Hyu HOpMauno CMOTpn Ha cTp. 26
Ioka3aHHbIe Ha pncyHKe IIN daIOUneScB OINcaHN DeTaIIN OCHAcTka He BCErDa BXOJAT B KOMnJIeKT NocTbKN.


Фирma OCTabIЯт 3a COбои BCE npaba Ha BHeceHne TexHnYeCKnx I3MeHEni N DoJOnJIeHEni!
OueHb BaxHoe yka3aHne no 6e3oNaChocTn. Bcerda co6bIoudaIte daHHbe yka3aHnB, B npOTNBHom clyuae Hec6bIouDeHne MOKeT npNBecTu K TjXeJIbIM TpaBMam.

Пре dioctepexeHne o6 onaChom dIy KI3N 3JIeKTPnuecKOM HApJxKeHIn

IpeodocetepexeHne 0 ropaey noBepxHocTN
-Ппсдунрждени-
O BO3MOKHOI ONaCHOI CNTuayuIN, KOTOPaJ MOKeT npNBecTN K JERKIM TeJeCHbIM TpaBMam IJI MATEpnaJIbHOMy yUepe6y.
-YKA3AHNE-
no npimMeHEnIO n dpyra NOJIe3Ha INΦopMaζIa.
2. ПравILA Тхнки 6e3oNaCHOCTN
Оьше npавILA texнки 6e3oNaChocTN npn 3KcnIpyaTuqun 3NeKtpOnHCTpyMeHTa

BHIMAHHE!
O83aTeNbHO npOHTnTe nHCTpyKUIO
03HaKOMbTECb CO BCEMN
IpaBnJAmN I NOLOKeHnAeMn.
OuibKn uynueHnB pe3yltate
HecO6IIOJENI npBBeEHbIX HNXe
npabNJ N NOJXKeHNI MOrY CTaTb
πριηνησι έποραχεήσι
3JIeKTPnueCKIM TOKOM,
BO3HKNKHOBEHNA NOXapa N/INN
TJXeJIbIX TpaBM
yBeeu.

Bepexxo xpaHnte Bce nHCTpyKmI n
pykoOIOCTBa NO TEXHKe
6e30nacchoctn dnaJbHeWero
INCNOJIb3OBAHNIA.
IcnoJIb3yeMbI 3decb TepMNH
"3JIeKTPoINHCTpymeHT" OTHOCTCRA K
3JIeKtpOnHCTpymEnTa, paBotaUoIIM OT cTeN (c
ceTeBbIMKaBeJEMnMOnyJemCeTeBOrKaBeJIa)
n pa6oTaHouzIM OT aKKymyIaTopa (C nHTaHHeM OT aKKymyIaTOpHbIX 6aTapei).
Бezonaachoctb pa6ohero mecta
ObecneyTe xopoOee oCbeSeHne I
PoiDJIepXINBaITe YIcTOTU IN IopRAIOK Ha pa6OeM MeCTe.
Becnpaok n HeocBeueeHHoe pa6ooye MeTo
MORYT CTAb PnunHoi HecuaCTHO Cnya.
3anpeaetcnyKcnnyataunnHnCTpyMeNTa BO B3pbIBOONaCHO 3OHe,B KOTOpOHaxoJrTcJeRKOBCPnAmehraIOuNEcKnDkoCTN,Ta3bl NnI NbJIb.
3JIeKtpOnHCTpyMeHTbI pOn3B0dT NCKpy, KOtOpa MoKeT BOCnJIaMeHNTbIbJIb INJIN Napbl.

He DonyckaIte npn 3KcNpyataunn 3JIeKTPoHnCTpymeHTa HAXOXKeHn pRdOM DeTei N IOCTOpOHnX JIuC.
OTBnEkaCb, MOXHO NOpTePraTb KOHTpOJIb NaI 3JNeKTpOINHCTpyMeHtOM.
3neKtpo6e30anacHOctb
山Tekep 3neKtpOnHCTpyMeHTa DOJIKeH NOxOuNTb K pO3eTke. 3anpeuaetc BHOscITb KaKHe-Ni6o H3MeHenH B 5Tekep. He NCnOJb3yIte nepexODHk 5Tekepa DnA 3neKtpOnHCTpyMeHTOB C 3aUHTbIM 3a3emJIeHNEM.
OpunnabHbHbI uTekep I NOxOJaUaK HeMy po3eTka ChnKaIoT pNCK nopaxHeNHa 3JIeKtpnueckm TOKOM.
He donyckaTKeKHTaTe Tena C TaKIMn 3a3eMJIeHHbIMN NOBepxHOCTaMn, KAK Tpy6bl, OTONJIbHbIe CNCTeMbI, KYXOHbIe PNTbI, Neu N XOJOnIIbHNK.
CyueCTByET NOBbIeHHbI PNCK nopaxhenn 3JIeKTPuYeCKM TOKOM,ecnBaSe TeNo 6yDet 3a3EmJeHO.

Obepera Te 3neKtpoHCTpymENT OTdoJnI NOnaDaHnBnAgn.
ПюнКНовене BOДБВ 3ЛЕКТПОИНСТРУМЕТ yBЕПЧИΝБЕТ риСК ПОражени 3ЛЕКТПУССКIM TOKOM.
IcnoJb3yIte Ka6eIb TOnbKO NO Ha3HaueHIO. 3aIpeuaeTc nepeHocITb 3JeKtpoHnCTpymeHT, ydepXnbAero 3a Ka6eIb, IIN NcNoJb3ObaTb Ka6eIb dIy oTOcoEInHeHn 7TeKepa OT po3ETKn. OBeperaiTe Ka6eIb OT Bo3DeiCTBn BblCOKnx TemnepaTyp, Macna, pexyux KpOMok IIN DnBxuyuXxCy y3IOB 3JeKtpoHnCTpymeHTa.
Поврждений nlin cnytaнь kabelb ybeiluynBaet pnck nopaxkeHn 3JIeKtpueckm TOKOM.
При paбote c электоинстум entOM Ha OTKpbITOM BO3dvyxe, ИСОЛьзуйTe yДИNHHTeNb, npedHa3haeHHbI TOJbKO ДЯн hapyKhbIX pa6OT.
Ipeed Tem KaB KJIIOUHTb 3JIeKTPoINHCTpyMeHT ydaJInte INHCTpyMeHTbl IJRA HAcTPOKN MaUNHbI JINKJIIOU NaTPOHa.
HCTpymEn Tn HAcTpoKn Nn KJIOU, BCTaBHeHHbI BO BpaAiooNcra y3eN MaunHbI, MOrTy npuBeCTN KYBeByIO Nn TpaMe.
He nepeoenceHbai Te CBOI CNbl, npHHMaJ HeecTeCTBeHHoe Ia TeJa noLoKeHne. Bcerda
BbIbpaIte yToIyHBOe nIOJKeHne n COxpaHnTe paBHOBeCne.
Blaroapr 3tomy moXho lyuwe KOHTpOInpoBaTb MaunHy n bIcTpee n IerYe pearnpoBaTb Ha HeoxnndaHHyU cTuayauio.
IcnoIb3yIte cneuaJIbHyO pa6Ouyo OdekU. He Hocnte npocToPbIe IpeDMtbl Odekbl nnn ykpaSeHn. ObeperaIte BOJocbl, OdekU n nepaTkn OT NODBHXbIX y3NoB u deTanei.
Cbo6oHa na oexka, ykpaueHnna nn nHHbIe BOIOcbl MOyT 6blb 3aTAYtbl NOBUNXHBIMN y3Iamn I DeTaJIaMn MaunHbl.
Ecni Ha 3neKtpoHnCtpymeHTe npedyCMOTpeHa BO3MOxHOCb POKJIIOUChENI PbIeCOca, y6eINTEcb, YTO OH npaBnIbHO POKJIIOUChEN I POKXODIT DnI OTCabIBaEMORo MATEpnaIa.
ПпменецпьлелOTсаьВаIOци npIJIeYJIaBnIBaIOци yCTpoIcTB ChNkaET BpeHoe BO3dIeCTBne ПьЛИ.
3JIeKtpOnHCTpyMent, KOtOpbI He BkIIOUaTeCn IINHe BbIKJIOUaTeCn, PpeIcTabIeT ONaCHOctb INdoJIkeH 6bITb OTpeMOHTnpOBaH.

Bcerda otcoeHnHne Te tKeep oT pO3eTKn, nIu aKKyMjYTOP OT MaunHbI, nepe TEm KAK pNcCTynNTb K NaCTPOKe, perynOpOBKe MaunHbI, 3aMeHe DeTaJe OChAcTKn IIN eCNI OTKnaDbIbAeTe MaunHy B CToPOHy.
3TN MepbI npedoctoPOXHOCTN npenTCTBYOT cnyaHOMy 3anycky MaunHbl.
HeicnoIb3yemble 3JekTPOHnCTpyMeNTbXpAHnTe B HeIOCTyHOM DnA DeTeMecTe. 3aNpeUaETc8 3KcIIpyatauia 3JekTPOHnCTpyMeHTa HENoIROTOBJIeHHbIMN IIN HeO6yueHHbIMN JInCaMn, HE O3HaKOMMBUNMNCs C npabINAmn 3KcIIpyatauinn.
3NeKtpOnHCTpyMeHTbI npedctabnIOT onaCHOCTbДЯ HeONbITHBIX,HeO6yueHHbIX NIIU.
Cneinte u yxaxnbaiTe 3a coCToHnEM 3JeKTPoHnCTpymeHTa. PpOBepaTe nOdBHXhIe DeTALN Uy3JIb Ha ux 6eZynpeuHyO fYHKUHOHaJIbHyO paBotoCnOpocBOHcTb - OHn He DOJIXHbI 3aEdaTb, 6bITb NOBpexKeHbI IIN CLOMaHb.I NobpexKeHHbIe DetAIn, NpeD TEM KAK npICTyNTb K pa6oTe c 3JeKTPoHnCTpymeHTOM, DOJIXHbI 6bITb OTpeMOHTPOBaHbI INI 3aMeHeHbI.
ПричноMHOrnHexCuaCThBIX CnyaEB YBJIeTcR
ПLOXOITexHnueckn yxO3a
3JIeKTPoHnCTpyMeHTOM.
Cneinte n yxajnbaite 3a coctoHnem Baunx pexyuxn HNCTpymEnTOB! OHN DoJXhbl 6bITb BCEgda OCTPO 3aTOUeHHbIMn YNCTbIMN.
Pexyüne INCTpyMeNTbI C OCTpbIMpeXyUIMN KpOMkAmn pexe 3aKJIINHUBaET N IMN IerYe ynpabTb.
IcnoIb3yIte 3NeKtpOnHCTpyMeHT, OChactKy I T.I. B COOTBETCTBnC 3TmNIpabuJAMn 3KcnpyaTaun I NO Ha3HaueHInO, KAK ONUcaHO B pyKOBOdCTBe IJIN DaHHORo Tnna MaunHbI. YUnTBaIeTe PnI 3Tom ycNoBra pa60tBu n Obpa6aTbIbAembM MaTePnAJI.
IcnoJIb3ObaHne 3eKtpOnHCTpyMeNTa Ipyrnx ceJe,OTnHybIX OT npedymoTeHHo OBnactn npimeHeHn, MoKeT npBecTn K ONaChbIM CHTyaUcnm. 3anpeuaeTcB BHOCntb KaKne-JIn6o H3MeHeHn B KOHCTpyKcUHO 3eKtpOnHCTpyMeNTa, HApUwA Tb cNoCTHOCTb KOpNyca, NtItaTbcra CamOCTOReTbHO BCKpbIBaTb n peMOHTnpOBaTb 3eKtpOnHCTpyMeNT, 3ameHryb KaBeJb, UcTKn, WTekep, CamOCToReTbHO pa3bnpaTb n Cma3bIBaTb 3eKtpOnHCTpyMeNT. HApUweHne BblseyKa3aHHbx YcNoBn I Tpe6oBaHn MOKeT NOBNeB 3a CO60b OTka3 B yDObNETbOpEHn rapaHTnHBx IpTeH3n.
CepBnC

Pemont 3neKTPoHnCTpymeHTa DOnJKeH OcyUeCTBnTbC TOnbKO CneuHaNtAMn cepBnCHOrO ZeHTpa N TOJIbKO C NcNoIb3OBAHnEM OpunHaJIbHbIX 3anaChbIX DeTaJeN Yuacte.
ToIbKO B 3TOM cnyuae 6yudet o6ecneueha 6e30nacHOCTb 3JIeKTPoHnCTpyMeHTa.
CneuaJIbHbIe 630nacHOCTN
npaBnna
TEXHKNK
He npn6nnkai Te pykn K 30ne DeiCTBna PnIbHoro nOIOTHa. 3anpeuaeTcay ydepXnBaTb 3arOTOBky cn3y pykami.
При ВОЗнКHOВЕНМ KOHTaKТС ПИЛьнБIM NOЛOTHOM CyIeCTbYeT ONaCHOcTb ПОЛуЧЕпЯ Трави И yBeHm.
3aTROBky TOJbKO BO BKJIIOUeHHOM COCTOHN.
B npotnbom cnuyae cyuectbyeT onachoctb BO3HNKHOBeHn OToaun npn 3akJINHBaHn INJIbHOrO nIoTHa B 3aRTOBKe.
Cneinte 3a TeM, YTObI npi BbINOJIHeHn paCnIIa ONOpHra PNTa HAdEJHo yNpapanacB B 3aTOrTOBky.
3aKJIINHbUeE IINI NepeKOWeHHoe IINJbHOe IIOJTOHO MOKeT nepeJIOMITbcra IINI pINBeCTN K BO3HNKHOBeHNU OToaH.
OTKJIIOUHTe 3JIeKTPoHNCTpymENT NO OKOHNaHn pa60TbI N DOxJNTecb, NOKA NINbHOE NOJIoTHO NOJHOCTbHO He OCTaHOBINT CBOE DBNXKeHne. ToJbKO NOcNe 3TORO BbIHMaTe NOJIoTHO n3 3aROTOBKn.
TakIM 06pa3OM MOXHO NCKJIOUHTb BO3HnKHOBHeHne OTdauN I NOLOXHTb 6e3 ONaCKN 3JIeKtpOnHCTpyMeHT B CTOpOHy.
3anpeaetcncnoJb3OBaTb NOBpexKeHHbIe nHn HekaeeCTBeHHbIe NIIbHbIe NOJIOTHa.
ДeформповаHHье Илп ПLOXO 3aTOUeHHьe ИльньгпОЛТ haMOryT 6bIaMbIbA TbCBЯИ NlN Bbl3bIbA Tb OТду.
3anpeaaetcTopMo3ntb NIN octaHaBJIInBaTb DvIXeHne NINbHorO NOJOTHa DaBJeHnEM C Topca ININ c60ky nocJe OTKJIOUHeHn MaunHbl.
Пиьhoe NOЛТНО MOКЕ 6ытб NOВрждeHO, OБЛOMИТсЯ ИЛВи Bbl3ВaTb OTДау.

IpeBaPnteBHo
IOBepxHOCTN
METAJIIONCKATEJIA
O6cIeIyIte
POMOUIIO
Ha
HaJIyue
CKpbIToB HNX 3NeKTpO npOBoDNK, Tpy6ra30- IN BOIOCha6KeHn8 INN O6paTInTeCb B MeCThIe KOMMyHaJIbHbIe CJyXkbI.
KoHTaKT C 3JeKTpOpOBoDkoM MoKeT cTaTb npuHnHO Bo3NtKHOBeHnna PoXapa N nopaxKeHnra 3JeKTpPueCKm TOKOM. PobpeXdHeNe ra3OpPOBDoH MaInCTpaJIN MoKeT npVBecTu K
B3pbIBy. IpopbIB BOIDonpoBOHOJ LINHN MOKeT HaHeCTN cepbe3HbIM MaTePnaJIbHbY uZepe6.
3aKpennTe 3arOToBky.
IcnoIb3yIe TnCKN IJIN 3aXkMblI dIg 3akpeIeHnI 3arOTOBKn. 3To ropa3do HaedKHee, Yem 3aXkMaTbe ee pyko.

He pekOMeHdyetcI dNITeNbHaJ 3KcIpyataun IJIeKTPoINHCTpymEnTa npn Opb60Te ac6ecToCoOpEpaUero MaTePnAna.
Ac6eCT Bb3bBaeT 06pa3OBaHne paka!
3haeHnIyMBOOByMnCCnI
U3mpeHHbI 3HaueHnnaNoJyueHbI B COOTBETCTBnC HOpMaTINBOM EN 60745.
UpoBHeH ⅦyMoBoI 3MnCCnHa pa6OeM MeCTe COCTaBnAeT:
YpOBeH WymoBOrO DaBHeHnA (LpA) 78 dB(A)
YpOBeH MoUHocTn UyMa (LwA) 89 dB(A)
IorpeuHocTb n3mepenK=3dB

YpOBeH yUma BO BpeM pa60tbl MoXeT npeBbIaTb 85 dB(A).
O6a3aTeIbHo IcNoIb3yIte HayuHnKn.
Bv6pa7a
TpnaKcnaJIbHoe 3MnCCNOHHe 3HaueHne Bn6paunnoJyueHoB COOTBETCTBn C HopMaTINBOM EN 60745.
I063nk
420 STE 500 STE
He3aMeIJIITeJIbHO 3aMeHHTb HOBbIM
OpunHaJIbHbIM MoUyIeM fIpMbI Kpecc.
HaabaTe Ha obaФNKcaTopa 3amka 13 n OTcoeHNHTe MOyIb ceTeBOrO shHpa 12 ot pykoTkn.
IcnoJb3yTe Bcerda ToJbKO OpunHaJIbHbI moJyJI bcTeBoro Ka6eIa KpeC, n no kpaIHei Mepe TJeKJI npope3nHeHHbI shaHroBbI npoBOD (KoJIOBoe oO3HaueHne H07 RN-F).
3Kcnnyataun
BkIIOUeyHne /OTKIIIOUeyHne
BHMaHHe!peed BKJIOUeHHeM lo63nKa B pa60Ty Heo6xOIMO CHOBA ONyCTNTb BHN3 nbJIne3aIHTbI KOKyx 3,yCTaHOBNeHHbI nepeD NIIbHbIM IONOTHom,do NNbHOrO CTOna4.
OTKJIUOChHepeRyIpyUoSeI 3NeKTPoHnIKBbIIOJIHReTcnyTeM yCTaHOBKn
peyunpoBOUHOro KOleCnKa Ha MaKcImaJIbHOe noJooKeHne. B 3TOM cnyae 3NeKtPoJIO63NK 6yIeT pa6OtaTb C MaKcImaJIbHbIM YNCNOM XoIOB INJIKB PEXKIME XOJOCTORO XOJa.
PpeBapntbHa yctaHOBka Yncna XoIOB NIIKN
Y 3JIeKTPoHnCTpyMeHTOB, IMeHOuNX peryInpOBOUHoe KOJecnKO 2, B 3aBcIMOCtN OT o6bIaCTn IIpIMeHeHMy MOKHO IpeBapITeNbHO n PIIaBHO 3aDaTb YNCNo O6OpOTOB C NOMOuBo peryInpOBOUHOrO KOJecnKa 2, dJaXe BO BpeMpa60TbI.
1-2: Hn3Koe YncNo xoIOB
3-4: CpeHnee YncIoo XoIOB
5-6: BbICOKoe YncIoo XoIOB
-ya3aHne
3NeKtpoNo63nK roTOB K NOkNIOueHIO CTaHdapTHOrO nbIneCocA.
ДяTORO,TO6bI MeCTO npONnA OCTaBAJIOCb YNCTbIM OT OINJOK, B OTBepCTne NaTPy6ka DЯ ydaJIeHn IbJIIN 9 BCTABJRAETcR n6kM WNaHR nbIneCoca.
Пьлесашитны Кожух 3 Heo6xOДIMOC dBHHTb Bn3 Do cpa6aTbIBAHINФИКcaTopa.
Pn BbINONHeHn HAKIOHNbIX paCNIIOB nJIe3aUHTbI KOKyX CneJyET nepeDvHHT bBepx.
3aMeHa HnctpyMeHtA

До NaHuaI npObeIeHnI nIObIx npOoIaKTNuecknx pa60, peryInpOBKn I HAcTpoIKN, 3aMeHbl OCHactKN INI NepeI TEM KAK OTCTaBNTb 3JIeKTPOINHCTpymeHT B CTOPHO, OTOeDHNHeIe WTekePOT o3eTKN.
OTДЛNTeIbHoI 3KcNlpyatauINnHCTpyMeHT MOXET CINlbHOHarpeBaTbcr, N/INn peJyUneKpOMKn INHCTpyMeHTa MoYr 6bITbOCTpbIMN.
CnCTema 3axmHa NMeet npenMuyueCTBO B TOM, YTO INIbHbIe NOJIoTHa MOXHO 3aMeHrTb 6e3 npIMHeHnKJIIOHa IIN DpyrOrO BCNOMORAteJIbHOrO IHCTpyMeHTa.
OnopHbI pOJIK npEoTbPaUaET OKTIOHeHne nIIKn I oBecneuINBaET pa3rpy3ky MexAHnueckOu actn (IToKa). OH cIyKNT B KaueCTBe ynpora N abTomatueeCKn 6bpa3yET yro1 3aJIMa B 90^ Pa3ymeTcR, 3TO OTHOcITc TOpIbKO K Tem cIyuaM, KOgda IcNoIb3yIOTc HauNOpunHaJIbHbIe nIIkn.
YctaHObKa nnJIbHOrO noJIoTHa (nnJIkn) "B"
- Chauana nepeBnHbTe nbJIe3aHTbI KOkyx 3 BBepx.
ПовернITEpbuGarФикcaиплки8do ynpa u ydepxkBaIte ero.
BCTaBbTe pIJIky 7 do ynpa.
OTnyctnte pbyar pfKcaun nJIKn 8.
-Ппдунрждениe
JIo63nK Heo6xOdImo yNepeTb KOHUnkOM PInIKN B DepeB8HHyIO pINITy N HAdaBnTb TaK, YTO6bl pbIurФHKCaun PInIKN 8 BepHyIcR B CBOe INCXoDHoe NOJoxKeHne.
ToIbKO TaK NIIka 7 6yJeT HAdExKHO npaBnIbHo 3akpenJIeHa n 3aunTHbI KOxUx 3 3akpoetc.
-ya3aHne
PpOBeBte NnIbHoe NOJIoTHO (NnIKy) Ha npOuHocTb NocaKn.
Плохо 3афикс neuropobahhoe NOIOTHO (ПИКА) MOKeT BbINaCTb И HaHeCTn TpaBMY.
BbIeMka nnJKN
ПовернITEpbuGarФикcaциплки8do ynpa n ydepknaBaiTe ero.
BbHbTe nnKy 7.
-ya3aHne
Ppi NOBOPTe pbyara qKcaunn NnKHe CneJeT OTXMaTb eTo Ha3a, TaK KaK B TaKOM nIOJKeHnn NnIka BbIHMaETc TOnbKO C npIMeHHeM Cnbl.
PpakTnueckne yka3aHna
Pa6ota 3neKtpoJIO63NKOM c MaTTHNKOBbIMXODOM
PnBbINOHeHn npoHIOB Heo6xOdmo CneIntb 3a Tem, YTO6bI ONOPHa nPiNTa lo63Nka HadeJxHO ynpapanacb B 3aROTOBky n pnpnerala K He. B 3TOM cnyae 3JeKtpoNo63NkOM IerYe UynabIpyko. PnI 3TOM, B INHTepecax NoJyUeHn 60Jee YNCTOrO npoNla n ONTMaJIbHO npOn3BOIDTeJIbHOCTn Pn NIIeHn Heo6xOdmo CneIntb 3a Tem, YTO6bI NaCTPOKa MaayTHNKOBORO XOda n NODaY a JIo63Nka COOTBETCTBOBaAN OcbpaTaIBaEMOMy MaTePnAly (HaNpIMeP: Pn NiJIeHN MToAIIa NaHAcTPOKa MaayTHNKOBORO XOda DOnJXHa 6blb YcTAHOBNeHa B NIOJoxEHe 0 n MeDJIeHHa NODa4a).
БлагорарьВстpoehнсстemeОбувпрогин He 3acopraetc Oплками Xopoшо npocMaTpRuBaetc.
PekomeHdaun no BbIbopy YncJa XoIOB nnJKN
OnTImaJIbHna HAcTpoKa YnCnA XoIOB OnpeIeJIeTcO nblTHbIM NyTeM Do Haayana BbINOJIHeHnPa cNIIIOBOUHybIX pa6Ot, TaK KaK pe3yIbTaTbI pa6Otbl MOrTy 3aBNCITb OT HECKoJIbKnxФakTopOB,TakNX KAK KaYeCTBO MaTePnAna,TOJIuHa MaTePnAna,CoCTOHRne NNJbHOrO NOIOTHa.
Hn3koe YncIoo XoIOB DnI PnIeHnI CTeKna, Kepamkn, Metanla.
CpeDHee YncNo XoOB dIy NIIeHnI
JIaCTMaCCbl, PpeccOBaHHoro MaTePnaJa,
fAHepbI.
BbICOKoe YnCNo XoIDOB npn O6pa60Tke DpeBeCInHbI TbePbIX N M8rKnx NopO, PNT DCI.
Pe3ka MeTaJIna
I3-3a HarpeBaHnMa MetaIIa BO BpEmr erO pe3Kn Heo6XoDIMO HAHOCHTb BDOJIb JINHN INpONJa XJaadaReHTb IIN MaCNo.
JInCTOBOMeTALN CNeIyET 3aKpeNnPaTb Ha DoCTaTOUHO npOuHOM OCHOBAHm (Ha DCII nIIN TOJCTOf pAHePHO nnITE).Tak MoXHo B 6oJIbWeI CTeneHN I36EkaTb CNTyaUHN, KOrDa o6pa6aTaBtBAeMbIM MaTePnaI HauHHaet npYkUnHTb.
Прореци
При Выпиньани порезн Heобхдимо npocBepnltb OTBepctne, T.e. COZdaTb ИСХОДнуTOUky,OT KOTOPОн НaЧNETс Bpe3ka ПИКINВ MaTeрпаI.
Bpe3ka norpuyxehnem"A"
ToIbKO MЯrkne MaTePnaJIbl, TaKne KaK dpeBecnHa, rHnCOKapTOH N POnObHbIe MaTePnaJIbl, DOnyckaIOTc K ObpaObTKe PyTeM Bpe3Kn C norgpyKeHHem!
We declare under our sole responsibility that this product is in conformity with the following standards or standardization documents: see CE
Technical file at: see TF
Quality & Process Representative


Josef Leins
Quality Management Representative

KRESS-elektrik GmbH & Co. KG
D-72406 Bisingen

- Symbols and abbreviations
- Symbols
- -WARNING-
- -NOTE-
- Safety rules
- General safety instructions for power tools
- WARNING!
- Work area
- Electrical safety
- Personal safety
- Power tool use and care
- Service
- Machine-specific SafetyWarnings
- Device description
- Device components
- Scope of supply
- Specified conditions of use
- Requirements for the user
- Noise/vibration Information
- Noise levels
- Vibration
- Operation
- Putting into operation
- Mains cable
- Fixed power supply
- Mains cable module (500 ST E)
- Operation
- Switching On and Off
- Restarting protection (500 ST E)
- Full-wave control electronics (420 ST E)
- Presetting the Stroke Rate
- Pendulum stroke setting (500 ST E)
- Mitre cuts
- Chip-flyoff guard
- Dust extractor
- Changing the tool
- Inserting the Saw Blade "B"
- -WARNING
- Unclamping saw blade
- Operating tips
- Operation of pendulum jigsaw
- Recommended stroke numbers
- Cutting metal
- Cutouts
- Plunge Cutting "A"
- Tools and accessories
- Selecting a Saw Blade
- Parallel fence (optional accessory)
- Circular cutter (optional accessory)
- Optional Accessory
- Maintenance and Service
- Maintenance and Cleaning
- Replacing brushes
- Spare parts / exploded view
- Environmental Protection
- Warranty
- Recommendation cycle
- Sagbladets montering "B"
- YIIOBcIeIcI aOpaAeiaC
- Epyaoies th eya taalavwns
- Euviotwuevos aipoos naiivopounoewv
- Pnioo aapiva
- Kotn aoivymuw
- -Ппсдунрждени-
- -YKA3AHNE-
- ПравILA Тхнки 6e3oNaCHOCTN
- Оьше npавILA texнки 6e3oNaChocTN npn 3KcnIpyaTuqun 3NeKtpOnHCTpyMeHTa
- BHIMAHHE!
- Бezonaachoctb pa6ohero mecta
- 3neKtpo6e30anacHOctb
- CepBnC
- CneuaJIbHbIe 630nacHOCTN
- 3haeHnIyMBOOByMnCCnI
- Bv6pa7a
- I063nk
- STE 500 STE
- 3Kcnnyataun
- BkIIOUeyHne /OTKIIIOUeyHne
- PpeBapntbHa yctaHOBka Yncna XoIOB NIIKN
- -ya3aHne
- 3aMeHa HnctpyMeHtA
- YctaHObKa nnJIbHOrO noJIoTHa (nnJIkn) "B"
- -Ппдунрждениe
- BbIeMka nnJKN
- PpakTnueckne yka3aHna
- Pa6ota 3neKtpoJIO63NKOM c MaTTHNKOBbIMXODOM
- PekomeHdaun no BbIbopy YncJa XoIOB nnJKN
- Pe3ka MeTaJIna
- Прореци
- Bpe3ka norpuyxehnem"A"
Brand : KRESS
Model : 500 ST E
Category : Electric saw