
ES-3124 - Network switch ZYXEL - Free user manual and instructions
Find the device manual for free ES-3124 ZYXEL in PDF.
| Product type | Network switch |
| Brand | ZYXEL |
| Model | ES-3124 |
| Dimensions (W x D x H) | 440 x 200 x 44 mm (approximate, 19-inch form factor) |
| Weight | Approximately 2.5 kg |
| Power supply | External power adapter, 100-240 V AC |
| Power consumption | Maximum 15 W |
| Number of ports | 24 RJ-45 ports |
| Port speed | 10/100/1000 Mbps (auto-negotiation) |
| Main features | Auto-negotiation of speed and duplex, auto-detection of straight/crossover cables, basic VLAN support (unspecified), management via serial console (console port optional) |
| Supported cable type | UTP/STP Category 5 or higher for 1000 Mbps, Category 3/4/5 for 10/100 Mbps |
| Maximum cable length | 100 meters |
| Indicator LEDs | PWR (power), LNK/ACT (link/activity) per port |
| Installation | Desktop (feet provided) or 19-inch rack (brackets provided) |
| Ventilation | Free space: 10 cm front, 8 cm rear |
| Operating temperature | 0 °C to 40 °C |
| Operating humidity | 10% to 90% (non-condensing) |
| Maintenance and cleaning | Unplug the device, clean with a soft dry cloth. Do not use abrasive products. |
| Safety | Respect ventilation distances, do not block openings, use only the provided adapter. |
| Spare parts and repairability | Contact an authorized dealer for any repairs. No user-serviceable parts. |
| General information | Unmanaged switch (layer 2) suitable for small networks. Manufacturer warranty 2 years (estimated). |
Frequently Asked Questions - ES-3124 ZYXEL
User questions about ES-3124 ZYXEL
0 question about this device. Answer the ones you know or ask your own.
Ask a new question about this device
Download the instructions for your Network switch in PDF format for free! Find your manual ES-3124 - ZYXEL and take your electronic device back in hand. On this page are published all the documents necessary for the use of your device. ES-3124 by ZYXEL.
USER MANUAL ES-3124 ZYXEL
This Quick Start Guide is for use with all ZyXEL Ethernet switches. Your device may differ from the illustrations below.
2 Installation
All switches can be used as a standalone device while some can alternatively be mounted on standard EIA racks.
Note: For proper ventilation, allow at least 4 inches (10 cm) of clearance at the front and 3.4 inches (8 cm) at the back of the switch. Leave space between switches if stacking.
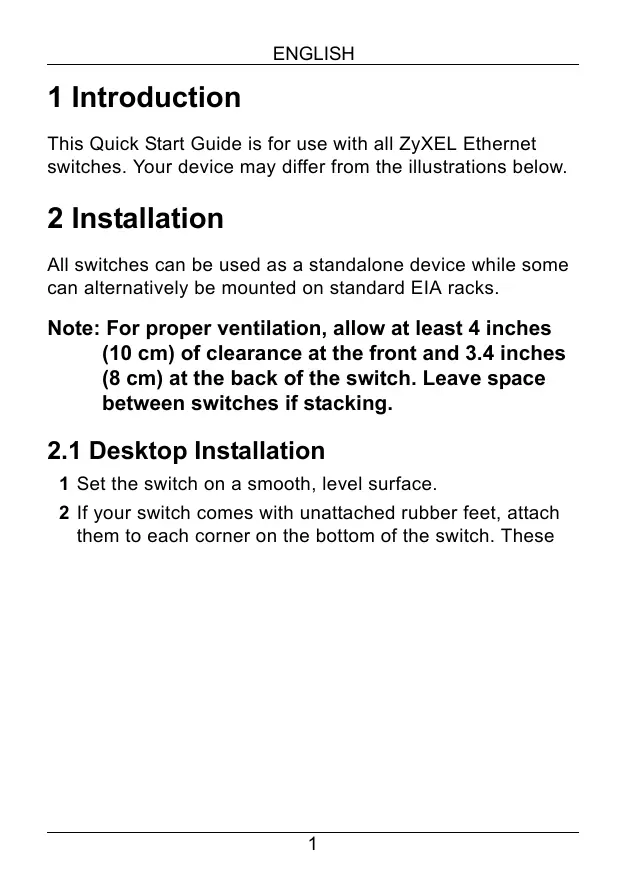
2.1 Desktop Installation
1 Set the switch on a smooth, level surface.
2 If your switch comes with unattached rubber feet, attach them to each corner on the bottom of the switch. These
ENGLISH
rubber feet help protect the switch from shock or vibration and ensure space between devices when stacking.
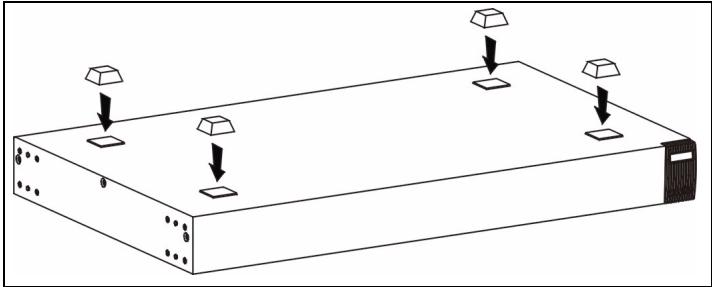
2.2 Rack-mounted Installation
1 Align one bracket with the holes on one side of the switch and secure it with bracket screws smaller than the rackmounting screws. Similarly, attach the other bracket.
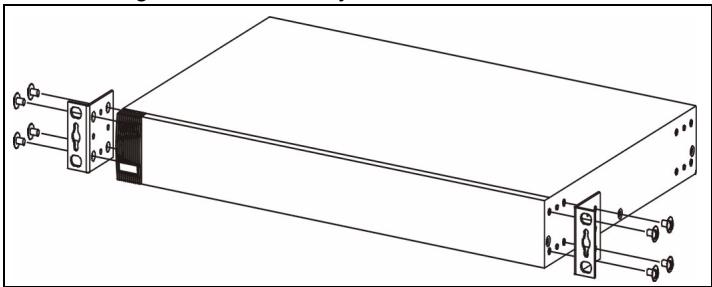
2 After attaching both mounting brackets, position the switch in the rack by lining up the holes in the brackets with the
appropriate holes on the rack. Secure the switch to the rack with the rack-mounting screws.
3 Hardware Connections
3.1 Auto-negotiating and Auto-crossover RJ-45 ports
Your switch comes with auto-negotiating, auto-crossover ports. Depending on the model, these ports are either fast Ethernet (10/100 Mbps) or Gigabit (10/100/1000 Mbps) ports. Auto-negotiating ports can detect the speed of incoming transmissions and allow either half duplex transfer mode (10/100 Mbps only) or full duplex mode. Auto-crossover means that you can connect the switch to a computer or hub using either a straight-through or a crossover Ethernet cable.
3.2 Network Cables
You can use unshielded twisted pair (UTP) or shielded twisted-pair (STP) Ethernet cables for RJ-45 ports. Make sure the cable length between connections does not exceed 100 meters (328 feet). The following table describes the types of network cable used for different connection speeds.
Table 1 Network Cable Types
| SPEED | NETWORK CABLE TYPE |
| 10Mbps | 100 Ω 2-pair UTP/STP Category 3,4 or 5 |
| 100Mbps | 100 Ω 2-pair UTP/STP Category 5 |
| 1000Mbps | 100 Ω 4-pair UTP/STP Category 5 |
The LNK/ACT LED should flash when data is being sent between your switch and a connected device.
3.3 Power Connection
Connect one end of the supplied power cable or power adaptor to the power receptacle on the switch and the other end to the appropriate power source. The PWR LED should turn steady on if the switch is receiving power.
3.4 Console Port (Managed Switches Only)
If your switch has a console port, you can use a terminal emulator for local management. Connect the male 9-pin end of a console cable to the console port of the switch. Connect the female end to a serial port (COM1, COM2 or other COM port) of your computer. Configure the computer with terminal emulation software to the following parameters:
- VT100 terminal emulation
9600 bps - No parity, 8 data bits, 1 stop bit
- No flow control
4 Troubleshooting
| PROBLEM | CORRECTIVE ACTION |
| None of the LEDs are on when the power is connected. | Verify that the included power or cable adaptor is connected to the switch's power receptacle and appropriate power source. If the error persists, you may have a hardware problem and should contact your vendor. |
| The LNK/ACT LED does not light up or flash when a device is connected. | Verify that the attached device(s) is turned on and properly connected to your switch. Also make sure the Ethernet cards are working on the attached devices. Verify that the network cable does not exceed 100 meters. |
1 Einleitung
3.4 Port Console (Switches Manageables Uniquement)
Brand : ZYXEL
Model : ES-3124
Category : Network switch