Toothcare 1100 Jet Clean Liberty - Interdental brush CECOTEC - Free user manual and instructions
Find the device manual for free Toothcare 1100 Jet Clean Liberty CECOTEC in PDF.


User questions about Toothcare 1100 Jet Clean Liberty CECOTEC
0 question about this device. Answer the ones you know or ask your own.
Ask a new question about this device
Download the instructions for your Interdental brush in PDF format for free! Find your manual Toothcare 1100 Jet Clean Liberty - CECOTEC and take your electronic device back in hand. On this page are published all the documents necessary for the use of your device. Toothcare 1100 Jet Clean Liberty by CECOTEC.
USER MANUAL Toothcare 1100 Jet Clean Liberty CECOTEC
Safety instructions 9
-
Parts and components 75
-
Before use 75
-
Operation 76
-
Cleaning and maintenance 78
-
Troubleshooting 79
-
Disposal of old electrical and
electronic appliances 80
-
Copyright 80
-
Simplified EU Declaration of Conformity 81
SOMMAIRE
EN · The coding in this manual is generic and applies to all code variants of the appliance.
Read the following instructions carefully before using the appliance. Keep this instruction manual for future reference or new users.
- Make sure that the mains voltage matches the voltage specified on the product's rating label and that the plug is earthed.
- This appliance can be used by children aged 8 years and above and people with reduced physical, sensory, or mental capabilities or lack of experience and knowledge if they have been given supervision or instruction concerning the use of the appliance in a safe way and understand the hazards involved. Children must not play with the appliance. Cleaning and user maintenance must not be carried out by children without supervision.
-
The appliance must be powered at a low safety voltage as stated on the marking.
-
This device should only be used with water or specific solutions.
- To avoid risk of burns, electric shock, fire, or injury:
- Do not attempt to connect or disconnect the charger with wet hands. To disconnect it, pull on the adapter, not the cable.
- Ensure the mains voltage matches the voltage specified on the appliance's rating label and that the socket is properly earthed.
- Check the charging cable regularly for visible damage. If the cord or adapter is damaged, malfunctioning, or has been dropped, it must be repaired by Cecotec's official Technical Support Service to avoid any danger.
- Disconnect the charger from the mains when the product is charged.
- Keep the product and cord away from fire and other heat sources.
- Never leave a product unattended while plugged in.
-
You must charge the product with the charger supplied by Cecotec. Do not use any other charger type.
-
Use the appliance only for the purposes described in this manual.
- Use only tips and accessories recommended or supplied by Cecotec.
- Do not drop or insert any foreign object into any opening.
- Do not direct water under the tongue, ear, nose, or other sensitive areas. This product can produce pressures which may cause serious damage in these areas.
- Do not use the device if you are wearing oral jewellery. Remove it before use.
- Do not use the device if you have an open wound on your tongue or your mouth. If you have been advised by your physician to receive antibiotic pre-medication prior to dental procedures, you should consult your dentist before using this device or any other oral-hygiene device.
-
This appliance is designed for domestic use only and is not intended for bars, restaurants, farmhouses, hotels, motels, and offices.
-
Store the appliance and its instruction manual in a safe and dry place when not in use.
- The oral irrigator may cause bleeding gums when first used. This is completely normal and will stop happening with frequent use. Adjust the intensity of the appliance to reduce the presence of bleeding gums.
- Do not use the device without assembling a tip.
- Do not place the device in a hot or wet place, nor in places with direct sunlight.
- During cleaning or maintenance, make sure that the device is switched off and is not charging.
- Users suffering from periodontitis or those who have undergone oral surgery within the last 2 months should consult a physician before using this device.
- Do not try to open, disassemble, or repair the appliance by yourself.
There are no serviceable parts inside the appliance.
- To avoid burns, do not fill the tank or attempt to clean your mouth with water above 40 °C.
- Do not use the device for any purpose other than oral hygiene.
- To avoid injury, do not press the tip between your gums or teeth.
- Do not use iodine, salt water, or concentrated essential oils that are insoluble in water with this appliance. Doing so would reduce performance and shorten its shelf life.
- Do not fill the device with pure mouthwash liquid. If you want to use mouthwash, dilute it according to the appropriate proportions.
Battery instructions
- This appliance contains an irreplaceable battery.
-
WARNING: to recharge the battery, use only the power supply unit provided with the appliance, reference ES518-U050100XYE.
-
This appliance includes a Li-ion battery. Do not incinerate or expose it to high temperatures, as it may explode.
- Do not allow children to replace batteries without adult supervision.
- Do not disassemble, open, or break secondary batteries.
- Keep the batteries out of the reach of children. Pay particular attention to small batteries. In case of battery ingestion, please seek medical attention immediately.
- Do not expose batteries to heat or fire. Avoid storage in direct sunlight.
- Do not short-circuit the battery. Do not store batteries in an untidy manner, in a box, or drawer where they can short-circuit each other or be short-circuited by other metal objects.
- Do not subject batteries to mechanical shock.
- Both batteries and cells can leak under extreme conditions. In the event of a battery leak, keep your skin and eyes away from the liquid.
If the liquid comes into contact with skin, wash immediately with soap and water. If the liquid gets into the eyes, rinse them immediately with clean water for at least 10 minutes and seek medical attention. Wear gloves to handle the battery and dispose of it immediately in accordance with local regulations.
- Battery ingestion can cause burns, soft tissue perforation and death. Severe burns may occur within two hours of ingestion.
- Keep batteries out of the reach of children when there is a risk of ingestion.
- Do not use any charger other than the one supplied specifically for this appliance.
- In case of battery ingestion, please seek medical help immediately.
- Secondary batteries must be charged before use. Always use the specified charger and refer to these instructions.
- Do not leave the battery on prolonged charge when not in use.
- After long periods of storage, it may be necessary to charge and discharge the batteries several times to obtain maximum performance.
- Dispose of the battery properly.
- The charger is only suitable for indoor use. Do not use it outdoors.
- Keep the charger clean. Dust can cause electric shock.
- You must not leave the charger running on easily flammable surfaces (paper, textile products, etc.) or flammable atmospheres.
- The charger can reach high temperatures while charging, creating a risk of fire.
- The recommended room-temperature range during charging is between 4 °C and 40 °C.
- The recommended room temperature range for battery storage is between 0 to 50°C.
- The recommended room-temperature range during charging is between 5 and 50 °C.
INSTRUCTIONS DE SÉCURITÉ
- 360° rotating tip
- Tip release button
- Power button
- Mode button
- Display
- Water tank
- Charging port
- Water inlet
Accessories:
Fig. 2
- High-pressure standard tip x4
- Periodontal tip x1
- Orthodontic tip x1
- Dental plaque tip x1
- Tongue cleaner tip x1
- Power cable x1
- Adapter x1
To be replaced every 6 months
High-pressure standard tip: regular cleaning
To be replaced every 3 months
- Orthodontic tip: regular orthodontic cleaning
- Dental plaque tip: dental implants/bridges/crowns/regular cleaning
- Periodontal tip: periodontal pocket cleaning
- Tongue cleaner tip: regular cleaning
NOTE:
The graphics in this manual are schematic representations and may not exactly match the product.
2. BEFORE USE
- This appliance comes in a packaging designed to protect it during transport. Take the appliance out of its box and remove all packaging materials. You can keep the original box and other packaging materials in a safe place to prevent damage to the appliance if you need to transport it in the future. If you wish to dispose of the original packaging, make sure all items are recycled properly.
- Check that all parts and components are included and in good condition. If any of them are missing or damaged, please contact Cecotec's Official Technical Support Service immediately.
Box content
- ToothCare 1100 Jet CleanLiberty Portable Water Flosser
- Power adapter
- 8 tips
- Travel pouch
- Instruction manual
Before first use:
Important! Ensure the device is fully charged before first use by connecting the cable to the charging port and mains socket. The device cannot be used while charging.
3. OPERATION
Step 1: Filling the water tank
Open the water inlet cover and pour water into the tank.
Note:
Ensure the device is switched off before filling the water tank.
Step 2: Tip installation
Insert the tip into the hole at the top of the device and press down. You should hear a click sound for correct installation. Rotate the tip to adjust the water output direction. To change the tip, press the release button and remove it. Fig. 3
Step 3: Mode selection
The device features 6 modes. Select the desired mode by pressing the mode button while the device is switched off. Each mode's function is explained below.
Fig. 4
- Mode indicator light
- Logo
-
Charging indicator light
-
Mode 1: Indicated by 1 constant white dot and white CECOTEC logo. Water pressure is 10-40 PSI.
-
Mode 2: Indicated by 2 constant white dots and white CECOTEC logo. Water pressure is 30-60 PSI.
-
Mode 3: Indicated by 3 constant white dots and white CECOTEC logo. Water pressure is 50-90 PSI.
- Mode 4: Indicated by 4 constant white dots and white CECOTEC logo. Water pressure is 60-110 PSI.
- Pulse mode: Indicated by 4 white dots flashing one by one and constant white CECOTEC logo. Water pressure is 60-110 PSI.
- Custom mode: Indicated by CECOTEC logo slowly fading from white to blue. Water pressure is 10-110 PSI. This mode features 8 water pressure levels. Flashing dots indicate odd pressure levels, while constant dots indicate even levels.
- Custom mode setting: At any time, press and hold the mode button for 2 seconds to access the Custom mode settings.
- The logo indicator will rapidly flash white. Each press of the mode button increases water pressure by 1 level. After setting desired water pressure, confirm settings by pressing and holding the mode button for 1 second or by not pressing any button for 5 seconds.
- This device includes water tank lights. The tank will illuminate during use.
Step 4: Before use
Before using the device, lean slightly over the sink, extend the tip towards your mouth and direct it towards your teeth, gums or between teeth.
- Rotate the tip to adjust the water direction so it's perpendicular to the area you wish to clean. Ensure your mouth is slightly open to allow water to exit.
Note:
- When using the water flosser for the first time, start with the lowest mode. Water pressure can be gradually increased as your mouth adapts.
- You may experience gum tingling or slight bleeding during use. This is normal and should subside after 1-2 weeks of use.
Step 5: Usage instructions
Press and hold the power button for 1 second to turn on the device. The device is equipped with a 120-second auto-shutoff timer.
Turn off the device at any time when finished by pressing the power button again. The timer will reset when the device is turned back on.
Techniques
For best results, begin with the molars (back teeth) and work towards the front teeth. While cleaning, position the tip at 90° to the gum line. Pause briefly between each tooth. Close your lips slightly to prevent water splashing but leave enough space for water to flow into the sink. Fig. 5.
Step 6: After use
After use, open the water inlet cover and empty any remaining contents. Turn on the device and expel any remaining liquid until no more water is released. Then turn off the device. Fig. 6.
Step 7: Charging
During use, the battery indicator light shows white and flashes red when battery is low, indicating recharging is needed. While charging, the battery indicator light and CECOTEC logo will flash red. When fully charged, the battery indicator light and CECOTEC logo will remain white.
4. CLEANING AND MAINTENANCE
Cleaning the main body
- Use only clean water or neutral detergent to clean the device. Do not use corrosive or abrasive cleaners. Do not use water above 50°C to clean any part of the device, as this could cause damage and reduce effectiveness.
- If immersing the water flosser for cleaning, ensure the charging port cover is properly sealed in place, otherwise the device could be damaged.
Cleaning the water tank
- Hold the main body with your left hand and the water tank with your right. To remove the tank, turn it clockwise and pull downwards.
- Rinse the inside of the tank with clean water at room temperature. Do not clean the tank with any type of detergent.
- After cleaning, attach the water tank by aligning it with the seal and rotating anticlockwise. Fig. 7
Limescale removal:
- Depending on mineral content in the water used, limescale deposits may accumulate in the device. If limescale build-up is not removed, product performance will decrease.
- Point the tip towards the sink, turn on the device and let it run until all water is consumed. Fill the water tank with clean lukewarm water and repeat the previous step to clean the tank. This cleaning process should be repeated every 1-3 months to maintain product performance.
Battery maintenance
- Ensure the battery is fully charged before first use.
- Ensure the battery is fully charged before storing the device for an extended period.
- To extend battery life, charge the device immediately when the battery level is low.
- If storing the device for an extended period, fully discharge and recharge the battery every 6 months.
Battery recycling
This device uses a recyclable rechargeable battery, located in the upper part of the main body. At the end of the device's life cycle, recycle or dispose of the battery separately according to local waste management regulations before disposing of the device.
Recycling procedure
With the device switched off, remove the tip and water tank, then use a screwdriver or similar tool to lever open the main body base and extract the recyclable battery. Fig. 8
Note:
Do not short-circuit the positive and negative terminals of the removed battery. Terminals can be insulated with adhesive tape.
- TROUBLESHOOTING
| Problem | Possible cause | Possible solution |
| There is a leak between the tip and the body | Tip not correctly installedThe tip holder seal is damaged | Remove the tip and reinstall it again in its position, ensuring it fits properlyIf the problem persists, contact Cecotec's Official Technical Support Service to repair the seal. |
| Problem | Possible cause | Possible solution |
| There is a leak in the water inlet | The seal is damaged, or there are impurities in the inlet | Contact Cecotec's Official Technical Support Service to repair it. |
| There is a leak in the water tank | The seal is damaged. | Repair the seal or contact Cecotec's Official Technical Support Service. |
| There is not enough water pressure | Low battery. | Try again after charging. |
| The device does not turn on | Low battery. | Try again after charging.If the problem persists, contact Cecotec's Official Technical Support Service to repair it. |
| The device does not release water | You are using the device for the first time, or it has not been used for a long time. The water tank is empty. The water suction tube is not correctly placed, or it is damaged | Add the proper amount of water into the tip holder gap and try again after installing a tip.Make sure there is enough water in the tank.Check the water suction tube and contact Cecotec's Official Technical Support Service if damaged. |
If you cannot resolve the issue using the above instructions, please contact Cecotec's Official Technical Support Service.
6. DISPOSAL OF OLD ELECTRICAL AND ELECTRONIC APPLIANCES


This symbol indicates that, according to the applicable regulations, the product and/or batteries must be disposed of separately from household waste. When this product reaches the end of its shelf life, you should dispose of the batteries/accumulators and take them to a collection point designated by the local authorities.

For detailed information on how to properly dispose of electrical and electronic equipment and/or the corresponding batteries, consumers should contact their local authorities. Compliance with the above guidelines will help protecting the environment.
7. COPYRIGHT
The intellectual property rights over the texts in this manual belong to CECOTEC INNOVACIONES, S.L. All rights reserved. The content of this publication may not, either in part or in its entirety, be reproduced, stored in a retrieval system, transmitted or distributed by any means (electronic, mechanical, photocopying, recording or similar) without prior authorisation from CECOTEC INNOVACIONES, S.L.
8. SIMPLIFIED EU DECLARATION OF CONFORMITY
CE
Cecotec Innovaciones hereby declares that this appliance complies with the essential requirements and other relevant provisions of the regulations applicable in the European Union. This appliance has been designed, manufactured and tested in compliance with required safety and quality standards. The full text of the EU
Declaration of Conformity can be found on the following website: https://cecotec.es/es/information/declaration-of-conformity
1. PIÈCES ET COMPOSANTS
Img. 1
https://cecotec.es/es/information/declaration-of-conformity
Fig./Img./Abb./Afb./Rys. 2

Fig./Img./Abb./Afb./Rys. 3

Fig./Img./Abb./Afb./Rys. 4


Fig./Img./Abb./Afb./Rys. 5
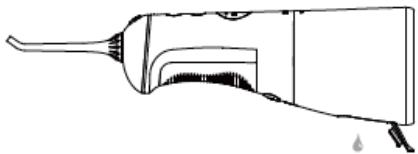
Fig./Img./Abb./Afb./Rys. 6
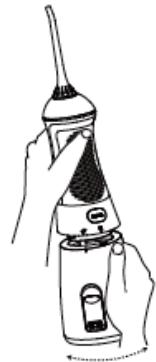
Fig./Img./Abb./Afb./Rys. 7

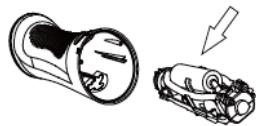
Fig./Img./Abb./Afb./Rys. 8
www.cecotec.es
- SOMMAIRE
- BATTERY INSTRUCTIONS
- INSTRUCTIONS DE SÉCURITÉ
- ACCESSORIES
- FIG. 2
- TO BE REPLACED EVERY 6 MONTHS
- TO BE REPLACED EVERY 3 MONTHS
- NOTE
- BEFORE USE
- BOX CONTENT
- OPERATION
- STEP 1: FILLING THE WATER TANK
- STEP 2: TIP INSTALLATION
- STEP 3: MODE SELECTION
- FIG. 4
- STEP 4: BEFORE USE
- STEP 5: USAGE INSTRUCTIONS
- TECHNIQUES
- STEP 6: AFTER USE
- STEP 7: CHARGING
- CLEANING AND MAINTENANCE
- CLEANING THE MAIN BODY
- CLEANING THE WATER TANK
- LIMESCALE REMOVAL
- BATTERY MAINTENANCE
- BATTERY RECYCLING
- RECYCLING PROCEDURE
- DISPOSAL OF OLD ELECTRICAL AND ELECTRONIC APPLIANCES
- COPYRIGHT
- SIMPLIFIED EU DECLARATION OF CONFORMITY
- PIÈCES ET COMPOSANTS
- WWW.CECOTEC.ES
Brand : CECOTEC
Model : Toothcare 1100 Jet Clean Liberty
Category : Interdental brush