Drumfit Wayhome 1600 Obelia - Fitness Equipment CECOTEC - Free user manual and instructions
Find the device manual for free Drumfit Wayhome 1600 Obelia CECOTEC in PDF.


| Product type | Electric treadmill |
| Model | Drumfit Wayhome 1600 Obelia |
| Brand | Cecotec |
| Users | Adults only |
| Power supply | Mains 220-240 V, 50 Hz |
| Motor power | 1600 W |
| Maximum speed | 14 km/h |
| Running surface | Approximately 120 x 42 cm |
| Incline | 3 adjustment levels |
| Workout programs | 12 preset programs |
| Display | LCD screen |
| Heart rate | Pulse sensors on the handles |
| Folding | Yes, compact folding system |
| Unfolded dimensions | Approximately 148 x 68 x 115 cm |
| Device weight | Approximately 34 kg |
| Maximum user weight | 120 kg |
| Safety | Emergency stop with magnetic key |
| Maintenance | Check fastenings and clean with a damp cloth |
| Spare parts | Available via Cecotec after-sales service |
| Warranty | Support and warranty via Cecotec |
| General information | Read and keep the manual for any new user |
Frequently Asked Questions - Drumfit Wayhome 1600 Obelia CECOTEC
User questions about Drumfit Wayhome 1600 Obelia CECOTEC
0 question about this device. Answer the ones you know or ask your own.
Ask a new question about this device
Download the instructions for your Fitness Equipment in PDF format for free! Find your manual Drumfit Wayhome 1600 Obelia - CECOTEC and take your electronic device back in hand. On this page are published all the documents necessary for the use of your device. Drumfit Wayhome 1600 Obelia by CECOTEC.
USER MANUAL Drumfit Wayhome 1600 Obelia CECOTEC
WAYHOME 1600 OBELIA ULTRAFLEX
Cinta de correr plegable/Foldable treadmill

Safety instructions 8
-
Parts and components 52
-
Before use 52
-
Product assembly 53
-
Operation 54
-
Information on exercising 56
-
Product transportation and storage 56
-
Cleaning and Maintenance 57
-
Technical specifications 58
-
Disposal of old electrical and electronic appliances 58
-
Technical support and warranty 58
-
Copyright 59
SOMMAIRE
Please, keep this instruction manual in a safe place for future reference or new users.
Read these instructions carefully before assembling or using the treadmill. These instructions contain important information that will help you get the best out of your equipment.
- The product will only be safe if it is properly assembled, maintained, and used.
- It is your responsibility to make sure every user is informed about the warnings and precautions stated in this instruction manual.
- This appliance can be used by children aged 8 years and above and persons with reduced physical, sensory, or mental capabilities or lack of experience and knowledge if they have been given supervision or instruction concerning the use of the appliance in a safe way and understand the hazards involved. Children must not play with the appliance. Cleaning and maintenance must not be performed by children without supervision.
- Keep children and animals away from the working area as small parts could cause risk of suffocation if swallowed.
- Keep children and animals away from the machine. It is designed for adults only.
- Check that the screws and nuts are securely fastened before using the treadmill. The safety level of the device can be only maintained through regular examination for damage and/or wear and tear signals.
- Always use the treadmill as indicated in this instruction manual. If you find any defective piece when assembling or testing the treadmill, or if it makes unusual noise during use, stop using it immediately and contact the Technical Support Service of Cecotec. Do not use the treadmill until the problem has been solved.
- Any misuse or non-compliance with these instructions voids the warranty and the manufacturer liability.
- Before starting an exercise programme, you should consult your doctor to determine if you have any physical or health conditions that could create a risk to your safety or prevent you from using the treadmill properly. Your doctor's advice is essential if you are taking medication because of your heart rate, blood pressure, or cholesterol level.
- Be aware of your body signals. Incorrect or excessive exercise can deteriorate your health. Stop exercising if you experience any of the following symptoms: pain, tightness in your chest, irregular heartbeat, extreme shortness of breath, dizziness, or nausea. If you experience any of these conditions, you should consult your doctor before continuing with your exercise programme.
- Care must be taken when lifting or moving the treadmill so as not to injure your back.
- Keep your hands and any loose clothing or objects away from all moving parts.
- Make sure you have enough space to lay out the parts before starting.
- Do not place any sharp objects around the treadmill.
- This product is intended for household use only. Do not use it in shops, institutions, or for therapeutic purposes. Not recommended for outdoor use.
- You are buying this equipment to exercise at your own risk. If you have any health condition or feel you may be at risk of one, please consult with your physician or doctor before starting any exercise.
- Follow the recommended warm-up and stretching exercises before using the equipment to exercise.
- Only one person at a time should use the treadmill.
- Wear appropriate clothing when using the treadmill. Avoid wearing loose clothing which may get caught in the treadmill or that may restrict or prevent movement. Start using the treadmill at a slow speed, holding on to the handlebars firmly.
- This product is suitable for a maximum user weight of 120 kg.
- This training device is not suitable for high-precision purposes.
- Exercise extreme caution when adjusting the belt. Keep your fingers, hair, and clothing away from the belt.
- Do not cover the belt with sheets or any textile item, nor use it if covered with any of these items. It may get hot and cause fire, injury, or electric shock.
- If repairs are required, please consult your supplier for further information or contact Cecotec Customer Service.
-
Treadmill location:
-
Place the treadmill on a flat, smooth, and stable surface with a protective floor covering or carpet.
-
Make sure you leave a minimum of 2 metres around the treadmill.

- Do not place anything behind the treadmill that could obstruct the emergency exit.
- Do not stand on the treadmill if you are not using it or if you are preparing to use it. Place both feet on the treadmill's side edges. Get on it only when you are ready.
- Never start at full speed.
- Do not jump on the treadmill.
- Keep the treadmill away from excessive humidity and dust.
- Make sure that those present during the exercise are aware of potential hazards, e.g., the protrusions of moving parts.
- Incorrect/excessive training can cause injuries.
- Do not arch your back when using the treadmill. Always try to keep your back straight.
- WARNING: the heart rate sensors may be inaccurate, as it is not a medical device. Sensors can give you estimated heart-rate information.
- If you feel any discomfort, stop exercising immediately. It may be dangerous for your health. If it persists, immediately go to the nearest medical centre.
- WARNING: do not run the treadmill when folded up.
- WARNING: wait for the running surface to come to a complete stop before folding the treadmill.
- Noise emission under load is higher than without load.
- To make an emergency stop, place your hands on the handlebars, and place your feet on the side edges.
- Always attach the safety clip to your clothing at waist level and attach the safety key to the control panel before starting your workout.
- To prevent accidents, this treadmill comes with a safety key to be securely attached to your clothing. In the event that you accidentally trip or slip while walking or running on the treadmill, remove the safety key from the console to stop the treadmill's motor. Re-insert the safety key to resume the training.
INSTRUCTIONS DE SÉCURITÉ
- Treadmill belt
- Left-side handrail
- Heart rate sensor
- Safety-clip holder
- LCD monitor
- Control panel
- Right-side handrail
- Bracket
- Transportation caster
- Side rail
- Folding handle
- Belt-adjustment system
- Treadmill On/Off switch
- Power socket
Fig. 2
- Screw (8 units)
- Screw (2 units)
- Washer (2 units)
- Allen key (1 unit)
- Safety clip (1 unit)
- Mp3 connection cable (1 unit)
Please note
The graphics in this manual are schematic representations and may not exactly match the product.
2. BEFORE USE
- This appliance is packaged in a way as to protect it during transport. Take the device out of its box and remove all packaging materials. You can keep the original box and other packaging elements in a safe place. This will help you prevent product damage when transporting it in the future. In case the original packaging is disposed of, make sure all packaging materials are recycled accordingly.
- Make sure all parts and components are included and in good conditions. If there is any piece missing or not in good condition, immediately contact the Technical Support Service of Cecotec
Box contents
- DrumFit WayHome 1600 Obelia UltraFlex Treadmill
- Control panel with LCD monitor
- Assembly tools
- Instruction manual
3. PRODUCT ASSEMBLY

By scanning the following QR code, you can view the product's complete step-by-step assembly.
It is recommended that two people assemble the device.
Step 1. Body:
Fig. 3
Carefully place the treadmill's main body on the floor, as close to the preferred location as possible.
Step 2. Side handrails:
Fig. 4
Raise the side handrails (2 and 7) and secure them:
- At the front with two screws (15) for each side handrail.
- At the side with one screw (16) for each side handrail.
- Use the Allen key (18) to tighten the screws.
Step 3. Control panel:
Fig. 5
- Place the connector (22) on the inside of the side handrail into position.
- Align the control panel with the LCD monitor (6) and insert it into the side handrails. Secure both parts with two screws (15) on each side. Tighten them with the Allen key (18).
- Connect the monitor's cord (21) to the side handrail's connector (22).
- Place the safety clip (19) in the safety clip holder (4) on the control panel. If not in place, the treadmill will not work.
Notes
- Attach the other end of the safety clip to your clothing when using the treadmill.
- The control panel has USB and jack sockets that allow you to listen to music from a variety of devices.
4. OPERATION
Fig. 6
- LCD monitor
- MP3
- USB
- Quick incline selection
- Quick speed selection
- Start
- Programme selection
- Change mode
- Pause
- Incline selection
- Speed selection
Control-panel functions
| FUNCTION | DISPLAY | DESCRIPTION |
| Time | TIME | No Target Time: time will count up from 00:00 to maximum of 99:00 in one-minute intervals.With Target Time: time will count down from the selected value. Increase the time in one-minute intervals between 5:00 to 99:00. |
| Speed | SPEED | Current training speed from 1.0 to a maximum of 16.0 km/h. |
| Distance | DIS | No Target Distance: distance will count up from 0.0 to a maximum of 99.5 km in 0.1 km intervals.With Target Distance: distance will count down from the selected value. Increase the distance from 0.5 km to 99.5 km in 0.5 km intervals. |
| Calories | CAL | No Target Calorie: calories will count up from zero to a maximum of 995 in 1 cal. intervals.With Target Calories: calories will count down from the selected value. Increase the calories in 5 cal. intervals from 10 to 995 calories. |
| Heart rate | PULSE | Place your hand on the sensor and the console will detect your heart rate. When the monitor is measuring your heart rate, a HEART SYMBOL will flash on the console. |
On
- Plug the power cord to a grounded outlet and operate the power switch on the front of the treadmill.
- Make sure the mains voltage matches the voltage input of the appliance.
- Make sure the safety clip is in position and properly attached to the control panel and your clothing.
Quick workout
- There are 4 buttons on the quick-speed-selection panel to choose between 4 pre-set speeds (3 km/h, 6 km/h, 9 km/h, and 12 km/h).
- You can also use the quick-speed-selection panel during your workout; press the Start button to begin your workout.
- If you need to stop the treadmill during your workout, press the Stop button or pull out the safety clip.
Programmes
- This treadmill console has 12 pre-set workout programmes to choose from (see below).
- Use the Program Select button to select the desired training (P1-P12). Press the Start button to confirm and start your workout.
- The pre-set time for each program is 30 minutes, 1.5 minutes per interval, but can be modified by pressing the speed +/- buttons before starting the program.
- Each program consists of 20-time intervals, same duration but different intensity. The following graphs correspond to the time intervals and the height shows intensity.
Fig. 7
P1: WARM-UP
P2: RANDOM (change in intensity)
P3: 5K RUN
P4: COMPETITION
P5: WEIGHT-LOSS
P6: HILL
P7: TIME GOAL
P8: DISTANCE GOAL
P9: CALORIES GOAL
P10: MOUNTAIN CLIMB
P11: BEACH SPORT
P12: CROSS COUNTRY RACE
ENGLISH
5. INFORMATION ON EXERCISING
Fig. 8
- A proper workout should consist of the following three activities:
- Warm-up: Consisting of 5 to 10 minutes of stretching and light exercise. A proper warm-up increases your body temperature, heart rate, and circulation in preparation for exercise.
- Training: Consisting of 20 to 30 minutes of exercise.
Please note
During the first few weeks of your exercise programme, do not keep your heart rate in your training zone longer than 20 minutes.
- Cool-down: 5 to 10 minutes of stretching exercises. This will increase the flexibility of your muscles and will help prevent injuries.
Workout routine
To maintain or improve your physical condition, exercise three times per week, with at least one day of rest between workouts. After a few months of regular exercise, you may exercise up to five times per week, if desired. Remember, the key to success is making exercise a regular and enjoyable part of your everyday life.
6. PRODUCT TRANSPORTATION AND STORAGE
Folding the treadmill
Fig. 9
- Switch off and disconnect the device from the main plug. Make sure it has come to a complete stop before folding.
- Lift the treadmill platform up towards the control panel until it fixes into place.
- To lower the treadmill platform, press the gas spring with your foot to disengage the lock. The platform will then lower itself to the ground. Do not force it.
Warning
If the treadmill does not fold correctly, it is because of improper assembly. The screws on the side rails should be better secured and the position of the control panel should be adjusted.
Moving the treadmill
Fig. 10
- When folded, the treadmill can be moved by tilting it towards you onto its transportation wheels.
- Make sure the power cord is unplugged and does not get hung up before moving it.
7. CLEANING AND MAINTENANCE
Warnings
- Before cleaning or carrying out maintenance on the equipment, make sure that it is switched off and unplugged from the mains.
- At least once a year, the motor cover on your treadmill should be removed and any dust or debris vacuumed, to ensure a smooth and correct operation of the motor and drive system.
Cleaning
Please note
The frequency of cleaning and maintenance indicated is a guideline. It depends on frequency and user intensity.
- Examine the equipment periodically to detect any issue, such as loose bolts.
- The belt/deck friction may play a major role in the performance and lifespan of your treadmill, thus requiring periodic lubrication.
- We recommend a periodic inspection of the platform.
- We recommend lubrication of the platform according to the following timetable:
A. Light user (less than 3 hours/week): once per year.
B. Medium user (3-5 hours/week): every six months.
C. Heavy user (more than 5 hours/week): every three months.
- Lift the belt slightly and apply lubricant to both ends.
- It is important to train for a few minutes afterwards to make sure the lubricant expands.
- Inspect and tighten all parts before using the equipment. Replace any defective parts immediately, and do not use the equipment again until it is in perfect condition.
- The equipment can be cleaned using a slightly damp cloth and mild non-abrasive detergent. Do not use solvents.
- Do not try to repair the product by yourself. Should you have any difficulty with its assembly or operation, or if you think that any part is missing, contact the official Technical Support Service of Cecotec.
- You must check the screw condition every two or three weeks.
Tensioning and centring the belt
Fig. 11
- Run the belt at a low speed.
- Fold the belt.
- Insert the Allen key to adjust the belt's tension and position and turn it clockwise and counterclockwise until correctly tensioned and centred.
- Do not over-tighten the belt, as this may damage the device.
- The tension is ideal if you can lift the central part of the equipment by about 5 cm.
ENGLISH
Storage
- Remember to store the treadmill in a dry place.
- Do not place objects on the treadmill.
8. TECHNICAL SPECIFICATIONS
Model: DrumFit WayHome 1600 Obelia UltraFlex
Product reference: 07080
Power: 1500 W
Voltage: 220-240 V\~
Frequency: 50/60 Hz
Speed: 1-16 km/h
Running surface: 130 x 42 cm
Size: 165 x 71.5 x 128 cm
HC Class
Weight: 57 kg
Maximum user weight: 120 kg
Technical specifications may change without prior notification to improve product quality.
Made in China | Designed in Spain
9. DISPOSAL OF OLD ELECTRICAL AND ELECTRONIC APPLIANCES

This symbol indicates that, according to the applicable regulations, the product and/or battery must be disposed of separately from household waste. When this product reaches the end of its shelf life, you should dispose of the batteries/accumulators and take them to a collection point designated by the local authorities.
Consumers must contact their local authorities or retailer for information
concerning the correct disposal of old appliances and/or their batteries.
Compliance with the above guidelines will help protecting the environment.
10. TECHNICAL SUPPORT AND WARRANTY
Cecotec shall be liable to the end user or consumer for any lack of conformity that exists at the time of delivery of the product under the terms, conditions, and deadlines established by the applicable regulations.
It is recommended that repairs be carried out by qualified personnel.
If at any moment you detect any problem with your product or have any doubt, do not hesitate to contact Cecotec official Technical Support Service at +34 963 210 728.
11. COPYRIGHT
The intellectual property rights over the texts in this manual belong to CECOTEC INNOVACIONES, S.L. All rights reserved. The contents of this publication may not, in whole or in part, be reproduced, stored in a retrieval system, transmitted, or distributed by any means (electronic, mechanical, photocopying, recording or similar) without the prior authorization of CECOTEC INNOVACIONES, S.L.
FRANÇAIS
1. PIÈCES ET COMPOSANTS
Img. 1
Fig./Img./Abb./Afb./Rys./Obr.1
| 15 | 16 | ||
| 17 | 18 | ||
| 19 | 20 |
Fig./Img./Abb./Afb./Rys./Obr. 2
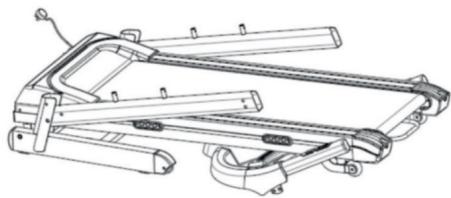
Fig./Img./Abb./Afb./Rys./Obr. 3
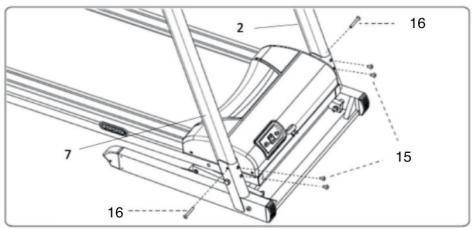
Fig./Img./Abb./Afb./Rys./Obr. 4

Fig./Img./Abb./Afb./Rys./Obr. 5
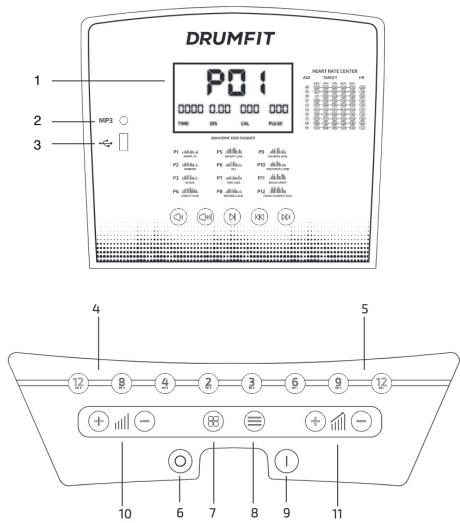
Fig./Img./Abb./Afb./Rys./Obr. 6
Fig./Img./Abb./Afb./Rys./Obr. 8

Fig./Img./Abb./Afb./Rys./Obr. 9

Fig./Img./Abb./Afb./Rys./Obr. 10

Fig./Img./Abb./Afb./Rys./Obr. 11
www.cecotec.es

- SOMMAIRE
- INSTRUCTIONS DE SÉCURITÉ
- FIG. 2
- PLEASE NOTE
- BEFORE USE
- BOX CONTENTS
- PRODUCT ASSEMBLY
- STEP 1. BODY
- STEP 2. SIDE HANDRAILS
- STEP 3. CONTROL PANEL
- NOTES
- OPERATION
- FIG. 6
- ON
- QUICK WORKOUT
- PROGRAMMES
- FIG. 7
- ENGLISH
- INFORMATION ON EXERCISING
- FIG. 8
- WORKOUT ROUTINE
- PRODUCT TRANSPORTATION AND STORAGE
- FOLDING THE TREADMILL
- FIG. 9
- WARNING
- MOVING THE TREADMILL
- FIG. 10
- CLEANING AND MAINTENANCE
- WARNINGS
- CLEANING
- TENSIONING AND CENTRING THE BELT
- FIG. 11
- STORAGE
- TECHNICAL SPECIFICATIONS
- DISPOSAL OF OLD ELECTRICAL AND ELECTRONIC APPLIANCES
- TECHNICAL SUPPORT AND WARRANTY
- COPYRIGHT
- FRANÇAIS
- PIÈCES ET COMPOSANTS
- IMG. 1
Brand : CECOTEC
Model : Drumfit Wayhome 1600 Obelia
Category : Fitness Equipment