POWERMAXX12 - Power tool METABO - Free user manual and instructions
Find the device manual for free POWERMAXX12 METABO in PDF.
| Product Type | Cordless drill/driver |
| Brand | Metabo |
| Model | PowerMaxx 12 |
| Rated Voltage | 12 V |
| Number of Speeds | 2 |
| Speed Range | 1st speed: 0-400 rpm, 2nd speed: 0-1400 rpm |
| Maximum Torque | 30 Nm |
| Torque Settings | 6 adjustable positions + drilling |
| Max Drilling Diameter (Steel) | 10 mm |
| Max Drilling Diameter (Wood) | 20 mm |
| Weight (with Battery Pack) | 1.2 kg |
| Power Source | 12 V Li-Ion battery pack |
| Lighting | Integrated LED light |
| Direction of Rotation | Right, left, transport safety (position 0) |
| Safety | Multi-function monitoring system (protection against deep discharge, overheating, overload) |
| Applications | Screwing, drilling, tapping |
| Recommended Storage Temperature | 10 °C to 40 °C |
| Included Accessories | Collet for bits, protective cap |
| Maintenance and Cleaning | Clean with a dry cloth; repairs exclusively by a Metabo specialist |
| Spare Parts and Repairability | List of spare parts available at www.metabo.com |
| Environmental Protection | Batteries and devices must not be disposed of with household waste; mandatory recycling |
Frequently Asked Questions - POWERMAXX12 METABO
User questions about POWERMAXX12 METABO
0 question about this device. Answer the ones you know or ask your own.
Ask a new question about this device
Download the instructions for your Power tool in PDF format for free! Find your manual POWERMAXX12 - METABO and take your electronic device back in hand. On this page are published all the documents necessary for the use of your device. POWERMAXX12 by METABO.
USER MANUAL POWERMAXX12 METABO
Director Product Engineering & Quality
Responsible Person for Documentation
© 2011 Metabowerke GmbH, 72622 Nürtingen, Germany
Mögliches Zubehr - Possible accessories - Accessoires possibles - Mogelijke toebehoren - Accessori possibili - Accessorios disponibles - Acceptorios posséis - Tillgängliga tillbehör - Mahdolliset lisātarvikkeet - Mulig tilbehr - Muligt tilbehr - Dopuszczalne akcesoria - Διαθέσιμα εξαρτήματa - Lehetségés tartozék - Bo3mokkHz πρηαπλεχκούctη
A
B
C
D

E
F
6.25390
0,8x5,5mm 1,0x5,5mm 1,2x6,5mm PH1, PH2, PH3, PZ1, PZ2, PZ3
6.25391
PZ1, PZ2, PZ3, TX10, TX15, TX20, TX25, TX30, TX40
6.25392
TX8, TX9, TX10, TX15, TX20, TX25, TX27, TX30, TX40
6.25393
2xPZ1,3xPZ2,1xPZ3
Zubehor nicht im Lieferumfang enthalten - Accessories not included in scope of delivery - Accessaires non fournis - Toebehoren nicht bij de levering inbegren - Accessori non compresi in dotazione - Accessories no incluados en el suministro de series - Acesorios não incluidos no volume de fornecimento - Tillbehör ingár inte - Lisatarvikkeet eivät kuulu toimitussältöän - Tilbehör er ikke inkludert - Tilbehör er/DDkneinkluderet i leveringsomfangeT Akcesoria não objete zakresem dostawy - Ta εδαρτήματε δε συπεριλαβανονται στΑ υλικα παράðoης - A tartozék nem képezi a szalítmany résztét - Πρинадлесхости Н BXODТВ KOMПЛЕKT NOCTABKN
D2max = in Weichholz
Original instructions
Dear Customer,
Thank you for the trust you have placed in us by buying a new Metabo power tool. Each Metabo power tool is carefully tested and subject to strict quality controls by Metabo's quality assurance. Nevertheless, the service life of a power tool depends to a great extent on you. Please observe the information contained in these instructions and the enclosed documentation. The more carefully you treat your Metabo power tool, the longer it will provide dependable service.
Contents
1 Declaration of Conformity
2 Specified Use
3 General Safety Instructions
4 Special Safety Instructions
5 Overview
6 Special Product Features
7 Use
7.1 The machine's multifunctional monitoring system
7.2 Battery pack
7.3 Setting the direction of rotation, engaging the transporting safety device (switch-on lock)
7.4 Selecting gear stage
7.5 Setting torque control,drilling
7.6 Switching power tool on/off, setting rotational speed
7.7 LED lights
8 Tips and Tricks
9 Accessories
10 Repairs
11 Environmental Protection
12 Technical Specifications
1 Declaration of Conformity
We, being solely responsible, hereby declare that this product conforms to the standards and directives specified on page 2.
2 Specified Use
The cordless drill/driver is suitable for screwing, drilling and thread cutting.
The user bears sole responsibility for any damage caused by improper use.
Generally accepted accident prevention regulations and the enclosed safety information must be observed.
3 General Safety Instructions

WARNING - Reading the operating instructions will reduce the risk of injury.

WARNING Read all safety warnings and instructions. Failure to follow all safety warn
ings and instructions may result in electric shock, fire and/or serious injury.
Keep all safety instructions and information for future reference.
Before using the power tool, carefully read through and familiarise yourself with all the enclosed safety information and the Operating Instructions. Keep all enclosed documentation for future reference, and pass on your power tool only together with this documentation.
4 Special Safety Instructions

F For your own protection and for the protection of your power tool, pay attention to all parts of the text that are marked with this symbol!
Hold the power tool by insulated gripping surfaces, when performing an operation where the cutting accessory may contact hidden wiring or its own cord. Cutting accessory contacting a "live" wire may make exposed metal parts of the power tool "live" and could give the operator an electric shock.
Ensure that the spot where you wish to work is free of power cables, gas lines or water pipes (e.g. using a metal detector).

Slightly acidic, flammable fluid may leak from defective Li-ion battery packs!
If battery fluid leaks out and comes into contact with your skin, rinse immediately with plenty of water. If battery fluid leaks out and comes into contact with your eyes, wash them with clean water and seek medical attention immediately.

Protect battery packs from water and moisture!

ENGLISH
Do not use faulty or deformed battery packs!

Do not expose battery packs to naked flame!
Do not open battery packs!
Do not touch or short-circuit battery packs!
Remove the battery pack from the machine before any adjustment or maintenance is carried out.
Before fitting the battery pack, make sure that the machine is switched off.
Keep hands away from the rotating tool!
Remove chips and similar material only with the machine at standstill.
Dust from material such as paint containing lead, some wood species, minerals and metal may be harmful. Contact with or inhalation of the dust may cause allergic reactions and/or respiratory diseases to the operator or bystanders.
Certain kinds of dust are classified as carcinogenic such as oak and beech dust especially in conjunction with additives for wood conditioning (chromate, wood preservative). Material containing asbestos must only be treated by specialists.
- Where the use of a dust extraction device is possible it shall be used.
- The work place must be well ventilated.
- The use of a dust mask of filter class P2 is recommended.
Follow national requirements for the materials you want to work with.
LED (2): Do not view LEDs directly through optical instruments, LED class 1M, classified as per DIN EN 60825-1: 2003, wavelength: 400-780 nm; t_imp = 300~ s 5 lm.
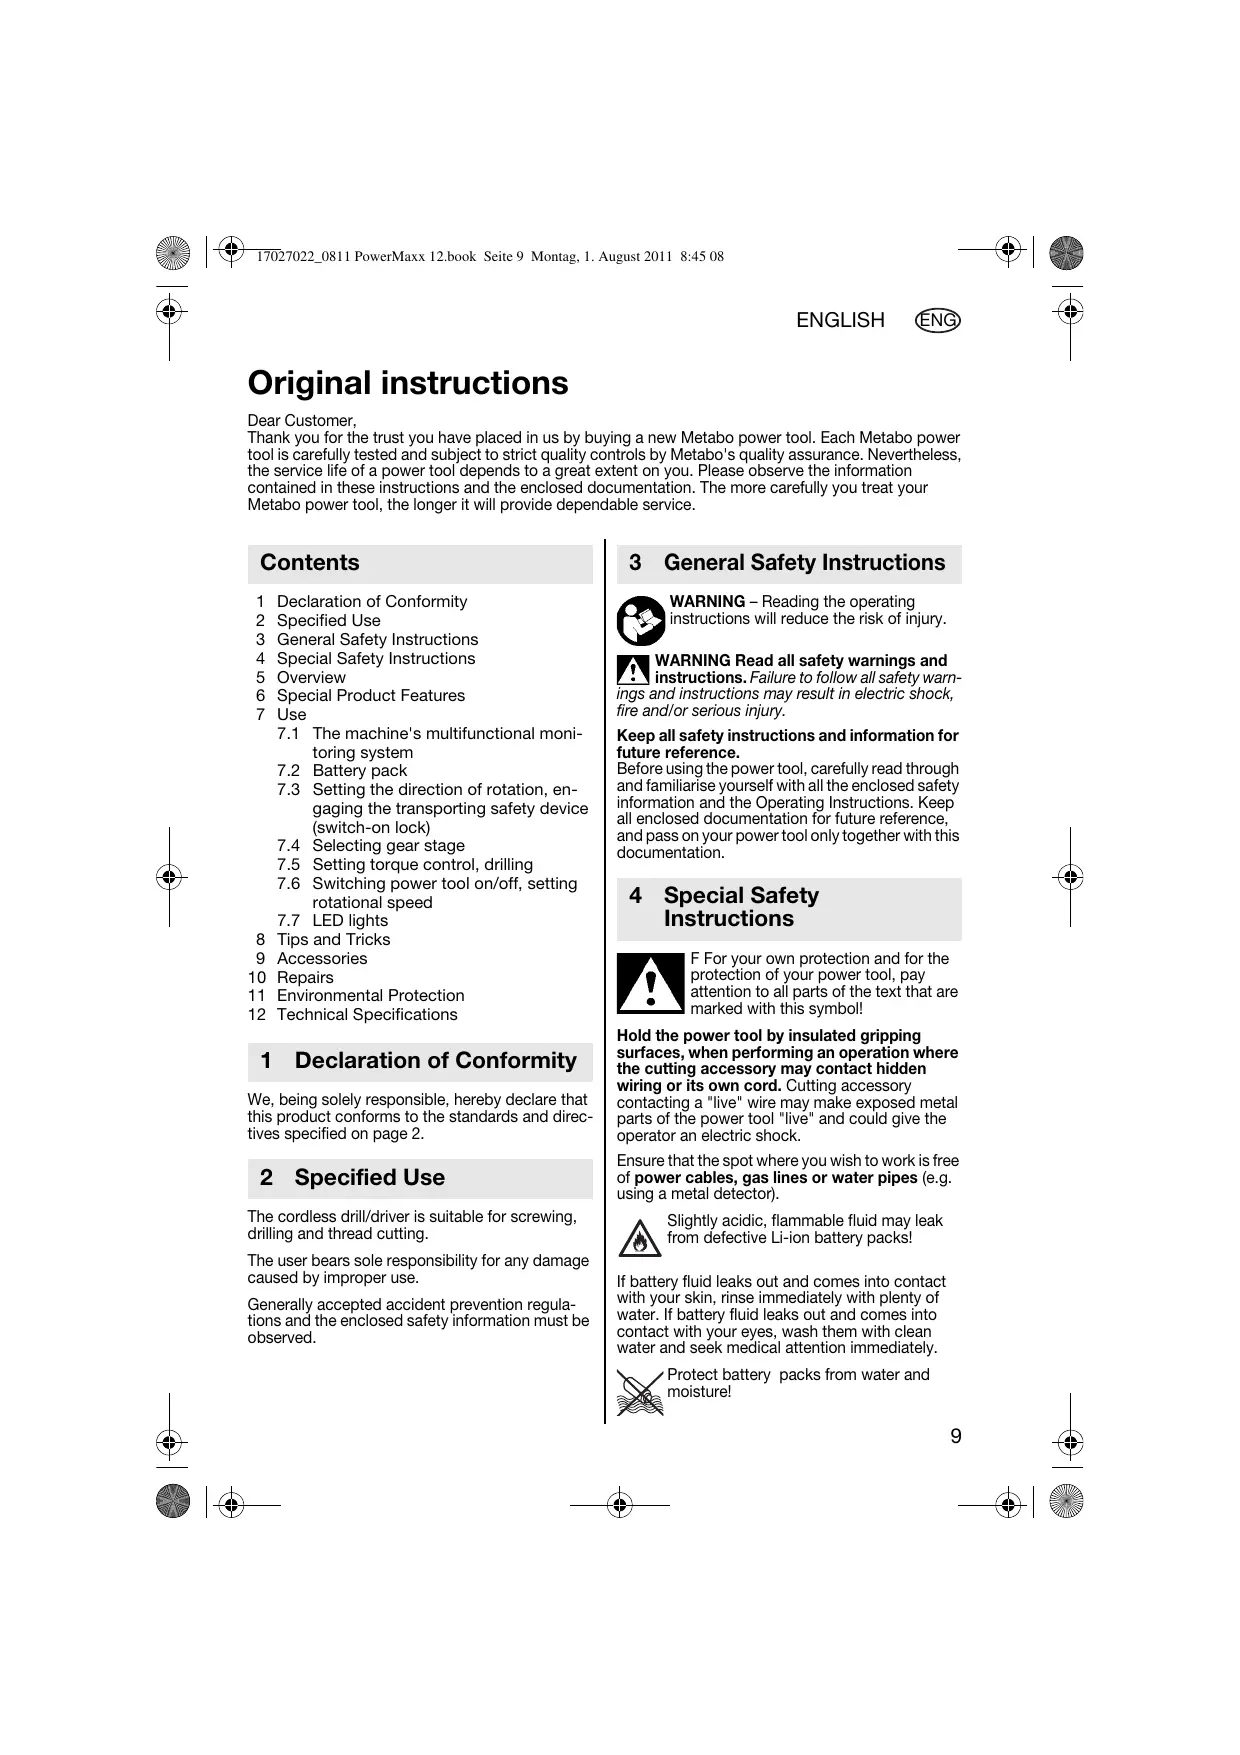
5 Overview
See page 3 (please unfold).
1 Protective cap/bit clamping bush*
2 LED lights
3 Adjusting sleeve (torque control, maximum torque)
4 Slide-switch (1st/2nd gear)
5 Rotation selector switch (direction of rotation setting, transporting safety device)
6 Trigger
7 Battery pack release button
8 Battery pack
- depending on model
6 Special Product Features
- Angle screwdriver attachment for drilling and screwing in areas that are hard to reach (depending on model)
- Hexagon socket holder in the spindle for a shorter, more lightweight machine.
- Spanner flat for easy chuck changes, even if the chuck is overtightened.
- Multifunctional monitoring system to protect the tool and battery pack
7 Use
7.1 The machine's multifunctional monitoring system
If the machine switches off automatically, the machine electronics have activated automatic protection mode. A warning signal sounds (continuous beeping). The beeping stops after a maximum of 30 seconds or when the trigger is released (6).
Causes and remedies:
- Battery pack almost flat (the electronics prevent the battery pack from discharging totally and avoid irreparable damage).
If the battery pack is almost flat, it must be recharged. - Long continuous overloading of the machine will activate the temperature cut-out.
Leave the machine or battery pack to cool.
Note: The machine will cool more quickly if you operate it at idling speed. - If the current is too high (for example, if the machine seizes continuously for long periods), the machine switches off.
Switch off the machine at the trigger (6). Then continue working as normal. Try to prevent the machine from seizing.
7.2 Battery pack
Charge the battery pack before use.
If performance diminishes, recharge the battery pack.
The ideal storage temperature is between 10^ and 40^ .
Removing the battery pack
Press the battery pack release (7) button and remove the battery pack (8).
To fit
Slide in the battery back (8) until it engages.
7.3 Setting the direction of rotation, engaging the transporting safety device (switch-on lock)
Do not activate rotation selector switch (5) unless the motor has completely stopped!
Actuate the rotation selector switch (direction of rotation setting, transporting safety device) (5).
See page 3 (please unfold).
R = Clockwise setting
L = Counter-clockwise setting
0 = Middle position: transportation safety device
(Switch-on lock) set
7.4 Selecting gear stage
1 1st gear (low speed, particularly high speed, preferable for screwing)
2nd gear (high speed, preferable for drilling)
7.5 Setting torque control, drilling
Turn selector barrel (torque,drilling) (3).
1...6 = Torque setting (with torque control) - intermediate positions are also possible.
= Drilling stage setting (max. torque, without torque control) To avoid motor overloading, do not lock the spindle.
7.6 Switching power tool on/off, setting speed
To start the machine, press the trigger (6). The speed can be changed by pressing in the trigger.
7.7 LED lights
For working on dimly lit areas. The LED lights (2) light up when the machine is switched on.
8 Tips and Tricks
If you are working with long screw bits or bit holders, we recommend the use of the bit clamping bush (1) provided or the bit clamping brush 6.31281 available as an accessory (see accessories Chapter).
Drilling
Preferably in 2nd gear (high speed).
Screws
Preferably in 1st gear (low speed) and with torque control.
Screws in areas that are hard to access
The angle screwdriver attachment (see Accessories chapter) greatly facilitates work on areas that are difficult to access.
Thread tapping
Lubricate the dies.
Select 1st gear (low speed).
Adjust torque control:
9 Accessories
Use only genuine Metabo accessories.
If you need any accessories, check with your dealer.
For dealers to select the correct accessory, they need to know the exact model designation of your power tool.
See page 4.
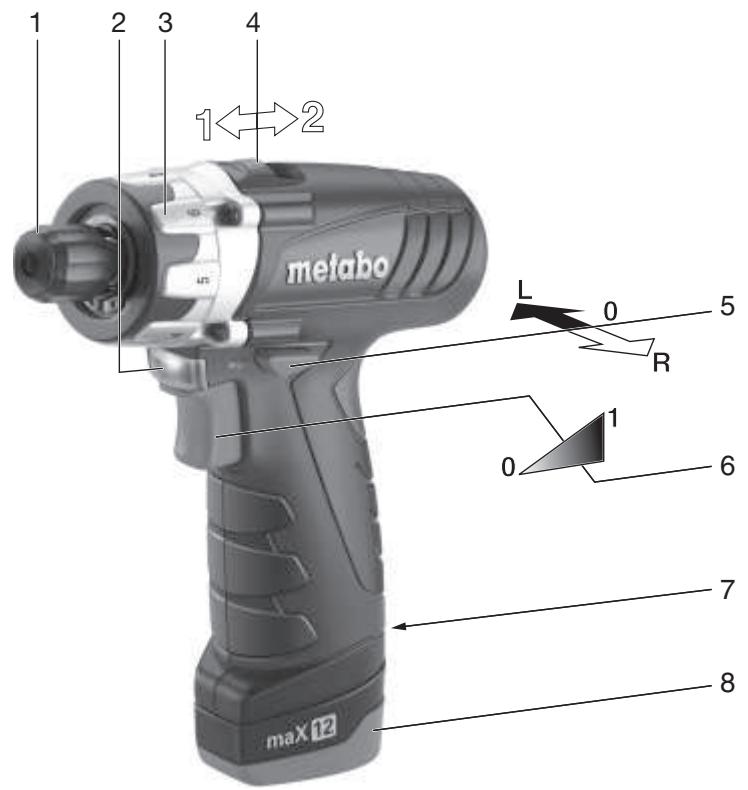
A Quick-clamping chuck.
Fitting: unscrew protective cap (1). Screw the quick-clamping chuck onto the spindle thread. The quick-clamping chuck can be tightened (and released again) with an open-jawed spanner.
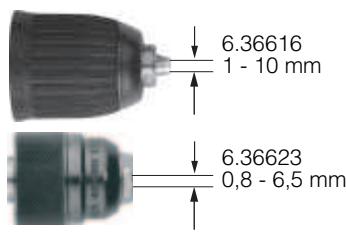
B Angle screwdriver attachment.
C Battery pack
D Battery charger
E Bit clamping bush
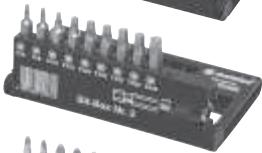
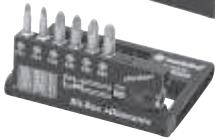
F Bit box
10 Repairs

Repairs to electrical tools must be carried out by qualified electricians ONLY!
If you have Metabo electrical tools that require repairs, please contact your Metabo service centre. For addresses see www.metabo.com.
You can download spare parts lists from www.metabo.com.
11 Environmental Protection
Metabo's packaging can be 100% recycled.
Scrap power tools and accessories contain large amounts of valuable resources and plastics that can be recycled.
These instructions are printed on chlorine-free bleached paper.
Battery packs must not be disposed of with regular waste. Return faulty or used battery packs to your Metabo dealer!
Do not allow battery packs to come into contact with water!

ENGLISH

Only for EU countries: Never dispose of power tools in your household waste! In accordance with European Guideline 2002/
96/EC on used electronic and electric equipment and its implementation in national legal systems, used power tools must be collected separately and handed in for environmentally compatible recycling.
Before disposal, discharge the battery pack in the power tool. Prevent the contacts from short-circuiting (e.g. by protecting them with adhesive tape).
12 Technical Specifications
Explanatory notes on the specifications on page 2.
Changes due to technological progress reserved.
U = Voltage of battery pack
n = No-load speed
Tightening torque for screwing:
M_A = soft screwing application (wood)
M_B = hard screwing application (metal)
M_C = adjustable torque (with torque control)
Max. drill diameter:
D1max = in steel
D2max = in softwood
m = Weight (with battery pack)
G = Spindle thread
Vibration total value (vector sum of three directions) determined in accordance with EN 60745:
a_h,D = Vibration emission value (drilling into metal)
a_h,S = Vibration emission level (screwing without impact)
K_h, Uncertainty (vibration)
The vibration emission level given in this information sheet has been measured in accordance with a standardised test given in EN 60745 and may be used to compare one tool with another. It is also suitable for a provisional estimate of the vibratory load.
The specified vibration level applies to the main applications of the power tool. However, if the tool is used for other applications, with different accessories or is poorly maintained, the vibration level may vary. This can considerably increase the vibratory load over the entire working period.
An estimation of the level of exposure to vibration should also take into account the times when the tool is switched off or when it is running but not actually doing the job. This can considerably reduce the vibratory load over the entire working period.
Identify additional safety measures to protect the operator from the effects of vibration such as: maintain the tool and the accessories, keep the hands warm, organisation of work patterns.
A-effective perceived sound levels:
L_pA =Sound pressure level
LWA = Acoustic power level
K_pA , K_WA = Uncertainty (noise level)

Wear ear protectors!
Measured values determined in conformity with EN 60745.
The technical specifications quoted are subject to tolerances (in compliance with the relevant valid standards).
Notice originale
Cher client,
D2max = in zacht hout
a_h,D = trillingsemissiewaarde (boren in metaal)
R = Hogergang installd
Reservedelslicer kan downloads paa www.metabo.com.
11 Miljøbeskyttelse
a_h,D = Vibrationsemission (boring i metal)
a_h,S = Vibrationsemission (skruning uden slag)
K_h, Usikkerhed (vibration)
6e30nacHOCTN 3aunTbI
3JIeKTPoHnHCTpymEnTa OT
NOBpeKdHn CObIouaIte yKa3aHnA,
OTMeueHHbIe DaHHbIM CnMBOJOM!
He BCKpbBaIte aKKymIaTOpHbIe 6nok!
He KacaTecb KOHTaKTOB aKKyMylTOpHbIX 6IOKOB IN He 3aMbIkaTe INx HAKOPOTko!
IpepeHaanomKaKnx-Im6o pa6oT no
peylnpOBKe nn TeXnHeCKOMy 0bCnyxNBaHNIO
nBLeKnTe aKKymJrToPbHb 6Iok N3
3NeKtPOMHCTpyMeHTA.
Y6eIHTecb TOM, yTO 3NeKTPoIHCTpymENT npu YctaHOBKe aKKyMylTOpHOrO 6Ioka BBykIHOueH.
He npikacaiTecb K BpaaioeMycnHCTpymenty!
YdAaIte OINnKIn TOMy NDoObHoe ToJIbKO nocLe NOJHOO OCTAHOBKIn HNCTpyMeHTa.
Пьл, ВОЗнkaюа пи орботke MaTeрnaIOB, COeprkauxxC BcHHeC, HeKOTOpbIX BnIOB DpeBecInbI, MInHepaIOB I MetaIIIOB, MOxET npEcdTaBnTb CO6O onAChOCTbДЯ 3dOPOBb. BdIxhaNHe qAcTu TAKO nbIIN nII N KOHTaKT C HeM MoKET CTaTb PnUHNOI NOBLeHnA anJIePruYeCKnx peAkUIM n/nnn 3a6OBeBAHH dIbxaTeNbHbIX nyTei.
HeKToTOpBle BVidIb Nbln (HaNPmEp Iblb, Bo3HnKaOuAaP rPi o6pa60Te y6ba nIb6yka) CHTaIOCTc KaHcpeoReHHbIMN,OC6eHNO B KOMbNAuHN C DOnONHIneMbHbIMN MaTePnaIaNMI, INCNoB3yEmbIMN dJIr O6pa60TKn DpeBecnbl (COIN XpOMOBOKNICLOTb,CpeDCTBa 3aunTbI dpeBecnbl).O6pa60TkMaTePnaIaNOB C COeApXaHMeM ac6eCTa DOJXhA BblONHtBcR TOnbKO CNeUAnINCtAm.
- ITOB03MOXHOCTNMCIONb3yIeTPOJXDQJUIN nbIEOTcAcbBAIOUAnnapaT.
- 06ecnebte xopouyu BeHTnlaIcno paOoey 30HbI.
- PeKoMehyETcH aHeBaTb peCnnpaTOp c
- dIJIbTPOm KJcca P2.
CobnoaTe DeIeCTBvUoJIne HaIOHOJIbHbIe npEanncnna IIO o6paObTKe MaTePnAIOB.
CBeToDIOJ (2): He cMoTpNte Ha rOpAun CBeToDIOJ Ype3e OtnTneCKne Pnp60bp; CBeToDIOJ KnaCa 1M, KnaCnΦuNpObaH nO DIN EN 60825-1: 2003,Длнa BOЛьы: 400-780 HM; timp=300 Mк, 5 Im.
5 063op
Cm. c. 3 (Ha pa3BopoTe).
1 3aunTHna KpbIka/3axmHaBtynKa nla 6nt*
2 CBeToIOIO
3 YcTaHOBOUHoe KOJIbIcO (OrpaHnueHHe KpyTaeTO MOMeHTa, MaKcIMMaJIbHbI KpyTaeuMOMeHT))
4 NepekeKIOUaTeIb (1-IA-CKOPOCTb)
5 PepeKIOUaTeIb HApBaBLeHn BpaSeHn (yCTaHOBka HApBaBLeHn BpaSeHn, 6JOKIpOBKa dJI TpaHCnpTIpOBKn)
6 HaxmHnoI nepeKluOaTeIb
7 KhoNka dIra pa36JIOKIpOBKn aKKymyTAToPHorO 6Joka
8 AkkymyIaTOpHbI 6Iok
- B 3aBcNIMOCTN OT KOMJIeKTAUIN
6 Oco6eHHoCTn HhctpyMeHTa
- YrnoBaHa HacaIka IIN CBepeHnI 3aBopauHbAHnI shpyNoB B
TpUHNOIOCTUYINbIX MeCTaX (B 3aBnCmOCTN OT KOMPJIeKTAuIN)
3aJIMC BHYTpEHMM 1eCTNrpAHHKOMB 1nHdJeIe IeAeT KOHcTpyKcHIO 6Olee KOPOTKOI N JERKO
ПоверхонсьКЛЮЧАпОЗВОЯТБылОЛНЯТь 3аменидддддддддддддддддддддддддддддддддддддддддддддддддддддддддддддддддддддддддддддддддддддддддддддддддддд徴пнлбногу natropona
MHorOpyHKnUHOHaJIbHaN CnCTeMa KOHTpONI JIIN 3aunTbI 3JNeKTOPNHCTPymENTa I AKKyMnTOpHOrO 6bnoka
7 3KcnIyatauia
7.1 MhorofoynkuoHaJIbHaN CnCTema KOHTPOJNA 3JeKToHnHCTpyMeHTa
EcniponcxOHTaBtOMaTHueckoe BblKIOHcHHeNJIeKTPOnHCTpyMeHTa,3TO 03Haayet,HTOJIeKToPONbIb6NOk AKTN3IPoBAn pexIMCamaO3auNTbI. PoJaETcR npedynpeJxdaIoUm ciRHaN (npoDOnXnTeBbHb3ByKOBoCirHan). OH npekpaTaetcMaKc. uee30 cekyHd mIn nocLe OTnyckAHnnepeKlouaTeTJe (6).
PpunHbI n cnoo6bI yCTpaHEnn HncnpaBHOCTN:
- AkkymyIaTOPbI 6LOK noTu pa3PdUncra (3NEKTOHka 3aunuaeT aKKymyIaTOPbI 6LOK OT NOBpeXJeHb BCJeDCTBVe rny6OKoRa pa3PraJa). EcIn aKKymyJIaTOPbI 6LOK noTu pa3PdUncRA, HeO6XoIMo CHOba 3aprJntb er!
2.Придлntьниперу3ke 3ЛЕКТРОИСТРУМЕТа срабаТыВаET TELIOBAЯ 3aunTa. ПоюждITE,пoka 3ЛЕКТРОИСТРУМЕТ ИПАKKUMYЛЯТOPНБIй 6ДOK HE OCTБIHYT. Указане:ЗЛЕКТРОИСТРУМЕТ OXлЖДаeTCBbICTpee B ржIMe XOJOCTOTO XOJa. - Пи Слишков ВсICOKО снLEТOKA (kaK, habprIMep, B cIpyae npOДоЖNTeBJHOb 6LOKINPOBKN) 3JIeKTpOINHCTpymENT OKTIOUaETcR.
BbIKIOHHTe 3JIeKTPONHCTpyMeHT HaXMHbIM nepeKJIOUaTeIem (6).Pocne 3TOr npOdoJXaeTae paObOTy B HopMaBHOM pexIme. IV36eraTte 6oKINpOBKn B daJIbeIeM.
7.2 AKKymyTOpHbI 6nok
Ipeed nCnoJIb3OBAHnEM 3apAДnte aKKyMnyTOpHbN bLOK.
Пи cnIxKeHm MOuHocTn 3apJnte aKKyMnyIaTOpHbI 6NoK.
Ontmalbna Tempepatypxa xpaHnna coctabnreT 10 ^ C do 40^
U3BvyeHne
HaxkMATE KHOKNy pa3bNoKupOBKn (7)
aKKyMnTApTO HorO 6NoKa n 3BNeKeNTe
aKKyMnTApHb 6NoK (8).
YctaHOBka
BCTaBbTe aKKymyIaTOpHbI 6Jok (8)do fHKcaUH.
7.3 YctaHObKa HnpaBNeHMa BpaSeHMa, 6IOKIOBbA DnT TpaHCnpTIpOBKn (poTbB BKJIoueHn)
Hajmmai TepeKIOuateIb HanpaBHeHn I BpaSeHHa (5) TolbKO npn Hepa6oTaoue JNekTPOdBVaTeTne!
YcTaHOBnTe B HUxHoe NIOLOXHeHne nepeKnOuAteNb HAnpaBHeHn BpaSeHn (ycTaHObKa HAnpaBHeHn BpaSeHn, (5) 6BJOKOBka dIg TpAHCnOpTIpOBKn).
CMOTPe c. 3 (Ha pa3BopOte).
R = npaBoe BpaueHne
L = neBOe BpaueHne
0 = cpeJHHee noJIOXeHMe: 6IOKuPbKa dIa TpaHCnOpTIpOuBk (6IOKuPbKA npOTINB BKJIIOUeHnI)
7.4 Bb6op ckopoctn
1 1-rCKOpocTb (Hn3Kaar YacToTa BpaSeHnA, BblcOKn KpyTlssm MOMeHT, PneIMyUeCTBeHHO IJIr 3aBopauHbAHnI WypynOB)
2 2-8CKOpOCTb (BbICOKaYacTota BpaueHn, npEIMyueCTBeHHo dIa CBepJIeHn)
7.5 YctahOBka orpaHnueHn KpyTaeo MOMeHTa, CbepeHne
ПовернITE Кобцо (Кртуши мочNT, CBeplenne) (3).
1...6 = yctahOBka KpyTaeero MOMeHTa (c ORpaHmEHNEM KpyTaeero MOMeHTa); TaKKe BO3MOXHbI pOMeKyTOUHbI NOJIOXEHIN.
= yctahOBka pexIMa CbepeHnA (MaKc. KpyTAnM MOMHT, 63e orpaHnueHnN KpyTJeO MOMTe) Bo n36eKaHne nepeRpy3kn 3JleKTPoDBnIaTeJI He JOnyCKaIte 6JokIpOBKn IINHdJIa.
RU PYCKNI
7.6 BkIIOUeHHe/ByIKIOUeHHe 3JIeKToPHNCHTpymEHTa,yCTaHOBka qACTOTbI BpaueHHa
Дяв BKЛIOUeHЯИнСТPyMMeHTa HaxmITE нанКIMнОпеpeKЛIOuAteЛь (6).НakatneмHa норepeKЛIOUcATEb MOxHOи3MeHЯrTb YacCTOTy ВрашЕнЯ.
7.7 CBeToaNoa
Cnick3aNaChbIX ChTeM MoXHo cKaHaTb C www.metabo.com.
He Bb6pa8BaIe aKkyMnyTOpHbIe 6JOKN B BOOEmbl!
ToIbKO IaIg CtpaH EC: He BbI6pacBlaaIte 3JIeKtponHcTpymE HBeMeTe C bIbTOBIMn OTxOaAMn! CorNaCHO DupeKTNBe 2002/96/
EG 06 yTInn3aunC stapbX 3eKtponpnoBOPOB I 3eKtponHOrO 06OpyDobAHIN COOTBECTBHyUOMH HauNoHAbHbIM HopMaM 6bIbWne B UnyoPteBHeN 3eKtponpnoBopbI N 3eKtponHCTpyMeHTI PNOJExKaT pa3dEbnHOy Tynn3aunC cJeBIO IN NOcLeDuOuSeI 3KoJOnuCheckn 6e3OpNaChOH nepepa60rKn. IpnjxJe Cem npOn3BeCtn yTInn3aUnO aKKymIyTopHO n6LoKa, p3zprIeeroB O 3eKtponHCTpyMeHTe. PpIMNTe MepBo BO n36exJaHNe KOpOTKO r3AmbIkaHn KOHTAKTOB (HaNPmEp, n3OIpnuTe KNeIko JIeToi).
12 TexHnueckne xapaKTepeNCTnKN
TOnaChEnH K daHbIM, yKa3aHHbIM Ha c.2.
OctabJnem 3a coboi npabo Ha texHnueckne n3MeHeHH.
U = HanpЯЖeHne aKKyMЛrTOpHOrO 6Jnoka
n = TaCToTa BpaueHna 6e3 Hargy3kn
Moment 3aTjKKn pni 3abOpauBaHmU wypuOB:
M A = JérgKoe 3aBOpaunBaHne (DpeBeCnHa)
M B CLOXHoe 3aBopauBaHne (MeTaJI)
MC = peYInpyEmbIMOMeHT3aTAAKKNc (C OrpaHnueHnEM KpyTaeero MOMeHTa)
MaKc. DnAmEtP cBepJa:
D1max= nO CTaJIa
D2max= no mRkoI dpBeCInHe
m = Macca (c aKKyMnyTOpHbIM 6nOKOM)
G = pe3b6a winnHdenn
CymmaHoe 3NaueHne BVbpaun (BeKTopHa Cymma TpEx HnapBaJIeHN) paCCHTbIaBcTc B COOTBeTCTBN co CTaNaprTom EN 60745:
a_h,D = 3na yHHe Bn6paun (CBepnHne B MeTaNJIe)
a_h,S = 3MNCsOHHoe 3NaueHne Bn6paun (3aBnHcNBAHne 6e3 yDapa)
Kh,... K03ΦΦmUeH TnOprEuHocTn (Bn6paun)
Yka3aHbI B DaHbOM pyKOBoDCTBe yOBoHeB
Bn6paunu N3MepeH MeToDOM, ONpeJeHNbIM
CTaHdApTOM EN 60745, INMOxET NcNoNt3OBaTbC8
DNr CpABHeHn3NeKTPOnHCTpyMeHTOB dpyr C
dpyrom. OH TaXke NoJxDonT dJa
npEJaBaPnteHoro ONpeJeHnHaBn6paUHOHHo
Harpy3Kn.
Yka3aHHbI ypoBeH Bn6paCmN DeiCTBtTeHEn
dJI OCHOBHbIX C6ep NcIONb3OBAHN
3NEKTPoINHCTpymeHT.OHaKO ecJN
3NEKTPoINHCTpymeHT NcIONb3yETcN dJI DpyHX
ZeJe, C dpyrMM paboOIMN INhCTpymeHTAMM IIN
B cLnyae erO HeUYDOBNeTBOpINTELbHO
Texo6clnyxmbAHn, ypoBeH Bn6paCmN MoXeT
6bITb INbIM. BCJeDCTBME 3TOG B TeUHeHBE CBOE
nepNoDA pa0bToI INhCTpymeHTA Bo3MOxHO
3NauHTeNBHo YE bELNuHeHne Bn6paCIOHOH
Harpy3Kn.
ДягToCHOrO onpeTeHEnI Bn6paUHOHNo
Harpy3Kn CneJeYet TAKKe yuHTbIBaTb
PpOMeKytKN BpeMeHn, B TeHeHne KOTOpbIX
HnCTpyMent HaxoINTCB a BbIKIOueHHOM
CoCToHmN INn pa60TaET BxOLOCTyo.
BcNeDCTBnE 3TOR B TeHeHne Bcero nepnoDa
pa60Tb INCTpyMenta BO3MOxHo 3NaHTeNbHOe
ymHeHsHeNc Bn6paUHOHNo Harpy3Kn.
ПрипимITE ДОПОЛНТЕNBHEМеры 6БЗОнСHOCТI ДЯЗАПNTБОЕРAPOTAOPTOBO3DEJCTBWA ВОЗнКИОUIENBIBOPAQUIN,HANPIMEP: TEXNHYECKOE OBCNYKUBAHNE 3JIeKTPONHCTPymEtHa paoUx INHCTpymETHO COXPAHEnHe TENNa pyk,PpabInbHa OPraHn3aQuIpaOoHx pOcEcoB.
UpOBeHbIyMaTnA:A:
LpA = ypoBeHb 3ByKOBOrO daBJeHHa
LWA = ypOBeHb 3ByKOBoM MoUHOCTN
K_pA , K_WA = норгшонть (уровец узma)

HaedeBaIte 3aunTHbIe HayuHnKn!
Pe3yIbTaTbI 3MpeHn IOnyuHebIB COOTBeTcBn CO cTaNdaptom EN 60745.
Ha yka3aHbIe TExHHyeCKHe xapAKTePnCTMn KaipocptpaHIEOTcDonyckn, ppeyCMOTpeHHbIe DeJIeCTBHOUIMN CTAHJaDTaMn.
metabo®
Metabowerke GmbH, 72622 Nurtingen, Germany www.metabo.com