
XL500 - Lawn mower FLYMO - Free user manual and instructions
Find the device manual for free XL500 FLYMO in PDF.
| Product type | Air cushion lawn mower |
| Brand | FLYMO |
| Model | XL500 |
| Cutting width | 50.5 cm |
| Weight | 16 kg / 16.5 kg |
| Engine | Honda GCV160, 4-stroke |
| Blade rotation speed | 3100 rpm |
| Fuel | Regular unleaded petrol |
| Engine oil | SAE 10W-30 (4-stroke detergent oil) |
| Cutting height adjustment | By washers (max 2 between blade and impeller) |
| Blade type | Rotary blade |
| Guaranteed sound power level | 97 dB(A) |
| Sound pressure level at operator ear | 86.8 dB(A) |
| Vibrations (hand) | 3.3 m/s² |
| Ignition | Spark plug (gap 0.028-0.031 in) |
| Air filter maintenance | Every 25 hours (cleaning); replacement every 200 hours |
| Blade replacement | Every 50 hours of use or 2 years |
| Safety stop | Safety on/off lever on handlebar |
| Transport and storage | Close fuel valve, engine horizontal, dry place |
| Warranty and compliance | Directives 2000/14/EC, 98/37/EEC, 89/336/EEC; standards EN836, ISO14982 |
Frequently Asked Questions - XL500 FLYMO
User questions about XL500 FLYMO
0 question about this device. Answer the ones you know or ask your own.
Ask a new question about this device
Download the instructions for your Lawn mower in PDF format for free! Find your manual XL500 - FLYMO and take your electronic device back in hand. On this page are published all the documents necessary for the use of your device. XL500 by FLYMO.
USER MANUAL XL500 FLYMO
Read before use and retain for future reference
DE
WICHTIGE INFORMATIONEN
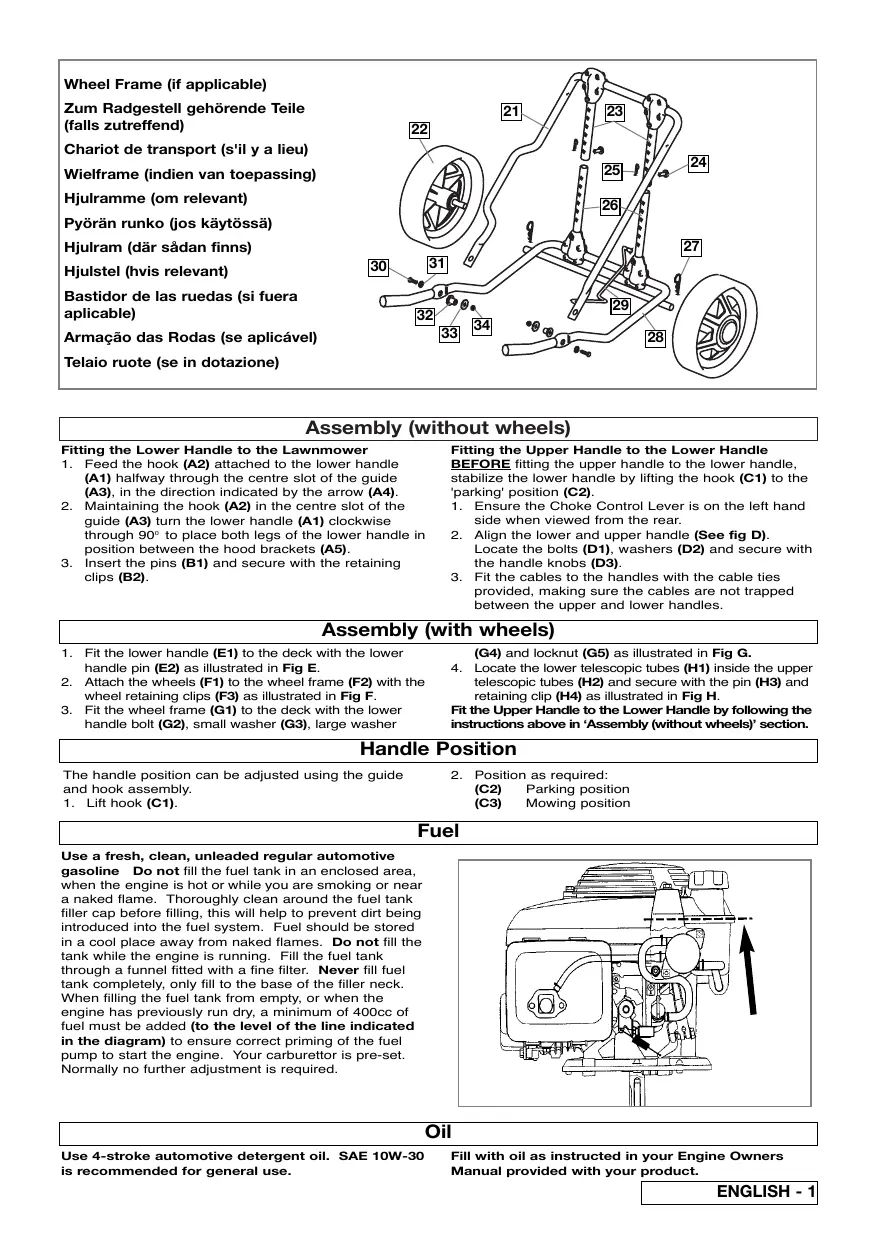
Wheel Frame (if applicable)
Assembly (without wheels)
Fitting the Lower Handle to the Lawnmower
- Feed the hook (A2) attached to the lower handle (A1) halfway through the centre slot of the guide (A3), in the direction indicated by the arrow (A4).
- Maintaining the hook (A2) in the centre slot of the guide (A3) turn the lower handle (A1) clockwise through 90^ to place both legs of the lower handle in position between the hood brackets (A5).
- Insert the pins (B1) and secure with the retaining clips (B2).
Fitting the Upper Handle to the Lower Handle
BEFORE fitting the upper handle to the lower handle, stabilize the lower handle by lifting the hook (C1) to the 'parking' position (C2).
- Ensure the Choke Control Lever is on the left hand side when viewed from the rear.
- Align the lower and upper handle (See fig D). Locate the bolts (D1), washers (D2) and secure with the handle knobs (D3).
- Fit the cables to the handles with the cable ties provided, making sure the cables are not trapped between the upper and lower handles.
Assembly (with wheels)
- Fit the lower handle (E1) to the deck with the lower handle pin (E2) as illustrated in Fig E.
- Attach the wheels (F1) to the wheel frame (F2) with the wheel retaining clips (F3) as illustrated in Fig F.
- Fit the wheel frame (G1) to the deck with the lower handle bolt (G2), small washer (G3), large washer
(G4) and locknut (G5) as illustrated in Fig G.
4. Locate the lower telescopic tubes (H1) inside the upper telescopic tubes (H2) and secure with the pin (H3) and retaining clip (H4) as illustrated in Fig H.
Fit the Upper Handle to the Lower Handle by following the instructions above in 'Assembly (without wheels)' section.
Handle Position
The handle position can be adjusted using the guide and hook assembly.
-
Lift hook (C1).
-
Position as required:
(C2) Parking position
(C3) Mowing position
Fuel
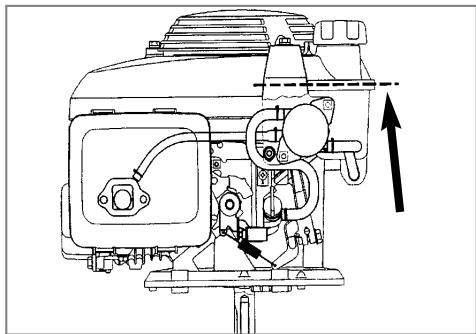
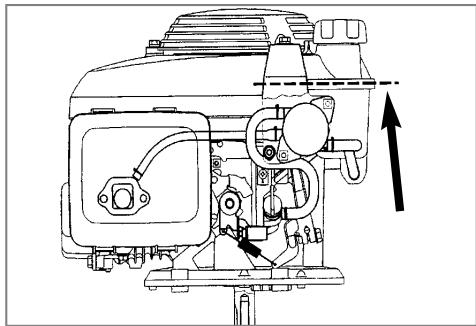
Use a fresh, clean, unleaded regular automotive gasoline Do not fill the fuel tank in an enclosed area, when the engine is hot or while you are smoking or near a naked flame. Thoroughly clean around the fuel tank filler cap before filling, this will help to prevent dirt being introduced into the fuel system. Fuel should be stored in a cool place away from naked flames. Do not fill the tank while the engine is running. Fill the fuel tank through a funnel fitted with a fine filter. Never fill fuel tank completely, only fill to the base of the filler neck. When filling the fuel tank from empty, or when the engine has previously run dry, a minimum of 400cc of fuel must be added (to the level of the line indicated in the diagram) to ensure correct priming of the fuel pump to start the engine. Your carburettor is pre-set. Normally no further adjustment is required.
Oil
Use 4-stroke automotive detergent oil. SAE 10W-30 is recommended for general use.
Fill with oil as instructed in your Engine Owners Manual provided with your product.
Starting and Stopping
To Start your Lawnmower
- Move the handle to the parking position (C2).
- Connect the spark plug lead. (J).
- Open the fuel tap (K).
- Move the Choke control lever to the 'Choke' position (L) when starting from cold, and to the 'Run' position (N) when starting from hot.
- Pull and firmly hold the Operator Presence Control to the upper handle.
- Place your right foot firmly on the deck and grasp the top of the lower handle with your left hand. Tilt the trimmer towards you (M). This ensures the product is in a secure position when starting and also prevents an unsightly ring being cut in your lawn.
-
Pull the starting handle gently until you feel a resistance, return the starting handle slowly.
-
Pull the starting handle firmly towards you to its full extent.
- Allow the engine to reach its full running speed then gently lower the lawnmower to the ground.
- When the engine has warmed up make sure the choke control lever is in the 'Run' (N) position.
To Stop your Lawnmower
- Blade continues to rotate after the machine has switched off, rotating blades can cause injury.
- Release the Operator Presence Control.
- As the engine dies, tilt the lawn mower slightly. This prevents a ring being cut in your lawn.
- When the engine has stopped, lower the lawnmower to the ground.
- Put the handle in the Parking position (C2).
- Close the fuel tap (K)
IMPORTANT
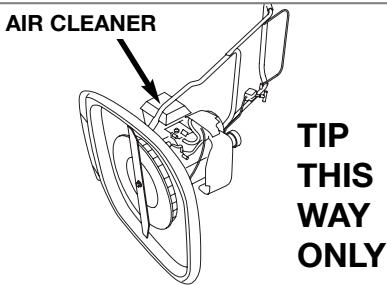
Before any servicing to the underside of your machine, close the fuel tap, let the engine run until it stops, disconnect the spark plug lead and TIP THE MACHINE ON ITS SIDE WITH THE AIR CLEANER UPPERMOST.
How To Mow
- Before using the lawnmower, always visually inspect to see that blades and bolts are not worn or damaged.
- Place the handle in the mowing position (C3).
- Mow twice a week in the growing season. Your lawn will suffer if more than one third of its length is cut at one time.
- Keep hands and feet away from the blade, a rotating blade cannot be seen.
- Mowing on banks and slopes can be dangerous.
Do not mow on steep slopes.
Always keep your feet on flat ground with the mower below you on the slope and with the spark plug uppermost to avoid lubricating oil running into the cylinder.
- Do not use this mower on slopes which are wet or more than 45^ from horizontal.
- Never push the mower up the slope.
Adjusting the Cutting Height
- Never use more than 2 cutting height spacers.
- Spacers can only be fitted between the blade and the fan and never between blade and the bolt (P).
-
Ensure the Operator Presence Control is released, when the engine has stopped rotating - disconnect the spark plug lead.
-
Close the fuel tap (K). Turn your lawnmower on its side.
- Remove the blade bolt (P1) and blade (P2) as described in 'Removing the Blade and Fan'.
- For a Lower Cut - Add spacers (P3) to a maximum of 2.
- For a Higher Cut - Take spacers (P3) away.
- Refit the blade as described in 'Fitting the Blade and Fan'.
Removing & Fitting the Blade & Fan
WARNING
Always handle the blade with care - sharp edges could cause injury. USE GLOVES
- Spark plug lead may be hot - handle with care. Removing the Blade and Fan
- Renew your metal blade after 50 hours mowing or 2 years whichever is the sooner - regardless of condition.
If the blade is cracked or damaged replace it with a new one.
1. Ensure the Operator Presence Control is released, when the engine has stopped and the blade has stopped rotating - disconnect the spark plug lead.
2. Fully close the fuel tap (K).
3. Turn your lawnower on its side with the air cleaner uppermost (see pic above).
4. To remove the blade bolt (P1), hold the fan (P4) firmly and with the spanner provided loosen the blade bolt by turning it anti-clockwise.
5. Remove the blade bolt (P1), blade (P2), spacers (P3) and fan (P4).
6. Inspect for damage and clean as necessary.
Fitting the Blade and the Fan
- Before using the lawnmower, always visually inspect to see that blades and bolts are not worn or damaged.
- Never use more than 2 cutting height spacers.
- Spacers can only be fitted between the blade and the fan and never between blade and the bolt.
- Ensure the fan is located correctly.
- Place the spacers (P3) onto the fan ensuring the pegs (P5) have located into the holes (P6).
- Place the blade (P2) onto the spacers (P3) ensuring the pegs (P7) have located into the holes (P8) on the blade and ensuring the blade is positioned as illustrated in Figure P.
- Place the blade bolt (P1) through the centre hole (P9) of the blade.
- Tighten down clockwise by hand.
- Hold the fan firmly and tighten the blade bolt with the spanner provided.
Spark Plug
An oily or carboned spark plug makes starting difficult and decreases the efficiency of the engine. Periodically remove the spark plug and clean and adjust when necessary.
Gap setting 0.028 - 0.031".
Do not remove spark plug when engine is hot. Do not sand blast the spark plug to clean it.
Cleaning the Air Filter
Q1 - Air Duct, Q2 - Air Cleaner Body, Q3 - Filter, Q4 - Latch Tabs, Q5 - Air Cleaner Cover
Never run the engine without a filter or with a dirty filter. This will greatly reduce engine efficiency and lead to engine damage.
Your lawnmower is fitted with an Air Cleaner, the maintenance for which is as follows:-
- Check the filter before each use.
- Clean every 25 hrs or more frequently when used in dusty areas.
-
Replace filter every 200 hrs.
-
Press the latch tabs on the top of the air cleaner cover and remove the cover.
- Check the filter is clean and in good condition.
If the filter is dirty:-
Tap the air filter several times on a hard surface to remove dirt, or blow compressed air through the air filter from the clean side that faces the engine. Never try to brush off dirt. Brushing will force dirt into the fibers.
- Wipe dirt from the air cleaner body and cover using a moist rag. Be careful to prevent dirt from entering the air duct that leads to the carburetor.
- Replace the filter and air cleaner cover.
Caring for your Lawnmower
If you do not intend to use your lawnmower for long periods it is advisable to follow this procedure after use:
- Stop the engine.
- Fully close the fuel tap. (K)
- Restart the engine.
- As fuel runs out the engine will begin to stop, tilt the lawnmower slightly.
- Once the engine has stopped, release the Operator Presence Control.
- Disconnect the spark plug lead.
- Remove all fuel from the fuel tank.
Cleaning - USE GLOVES
- Keep your lawnmower clean - grass clippings left in any of the air intakes, around the engine or under the deck could become a potential fire hazard.
- Do not clean with chemicals, including petrol, or solvents - some can destroy critical plastic parts.
- Remove grass from under the deck with a piece of wood or similar.
- Using a soft brush - remove grass clippings from around the engine and from all air intakes.
- Remove the fan, See 'Removing and Fitting the Blade and Fan', and clean with a soft brush.
- Wipe over the surface of your lawnmower with a dry cloth.
Transporting your Lawnmower
- Turn the fuel tap to the off position and transport with the engine in a horizontal position.
- Never transport the lawnmower when it is running.
Storing Your Lawnmower
Turn the fuel tap to the off position and store in a cool, dry, damp-proof and safe place with the engine in a horizontal position. Service your lawnmower after the last cut of the year as follows:-
At the end of the Mowing Season
- Stop the engine.
- Fully close the fuel tap. (K)
- Restart the engine.
- As fuel runs out the engine will begin to stop, tilt the lawnmower slightly.
- Once the engine has stopped, release the Operator Presence Control.
- Disconnect the spark plug lead.
- Remove all fuel from the fuel tank.
- Remove the spark plug lead and spark plug. Pour one teaspoon (5ml) of oil through the spark plug hole. Pull the starting handle 2 or 3 times. This will distribute oil on the internal surfaces of the engine. Inspect, clean and replace the spark plug. If a new spark plug is required contact your local approved Service Centre/Dealer. Do not re-connect the spark plug lead.
- Clean the air filter. See 'Cleaning the Air Filter'.
- Renew the blade if it is cracked, damaged or bent. Renew the blade bolt if necessary. See 'Removing and Fitting the Blade and Fan' for complete instructions.
- Use only genuine Flymo parts and accessories specified for this product.
- Clean your lawnmower thoroughly See 'Cleaning'.
- Your local approved Service Centre/Dealer will carry out any service or repairs required.
- Store your lawnmower in a cool, dry, damp-proof and safe place.
Fault Finding
Engine Will Not Start
- Ensure that the Operator Presence Control is gripped firmly to the upper handle.
- Check that there is sufficient fuel in the fuel tank and the fuel tap is open
- Check that the choke control lever is in the correct position: - 'Run' position (N) - for a hot engine, 'Choke' position (L) - for a cold engine.
- The engine may have flooded. Remove and dry the spark plug.
- Petrol may be stale, replace. Once the petrol has been replaced, it may take a little time for fresh petrol to filter through.
- Check that the blade bolt is tight. A loose blade bolt could cause difficult starting.
- If the engine will still not start - disconnect the spark plug lead and consult you local approved Service Centre/Dealer.
Poor Flotation or Lack of Power
- Disconnect the spark plug lead.
- Clean the underside of the hood, the air filter, the fan, around the engine and the air intakes.
- Check that the engine choke control lever is in the 'Run' position. (N)
- Petrol may be stale, replace. Once the petrol has been replaced, it may take a little time for fresh petrol to filter through.
- If poor flotation or lack of power persists - disconnect the spark plug lead and consult your local approved Service Centre/Dealer.
Excessive Vibration
- Disconnect the spark plug lead.
- Check that the blade is correctly fitted. 'See 'Fitting and Removing the Blade and the Fan'.
- If the blade is damaged or worn, renew the blade.
- If vibration persists - do not use - disconnect the spark plug lead and consult your local approved Service Centre/Dealer.
Montage (ohne Räder)
-
Loft kroken (C1)
-
Sett handtaket i stilling:
(C2)-parkering
(C3)-klipping.
Drivstoff
Bruk ny, ren, blyfri, vanlig bilbensin
Bensintanken mägressive fylles i lukket rom, när motoren er varm, när bar flamme aller mens du røyker. Rengjør grundig rundbensintanklokket for du fyller, sik vil du forhindre at skittkommen inn i drivstoffsystemet. Bensinen bor oppbevares kjolig, borte fra bare flammer. Tanken mägressive fylles mens motoren går. Fyllbensintanken giennom en trakt med etrint filter. Bensintanken mä aldrifylles helt, bare til nederst pa pafyllingshalsen. När du fyller opp en helt tom bensintanken, ellar när motoren tildigere har gatt tom for bensin, mä det has i minst 400cm_bensin (opptil streken som er vist pa diagrammet) for a sorge for korrett priming av bensinpumpen til a starte motoren. Forgassener er forhandsninnstilt. Normalt er det违法犯罪
Olje
(C2) - Parking
(C3) - Plaenklipning.
Brændstof
Brug ny, ren, blyfri, almindelig benzin
Hvis du参加会议 to be a member of the Hivenshipper, including the members of the Hivenshipper's executive board.
- Stands motoren.
- Luk brandostofhanen welt. (K)
- Start motorenigen
- När motoren lober tor for brandstof, stopper den, og du kan vinpe pläneaklipperen en anelse.
- När motoren er standset, udlo Operator Presence Control (betjeningshandtaget).
- Tag taendrorsledningen af.
- Tøm brændstofbeholderen.
Rensning
| EC DECLARATION OF CONFORMITY | ||
| I, the undersigned M. Bowden of Husqvarna Outdoor Products, Aycliffe Industrial Park, NEWTON AYCLIFFE, Co. Durham. DL6 6UP. Certify that the Product-Category.........Petrol Hover Make.........Husqvarna Outdoor Products Conforms to the specifications of Directive 2000/14/EEC | I, the undersigned M. Bowden of Husqvarna Outdoor Products, Aycliffe Industrial Park, NEWTON AYCLIFFE, Co. Durham. DL5 6UP. Certify the maximum weighted sound pressure level recorded on a sample of the above product at the operator position under free field conditions was: - | I, the undersigned M. Bowden of Husqvarna Outdoor Products, Aycliffe Industrial Park, NEWTON AYCLIFFE, Co. Durham. DL5 6UP. Certify the maximum weighted root mean square value recorded on a sample of the above product at the operators hand position was: - |
| Type of Cutting Device.........Rotary Blade Identification of Series..........See Product Rating Label Conformity Assessment Procedure...ANNEX VI Notified Body..............L.T.S., Cleeve Road, Leatherhead, Surrey, KT22 75B England Other Directives:..........98/37/EEC, 89/336/EEC & applicable standards:..........EN836, ISO14982 Type.........XL500/XL550 | Engine Manufacturer..........Honda GCV160 Width of Cut..........50.5 cm Speed of Rotation of Cutting Device..........3,100 RPM Guaranteed sound power level..........97 dB(A) Measured Sound Power Level..........96 dB(A) Level..........86.8 dB(A) Value..........3.3 m/s2 Weight..........16 kg/16.5 kg | |
EC KONFORMITATSEBLABUNG
Husqvarna Outdoor Products
Aycliffe Industrial Park
NEWTON AYCLIFFE
Co.Durham DL5 6UP
ENGLAND
Telephone - (00) 44 1325 300303 Fax - (00) 44 1325 310339
UK Telephone - 0870 609 1901 Fax - 0870 609 1902
Our policy of continuous improvement means that the specification of products may be altered from time to time without prior notice.
- WICHTIGE INFORMATIONEN
- Assembly (without wheels)
- Fitting the Lower Handle to the Lawnmower
- Fitting the Upper Handle to the Lower Handle
- Assembly (with wheels)
- Handle Position
- Fuel
- Oil
- Starting and Stopping
- To Start your Lawnmower
- To Stop your Lawnmower
- IMPORTANT
- Before any servicing to the underside of your machine, close the fuel tap, let the engine run until it stops, disconnect the spark plug lead and TIP THE MACHINE ON ITS SIDE WITH THE AIR CLEANER UPPERMOST.
- How To Mow
- Adjusting the Cutting Height
- Removing & Fitting the Blade & Fan
- WARNING
- Fitting the Blade and the Fan
- Spark Plug
- Cleaning the Air Filter
- Q1 - Air Duct, Q2 - Air Cleaner Body, Q3 - Filter, Q4 - Latch Tabs, Q5 - Air Cleaner Cover
- If the filter is dirty:-
- Caring for your Lawnmower
- If you do not intend to use your lawnmower for long periods it is advisable to follow this procedure after use:
- Cleaning - USE GLOVES
- Transporting your Lawnmower
- Storing Your Lawnmower
- At the end of the Mowing Season
- Fault Finding
- Engine Will Not Start
- Poor Flotation or Lack of Power
- Excessive Vibration
- Montage (ohne Räder)
- Drivstoff
- Bruk ny, ren, blyfri, vanlig bilbensin
- Olje
- Brændstof
- Brug ny, ren, blyfri, almindelig benzin
- Rensning
Brand : FLYMO
Model : XL500
Category : Lawn mower