
AXM10E - Hi-Fi System HITACHI - Free user manual and instructions
Find the device manual for free AXM10E HITACHI in PDF.

| Product type | Hi-Fi System |
| Brand | HITACHI |
| Model | AXM10E |
| Power supply | 230 V AC, 50 Hz |
| Power consumption | 30 W |
| Output power | 12.5 W + 12.5 W |
| Main unit dimensions | 145 (W) x 182 (H) x 258 (D) mm |
| Speaker dimensions | 120 (W) x 170 (H) x 186 (D) mm |
| Main unit weight | 2.9 kg |
| Speaker weight | 1.3 kg/piece |
| Speakers | 7.6 cm diameter, impedance 4 ohms |
| FM frequency range | 87.5 - 108 MHz (50 kHz steps) |
| MW frequency range | MW loop antenna |
| CD player | Sampling frequency 44.1 kHz, D/A converter 1 bit |
| Headphone output | 3.5 mm stereo jack, impedance 16-68 ohms |
| Sound functions | X-BASS, PRESET EQ (POPS/ROCK/CLASSIC/JAZZ/FLAT) |
| Radio functions | RDS (PTY, CT, RT), manual/auto tuning |
| Timer | Timer, Snooze, Sleep |
| Included accessories | Power cord, remote control, FM antenna, loop antenna, speaker cables |
| Maintenance | Clean with a dry cloth, do not use solvents |
| Safety | Do not open the device, unplug during storms, avoid water and heat |
| Reset | RESET button under the device, use a toothpick |
| MW frequency step | 9 kHz or 10 kHz (selectable) |
Frequently Asked Questions - AXM10E HITACHI
User questions about AXM10E HITACHI
0 question about this device. Answer the ones you know or ask your own.
Ask a new question about this device
Download the instructions for your Hi-Fi System in PDF format for free! Find your manual AXM10E - HITACHI and take your electronic device back in hand. On this page are published all the documents necessary for the use of your device. AXM10E by HITACHI.
USER MANUAL AXM10E HITACHI
Before operating please read all these instructions thoroughly.
The STANDBY/ON button on the front panel switches the unit from ON to STANDBY but does not isolate the unit from the mains supply. If it is to be left unattended for a long period, it is recommended that the unit is switched to standby and the mains plug is removed from the socket.
HINWEIS
- DECLARATION OF CONFORMITY
We declare under our sole responsibility that this product, to which this declaration relates, is in conformity with the following standards:
EN60065, EN55013, EN55020, EN60555-2 and EN60555-3.
Following the provisions of 73/23/EEC, 89/336/EEC and 93/68/EEC Directive.
- If no sound is emitted from the speakers when the volume is raised, lower the volume, switch the STANDBY/ON button to STANDBY, and check to see if the speaker cords are properly connected.
- This unit contains a mating circuit and it takes about 2 - 4 seconds until this unit reaches stable operation after switching the STANDBY/ON.
- Never open the covers or touch the inside or insert a metal object. Any of these could cause an electric shock or a fault.
- When a thunder starts, unplug the power cord and disconnect the antenna.
- The apparatus shall not be exposed to dripping or splashing.
- To clean cabinet and panels when dirty, clean off dirt on the surfaces with a dry cloth. Never use thinner, benzene or alcohol, for these will damage the surface finish.
- Protect the unit against excessive heat (e.g. direct sunlight), dust and moisture.
Discs which can be played on the CD player have the following mark on them: DIGITAL AUDIO - Be careful not to damage the power supply cord. Be sure to hold the plug when pulling it out; do not pull the cord.
- Do not install the set in a confined location; otherwise, heat dissipation will be poor and malfunctions may occur.
- Do not place foreign objects in the disc compartment. It may cause damage to the mechanism.
- Do not move the sound system suddenly from a very cold room into a warm room. When a chilled CD player is moved suddenly to a warm location, condensation may form on the pickup lens, preventing proper operation. In this case, wait 1 - 2 hours before resuming play.
- During playback, if the CD player is subjected to a sudden shock or jolt, some noise may be produced. This is not a malfunction.
- The CD player has wide dynamic range. As a result, if you turn your amplifier's volume up too high during soft (low volume) parts of a program, your speakers may be damaged when the dynamic range of a sudden loud passage is produced.
- Do not store discs in high-temperature, high-humidity locations. The discs may develop warps and become unable to play. Also, discs with moisture on them may be unplayable. Wipe any moisture off with a soft, dry cloth, and be sure discs are fully dry before using.
- Do not leave a disc inside the CD player when it is not used for a long period.
- Please do not use compact discs with cellophane or with labels attached or those CD with peeled off stains, such as rental CD. If such discs were used on a CD player, they may get trapped inside the unit and cause malfunction.
- CDs with special shapes (heart-shaped CDs, octagonal CDs etc.) cannot be played on this set.
Attempting to do so may damage the set. Do not use such CDs.


SAFEGUARDS
Electrical energy can perform many useful functions. This unit has been engineered and manufactured to assure your personal safety. Improper use can result in potential electrical shock or fire hazards. In order not to defeat the safeguards, observe the following instructions for its installation, use and servicing.
INSTALLATION
Avoid the use of this unit in high temperature areas (such as near heating equipment) or in direct sunlight. Do not block the unit from radiating heat.
SICHERHEITSHINWEISE
- CONNECTIONS (CONT'D)
TILKOBLINGER (FORTS.)
COLLEGAMENTI (SEGUE)
- Connection with cassette deck, etc. for recording from this unit
- Anschluß eines Cassettendecks o.ä. zur Aufzeichnung von thism Gerät
- Raccordement d'une platine à cassette, etc. pour enregistrement à partir de cet apparéil
- UvEo n e KaetOphiV, KAn., yia TnV EyypaH ano autn Tn ouokue
- Conexión con plastina de cassette, etc., para grabar desde esta unidad
- Collegamento ad una piatra a cassette, ecc. per la registrazione da esta unità
- Aansluiting op cassettedeck enz. voor opname vanaf dit toestel
- Anslutning till kassettdäck aller liknande für inpelning franenna apparat
- Tilslutting til kassettebandoptager m.m. for at optage der igennem
Liitäkasettisoittimeen jne. tastā laitteesta tallentamista varten - Tilkobling til kassettspiller o.l. for innspilling fra dette apparatet

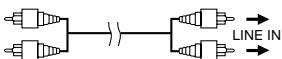
Cassette deck, etc. (optional)
Cassettendeck o.ä. (Option)
-Platine a cassette, etc. (en option)
Kaotopwvo, kπ. (npoapetiká)
- Platina de cassette, etc. (optional)
Piastra a cassette, ecc. (opzionale)
Cassettedeck enz. (in optie)
Kassettdack erler liknande (extra utrustning)
Kassettebandoptager m.m. (valgfrit)
Kasettisoit jne. (valinnainen)
Kassettspiller o.l. (valgfritt)
- Signal cord (optional)
- Signalkabel (Option)
Cordon de raccordement (en option)
-Kaλωδio Μηματος (προαιρετικᾶ)
Cable de senal (optional)
Cavo segnale (opzionale) - Signaalsnoer (in optie)
- Signalsladd (extra ultrusting)
- Signalkabel (valgrit)
- Signaaljohto (valinnainen)
-
Signalledning (valgfritt)
-
CONNECTIONS (CONT'D)
- ANSCHLUSSE (FORTS.)
- BRANCHEMENTS (SUITE)
- ΣYNΔΕΣΕΙΣ (ΣYNΞΧΕΙΑ)
- CONEXIONES (CONTINUACION)
COLLEGAMENTI (SEGUE)
AANSLUMNGEN (VERVOLG)
- ANSLUTNING (FORTS.)
TILSUTNING (FORTSA)
· LIITÄNTÄ (JATKUU)
TILKOBLINGER (FORTS.)
- Connection to an optical device
- Anschluß an ein Gerät mit optischer Signalübertragung
- Raccordement à un lecteur optique
- EuVbEaOaONtIKouKeu
- Conexión a un dispositivo optico
- Collegamento ad un dispositivo ottico
Aansluiting op een optisch toestel - Inkoppling av en optisk utrustning
- Tilslutting til optisk apparat
- Liittäminen optisella liitannäla varustettuun laitteseen
- Tilkobling til et optisk apparat
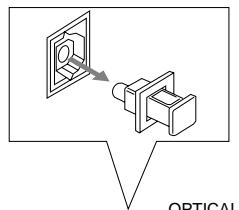
OPTICAL DIGITAL IN
OPTICAL DIGITAL OUT
- Connect the optical digital cord to this unit after removing the terminal cover from the optical terminal.
Zum Anschlu eines Digital-Glasfaserkabels am Gerat muß zunchast die Anschluabdeckung über dem Optik-Eingangsanschu entfern werden.
Raccordez le cordon numérique optique à cet apparéil après avoir retire le capuchon de la borne optique.
TO ONTIKO i KAWDIO OE autn TNI OOUKEU APou NPwTA apaipoeTe TO KANAKI TOU ONTIKOU AKPOEKTNI. - Collegare il cavo ottico digitale a但这a unità dopo aver molto il copri-terminale dal terminale ottico.
- Conecte el cable digital optico a estaunidad despues de retiring la cubierta terminal del terminal optico.
- Sluit het optisch digitaal snoer op dit toestel aan na verwijdering van de bescherming van het optisch contactpunt.
- Anslut den optiska/digitala sladden till apparaten after att ha tagit bort skyddslocket fran den optiska anslutningen.
Den optiske digitalsnor tilsluttes anlaegget, after at teminalens lag er fjernet fra den optiske terminal. - Poista tän laitteen optisesa liitannässe olevasuojus ja liita optinen kaapeli liitantaan.
Koble den optiske digitaldningen til dette apparatet.
etter at du har fjernet tilkobingsdekslet fra den optiske tilkobingen.
Optical digital cord (optional)
Digital-Glasfaserkabel (Option)
Cordon numérique optique (en option)
- Oπικό ηηφίακο καλώδιο (προαρετικά)
Cable digital optico (optional)
Cavo ottico digitale (opzionale)
- Optisch digitaal snoer (in optie)
- Optisk/digital sladd (extra utrustning)
- Optisk digitalsnor (valgfrit)
- Optinen digitaalinen kaapeli (lisävaruste)
- Optisk digitalledning (valgfritt)
- MD recorder, etc. (optional)
- MD-Recorder o.ä. (Option)
- Enregistreur MD, etc. (en option)
-Σuokεuñ MD, kλπ. (προαρετικά) - Grabador de MD, etc. (optional)
- Registratore MD, ecc. (opzionale)
- MD-recorder enz. (in optie)
- MD-spelare etc. (extra ultrusting)
- MD-spiller m.m. (valgfrit)
-MD-tallennin tms. (lisavaruste) - MD-spiller o.l. (valgfritt)
CONTROLS
- BEDIENUNGSELEMENTE
CONTROLES
XEPII∑THPIA
CONTROLES
CONTROLLI
- BEDIENINGSSONDERDELEN
REGLAGE
KONTROLLER
OHJAIMET
BETJENINGSKNAPPER
GENERAL SECTION ALLGEMEINER TEIL SECTION GENERALI
TENIKO TMHMA SECCION GENERAL SEZIONE GENERALE
ALGEMEEN GEDEELTE HUVUDDELEN HOVEDAPPARAT
General Section (see page 23)
- Display window
a. Timer mode indicator
b. X-BASS indicator
c. CLOCK indicator
d. SNOOZE indicator
e. SLEEP indicator
f. Timer indicator (ON/OFF)
g. Time display
h. PRESET EQ indicator
i. STEREO/MONO indicator
- STANDBY/ON Button
- Remote sensor section
- VOLUME control knob
- STANDBY indicator
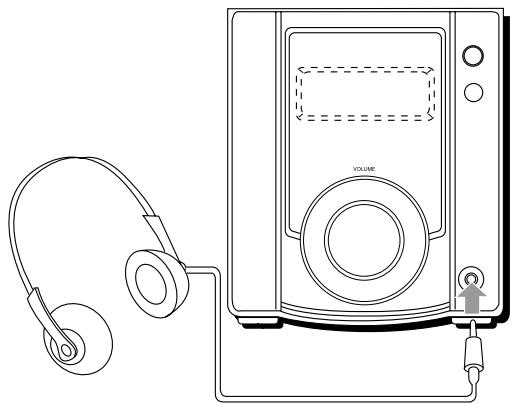
- Phones jack (Ω)
(3.5 mm dia. stereo mini)
Connect headphones (impedance 16Ω to 68Ω) to this jack. Speaker sound is automatically switched off when the headphones are connected. - PRESET EQ Button
- X-BASS Button
- AUX Button
- CLOCK Button
- TIMER/SNOOZE Button
- SLEEP Button
CD Player Section (see page 23)
- Display window
a. Playback indicator (▶)
b. MEMORY indicator
c. RANDOM play indicator
d. Repeat play indicator ( ALL)
e. Pause indicator (II)
f. Function/Track number display
g. Play time display
h. Track number indicator
- CD door
- CD operation buttons
Stop Button (■):
Press to stop playing a CD or cancel programmed play.
PLAY/PAUSE Button
Press to play a CD or to stop temporarily.
CD SEARCH Buttons
(144/44,>4>):
Press to locate the beginning of a track and to start forward/back search operations.
Press and hold during play, the CD player will start search. The player will start play when you release the button.
- CD door OPEN/CLOSE Button (▲)
Tuner Section (see page 24)
- Display window
a. STEREO indicator
b. MONO indicator
c. Radio Data System indicators
d. Band indicator
e. Radio frequency display Channel space mode display
- PRESET TUNING Button
- Tuning Buttons (UP/DOWN)
- BAND Button: Press to select tuner mode.
Press to select the band.
- BEDIENUNGSELEMENTE
- PRESET EQ-painike
- X-BASS-painike
- AUX-painike
- CLOCK-painike
- TIMER/SNOOZE-painike
- SLEEP-painike
- Point the remote control at the remote sensor (①) when operating.
- The remote control may not be effective in the strong day light.
- Never get the remote control wet.
- Replace the batteries when the performance of the remote control becomes unstable.
NOTES: Do not use new and old batteries or different kinds of batteries together.
- During radio listening (MW), if you operate the remote control extremely close to the sound system, some noise may be produced.
Deutsch
FUNCTIONS AND FEATURES
GENERAL SECTION
SWITCHING THE POWER STANDBY/ON
- Switching on : The STANDBY indicator goes off. The display window lights up.
- Switching standby: The STANDBY indicator lights up. The display window lights goes off and only the clock is indicated.
- Even when the power is set to STANDBY, pressing the button shown below the sound system is automatically turned on, a sound source is chosen, and play begins.
| Function mode | Operations | |
| PLAY/PAUSE | CD | When this button is pressed with a CD loaded, CD playback begins. |
| BAND | TUNER | When this button is pressed, the tuner is engaged. |
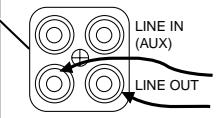
| AUX | AUX | A sound source connected to the LINE IN (AUX) terminal can be engaged. |
- When the OPEN/CLOSE button is pressed, the sound source does not switch, but the CD door can open or close.
Note: When switching off the power, be sure to press the STANDBY/ON button.
VOLUME, X-BASS AND OTHER CONTROLS
VOLUME buttons (using the remote control unit)
- : Use to increase the volume
- : Use to decrease the volume
X-BASS Buttons
ON: X-BASS indicator lights up. X-BASS sound is activated.
OFF : X-BASS indicator goes off. X-BASS sound is not activated.
- DIMMER Button (using the remote control unit)
When the power is switched on, pressing this button dims the display window's light. When the button is pressed again, the display window returns to its normal brightness.
- PRESET EQ Button
POPS: More presence in the vocals and midrange
ROCK: Powerful sound emphasizing treble and bass
CLASSIC: Enriched sound with heavy bass and fine treble
JAZZ: Accented lower frequencies for jazz-type music
FLAT: Natural sound
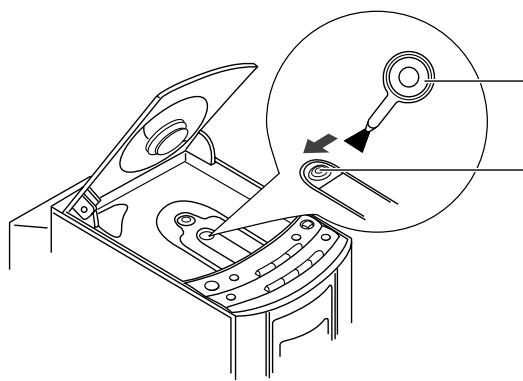
- RESET
If operations or displays of this unit are at fault:
Many functions of this unit are controlled by microcomputers. Make the units in standby mode and then press the reset switch when operations or displays are still at fault in spite of pressing any buttons. There is also need to set stations again because pressing the reset switch makes the preset stations lost.
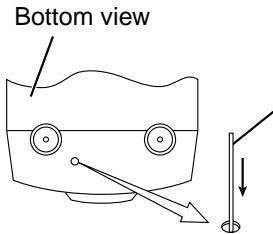
Press RESET switch inside the unit with a cocktail stick. Do not use a metal stick.
TUNER SECTION
TUNER AERIALS
- For FM, connect the provided FM feeder antenna (see page 18).
- For MW, adjust the position of AM loop antenna (see page 17).
A. STEREO/MONO button (using the remote control unit)
- Auto mode:
When listening to an FM stereo broadcast, set the unit to this mode by pressing the ST/MONO button. The STEREO indicator lights when the FM stereo broadcast is received. - Mono mode:
When the FM stereo reception is noisy, set the unit to MONO MODE by pressing the ST/MONO button.
- Seek tuning:
Press the UP or DOWN button for one second or more. The unit enters the seek tuning mode to tune in the nearest station automatically, so the broadcast can be heard.
- Manual tuning:
Each time the UP or DOWN button is pressed, the unit steps through the current frequency band. Tuning is done in steps of 50kHz for FM and 9kHz for MW.
Note:
- When seek tuning to the required station is not possible because the broadcast signal is too weak, press the UP or DOWN button momentarily to perform manual tuning.
- When the power is set to the STANDBY, or another mode (CD or AUX) is selected, the last tuned frequency is stored in memory. When the power is switched on again and BAND button is pressed, the same station will be turned on.
B. Auto preset tuning (using the remote control unit)
This will automatically store any broadcasting stations with strong signals into the memory (Max. 10 for FM and 10 for MW)
- Press the AUTO PRESET button for more than 2 seconds. The frequencies of stations broadcasting signals can be stored in memory automatically in the order of increasing frequency.
C. Presetting stations (using the remote control unit) 20 stations in 2 band FM/MW can be preset Notes:
- The previous stored station is erased when a new station is stored, because the new station's frequency replaces the previous frequency in memory.
- When listening to a MW broadcast, noise may be heard if the remote control unit is used.
- All preset stations will be erased when the power cord is disconnected or a power failure occurs. In such cases, store the stations again.
D. Frequency step of MW band
To tune to your local MW station, you can select either 9 kHz or 10 kHz as the frequency step. By default, the factory setting for the unit is at 9 kHz step.
To switch to the required frequency step:
1) Make sure the unit is at MW band in TUNER mode.
2) To select 9 kHz frequency step – press and hold the BAND button while pressing button.
3) To select 10kHz frequency step - press and hold the BAND button while pressing 1 / button.
The set will remain at the selected frequency step setting, until item 2 or 3 is pressed again.
E. RDS Button (using the remote control unit)
Use this button to automatically tune to stations using the radio data system. There are program type identification (PTY), clock time (CT) and radio text (RT) functions.
DISPLAY
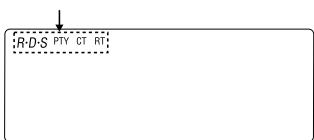
- RDS (Radio Data System) When the RDS button is pressed, a station is being searched for and automatically tuned in. The "RDS" indicator lights up and the station's name is displayed on the frequency display.
- PTY (Program Type) This indicator lights up when the type of RDS program is specified.
- RT (Radio Text) This lights when the RT mode and the RT message is displayed.
REMOTE CONTROL
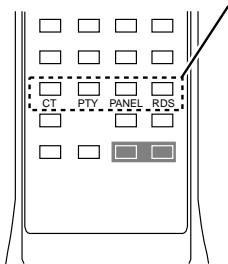
CT button
Use this to correct the time of the clock on the AX-M10. Press this button when the time service of an RDS station is received correctly. "CT ON" is displayed for 2 seconds and the AX-M10's clock is corrected. Press the CT button twice, and "CT OFF" is displayed.
The clock can be adjusted manually in "CT OFF" mode.
RDS button
Use this to automatically tune to stations using the radio data system.
PTY button
Press this button after selecting "PTY" with the RDS button to select one of the 16 program types.
PANEL button
Press this button when receiving RDS stations to select the frequency, PTY, RT or CT display.
Note that this button will not function if the reception is poor.
Each time the button is pressed, the display mode changes as follows:

CD PLAYER SECTION
CD SEARCH BUTTONS
Skip playback
By pressing briefly the CD SEARCH buttons (↓/↓, ▷/□), you can jump to a next or previous title, or you can select a track before starting playback.
A. During PLAY
- You can jump to the next title by pressing the CD SEARCH button (▶▶/▶▶I) once. If you want to skip more than one track, press the CD SEARCH button (▶▶/▶▶I) more than once until the display shows the desired track number.
- If you want to repeat one of the previous titles, press the CD SEARCH button (14/44) more than once until the display shows the required track number.
- Press and hold the CD SEARCH button (▶/▶,▶/▶) during play, the CD player will start search. The player will start play when you release the button.
B. In position STOP
- In position STOP with a CD inserted you can select the desired title using the CD SEARCH buttons (▲▲/▲▲, ▲▲/▲▲) until the display shows the required track number. Press PLAY/PAUSE button (▲/■) to start playback.
OPERATION
(See page 101 - 116)
TO LISTEN USING HEADPHONES
(See page 117)
MAINTENANCE
(See page 118)
SPECIFICATIONS
TUNER SECTION
Frequency Range FM: 87.5 - 108 MHz (50 kHz step),
MW: 522 - 1611 kHz (9 kHz step)
MW: 520 - 1710 kHz (10 kHz step)
Antennas FM:FM feeder antenna,
MW: AM loop antenna
CD PLAYER SECTION
Sampling frequency 44.1 kHz
1 bit D/A converter
This unit can be connected to another recorder with the optical digital output terminals on the back panel for digital recordings.
GENERAL SPECIFICATION
Power Requirements AC 230 V, 50 Hz
Power Consumption 30 W in AC operation
Speakers 7.6 cm (3.2 in.) dia., Impedance: 4 ohms
Power Output 12.5 W + 12.5 W
Outputs Headphones jack (stereo mini jack) for 16 - 68 ohms impedance headache
Dimensions Main Unit: 145 (W) X 182 (H) X 258 (D) mm
Speaker Unit: 120 (W) X 170 (H) X 186 (D) mm
Weight Main Unit: Approx. 2.9 kg
Speaker Unit: Approx. 1.3 kg/piece
Accessory Supplied AC power cord (1)
Remote Control Unit (1)
FM antenna (1)
Loop antenna (1)
Speaker Cord (2)
Specifications are subject to change for performance improvement without notice.
Nota: Whenever you want to use the system, you can use the following command.
VOLUME, X-BASS ED ALTRI CONTROLLI
A. Tasto STEREO/MONO (tramite telecomando)
- Modo Auto:
E. Tasto RDS (tramite telecomando)
OMKOPPLING MELLAN STANDBY OCH ON
ATT LYSSNA MED HÖRLURAR
(se sid. 117)
SKÖTSEL
(se sid. 118)
TEKNISKA DATA
RADIO-delen
| Frekvensområde: | FM: 87,5 - 108 MHz (50 kHz steg) |
| MV: 522 - 1611 kHz (9 kHz steg) | |
| MV: 520 - 1 710 kHz (10 kHz steg) | |
| Antenner: | FM: stavantenn für FM |
| MV: inbyggd antennslinga |
CD-spelardelen
| SAMPLINGSFREKvens: | 44,1 kHz |
| 1-bits digital/analogomvandlare |
- Manuel sogning (Manual tuning):
TOIMINNOT JA OMINAISUUDETYLEINEN OSA
RADIO-OSA
VIRRAN JA VALMIUSTILAN KYTKEMINEN (STANDBY/ON)
TIDSUR AVSPILLING (FORTS.)
To get extra 5 minutes of sleep ... (will snooze for another 5 minutes)
Um noch 5 Minuten weiterzuschlafen ... (Gerät bleibt weitere fünf Minuten im Schlummer-Modus)
- Pour dormir 5 minutes de plus...(pour somnoler 5 minutes supplémentaires)
- Tia va napataivevTov unvo yia aaaa 5 eaTTa...(to ouotma thapaaevi oTn aeitoupyia "snooze" ia aaaa 5 eaTTa)
- Para poder dormir 5 horas más (volverá a sonar afterwards de 5 horas)
- Per prolungare il sonno di 5 minuti ... (ilsystema restera in modo "snoopze" per altri 5 minuti)
- Om nog 5 Minutes extra te sluimeren... (toestel zwijgt nogiens 5 minutes)
- För att fá fem minuter extra sömn ... (ny väckning after fem minutes)
- For at fä 5 ekstra minutter (afspilningen begynder 5 minutter senere)
- Jos haluat nukkua vielä 5 minuuttla ... (ajastimen ajan lisäys 5 minuutila)
- For a save 5 minute til ... (dose i 5 minute til)
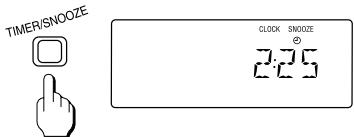
- During timer playback, user can get extra 5 minutes of sleep (5 minutes in standby mode) by pressing TIMER/SNOOZE button.
Note: In order for the snooze function to operate, the timer on/off interval setting has to be more than 5 minutes.
A To switch off the radio
Zum Ausschalten des Radios
- Pour couper la radio
-Ⅰa va αβησετ to paδιόφωνo
- ParaURTARALadio
Per spegnere la radio
- Om de radio uit te zetten
- Att stanga av radion
- At slukke radioen
Virran katkaisemin radiosta
For a slara radioen av

STANDBY/ON
-
SEEKING TUNING
-
EEN ZENDER ZOEKEN
-
SENDERWAHL
STATIONSINSTÄLLNING
SYNTONISATION PAR RECHERCHE
-
SÖGNING AF RADIOSTATIONER
-
TOPIKH ANAZHTHszH
-
HAKUVIRITYS
SYNTONIZACION
- SØKEINNSTILLING
To receive the next station, repeat steps 2 - 3.
Zum Empfang des nachsten Senders die Schritte 2 - 3 wiederholen.
- Pour capter la station suivante, repêze les étapes 2 - 3.
- Tn lyu o nou o aou, enavaaβe Ta hmuata 2-3.
- Para &, recibir la emisora?, repita los pasos 2 - 3.
Per ricevere la stazione successiva, ripetete i passaggi 2-3.
- Om de volgende zender te ontvangen herhaalt u stap 2 -3.
- Upprepa stegen 2 - 3 für att ta emot{nasta station.
- For at modtage naste radiostation, gentag trin 2 - 3.
- Toista seuraavan aseman vastaanottomiseksi vaiheet 2 -3.
Gjenta trinn 2-3 for a motta stasjon.
- TO LISTEN USING HEADPHONES
MITHÖREN MIT KOPFHÖRERN - ECOUTE AVEC CASQUE D'ECOUTE
AKPOAZH ME AKOYSTIKA - ESCUCHANDO CON EL USO DE LOS AURICULARES
- ASCOLTARE UTILIZZANDO LE
CUFFIE
-
DMTE LUISTEREN VIA DE HOOFDTELEFOON
ATT LYSSNA MED HÖRLURAR
LYTNING V.H.A. HOVEDTELEFONER
KUUNTELEMINEN KUULOKKEILLA
LYTTE MED HODETELEFON -
You can connect stereo headphones having a 3.5mm plug to the socket. Inserting the plug will disconnect the speaker.
- An der Steckbuchse laßt sich ein Stereo-Kopfhörer mit 3,5-mm-Stecker anschließen. Beim Einführen des Steckers wird die Lautsprecher abgeschaltet.
- Vous pouze brancher un casque stéreo muni d'une fiche de 3.5mm à la prise. Dès que vous insérez la fiche, vous déconnectez les haut-parleurs.
Mnpoeite va ouvdoeTe oTpeoovwika akouotikka buogma 3,5mm otnv unodoxn. Me tnv Eioaywyn Tou buogatoc ta nxia anoovovvtai. - Se puede conectarunos auriculares con clavija de 3,5mm al enchufe. Los altovoces se desconectarán al insertar la clavija.
- Potete collegare una cuffia con spina 3,5mm alla presa. Gli atoparlanti vengono cos i esclusi.
- U Kunt een stereo hoofdtelefoon met 3,5mm steker aansluiten op de uitgang. De luidsperkers worden daardoor uitgeschakeld.
- Det går att ansluta hörllar med 3,5 mm propp till uttaget. Högtalarna kopplas bort vid anslutning av hörllurarna.
- Man Kan tilslutte stereo hovedtelefoner som har et 3,5mm stik i bøsningen. Hojttalerne afbrydes nár stikket sættes l.
- Voit liittä liitäntän stereokuulokkeet, joissa on 3,5 mm:n liitin. Kun liitä kuulokkeet, kaiuttimien äni katkeaa.
- En hodetelefon med 3,5 mm plugg kan kobles til kontakten. Pluggen kobler fra høyttileren.
MAINTENANCE (CD PLAYER)
WARTUNG (CD-SPIELER)
ENTRETIEN (LECTEUR DE CD)
- SYNTHPHSH (CD PLAYER)
MANTENIMIENTO (LECTOR DE CD)
- MANUTENZIONE (LETTORE CD)
- ONDERHOUD (CD-SPELER)
- UNDERHÄLL (CD-SPELAREN)
VEDLGHEHOLDELS
(CD-AFSPILLER)
HOI0 (CD-SOITIN)
-VEDLIKEHOLD (CD-SPILLER)
- BLOWER
- BLASEBALG
- SOUFFLET
ΦYΣHTHPA - SOPLADOR
- SOFFIETTO
- BLAZER
- BLASPENSEL
BLAESER -
PUHALLIN
BLASEPENSEL -
PICKUP LENS
- ABTASTOPTIK
- OPTIQUE DE LECTURE
- ΦAKOI PICKUP
- LENTE FONOCAPTORA
- LENTE PICKUP
- PICK-UP LENS
- PICKUPLINS
- PICKUPLINSE
LUKUPAAN LINSSI -
PICKUPLINSE
-
CLEANING STICK
REINIGUNGSSTÄBCHEN
COTON-TIGE - MNATONETA
PALILLO DE LIMPIEZA - BASTONCINO OVATTATO
WATTENSTOKJE
BOMULLSTOPP - RENSEPIND
PUMPULIPUIKKO - RENSEPINNE

- PICKUP LENS
- ABTASTOPTIK
- OPTIQUE DE LECTURE
- ΦAKOI PICKUP
- LENTE FONOCAPTORA
- LENTE PICKUP
- PICK-UP LENS
- PICKUPLINS
- PICKUPLINSE
- LUKUPÄAN LINSSI
- PICKUPLINSE
MEMO
HITACHI
Hitachi, Ltd. Tokyo, Japan
International Sales Division
THE HITACHI ATAGO BUILDING,
No. 15-12 Nishi Shinbashi, 2-Chome,
Minato - Ku, Tokyo 105-8430, Japan.
Tel: 03 35022111
HITACHI EUROPE LTD.
Dukes Meadow
Millboard Road
Bourne End
Buckinghamshire
SL85XF
UNITED KINGDOM
Tel: 01628 643000
Fax: 01628 643400
Email: consumer-service@hitachi-eu.com
HITACHI EUROPE S.A.
364, Kifissias Ave. & 1, Delfon Str.
15233Chalandri
Athens
GREECE
Tel: 1-6837200
Fax: 1-6835694
Email: service.hellas@hitachi-eu.com
HITACHI EUROPE GmbH
Munich Office
Dornacher Strasse 3
Email: customerservice.italy@hitachi-eu.com
HITACHI EUROPE S.A.S
Lyon Office
B.P. 45, 69671 Bron Cedex
FRANCE
Tel: 0472142970
Fax: 0472142999
Norwegian Branch Office
Strandveien 18
1366 Dysaker
NORWAY
Tel: 02205 9060
Fax: 02205 9061
Email csgnor@hitachi-eu.com
ITEM N.V./S.A. (INTERNATIONAL TRADE FOR
ELECTRONIC MATERIAL & MEDIA N.V./S.A)
UCOTower-Bellevue,17
B-9050 GENT
BELGIUM (for BENELUX)
Tel: 092304801
Fax: 092309680
Email: hitachi.item@skynet.be