
1000 Series XB1111 - Vacuum Cleaner PHILIPS - Free user manual and instructions
Find the device manual for free 1000 Series XB1111 PHILIPS in PDF.


| Product type | Bagless canister vacuum cleaner |
| Brand | Philips |
| Model | 1000 Series XB1111 |
| Power supply | Mains, 220-240 V ~ 50/60 Hz |
| Maximum power | 750 W |
| Tank capacity | 1.5 L |
| Filter type | Washable HEPA filter |
| Dimensions (L x W x H) | 40 x 28 x 32 cm |
| Weight | 4.5 kg |
| Cord length | 6 m |
| Operating radius | 9 m |
| Included accessories | Crevice tool, furniture brush, slot nozzle |
| Main functions | Powerful suction, cyclonic system, HEPA filtration |
| Noise level | 80 dB (A) |
| Maintenance | Empty the tank after each use, wash the filter every 3 months |
| Safety | Unplug before any cleaning, do not vacuum liquids |
| Spare parts and repairability | Filter, brush, nozzles available on the Philips website |
| Warranty | 2 years |
Frequently Asked Questions - 1000 Series XB1111 PHILIPS
User questions about 1000 Series XB1111 PHILIPS
0 question about this device. Answer the ones you know or ask your own.
Ask a new question about this device
Download the instructions for your Vacuum Cleaner in PDF format for free! Find your manual 1000 Series XB1111 - PHILIPS and take your electronic device back in hand. On this page are published all the documents necessary for the use of your device. 1000 Series XB1111 by PHILIPS.
USER MANUAL 1000 Series XB1111 PHILIPS
English 6
Čeština 20
Dansk 34
Deutsch 48
Eesti 64
Español 78
Français 92
Hrvatski 107
Italiano 121
Latviešu 136
Lietuviškai 150
Magyar 164
Nederlands 178
Norsk 193
Polski 207
Português 222
Română 236
Shqip 250
Slovenian 264
Slovak 278
Serbian 292
Finnish 306
Swedish 320
Turkish 334
Greek 348
Bulgarian 363
Macedonian 378
Ukrainian 393
408
6 English
Congratulations on your purchase and welcome to Philips! To fully benefit from the support that Philips offers, register your product at www.philips.com/MyVacuumCleaner.
Important safety information
Read this important information carefully before you use the appliance and save it for future reference.
Danger
Never vacuum up water or any other liquid, flammable substances or hot ashes.
Warning
- Check if the voltage indicated on the appliance corresponds to the local mains voltage before you connect the appliance.
- Do not use the appliance if the plug, the mains cord or the appliance itself is damaged.
- If the mains cord is damaged, you must have it replaced by us, a service center authorized by us or similarly qualified persons in order to avoid a hazard.
- Do not point the hose, the tube or any other accessory at the eyes or ears nor put it in your mouth.
- Do not use the appliance in combination with a transformer, as this could cause hazardous situations.
- This appliance can be used by children aged from 8 years and above and persons with reduced physical, sensory or mental capabilities or lack of experience and knowledge if they have been given supervision or instruction concerning use of the appliance in a safe way and understand the hazards involved. Children shall not play with the appliance. Cleaning and user maintenance shall not be made by children without supervision.
- The plug must be removed from the socket-outlet before cleaning or maintaining the appliance.
- This vacuum cleaner is designed for household use only. Do not use this vacuum cleaner to vacuum up building waste, cement dust, ashes, fine sand, lime and similar substances. Never use the vacuum cleaner without any of the filters. This could damage the motor and shorten the life of the vacuum cleaner. Always clean all parts of the vacuum cleaner as shown in the user manual. Do not clean any parts with water and/or cleaning agents if this is not specifically shown in the user manual.
Caution
- Never use the appliance without any of the filters. This could damage the motor and shorten the life of the appliance.
- Always clean all parts as shown in the user manual. Do not clean any parts with water and/or cleaning agents if this is not particularly shown in the user manual.
- If you clean a washable filter with water, make sure it is completely dry before you put it back into the appliance. Do not dry the filter in direct sunlight, on a radiator or in a tumble dryer. Replace a washable filter if it can no longer be cleaned properly or if it is damaged.
- To guarantee optimal dust retention and performance of the vacuum cleaner, always replace the filters with original Philips filters of the correct type.
- Maximum noise level: Lc = 84 dB(A)
Electromagnetic fields (EMF)
This appliance complies with the applicable standards and regulations regarding exposure to electromagnetic fields.
General description

8 English
A Bend assy H 2-in-1 Crevice tool
B Hose assy I Power cord
C 2-piece telescopic metal tube J Inlet filter assy
D Multi-purpose nozzle K Foam filter
E Quick start guide L Vortex finder
F Important information leaflet M Vortex finder cover
G Furniture nozzle (only available for XB1042 & XB1142)
Dust bucket
Preparing for use
Connecting and disconnecting the hose

1. To connect the hose, insert it into the hose connection opening until it snaps into place.

2. To disconnect the hose, press the easy-release buttons on either side of the hose connector (1) and pull the hose out of the hose connection opening (2).
Connecting and adjusting the telescopic tube

1. To connect the telescopic tube to the handgrip of the hose, align the hole in the end of the handgrip with the metal tube and push the tube into place.
2. To adjust the telescopic metal tube to the length you find most comfortable during vacuuming, push the length adjustment button and push or pull one of the tube parts upwards or downwards.
3. To disconnect the tube from the handgrip, pull the handgrip out of the tube.
Connecting and disconnecting the nozzles
Multi-function nozzle
The Multi-function nozzle is a multipurpose nozzle for effective cleaning of carpets and hard floors. The air gap at the front of the nozzle lets large crumbs in and the brushes at the sides clean closely along furniture and walls.
1. To connect the nozzle, align the hole on the end of the tube with the nozzle and push the tube into the nozzle.


2. To clean hard floors, push the rocker switch on top of the nozzle backwards with your foot. The brush strip for cleaning hard floors comes out of the nozzle housing.

3 To clean carpets, push the rocker switch on top of the nozzle forwards with your foot. The brush strip disappears into the nozzle housing.

4 To disconnect the nozzle from the tube, push the nozzle with one hand and pull the tube out of the nozzle with the other hand.

Furniture nozzle (for XB1042/XB1142 only)
This nozzle is especially suitable for cleaning furniture.
1 Connect the furniture nozzle with the metal tube.

2 Clean your furniture.
2-in-1 Crevice tool
You can use the crevice tool to clean around tricky edges and into hard-to-reach narrow spaces.

1 To connect the crevice tool, insert the tube to the Crevice tool. You can turn the head over to use it as a brush.

2 Use it to clean some narrow spaces.
Using the appliance

1 Pull the mains cord out of the appliance.

2 Put the plug in the wall socket.

3 Press the on/off button on top of the appliance with your foot to switch on the appliance.
Tip: Regularly check the dust bucket to see if it is full. Regularly clean the filters to ensure optimal performance.
Adjusting the suction power

You can adjust the suction power during vacuum cleaning with the suction power control slide on the handgrip.
- Suction control slide in upwards direction for low suction power to clean curtains, rugs and furniture.
- Suction control slide in downwards direction for maximum suction power to clean hard floors.
Pausing while vacuuming
If you want to pause for a moment, insert the ridge on the multi-purpose nozzle into the parking slot to park the telescopic tube in a convenient position.
Maintenance
Warning: The plug must be removed from the socket-outlet before cleaning or maintaining the appliance.
Caution: Do not clean any part of the appliance in the dishwasher.

Note: For optimal performance, empty the dust bucket after use. Always empty the dust bucket when the dust reaches the maximum indication.
1 Switch off and unplug the appliance.

2 Press the dust bucket release button to unlock the dust bucket. Lift the dust bucket out of the appliance.

3 Open the cover of the dust bucket.

4 Grab the two holders with your hands and pull the Vortex finder straight up from the dust bucket.

5 Empty the dust bucket in a waste bin.

6 Properly install the Vortex finder by ensuring it fits securely against the edge of the dust bucket, as shown in the illustration.
Note: Pull the Vortex finder out of the dust bucket to prevent the filter from getting wet if you only want to clean the dust bucket.
Caution: You can also clean the inside and outside of the dust bucket with a moist cloth. Make sure the dust bucket is dry before you place the dust bucket back in the appliance.

7 Close the cover of the dust bucket.

8 Place the dust bucket back in the appliance.
Cleaning the dust bucket
To guarantee optimal performance, clean the dust bucket every xx weeks.
1 Switch off and unplug the appliance.
2 Open the cover of the dust bucket.


3 Hold the handles of filter housing and twist anti-clockwise to release.
![graph TD A["Initial Review"] --> B["Step 1: Blood Pressure Measurement"] B --> C["Step 2: Blood Pressure Measurement"] C --> D["Step 3: An Evaluation of Blood Pressure"] D --> E["Step 4: Time Scale Measurement"] E --> F["Step 5: Final Observation"] style A fill:#cce5ff,stroke:#333 style F fill:#cce5…](/content/2026/07/1416223/images/7123d0e7b4481eb2ead4046e143a7e5eee074528cffdba7b12b4523b63cb52eb.jpg)
Note: Do not clean the sponge with a brush. Rinsing it with running water does not restore its original color, but it does restore its filtration power.
4 Separate the inlet sponge from filter assy. Wash the sponge and keep to dry for 24 hours. Once sponge is dry, reinsert it into filter housing.

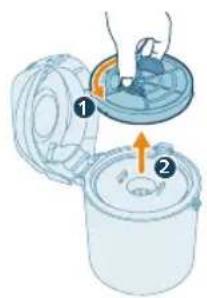
5 Pull the Vortex finder out from the dust bucket.

6 Twist anti-clockwise to release the cover from the Vortex finder.

7 Empty the dust bucket in a waste bin.

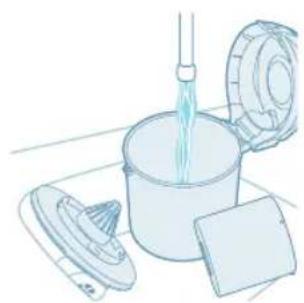
8 Wash the dust bucket and Vortex finder.

9 Use a soft cloth to thoroughly dry all parts.

10 Twist clockwise to install the cover back to the Vortex finder.

11 Properly install the Vortex finder by ensuring it fits securely against the edge of the dust bucket, as shown in the illustration.
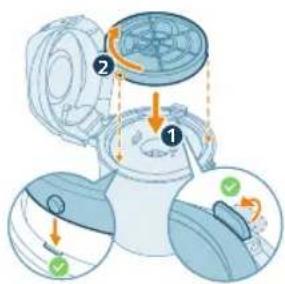
12 Align the locking pins on the filter housing to the slots on the Vortex finder housing. Make sure the edge of the filter housing "activates" the filter missing detection mechanism. Twist the filter housing clockwise to lock it in position.

13 Close the cover and put the dust bucket back into the appliance.
Note: Do not use the appliance without the filter.
Replacing the filter
Our allergy system captures 99.9% of fine dust – including pollen, pet hair and dust mites – for allergy sufferers and anyone demanding a higher level of hygiene.
Note: You can dispose of the old filter with the normal household waste.

1 Switch off and unplug the appliance.
2 Press the cover release button to open the cover of the filter.

3 Pull the used filter out and dispose it properly. Remove the packing materials of the new filter (XV1210).

4 Insert the two clips of the filter into the upper rim of the filter compartment and push the bottom end of the filter into the compartment.

5 Close the filter compartment.
Storage
1 Switch off the appliance and remove the mains plug from the wall socket. 2 Press the cord rewind button to rewind the mains cord. 3 After use, store the crevice tool on the accessory holder. 4 Insert the ridge on the TriActive nozzle into the storage slot.
Troubleshooting
This chapter summarizes the most common problems you could encounter with the appliance. If you are unable to solve the problem with the information below, visit www.philips.com/support for a list of frequently asked questions or contact the Consumer Care Center in your country.
Problem Possible cause Solution
| The vacuum cleaner does not start when I press the on/off button. | The dust bucket is not locked in the appliance properly. | Make sure that the filter is installed properly. |
| The suction power is insufficient. | The dust container is full. Empty the dust container. | |
| The filters are dirty. Clean or replace the filters. | ||
| The suction power is set to a low setting. | Increase the suction power with the regulator on the appliance or on the handgrip. | |
| The nozzle, tube or hose is blocked up. | To remove the obstruction, disconnect the blocked-up item and connect it (as far as possible) the other way around. Switch on the vacuum cleaner to force the air through the blocked-up item in opposite direction. | |
| When I use my vacuum cleaner I sometimes feel electric shocks. | Your vacuum cleaner builds up static electricity. The lower the air humidity, the more static electricity the appliance builds up. | Discharge the appliance by frequently holding the tube against other metal objects in the room (for example the legs of a table or chair, a radiator etc.). You can also raise the air humidity level in the room. |
Recycling

- This symbol means that electrical products shall not be disposed of with normal household waste.
- Follow your country's rules for the separate collection of electrical products.
Warranty and support
Versuni offers a two-year warranty after purchase on this product. This warranty is not valid if a defect is due to incorrect use or poor maintenance. Our warranty does not affect your rights under law as a consumer. For more information or for invoking the warranty, please visit our website www.philips.com/support.
Order parts or accessories
If you have to replace a part or want to purchase an additional part, go to your Philips dealer or visit www.philips.com/support.
If you have problems obtaining the parts, please contact the Philips Consumer Care Center in your country.


Clean your furniture.
Empty the dust container into the trash bin.

Empty the dust container into the trash bin.

Wash the dust container and the vortex finder.

Close the filter compartment.
Storage
A Cleaning kit H Two-in-one crevice nozzle

Furniture nozzle (available only for model XB1042/XB1142)
2-in-1 crevice nozzle
3 Open the dust container lid.

5 Empty the dust container contents into a trash bin.

7 Close the dust container lid.

8 Put the dust container back into the appliance.

7 Empty the dust container contents into a trash bin.
5 Close the filter compartment.
Storage


2 To disconnect the hose, press the release buttons on each side of the hose connector (1) and pull the hose out of the hose connection opening (2).
Connecting and adjusting the telescopic tube


Furniture nozzle (only for models XB1042/XB1142)
This nozzle is especially suitable for cleaning furniture.
1 Pull the power cord out of the appliance.

2 Press the dust container release button to unlock it. Remove the dust container from the appliance.
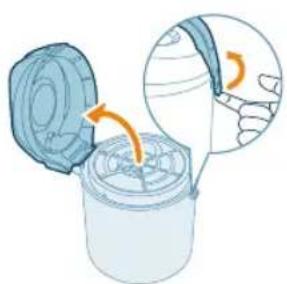
3 Open the dust container lid.

5 Empty the dust container into a waste bin.

7 Close the dust container lid.


7 Empty the dust container into a waste bin.

4 Insert the two filter clips into the top edge of the filter compartment and push the bottom end of the filter into the compartment.

Furniture nozzle (only for XB1042/XB1142)
2 Clean the furniture.
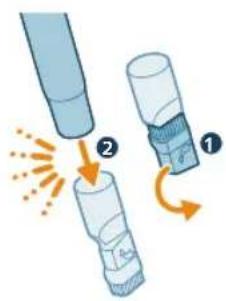
2-in-1 lance accessory

4 To detach the nozzle from the tube, press the tip with one hand and pull the tube out of the nozzle with the other hand.

2 Empty the dust container into a waste bin.
2 Insert the plug into the socket.

5 Empty the dust container into a waste bin.

8 Put the dust container back into the device.
Cleaning the dust container

5 Pull the vortex cylinder out of the dust container.

7 Empty the dust container into a waste bin.

5 Close the filter compartment.
Storage

Furniture nozzle (only in models XB1042 / XB1142)
2 Clean the furniture.

Narrow nozzle "2 in 1"
2 Use it to clean narrow spaces.


2-in-1 crevice nozzle

A Bocht H 2-in-1 crevice nozzle
B Hose I Power cord
C 2-piece metal telescopic tube J Inlet filter
D Multi-function nozzle K Foam rubber filter


Furniture nozzle (only for XB1042/XB1142)
2 Clean the furniture.
2-in-1 crevice nozzle
5 Empty the dust container into the trash.


7 Empty the dust container into the trash.

8 Clean the dust container and the Vortex finder.

5 Close the filter compartment.
Storage
Furniture nozzle (only for models XB1042/XB1142)
2 Clean the furniture.


Furniture nozzle (only for XB1042/XB1142)
2 Clean the furniture.
7 Close the dust container lid.



2 Clean your furniture.


1 Unplug the device.
5 Close the filter compartment.
Storage
A 2-in-1 crevice tool H
266 Slovenian
B Flexible hose assembly I Power cord
C 2-piece telescopic metal tube J Inlet filter assembly
D Multi-purpose nozzle K Foam filter
1 To attach this nozzle, align the hole at the end of the tube with the nozzle and push the tube into the nozzle.

3 When cleaning carpets, press the foot switch on the top of the nozzle forward with your foot. The brush retracts back into the nozzle housing.

Furniture nozzle (only for model XB1042/XB1142)
2 Clean the furniture.
2-in-1 crevice tool
1 Pull the power cord out of the appliance.

3 To turn on the appliance, press the on/off button on the top of the appliance with your foot.
7 Close the dust container lid.

8 Insert the dust container back into the appliance.
1 Switch off and unplug the appliance.
6 Turn counterclockwise to release the cover from the vortex finder.

9 Wipe all parts thoroughly dry with a soft cloth.

10 Turn clockwise to fit the cover back onto the vortex finder.

13 Close the lid and insert the dust container back into the appliance.
Note: Do not use the appliance without the filter.
Replacing the filter
4 Insert the filter tabs into the top edge of the filter compartment and push the bottom end of the filter into the compartment.

5 Close the filter compartment.
Storage
1 Switch off the appliance and unplug the power cord from the outlet. 2 Press the cord rewind button to rewind the power cord. 3 Store the crevice nozzle in the accessory holder after use. 4 Insert the edge of the TriActive nozzle into the storage slot.
Troubleshooting
280 Slovak
A Bending assembly H Slotted attachment 2-in-1
1 Connect the hose by pushing it into the hose connection opening until it clicks into place.

2 To disconnect the hose, press the quick release buttons (1) on either side of the hose connector (1) and pull the hose connector out of the hose connection opening (2).
282 Slovak

3 To clean carpets, press the rocker switch on the top of the nozzle forward with your foot. The brush strip will slide into the nozzle cover.

Furniture nozzle (only for model XB1042/XB1142)
1 Pull the power cord out of the device.
284 Slovak

3 Open the dust container lid.
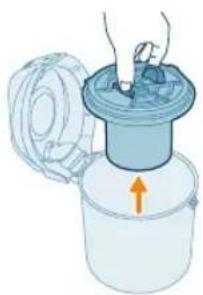
4 Hold the two holders with your hands and pull the overflow tube straight up out of the dust container.

8 Place the dust container back into the device.
Cleaning the dust container

5 Pull the overflow tube out of the dust container.

10 Install the lid back onto the overflow tube by turning it clockwise.
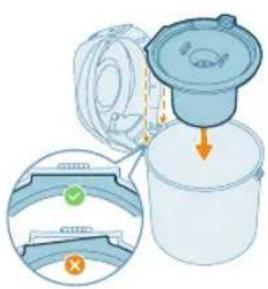
13 Close the cover and insert the dust container back into the device.
1 Turn off the device and unplug it from the power supply.
2 Press the cover release button and open the filter cover.

4 Insert the two filter clips into the top edge of the filter compartment and push the bottom of the filter into the compartment.

5 Close the filter compartment.
Storage
A Fold the knee H 2-in-1 crevice tool
B Fold the hose I Power cord
1 To connect the hose, insert it into the hose connection opening until it clicks into place.

2 To disconnect the hose, press the easy release buttons on both sides of the hose connector (1) and pull the hose out of the connection opening (2).

2 If you want to clean hard floors, push the switch on the top of the foot pedal backward with your foot. The hard floor cleaning brush will come out of the foot pedal housing.

3 If you want to clean carpets, push the switch on the top of the foot pedal forward with your foot. The brush will retract into the foot pedal housing.

4 To detach the foot from the tube, push the foot with one hand and pull the tube out with the other.

1 To attach the crevice tool, insert the tube into the crevice tool. You can rotate the head to use it as a brush.

3 Press the on/off button on the top of the appliance with your foot to turn it on.
Tip: Regularly check the dust container to see if it is full. Clean the filters regularly to ensure optimal performance.
Adjusting the suction power

During vacuuming, you can adjust the suction power using the suction control slider on the handle.
- Set the suction control slider upward for low suction power for cleaning curtains, carpets, and upholstery.
- Set the suction control slider downward for maximum suction power for cleaning hard floors.
Pausing during vacuuming
If you want to take a short break, insert the tab on the multi-purpose foot into the parking slot and place the telescopic tube in the appropriate position.
Maintenance
Warning: Always unplug the appliance from the power outlet before cleaning or maintenance.
Caution: Do not wash parts of the appliance in a dishwasher.

Note: For optimal performance, empty the dust container after use. Always empty the dust container when dust reaches the maximum level mark.
1 Turn off the appliance and unplug it from the electrical outlet.

2 Press the dust container release button to unlock the dust container. Remove the dust container from the appliance.
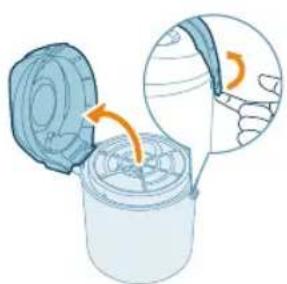
3 Open the dust container lid.

4 Hold the two handles with your hands and pull the vortex finder straight up out of the dust container.

5 Empty the dust container into a waste bin.

6 Properly position the vortex finder, making sure it fits securely on the edge of the dust container, as shown in the figure.
Note: Remove the vortex finder from the dust container to prevent the filter from getting wet if you only want to clean the dust container.
7 Close the dust container lid.

8 Return the dust container to the appliance.
Cleaning the dust container
To guarantee optimal performance, clean the dust container every xx weeks.
1 Turn off the appliance and unplug it from the electrical outlet.
2 Open the dust container lid.


3 Hold the filter housing handles and turn counterclockwise to release it.
![graph TD A["Initial Review"] --> B["Step 1: Review"] B --> C["Step 2: Stimulation"] C --> D["Step 3: Hand-Skip"] D --> E["Step 4: Time Scale"] E --> F["Step 5: Observation"]](/content/2026/07/1416223/images/d591f3d460cd82baded306d4ba5ad7667961e79f4f78cf01e4864edb830835a8.jpg)
5 Pull the vortex finder out of the dust container.

6 Turn counterclockwise to release the cover from the vortex finder.

7 Empty the dust container into a trash can.

8 Wash the dust container and vortex finder.

9 Dry all parts thoroughly with a soft cloth.

10 Turn counterclockwise to replace the cover on the vortex finder.

11 Properly position the vortex finder by making sure it fits securely on the edge of the dust container, as shown in the figure.

12 Align the locking pins on the filter housing with the slots on the vortex finder housing. Make sure the edge of the filter housing 'activates' the missing filter detection mechanism. Turn the filter housing clockwise to lock it in place.

13 Close the cover and return the dust container to the appliance.
Note: Do not use the appliance without the filter.
Replacing the filter
Our allergy protection system retains 99.9% of fine dust – including pollen, pet dander, and dust mites – for allergy sufferers and anyone who wants a higher level of hygiene.
Note: You can dispose of the old filter with household waste.

1 Turn off the appliance and unplug it from the electrical outlet.
2 Press the cover release button to open the filter cover.

3 Remove the used filter and dispose of it properly. Remove the packaging material from the new filter (XV1210).

4 Insert the two filter tabs into the upper edge of the filter compartment and push the lower end of the filter into the compartment.

5 Close the filter compartment.
Disposal
1 Switch off the appliance and unplug it from the power outlet. 2 Press the cord rewind button to rewind the power cord. 3 After use, store the crevice tool in the accessory holder. 4 Insert the protrusion on the TriActive nozzle into the storage slot.
Troubleshooting
This chapter briefly lists the most common problems you may encounter while using the appliance. If you cannot solve the problem with the list of possible problems below, visit www.philips.com/support for a list of frequently asked questions or contact the customer support center in your country.

5 Close the filter compartment.
Storage

2 Clean the furniture.
2-in-1 crevice nozzle
1 Pull the mains cable out of the appliance.

While vacuuming, you can adjust the suction power using the suction power control on the handle.


2 Plug the plug into the socket.


2-in-1 crevice tool


2 Clean the furniture.
The plug must be removed from the socket-outlet before cleaning or
maintaining the appliance
-


3
4


3071997
278 17287 17
- 728777


4'77'77'77'77'
.7287
5. Container
6
- Marshah Birshah
- Marshah
2. Akosloua

- Marshah Beot
![graph TD A["Initial Setup"] --> B["Reaction"] B --> C["Extraction"] C --> D["Filter"] D --> E["Product"] style A fill:#f9f,stroke:#333 style B fill:#ccf,stroke:#333 style C fill:#cfc,stroke:#333 style D fill:#fcc,stroke:#333 style E fill:#cff,stroke:#333](/content/2026/07/1416223/images/4266fb95943769f486bdcbf3c36a025ad1f53518394c3691affd26dd4ded0751.jpg)


6. Container
- Barshah Barshah
8. Container
- Mekarahiyah:
418


10. Container
Birshah, Barshah, Arshah, Arshah, Arshah, Arshah, Arshah, Arshah, Arshah, Arshah, Arshah, Arshah
11. Talrah Bevam
12. Talrah Ar'ah.


www.philips.com/support
Philips 7-10, 7-11, 7-12, 7-13, 7-14, 7-15, 7-16, 7-17, 7-18, 7-19, 7-20, 7-21, 7-22, 7-23, 7-24, 7-25, 7-26, 7-27, 7-28, 7-29, 7-30, 7-31, 7-32, 7-33, 7-34, 7-35, 7-36, 7-37, 7-38, 7-39, 7-40, 7-41, 7-42, 7-43, 7-44, 7-45, 7-46, 7-47, 7-48, 7-49, 7-50, 7-51, 7-52, 7-53, 7-54, 7-55, 7-56, 7-57, 7-58, 7-59, 7-60,
www.philips.com/support 97 D17
Philips 77-10-2017, 1986.

-1
1_
-1
1
2025 © Versuni Holding B.V.
PHILIPS and the Philips Shield Emblem are registered trademarks of Koninklijke Philips N.V. and are used under license.
This product has been manufactured by and is sold under the responsibility of Versuni Holding B.V., and Versuni Holding B.V. is the warrantor in relation to this product.
- ENGLISH
- IMPORTANT SAFETY INFORMATION
- DANGER
- WARNING
- CAUTION
- ELECTROMAGNETIC FIELDS (EMF)
- GENERAL DESCRIPTION
- PREPARING FOR USE
- CONNECTING AND DISCONNECTING THE HOSE
- CONNECTING AND ADJUSTING THE TELESCOPIC TUBE
- CONNECTING AND DISCONNECTING THE NOZZLES
- MULTI-FUNCTION NOZZLE
- FURNITURE NOZZLE (FOR XB1042/XB1142 ONLY)
- IN-1 CREVICE TOOL
- USING THE APPLIANCE
- ADJUSTING THE SUCTION POWER
- PAUSING WHILE VACUUMING
- MAINTENANCE
- CLEANING THE DUST BUCKET
- REPLACING THE FILTER
- STORAGE
- TROUBLESHOOTING
- RECYCLING
- WARRANTY AND SUPPORT
- ORDER PARTS OR ACCESSORIES
- FURNITURE NOZZLE (AVAILABLE ONLY FOR MODEL XB1042/XB1142)
- IN-1 CREVICE NOZZLE
- FURNITURE NOZZLE (ONLY FOR MODELS XB1042/XB1142)
- FURNITURE NOZZLE (ONLY FOR XB1042/XB1142)
- IN-1 LANCE ACCESSORY
- CLEANING THE DUST CONTAINER
- FURNITURE NOZZLE (ONLY IN MODELS XB1042 / XB1142)
- NARROW NOZZLE "2 IN
- SLOVENIAN
- FURNITURE NOZZLE (ONLY FOR MODEL XB1042/XB1142)
- SLOVAK
- PAUSING DURING VACUUMING
- DISPOSAL
Brand : PHILIPS
Model : 1000 Series XB1111
Category : Vacuum Cleaner