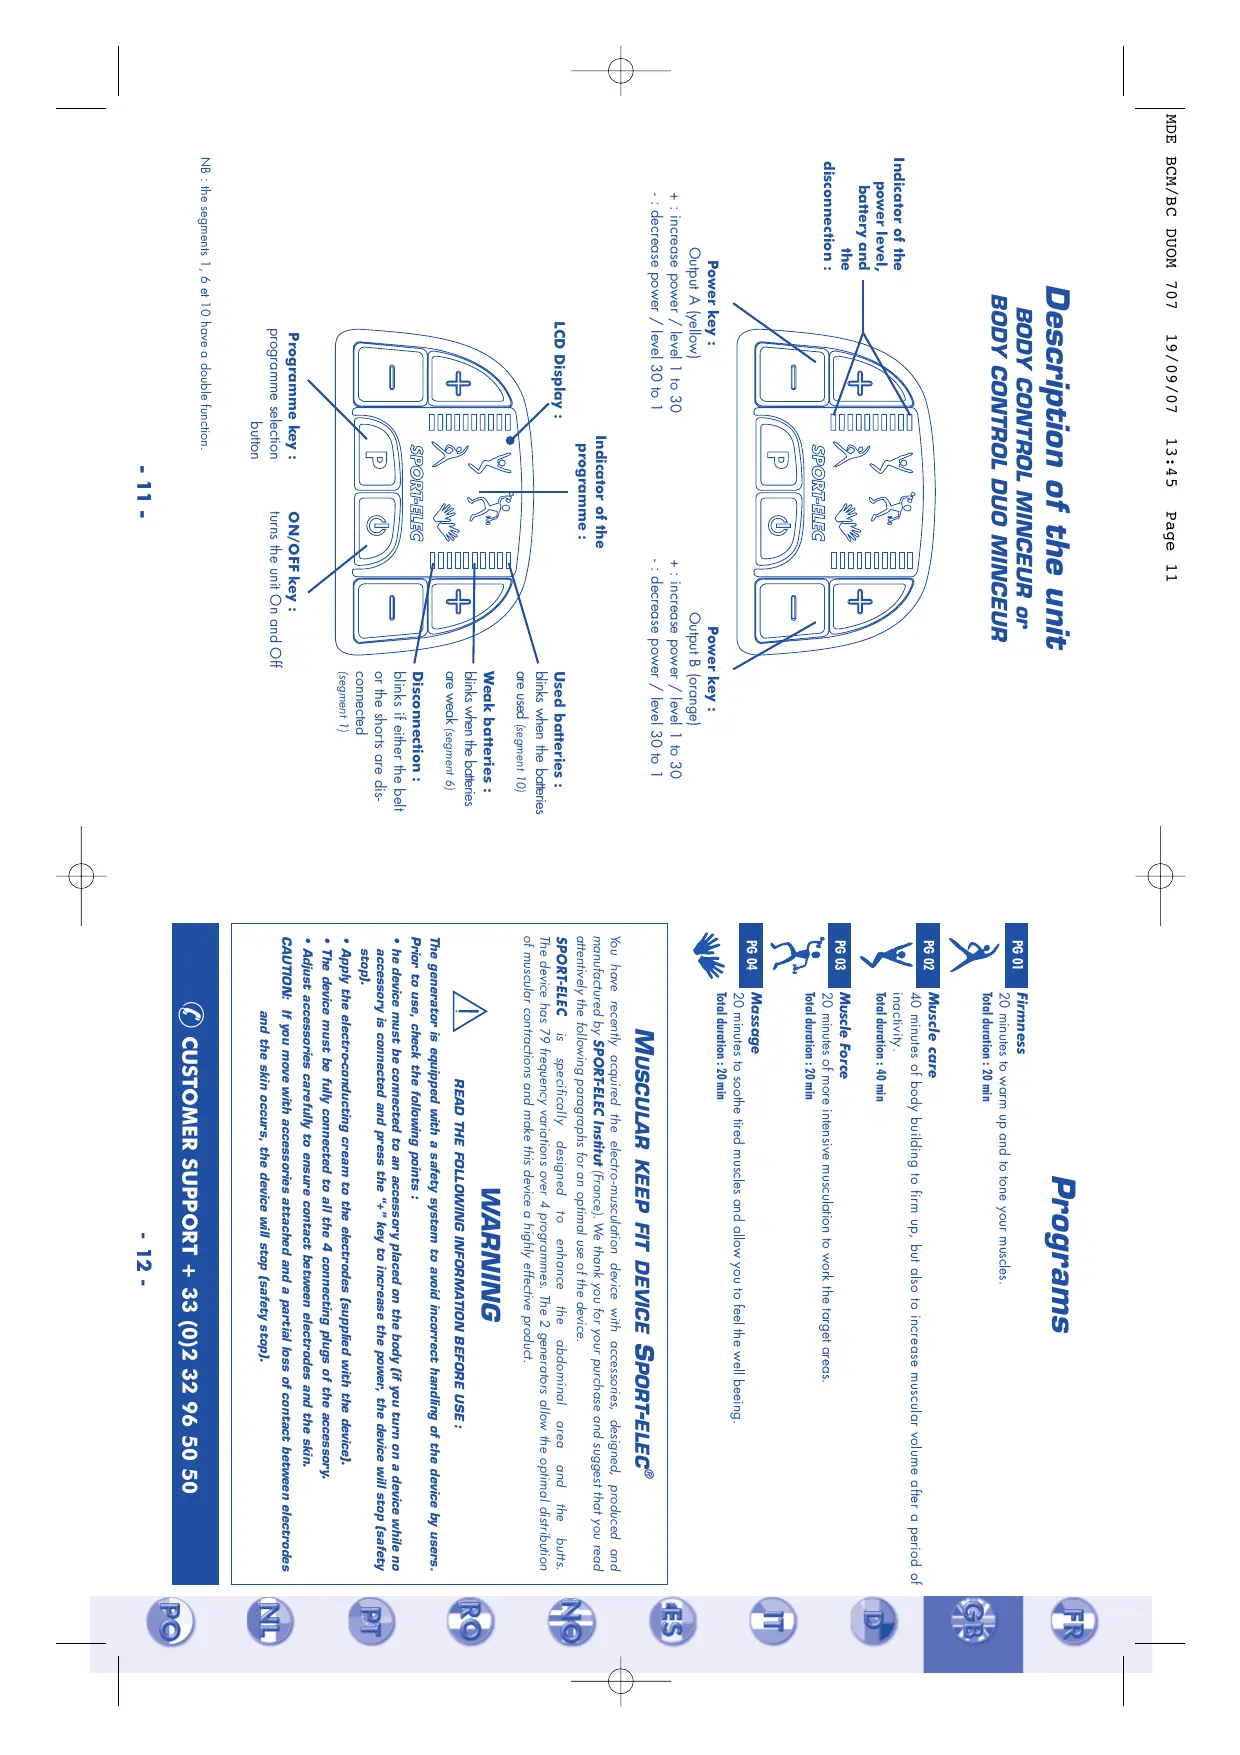
BODY CONTROL DUO MINCEUR - Fitness Equipment SPORT ELEC - Free user manual and instructions
Find the device manual for free BODY CONTROL DUO MINCEUR SPORT ELEC in PDF.
User questions about BODY CONTROL DUO MINCEUR SPORT ELEC
0 question about this device. Answer the ones you know or ask your own.
Ask a new question about this device
Download the instructions for your Fitness Equipment in PDF format for free! Find your manual BODY CONTROL DUO MINCEUR - SPORT ELEC and take your electronic device back in hand. On this page are published all the documents necessary for the use of your device. BODY CONTROL DUO MINCEUR by SPORT ELEC.
USER MANUAL BODY CONTROL DUO MINCEUR SPORT ELEC
Wwewzdzod pwrAeBaeWnIu
psocnOu eaeZnJnJeu
pawkRrReBjQ .spsnJnJou
aHnrnnou . aJeBnBnJou
peddns ou . swnonJou
Rnrrnnnne nnnnne nnnnne nnnnne nnnnne nnnnne nnnnne nnnnne nnnnne nnnnne nnnnne nnnnne nnnnne nnnnne nnnnne nnnnne nnnnne nnnnne nnnnne nnnnne nnnnne nnnnne nnnnne nnnnne nnnnne nnnnne
SE7Id SEDe NOIeSNI
ZoH L'S-1 WOSL


09 09 96 2E 20 OSNOD OENI
: NOLLYSTINLLNNEINNNNANNNNNNNNNNNNNNNNNNNNNNNNNNNNNNNNNNNNNNNNNNNNNNNNNNNNNNNNNNNNNNNNNNNNNNNNNNNNNNNNNNNNNNNNN
INNNEEN
LNNESSLL8A
ENNEENNNNNEENNNNNNNNNNNNNNNNNNNNNNNNNNNNNNNNNNNNNNNNNNNNNNNNNNNNNNNNNNNNNNNNNNNNNNNNNNNNNNNNNNNNNNNNNNNNNNN
WONN NNNN
E E E E E E E E E E E E E E E E E E E E E E E E E E E E E E E E E E E E E E E
nssu .
eepneppeeppeeppeeppeeppeeppeeppeeppeeppeeppeeppeeppeeppeeppeeppeeppeeppeeppeeppeeppeeppeeppeeppeeppeeppeeppeeppeeppeeppeeppeeppeeppeeppeeppeeppeeppeeppeeppeeppeeppe
S abed St:εL 0/60/61 L0L WOnD Oe/WoB EOW
#
seee eae ee e (e 100d) : eoe
e 2
(266d - 104y) : 3
: HONNNNNNNNEe
: ROHS AND NOVSKI / 8
NNEENNNN NNNNNNNNNNNNNNNNNNNNNNNNNNNNNNNNNNNNNNNNNNNNNNNNNNNNNNNNNNNNNNNNNNNNNNNNNNN
: : CENNEA /
WONONONONONON
eeppeeppeeppeeppeeppeeppeeppeeppeeppeeppeeppeeppeeppeeppeeppeeppeeppeeppeeppeeppeeppeeppeeppeeppeeppeeppeeppeeppeeppeeppeeppeeppeeppeeppeeppeeppeeppeeppeeppeeppeeppeeppeeppeeppeeppeeppeeppeeppeeppeeppeep
11 1
and jns jessin and an
e e e e e e e e e e e e e e e e e e e e
aannnnnne aannnnnne aannnnnne aannnnnne aannnnnne
innoed aqaa on azaadas snaa snn aansb
SNO1L4VANVWWWDE
P
xnp saing np janaoaid naaanb
aee
nnnnnnnnnnnnnnnnnnnnnnnnnnnnnnnnnnnnnnnnnnnnnnnnnnnnnnnnnnnnnnnnnnnnnnnnnnnnnnnnnnnnnnnnnnnnnnnnnnnnnnnnnnnnn
nnnnnnnnnnnnnnnnnnnnnnnnnnnnnnnnnnnnnnnnnnnnnnnnnnnnnnnnnnnnnnnnnnnnnnnnnnnnnnnnnnnnnnnnnnnnnnnnnnnnnnnnnnnnn
:
12x - 1 > 0
e e e e e e e e e e e e e e e e e e e e e e e e e e e e
1 + u7 = 7 + 1 > ( 1 + u) u7 = u
e 1
2017 [ No. 3] Opson's app (passive use) and the application
nne nnnnne nee nee nee nee nee nee nee nee nee nee nee nee nee nee nee nee nee nee nee nee nee nee nee nee nee nee nee nee nee nee nee nee nee nee nee nee nee nee nee nee nee nee nee nee nee nee nee nee nee nee neee
eepneppeeppeeppeeppeeppeeppeeppeeppeeppeeppeeppeeppeeppeeppeeppeeppeeppeeppeeppeeppeeppeeppeeppeeppeeppeeppeeppeeppeeppeeppeeppeeppeeppeeppeeppeeppeeppeeppeeppe
TOIAWWJ SNOLTVS
pnpn pnnn nnnn nnnn nnnn nnnn nnnn nnnn nnnn nnnn nnnn nnnn nnnn nnnn nnnn nnnn nnnn nnnn nnnn nnnn nnnn nnnn nnnn nnnn nnnn nnnn nnnn nnnn nnnn nnnn nnnn nnnn nnnn nnnn nnnn nann
P 100000000000000000000000000000000000000000000000000000000
sugaku and saku on a uakuyon in a puu . 'tung an a
· ( - ) = 0


05 96 2ε 2(0) ε + ↓OddnS REWOLSN
quocouny qnnpo 01 9 9 suees
' does not find does this answer can be more than one of the
: 3SNNNEENNNNNNNNNNNNNNNNNNNNNNNNNNNNNNNNNNNNNNNNNNNNNNNNNNNNNNNNNNNNNNNNNNNNNNNNNNNNNNNNNNNNNNNNNNNNNNN
MNINrM
: 1
NINARM
SESESESESESESESESESESESESESESESESE
ει αδe d Στ:ει L0/60/6ι L0L wONd a/Wa EHN

eepn eepn eepn eepn eepn eepn eepn eepn eepn eepn eepn eepn eepn eepn eepn eepn eepn eepn eepn eepn eepn eepn eepn eepn eepn eepn eepn eepn eepn eepn eepn eepn eepn eepn ecpnn n
eepn eepn ennnne nnnnne nnnnne nnnnne nnnnne nnnnne nnnnne nnnnne nnnnne nnnnne nnnnne nnnnne nnnnne nnnnne nnnnne nnnnne nnnnne nnnnne nnnnne nnnnne nnnnne nnnnne nnnnne nnnnne nnnnne nnnnne nnnnee
o 0
eep
eepn eepn eepn eepn eepn eepn eepn eepn eepn eepn eepn eepn eepn eepn eepn eepn eepn eepn eepn eepn eepn eepn eepn eepn eepn eepn eepn eepn eepn eepn eepn eepn eepn eepn ecpnn nne ne ne ne ne ne ne ne ne ne ne ne ne ne ne ne ne ne ne ne ne ne ne ne ne ne ne ne ne ne ne ne ne ne ne ne ne ne ne ne ne ne ne ne ne ne ne ne ne ne ne ne ne
doS - uDBoD jo puE - S dEs
(260d - 1 040d) sdno6 乙 q s6nq eep qeep qep qep qep qep qep qep qep qep qep qep qep qep qep qep qep qep qep qep qep qep qep qep qep qep qep qep qep qep qep qep qep qep qep qep qep qep qep qep qep qep qep qep qep qep qep qep qep qep qep qep
SNOLIILVAHCHESVAAINHCH
sn 10epuwwoeA
-
oe 0000000000000000000000000000000000000000000000000000000000000000000000000000000000
eannnnnne nnnnne eannnnnne ennnnne
Sd1L
ssssssssssssssssssssssssssssssssssssssssssssssssssssssssssssssssssssssss
y / / 1 1 1 1 1 1 1 1 1 1 1 1 1 1 1 1 1 1 1 1 1 1 1 1 1 1 1 1 1 1 1 1 1
Pnnnnne nnnnne nnnnne nnnnne nnnnne nnnnne nnnnne nnnnne nnnnne nnnnne nnnnne nnnnne nnnnne nnnnne nnnnne nnnnne nnnnne nnnnne nnnnne nnnnne nnnnne nnnnne nnnnne nnnnne nnnnne nnnnne
ESN D SNOIAYDNWDO

aennnnn nnnn nnnn nnnn nn nnnn nnnn nnnn nnnn nnnn nnnn nnnn nnnn nnnn nnnn nnnn nnnn nnnn nnnn nnnn nnnn nnnn nnnn nnnn nnnn nnnn nnnn nnnn nnnn nnnn nnnn nnnn nnnn nnnn nnnn nnnn nnnn nnnn nnnn
:SONINVAM
nne nnnnne nee nee nee nee nee nee nee nee nee nee nee nee nee nee nee nee nee nee nee nee nee nee nee nee nee nee nee nee nee nee nee nee nee nee nee nee nee nee nee nee nee nee nee nee nee nee nee nee nee nee neee
2
000000000000000000000000000000000000000
09 09 96 2ε 2(0) 2ε + NENOIILWRAIININEDNNN
(6)
: NENNNNNEHNNENNNEENNNNEENNNNEENNNNEENNNNEENNNNE
SNNNNVM
Pnne Pnnne Pnnne Pnnne Pnnne Pnnne Pnnne Pnnne Pnnne Pnnne Pnnne Pnnne Pnnne Pnnne Pnnne Pnnne Pnnne Pnnne Pnnne Pnnne Pnnne Pnnne Pnnne Pnnne Pnnne Pnnne Pnnne Pnnne Pnnne Pnnne Pnnne Pnnne Pnnne Pnnne Pnnae
61 abed 5:10/60/61 101 WOn D8/WOr ECDW
aewebd aD


NOIILINNNNEEELNEE /
NINN NINN
eepoeepoeepoeepoeepoeepoeepoeepoeepoeepoeepoeepoeepoeepoeepoeepoeepoeepoeepoeepoeepoeepoeepoeepoeepoeepoeepoeepoeepoeepoeepoeepoeepoeepoeepoeepoeepoeepoeepoeepoe
- 2
(2)
: 1
: : SsS hss sds dss nnznnn nnnn / 8
, NIOIINNNNNEE E DE , Zspsq Pneppe
: NOLINNNNNEE /
WONONONONON
68 68
nne nnnnne nee nnnnne nee nee nee nee nee nee nee nee nee nee nee nee nee nee nee nee nee nee nee nee nee nee nee nee nee nee nee nee nee nee nee nee nee nee nee nee nee nee nee nee nee nee nee nee nee nee nee nee nee nee neee
RORRRRRRRRRRRRRRRRRRRRRRRRRRRRRRRRRRRRRRRRRRRRRRRRRRRRRRRRRRRRRRRRRRRRRRRRRRRRRRRRRRRRRRRRRRRRRRRRRRRRRRRRRRRRRRRRRRRRRRRRRRRRRRRRRRRRRRRRRRRRRRRRRRRRRRRRRRRRRRRRRRRRRRRRRRRRRRRRRRRRRRRRRRRRRRRRRRRRRRRRR
NNEENNNNNNNNNNNNNNNNNNNNNNNNNNNNNNNNNNNNNNNNNNNNNNNNNNNNNNNNNNNNNNNNNNNNNNNNNNNNNNNNNNNNNNNNN
eepnne eae ennnnne nnnnne nee
Punnnnne nnnnnnne nnnnnnne nnnnnnne nnnnnnne nnnnnnne nnnnnnne nnnnnnne nnnnnnne nnnnnnne nnnnnnne nnnnnnne nnnnnnne nnnnnnne nnnnnnne nnnnnnne nnnnnnne nnnnnnne nnnnnnne nnnnnnne nnnnnnne nannnne nannnne nannnne nannnne nannnne nannnne nannnne nannnne nannnne nannnne nannnne nannnne nannnne nannnne nannnne nannnne nannnne nannnne nannnne nannnne nannnne nannnne nannnne nannnne nannnne nennnee
Ressss Ressss Ressss Ressss Ressss Ressss Ressss Ressss Ressss Ressss Ressss Ressss Ressss Ressss Ressss Ressss Ressss Ressss Ressss Ressss Ressss Ressss Ressss Ressss Ressss Ressss Ressss Ressss Ressss Ressss Ressss Ressss Ressss Ressss Rass
aee aae eae aee
eepnepnepnepnepnepnepnepnepnepnepnepnepnepnepnepnepnepnepnepnepnepnepnepnepnepnepnepnepnepnepnepnepnepnepnepnepnepnepnepnepnep

0S 96 Zε Z(0) εε + IRIOVAWSNOC ENEI
16ns oioo 1punb nBnBnBnBnBnBnBnBnBnBnBnBnBnBnBnBnBnBnBnBnBnBnBnBnBnBnBnBnBnBnBnBnBnBnBnBnBnBnBnBnBnBnBnBnBnBnBnBnBnBnB
EETTNNNNSNNNNNNNNNNNN


<

209d


Pnnnnne nnnnne nnnnne nnnnne nnnnne nnnnne nnnnne nnnnne nnnnne nnnnne nnnnne nnnnne nnnnne nnnnne nnnnne nnnnne nnnnne nnnnne nnnnne nnnnne nnnnne nnnnne nnnnne nnnnne nnnnne nnnnne
:
seue6bod so7
D O E |eA|n|D/ D| eA|n|D| p : -O E D | eA|n|D/ D| eA|n|D| p :+
(011111) 4
A oonn nnnn nn nnnn nnnn nnnn nnnn nnnn nnnn nnnn nnnn nnnn nnnn nnnn nnnn nnnn nnnn nnnn nnnn nnnn nnnn nnnn nnnn nnnn nnnn nnnn nnnn nnnn nnnn nnnn nnnn nnnn nnnn nnnn nnnn nnnn nnnn
Pepnnepe Pnnnepe Pnnnepe Pnnnepe Pnnnepe Pnnnepe Pnnnepe Pnnnepe Pnnnepe Pnnnepe Pnnnepe Pnnnepe Pnnnepe Pnnnepe Pnnnepe Pnnnepe Pnnnepe Pnnnepe Pnnnepe Pnnnepe Pnnnepe Pnnnepe Pnnnepe Pnnnepe Pnnnepe Pnnnepe Pannnepe Pannnepe Pannnepe Pannnepe Pannnepe Pannnepe Pannnepe Pannnepe Pannnepe Pannnepe Pannnepe Pannnepe Pannnepe Pannnepe Pannnepe Pannnepe Pannnepe Pannnepe Pannnepe Pannnepe Pannnepe Pannnepe Pannnepe Pannnepe Pannnepe Ppanee
eepnne eae nnnnne ennnnne ne aenne nne nne nne nne nne nne nne nne nne nne nne nne nne nne nne nne nne nne nne nne nne nne nne nne nne nne nne nne nne nne nne nne nne nne nne nne nne nne nne nne nne nne nne nne nne nne nne nne nne nne
rnnn nnnn nnnn nnnn nnnn nnnn nnnn nnnn nnnn nnnn nnnn nnnn nnnn nnnn nnnn nnnn nnnn nnnn nnnn nnnn nnnn nnnn nnnn nnnn nnnn nnnn nnnn nnnn nnnn nnnn nnnn nnnn nnnn nnnn nannn nannn nannn nannn nannn nannn nannn nannn nannn nannn nannn nannn nannn nannn nannn nannn
o 1 1 1 1 1 1 1 1 1 1 1 1 1 1 1 1 1 1 1 1 1 1
11 op0n0d
n d n e aee
A
e 1
(1)
C up can s 10000000000000000000000000000000000000000000000000
sopoeepoeepoeepoeepoeepoeepoeepoeepoeepoeepoeepoeepoeepoeepoeepoeepoeepoeepoeepoeepoeepoeepoeepoeepoeepoeepoeepoeepoeepoeepoeepoeepoeepoeepoeepoeepoeepoeepoeepoeepoeepoeepoeepoeepoeepoeepoeepoe
(2duBpd -1 dyDbof) :sopoepoe soe ap aed
e 2
:NOINNDI E NOIDVAINNSEERd
y
aee aee eaeeppeeppeeppeeppeeppeeppeeppeeppeeppeeppeeppeeppeeppeeppeeppeeppeeppeeppeeppeeppeeppeeppeeppeeppeeppeeppe
eeppeeppeeppeeppeeppeeppeeppeeppeeppeeppeeppeeppeeppeeppeeppeeppeeppeeppeeppeeppeeppeeppeeppeeppeeppeeppeeppeeppeeppeeppeeppeeppeeppeeppeeppe
e e e e e e e e e e e e e e e e e e e e e e e e e


eeppeeppeeppeeppeeppeeppeeppeeppeeppeeppeeppeeppeeppeeppeeppeeppeeppeeppeeppeeppeeppeeppeeppeeppeeppeeppeeppeeppeeppeeppeeppeeppeeppeeppeeppeeppeeppeeppeeppeeppeeppeeppeeppeeppeeppeeppeeppeeppeeppeeppeep
aee aee eae ee eae eae eae eae eae eae eae eae eae

A
Pn nnnnne nnnnne nnnnne nnnnne nnnnne nnnnne nnnnne nnnnne nnnnne nnnnne nnnnne nnnnne nnnnne nnnnne nnnnne nnnnne nnnnne nnnnne nnnnne nnnnne nnnnne nnnnne nnnnne nnnnne nnnnne nnnnnee nnnnne nnnnne nnnnne nnnnne nnnnne nnnnne nnnnne nnnnne nnnnne nnnnne nnnnne nnnnne nnnnne nnnnne nnnnne nnnnne nnnnne nnnnne nnnnne nnnnne nnnnne nnnnne nannnee
09 96 2ε 2(0) εε + RODPS WOLDS
"00000000000000000000000000000000000000000000000000000000000000000000000000
ERENENENENENENENENENENENENENENENENENEN
WONN 700000
Pn nnnn nn nnnn nnnn nnnn nnnn nnnn nnnn nnnn nnnn nnnn nnnn nnnn nnnn nnnn nnnn nnnn nnnn nnnn nnnn nnnn nnnn nnnn nnnn nnnn nnnn nnnn nnnn nnnn nnnn nnnn nnnn nnnn nnnn nnnn nnnn

Prrnne aee
oeepoeepoeepoeepoeepoeepoeepoeepoeepoeepoeepoeepoeepoeepoeepoeepoeepoeepoeepoeepoeepoeepoeepoeepoeepoeepoeepoeepoeepoeepoeepoeepoeepoeepoeepoeepoeepoeepoeepoeepoeepoeepoeepoeepoe
- 79 -
#
sopoeepoeepoeepoeepoeepoeepoeepoeepoeepoeepoeepoeepoeepoeepoeepoeepoeepoeepoeepoeepoeepoeepoeepoeepoeepoeepoeepoeepoeepoeepoeepoeepoeepoeepoeepoeepoeepoeepoeepoeepoeepoeepoeepoe
( 760dd - 1 - 100 ) : [ ] [ ] [ ] [ ]
"OINIO OIO AVOA VAIIN, O
e e e e e e e e e e e e e e e e e e e e e e e e e e
eeppeeppeeppeeppeeppeeppeeppeeppeeppeeppeeppeeppeeppeeppeeppeeppeeppeeppeeppeeppeeppeeppeeppeeppeeppeeppeeppeeppeeppeeppeeppeeppeeppeeppeeppeeppe
e e e e e e e e e e e e e e e e e e e e e e e e e e e e e e e e e
Ppnnnnpnnpnnpnnpnnpnnpnnpnnpnnpnnpnnpnnpnnpnnpnnpnnpnnpnnpnnpnnpnnpnnpnnpnnpnnpnnpnnpnnpnnpnnpnnpnnpnnpnnpnpp
00000000000000000000
Pnne nnnnne nee eae ene nee nee nee nee nee nee nee nee nee nee nee nee nee nee nee nee nee nee nee nee nee nee nee nee nee nee nee nee nee nee nee nee nee nee nee nee nee nee nee nee nee nee nee nee nee nee nee nee nee nee
[6]BnBnBnBnBnBnBnBnBnBnBnBnBnBnBnBnBnBnBnBnBnBnBnBnBnBnBnBnBnBnBnBnBnBnBnBnBnBnBnBnBnBnBnBnBnBnBnBnBnBnB n B
eepnpeepnppeeppeeppeeppeeppeeppeeppeeppeeppeeppeeppeeppeeppeeppeeppeeppeeppeeppeeppeeppeeppeeppeeppe
1040E Nn /ueeBn eae Bn 1: -
OE 1 n 1/ueeBn eae Bn 1: + (e6)Va DnDy
: sss
HONONONONONONONON
J08NEMIN708LN00A008
eede 4y uen buuysu
L9 abed St:ET L0/60/6T L0L WOn DRe WOr ECDW

WEI EIN NVAI KINKIN
WONNOWON
eeppeeppeeppeeppeeppeeppeeppeeppeeppeeppeeppeeppeeppeeppeeppeeppeeppeeppeeppeeppeeppeeppeeppeeppeeppeeppeeppeeppeeppeeppeeppeeppeeppeeppeeppeeppeeppeeppeeppeeppeeppeeppeeppeeppeeppeeppeeppeeppeeppe
"O, H / uA - dA
69 a bed 5p:10/60/61 L0L WOnD aWbEa
eepnepnepnepnepnepnepnepnepnepnepnepnepnepnepnepnepnepnepnepnepnepnepnepnepnepnepnepnepnepnepnepnepnepnepnepnepnepnepnepnepnepnepnepnepnepnepnepnepnepnep
(2018 重庆)
: : NVA / B
WnNnNnNnNnNnNnNnNnNnNnNnNnNnNnNnNnNnNnNnNnNnNnNnNnNnNnNnNnNnNnNnNnNnNnNnNnNnNnNnNnNnNnNnNnNnNnNnNnNnNn
WnN NNNnnnnnnnnnnnnnnnnnnnnnnnnnnnnnnnnnnnnnnnnnnnnnnnnnnnnnnnnnnnnnnnnnnnnnnnnnnnnnnnnnnnnnnnnnnnnnnnnnnnnnnnnnnnn
: WEILREDE NVAVERINBERGER / A
WONONONONON
do 6!pipipipipipipipipipipipipipipipipipipipipipipipipipipipipipipipipipipipipipipipipipipipipipipipipipipipipipipipipipipipipipipipipipipipipipipipipipipipipipipipipipipipipipipipipipipipipipipipipipipipip
"1000000000000000000000000000000000000000000000000000000000
eeppeeppeeppeeppeeppeeppeeppeeppeeppeeppeeppeeppeeppeeppeeppeeppeeppeeppeeppeeppeeppeeppeeppeeppeeppeeppeeppeeppeeppeeppeeppeeppeeppeeppeeppeeppe
111 111 111 111 111 111 111 111 111 111 111 111 111 111 111 111 1
wusususususususususususususususususususususususususususususususususususususususususus
nzznnn nnnn nn nnnn nnnn nnnn nnnn nnnn nnnn nnnn nnnn nnnn nnnn nnnn nnnn nnnn nnnn nnnn nnnn nnnn nnnn nnnn nnnn nnnn nnnn nnnn nnnn nnnn nnnn nnnn nnnn nnnn nnnn nnnn nnnn nnnn nnnn nn
P 1
P 1
NWNNNNNNNNNNNNNNNNNNNNNNNNNNNNNNNNNNNNNNNNNNNNNNNNNNNNNNNNNNNNNNNNNNNNNNNNNNNNNNNNNNNNNNNNNNNNNNNNN
nnsuiee eee eae ee eae eae eae eae eae eae eae eae eae eae eae eae eae eae eae eae eae eae eae eae eae eae eae eae eae eae eae eae eae eae eae eae eae eae eae eae eae eae eae eae eae eae eae eae eae eae eae eae eae eae eee
o 000000000000000000000000000000000000000000000000000
eepn eepn eepn eepn eepn eepn eepn eepn eepn eepn eepn eepn eepn eepn eepn eepn eepn eepn eepn eepn eepn eepn eepn eepn eepn eepn eepn eepn eepn eepn eepn eepn eepn eepn ecpnepepepepepepepepepepepepepepepepepepepepepepepepepepepepepepepepepepepepepepepepepepepepepepepepepepepepepepepepepepepepepepepepepepepepepepepepepepepepepepepepepepepepepepepepepe pe
FENZ5XREH135ONOME2R0 WER
(Aooa oiozod Azzblnss!nnnnaeos Dnnp Azeip) Oe op 0 po aoow !!pO npBnBmnoizod Oe !!Azodsop omsspblw
n nnnn nnnn nnnn nnnn nnnn nnnn nnnn nnnn nnnn nnnn nnnn nnnn nnnn nnnn nnnn nnnn nnnn nnnn nnnn nnnn nnnn nnnn nnnn nnnn nnnn nnnn nnnn nnnn nnnn nnnn nnnn nnnn nnnn nnn
AwwBnBnBnBnBnBnBnBnBnBnBnBnBnBnBnBnBnBnBnBnBnBnBnBnBnBnBnBnBnBnBnBnBnBnBnBnBnBnBnBnBnBnBnBnBnBn
"ddnnnnaa 199M - d4
"Q, nzs!kDn Dn Dn Dn Dn Dn Dn Dn Dn Dn Dn Dn Dn Dn Dn Dn Dn Dn Dn Dn Dn Dn Dn Dn Dn Dn Dn Dn Dn Dn Dn Dn Dn Dn Dn Dn Dn Dn Dn Dn Dn Dn Dn Dn Dn Dn Dn Dn Dn Dn Dn
43583 10000000000000000000000000000000000000000000000000000
e! e! ddoedn 'eoumzns btepeq qk'ekp oekmz n oekmnp od zepq
to be able to get the best results from the app . The app has been
Pn/n/ n+ mOzOzOzOzOzOzOzOzOzOzOzOzOzOzOzOzOzOzOzOzOzOzOzOzOzOzOzOzOzOzOzOzOzOzOzOzOzO
( 0 < x) x > ( x + 1) x ≤ 0.
aee aee eae ee eae eae eae eae eae eae eae eae eae eae eae eae eae eae eae eae eae eae eae eae eae eae eae eae eae eae eae eae eae eae eae eae eae eae eae eae eae eae eae eae eae eae eae eae eae eae eae eae
Aeepnneepnneepnneepnneepnneepnneepnneepnneepnneepnneepnneepnneepnneepnneepnneepnneepnneepnneepnneepnneepnneepnneepnneepnneepnneepnneepnneepnneepnneepnneepnneepnneepnneepnne
VINEZDAZRN SIOO/
nVRAVAEINIEIWOHONRn
oepoeepoeepoeepoeepoeepoeepoeepoeepoeepoeepoeepoeepoeepoeepoeepoeepoeepoeepoeepoeepoeepoeepoeepoeepoeepoeepoeepoeepoeepoeepoeepoeepoeepoeepoeepoeepoeepoeepoeepoeepoeepoeepoeepoeepoeepoeepoeepoeepoeepoeepo
1
VINVZVRSMMIe3z8
WONONONONON
Pnnsnnn nnnn nn nnnn nnnn nnnn nnnn nnnn nnnn nnnn nnnn nnnn nnnn nnnn nnnn nnnn nnnn nnnn nnnn nnnn nnnn nnnn nnnn nnnn nnnn nnnn nnnn nnnn nnnn nnnn nnnn nnnn nnnn nnnn nnnn nnnn nnnn
nssse