HC5 - Electric toothbrush SPORT ELEC - Free user manual and instructions
Find the device manual for free HC5 SPORT ELEC in PDF.
User questions about HC5 SPORT ELEC
0 question about this device. Answer the ones you know or ask your own.
Ask a new question about this device
Download the instructions for your Electric toothbrush in PDF format for free! Find your manual HC5 - SPORT ELEC and take your electronic device back in hand. On this page are published all the documents necessary for the use of your device. HC5 by SPORT ELEC.
USER MANUAL HC5 SPORT ELEC
CE (2004/108/CE) (2006/95/CE)
RoHS (2002/95/EC) - IPX7
CE (2004/108/CE) (2006/95/CE)
RoHS (2002/95/EC)
IPX7

CE : (2004/108/CE) - (2006/95/CE)
Rohs (2002/95/EC)
IPX7

(2004/108/CE) - (2006/95/CE)
Rohs (2002 /95 /EC)-IPX7
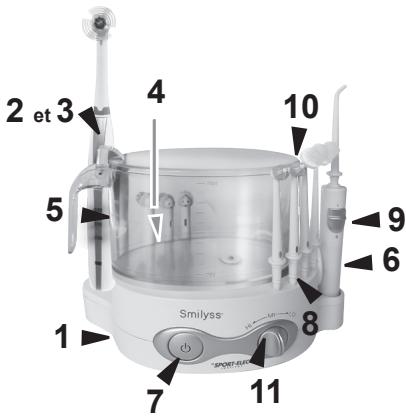
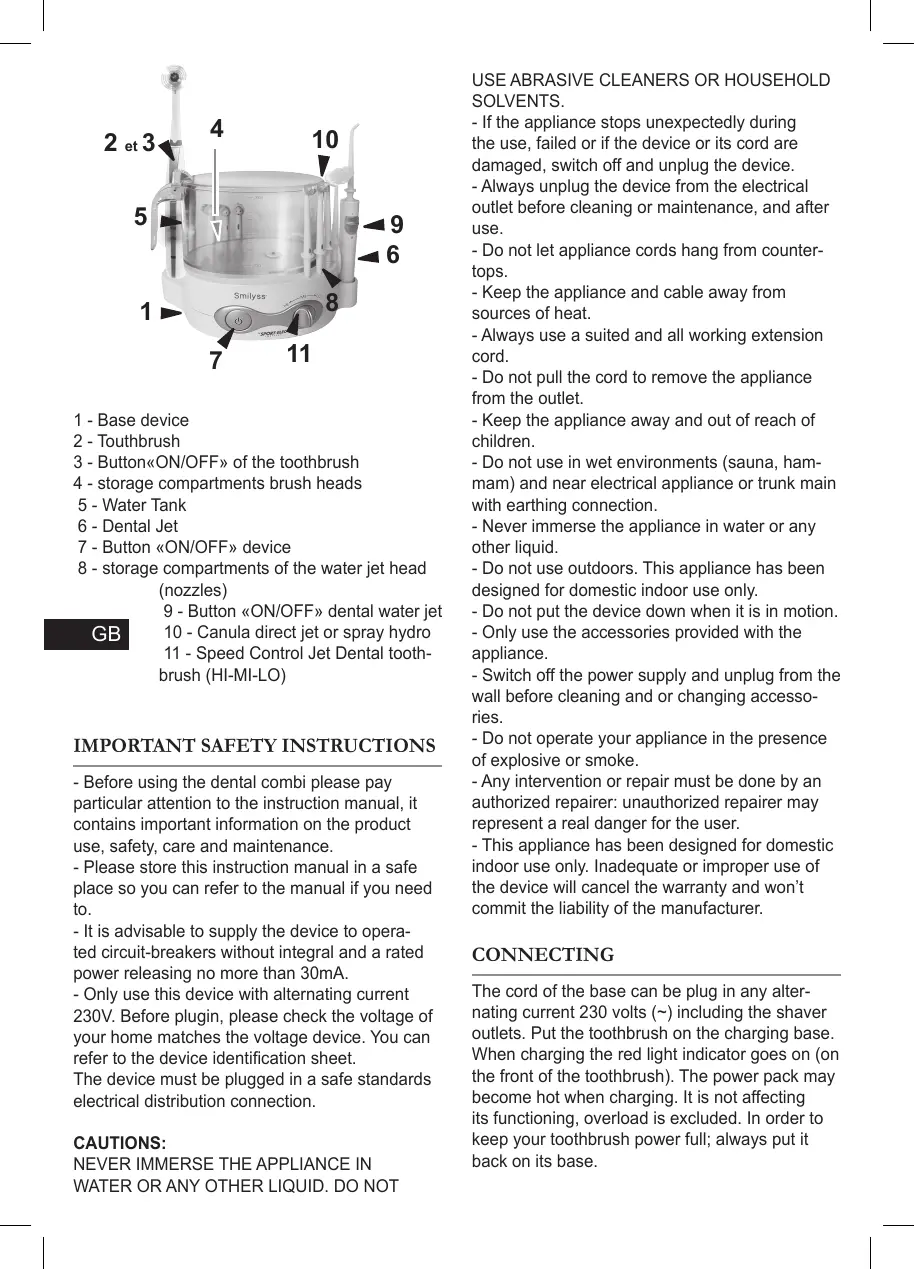
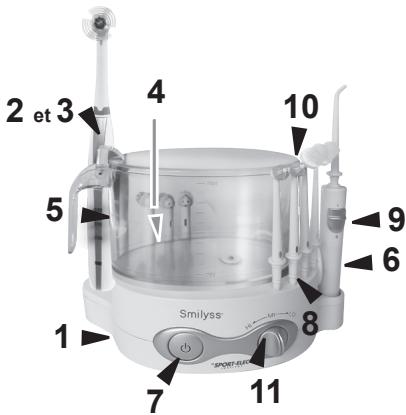
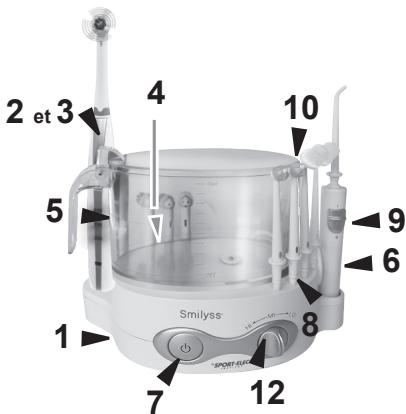
1 - Base device
2 - Mouthbrush
3 - Button«ON/OFF» of the toothbrush
4 - storage compartments brush heads
5 - Water Tank
6 - Dental Jet
7-Button《ON/OFF》device
8 - storage compartments of the water jet head (nozzles)
9 - Button «ON/OFF» dental water jet
10 - Canula direct jet or spray hydro
11 - Speed Control Jet Dental toothbrush (HI-MI-LO)
IMPORTANT SAFETY INSTRUCTIONS
- Before using the dental combi please pay particular attention to the instruction manual, it contains important information on the product use, safety, care and maintenance.
- Please store this instruction manual in a safe place so you can refer to the manual if you need to.
- It is advisable to supply the device to operated circuit-breakers without integral and a rated power releasing no more than 30mA .
- Only use this device with alternating current 230V. Before plugin, please check the voltage of your home matches the voltage device. You can refer to the device identification sheet. The device must be plugged in a safe standards electrical distribution connection.
CAUTIONS:
NEVER IMMERSE THE APPLIANCE IN
WATER OR ANY OTHER LIQUID. DO NOT
USE ABRASIVE CLEANERS OR HOUSEHOLD SOLVENTS.
-
If the appliance stops unexpectedly during the use, failed or if the device or its cord are damaged, switch off and unplug the device.
-
Always unplug the device from the electrical outlet before cleaning or maintenance, and after use.
-
Do not let appliance cords hang from countertops.
-
Keep the appliance and cable away from sources of heat.
-
Always use a suited and all working extension cord.
-
Do not pull the cord to remove the appliance from the outlet.
-
Keep the appliance away and out of reach of children.
-
Do not use in wet environments (sauna, hammam) and near electrical appliance or trunk main with earthing connection.
-
Never immerse the appliance in water or any other liquid.
-
Do not use outdoors. This appliance has been designed for domestic indoor use only.
-
Do not put the device down when it is in motion.
-
Only use the accessories provided with the appliance.
-
Switch off the power supply and unplug from the wall before cleaning and or changing accessories.
-
Do not operate your appliance in the presence of explosive or smoke.
-
Any intervention or repair must be done by an authorized repairer: unauthorized repairer may represent a real danger for the user.
-
This appliance has been designed for domestic indoor use only. Inadequate or improper use of the device will cancel the warranty and won't commit the liability of the manufacturer.
CONNECTING
The cord of the base can be plug in any alternating current 230 volts () including the shaver outlets. Put the toothbrush on the charging base. When charging the red light indicator goes on (on the front of the toothbrush). The power pack may become hot when charging. It is not affecting its functioning, overload is excluded. In order to keep your toothbrush power full; always put it back on its base.
CARE AND MAINTENANCE
After use, empty the device from all liquid. Note: If the device is used with a "mouthwash", after each use, rinse the device allowing the water to pass one full water tank to remove any leftover.
- TOOTHBRUSH: to keep your brush head in a good condition of use, rinse it carefully under water during few seconds. The toothbrush has to be in motion while operating. For a perfect hygiene, you can soak the brush head (and only the head) once a week in a water container with a denture cleaner.
Clean the toothbrush with a soft and damp cloth. The power pack has to be perfectly dry before putting the toothbrush back on the charging base. - CHARGING BASE: clean the external sides from the charging base with a soft and damp cloth.
- WATER JET: Unplug the device from the outlet. Rinse the sprinkler head and the handle separately during a few seconds.
Caution: make sure the water doesn't go in the handle.
Put the head away in the compartment after cleaning. Put the handle back on the base. Regularly clean the charger base with a soft cloth. The base has to be perfectly dry before plugging into the outlet.
Caution before the first use
- If you had an oral or periodontal surgery, contact your dentist before using the water jet.
- If you have a gum excessive bleeding, or even if you are bleeding after two weeks, consult your dentist.
INSTRUCTIONS MANUAL
WATER JET
1 - Take off the tank. Make sure you're holding the base (1) from one hand, and the tank with the other hand.
Fill the tank with warm water and put it back on the device.
2 - Plug the device in the outlet.
Note: before the first use, rinse the device allowing the water to pass one full water
tank.
If the device is used with a "mouthwash", you need to rinse the device with pure water after each use in order to remove any leftover. If the device has not been used for a while, it is advised, for sanitary conditions, to follow the instructions for initial use and allow a full water container to pass.
- Choose a water jet head or a multi jet head (8) and place it on the base handle, this way the colored head is in the same direction as "the water stop" button.
- Put the pressure control button at the minimum (in front of LO) for the first use. You can gradually increase the pressure in order to find the most comfortable position (MI then HI/ turbo).
- Put the device in motion by pushing the "on/off" button located on the base (7), lean over your sink and put the head brush in your mouth. Put the button "on/off" from the water jet on the "on" (I) position.
Note: keep your mouth lightly open and your elbow raised so that the water can flow into the sink.
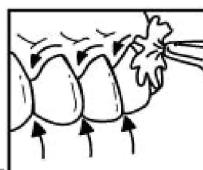

- Run the water along your gums and between your teeth. Never point the sprinkler head directly at your gums. For best results, it is advisable to start with your back teeth and work forward the front teeth.
- To pass from the "jet" function to the hydro massage spray (or vice-versa), use the multi jet head brush and run the colored part. Use the jet for an accurate/ precise cleaning and a larger jet for a massage and cleaning in general.
- Once you're done, put the "on/off" water jet (on the handle) on the "off" position (O). Take away the head by
pushing on the removing button and put it away in the compartment. Empty the device from all liquid. Unplug the outlet from the wall.
Note: never let the device on the "on" position when not in use. The water pressure will keep on form and may damage the device. Always set the "on/off" button from your water jet and the base on the "off" position (O) when the device is not in use.

You can also use the interdental brush head (with integrated water jet) which combines brushing and jet efficiency.
This tool allows a good oral hygiene, even in the hard to reach area.
- TOOTHBRUSH
Connecting and Maintenance
The cord of the base can be plug in any alternating current 220-240 volts () including the shaver outlets. Place the toothbrush on the charging base. When charging the red light indicator goes on. The power pack may become hot when charging. It is not affecting its functioning, overload is excluded. In order to keep your toothbrush power full; always put it back on its base.
Before using the appliance for the first time and to protect the life of the battery, we recommend to proceed as mentioned below:
1 - Charge the battery entirely for at least 16 hours prior to use.
2 - We recommend that you run the battery flat by putting on the toothbrush until it stops automatically (around 20-25 min before discharging).
The toothbrush has a timer for 2 minutes. To run the battery flat entirely you need to launch the program several times.
3 - Then fully charge the battery for at least 16 hours.
This procedure "charging/recharging" must be done each 6 months.
N.B: when the battery starts running flat, the toothbrush stops automatically to avoid batteries to be fully discharged. All you need is plug the device back on the base to recharge.
After operating the "charging /recharging" step mentioned in the previous paragraph, you can start using the toothbrush.
-
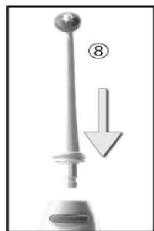
Screw the brush head on the toothbrush.
-
Before the first use of a brush head, carefully rinse the brush head.
-
Put your usual toothpaste on the brush head.
-
Rinse your mouth before brushing.
-
To avoid spillage: Place the brush at an angle to your teeth, then put the toothbrush on (button on the handle of the toothbrush while you're at a lower speed - the first blue LED light).
-
Pass the brush on your teeth from top to bottom. Guide it along the inner and outer faces also taking care to clean the gums. It is not necessary to press hard the brush on your teeth. Clean the sides and surfaces of your teeth..
-
If you want to upgrade to a higher speed pressing of the button on the handle of the toothbrush (turbo speed - 2 blue LED are lit) and then to go to massage press once again (a single blue LED lit top of the brush).
-
To stop the toothbrush again press the button (all LED off).
-
To fully remove dental plaque, the timer allows you to brush your teeth for 2 min.
-
Carefully rinse your mouth after brushing.
-
During the first use, your gums may bleed a little particularly if they are sensitive. After few days the bleeding should stop. If your gums keep bleeding after 15 days, we recommend you to consult your dentist.
The efficient way to clean your teeth is to gently run the brush over from one tooth to another, without pressing.
The shape of the brush is changing with use, which depends on the personal way of use of the brush. This misshapeness has no impact on the brush efficiency. However do not forget to change the brush head as soon as a manual toothbrush.
-
After using the toothbrush, rinse carefully the head brush.
-
Put the toothbrush back on the charging base.
ENVIRONMENT FRIENDLY DISPOSAL
Your appliance contains valuable materials which can be recovered or recycled. Please leave it at a collection point as listed by your local authority. CE : (2004/108/CE) - (2006/95/CE) Rohs (2002/95/EC) - IPX7
1 - Base
2 - Periută de dinti
3 - Buton on / off de periuta de dinti
4 - Perie compartimento de depositare capete
5 - Rezervor de apa
6 - Jet dentare
7 - buton «on / off» dispositiv
compartimento de depositare a capului jet de apã (duze) - 8
9 - Button «on / off» jet de apà dentare
10 - Direct spray cu jet de masaj
12 - Viteza de control Jet Dental periută de dinti (HI-MI-LO)
PRECAUTII
UTILIZAREA al unui aparat electric
CE (2004/108/CE) - (2006/95/CE)
RoHS (2002/95/CE)
IPX7