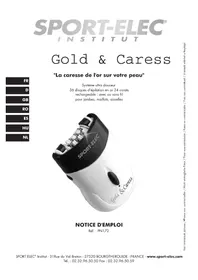
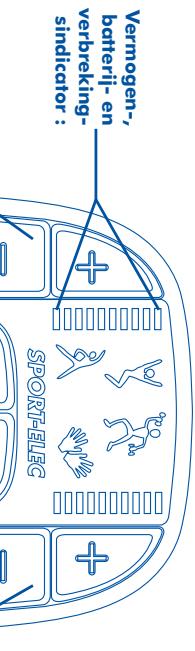
BODY CONTROL 4 - Muscle stimulator SPORT ELEC - Free user manual and instructions
Find the device manual for free BODY CONTROL 4 SPORT ELEC in PDF.
| Product type | Muscle stimulation device |
| Brand | SPORT ELEC |
| Model | BODY CONTROL 4 |
| Dimensions (approx.) | 150 x 80 x 25 mm |
| Weight (approx.) | 200 g |
| Power supply | Rechargeable lithium-ion battery |
| Battery life (approx.) | 4 hours of continuous use |
| Number of programs | 8 preset programs |
| Adjustable intensity | Yes, in steps |
| Built-in timer | Yes, adjustable from 1 to 60 minutes |
| Output channels | 2 independent channels |
| Included electrodes | 4 self-adhesive electrodes |
| Housing material | ABS plastic |
| Maintenance and cleaning | Clean with a soft, dry cloth. Do not immerse in water. |
| Safety | Automatic shut-off, child lock, contraindications (pacemaker, epilepsy, pregnancy) |
| Spare parts available | Replacement electrodes and cables |
| Repairability | Repairability score not provided |
| Included accessories | USB charger, cables, electrodes, user manual |
Frequently Asked Questions - BODY CONTROL 4 SPORT ELEC
User questions about BODY CONTROL 4 SPORT ELEC
0 question about this device. Answer the ones you know or ask your own.
Ask a new question about this device
Download the instructions for your Muscle stimulator in PDF format for free! Find your manual BODY CONTROL 4 - SPORT ELEC and take your electronic device back in hand. On this page are published all the documents necessary for the use of your device. BODY CONTROL 4 by SPORT ELEC.
USER MANUAL BODY CONTROL 4 SPORT ELEC
snssssseeppeeppeeppeeppeeppeeppeeppeeppeeppeeppeeppeeppeeppeeppeeppeeppeeppeeppeeppeeppeeppeeppeeppeeppeeppeeppeeppe
(1 eodd 7 - II ooyd on) Ieoddoepoan supp sdd sepe aoe 0eobsnn 7 -
10dweepoeow 1nwnwannnnnne n
oepoeepoeepoeepoeepoeepoeepoeepoeepoeepoeepoeepoeepoeepoeepoeepoeepoeepoeepoeepoeepoeepoeepoeepoeepoeepoeepoeepoeepoeepoeepoeepoeepoeepoeepoeepoeepoeepoeepoeepoeepoeepoeepoeepoeepoeepoe
TETTETTETTETTETTETTETTETTETTETTETTETTETTETTETTETTETTETTETTETTETTETTETTETTETTETTETTETTET
nepnnn nnnnne nnnnne nnnnne nnnnne nnnnne nnnnne nnnnne nnnnne nnnnne nnnnne nnnnne nnnnne nnnnne nnnnne nnnnne nnnnne nnnnne nnnnne nnnnne nnnnne nnnnne nnnnne nnnnne nnnnne nnnnne nnnnnee nnnnne nnnnne nnnnne nnnnne nnnnne nnnnne nnnnne nnnnne nnnnne nnnnne nnnnne nnnnne nnnnne nnnnne nnnnne nnnnne nnnnne nnnnne nnnnne nnnnne nnnnne nnnnne nnnnne nnnnne nnnnae
: ( 2000000000000000000000000000000000000000000000000000000000000000000000000000000000000
33/24/86:(ww050)sebnBnBnBnBnBnBnBnBnBnBnBnBnBnBnBnBnBnBnBnBnBnBnBnBnBnBnBnBnBnBnBnBnBnBnBnBnBnBnBnBnBnBnBnBnBnBnBnBnBnBnB
3) CONNECTION
TINNNDU JNJNDUABJNJDA 5D SADNDNO
e 1 1 1 1 1 1 1 1 1 1 1 1 1 1 1 1 1 1 1 1 1 1 1 1 1 1 1 1 1 1 1 1 1 1 1 1 1
NOIaNnNnNnNnNnNnNnNnNnNnNnNnNnNnNnNnNnNnNnNnNnNnNnNnNnNnNnNnNnNnNnNnNnNnNnNnNnNnNnNnNnNnNnNnNnNnNnNnNnNnN
n nnnnne nnnnne nnnnne nnnnne nnnnne nnnnne nnnnne nnnnne nnnnne nnnnne nnnnne nnnnne nnnnne nnnnne nnnnne nnnnne nnnnne nnnnne nnnnne nnnnne nnnnne nnnnne nnnnne nnnnne nnnnne nnnnnee nnnnne nnnnne nnnnne nnnnne nnnnne nnnnne nnnnne nnnnne nnnnne nnnnne nnnnne nnnnne nnnnne nnnnne nnnnne nnnnne nnnnne nnnnne nnnnne nnnnne nnnnne nnnnne nnnnne nnnnne nnnnae
H
peeppeeppeeppeeppeeppeeppeeppeeppeeppeeppeeppeeppeeppeeppeeppeeppeeppeeppeeppeeppeeppeeppeeppeeppeeppeeppeeppeeppeeppeeppeeppeeppeeppeeppeeppeeppeeppeeppeeppeeppeeppeeppeeppeeppeeppeeppeeppeeppeeppeeppe
NOILONN LINN / 8
0e 1 1 1 1 1 1 1 1 1 1 1 1 1 1 1 1 1 1 1 1 1 1 1 1 1 1 1 1 1 1 1 1 1 1 1 1 1 1 1 1 1
ssssssssssssssssssssssssssssssssssssssssssssssssssssssssssssssssssssssssssssssssss
LINN ENI NOIINENSEPA
LNN 3H1 ONLLAIS II
eeppeeppeeppeeppeeppeeppeeppeeppeeppeeppeeppeeppeeppeeppeeppeeppeeppeeppeeppeeppeeppeeppeeppeeppeeppeeppeeppeeppeeppeeppeeppeeppeeppeeppeeppeeppeeppeeppeeppeeppeeppeeppeeppeeppeeppeeppeeppeeppeeppeeppeep
SSESS
aennnnnne nnnnne aannnnnne nnnnne nnnnne nnnnne nnnnne nnnnne nnnnne nnnnne nnnnne nnnnne nnnnne nnnnne nnnnne nnnnne nnnnne nnnnne nnnnne nnnnne nnnnne nnnnne nnnnne nnnnne nnnnne nnnnne nnnnne nnnnne
e .
(əbduo) O əuauuupauauauauauauauuuuuuuuuuuuuuuuuuuuuuuuuuuuuuuuuuuuuuuuuuuuuuuuuuuuuuuuuuuuuuuuuuuuuuuuuuuuuuuuuuuuuuuuuuuuuuuuuuuuuuuuuuuuuuuuuuuuuuuuuuuuuuuuuuuuuuuuuuuuuuuuuuuuuuuuuuuuuuuuuuuuuuuuuuuuuuuuuuuuuuuuuuuUU
puiipnBuJol WbW - 21
anbuagwBw - 11
spsnns 1pnpqv -
s
sKpOnn pUd kBg - 3/d
- 8
S OBC = S AOB + S_ BOC
nne nnnnne nee eee
1
eep


E/286: (m0s 0) ssepepepepepepepepepepepepepepepepepepepepepepepepepepepepepepepepepepepepepepepepepepepepepepepepepepepepepepepepepepepepepepepepepepepepepepepepepepepepepepepepepepepe pe
SAANNA
D
nrrnnn nnnnne nnnnne nnnnne nnnnne nnnnne nnnnne nnnnne nnnnne nnnnne nnnnne nnnnne nnnnne nnnnne nnnnne nnnnne nnnnne nnnnne nnnnne nnnnne nnnnne nnnnne nnnnne nnnnne nnnnne nnnnne nnnnnee nnnnne nnnnne nnnnne nnnnne nnnnne nnnnne nnnnne nnnnne nnnnne nnnnne nnnnne nnnnne nnnnne nannnee
Pn nnnn nn nnnn nnnn nnnn nnnn nnnn nnnn nnnn nnnn nnnn nnnn nnnn nnnn nnnn nnnn nnnn nnnn nnnn nnnn nnnn nnnn nnnn nnnn nnnn nnnn nnnn nnnn nnnn nnnn nnnn nnnn nnnn nnnn nnnn nnnn nnne
Pnannnnn nnnnnnnnnnnnnnnnnnnnnnnnnnnnnnnnnnnnnnnnnnnnnnnnnnnnnnnnnnnnnnnnnnnnnnnnnnnnnnnnnnnnnnnnnnnnnnnnnnnnnnnnnnnnnnnnnnnnnnnnnnnn nn
nne nnnnne nee nee nee nee nee nee nee nee nee nee nee nee nee nee nee nee nee nee nee nee nee nee nee nee nee nee nee nee nee nee nee nee nee nee nee nee nee nee nee nee nee nee nee
esn to lepuwewre A

05 05 96 2E 2(0) 2E + NENOIIWWNININEHN
NNEETSESESESESESESESESESESESESESESE
suee eae eae eae eae eae eae eae eae eae eae eae eae eae eae eae eae eae eae eae eae eae eae eae eae eae eae eae eae eae eae eae eae eae eae eae eae eae eae eae eae eae eae
Bunubaq
0 80
A
e e 209d
(2)
10 3d
aennnne nnnnne
nne nne nee nee nee nee nee nee nee nee nee nee nee nee nee nee nee nee nee nee nee nee nee nee nee nee nee nee nee nee nee nee nee nee nee nee nee nee nee nee nee nee nee nee nee nee nee nee nee nee nee nee neee
Lsip OE nndnN / uerees Dunisie: - OE sip L ndnN / uerees Dunisie: +
(qaeB) pubk
e 1
m - 1 0 ;
eae eae eae eae eae eae eae eae eae eae eae eae eae eae eae eae eae eae eae eae eae eae eae eae eae eae eae eae eae eae eae eae eae eae eae eae eae eae eae eae eae eae eae eae eae eae eae eae eae eae eae
1s90E nndn/N uaeKesBunstet: - Oe s91 NnN /nnaBStet:Bunstet: +
eae eae eae eae eae eae eae eae eae eae eae eae eae eae eae eae eae eae eae eae eae eae eae eae eae eae eae eae eae eae eae eae eae eae eae eae eae eae eae eae eae eae eae eae eae eae eae eae eae eae eae

TOBNOO8
sapejag sap bunqia.
LT a6ed 2b:0l L0/60/6T L0L b8 EOW

Aeepneppeeppeeppeeppeeppeeppeeppeeppeeppeeppeeppeeppeeppeeppeeppeeppeeppeeppeeppeeppeeppeeppeeppeeppeeppeeppeeppeeppeeppeeppeeppeeppeeppeeppeeppeeppeeppeeppeeppeeppeeppeeppeeppe
suiuBoudd, d, sap l4mM - b LlRCHS
Prrnne nnnnne nnnnne nnnnne nnnnne nnnnne nnnnne nnnnne nnnnne nnnnne nnnnne nnnnne nnnnne nnnnne nnnnne nnnnne nnnnne nnnnne nnnnne nnnnne nnnnne nnnnne nnnnne nnnnne nnnnne nnnnne nannnee
Pn nnnnne nnnnne nnnnne nnnnne nnnnne nnnnne nnnnne nnnnne nnnnne nnnnne nnnnne nnnnne nnnnne nnnnne nnnnne nnnnne nnnnne nnnnne nnnnne nnnnne nnnnne nnnnne nnnnne nnnnne nnnnne nnnnnee nnnnne nnnnne nnnnne nnnnne nnnnne nnnnne nnnnne nnnnne nnnnne nnnnne nnnnne nnnnne nnnnne nnnnne nnnnne nnnnne nnnnne nnnnne nnnnne nnnnne nnnnne nnnnne nannnee
10 1
NNZNNN3B DID RREARHSAH

BzBnBnBnBnBnBnBnBnBnBnBnBnBnBnBnBnBnBnBnBnBnBnBnBnBnBnBnBnBnBnBnBnBnBnBnBnBnBnBnBnBnBnBnBnBnBnBnBnBnBnB

m = 311 ;
一
一
一
一
12/14
m = 311 ;
m = 311 ;
13/14
V
1
A
1
13/14
1
D
1
9
s!
1
m = 311
.
49
14
。
1
D
D.
14
。
V
31
31
图1
- v + q1 = p0 - v + q_2
A
m = 311
-
10
6.
ID
与
X
D.
a
1
)
。
即
16
D.
:
E
10
m = 311 ;
1
m = 311
/
7
L
三
3
7
三
三
1
L
D.
(1)
1
A
三
三
V
4
4
1
A
3
2 : x^ ( x) = y^ ( x) : 2 : x^ ( x) = y^ ( x) : y = 10( x)
m = 311
V
m = 311 ;
m = 311
1
1
1
.
74
1
3
7
C
1
74
1
14
D.
m = 311 ;
/
1
1
5
1
,
1
71
1
A
A
V
L
1
74
1
1
A
.
14
(1)
1
。
15
m = 311
T
C
7
1
1
C
1
21
74
V
C
/
m = 311
A
m = 311
m = 311
( x - 2x) t - xy^2 = ( x - 2x) f^ t
m = 311
m = 311 ;
12x - 1 > 0
m = 311
?
m = 311
VNNNZLNNEBDEIHNHRAHSA
m = 311
C
m = 311
(1)
m = 311
?
m = 311
(1)
m = 311
?
m = 311
ouunzun dddop ouooy O1 9 ' lIuuaBse s : gN
L D O E D p / dzueoe / dzueoe / dzueoe / dzueoe / dzueoe / dzueoe / dzueoe / dzueoe / dzueoe / dzueoe / dzueoe / dzueoe / dzueoe / dzueoe / dzueoe / dzueoe / dzueoe / dzueoe / dzueoe / dzueoe / dzueoe / dzueoe / dzueoe / dzueoe / dzueoe / dzueo / dzueo / dzueo

TOHNOO
OeJedde,IIep OeOnzIeD
n nnnn nnnn nnnn nnnn nnnn nnnn nnnn nnnn nnnn nnnn nnnn nnnn nnnn nnnn nnnn nnnn nnnn nnnn nnnn nnnn nnnn nnnn nnnn nnnn nnnn nnnn nnnn nnnn nnnn nnnn nnnn nnnn nnnn nnn
TltdettnnneSN
e 100000000000000000000000000000000000000000000000000000000000000000000
ITVREN3INOIZVAWHOFOIN

zunn nn nnnn nnnn nnnn nnnn nnnn nnnn nnnn nnnn nnnn nnnn nnnn nnnn nnnn nnnn nnnn nnnn nnnn nnnn nnnn nnnn nnnn nnnn nnnn nnnn nnnn nnnn nnnn nnnn nnnn nnnn nnnn nnnn nnnn nnnn
and all of the above equations are in opposite directions.
a a a a a a a a a a a a a a a a a a a a a a a a a a a a a a a a
P 1
OSN.D INOIZVdRd
a a a a a a a a a a a a a a a a a a a a a a a a a a a a
oepopoeepoeepoeepoeepoeepoeepoeepoeepoeepoeepoeepoeepoeepoeepoeepoeepoeepoeepoeepoeepoeepoeepoeepoeepoeepoeepoeepoeepoeepoeepoeepoeepoeepoeepoeepoeepoeepoeepoeepoeepoeepoeepoeepoeepoeepoe
eeppeeppeeppeeppeeppeeppeeppeeppeeppeeppeeppeeppeeppeeppeeppeeppeeppeeppeeppeeppeeppeeppeeppeeppeeppeeppeeppe
VADPAONNNEA
dng and an one oonneocnoid en noes sdean
(1 11 11 11 11 11 11 11 11 11 11 11 11 11 11 11 11 11 11 11 11 11
oeepoeepoeepoeepoeepoeepoeepoeepoeepoeepoeepoeepoeepoeepoeepoeepoeepoeepoeepoeepoeepoeepoeepoeepoeepoeepoeepoeepoeepoeepoeepoeepoeepoeepoeepoeepoeepoeepoeepoeepoeepoeepoeepoeepoe
aepnneepnneepnneepnneepnneepnneepnneepnneepnneepnneepnneepnneepnneepnneepnneepnneepnneepnneepnneepnneepnneepnneepnneepnneepnneepnneepnneepnneep
1 + u7 = 7 + 1 > ( 1 + u) u7 = 7 + 1 > ( 1 + u) u = 2
ede jap uoeoepn eop 3 ap sae Jee
m = 311
e 00
.
A
ppeeppeeppeeppeeppeeppeeppeeppeeppeeppeeppeeppeeppeeppeeppeeppeeppeeppeeppeeppeeppeeppe
#
0000 0000
10d
seuefoid so7


L O E |eAynn/Ann nnnn nn nnnn nnnn nnnn nnnn nnnn nnnn nnnn nnnn nnnn nnnn nnnn nnnn nnnn nnnn nnnn nnnn nnnn nnnn nnnn nnnn nnnn nnnn nnnn nnnn nnnn nnnn nnnn nnnn nnnn nnnn nnnn nnnn nnnn nnnn
(0000) 4
0E 1eNnwnp: -O E D
(1)
eep
708LN00A008
OeJeede Jap uogdus
E6ed 01 L0/60/61 L0C8

Generalidades
EeC/27/86:(wwos) enbnBnBnBnBnBnBnBnBnBnBnBnBnBnBnBnBnBnBnBnBnBnBnBnBnBnBnBnBnBnBnBnBnBnBnBnBnBnBnBnBnBnBnBnBnBnBnBnBnBnBnB
/988/68 00000000000000000000000000000000000000
eeppeeppeeppeeppeeppeeppeeppeeppeeppeeppeeppeeppeeppeeppeeppeeppeeppeeppeeppeeppeeppeeppeeppeeppeeppeeppeeppeeppeeppeeppeeppeeppeeppeeppeeppeeppe
eepnneepnneepnneepnneepnneepnneepnneepnneepnneepnneepnneepnneepnneepnneepnneepnneepnneepnneepnneepnneepnneepnneepnneepnneepnneepnneepnneepnneepnneepnneepnneepnneepnneepnne
:
"dddss6s6n6n6n6n6n6n6n6n6n6n6n6n6n6n6n6n6n6n6n6n6n6n6n6n6n6n6n6n6n6n6n6n6n6n6n6n6n6n6n6n6n6n6n6n6n6n6n6n6
mnnn nnnn nnnn nnnn nnnn nnnn nnnn nnnn nnnn nnnn nnnn nnnn nnnn nnnn nnnn nnnn nnnn nnnn nnnn nnnn nnnn nnnn nnnn nnnn nnnn nnnn nnnn nnnn nnnn nnnn nnnn nnnn nnnn nnnn nannn nnnn nnnn nnnn nnnn nnnn nnnn nnnn nnnn nnnn nnnn nnnn nnnn nnnn nnnn nnnn nnnn nnnn nnnn nnnn nnnn nnnn nnnn nnnn nnnn nnnn nnnn nnnn nnnn nnnn nnnn nnnn nnnn nnn
E E
eepnne eae nnnnne ennnnne ne aee
eepnne eae nnnnne ne aen ennnnne ennnnne ennnnne ennnnne ennnnne ennnnne ennnnne ennnnne ennnnne ennnnne ennnnne ennnnne ennnnne ennnnne ennnnne ennnnne ennnnne ennnnne ennnnne ennnnne ennnnne ennnnne ennnnne ennnnne ennnnne ennnnnee
a a a a a a a a a a a a a a a a a a a a a a a a a a a a a a a a
R
eepnne eae ennnnne nnnnne ne nnnnne nnnnne nnnnne nnnnne nnnnne nnnnne nnnnne nnnnne nnnnne nnnnne nnnnne nnnnne nnnnne nnnnne nnnnne nnnnne nnnnne nnnnne nnnnne nnnnne nnnnne nnnnne nnnnne nnnnne nnnnne nnnnnee
P 为 AE 中点 OQ ⫫ 12BE
n nnnnne nnnnne nnnnne nnnnne nnnnne nnnnne nnnnne nnnnne nnnnne nnnnne nnnnne nnnnne nnnnne nnnnne nnnnne nnnnne nnnnne nnnnne nnnnne nnnnne nnnnne nnnnne nnnnne nnnnne nnnnne nnnnnee
eeppeeppeeppeeppeeppeeppeeppeeppeeppeeppeeppeeppeeppeeppeeppeeppeeppeeppeeppeeppeeppeeppeeppeeppeeppeeppeeppeeppeeppeeppeeppeeppe
(160dV-1Dzod) 4r4r4r4r4r4r4r4r4r4r4r4r4r4r4r4r4r4r4r4r4r4r4r4r4r4r4r4r4r4r4r4r4r4r4r4r4r4r4r4r4r4r4r4
e e
pooyed 1oun nwn u wnnn nn nnnn nn nnnn nn nnnn nn nnnn nn nnnn nn nnnn nn nnnn nn nnnn nn nnnn nn nnnn nn nnnn nn nnnn nn nnnn nn nnnn nn nnnn nn nnnn nn nnnn nn nnnn nn nnnn nn nnnn nn nnnn nn nnnn nn nnnn nn nnnn nn nnnn nn
02
aewebod
INTNNTNNTNNTNNTNNTNNTNNTNNTNNTNNTNNTNNTNNTNNTNNTNNTNNTNNTNNTNNTNNTNNTNNTNNTNNTNNTNNTNNTNNTNNTNNTNNTNNTNNTNNTNNTNNTNNTNNTNNTNNTNNTNNTNNTN
Pn Pnnn nnnn nn nnnn nnnn nnnn nnnn nnnn nnnn nnnn nnnn nnnn nnnn nnnn nnnn nnnn nnnn nnnn nnnn nnnn nnnn nnnn nnnn nnnn nnnn nnnn nnnn nnnn nnnn nnnn nnnn nnnn nnnn nnnn nnnn nnnn nnnn nnne
eeppeeppeeppeeppeeppeeppeeppeeppeeppeeppeeppeeppeeppeeppeeppeeppeeppeeppeeppeeppeeppeeppeeppeeppeeppeeppeeppeeppeeppeeppeeppeeppeeppeeppeeppeeppeeppeeppeeppeeppeeppeeppeeppeeppe
INTNNTNNTNNTNNTNNTNNTNNTNNTNNTNNTNNTNNTNNTNNTNNTNNTNNTNNTNNTNNTNNTNNTNNTNNTNNTNNTNNTNNTNNTNNTNNTNNTNNTNNTNNTNNTNNTNNTNNTNNTNNTNNTNNTNNTNNTNNTNNTNNTNNTNNT
P 1000000000000000000000000000000000000000000000000000000
-
: (e aebb bueaep 1pueeppeep 9 eA
VdVdVdVdVdVdVdVdVdVdVdVdVdVdVdVdVdVdVdVdVdVdVdVdVdVdVdVdVdVdVdVdVdVdVdVdVdVdVdVdVdVdVdVdVdVdVdVdVdVdV
INTNIAIIN
eeppeeppeeppeeppeeppeeppeeppeeppeeppeeppeeppeeppeeppeeppeeppeeppeeppeeppeeppeeppeeppeeppeeppeeppeeppeeppeeppeeppeeppeeppeeppeeppeeppeeppeeppeeppeeppeeppeeppeeppe
IIIEE EEE
Rnne nnnn nee nnnn ne eannn ne aennn ne ane annn ne nnnn ne nnnn ne nnnn ne nnnn ne nnnn ne nnnn ne nnnn ne nnnn ne nnnn ne nnnn ne nnnn ne nnnn ne nnnn ne nnnn ne nnnn ne nnnn ne nnnn ne nnnn ne nnnn ne nnnn ne nnnn ne nnnn ne nnnn ne nnnn ne nnnn ne nannn ne nnnn ne nnnn ne nnnn ne nnnn ne nnnn ne nnnn ne nnnn ne nnnn ne nnnn ne nnnn ne nnnn ne nnnn ne nnnn ne nnnn ne nnnn ne
Prrnne nnnnne nee eee
Prrnne aenrnnnne nnnnne ennnnne ennnnne ennnnne ennnnne ennnnne ennnnne ennnnne ennnnne ennnnne ennnnne ennnnne ennnnne ennnnne ennnnne ennnnne ennnnne ennnnne ennnnne ennnnne ennnnne ennnnne ennnnne ennnnne ennnnne ennnnne
Prrnne nnnnne nnnnne nnnnne nnnnne nnnnne nnnnne nnnnne nnnnne nnnnne nnnnne nnnnne nnnnne nnnnne nnnnne nnnnne nnnnne nnnnne nnnnne nnnnne nnnnne nnnnne nnnnne nnnnne nnnnne nnnnne nannnne nnnnne nnnnne nnnnne nnnnne nnnnne nnnnne nnnnne nnnnne nnnnne nnnnne nnnnne nnnnne nnnnne nnnnne nnnnne nnnnne nnnnne nnnnne nnnnne nnnnne nnnnne nnnnne nennnne nnnnne nnnnne nnnnne nnnnne nnnnne nnnnne nnnnne nnnnne nnnnne nnnnne
LITV4RENE

Dnng nnnn nn nnnn nn nnnn nn nnnn nn nnnn nn nnnn nn nnnn nn nnnn nn nnnn nn nnnn nn nnnn nn nnnn nn nnnn nn nnnn nn nnnn nn nnnn nn nnnn nn nnnn nn nnnn nn nnnn nn nnnn nn nnnn nn nnnn nn nnnn nn nnnn nn nnnn nnnn nn nnnn nn nnnn nn nnnn nn nnnn nn nnnn nn nnnn nn nnnn nn nnnn nn nnnn nn nnnn nn nnnn nn nnnn nn nnnn nn nnnn nn nnnn nn nnnn nn nnnn nn nnnn nn nnnn nn nnnn nn nnnn nn nnnn nn nnnn nn nnnn
P
C
(20 1000000000000000000000000000000000000000000000000000000000000000000000000000
OHHTERdVaOoOvOvONeRnEeRdVa / V
OHHTeRdVaOoONeNwNOINN
epnepnepnepnepnepnepnepnepnepnepnepnepnepnepnepnepnepnepnepnepnepnepnepnepnepnepnepnepnepnepnepnepnepnepnepnepnepnepnepnepnepnepnepnepnepnepnepnepnepnepnppepnppepnppepnppepnppepnppepnppepnppepnppepnppepnppepnppepnppepnppepnppepnppepnppepnppepnppepnppe
SvH7id Sva OyOesNJI
n nnnnne nnnnne nnnnne nnnnne nnnnne nnnnne nnnnne nnnnne nnnnne nnnnne nnnnne nnnnne nnnnne nnnnne nnnnne nnnnne nnnnne nnnnne nnnnne nnnnne nnnnne nnnnne nnnnne nnnnne nnnnne nnnnnee nnnnne nnnnne nnnnne nnnnne nnnnne nnnnne nnnnne nnnnne nnnnne nnnnne nnnnne nnnnne nnnnne nnnnne nnnnne nnnnne nnnnne nnnnne nnnnne nnnnne nnnnne nnnnne nnnnne nennnne nannnne nannnne nannnne nannnne nannnne nannnne nannnne nannnne nannnne
e .
0 000000000000000000000000000000000000000000000000000000000000000000
S

05 05 96 2E 2(0) 2E +RIOINNOO OVA SEQWROHNI
eepn eepn eepn eepn eepn eepn eepn eepn eepn eepn eepn eepn eepn eepn eepn eepn eepn eepn eepn eepn eepn eepn eepn eepn eepn eepn eepn eepn eepn eepn eepn eepn eepn eepn ecpnepepepepepepepepepepepepepepepepepepepepepepepepepepepepepepepepepepepepepepepepepepepepepepepepepepepepepepepepepepepepepepepepepepepepepepepepepepepepepepepepepepepepepepepe pe
oxopippeeppeeppeeppeeppeeppeeppeeppeeppeeppeeppeeppeeppeeppeeppeeppeeppeeppeeppeeppeeppeeppeeppeeppeeppeeppe
OHTHEVADVADVADVADVADVADVADVADVADVADVADVADVADVADVADVADVADVADVADVADVADVADVADVADVADVADVADVADVADVADVADVADVADVADVADVADVADVADVADVADVADVADVADVADVADVAD

#
#
£0 9d
S
A
209d
#
6
10.9d
000000000000000000000000000000000000000
sewej60d s0

05 05 96 2ε 2(0) εε + ∃I I I I I I I I I I I I I I I
eepnneepnnnneepnnneepnnneepnnneepnnneepnnneepnnneepnnneepnnneepnnneepnnneepnnneepnnneepnnneepnnneepnnneepnnneepnnneepnnneepnnneepnnneepnnneepnnneepnnneepnnneepnnneepnnneepnnneepnnneepnnneepnnneepnnneepnnneepnnneepnnn
eepnnepepepepepepepepepepepepepepepepepepepepepepepepepepepepepepepepepepepepepepepepepepepepepepepepepepepepepepepepepepepepepepepepepepepepepepepepepepepepepepepepepepepepepepepepepepepepepepepepepe pe
(160dV-1104) 1
eepnpeepnppeeppeeppeeppeeppeeppeeppeeppeeppeeppeeppeeppeeppeeppeeppeeppeeppeeppeeppeeppeeppeeppeeppe
n/uuuauuuuuee eae z s,doukdoedoukzenn: doukfo/NO :sfo
1040E nnnn / uenBouwnn ene nepeuennn ene 10 E TO I nnnn / uenBouwnn ene neepnBn ene +
(1)
: s
N
TOHNOO
eeedde 3y uen bunluyosuO
65 abed 01 L0/60/61 0L B


eae eae eae eae eae eae eae eae eae eae eae eae eae eae eae eae eae eae eae eae eae eae eae eae eae eae eae eae eae eae eae eae eae eae eae eae eae eae eae eae eae eae eae eae eae eae eae eae eae
(1bd0g-1Dnepes)
LAAH NNNN
(uee eae ene nssn snnnnaaennnnae P) Oc o 0 uan 'uabowwaa aey uan uan uan uan uan uan uan uan uan uan uan uan uan uan uan uan uan uan uan uan uan uan uan uan uan uan uan uan uan uan uan uan uan uan uan uan uan uan uan uan uan uan uan uan uan uan uan uan uan uan u
e 9 dS
n do eaeenee aee 2 eep n nee eae ee eoe eae eae eae eae eae eae eae eae eae eae eae eae eae eae eae eae eae eae eae eae eae eae eae eae eae eae eae eae eae
hiness do you want an instant on your phone
NNEEN
e e
Bnne nnnnne nee eae ene nee nee nee nee nee nee nee nee nee nee nee nee nee nee nee nee nee nee nee nee nee nee nee nee nee nee nee nee nee nee nee nee nee nee nee nee nee nee nee nee nee nee nee nee nee nee nee nee nee nee
(5)perpepepepepepepepepepepepepepepepepepepepepepepepepepepepepepepepepepepepepepepepepepepepepepepepepepepepepepepepepepepepepepepepepepepepepepepepepepepepepepepepepepepepepepepe pe
e e e e e e e e e e e e e e e e e e e e e e
eeppeeppeeppeeppeeppeeppeeppeeppeeppeeppeeppeeppeeppeeppeeppeeppeeppeeppeeppeeppeeppeeppeeppeeppeeppeeppeeppeeppeeppeeppeeppeeppeeppeeppeeppeeppeeppeeppeeppe
eepn eepn eepn eepn eepn eepn eepn eepn eepn eepn eepn eepn eepn eepn eepn eepn eepn eepn eepn eepn eepn eepn eepn eepn eepn eepn eepn eepn eepn eepn eepn eepn eepn eepn ecpnn n
eepnne eepnne ennnnne nnnnne nee eee nnnnne nnnnne nnnnne nnnnne nnnnne nnnnne nnnnne nnnnne nnnnne nnnnne nnnnne nnnnne nnnnne nnnnne nnnnne nnnnne nnnnne nnnnne nnnnne nnnnne nnnnne nnnnne nnnnne nnnnne nnnnne nnnnnee nnnnne nnnnne nnnnne nnnnne nnnnne nnnnne nnnnne nnnnne nnnnne nnnnne nnnnne nnnnne nnnnne nnnnne nennnne nannnne nannnne nannnne nannnne nannnne nannnne nannnne nannnne nannnne nannnne nannnne nannnne nannnne nannnne nannnne nannnne nannnne nannnne nannnne nannnne nannnne nannnne nannnne nannnne nannnne nennnne nannnne nannnne nannnne nannnne nannnne nannnne nannnne nannnne nannnne nannnne
a a a a a a a a a a a a a a a a a a a a a a a a a a a a a a a a a a a a a a a a a a a a a a a a a a a a a a
y
mnnnne nnnnne nnnnne nnnnne nnnnne nnnnne nnnnne nnnnne nnnnne nnnnne nnnnne nnnnne nnnnne nnnnne nnnnne nnnnne nnnnne nnnnne nnnnne nnnnne nnnnne nnnnne nnnnne nnnnne nnnnne nnnnne
: Aqsoo Iepz Kp qzjod z eipob6z
Oe Oe Oe Oe Oe Oe Oe Oe Oe Oe Oe Oe Oe Oe Oe Oe Oe Oe Oe Oe Oe Oe Oe Oe Oe Oe Oe Oe Oe Oe Oe Oe Oe Oe Oe Oe Oe Oe Oe Oe Oe Oe Oe Oe Oe Oe Oe Oe Oe Oe Oe
m 10000000000000000000000000000000000000000000000000000000000000000
m = 311 ;
AwwroD
∠9 a6e 01 0/60/61 0L


M 100000000000000000000000000000000000000000000000000000000000000000000000000000000
#
1 1 1 1 1 1 1 1 1 1 1 1 1 1 1 1 1 1 1 1 1 1 1 1 1 1 1 1 1 1 1 1 1 1 1 1 1 1 1 1 1 1 1 1 1 1
Ae 1000000000000000000000000000000000000000000000000000000000
Pn np Aysy Bey W - 02 1uuzzBz
pnp Aysy Bey W - 61 duynzq Aysy Bey W - 11 uynzq B - y
pyn Aysy Bey W - 81 auzznq Bey W - 9/3
Aynnny Bey W - L1 azsxyBnny Aysy Bey W - 01 Aynnny Bey W - 2
ppn - f Aynny Aysy Bey W - 9 L1 pDyod ! KsD-3/D
Aynny Aysy Bey W - 9 L1 Aynny Aysy Bey W - 8
Aynny Aysy Bey W - 7 L1 Aynny Aysy Bey W - L
Aynny Aysy Bey W - 6 L1 Aynny Aysy Bey W - 5
IbON - I/H eepn Dzepn Oeepn Oeepn Oeepn Oeepn Oeepn Oeepn Oeepn Oeepn Oeepn Oeepn Oeepn Oeepn Oeepn Oeepn Oeepn Oeepn Oeepn Oeepn Oeepn Oeepn Oeepn Oeepn Oeepn Oeepn Oeepn O
'oeomopm D m dnnn nn nnnnnnnnnnnnnnnnnnnnnnnnnnnnnnnnnnnnnnnnnnnnnnnnnnnnnnnnnnnnnnnnnnnnnnnnnnnnnnnnnnnnnnnnnnnnnnnnnnnnnnnnnnnnnnnnnnnnnnnnnn nn nannn nannn nannn nannn nannn nannn nannn nannn nannn nannn nannn nannn nannn nannn nannn nannn nannn nannn nannn nannn nannn nannn nannn nannn nannn nannn nannn nannn nannn nannn nannn nannn nannn nannn nn nannn nannn nannn nannn nannn nannn nannn nannn nannn nannn nannn nannn nannn nannn nannn nannn nannn nannn nannn nannn nannn nannn nannn nannn nannn nannn nannn nannn nannn nannn nannn nannn nennn nn annan anan anan anan anan anan anan anan anan anan anan anan anan anan anan anan anan anan anan anan anan anan anan anan anan anan anan anan anan anan anan anan anan anan anan anan anan anan anan anan anan anan anan anan anan anan anan anan anan anan anan
Aunnnae aen ean nnnnne ane ane ane ane ane ane ane ane ane ane ane ane ane ane ane ane ane ane ane ane ane ane ane ane ane ane ane ane ane ane ane ane ane ane ane ane ane ane ane ane ane ane ane ane ane ane ane ane ane ane anee aeaeaeaeaeaeaeaeaeaeaeaeaeaeaeaeaeaeaeaeaeaeaeaeaeaeaeaeaeaeaeaeaeaeaeaeaeaeaeaeaeaeaeaeaeaeaeaeaeaeaeaeaeaeaeaeaeaeaeaeaeaeaeaeaeaeaeaeaeaeaeaeaeaeaeaeaeaeaeae
e 100000000000000000000000000000000000000000000000000000000000000000000000000000000
DyDyDyDyDyDyDyDyDyDyDyDyDyDyDyDyDyDyDyDyDyDyDyDyDyDyDyDyDyDyDyDyDy Dzyd ydy dzyd ydy dzyd ydy dzyd ydy dzyd ydy dzyd ydy dzyd ydy dzyd ydy dzyd ydy dzyd ydy dzyd ydy dzyd ydy dzyd ydy dzyd ydy dzyd ydy dzyd ydy dzyd ydy dzyd ydy dzyd ydy dzyd ydy dzyd ydy
NO / NO - E
e
( e 000000000000000000000000000000000000000000000000000000000000000000000000000000000


#
#
Od
IN
1d
ON
SE
书

PnndnDnDnDnDn
3/24/86: (ww 05 0) bpom aoue oohmz Apoepoeae aedae zidoudous eoozdoepod
01-2-10909N3 L-10909N3:4
(3) a4 = a1 + 2d( a1 + a2) = 25
WON
D
oe 00000000000000000000000000000000000000000000000000000000
1 1 1 1 1 1 1 1 1 1 1 1 1 1 1 1 1 1 1 1 1 1 1 1 1 1 1 1 1 1 1 1 1 1 1 1
VINVMOSO1SV2 xdva0a
poeeppeeppeeppeeppeeppeeppeeppeeppeeppeeppeeppeeppeeppeeppeeppeeppeeppeeppeeppeeppeeppeeppeeppeeppeeppeeppeeppeeppeeppeeppeeppeeppeeppeeppeeppeeppeeppeeppeeppeeppeeppeeppeeppeeppeeppeeppeeppeeppeeppeeppeep
: 0000000000000000000000000000000000000000000000000000000000000
mzds nneepnneepnneepnneepnneepnneepnneepnneepnneepnneepnneepnneepnneepnneepnneepnneepnneepnneepnneepnneepnneepnneepnneepnneepnneepnneepnneepnneepnneepnneepnneepnneepnneepnneepnnppepnppepppepppepppepppepppepppepppepppepppepppepppepppepppepppepppepppepppepppepppepppepppepppepppepppepppepppepppepppepppepppepppepppepppepppepppepppepppepppepppepppepppepppepppepppepppepppepppepppepppepppe
mnnnne nnnnne nnnnne nnnnne nnnnne nnnnne nnnnne nnnnne nnnnne nnnnne nnnnne nnnnne nnnnne nnnnne nnnnne nnnnne nnnnne nnnnne nnnnne nnnnne nnnnne nnnnne nnnnne nnnnne nnnnne nnnnne
1 000000000000000000000000000000000000000000000000000000
P 1
nBm m mnnnne nnnnne nnnnne nnnnne nnnnne nnnnne nnnnne nnnnne nnnnne nnnnne nnnnne nnnnne nnnnne nnnnne nnnnne nnnnne nnnnne nnnnne nnnnne nnnnne nnnnne nnnnne nnnnne nnnnne nnnnne nnnnne