
Party Box 810 - Loudspeaker AKAI - Free user manual and instructions
Find the device manual for free Party Box 810 AKAI in PDF.


| Product Type | Portable Party Speaker |
| Brand | AKAI |
| Model | Party Box 810 |
| Power Output | 100W RMS |
| Speaker Configuration | 2 x 6.5" woofers, 2 x 1" tweeters |
| Frequency Response | 40Hz - 20kHz |
| Bluetooth Version | 5.0 |
| Inputs | Bluetooth, USB, AUX, Microphone (6.3mm) |
| Battery Type | Rechargeable Lithium-Ion |
| Battery Life | Up to 8 hours |
| Charging Time | Approximately 4 hours |
| Dimensions (W x H x D) | 320 x 500 x 280 mm |
| Weight | 7.5 kg |
| Power Supply | AC 100-240V, 50/60Hz |
| Special Features | Party lights, Karaoke echo, TWS pairing |
| Cleaning Instructions | Wipe with a soft dry cloth; do not use liquid cleaners |
| Safety Precautions | Do not expose to moisture; keep away from heat sources |
| Spare Parts Availability | Contact AKAI support for replacement parts |
| Repairability | Not user-serviceable; refer to qualified technician |
Frequently Asked Questions - Party Box 810 AKAI
User questions about Party Box 810 AKAI
0 question about this device. Answer the ones you know or ask your own.
Ask a new question about this device
Download the instructions for your Loudspeaker in PDF format for free! Find your manual Party Box 810 - AKAI and take your electronic device back in hand. On this page are published all the documents necessary for the use of your device. Party Box 810 by AKAI.
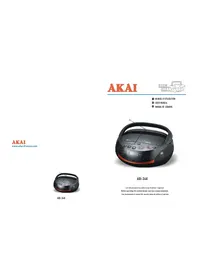
USER MANUAL Party Box 810 AKAI
Party Box 810 Bluetooth portable speaker User Manual
NOTES ON USE
- This is a precision electronic appliance; avoid using it in the following cases:
- Listening to high volume for a long time could damage your hearing.
- Do not close the ear to the loudspeaker during step setting and volume adjustments, and in particular keep the volume down at the ignition
- Near strong heat sources, such as central heating plants or stoves.
• In very humid places such as bathrooms, swimming pools, etc.
• In very dusty places.
• In places subject to strong vibrations. - Position the appliance in such a way that there is always enough room for free air circulation (at least 5 cm).
- Do not block the air inlets.
- If any liquid enters the appliance, unplug it immediately from the socket and take it to the nearest authorized service center.
- Before switching on the appliance, always check that the power cable and the connection cable are properly installed.
- The apparatus shall not be exposed to dripping or splashing water. No objects filled with liquid, such as vases, should be placed on the unit.
• No naked flame sources, such as lighted candles, should be placed on. - Power adaptor must be connected to a socket close to the device and must be easily accessible.
- If you notice excessive heat on the device or power adaptor, disconnect the plug from the main power socket immediately.
- Do not pull the power cord
- Keep this manual.
CARE AND MAINTENANCE
Use a slightly damp soft cloth for cleaning. Do not use solvents and abrasive substances.
IMPORTANT
This device is designed for home use (not professional use). This appliance has been carefully built to ensure long-lasting perfect performance. However, should any inconvenience occur, please contact your local authorized Service Centre.
follows a policy of ongoing research and development. Therefore products may have different features from those described.
TECHNICAL SPECIFICATIONS
| •Power Source | AC:100-240V 0.8A |
| •Power Consumption | MAX 60W |
| •RMS Power | 40W |
| •Bluetooth version | V5.0 |
| •BT channel emission power | 0dBm |
| •Bluetooth frequency | 2402 MHz~2480MHz |
| •Bluetooth range | >10M |
| •FM frequency | 87.5Hz-108.0MHz |
| •Battery type | 8V,7A Lead-acid battery |
| •Speakers | 6.5" 3 Ohm |
| •Frequency response | 60Hz-16kHz |
| •Product dimensions | 26.9(L)×29(D)×62.6(H) |
LOCATIONOFCONTROL
(01) POWER(Stand-by)
(02) MODEbutton
(03) PREVbutton(prievioussong)
(04) NEXTbutton(nextsong)
(05) LED(LIGHTSWbutton)
(06) RECbutton
(07) MENU(treble/bass/microphonevol/microphoneecho/guitarvol)adjustment
(08) Play/Pausebutton(longpressTWS)
(09) VOLUME
(10) GTinput
(11) MICinput
(12) AUX/FMinput
(13) TFCardinput
(14) USBinput
(15) AC100-240Vinput

REMOTECONTROL
(01) PowerON/Stand-by
(02) MUTEbutton
(03) RECbutton(Presstostartrecording.Pressagainto stoprecording)
(04) Modefunction(selectbetweenAUX/USB/SD/FM/BLUETOOTH)
(05) Volume+
(06) Nextsong/CH+
(07) Previousssong/CH-
(08) Play/Pause/TWS
(09) (SingleRepeat/RepeatAll)
(10) EQSoundModeKey(POP/ROCK/JAZZ/CLASSIC/FLAT)
(11) Volume—
(12) Numericbuttons

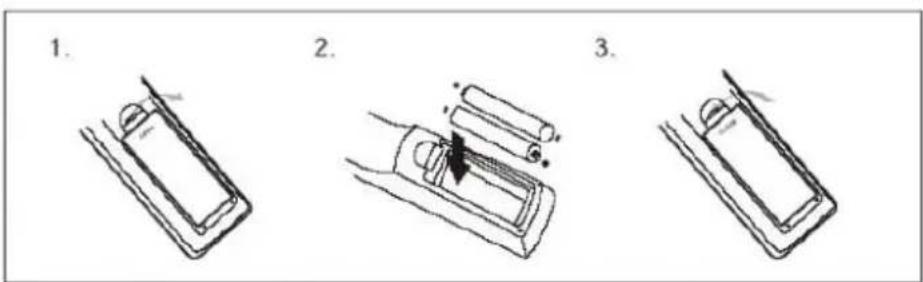
InstallingtheBatteries
RemovethebatterycoverfromtheRemoteControlandput2xAAAsizebatteriesinsidethe compartment. ThediagraminsidetheBatter ycompartmentshowsthecorrectwaytoinstallthe batteries.
TRANSPORTATION
For transportation, use the upper handle, slightly fold the appliance and use the two rear whe
POWER
This unit works with 8V/7A lead acid rechargeable battery and 100-240V power supply.
When the battery is being phased out and the device does not turn on, plug the power cord. Power socket (15) on the device and plug into a wall socket to recharge.
Lamp status LED charging:
- Red LED indicator: The device is charging.
- Green LED indicator: The battery is charged.
Caution:
- Do not connect the appliance to sockets with a voltage other than indicated one.
BASIC FUNCTIONS
POWER ON/OFF
Long press the main ON/OFF power switch (01) to position ON to turn the power.
BATTERY CHARGE
- Connect the charging cable to the charging plug (15) the charging function and the LED indicating charging status will start immediately.
For a longer battery life it is recommended to disconnect the main power cable after 10 hour of recharging.
If the battery is empty, please turn the speaker off and recharge for at least half an h before using it again.
STAND-BY
You can switch the system to standby mode using 1 (↓) button (01) on remote control:
Press it again to Switch On the unit. Caution:
- In standby mode the battery is NOT recharged and the device has a minimum battery consumption.
- When connecting the main power supply, long-press the power button (01) for 3 seconds, the device will display turned
on. Which means it works normally. Short press the power button (01), the device will display entering into stand-by mode. At the same time, the power button shows red light.
- For long periods of inactivity, it is necessary to disconnect the mains cable and recharge the battery periodically.
PLAYBACK MODE SELECTION FUNCTION
To change the mode function, press the key (02) on the unit or press button (04) on remote control to select: BLUETOOTH (the display BLUE), USB/SD (only if the USB socket (Micro SD (13) is connected to a memory, the display shows for a few seconds "USB" or "S AUX-IN (the display shows "LINE" or "FM").
ADJUSTING THE VOLUME
- Turn the Main Volume control (09) to increase or decrease the overall volume of playback, or use the buttons (05) and (11) on the remote control;
- Press the button (07) and turn the knob (09) (treble / bass / microphone vol / microphone echo / guitar vol) adjustment
PRE-EQUALIZER
This unit has a pre-set audio equalization system. Press the unit or the EQ button (10) on the remote control repeatedly to select one of the 5 audio equalizations available and which best the current sound reproduction.
SETTING TONE TREBLE AND BASS
Press the ≡ MENU (07) key (1) time to adjust the treble and (2) times to adjust the bas
MASTER VOLUME
Turn the (09) knob to adjust the main volume
MIC ECHO EFFECT
Press the MENU (07) key (4) times and rotate the master volume knob (09) to adjust the microphone echo adjustment.
Note: the echo only works on microphone inputs.
MIC TONE
Press the MENU (07) key (3) times and rotate the master volume knob (09) to adjust the microphone sound level.
Note: This function is available only when a wired microphone is connected (not provided)
GT TONE
Press the MENU (07) key (5) times and rotate the master volume knob (09) to adjust the sound level of the guitar.
Note: Only when a GUITAR device is connected.
LED LIGHT
Press the LED button (05) several times to select the Moving Disco-Light effect, each press is correspond to a lighting effect.
ON/OFF VOICE PROMPT FUNCTION
Press and hold MODE button (02) on unit or button (04) on remote control to switch ON/OFF the voice announcement.
BLUETOOTH FUNCTION
- Switch On and press the MODE (02) on unit, or button (04) on remote control to select the Bluetooth function, the display shows "BLUE";
- In the Bluetooth mode, the "BLUE" on display will star flashing, the system automatically enters pairing mode;
- Activate the Bluetooth feature on the external device;
- Search the available devices and select "AKAI PARTY BOX 810";
- Enter the password "0000" if required;
- Press the Play/Pause button (08) on the unit o (08) button on remote control to start playing, or use PREV button (03) or NEXT (04) on unit, or the keys (6) and (7) on remote control to select a song.
(True wireless stereo technology) W/S technology enables user to make wireless connection between two speakers which are same model and compatible with TWS. In TWS connection, speakers will be automatically grouped to be a Stereo- Speaker System which outputs the left right channel.
CONNECTION MODE
Notice: Two speakers must be same model and both compatible with TWS.
- Please switch on both speakers and select "Bluetooth" mode;
- Press and hold PLAY button (08) on the unit, you will hear a "beep". It becomes the main speaker (left channel), which will automatically search and connect with another speaker (right channel). After connection, you will hear a "beep";
- Connect mobile phone or Bluetooth player to the speaker by Bluetooth. After connection, you can play music with the TWS Stereo- Speaker System.
TWS function operates in TWS mode, manipulations to the main speaker will be simultaneous affected in another speaker. For example, volume adjustment, previous and next song selection play and pause, power on and off.
Note:
- If the 2 loudspeakers are not paired, switch off both devices and repeat steps 1, 2 and 3.
- The TWS function only works between equal speakers or with other speakers that use the same micro-processor or solution
USB/SD INPUT
- Switch on the unit;
- Insert a USB memory or an Micro SD card into the USB or SD slot (13 or 14). Playback automatically;
- To pause playback, press (08) button on the unit or the key (08)▶dn remote control, the display will show "PAUS"; press it again to resume playback;
- Press NEXT (10) button on unit or key ▶▶ (06) on remote control while listening to switch to the next track. Press PREV (03) button on unit or ◀◀ (07) on remote to go to the previous tracks;
-
Using the numeric keypad (12) on remote control you can directly enter the number of the song you want to play;
-
Press once button (09) on the remote, the display will show "ONE", to continually play the same track; press it a second time, the display will show "ALL" to continuously play all songs in the USB/SD.
Note:
- The player may not support some USB/SD devices, this is due to the incompatibility of some processors.
- To avoid harmful interference, always connect USB devices directly to the unit, do not use extension cords.
- From the computer to format the USB memory/SD FAT (16 or 32).
AUX-IN
- Press the → MODE button (02) on the unit or press → button (04) on the remote control and select the "LINE" function;
- Connect any unit equipped with audio output 3.5mm jack to the AUX (12) input;
- Use the controls on the external device.
FM RADIO FUNCTION
- Turn on the unit and press repeatedly the remote control and select FM function (the display will show the frequency).
→ MODE key on unit, or the → on
- Press the PLAY button on the unit or the ▶key o n remote control to activate the auto memory (the radio starts an automatic search for available radio stations and saves them automatically). The station's number stored depends on the radio signal in your area. During the search, press PLAY button on the remote control to stop searching.
- Use the NEXT and PREV, or the keys ▶ and ◀ on the remote control to listen to the various radio stations saved in memory.
- To change to a preset station, use the number keys on the remote control. For example, to call up the station number12 first press 1 and then 2.
Note: For a better FM radio connection please insert the provided "line in cable" into AUX/FM input.
VOICE RECORDING
This unit is capable of recording the voice on the USB memory or SD card when using the microphone.
The device will automatically create a folder called "Record" inside the USB memory and it log files.
- Switch On the unit;
- Insert a USB memory or a SD Card into the socket;
-
Select the USB or SD function MODE button (02) on the unit, or the button (04) on the remote control;
-
Via the REC (06) button on the unit or REC button (03) on remote control to start record the display will show "REC" and the time signature will start;
-
Press again REC button to stop recording. The unit will play, automatically, the recorded file Note:
- You can record only the voice.
- When the "Recording" function is activated, some appliance controls are deactivated, they will resume their normal function when the recording is stopped.
TROUBLESHOOTING
If a problem occurs, follow the steps in the table below.
If the problem still can't be solved, please contact your retailer.
| Problem | Possible cause | Solution |
| No sound when power is tur ON | 1.No input sound source comes2.Volume knob in the lowest position3.Voice switch off4.USB/SD card not plugged | 1.Input AUX signal2.Adjust volume3.Turn on voice switch4.Plug USB/SD card, play MP3 |
| Distorted sound | 1.Volume is too loud2.Audio file error | 1.Turn the volume down2.Check and change the audio file |
| No sound from the microphor | 1.Microphone socket may not be plugge properly.2.Microphone switch may not be on.3.Microphone volume is on lowest mod | 1.Ensure the microphone is correctly plugged into the socket.2.Turn on the microphone3.Adjust the microphone volume as per users wish |
| No sound comes after inserting USB/SD Card | 1.Incorrect file format2.USB/SD may not be plugged properly | 1.File format should be MP32.Plug USB/SD card correctly |
| Charging indication-red light flashing when there is low cl | Charging adapter is not inserted prop | It will not affect the speaker system. The light is only used for indicating whether unit is charging |
| Unable to charge or the battery works only for short duration | 1.Connect with power cord to charge2.Battery not fully charged3.Battery life may have ended | 1.Check if power cord connected proper2.Extend charging time; normally it takes 8 hour to fully charge3.Replace old batteries with the same specification as the old batteries. |
| If Speaker makes loud noises | 1.Microphone switched on but may too close to the speaker2.Microphone switched on but is not being used3.Microphone volume may be too loud4.Mobile phone is being used too cl the speaker5.Other wireless equipment may be placed very close to the speaker | 1.Keep the microphone 2 meters away fi the speaker2.Turn off microphone if not in use.3.Adjust microphone volume to lower mo4.Keep mobile away from the speaker wh a ending a call.5.Keep the speaker away from other wire equipment |
INFORMATION ON THE REMOVAL AND DISPOSAL OF BATTERIES
Used batteries should not be disposed of with household waste or thrown into fire or water.
Used batteries should be recycled or disposed of in separate waste collection centers.
BATTERY REMOVAL
Warning: Only high-qualified personnel should perform this operation!
The appliance should not be plugged to the mains socket when performing this operation
- Remove the screws that secure the slot panel battery;
- Remove the metal panel;
- Disconnect the battery and remove it;
- Replace the battery with one of the same characteristics and capacity.
DISPOSAL OF WASTE ELECTRICAL AND ELECTRONIC EQUIPMENT
This symbol on the product or packaging means that the product should not be treated as
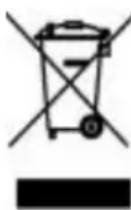
household waste. Do not throw garbage at the end of its life, but take it to a center for recycling. In this way you will help to protect the environment and be prevent any negative consequences that it would have on the environment and hu health.
To find your nearest collection center:
-Contact local authorities;
-Access the website: www.mmediu.ro
-Request additional information from the store where you purchased the product.
AKAI

Party Box 810
Difuzor portabil cu Bluetooth Manual de utilizare
OBSERVATIIPRIVINDUTILIZAREA
Party Box 810
Party Box 810
Party Box 810
Party Box 810
8V,7A Lead-acid battery
6.5" 3 Ohm
60Hz-16kHz
26.9(L)×29(D)×62.6(H)
LOKALIZACJA PRZYCISKOW
Party Box 810
8V,7A Lead-acid battery
6.5" 3 Ohm
60Hz-16kHz
26.9(L)×29(D)×62.6(H)
UMÍSTĚNÍ OVLÁDACÍCH PRVKŮ
Party Box 810

- NOTES ON USE
- CARE AND MAINTENANCE
- IMPORTANT
- LOCATIONOFCONTROL
- REMOTECONTROL
- INSTALLINGTHEBATTERIES
- TRANSPORTATION
- POWER
- CAUTION
- BASIC FUNCTIONS
- POWER ON/OFF
- BATTERY CHARGE
- STAND-BY
- PLAYBACK MODE SELECTION FUNCTION
- ADJUSTING THE VOLUME
- PRE-EQUALIZER
- SETTING TONE TREBLE AND BASS
- MASTER VOLUME
- MIC ECHO EFFECT
- MIC TONE
- GT TONE
- LED LIGHT
- ON/OFF VOICE PROMPT FUNCTION
- BLUETOOTH FUNCTION
- CONNECTION MODE
- NOTE
- USB/SD INPUT
- AUX-IN
- FM RADIO FUNCTION
- VOICE RECORDING
- TROUBLESHOOTING
- INFORMATION ON THE REMOVAL AND DISPOSAL OF BATTERIES
- BATTERY REMOVAL
- DISPOSAL OF WASTE ELECTRICAL AND ELECTRONIC EQUIPMENT
- AKAI
- PARTY BOX 810
- DIFUZOR PORTABIL CU BLUETOOTH MANUAL DE UTILIZARE
- OBSERVATIIPRIVINDUTILIZAREA
- LOKALIZACJA PRZYCISKOW
- UMÍSTĚNÍ OVLÁDACÍCH PRVKŮ
Brand : AKAI
Model : Party Box 810
Category : Loudspeaker