RPM3 - Speaker AKAI - Free user manual and instructions
Find the device manual for free RPM3 AKAI in PDF.
| Product Type | Near-field Monitoring Speaker |
| Brand | AKAI |
| Model | RPM3 |
| Dimensions (W x H x D) | 15.3 cm x 12.7 cm x 19 cm (6 in x 5 in x 7.5 in) |
| Net Weight | 3.4 kg (7.5 lb) |
| Power | 10 W RMS per channel, voltage selector 100-120 V / 220-240 V |
| Frequency Response | 80 Hz - 20 kHz |
| Bass Boost | 4.8 dB at 100 Hz (switchable) |
| Signal-to-Noise Ratio | 88 dB (weighted) |
| Woofer | 3 in, polypropylene cone, magnetic shielding |
| Tweeter | 1 in silk dome |
| Audio Inputs | USB 1.1, 1/8 in stereo, 1/4 in TS (x2), RCA (x2) |
| Connectivity | USB Plug-and-Play (PnP), no driver required |
| Headphone Output | 1/8 in jack (mutes speakers) |
| Features | Volume/power knob, bass boost switch, zero-latency monitoring |
| Care and Cleaning | Unplug before cleaning; use a soft, dry cloth |
| Safety | Read safety instructions before use; do not expose to moisture |
| Spare Parts | Available upon request from the manufacturer |
| Repairability | Contact a qualified technician; no user-serviceable parts |
Frequently Asked Questions - RPM3 AKAI
User questions about RPM3 AKAI
0 question about this device. Answer the ones you know or ask your own.
Ask a new question about this device
Download the instructions for your Speaker in PDF format for free! Find your manual RPM3 - AKAI and take your electronic device back in hand. On this page are published all the documents necessary for the use of your device. RPM3 by AKAI.
USER MANUAL RPM3 AKAI
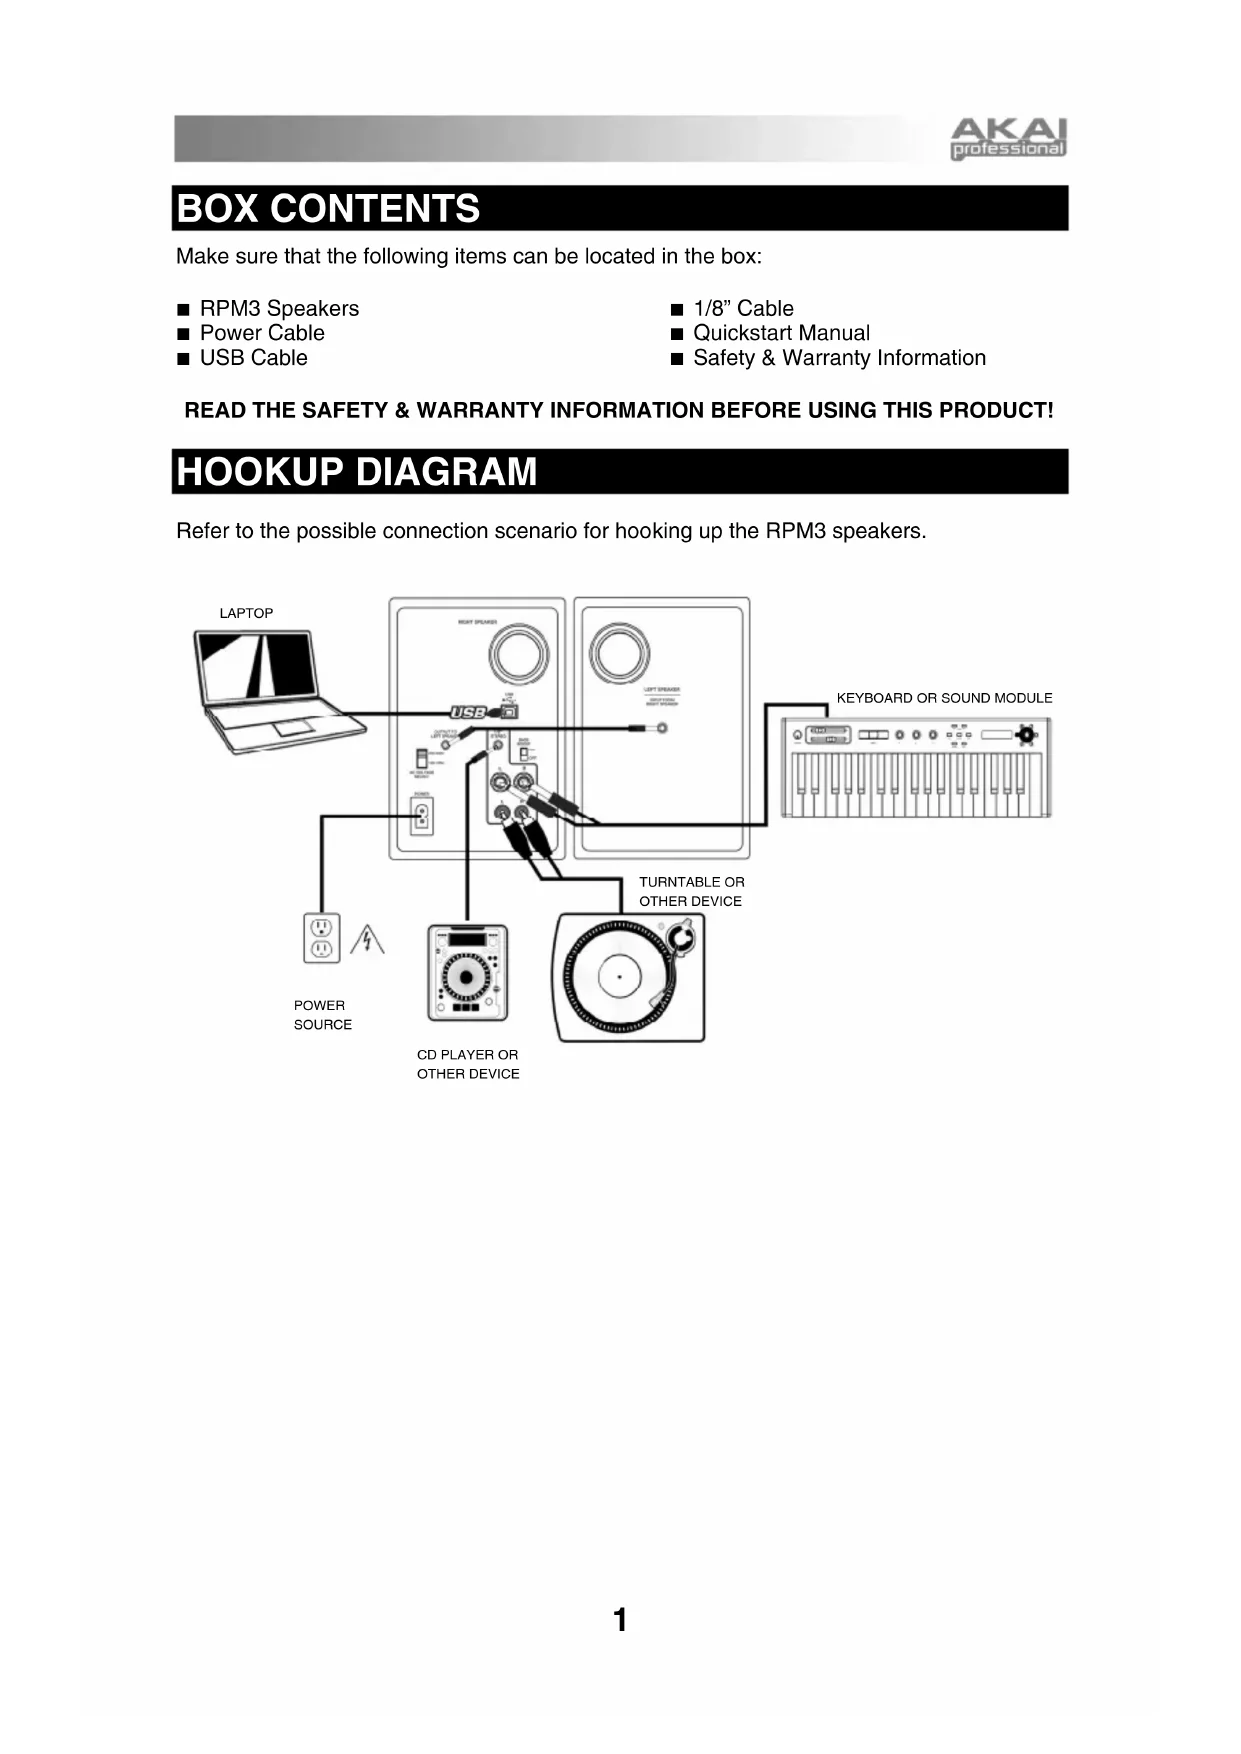
Make sure that the following items can be located in the box:
RPM3 Speakers
Power Cable
USB Cable
1/8" Cable
Quickstart Manual
Safety & Warranty Information
READ THE SAFETY & WARRANTY INFORMATION BEFORE USING THIS PRODUCT!
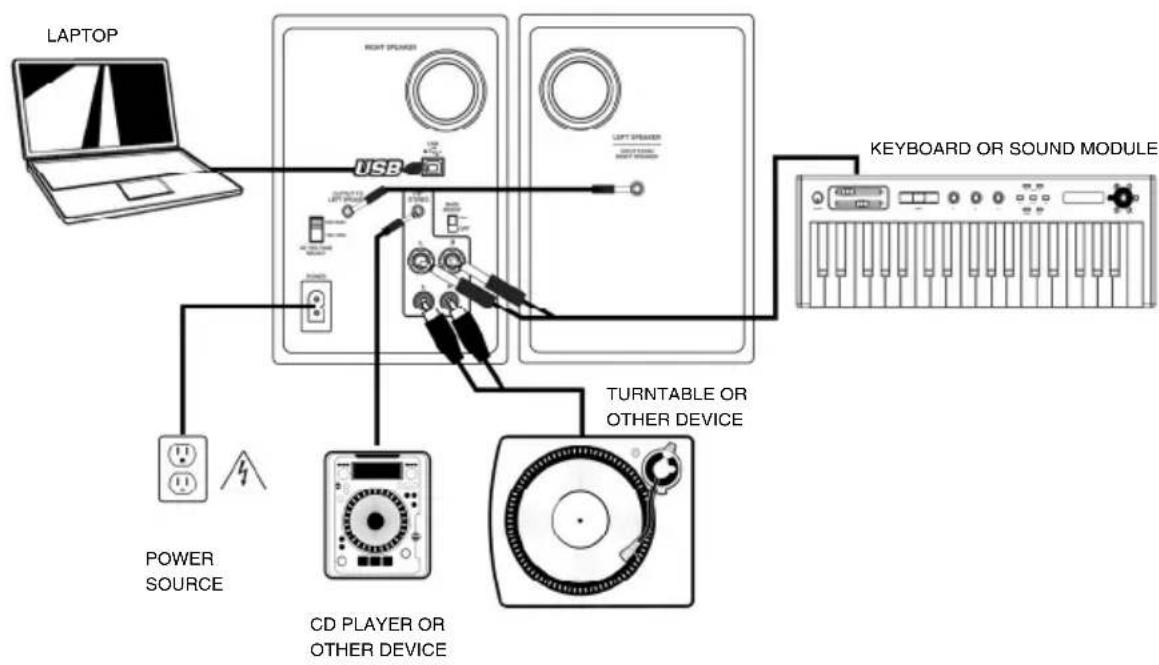
HOOKUP DIAGRAM
Refer to the possible connection scenario for hooking up the RPM3 speakers.
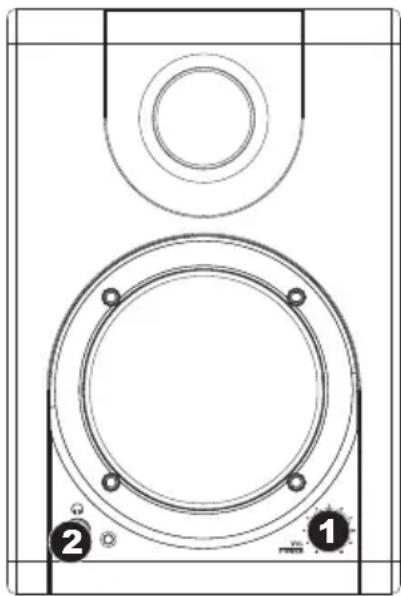
FRONT PANEL OVERVIEW
- VOL/POWER - This knob is used to turn the speakers on and adjust their volume. To turn on, simply turn up the knob; you will feel a click when the speakers turn on. A blue LED light on the left side of the speaker will illuminate. To turn off, simply turn the volume all the way down; the blue LED will turn off to let you know that the speakers are off.
- HEADPHONES - Connect your 1/8" headphones to this output to hear the mix through your headphones. Note that while the headphones are connected, you will not be able to hear sound out of your speakers until the headphones are disconnected.
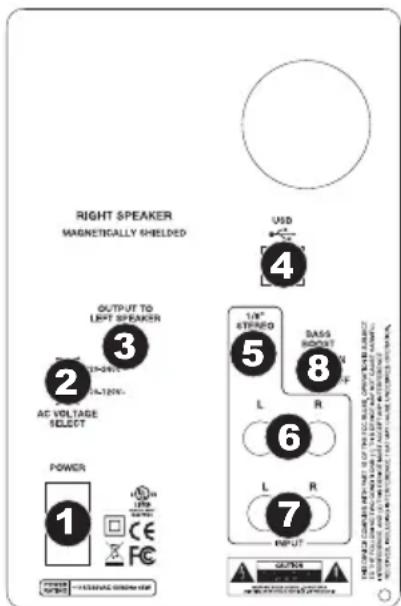
REAR PANEL OVERVIEW
- POWER - Use the included power cable to connect the speakers to a live power source. Make sure your AC Voltage Selector (see item #2 below) is set to the correct voltage for your country.
- AC VOLTAGE SELECTOR - This 2-position switch sets the AC input voltage for the speaker. US users should set this switch to "100-120V" whereas UK and most European users will need to set this to "220-240V.
- OUTPUT TO LEFT SPEAKER - This is the audio connection to the left speaker. Use the included 1/8 cable to connect the right speaker to the left speaker.
- USB (1.1) - Use the supplied USB cable to connect the speaker system to your computer. Note that the RPM3 speakers are Plug-and-Play so there is no additional driver installation necessary; the speakers should be ready to use as soon as they are plugged in.
- 1/8" STEREO INPUT - Use a 1/8" stereo cable (not included) to connect external sound sources to this input.
- 1/4" TS INPUTS - Use 1/4" TS cables (not included) to connect external sound sources to these inputs.
- RCA INPUTS - Use a stereo RCA cable (not included) to connect external sound sources to these inputs.
- BASS BOOST - This 2-position switch allows you to boost the speakers' bass frequencies.
If you experience problems when connecting the speakers through a USB hub, we recommend connecting the speakers directly to your computer.
All three input options are mixed together as a stereo pair when recording your external sources into your computer.
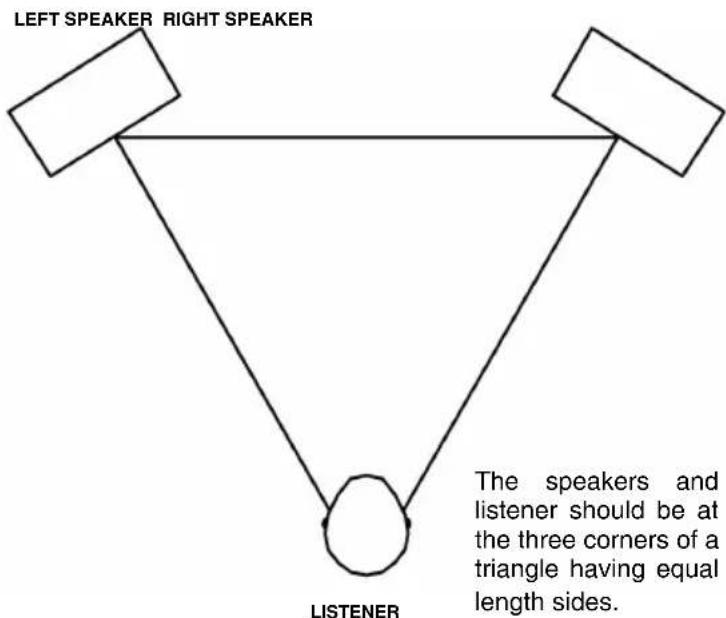
SPEAKER PLACEMENT
The placement of your speakers has a huge impact on how well they will perform in your studio.
Although nearfield studio monitors are designed to be more forgiving when it comes to placement, you should do your best to make sure they form an equilateral triangle relative to your head. In other words, make sure that each speaker is equally distant from both your head as well as the other speaker. Once each speaker has been placed, rotate the speakers slightly so that the drivers are pointing toward the engineer.
Take a look at the diagram on the right. Notice that the distance from the engineer's head to each speaker is the same as the distance between the left and right speakers. Also note that the speakers are turned slightly so that the drivers are facing the engineer.
This is an ideal setup but if it is not practical (or possible) to do this, try to match this setup as closely as possible.
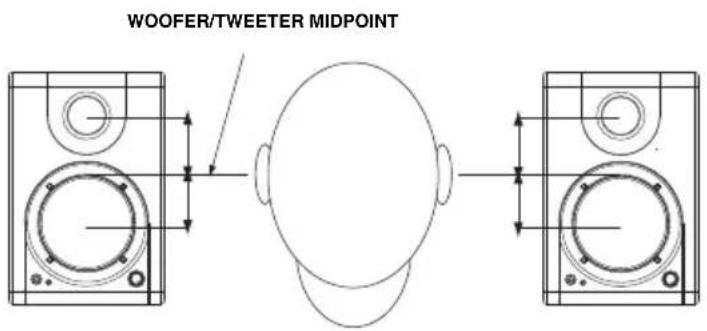
SPEAKERHEIGHT
The ideal height for RPM3 speakers is so that the speaker is parallel to the ground and that the midpoint of the woofer and tweeter is at ear-height.
The diagram below demonstrates the ideal placement height of the speakers relative to the engineer. Notice that the engineer's ears are directly between the woofer and tweeter.
If possible, use speaker stands and move the monitors off of your desk (or meter bridge, if you are using a mixer). This usually results in better imaging since the monitor is decoupled from your desk and there is less chance reflected sound from the desk (or mixer) reaching your ears and smearing the imaging of your studio monitors.
The RPM3 speakers are plug-and-play under Windows XP/Vista so there is no special driver installation necessary. Simply power on the speakers, connect them to your computer's USB port and all the necessary drivers will be automatically installed.
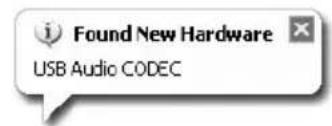
When you first plug the speakers into your computer, you will see a few messages similar to the one shown on the left. Allow the process to complete.

Once the process has completed, you will see the message displayed on the left. Your speakers are now ready to use.
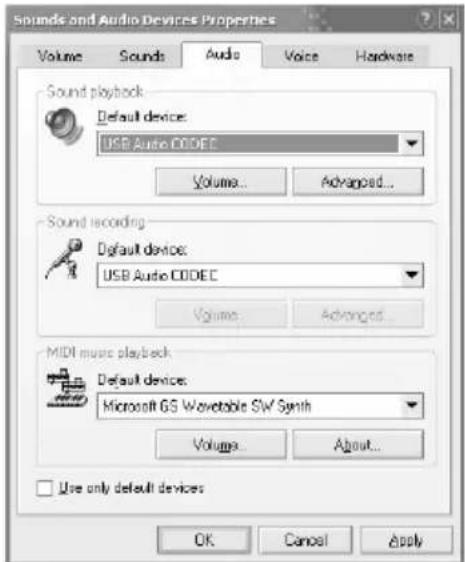
You may choose to use the RPM3 speakers as the default audio output for your computer. To access your computer's default audio preferences, go to Start Control Panel Sounds and Audio Devices and click on the Audio tab.
You will see the screen displayed on the left.
To select the speakers as the default playback device, choose USB Audio CODEC under Sound Playback.
To select the speakers as the default recording device, choose USB Audio CODEC under Sound Recording.
Tip: While in Sounds and Audio Devices, we recommend turning off Windows system sounds so they do not interfere with your audio while in the middle of a session. You can do this by clicking on the Sounds tab and selecting No Sounds under the Sound Scheme pull-down menu.
ABOUT LATENCY & THIRD-PARTY ASIO DRIVERS
"Latency" is the delay between the moment when audio is generated and the moment when you actually hear it. Higher latency means a longer delay.
The RPM3 speakers feature zero latency direct monitoring so you don't have to worry about latency when monitoring input sources connected to the rear of the speakers. However, latency may become an issue when using software synths and instruments.
Generally, you want to keep latency as low as possible while still allowing your equipment to operate without glitches. Latency and buffering is usually adjusted in your software's Preferences settings.
If you still experience too much latency or "lag" when using software synths and instruments, you might want to download one of the free and widely available ASIO (Audio Stream Input/Output) drivers from the Internet. In general, ASIO drivers may perform better and with lower latency since they create a more efficient communication between audio devices and software. You may download and install the free ASIO4ALL driver (PC) by visiting www.asio4all.com.
CONFIGURATION UNDER MAC OSX
The RPM3 speakers are plug-and-play under Mac OSX so there is no special driver installation necessary. Simply power on the speakers, connect them to your computer's USB port and the speakers should be ready to use immediately.
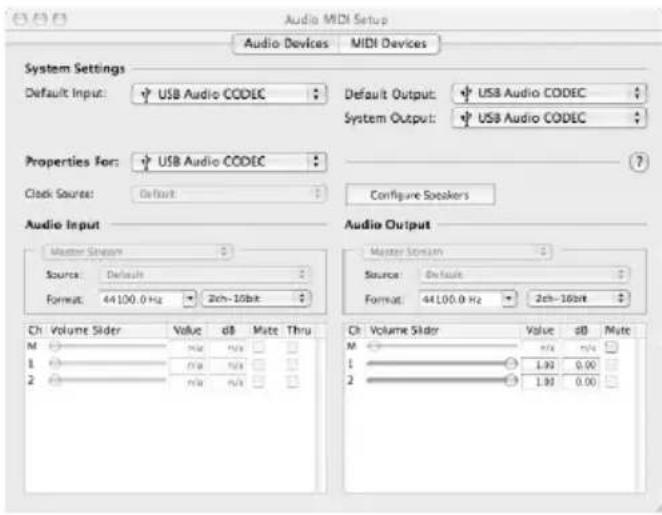
You may choose to use the RPM3 speakers as the default audio output for your computer. To access your computer's default audio preferences, go to Applications Utilities and double-click Audio MIDI Setup.
Under the Audio Devices tab, select USB Audio CODEC as the default system input and output.
CONFIGURING YOUR DAW
Below are some tips on configuring your DAW to work with the speakers.
PLAYBACK
You may need to make sure that the speakers are enabled as an audio output device in your DAW, if you have not set them to be the default system audio output. This is usually done in the application's Preferences dialog.
RECORDING
As you may have noticed, there are several inputs on the rear panel of the left speaker. These inputs allow you to record external sound sources directly into your computer. Note that the three sets of inputs are summed together before entering your computer as a stereo track. Therefore, it's important to ensure that the volume of the input signal does not clip when using multiple external devices simultaneously.
To record from the inputs, make sure that the speakers are enabled as an audio input device in your DAW. This is usually done in the application's Preferences dialog.
IMPORTANT: Make sure that software monitoring is turned off when recording from external sound sources. Otherwise, you may get feedback and distortion. To turn off monitoring on the recording channel, you can simply mute the channel in your software.
TROUBLESHOOTING
Please refer to the following list of common troubleshooting scenarios if you run into problems.
| PROBLEM CAUSE SOLUTION | ||
| Speakers do not work. | Speakers not plugged in. Make | sure that the speakers are connected to a live power source. |
| Speakers not turned on. Make sure that the speakers are turned on. The blue LED will be illuminated while the speakers are on. | ||
| Speakers not connected to computer. | Make sure that the speakers are connected to a functioning USB port on your computer. | |
| Problem is caused by use of a hub. | We strongly recommend that you avoid using USB hubs and connect the speakers directly to your computer. | |
| Headphones are plugged in. Remember that while the headphones are plugged in, the speakers will not output audio. Disconnect the headphones if you would like to listen through the speakers. | ||
| Volume is all the way at minimum.. | Turn up the volume knob on the front to a suitable level. | |
| I am only hearing audio from the left speaker. | Right speaker not connected. Make sure that the right speaker is connected to the left speaker with the included 1/8" cable. | |
| I am experiencing distortion when recording from external sources. | Gain levels of your input sources are too hot. | Turn down the audio level of your input sources. This is extremely important when using multiple sources, as the inputs on the rear panel of the speakers will be summed together before entering your computer. |
| Software monitoring has not been tuned off and is causing a feedback loop. | Make sure that your software monitoring is turned off when recording from external sources to avoid feedback and distortion. | |
| I am experiencing a lot of latency or "lag". | Buffer size in your software is set too high. | Set the buffer size to a lower value. This is usually done in your software's Audio settings or perferences. |
| The class-compliant audio drivers are insufficient. | Download the free ASIO4ALL driver from www.asio4all.com. It may help achieve better results under extremely low latency settings. | |
| I am experiencing audio dropouts and glitches. | Buffer size in your software is set too low. | Exteremely low buffer sizes can result in your computer working harder than it can, causing unwanted dropouts and glitches. Select a higher buffer size in your software to avoid this. |
| My software DAW is not "seeing" the speakers. | Speakers were connected after the software was started. | Some configurations require that audio and MIDI devices are connected prior to starting any software applications with which you may wish to use the devices. Try restarting the application with the speakers plugged in and powered on. |
TECHNICAL SPECIFICATIONS
Woofer: 3" lightweight, magnetically-shielded,
polypropylene cone with rubber surround and high
power handling voice coil. 4 Ohm impedance.
Tweeter: 1" silk dome
Frequency Response: 80Hz - 20kHz
Bass Boost: 4.8dB at 100Hz
Power: 10 W per channel RMS
Signal-to-Noise Ratio: 88dB weighted
Inputs: 1/4" TS, RCA, 1/8" Stereo, USB1.1
Input Impedance: 20k ohms
DAC/ADC 16 bit delta sigma, 44.1kHz or 48kHz sampling
rate
Dimensions (W x H x D): 6.0" x 5.0" x 7.5" / 15.3 cm x 12.7 cm x 19.0 cm
Net Weight (total): 7.5 lbs / 3.4 kg