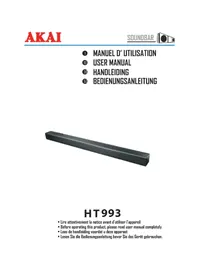
USER MANUAL AB40K AKAI
Touche Lecture/Pause
natural_image
Line drawing of a portable electronic device connected to a CD-ROM via cable (no text or symbols)
GUIDE DE DEPANNAGE
DC 12V (LR-14 - 1.5V x 8 - piles non fournies)
natural_image
Symbol of a trash bin with crossed-out lanes and a blank rectangular block below (no text or labels)
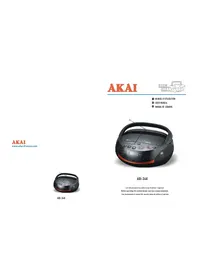
Thank you for purchasing the AKAI AB-40K SCORPIO BOOMBOX. This is your assurance of quality, performance and value. This product was manufactured using the highest quality components and standards of workmanship. Our engineers have included many useful and convenient features in this product. Please be sure to read this instruction Manual completely to make sure you are getting the maximum benefit from each feature.
It was tested by inspectors and found to be in perfect working order before it left our factory. If, after reading this manual, you experience any problems with the operation of this product, please refer to the instructions for obtaining services at the end of this Manual.
For future reference, record the serial number in the space provided.
Model No: AKAI AB-40K
Serial Number:
IMPORTANT SAFETY INSTRUCTIONS

CAUTION
RISK OF ELECTRIC SHOCK
DO NOT OPEN

WARNING: TO REDUCE THE RISK OF ELECTRIC SHOCK, DO NOT REMOVE COVER (OR BACK). NO USER-SERVICEABLE PARTS INSIDE. REFER SERVICING TO QUALIFIED SERVICE PERSONNEL.
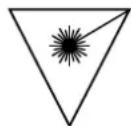
LASER SAFETY: This unit employs a laser. Only qualified service personnel should attempt to service this device due to possible eye injury.
CAUTION: USE OF CONTROLS, ADJUSTMENTS OR PERFORMANCE, PROCEDURE HEREIN MAY RESULT IN HAZARDOUS RADIATION EXPOSURE.
The CAUTION marking is located at the bottom of the unit.

DANGEROUS VOLTAGE
The lightning flash with arrowhead symbol, within an equilateral triangle, is intended to alert the user to the presence of uninsulated dangerous voltage within the product's enclosure that may be of sufficient magnitude to constitute a risk of electric shock to persons.

ATTENTION
The exclamation point within an equilateral triangle is intended to alert the user to the presence of important operating and maintenance (servicing) instructions in the literature accompanying the appliance.
DANGER:
Invisible and hazardous laser radiation when open and interlock failed or defeated. Avoid direct exposure to beam.

This symbol means that this unit is double insulated. An earth connection is not required.
CLASS 1
LASER PRODUCT
This compact disc player is classified as a CLASS 1 LASER PRODUCT. The CLASS 1 LASER PRODUCT label is located on the bottom exterior.
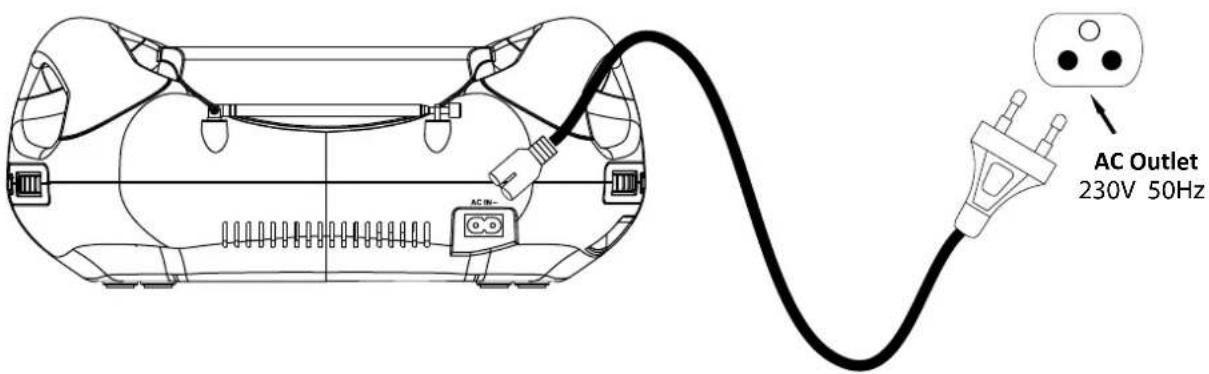
This unit is designed to operate on an AC 230V\~50Hz supply only. Connecting it to other power sources may damage it. Ensure that the supply corresponds to the information on the rating label on the bottom of the unit
Safety Considerations
- Ensure a minimum distance of 5 cm around the apparatus for sufficient ventilation.
- The ventilation should not be impeded by covering the ventilation openings with items, such as newspapers, able-cloths, curtains, etc.
- No naked flame sources, such as lighted candles, should be placed on the apparatus.
- It shall not be exposed to dripping or splashing and that no objects filled with liquids, such as vases, shall be placed on the apparatus.
- Do not place the product in closed bookcases or racks without proper ventilation.
- Where the mains plug or an appliance coupler is used as the disconnect device, the disconnect device shall remain readily operable.
POWER CONNECTION
Connecting AC Power
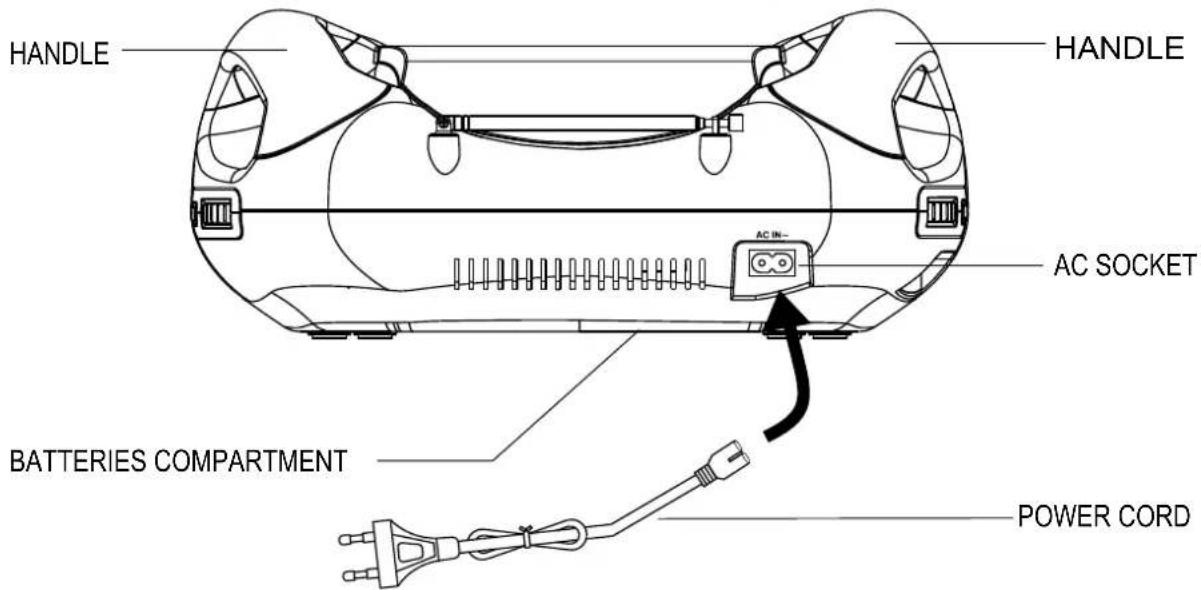
Connect the small end of AC cord to the socket at the back of the main unit and insert the plug of AC cord into standard AC wall outlet.
Caution:
The unit is designed to operate from mains supply of AC 230V\~50Hz. If the plug of AC cord does not fit properly, try to turn it over and try again. Do not force it. The unit is intended for being unused for a long period of the time. Please slide the FUNCTION switch to OFF position to turn off the unit and unplug the power cord from the AC wall outlet.
Battery Operation
Before installing batteries (not included), ensure that the unit is disconnected from the mains supply. Remove the battery compartment cover on the bottom of the unit by lifting up the two lugs on the battery cover. The battery cover can then be lifted up.
Install 8 pieces of 1.5V (UM2) batteries (not included) by following the polarity markings and then replace the cover.
For battery operation, unplug the AC cord from the AC wall outlet first and then remove the AC cord from the socket at the back of the main unit.
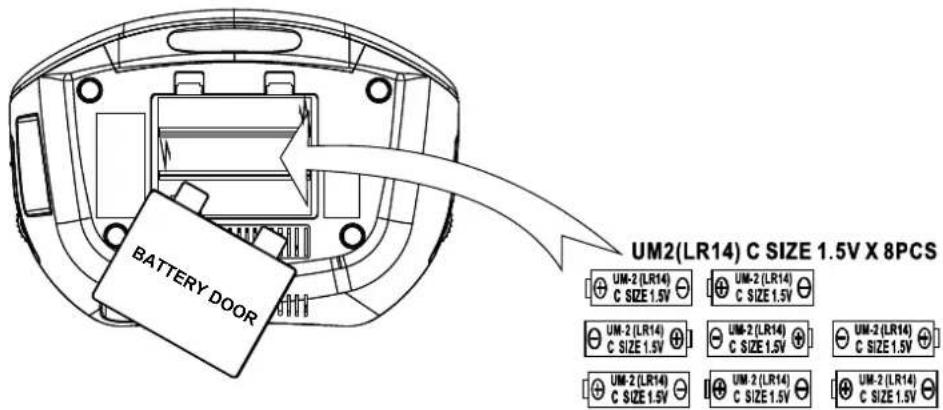
Caution:
There is a danger of explosion if batteries are replaced incorrectly.
Replace batteries with the same type and same brand only.
When the unit is intended for being unused for a long period of the time. Slide the
FUNCTION switch to OFF position and remove all batteries from the main unit.
MAIN OPERATION
Switching On for the first time
Plug into AC power or install batteries by following instructions on the previous Power Connection section. Slide the FUNCTION switch to RADIO or CD/USB/AUX position to turn on the unit. The POWER indicator will be lighted up.
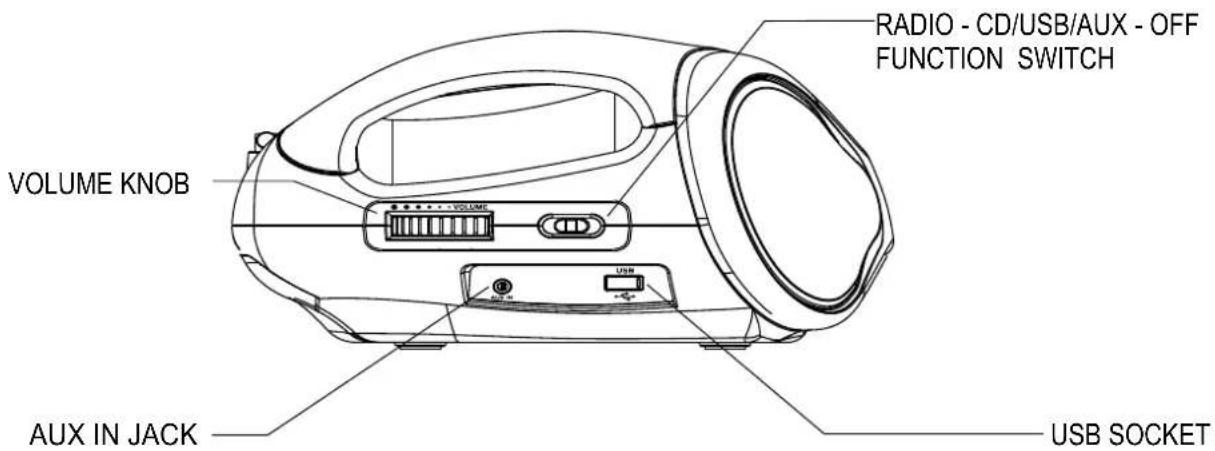
Switching between different sources (Radio / CD / USB / AUX)
After turning on the unit, slide the FUNCTION switch to select different sound sources
Adjusting sound volume level
After turning on the unit, turn the VOLUME knob to adjust the level of sound volume.
Adjusting the rod antenna
The aerial should be extended to ensure good reception in both FM radio modes. It may be necessary to adjust the position of the unit and /or aerial position to achieve the best signal reception.
Bass booster
During music playback, toggle the BASS button to turn on/off bass booster for bass enhancement.
CARE AND MAINTENANCE
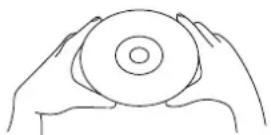
\*Carrying for Compact Discs
- Treat the disc carefully. Handle the disc only by its edges. Never allow your fingers to come in contact with the shiny, unprinted side of the disc.
- Do not attach adhesive tape, stickers, etc. to the disc label.
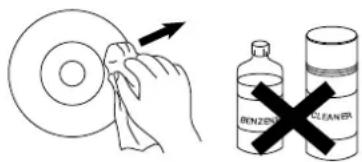
- Clean the discs periodically with a soft, lint-free, dry cloth. Never use detergents or abrasive cleaners to clean the disc. If necessary, use a CD cleaning kit. If a disc skips or gets stuck on a section of the disc, it is probably dirty or damaged (scratched). When cleaning the disc, wipe in straight lines from the center of the disc to the outer edge of the disc. Never wipe in circular motions.
- This unit is designed to play discs bearing the identification logo as shown here or MP3 format Disc. Other discs may not conform to the CD standard and may not play properly.
- Discs should be stored in their cases after each use to avoid damage.
- Do not expose discs to direct sunlight, high humidity, high temperatures, or dust, etc. Prolonged exposure or extreme temperatures can warp the disc.
- Do not stick or write anything on either side of the disc. Sharp writing instruments or the ink may damage the surface.
Care of the Cabinet
- To prevent fire or shock hazard, disconnect your unit from the AC power source when cleaning.
- The finish on your unit may be cleaned with a dust cloth and cared for as other furniture. Use caution when cleaning and wiping the plastic parts.
- Mild soap and a damp cloth may be used on the front panel.
To Clean the Lens
If the lens get dirty, your player may skip or may not play a CD
- Open the CD door.
- Use a camera lens blower/brush to blow on the lens once or twice, brush the dust or particles off the lens then blow again.
- To remove fingerprints, use a dry cotton swab to wipe from the middle to outer edge of the lens

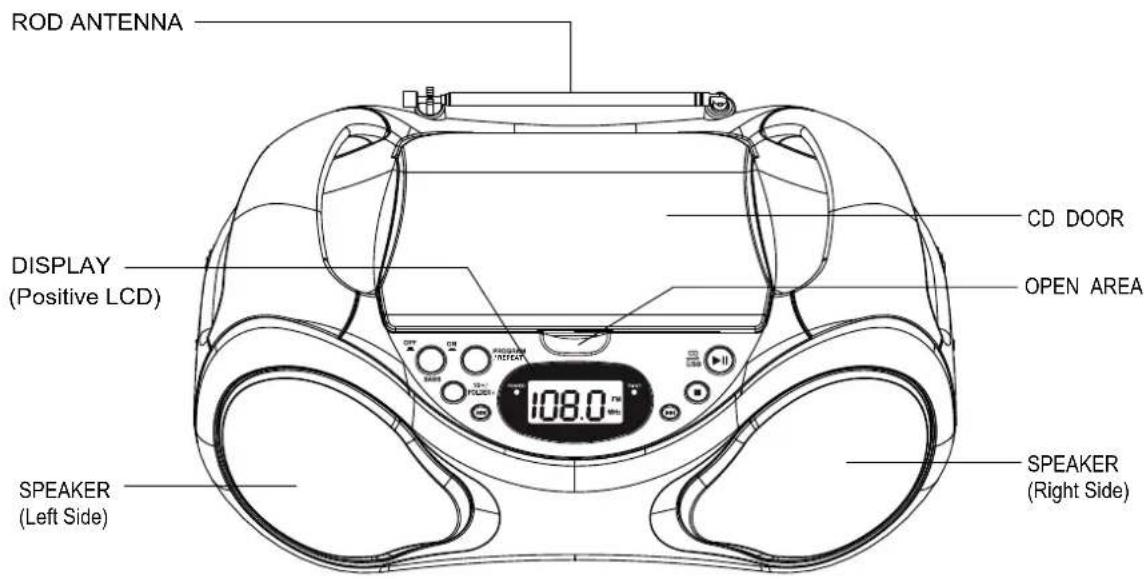
FRONT VIEW
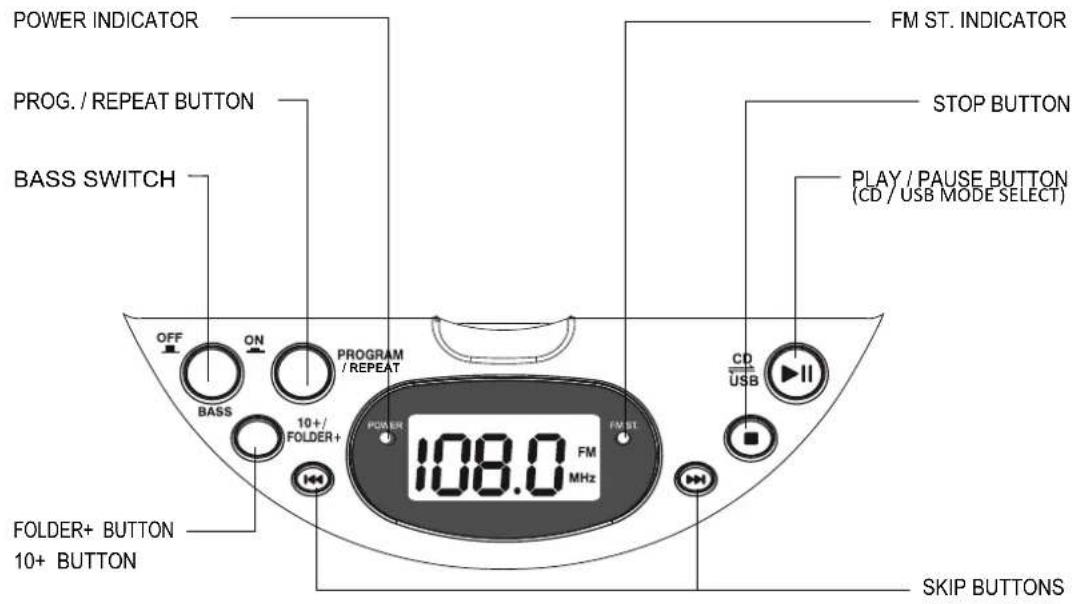
CONTROL PANEL
REAR SIDE VIEW
LEFT SIDE VIEW
RIGHT SIDE VIEW
The unit is designed to play normal music CD disc or MP3 disc bearing the correct identification logo. If the disc does not conform to the standard, it may not be played back properly.
Caution:
- Playback of CD-R / CD-RW may depend on recording conditions.
- Do not attach a seal or label to either side (the recordable side or the labeled side) of a CD-R/RW disc. It may cause malfunction.
- Do not load a blank CD-R/ RW disc. It will take over 1 minute to read the disc. The disc may be damaged if you try to open the CD Door while reading the disc.
- CD-ROM, CD-I, CDV, VCD, DVD or computer CDs are not possible to be read.
Loading disc
- Slide the FUNCTION switch to CD/USB/AUX position to turn on the unit.
- Access the OPEN AREA on the top panel to flip the CD door open.
- Hold the CD disc by its edge with CD graphical side facing up and put it onto the CD compartment after the CD door is opened. Make sure that the disc label is facing up.
- Close the CD door and make sure no AUX-in device is plugged.
CD playback
After loading the disc, the disc will begin spinning and the total number of the tracks on the disc will be shown on the display. Press the PLAY/PAUSE button once, the first track/file on the CD will be played back. (For reading/playing back MP3 disc, the "MP3" icon will be displayed.)
- If there is no disc in the unit, "NO" or "ERR" will be indicated on the display.
- If the CD cannot be read, "NO or ERR" will be indicated on the display.
Play/Pause Control
To pause playback temporarily by pressing the PLAY/PAUSE button. Music playback will be paused and the current elapsed track number will be shown on the display and the play icon will be blinking. Press the PLAY/PAUSE button again to resume playback.
Stop playback
To stop playback, press the STOP button on the unit. The total number of tracks of the disc will be displayed.
Skip track
During playback, press the forward or backward SKIP buttons to skip to the next or previous tracks.
High-speed music search
During playback, press and hold the forward or backward SKIP buttons to skip/search through the current track at high speed in forward or backward directions. When the SKIP buttons are released, normal playback speed will be resumed immediately.
10+ / folder+ control (for MP3 disc only)
Press and hold the 10+ / FOLDER+ button to advance the music search by increment of 10 tracks. Press the 10+ / FOLDER+ button once to advance to the next folder on a MP3 disc.
10+/FOLDER+ --- this function is not available for normal music CD. (Only for MP3 disc / MP3 files on USB flash-drive)
The unit is designed to play MP3 file on the USB flash-drive. If the files on the USB device do not conform to the standard, they may not be played back properly.
1) Flip up the door in front of USB socket and insert the USB flash-drive into the USB socket on the unit. Make sure no AUX-in device is plugged.
2) Slide the FUNCTION switch to CD/USB/AUX position to turn on the unit.
3) If the unit is in the CD mode, press and hold the PLAY / PAUSE button for more than 1 second to switch to USB mode. "USB" icon will be shown on the display. (To switch back to CD mode, press and hold the PLAY/PAUSE button again for more than 1 second. The "USB" icon will disappeared.)
4) After reading the USB flash-drive, the unit will display the total number of files on the flash-drive.
USB playback
After reading the USB flash-drive, press the PLAY/PAUSE button once, the first track/file on the USB flash-drive will be played back. The "MP3" icon will be displayed during playback.
Play/Pause Control
To pause playback temporarily by pressing the PLAY/PAUSE button. Music playback will be paused and the current elapsed track number will be shown on the display and the play icon will be blinking. Press the PLAY/PAUSE button again to resume playback.
Stop playback
To stop playback, press the STOP button on the unit. The total number of tracks/files on the USB flash-drive will be displayed.
Skip track
During playback, press the forward or backward SKIP buttons to skip to the next or previous track/file.
High-speed music search
During playback, press and hold the forward or backward SKIP buttons to skip/search through the current track/file at high speed in forward or backward directions. When the SKIP buttons are released, normal playback speed will be resumed immediately.
10+ / folder+ control
Press and hold the 10+ / FOLDER+ button to advance the music search by increment of 10 tracks. Press the 10+ / FOLDER+ button once to advance to the next folder on the USB flash-drive.
Repeat playback modes (Repeat 1 / Repeat all / Repeat Folder)
Repeat the Current Track
During playback, press the PROGRAM / REPEAT button until the ① icon is displayed to select the current track/file to be repeated. The selected track/file will be repeated continuously.
Repeat Folder (for MP3 disc only)
During playback, press the PROGRAM / REPEAT button until ① icon and "FOLDER" icon are shown on the display. All tracks/files inside the desired folder will be repeated continuously.
Remark:
REPEAT FOLDER – this function is not available for normal music CD. (Only for MP3 disc / MP3 files on USB flash-drive)
Repeat All Tracks
During playback, press the PROGRAM / REPEAT button until ○ icon is displayed. All tracks/files on the disc will be repeated continuously.
Return to normal playback
Press the PROGRAM / REPEAT button until NO repeat indicator is displayed. The normal playback will be resumed.
Programmed CD playback
This unit can be programmed to play up to 20 tracks/files in CD mode. Load the music CD/MP3 disc onto the CD compartment or plugged in the flash-drive (without pressing the "PLAY/PAUSE" button).
- Press PROGRAM / REPEAT button once in the stop mode. "P01" will be shown on the display and blinking.
- Press the 10+ / FOLDER+ button to select the desired folder first (for MP3 disc only).
- Press the SKIP buttons to select the desired track to be programmed.
- Press PROGRAM / REPEAT button again to save the selected track/files.
- Repeat steps 2-4 to program up to 20 tracks/files.
- Press the PLAY/PAUSE button to play the programmed tracks after programming is completed. The "PROG" icon will be displayed during the programmed playback.
- To clear program and resume normal playback, press the STOP button twice during playback, or open the CD door, or change to RADIO mode to clear the programmed tracks.
Remark:
The unit can store up to 20 tracks/files in the programmable memories. During the programmed playback, user can still select the "repeat 1 / repeat all" functions.
RADIO OPERATION
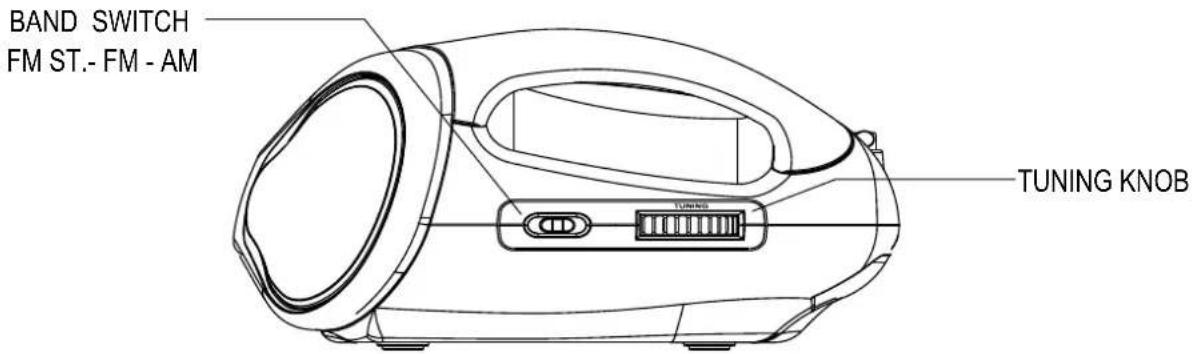
The unit is designed to receive FM Stereo / FM and AM radio bands.
- Slide the FUNCTION switch on the side of the unit to select RADIO mode.
- Slide the BAND switch on the side of the unit to select FM ST, FM or AM band.
- Adjust the TUNING knob on the side of unit to tune the frequency of desired radio station.
- The tuning frequency will be displayed on the LCD display.
- For the FM stereo mode, please slide the BAND switch to FM ST position. The FM ST. indicator will be lighted up when the reception signal is strong.
- For the FM mono mode, please slide the BAND switch to FM position. The FM ST. indicator will be turned off.
- For the AM mode, please slide the BAND switch to AM position.
The unit has built-in AM ferrite bar antenna, which can provide adequate reception in most areas. If the AM reception is weak, try to adjust the location of the unit or relocate the unit to improve the reception. If the FM reception is weak, try to adjust the length and the angle of the FM antenna to improve the signal reception.
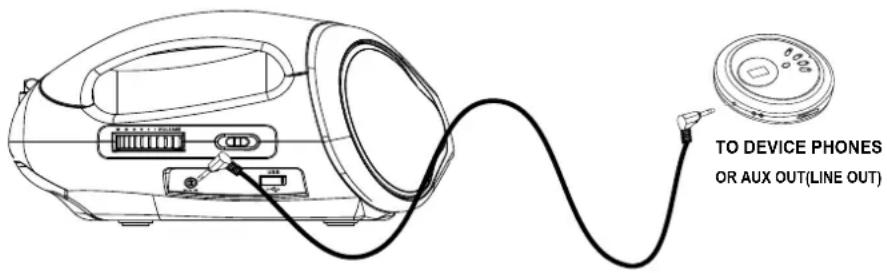
AUX-IN OPERATION
Setting up (AUX-IN) connection
AUX-IN jack will allow you to connect external music player or external sound source to the main unit.
- Plug into a 3.5mm audio cable (not included) into your external music player and connect the other end (3.5mm jack) into the AUX- IN jack on the side of the unit.
- Make sure your external music player is turned on.
- Slide the FUNCTION switch to CD/USB/AUX position on the unit.
- Start music playback on your external music player.
- Adjust VOLUME knob to control the sound level of music playback from the speakers on the unit.
TROUBLE SHOOTING
If a fault occurs, first check the points listed below before taking the set for repair. If you are unable to remedy a problem by following these hints, consult you dealer or service center.
WARNING: Under no circumstances should you try to repair the set yourself, as this would invalidate the guarantee.
| PROBLEM | POSSIBLE CAUSE | REMEDY |
| No sound in general | Volume not adjusted.Mains supply is not correctly connected. | Adjust the Volume knob.Connect the mains supply properly. |
| The unit does reset to operation of any button | Under the influence of electrostatic phenomenon, the product may malfunction and require user to disconnect. | Turn off the unit, disconnect the mains plug, and reconnect after a few seconds. |
| Radio poor reception | Weak radio aerial signal.Interference caused by the vicinity of electrical equipment like TVs, video recorders, computer, thermostats, fluorescent lamps (TL) engines etc. | Aim the aerial for best reception: Fully extend the telescopic antenna.Keep the unit away from electrical equipment. |
| CD cannot read | The disc is dirtyThe disc is upside down.The CD player is in Pause mode | Clean or replace the discTurn it over so that the label is face up.Release the Pause Mode by pressing the Play/Pause button. |
| No sound in USB mode | Volume at minimum.External device not connected properly. | Adjust the volume knob.Clear contact pins and connect again. |
TECHNICAL SPECIFICATION
Power Supply AC230V\~50Hz
DC 12V (LR14-1.5VX8 –piles non fournies)
Power consumption 20 W
Standby power consumption 0.8 W
Dimensions (H × W × D) 133mm × 323mm × 228mm
Net Weight 1.685 kg
Radio section
Frequency Coverage FM: 87.5 - 108MHz - AM: 520- 1620 KHz
USB section Support USB flash-drive up to 8 GB
Power Output 2x 3.6 W (1.8 W RMS x 2)
Speakers 4 Ohms 3inch x 2
IMPORTANT: Due to continual revision and improvement on our products design, specifications are subject to change without further notice.
Warning! This logo set on the product means that the recycling of this apparatus comes within the framework of the Directive 2002/96/CE of January 27, 2003 concerning the Waste of Electrical and Electronic Equipment (WEEE). This symbol means that used electrical and electronic products should not be mixed with general household wste. There is a separate collection system for these products.
If you want to dispose of this equipment, please do not use the ordinary dust bin!
- The presence of dangerous substances in the electrical and electronic equipments can have potential consequences on the environment and human health in the cycle of reprocessing this product.
- Therefore, at the end of its lifetime, this product shall not be disposed with other non-recycled waste. Used electrical and electronic equipment must be treated separately and in accordance with legislation that requires proper treatment, recovery and recycling of used electrical and electronic equipment.
- Local authorities and resellers have set special procedures for the purpose of collecting and recycling this product (please contact your local authority for further details). You have the obligation to use the selective waste collection systems put in place by your local authority.
- If your used electrical or electronic equipment has batteries or accumulators, please dispose of these separately beforehand according to local requirements.
- By disposing of this product correctly you will help ensure that the waste undergoes the necessary treatment, recovery and recycling and thus prevent potential negative effects on the environment and human health which could otherwise arise due to inappropriate waste handling.

This unit complies with European Council Directive 2006 / 95 CE (Electromagnetic Compatibility & Low Voltage Directives)
ANTES DE COMENZAR
natural_image
Line drawing of two hands holding a circular object (no text or symbols)
natural_image
Line drawing of a portable electronic device with labeled parts (no text or symbols beyond labels 1 and 2)
natural_image
Line drawing of a portable electronic device connected to a CD-ROM via cable (no text or symbols)
natural_image
Black and silver portable electronic device with a digital display and a smartphone on the right (no visible text or symbols)