ABI34K - Speaker AKAI - Free user manual and instructions
Find the device manual for free ABI34K AKAI in PDF.
| Product type | Speaker with radio, CD/MP3/USB player and iPod compatibility |
| Brand | AKAI |
| Model | ABI34K |
| Dimensions (approx.) | 302 mm (W) x 234 mm (D) x 135 mm (H) |
| Mains power supply | AC 230 V, 50 Hz |
| Battery power supply | 8 x UM-2 (LR-14) alkaline batteries |
| Output power | 13.2 W (4 x 2 W RMS) |
| Frequency response (CD section) | 100 Hz – 16 kHz |
| Headphone impedance | 4 ~ 32 Ω, 3.5 mm jack |
| Weight (approx.) | Approximately 2 kg |
| Main functions | CD/MP3/USB playback, AM/FM/FM stereo radio, 99-track programming, repeat/random playback, bass mode, auxiliary input, headphone jack, iPod compatible |
| Recommended battery type | Alkaline |
| Operating temperature | 5 °C to 35 °C |
| FM antenna | Telescopic, adjustable |
| Maintenance and cleaning | Unplug before cleaning; use a soft damp cloth (soapy water); do not use solvents or abrasives |
| Laser safety | Invisible laser radiation; do not open the cabinet; service by qualified personnel only |
| Safety instructions | Do not expose to liquids; do not block ventilation openings; disconnect during thunderstorms |
| Spare parts and repairability | No user-serviceable parts; refer to an authorized repair center |
| General information | Complies with European Directives 2006/95/EC and 2004/108/EC; recycling according to WEEE Directive |
Frequently Asked Questions - ABI34K AKAI
User questions about ABI34K AKAI
0 question about this device. Answer the ones you know or ask your own.
Ask a new question about this device
Download the instructions for your Speaker in PDF format for free! Find your manual ABI34K - AKAI and take your electronic device back in hand. On this page are published all the documents necessary for the use of your device. ABI34K by AKAI.
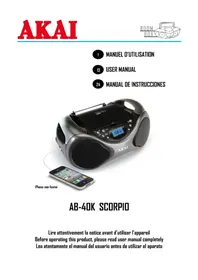
USER MANUAL ABI34K AKAI
PRODUIT LASER DE CLASSE 1
ATTENTION: RADIATION I
DANGEREUSE LORSQUE
L'OUVERTURE ET L'ENCLENCEMENT
SONT DEFECTUEUX
ATTENTION
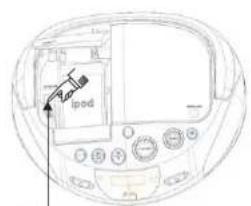
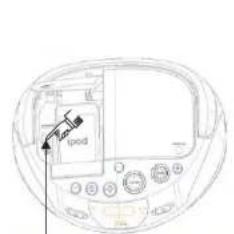
Press here to open the IPOD Jack
-8-
Piles DC 12V---(LR-14 x 8)
FM:87.5-108,5MHz
AM:520-1620 KHZ
Consummation
Enter below the Serial N o, which is lo cated On the bott om of the cabinet. Re tain this Information for future reference.
Mode No.
Serial No.

This "bolt of lightning"
indicates uninsulated
material within your unit
which may cause an electrical shock. For the safety of everyone in your household, please do not remove product covering.

The "exclamation point"
calls attention to features
for which you should read
the enclosed literature closely to prevent operating and maintenance problems.
Dripping warning:
The product shall not be exposed to dripping or splashing and that no objects filled with liquids, such as vases, shall be placed on the product.
WARNING: TO PREVENT
FIRE OR SHOCK HAZARD,DO
NOT EXPOSE THIS EQUIPMENT TO RAIN OR MOISTURE.
CAUTION: TO PREVENT
ELECTRIC SHOCK, MATCH WIDE
BLADEOF PLUG TO WIDE SLOT, AND FULLY INSERT.
Ventilation warning:
The normal ventilation of the product shall not be impeded for intended use.

CLASS 1 LASER PRODUCT
ENGLISH
PREPARATION FOR USE
Unpacking and Setup
Carefully remove the unit from the display carton and remove all packing material from the unit itself.
Remove any descriptive labels that may be found on either the front or top cabinet of the unit. Do not remove any labels located on either the back or button cabinet of the unit.
- The detachable AC power cord is packed in the carton separately from the unit. Make sure that the AC power cord is not accidentally discarded with the carton or packing material.
Press the CD door OPEN Button to open the CD compartment door. There is a white card in the CD compartment which is intended to prevent the CD pickup from moving during shipment of the product. Remove this card from the CD compartment before use.
Power Supply
Using AC Power
- Check if the power voltage, as shown on the type plate located on the bottom of the set, corresponds to your local AC power supply. If it does not, consult your dealer or service centre.
- Connect the power cord to the AC MAINS inlet and the wall outlet. The power supply is now connected and ready for use.
3.To switch off completely, unplug the power cord from the wall outlet. - Unplug the power cord from the wall outlet to protect your set during heavy thunderstorms.
Battery Operation
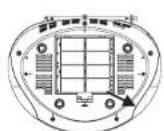
The battery compartment is located on the back of the cabinet.
- Remove the battery compartment door by pressing downward on the labs as shown in figure 1 below.
- Insert S C size (UM-2) batteries into the battery compartment as shown in figure 2 below. Be sure to observe the polarity markings which are engraved inside the battery compartment. If the batteries are inserted incorrectly, the unit will not operate.

音
Replace the battery compartment door
NOTE: The AC power cord must be disconnected from the AC socket on the back of the unit in order for the unit to operate on battery power.
BATTERY PRECAUTIONS
Follow these precautions when using batteries in this device.
1. Use only the size and type of batteries specified
2. Be sure to follow the correct polarity when installing the batteries as indicated in the battery
compartment. Reversed batteries may cause damage to the device.
3. Do not mix different types of batteries together (e.g. Alkaline and Carbon-zinc) or old batteries
with fresh ones.
4. If the device is not to be used for a long period of time, remove the batteries to prevent damage
or injury from possible battery leakage.
6. Do not try to recharge batteries not intended to be recharged, they can overheat and rupture.
(Follow battery manufacturers directions.)
ENGLISH
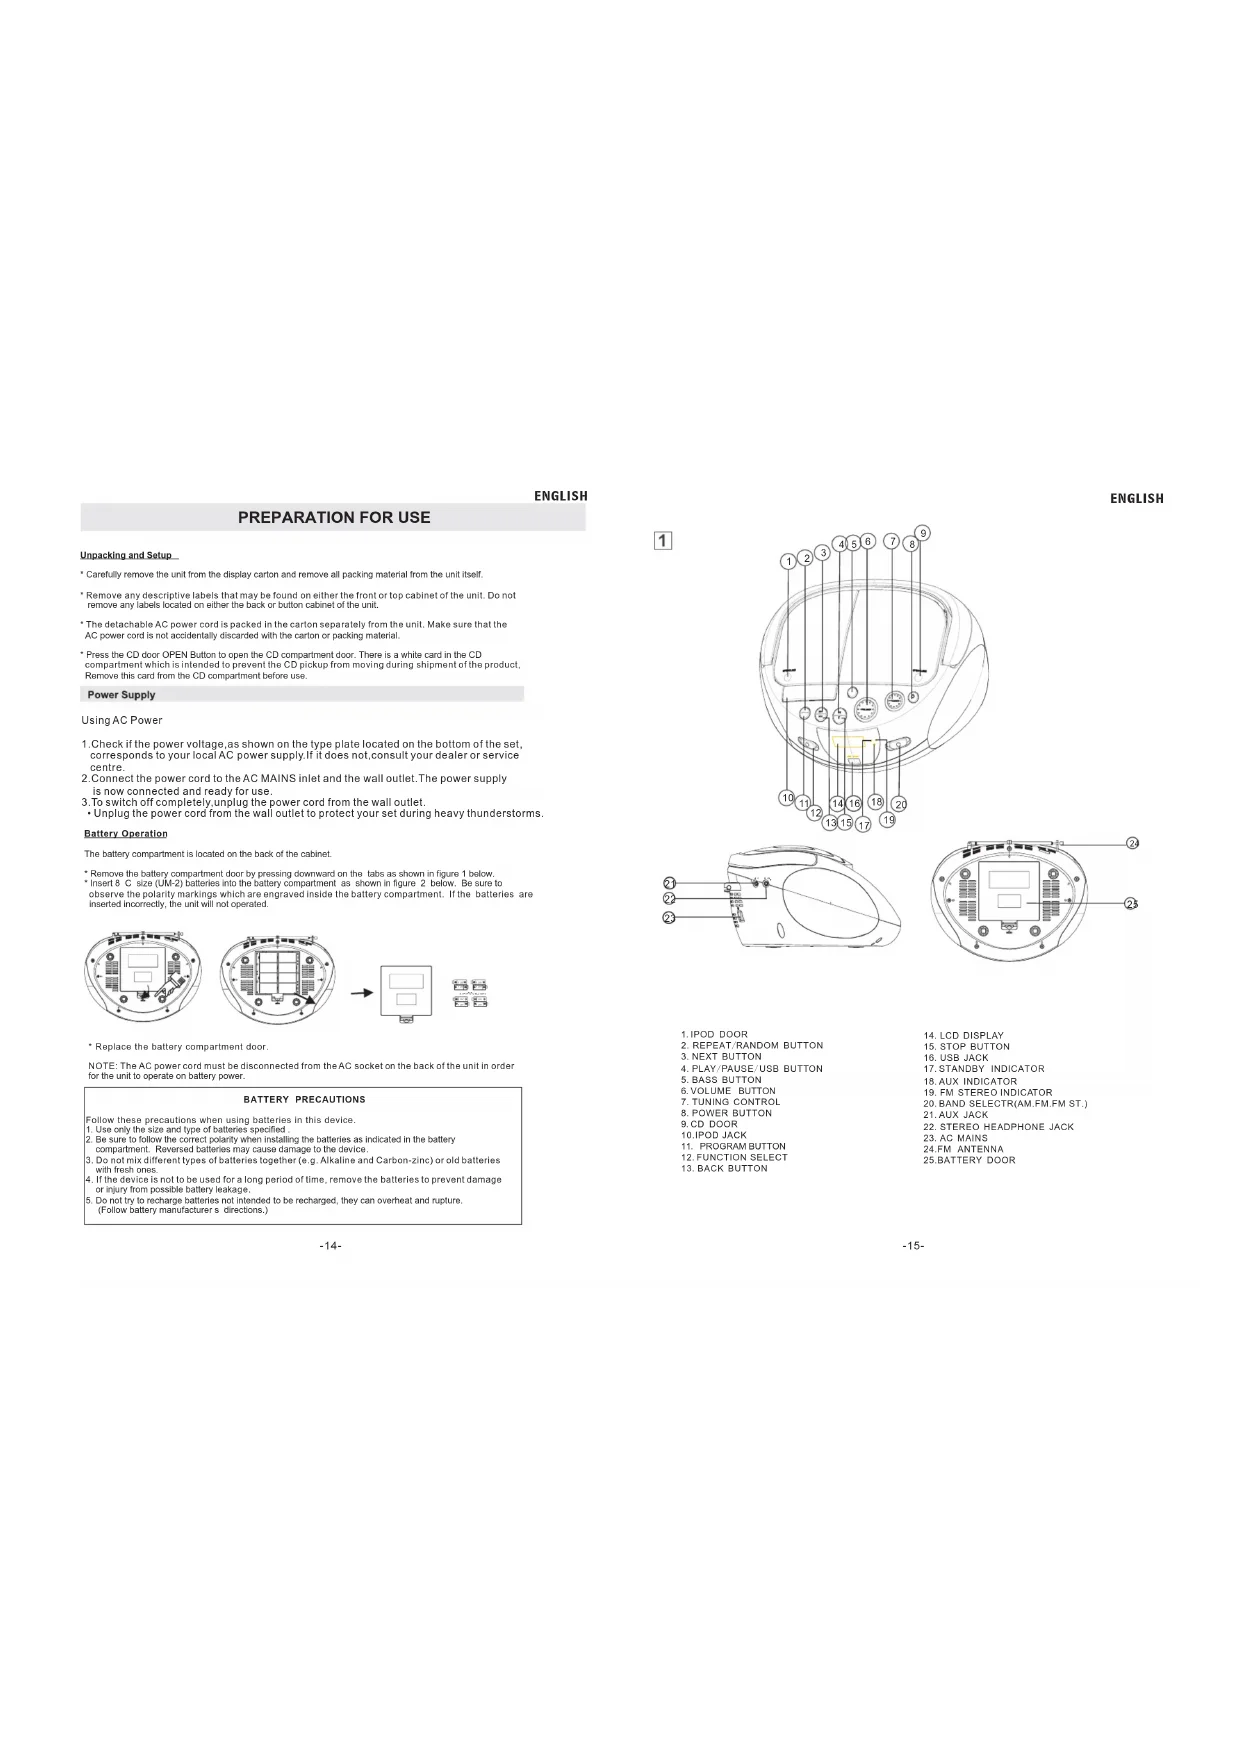
1

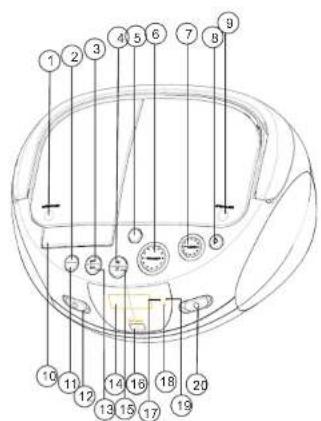
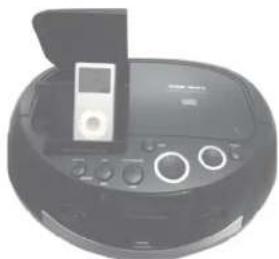
- IPOD DOOR
- REPEAT/RANDOM BUTTON
- NEXT BUTTON
- PLAN/PURPOSE/UPDRP BUTTON
4.PAY/PAOSE/USBBOTTON 5.D100BPTTON
5.BASS BUTTON - VOLUME BUTTON
7.TUNING CONTROL - POWER BUTTON
6.DOD
10CD 10 - IPOB JACK
11.PROGRAM BUTTON - FUNCTION
- BACK BUTTON
14LCDDISPLAY
15. STOP BUTTON
18. USB 12G
17 STANDBY INDUSTR
17 STANDBY INDIC
18.AUXINDICATOR
19. FM STEREO INDICATOR
20.BAND SELECTIAM EM.EM ST.
31.4JX-JACK
32. STEP0-HEAPPHONE-ACK
22. STEREO HEADPHONE JACK
23.AC MAINS
24.FM ANTENNA
25.BATTERY DOOR
ENGLISH
ENGLISH
English
BASIC FUNCTION
RADIO
Top and front panels (See)
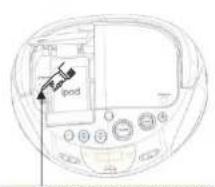
1. IPOD DOOR OPEN BUTTON
- press here to open/close the ipod door
- Open the door will see the IPOD JACK, Press to open the ipod jack the same way(see 2)
2.REPEAT/RANDOM BUTTON
-
repeat a track/CD/program
-
play CD tracks in random order
3.SEARCHNEXT(
-MP3/CD: -Skip or search a passage /track forwards
-
PLAY/PAUSE/USB BUTTON (start - start or pause MP3/CD play
-
Press and Hold more than 1.5 sec change CD/USB media.
5.BASS BUTTON
6. VOLUME
adjust volume level
7. TUNING CONTROL
select AM/FM/FM ST. Stations.
8. POWER BUTTON
-Press POWER button to turn on/off power.
9.CDDOOR
-Lift the CD lid to open/close the CD door.
- IPOD JACK(See 2)
(The special of ipod connects.)
Push suction button select AUX station, play IPOD and supply power. - After connecting audio equipment to the AUX INPUT JACK, the IPOD will have no function.
The unit does not control the ipod
11.PROGRAM
-program and review programmed track numbers.
12. FUNCTION SELECT
- select source of sound MP3/CD, AUX or RADIO.
13.SEARCH BACK
MP3/CD: - Skip or search a passage /track backwards.
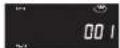
14.LCDDISPLAY
show the AM/FM dial frequency show the number of tracks
15. STOP BUTTON
- stop MP3/CD playback; erase a MP3/CD program.
16.USBJACK
17.STANDBYINDICATOR
18.AUXINDICATOR
show the AIX indicatior
19. FM STEREO INDICATOR
20.BAND SELECTOR (AM.FM.FM ST.) -select AM/FM/FTM, Wave band
21.AUX JACK
Push FUNCTION button, select AUX Station. Play MP3, DISCIM, WALKMAN AUX INSERT. (Need to usb the AUX line conjunction)
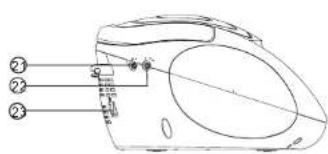
22. STEREO HEADPHONE JACK
- 3.5 mm stereo headphone jack
23AC MAINS
- inlet for power cord
24.EMANTENNA
to improve EM reception
25. BATTERY DOOR
to open battery compartment
General operation
- To select your sound source adjust the source selector to MP3/CD/AUX/RADIO
- Adjust the sound with the VOLUME.
RADIO
Radio reception
- Slide the FUNCTION selector to RADIO.
- Slide the BAND selector to a desired setting - FM STEREQ, FM AM.
-
Rotate the TUNING control to find the desired stations. NOTE: If the BAND selector is set to the FM stereo position and you have tuned to an FM stereo station, the FM stereo LED indicator will light.
-
For FM, pull out the telescopic antenna.
Incline and turn the antenna. Reduce its length if the signal is too strong (very close to a transmitter). - For AM, the set is provided with a built-in antenna so the telescopic antenna is not needed. Direct the antenna by turning the whole set.
PROGRAM METHOD
(1)Press the [PROGRAM] key at STOP mode, system will go to PROGRAM mode.
The PRG icon and P01 will blink at 2Hz. This prompts the user to enter the first songs in the program PLAY list.
(2) The user can select the desire tracks by using [NEXT][+10 Track], [BACK][-10 Track] keys. Once these keys are pressed, the Display will show the selected track.
(3)After select the desired track, press [PROGRAM] key again and it will be stored in the memory.
A maximum 99 tracks can be programmed.
(4) If press the [STOP] key during the program mode, then the selected TRACKs will be stored in the memory and return to STOP mode (Continuous Play mode)
(5)If press the [PLAY] key during the program mode, it will start the program PLAY mode. PLAY start from P01 Track
Erasing a program
You can erase the content of the memory by:
- While playing, press STOP button
- Opening the CD door
- Select the other mode.
ENGLISH
ENGLISH
CD/MP3 PLAYER
CD/MP3 Player
Playing a CD/MP3
This CD-player can play Audio Discs, MP3 CD-R、CD-RW。Do not try to play CD ROM. CDVI、VCD、DVD or computer CD.
1. Adjust the source selector to MP3/CD
2. To open the CD door, press CD OPEN button.
3.Insert a MP3/CD or CD-R with the printed side facing up and press CD Door gently to close.
4. Press on the set to start playback.
5. To pause playback press. To resume, press again.
6. To stop CD playback, press S
Note:CD/MP3 play will also stop when:
you open the CD compartment;
you select RADIO sound source
the CD/MP3 has reached to the end.
Selecting a different track
During playback you can use or to select a particular track in Play or pause mode.
- Press once briefly for the next track, or press repeatedly until the desired track number appears in the display.
Press once briefly for the back track.
Press more than once briefly for a previous track.
Finding a passage within a track
1.press & hold down or continuously, the disc is forwarding or rewarding at high speed!
the speaker has not sound to output in high speed until release or
2. When you recognize the passage you want release or
Normal playback resumes
The LCD display the current song folder after 5 second, the LCD don't show the folder if there is not folder.
Different play modes: Repeat/Ra
repeat - plays the current track continuously. repeat all - plays the entire CD continuously.
1>playing tracks in Repeat mode after press Repeat Ratione time, the displaying will be show:
2>playing tracks in Repeat mode afterpress Repeaedanton 2nd time, the displaying will be show:
3>playing tracks in Repeat mode after press RepeatRandom button 3rd time, the displaying will be show:

4>release tracks in playing mode after press Repeat/Random button 4th time,Repeat indicator goes off and go to Random mode, the displaying will be show:

5>release tracks in playing mode after press Repeat/Random button 5th time, Random indicator goes off, the displaying will be show:

Different play modes: BASS
BASS-Advancing the bass function directly 1>press BASS button one time to work; and the BASS function will be erased pressing BASS buttons in double time
notice: BASS function has NO Indicator on unit LCD displaying when it is working;
-18
Different play modes: Program
program- using remote control, program function can be operated when the unit is stop portion
1>> when the unit is playing CD DISC:
A>press "program" knob of remote control one time in stop potion the displaying will be show:

B>Using or to select your favorite track No. then press "program" again to confirm, and then the displaying of unit will show:

C>Ripeatheabovopertiontoprogramthe nextfavoritectractkunitcomplete,you can pressorto seletctyourfavortride track
D>Press PLAY button to play the programmed tracks, the displaying of unit will show:

E>press STOP button one time to stop the program play, press STOP button one more time to Erasing a program!
notice: the former Programmed tracks can not be deposited by unit automatically;
the max program function for CD is 99 tracks
2>> when the unit is playing Mp3 DISC; A>one time, in stop motion the

B>Using H = or H = to select your favorite track No, then press program again to confirm, and then the displaying of unit will show:

C>Rpeat the abo ve operation to prog ram the next fa vorite track unit comp te, you can pres s or to selec t y your favorit e trak k
D>Press PLAY button to play the programmed tracks,he displaying of unit will show:

E>press STOP button to stop the program play, press STOP button one more time to Erasing a program!
notice: the former Programmed tracks can not be deposited by unit
automatically; the max program function for MP3 is 99 tracks
-19-
ENGLISH
ENGLISH
Playing a USB
USB Audio Functions
1) PLAY/PAUSE/STOP
2) NEXT/FF, BACK/FB Skip search
3) +10 Track/-10 Track Skip search
4) Folder Increment' Folder Decrement Skip search.
5) Program Track(99 Track)
6)PLAYMODE: normal->repeat1->repeat all->repeat1 album->random->normal (There is not repeat 1 folder mode in Program PLAY mode)
7) Maximum Folders: 500 Folders
8) Maximum File : 999 Files
9) USB_UP (Select USB)
Press and hold the [PLAY] key more than 1.5sec at CD mode, system will change to USB mode.
Then ^a - - - ^a will be display. At this moment,system will read the USB TOC.
[USB_UP](Press and hold the [PLAY] key more than 1.5sec at USB mode, system will change
to CD mode. Then "----" will be display. Press PLAY button to start playback.
The unit don't support the HDD all and the portion usb with mp3 player.
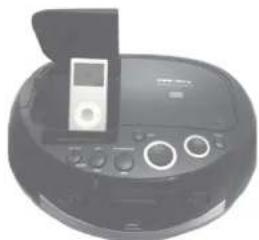
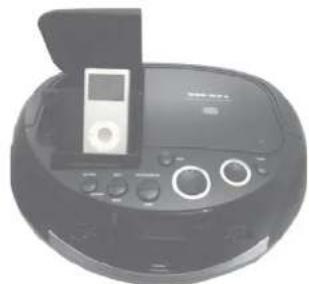
Playing a IPOD (see 2)
push FUCTION button select AUX station, play IPOD and supply power.
Connected audio equipment to the AUX input jack and the IPOD at the same time, the
IPOD will no sound.
The unit can't control the IPOD.
IPOD CONNECTIONS
2
Press here to open the IPOD jack
Precautions & General Maintenance
- Place the set on a hard and flat surface so that the system does not tilt.
- Do not expose the set, batteries or CDs to humidity, rain, sand or excessive heat caused by heating equipment or direct sunlight.
- Do not cover the set. Adequate ventilation with a minimum gap of 6 inches between the ventilation holes and surrounding surfaces is necessary to prevent heat build-up.
- The mechanical parts of the set contain self-lubricating bearings and must not be oilied or lubricated.
To clean the set, use a soft dry cloth. Do not use any cleaning agents containing alcohol, ammonia, benzene or abrasives as these may harm the housing.

CD player and CD handling
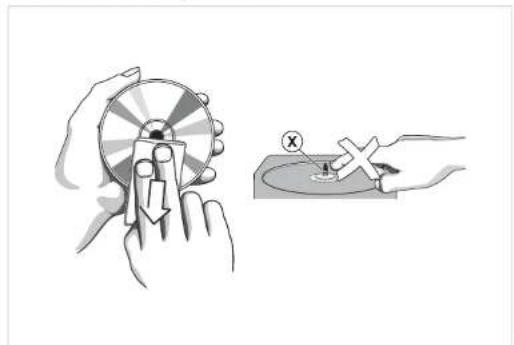
The lens of the CD player should never be touched!
- Sudden changes in the surrounding temperature can cause condensation to form and the lens of your CD player to cloud over. Playing a CD is then not possible. Do not attempt to clean the lens but leave the set in a warm environment until the moisture evaporates.
- Always close the CD door to keep the CD compartment dust-free. To clean, dust the compartment with a soft dry cloth.
- To clean the CD, wipe in a straight line from the centre towards the edge using a soft, lint-free cloth. Do not use cleaning agents as they may damage the disc.
- Never write on a CD or attach any stickers to it.
TROUBLESHOOTING
ENGLISH
Troubleshooting
If a fault occurs, first check the points listed below before taking the set for repair.
Do not open the set as there is a risk of electric shock.
If you are unable to remedy a problem by following these hints, consult your dealer or service center.
WARNING: Under no circumstances should you try to repair the set yourself, as this will invalidate the warranty.
-Problem
Solution
No sound /power
Volume not adjusted
- Adjust the VOLUME
1. 实验原理
power cord not securely connected
- Connect the AC power cord properly
- Batteries dead/incorrectly inserted
- Insert (fresh) batteries correctly
Display does not function properly / No reaction to operation of any of the controls
- Electrostatic discharge
- Switch off and unplug the set. Reconnect after a few seconds
no disc indication
- No CD/MP3 Inserted
- Insert a CD, MP3, CD-R.
- CD badly scratched or dirty
- Replace/ clean CD, see Maintenance
Laserslonssteamed up - Wait until lens has cleared
- CD-R is blank or the disc is not finalized
- Use a finalized CD-R
- Wait until lens has cleared
- CD-R is blank or the disc is not finalized
- Use a finalized CD-R
CD/MP3/USB playback does not work
- CD/MP3/USB badly scratched/dirty
Replace/clean CD/MP3/USB
(see maintenance)
Laser lens steamed up
- Wait until lens has adjusted to room
temperature
The CD/MP3 skips tracks
- CD/MP3 damaged or dirty
Replace or clean CD/MP3 - Program is active
- Quit Program mode(s)
Environmental Information
We have done our best to reduce the packaging and make it easy to separate into 3 materials: cardboard, paper pulp and expandable polyethylene.
Your set consists of materials which can be recycled if disassembled by a specialized company. Please observe the local regulations regarding the disposal of packaging, dead batteries and old equipment.
TECHNICAL SPECIFICATIONS
GENERAL Power Requirement AC 230V-50Hz
Batteries. DC 12V-8 x UM-2 (LR-14)
Power consumption 13.2 Watts
Dimensions.. Approx.302 mm(L) x 234 mm(W) x 135 mm(H)
Operation temperature. +5^ + + 35^
RECEIVER SECTION
Receiving Bands.. AM/FM
Tuning Range.. AM:520-1620KHz
COMPACT DISC SECTION
Optical Pickup. 3-Beam Laser
Frequency Response. 100Hz-16KHz
AUDIO SECTION
Power output 2x4W (2x2WRMS)
Headphone Impedance 4-32 Ohms
ACCESSIONS
Instruction Booklet 1
End of Life Disposal

Warning! This logo set on the product means that the recycling of this apparatus comes within the framework of the Directive 2002/96/CE of January 27, 2003 concerning the Waste of Electrical and Electronic Equipment (WEEE). This symbol means that used electrical and electronic products should not be mixed with general household waste. There is a separate collection system for these products.
If you want to dispose of this equipment, please do not use the ordinary dust bin!
The presence of dangerous substances in the electrical and electronic equipments can have potential consequences on the environment and human health in the cycle of reprocessing this product.
-Therefore, at the end of its lifetime, this product shall not be disposed with other non-recycled waste. Used electrical and electronic equipment must be treated separately and in accordance with legislation that requires proper treatment, recovery and recycling of used electrical and electronic equipment.
-Local authorities and resellers have set special procedures for the purpose of collecting and recycling this product (please contact your local authority for further details). You have the obligation to use the selective waste collection systems put in place by your local authority.
- If your used electrical or electronic equipment has batteries or accumulators, please dispose of these separately beforehand according to local requirements.
-By disposing of this product correctly you will help ensure that the waste undergoes the necessary treatment, recovery and recycling and thus prevent potential negative effects on the environment and human health which could otherwise arise due to inappropriate waste handling.

This unit complies with European Council Directive 2006 / 95 CE (Electromagnetic Compatibility & Low Voltage Directives)

Differentesmosde reproduction: BASS (BAJOS)
Press here to open the IPOD jack
-32
DC 12V-8x UM-2 (LR-14)
AM/FM
AM:520~1620 KHZ
FM:87.5 ~ 108.5 MHZ
Consumo de energia