ADI19K - Speaker AKAI - Free user manual and instructions
Find the device manual for free ADI19K AKAI in PDF.

User questions about ADI19K AKAI
0 question about this device. Answer the ones you know or ask your own.
Ask a new question about this device
Download the instructions for your Speaker in PDF format for free! Find your manual ADI19K - AKAI and take your electronic device back in hand. On this page are published all the documents necessary for the use of your device. ADI19K by AKAI.
USER MANUAL ADI19K AKAI
Cordon d'alimention
« Made for iPod » et « Made for iPhone » mean that an electronic accessory has been designed to connect specifically to iPod®, or iPhone®, respectively, and has been certificated by the developers to meet Apple performance standards. Apple is not responsible for the operation of this device of its compliance with safety and regulatory standards. Please note that the use of this accessory with iPod®, or iPhone® may affect wireless performance.
iPhone®, iPod®, iPod® classic, iPod® nano, and iPod® touch are trademarks of Apple Inc., registered in the U.S. and other countries.
BEFORE WE BEGIN
Thank you for purchasing the AKAI ADI-19K
The iPod® & iPhone® Docking station tower with DIGITAL TUNER, LINE IN & SUBWOOFER
This is your assurance of quality, performance and value. Our engineers have included many useful and convenient features in this product. Please be sure to read this instruction Manual completely to make sure you are getting the maximum benefit from each feature.
This product was manufactured using the highest quality components and standards of workmanship. It was tested by inspectors and found to be in perfect working order before it left our factory. If, after reading this manual, you experience any problems with the operation of this product, please refer to the instructions for obtaining services at the end of this Manual.
For future reference, record the serial number in the space provided.
Model No: AKAI ADI-19K
Serial Number:
IMPORTANT SAFETY INSTRUCTIONS


The lightning flash with arrowhead symbol within an equilateral triangle is intended to alert the user to the presence of uninsulated dangerous voltage within the product enclosure that may be of sufficient magnitude to constitute a risk of electric shock to persons.

The exclamation point within an equilateral triangle is intended to alert the user to the presence of important operating and maintenance (servicing) instructions in the literature accompanying the appliance.
-
READ INSTRUCTIONS --- All the safety and operating instructions should be read before the product is operated.
-
RETAIN INSTRUCTIONS --- The safety and operating instructions should be retained for future reference.
-
HEED WARNINGS --- All warnings on the product and in the operating instructions should be adhered to.
-
FOLLOW INSTRUCTIONS --- All operating and use instructions should be followed.
-
CLEANING --- Unplug this product from the wall outlet before cleaning. Do not use liquid cleaners or aerosol cleaners. Use a damp cloth for cleaning.
-
ATTACHMENTS --- Do not use attachments not recommended by the product manufacturer as they may cause hazards.
-
WATER AND MOISTURE --- Do not use this product near water - for example, near a bath tub, wash bowl, kitchen sink, or laundry tub; in a wet basement; or near a swimming pool; and the like.
-
ACCESSORIES --- Do not place this product on an unstable cart, stand, tripod, bracket, or table. The product may fall, causing serious injury to a child or adult and serious damage to the product. Use only with a cart, stand, tripod, bracket, or table recommended by the manufacturer, or sold with the product. Any mounting of the product should follow the manufacturer instructions, and should use a mounting accessory recommended by the manufacturer. A Product and Cart Combination Should Be Moved with Care - Quick stops, excessive force and uneven surfaces may cause the product and cart combination to overturn.
-
VENTILATION --- Slots and openings in the cabinet are provided for ventilation and to ensure reliable operation of the product and to protect it from overheating, and these openings must not be blocked or covered. The openings should never be blocked by placing the product on a bed, sofa, rug or other similar surface. This product should not be placed in a built-in installation, such as a bookcase or rack, unless proper ventilation is provided or the manufacturer* instructions have been adhered to.
-
POWER SOURCES --- This product should be operated only from the type of power source indicated on the marking label. If you are not sure of the type of power supply to your home, consult your product dealer or local power company. For products intended to operate from battery power, or other sources, refer to the operating instructions.
-
GROUNDING OR POLARIZATION --- This product may be equipped with a polarized alternating-current line plug (a plug having one blade wider than the other). This plug will fit into the power outlet only one way. This is a safety feature: If you are unable to insert the plug fully into the outlet, try reversing the plug. If the plug should still fail to fit, contact your electrician to replace your obsolete outlet. Do not defeat the safety purpose of the polarized plug.
-
POWER-CORD PROTECTION --- Power-supply cords should be routed so that they are not likely to be walked on or pinched by items placed upon or against them, paying particular attention to cords at plugs, convenience receptacles, and the point where exit from the product.
-
NON-USE PERIODS --- The power cord of the product should be unplugged from the outlet when left unused for long periods of time.
-
OUTDOOR ANTENNA GROUNDING --- If an outside antenna or cable system is connected to the product, be sure the antenna or cable system is grounded so as to provide some protection against voltage surges and built-up static charges.
Article 810 of the National Electrical Code, ANSI/NFPA 70, provides information with regard to proper grounding of the mast and supporting structure, grounding of the lead-in wire to an antenna discharge unit, size of grounding conductors, location of antenna-discharge unit, connection to grounding electrodes, and requirements for the grounding electrode.

- LIGHTNING --- For added protection for this product during a lightning storm, or when it is left unattended and unused for long periods of time, unplug it from the wall outlet and disconnect the antenna or cable system. This will present damage to the product due to lightening and power-line surges.
- POWER LINES --- An outside antenna system should not be located in the vicinity of overhead power lines or other electric light or power circuits, or where it can fall into such power lines or other electric light or power circuits, or where it can fall into such power lines or circuits. When installing an outside antenna system, extreme care should be taken to keep from touching such power lines or circuits as contact with them might be fatal.
- OVERLOADING --- Do not overload wall outlets, extension cords, or integral convenience receptacles as this can result in a risk of fire or electric shock.
- OBJECT AND LIQUID ENTRY --- Never push objects of any kind into this product through openings as they may touch dangerous voltage points or short-out parts that could result in a fire or electric shock. Never spill liquid of any kind on the product.
- SERVICING - Do not attempt to service this product yourself as opening or removing covers may expose you to dangerous voltage or other hazards. Refer to all servicing to qualified service personnel.
- DAMAGES REQUIRING SERVICE - Unplug this product from the wall outlet and refer servicing to qualified service personnel under the following conditions.
a) When the power-supply cord or plug is damaged.
c) If the product has been exposed to rain or water.
b) If liquid has been spilled, or objects have fallen into the product.
d) If the product does not operate normally by following the operating instructions. Adjust only those controls that are covered by the operating instructions as an improving adjustment of other controls may result in damage and will often require extensive work by a qualified technician to restore the product to its normal operation.
e) When the product exhibits a distinct change in performance - this indicates a need for service.
- REPLACEMENT PARTS - When replacement parts are required, be sure the service technician has used replacement parts specified by the manufacturer or have the same characteristics as the original part, Unauthorized substitutions may result in fire electric shock and other hazards.
22- HEAT the product should be situated away from sources such as radiators, heat registers, stoves or other products that produce heat.
Establish a safe sound level
Over time your hearing will adapt to continuous loud sounds and will give the impression that the volume has in fact been reduced. What seems normal to you may in fact be harmful. To guard against this before your hearing adapts, set the volume to a low level.
Slowly increase the level until you can hear comfortably and clearly and without distortion. Damage to your hearing is accumulative and is irreversible. Any ringing or discomfort in the ears indicates that the volume is too loud.
Once you have established a comfortable listening level, do not increase the sound level.
MAINTENANCE
Cleaning the Unit
- To prevent fire or shock hazard, disconnect your unit from the mains power source when cleaning.
- If the cabinet becomes dusty wipe it with a soft dry cloth. Do not use any wax or polish sprays on the cabinet.
- If the cabinet becomes dirty or smudged with fingerprints, it may be cleaned with a soft cloth slightly dampened with a mild soap and water solution. Never use abrasive cloths or polishes, and these will damage the finish of your unit.
Caution: Never allow any water or other liquids to get inside the unit while cleaning.
PREPARATION FOR USE
UNPACKING AND SET UP
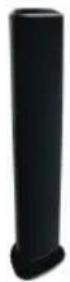
The Tower
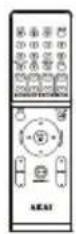
Remote Control
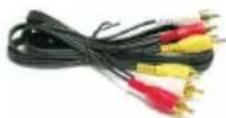
AV cable

5 x Docking brackets

User manual
- Carefully remove all the components from the carton and remove all packing materials from the components. Make sure noting is accidentally discarded with the packing materials.
- Save the carton and the packing materials, if possible, in the unlikely event that the unit ever needs to be returned for service. Using the original carton and packing material is the only proper way to protect the unit from shipping damage.
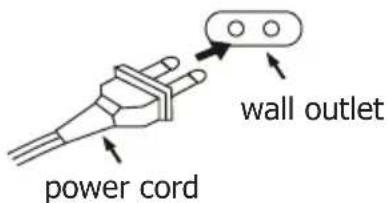
- Unwind the AC power cord on the back of the main unit and extend it to its full length.
POWER SUPPLY
Using AC Power
- Check if the power voltage, as shown on the type plate located on the back of the set, corresponds to your local AC power supply. If it does not, consult your dealer or service centre.
- Connect the power cord to the wall outlet. The power supply is now connected and ready for use.
-
To switch off completely, turn off the main power on/off button and unplug the power cord from the wall outlet.
-
Unplug the power cord from the wall outlet to protect your set during heavy thunderstorms.
- If electric cable is damaged, it must be replaced by manufacturer, or by the qualification persons, in order to avoid a danger.
- The mains plug is used as disconnect device, the disconnect device shall remain readily operable.
DESCRIPTION OF UNIT AND CONTROLS
Top view
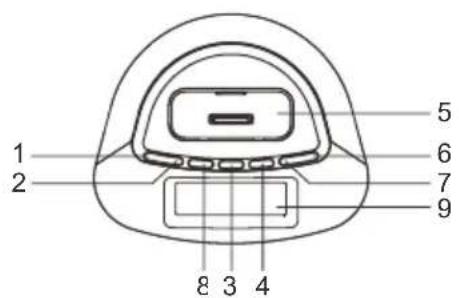
MAIN UNIT
- VOLUME - BUTTON
- VOLUME + BUTTON
- POWER BUTTON
- PLAY/PAUSE BUTTON
- iPod/iPhone DOCKING
- TUNING ^ BUTTON
- TUNING √ BUTTON
- SOURCE BUTTON
- LCD DISPLAY
DESCRIPTION OF UNIT AND CONTROLS
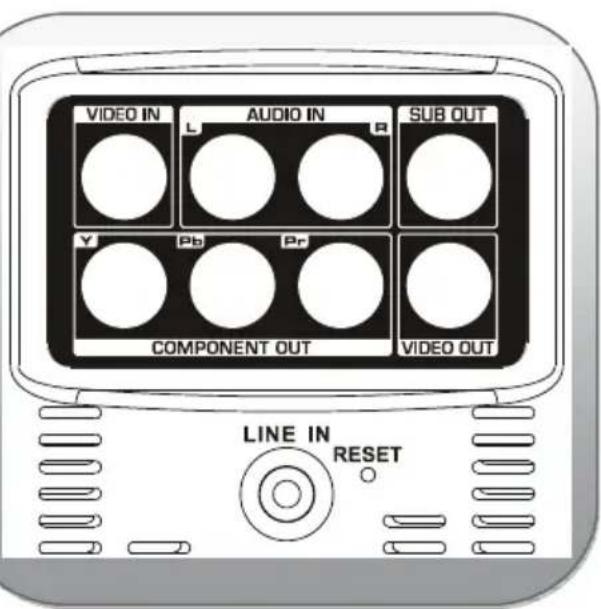
Front & Back views
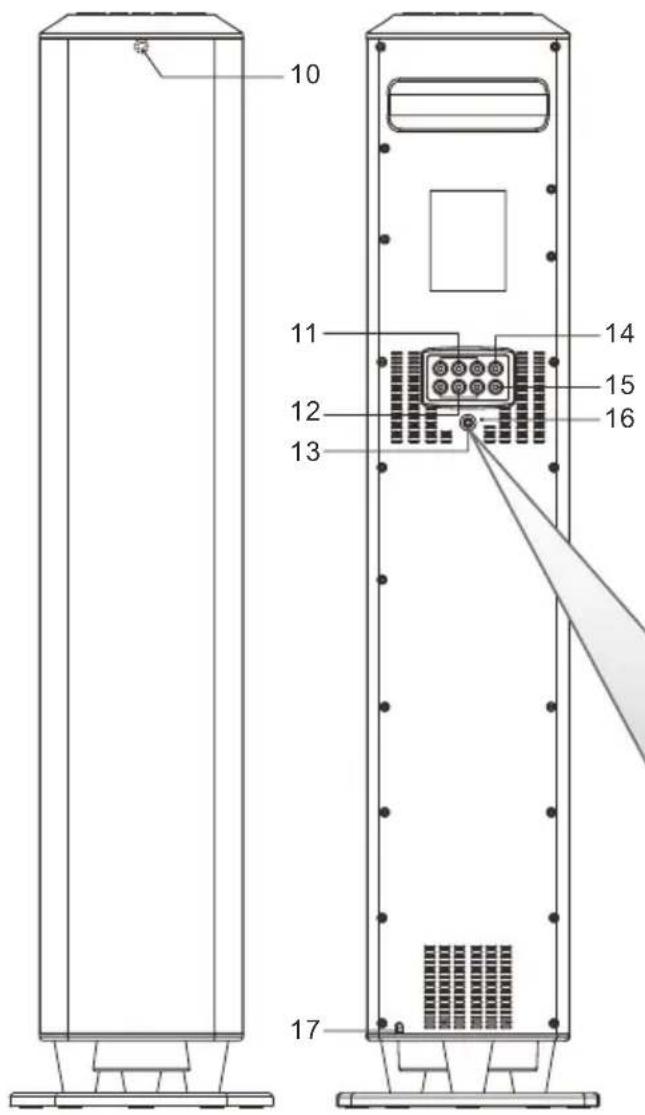
- REMOTE SENSOR
- A/V INPUT JACKS
- COMPONENT VIDEO OUTPUT JACKS
- LINE IN JACK
- SUB OUTPUT JACK
- COMPOSITE VIDEO OUTPUT JACK
- RESET BUTTON
- AC CORD

- Open the battery cover to remove it.
- Insert 2 X 1.5V - AAA/UM-4/LR-03 batteries (not included) correctly so that the + and - polarities match the polarity diagrams inside the battery compartment.
- Cover the battery compartment with the battery cover.
To use the remote controller, point the remote control transmitter on the front panel of the main unit and press the desired button. Please note that bright sunlight or artificial light may interfere with the proper operation of the remote control.
Battery Replacement
When the remote operation becomes weak or intermittent, it is time to replace the remote control battery. Remove the battery cover, remove the old battery and install new AAA batteries in the battery compartment. Assemble the battery cover to the remote control.
NOTE: If the batteries are installed incorrectly the remote control will not work.
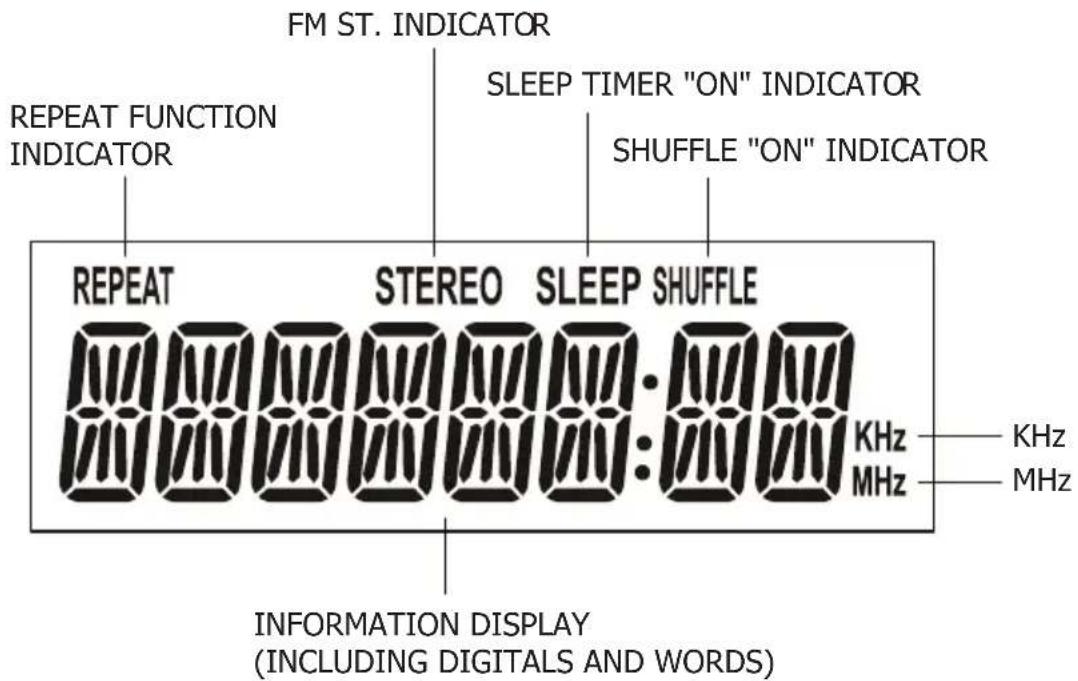
LCD DISPLAY DESCRIPTION & INDICATORS
- To turn on the Speaker, press the ⏻ button on the top panel of the unit or on the remote control.
- To turn off the Speaker, press the ⏻ button again.
MUTE Button (On Remote Control Only)
- You can also press the MUTE button on the remote control to turn off the sound temporarily, for example, when answer the telephone.
Press the MUTE button again to cancel the mute function and restore the sound. - The mute function will also be cancelled automatically by pressing the VOLUME + or - buttons.
SOURCE BUTTON
Press the SOURCE button repeatedly to switch among AV/Line in/iPod/Tuner modes.
DIMMER FUNCTION
During playback, press DIMMER button to switch the LCD screen between lighter or normal light mode.
VOLUME LEVEL
Press VOLUME +/- button on remote control or on the top panel of the unit to adjust the volume level.
TREBLE ADJUSTMENT
Press TREBLE button ▼/▲ on remote control to adjust the treble effect.
BASS ADJUSTMENT
Press BASS ▼/▲ button on the remote control to adjust the bass effect.
RESET BUTTON
When using the unit, you will come across some problems that the unit doesn't work or halt accidentally; you can use a fine needle to poke the RESET button in the rear of the player, the unit will turn off automatically and then please reboot the unit, the unit will recover the normal mode.
SETTING CLOCK
How to set time?
- The time only could be set on standby mode.
A. On the Standby mode, press and hold PLAY/PAUSE button on the unit or TIME SET/MEM button on the remote until the Hour flashes on the screen. "CLK" shows on the screen, use TUNING ∧/√button on the unit or TUN+/- button on the remote control to adjust the hour and confirm your adjustment by pressing PLAY/PAUSE button on the unit or TIME SET/MEM button on the remote control;
B. Minute starts blinking on the screen, press TUNING ∧/√button on the unit or TUN+/-button on the remote control to set the minute accordingly, press PLAY/PAUSE button on the unit or TIME SET/MEM button on the remote again to confirm your setting.
- Once you connect an iPhone® or an iPod® on docking station, time will be set as the time on the connected iPhone®/iPod® automatically after connecting the unit to main power (on the standby mode);
On the standby mode, if you disconnect the iPhone®/iPod® and then you connect it to the unit again, it is necessary to long press the CLOCK SYNC button to achieve the clock sync function. During playback, when you connect the iPhone/iPod to the unit and switch to iPod mode and then press and hold CLOCK SYNC button to make time auto changed synchronously with the connected iPhone.
- During playback, press CLOCK VIEW button to check the current time, press the button again to resume the previous display.
Note: The time only could be set on standby mode.
SLEEP TIMER SETTING
You can set the sleep timer at power on & off modes as following instructions:
On the standby mode, press SLEEP button and wait a moment, the unit will be powered on with "WELCOME" shows on the LCD screen. Then press SLEEP button repeatedly to cycle through the sleep time options:
$$ 9 0 \Rightarrow 8 0 \Rightarrow 7 0 \Rightarrow 6 0 \Rightarrow 5 0 \Rightarrow 4 0 \Rightarrow 3 0 \Rightarrow 2 0 \Rightarrow 1 0 \Rightarrow O F F $$
After the sleep time setting, you can play the unit freely. Once the sleep time is expired, the unit will be switched off.
Or, during playback, press SLEEP button repeatedly to cycle through the sleep time options, once the options you want shows on the screen, release the sleep button.
FM RADIO OPERATION
TUNING THE FM RADIO
- Power the unit on, switch to TUNER (RADIO) mode by pressing SOURCE repeatedly.
- Press TUNING ∧/∨ button on the unit or TUN+/- button on the remote to fine tune radio station. Press and hold TUNING∨ button on the unit or TUN +/- button on the remote to auto search radio station forward or backward respectively (When an available station will be found, the unit will broadcast it immediately and the searching will be stopped).
- During radio playback, you can input the frequency you know to the unit directly through the numeric buttons. If you want to input the frequency 89.8MHz, press numeric buttons 8, 9, 8, and 0; if you input a wrong frequency, "ERROR" will be displayed on the screen.
- During radio playback, press REPEAT/ST button on the remote to switch between FM STEREO or FM MONO.
STORING YOUR FAVORITE RADIO STATION
- During playback, press and hold PLAY/PAUSE button on the unit or TIME SET/MEM button on the remote for storing the current station until memory cell number "P01" flashes on the screen.
- Use TUNING ∧/∨ button on the unit or TUN +/- button on the remote to select the corresponding memory cell among P01-P20 for storing the station.
- Confirm your selection by pressing PLAY/PAUSE button on the unit or TIME SET/MEM button on the remote.
- During radio playback, press PLAY/PAUSE button on the unit or TIME SET/MEM button on the remote repeatedly to recall the stored stations.
Any iPod®/iPhone® can be connected to the ADI-19K to allow all your songs to be played through the Tower. Please refer the compatibility table for iPod® and iPhone® on page 28-29.
Description of iPod® & iPhone Docking Station
The system is supplied with 5 different adaptors intended to insure iPod® & iPhone® models fit properly in the docking area.
Each adaptor is identified by numbered bracket. Select the adaptor with the numbered bracket that corresponds to your iPod® or iPhone® model.
Position the adaptor in the docking area as shown and make sure that it 'locks' in place, then place your iPod® & iPhone® into the adaptor and make sure that its connector on this system is fully inserted into the slot on the bottom of your iPod.
Note:
DO NOT ATTEMPT TO "STRAIGHTEN" YOUR IPOD. THIS COULD RESULT IN DAMAGE TO THE DOCKING CONNECTOR OR DAMAGE TO YOUR IPOD.
To place a dock adaptor:
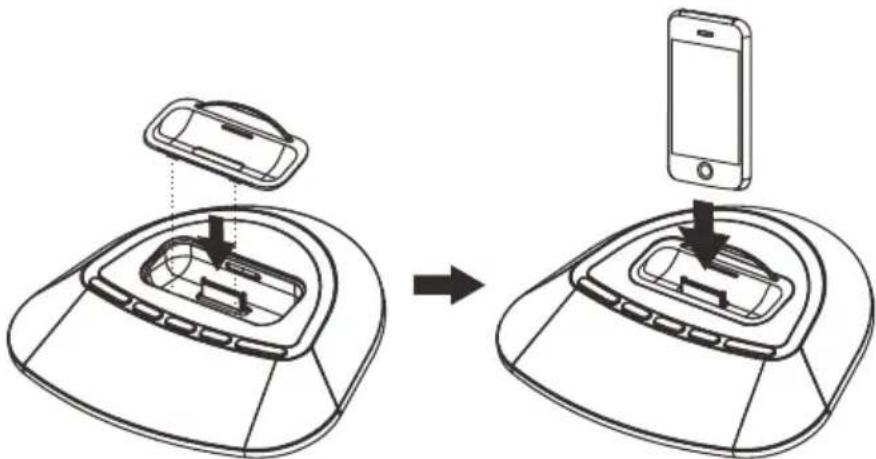
- Refer to the compatibility table (on page 29) and select the correct dock adaptor for the iPod/iPhone.
- Place the proper adaptor into the dock and press it into position. The adaptor will only go in one way. The iPod dock connector should fit through the opening in the bottom of the adaptor.
- Carefully align and then gently insert the iPod/iPhone into the dock. (The iPod®/iPhone® must not be in a case or "SKIN")
- To remove/replace a dock adaptor, first remove the iPod/iPhone, and then grip the adaptor and pull gently upwards.
Note: Once the iPod®/iPhone® is docked to the unit (after the unit connected to the main power), it will be charged automatically.
Playing an iPod® or an iPhone®
- Dock the iPod® or iPhone® on to the unit. Power on the unit, then press SOURCE button repeatedly to switch to iPod mode, and then the playback will start automatically.
- Press PLAY/PAUSE button to start or pause the playback.
- Press TUNING ^ button on the unit or iPod+/TUN+ button on the remote to skip to the next track; press and hold to search through the track forward.
- Press TUNING √ button on the unit or iPod-/TUN- button on the remote to skip to the previous track; press and hold to search through the track backward.
- Press MENU button on the remote to return back to the iPod menu, press navigation buttons ▲/▼ to select your desired track for playback.
- Press PLAYLIST ▲/▼ button to cycle through the playlists on the connected iPod®/iPhone®.
- Press ALBUM ▲/▼ button to select your desired album for playback on the connected iPod®/iPhone®.
- Press CHAPTER +/- button to select a corresponding chapter for playback.
- Press and hold CLOCK VIEW/→ SHUFFLE button to enable or disable the shuffle function.
- Press REPEAT/ST button repeatedly to cycle through the repeat options (repeat 1, repeat album and repeat off).
COMPATIBLE WITH THE FOLLOWING iPod® and iPhone®

Made for iPod
1st + 2nd generation
5GB 10GB 20GB

Made for iPod
4th generation
20GB

Made for iPod
4th generation
40GB

Made for iPod
4th generation
(color display)
20GB 30GB
Made for iPod classic
80GB 160GB (2007)
Made for iPod classic
160GB (2009)

Made for iPod nano
1st generation
1GB 2GB 4GB

Made for iPod nano
2nd generation
(aluminum)
2GB 4GB 8GB
Made for iPod touch
1st generation
8GB 16GB 32GB

Made for iPod touch
2nd generation
8GB 16GB 32GB

Made for iPod touch
3rd generation
32GB 64GB

Made for iPod touch
4th generation
8GB 32GB 64GB

Made for iPod
4th generation
(color display)
40GB 60GB

Made for iPod
5th generation
(video)
30GB

Made for iPod
5th generation
(video)
60GB 80GB

Made for iPod mini
4GB 6GB

Made for iPod nano
3rd generation
(video)
4GB 8GB

Made for iPod nano
4th generation
(video)
8GB 16GB

Made for iPod nano
5th generation
(video camera)
8GB 16GB

Made for iPod nano
6th generation
8GB 16GB

Made for iPhone
4GB 8GB 16GB

Made for iPhone 3G
8GB 16GB

Made for iPhone 3GS
8GB 16GB 32GB
Made for iPhone 4
16GB 32GB
DOCK ADAPTOR COMPATIBILITY
| MODEL CAPACITY PLAY & CHARGE VIDEO OUTPUT BRACKET | ||||
| iPad | ||||
| iPad 8GB 16GB 32GB | ||||
| iPhone | ||||
| iPhone 4 | 16GB 32GB | • | • | |
| iPhone 3GS | 8GB 16GB 32GB | • | • | 12 |
| iPhone 3G | 8GB 16GB | • | • | 12 |
| iPhone | 4GB 8GB 16GB | • | • | 12 |
| iPod touch | ||||
| iPod touch 4th generation | 8GB 32GB 64GB | • | • | |
| iPod touch 3rd generation | 32GB 64GB | • | • | 14 |
| iPod touch 2nd generation | 8GB 16GB 32GB 64GB | • | • | 14 |
| iPod touch 1st generation | 8GB 16GB 32GB | • | • | 14 |
| iPod nano | ||||
| iPod nano 6th generation | 8GB 16GB | • | • | |
| iPod nano 5th generation (video camera) | 8GB 16GB | • | • | 8 |
| iPod nano 4th generation (video) | 8GB 16GB | • | • | 8 |
| iPod nano 3rd generation (video) | 4GB 8GB | • | • | 13 |
| iPod nano 2nd generation (aluminum) | 2GB 4GB 8GB | • | 8 | |
| iPod nano 1st generation | 1GB 2GB 4GB | • | 8 | |
| iPod and iPod mini | ||||
| iPod classic (2009) | 120GB 160GB | • | • | 10 |
| iPod classic (2007) | 160GB | • | • | 10 |
| iPod classic | 80GB | • | • | 10 |
| iPod 5th generation (video) | 60GB 80GB | • | • | 10 |
| iPod 5th generation (video) | 30GB | • | • | 10 |
| iPod 4th generation (color display) | 40GB 60GB | • | • | |
| iPod 4th generation (color display) | 20GB 30GB | • | • | 10 |
| iPod 4th generation | 40GB | • | 10 | |
| iPod 4th generation | 20GB | • | 10 | |
| iPod mini | 4GB 6GB | • | ||
flowchart
graph TD
    A["Server"] -->|Data Flow| B["Central Server"]
    B -->|Data Flow| C["Monitor 1"]
    B -->|Data Flow| D["Monitor 2"]
    B -->|Data Flow| E["Monitor 3"]
    B -->|Data Flow| F["Monitor 4"]
    B -->|Data Flow| G["Monitor 5"]
    B -->|Data Flow| H["Monitor 6"]
    B -->|Data Flow| I["Monitor 7"]
    B -->|Data Flow| J["Monitor 8"]
    B -->|Data Flow| K["Monitor 9"]
    B -->|Data Flow| L["Monitor 10"]
    B -->|Data Flow| M["Monitor 11"]
    B -->|Data Flow| N["Monitor 12"]
    B -->|Data Flow| O["Monitor 13"]
    B -->|Data Flow| P["Monitor 14"]
    B -->|Data Flow| Q["Monitor 15"]
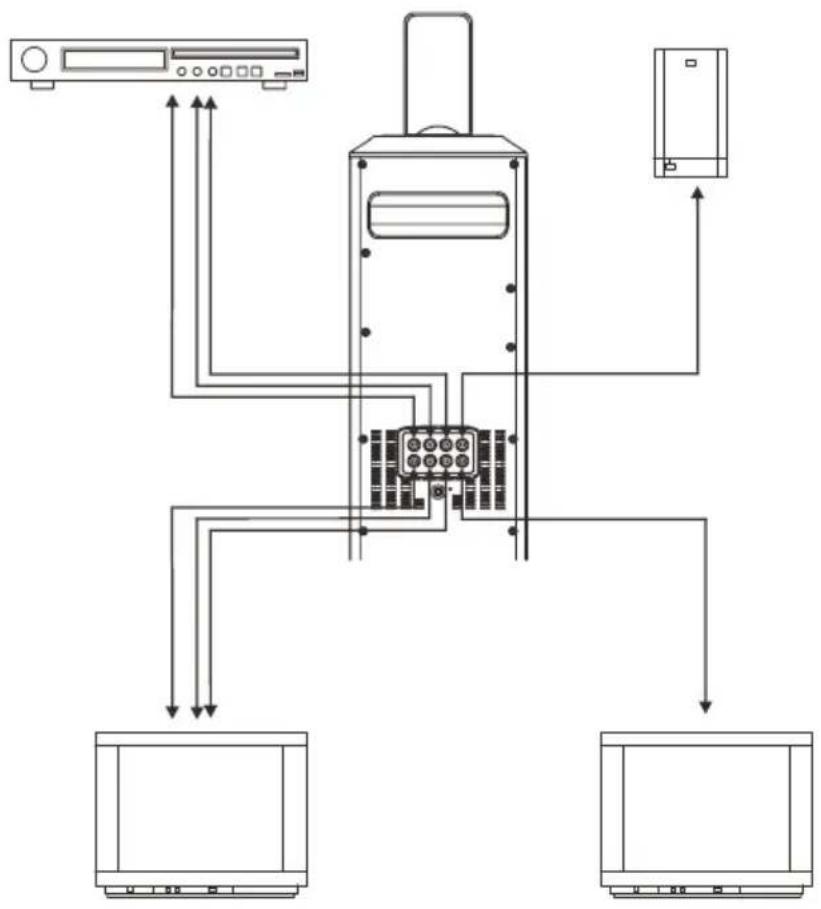
LINE IN
Observe the following steps to connect the unit to another audio appliance:
- Connect the appliance into the player LINE IN jack with the LINE OUT cables.
- Press POWER button to turn the unit on.
- Press SOURCE button repeatedly to switch the unit to LINE IN mode.
- Power on the appliance and begin play.
At this time you will be able to hear the sound produced from the connected appliance.
A/V INPUT
- Connect a RCA cable to the A/V jacks on the unit and audio &video source, for example, DVD player and the like.
- Press the POWER button to turn the unit on.
- Press the SOURCE button repeatedly to switch to AV mode.
- Use the native controls on the connected audio & video device to begin playing music through the connected the unit.
- You also can input audio source through the Audio Right & Left Jacks of the A/V Jacks to the unit following above instructions.
COMPOSITE VIDEO OUTPUT
- Connect a RCA cable to the Composite Video Output and a television.
- Power on the TV set and the unit.
-
Adjust the connected television to the proper input setting.
-
Press VIDEO button repeatedly to switch between Composite and Component video output modes.
-
Video from a docked iPhone/iPod or the connected DVD or the like can now be played through the unit to the connected television.
COMPONENT VIDEO OUTPUT
The Component Video Output jacks will only output video from a docked iPod/iPhone. It cannot output video from the A/V input.
- Connect a component video cable to the Component Video Output jacks on the unit and a television.
- Adjust the connected television to the proper input setting.
- Press VIDEO button on the remote to switch to Component video output modes.
- Video from a docked iPhone/iPod can now be played through the bar speaker to the connected television.
SUBWOOFER OUTPUT
The AKAI ADI-19K comes with a built-in subwoofer and allows you to output the subwoofer signal to an external amplifier (such as a 2.1CH amplifier or 5.1/6.1/7.1CH amplifier or a 2.1CH micro system) via the SUB OUTPUT jack on the rear of the AKAI ADI-19K. Follow the below steps to connect the external amplifier:
- Use a RCA cable to connect the external amplifier with a SUB INPUT jack to the Sub Output jack on the AKAI ADI-19K.
- Power on the AKAI ADI-19K and the external amplifier.
- When audio is played through any source, the sound will be produced from the AKAI ADI and the connected external amplifier synchronously for enhancing the sound effect.
TROUBLE SHOOTING GUIDE
| Problem Possible Cause | Solution | |
| Radio sound distorted. 1. The | the station is not tuned in.2. There is a poor signal in the area. | 1. Fine tune the station.2. Reposition the Speaker. |
| No radio sound. 1. The Speaker is not in tuner mode.2. The volume has been muted or is on the minimum setting. | 1. Press the SOURCE button until Tuner is selected.2. Adjust the volume level. | |
| The iPod will not play 1. The Speaker is not in iPod mode.2. The iPod is not connected correctly. | 1. Press the SOURCE button until iPod is selected.2. Reconnect the iPod. | |
| No iPod sound. 1. The Speaker is not in iPod mode.2. The volume has been muted or is on the minimum setting. | 1. Press the SOURCE button until iPod is selected.2. Adjust the volume level. | |
| If none of the above can solve your problems, perform a reset as described on page 25. | ||
TECHNICAL SPECIFICATIONS
| Model Number • ADI-19K | |
| Power Supply | • AC 100 ~ 240 |
| Power consomption • 60W | |
| Standby power consumption | • < 2 W |
| Radio Frequency Coverage • FM: 87.5 MHz - 108 MHz | |
| Speaker Size • TREBLE 2.5 INCH SUB 3 | 5 INCH |
| Outputs | • YUV (RCA)• SUB (RCA)• VIDEO (RCA) |
| Inputs | • LINE IN• AV |
| Power Output RMS • 8W x 2+24W | |
| Power Output MAX • 2 x 32W+96W | |
| Net Weight • about 4.3Kg | |
| Dimensions • 199(L) x 172(W) x 828(H) | mm |
IMPORTANT: Due to continual revision and improvement on our products design, specifications are subject to change without further notice.

Warning! This logo set on the product means that the recycling of this apparatus comes within the framework of the Directive 2002/96/CE of January 27, 2003 concerning the Waste of Electrical and Electronic Equipment (WEEE).
This symbol means that used electrical and electronic products should not be mixed with general household waste. There is a separate collection system for these products.
If you want to dispose of this equipment, please do not use the ordinary dust bin!
- The presence of dangerous substances in the electrical and electronic equipments can have potential consequences on the environment and human health in the cycle of reprocessing this product.
- Therefore, at the end of its lifetime, this product shall not be disposed with other non-recycled waste. Used electrical and electronic equipment must be treated separately and in accordance with legislation that requires proper treatment, recovery and recycling of used electrical and electronic equipment.
- Local authorities and resellers have set special procedures for the purpose of collecting and recycling this product (please contact your local authority for further details). You have the obligation to use the selective waste collection systems put in place by your local authority.
- If your used electrical or electronic equipment has batteries or accumulators, please dispose of these separately beforehand according to local requirements.
- By disposing of this product correctly you will help ensure that the waste undergoes the necessary treatment, recovery and recycling and thus prevent potential negative effects on the environment and human health which could otherwise arise due to inappropriate waste handling.

This unit complies with European Council Directive 2006 / 95 CE (Electromagnetic Compatibility & Low Voltage Directives)