VOYAGER - Binoculars BUSHNELL - Free user manual and instructions
Find the device manual for free VOYAGER BUSHNELL in PDF.

User questions about VOYAGER BUSHNELL
0 question about this device. Answer the ones you know or ask your own.
Ask a new question about this device
Download the instructions for your Binoculars in PDF format for free! Find your manual VOYAGER - BUSHNELL and take your electronic device back in hand. On this page are published all the documents necessary for the use of your device. VOYAGER by BUSHNELL.
USER MANUAL VOYAGER BUSHNELL
78-9945 900x114mm REFLECTOR
Congratulations on the purchase of your Bushnell Voyager Telescope with Sky Tour! This telescope truly is the ultimate first telescope. The Sky Tour handset will actually speak, giving you a personal real-time tour of the night sky each and every night. Each tour object will include directions associated with it to allow you to quickly find the object with your telescope.
After reading through this manual and preparing for your observing session as outlined in these pages, you can start enjoying the Sky Tour feature by doing the following:
After inserting 3 AA batteries, push and hold the "Constellation" button (the upper left hand button in the four button section) until the Sky Tour handset starts speaking and prompting you for set up.
To find your latitude and longitude, please check a map of your area or log on to the Bushnell website for assistance (www.bushnell.com).
Once the setup is complete, and handset confirms that your settings are saved you should then power off. To begin using the handset, press and hold the Constellation button until the unit powers on again.
Your settings will be retained for an extended period of time provided that you do not remove the batteries. This will allow you to immediately enjoy the Sky Tour each and every time that you use the same viewing location. If you have moved to a different viewing location, you can change your settings by powering up the handset with the "Mythology" button depressed (instead of the "Constellation" button) and simply following the spoken directions.
We hope you enjoy this telescope for years to come.


NEVER LOOK DIRECTLY AT THE SUN WITH YOUR TELESCOPE PERMANENT DAMAGE TO YOUR EYES MAY OCCUR
SKY TOUR HANDSET INTERFACE KEY
- Constellation Button (also turns unit ON by depressing and holding)
- Mythology Button (also places unit into SETUP mode from the off position when held and depressed)
- Amazing Facts Button
- Planets Button
- Back Button (also turns volume down when depressed and held while handset is speaking)
- Next Button (also turns volume up when depressed and held while handset is speaking)

BUTTON FUNCTIONS
ALL BUTTONS ARE ILLUMINATED FOR NIGHTTIME USE.
The Constellation Mode Button will allow you to tour many well-known constellations, and will give you basic information about each, including tips for finding and navigating by them, as well as specific information about special stars or other objects located within them.
The Mythology Mode Button will allow you to hear about ancient stories and myths revealing why the constellations are depicted and named as they are.
The Amazing Facts Mode Button provides mind-boggling information related to each constellation, including distance to stars, size, and other other interesting information.
The Planets Mode Button will give you a guided tour of the planets.
Note: To get the most out of the Sky Tour (for example the Constellation tour), listen to the entire set of information, and then change over to another mode. Anytime that you switch to another mode, you will hear more information, but may miss some from the previous mode unless you continue selecting next to hear more until the information begins to be repeated.
Pressing any mode button more than once sequentially will advance you to the next tour object in that mode.
The handset will power itself off after a certain length of time to conserve battery life. However, the illuminated mount and red dot finderscope must be turned off manually.
PARTS PACKING LIST-ALL MODELS
- Red Dot Finderscope
- 1.25” Format Eyepieces
- Illuminated Telescope Mount with attached Adjustable Aluminum Tripod
- Diagonal Mirror (Refractors Only)
- 1.5x Erecting Eyepiece (Select Models Only)
- Sky Tour Handset
- Main Telescope Tube
- Compass
- Barlow Lens (Select Models Only)
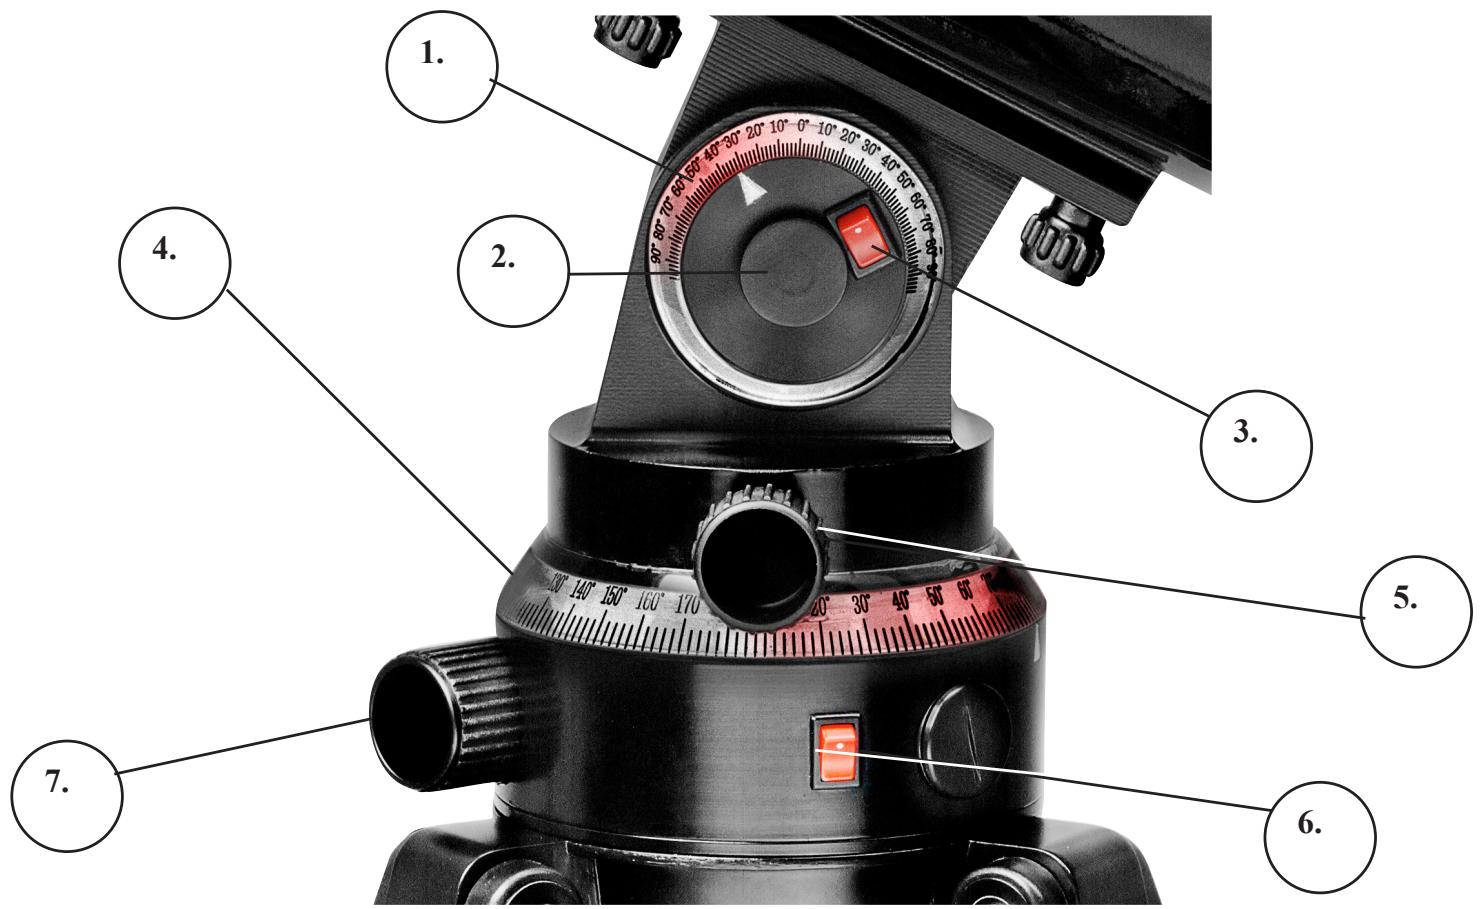
Telescope Mount Parts Key
- Illuminated Altitude Dial
- Altitude Lock Knob (Backside)
- Altitude Dial Light Switch
-
Illuminated Azimuth Dial
-
Azimuth Lock Knob
- Azimuth Dial Light Switch
- Azimuth Fine Adjustment Knob (Used only when Azimuth Lock Knob is engaged)
78-9930/78-9945
78-9960/78-9970
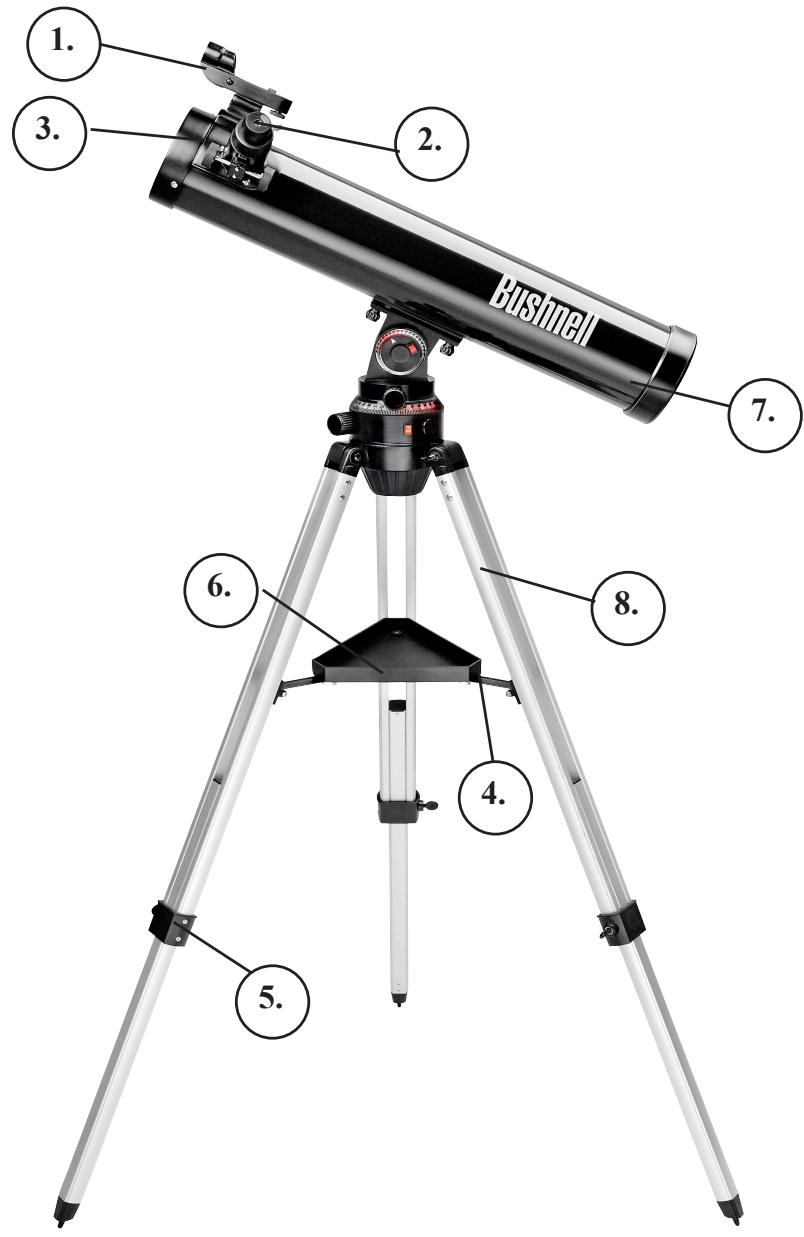
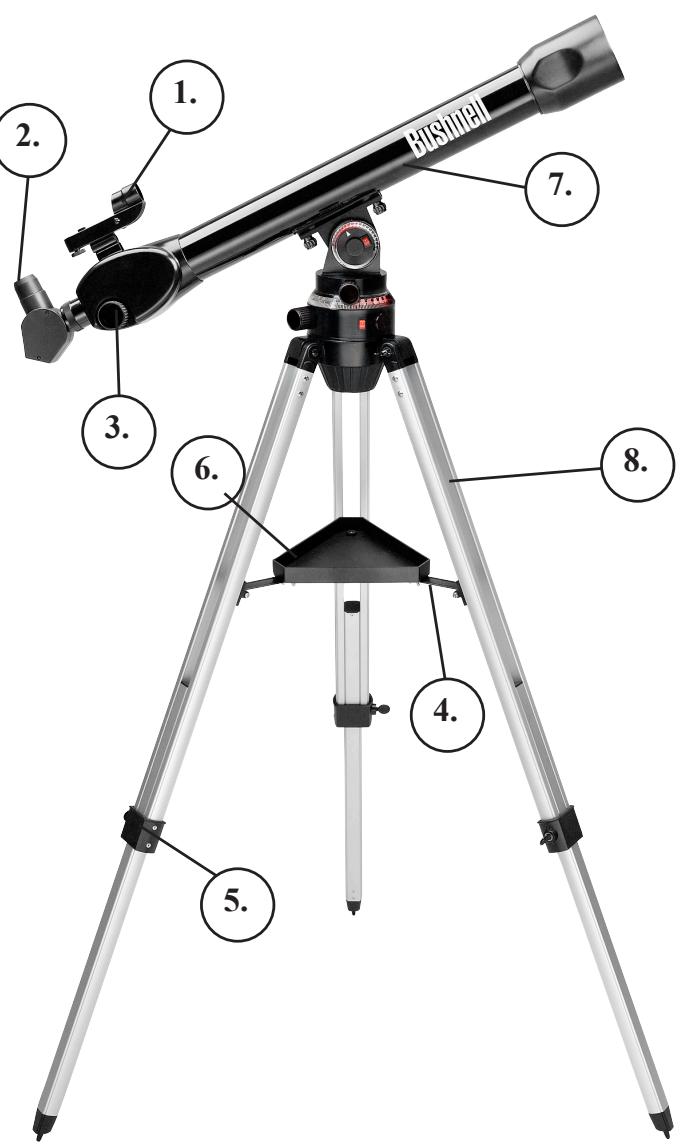
Telescope Components Key
- Red Dot Finderscope
- 1.25" Format Eyepiece
- Rack and Pinion Focusing
-
Accessory Tray Brace
-
Tripod Leg Adjust
- Quick-Release Accessory Tray
- Main Telescope Tube
- Adjustable Aluminum Tripod
No tools are required for assembly of your telescope.
Remove all components from the carton and identify all parts. It is a good idea to lay all the parts out in front of you before assembly. Since your telescope is a precision optical system, the components require careful handling—particularly the Sky Tour Handset, Telescope, Eyepieces and various accessories.
Set Up Tripod and Accessory Tray
- Stand the Voyager Illuminated Mount Assembly with pre-attached tripod legs on a level surface. Spread the tripod legs to their fullest position.
- Fold down the accessory tray braces and place the Quick Release Accessory Tray on top of the braces.
- Insert accessory tray bolt through the center of the accessory tray braces and tighten accessory tray bolt into the accessory tray brace.
- Adjust the tripod height to suit by loosening the tripod leg adjustment bolts and extending the tripod legs to the desired height. Tighten the tripod leg adjustment bolts.
Attach Telescope Tube
- Locate Main Telescope Tube.
- Remove the two telescope tube bolt nuts from the bolts extending from the under side of the telescope tube.
- Position main telescope tube with the attachment bolts facing down through the two holes in the illuminated telescope mount top.
- Reattach the telescope tube bolt nuts and tighten.
Attach Final Telescope Accessories
- Locate Red Dot Finderscope
- Place finderscope over the corresponding attachment lug on the top of the telescope tube near the focusing mechanism.
- Slide forward until the finderscope is seated securely. The large end of the finderscope should face the open end of the telescope tube.
- Attach low power eyepiece.
a. For Reflector Telescopes, insert eyepiece directly into the focusing tube mechanism.
b. For Refractor Telescopes, insert eyepiece into the diagonal mirror, then insert the diagonal mirror into the focusing tube mechanism.
- Tighten all set screws to secure accessories.
LENS ACCESSORIES
Barlow Lens (Select Models)
Some Voyager with Sky Tour units come with a Barlow lens. This accessory will allow you to now have dual use of any eyepiece. Simply put the Barlow lens between the focusing mechanism and the eyepiece for reflector style telescopes, or the focusing mechanism and the diagonal mirror on refractor style telescopes. Depending on the specification written on the Barlow lens, these accessories can double or even triple the magnification of the eyepiece when used with it. Remember, low power is always recommended, but higher powers are good especially on bigger and brighter objects such as the moon and planets.
LENS ACCESSORIES-con't
Erecting Lens 1.5X (Select Models Only)
This accessory allows the user to view objects on land as you would naturally see them with your unaided eye. To use this accessory, simply place the erecting lens in between your eyepiece and the focusing mechanism on your telescope.
FOCUSing TELESCOPE
- After selecting the desired Eyepiece, aim Main Telescope Tube at a land-based target at least 200 yards away (e.g. A telephone pole or building). Fully extend focusing tube by turning Rack and Pinion Focusing Mechanism.
- While looking through selected Eyepiece, slowly retract focusing tube by turning Rack and Pinion Focusing Mechanism until object comes into focus.
ALIGNING FINDERSCOPE
- Look through Main Telescope Tube and establish a well-defined target. (see focusing telescope section).
- Looking through finderscope, alternate tightening each Finderscope Adjustment Screw until center of finderscope is precisely centered on the same object already centered in main telescope tube's field of view.
- Now, objects located first with the Finderscope will also be centered in the field of view of the Main Telescope Tube.
BATTERY INSTALLATION
Your Sky Tour Handset is powered by 3 AA batteries (user supplied) and are installed like you would with most remote controllers.
Your Illuminated Voyager Mount is powered by two CR1620 watch batteries (included). These batteries are installed by removing the battery cap located next to the illuminated dial power switches.

NEVER LOOK DIRECTLY AT THE SUN WITH YOUR TELESCOPE PERMANENT DAMAGE TO YOUR EYES MAY OCCUR
- Set up your assembled telescope on a stable level surface. Your back yard is preferred to your back deck.
- Turn on both illuminated dial switches to light your telescope mount.
- Refer to the direction indicated by "0" on the included compass to align your telescope properly. To orient your telescope to the same "0" reference, follow these steps (refer to the "Telescope Mount Parts Key" on the parts illustration page):
a. Find the black arrow index mark, located just below the azimuth dial on the mount.
b. Move the tripod (or entire telescope) until this arrow index mark is aimed in the direction indicated by "0" on the compass.
c. Loosen the azimuth lock knob and rotate the telescope tube until it is lined up in the same direction as the arrow index mark (and "0" on the compass). On refractor style telescopes, the large objective lens should be pointed in the same direction as the arrow index mark. On reflector style telescopes, the "open" end of the telescope tube should be pointed in this direction.
d. Finally, with the azimuth lock knob still loosened, rotate the illuminated azimuth dial so that "0" on the dial is lined up with the arrow index mark, telescope tube, and "0" compass heading.
- Power on your Sky Tour Handset by pressing and holding the "Constellation Button".
a. If this is your first time setting up, the handset will prompt you to set your date, time, location information. Once this is set up, your Sky Tour handset will retain that information until the batteries are replaced. To find your latitude and longitude, please check a map of your area or log on to the Bushnell website for assistance (www.bushnell.com).
b. Once your Sky Tour Handset is set for your location and time, the handset will automatically tell you your local time and what objects are available for you to tour that evening.
- Choose your desired mode of operation by pressing the corresponding button: Constellations, Mythology, Amazing Facts, or Planets.
- The Sky Tour handset will then tell you an altitude number (this corresponds to the top dial) and an azimuth number (this corresponds to the bottom dial) for the tour object of choice.
- Don't worry if you miss the numbers, you can repeat them by pressing the back button.
- Move the telescope in altitude and azimuth to the corresponding numbers on the dials and the telescope will be pointed at your tour object!
- Continue pressing the next button to hear more information for that mode until the facts are starting to repeat, then select a different mode.
- You don't have to listen to all items in each mode, you can jump from mode to mode if you choose.
- Each time you choose a new mode, directions are given for the first object in each mode. Simply move your telescope to view them and enjoy the information as it is spoken.
- The planets mode is a unique mode that allows you to hear basic information about the five brightest planets and the moon.
- Once you've finished the tour of each mode, you can advance to the next tour object by pressing the mode you desire a second time. This will advance the handset to the next item in the tour.
-
If desired, your telescope and handset may also be used independently.
-
Your telescope is a very sensitive instrument. For best results and fewer vibrations, set your telescope up on a level location on the ground rather than your concrete driveway or your wooden deck. This will provide a more stable foundation for viewing, especially if you've drawn a crowd with your new telescope.
- If possible, view from a location that has relatively few lights. This will allow you to see much fainter objects. You'd be surprised how much more you'll see from your local lake or park when compared to a backyard in the city.
- Using your telescope out a window is NEVER recommended.
-
View objects that are high in the sky if possible. Waiting until the object rises well above the horizon will provide a brighter and crisper image. Objects on the horizon are viewed through several layers of earth's atmosphere. Ever wonder why the moon appears orange as it sets on the horizon? It's because you are looking through a considerably greater amount of atmosphere than you would directly overhead. (Note: If objects high in the sky are distorted or wavy, you are probably viewing on a very humid night.) During nights of unstable atmosphere, viewing through a telescope can be frustrating if not impossible. Astronomers refer to crisp, clear nights as nights of "good seeing."
-
First choose a target to view. Any bright object in the night sky is a good starting point. One of the favorite starting points in astronomy is the moon. This is an object sure to please any budding astronomer or experienced veteran. When you have developed proficiency at this level, other objects become good targets. Saturn, Mars, Jupiter, and Venus are good second steps to take.
The Moon--a wonderful view of our lunar neighbor can be enjoyed with any magnification. Try viewing at different phases of the moon. Lunar highlands, lunar maria (lowlands called "seas" for their dark coloration), craters, ridges and mountains will astound you.
Saturn--even at the lowest power you should be able to see Saturn's rings and moons. This is one of the most satisfying objects in the sky to see simply because it looks like it does in pictures. Imagine seeing what you've seen in textbooks or NASA images from your backyard!
Jupiter--the largest planet in our solar system is spectacular. Most noted features are its dark stripes or bands both above and below its equator. These are the north and south equatorial belts. Also interesting are Jupiter's four major moons. Pay close attention to their positions from night to night. They appear to be lined up on either side of Jupiter.
Mars--The Great Red Planet appears as a reddish-orange disk. Look at different times of the year and try to catch a glimpse of the white polar ice caps.
Venus--just like the moon, Venus changed phases from month to month. Some views of brilliant Venus appear as if you were looking at a distant crescent moon.
Nebulae--The Great Orion Nebula is a very well known night sky object. This and many others are brought to you by this telescope.
Star Clusters--View millions of stars densely packed in a cluster that resembles a ball.
Galaxies--One of the greatest and most interesting galaxies is our neighbor the Andromeda Galaxy. Enjoy this and many others.
While this manual is intended to assist you in the set-up and basic use of this instrument, it does not cover everything you might like to know about astronomy. For objects other than stars and constellations, a basic guide to astronomy is a must. A list of recommended guides may be found on our website at www.bushnell.com. The website also lists current events in the sky for suggested viewing.
- After setting up the telescope and selecting something to view, center the desired object in the finderscope. Provided you did a reasonable job aligning the finderscope, a quick look through the main telescope tube at low power should reveal the same image. With the lowest power eyepiece (the one with the largest number printed on it) you should be able to focus the same image that you saw through the finderscope. Avoid the temptation to move directly to the highest power. The low power eyepiece will give you a wider field of view, and brighter image--thus making it very easy to find your target object. At this point with a focused image in both scopes, you've passed the first obstacle. If you don't see an image after attempting to focus it in, you might consider aligning your finderscope again. Once you pass this step, you'll will enjoy the time spent ensuring a good alignment. Every object you center in the finderscope will be easily found in the main telescope tube, which is important for continuing your exploration of the night sky.
- The low power eyepieces are perfect for viewing the full moon, planets, star clusters, nebulae, and even constellations. These should build your foundation. However, for more detail, try bumping up in magnification to higher power eyepieces on some of these objects. During calm and crisp nights, the light/dark separation line on the moon (called the "Terminator") is marvelous at high power. You can see mountains, ridges and craters jump out at you due to the highlights. Similarly, you can move up to higher magnifications on the planets and nebulae. Star clusters and stars are best viewed through the low power no matter what.
- The recurring astronomical theater we call the night sky is an ever-changing billboard. In other words, not the same movie plays all the time. Rather, the positions of the stars change not only hourly as they seem to rise and set, but also throughout the year. As the earth orbits the sun our perspective on the stars changes on a yearly cycle about that orbit. The reason the sky seems to move daily just as the sun and the moon "move" across our sky, is that the earth is rotating about its axis. As a result you may notice that after a few minutes or a few seconds depending on what power you are viewing at, the objects in your telescope will move. At higher magnifications especially, you will notice that the moon or Jupiter will "race" right out of the field of view. To compensate, just move the fine adjustment controls on your telescope to "track" it in the necessary path.
NOTES
WARRANTY / REPAIR
TELESCOPE LIFETIME LIMITED WARRANTY
Your Bushnell® telescope is warranted to be free of defects in materials and workmanship for the lifetime of the original owner. The Lifetime Limited Warranty is an expression of our confidence in the materials and mechanical workmanship of our products and is your assurance of a lifetime of dependable service.
If your telescope contains electrical components, these components are warranted to be free of defects in materials and workmanship for two years after the date of purchase.
In the event of a defect under this warranty, we will, at our option, repair or replace the product, provided that you return the product postage prepaid. This warranty does not cover damages caused by misuse, improper handling, installation, or maintenance provided by someone other than a Bushnell Authorized Service Department.
Any return made under this warranty must be accompanied by the items listed below:
1) A check/money order in the amount of $15.00 to cover the cost of postage and handling
2) Name and address for product return
3) An explanation of the defect
4) Proof of Date Purchased
5) Product should be well packed in a sturdy outside shipping carton, to prevent damage in transit, with return postage prepaid to the address listed below:
IN U.S.A. Send To:
Bushnell Outdoor Products
Attn.: Repairs
8500 Marshall Drive
Lenexa, Kansas 66214
IN CANADA Send To:
Bushnell Outdoor Products
Attn.: Repairs
25A East Pearce Street, Unit 1
Richmond Hill, Ontario L4B 2M9
For products purchased outside the United States or Canada please contact your local dealer for applicable warranty information. In
Europe you may also contact Bushnell at:
Bushnell Germany GmbH
European Service Centre
Mathias-Bruggen-Str. 80
D-50827 Köln
GERMANY
This warranty gives you specific legal rights.
You may have other rights which vary from country to country.
©2010 Bushnell Outdoor Products
GARANTIE / RÉPARATIONS
Bushnell Outdoor Products
Attn.: Repairs
8500 Marshall Drive
Lenexa, Kansas 66214
Bushnell Outdoor Products
Attn.: Repairs
25A East Pearce Street, Unit 1
Richmond Hill, Ontario L4B 2M9
European Service Centre
Mathias-Bruggen-Str. 80
D-50827 Köln
GERMANY
©2010 Bushnell Outdoor Products
Bushnell Outdoor Products
Attn.: Repairs
8500 Marshall Drive
Lenexa, Kansas 66214
En Canadá envía:
Bushnell Outdoor Products
Attn.: Repairs
25A East Pearce Street, Unit 1
Richmond Hill, Ontario L4B 2M9
European Service Centre
Mathias-Bruggen-Str. 80
D-50827 Köln
GERMANY
©2010 Bushnell Outdoor Products
GARANTIE / REPARATUR
Bushnell Outdoor Productss
Attn.: Repairs
8500 Marshall Drive
Lenexa, Kansas 66214
Postadresse in KANADA:
Bushnell Outdoor Products
Attn.: Repairs
25A East Pearce Street, Unit 1
Richmond Hill, Ontario L4B 2M9
European Service Centre
Mathias-Bruggen-Str. 80
D-50827 Köln
GERMANY
©2010 Bushnell Outdoor Products
Bushnell Outdoor Products
Attn.: Repairs
8500 Marshall Drive
Lenexa, Kansas 66214
Recapito in Canada:
Bushnell Outdoor Products
Attn.: Repairs
25A East Pearce Street, Unit 1
Richmond Hill, Ontario L4B 2M9
European Service Centre
Mathias-Bruggen-Str. 80
D-50827 Köln
GERMANY
©2010 Bushnell Outdoor Products
Bushnell Outdoor Products
Attn.: Repairs
8500 Marshall Drive
Lenexa, Kansas 66214
No CANADÁ envie para:
Bushnell Outdoor Products
Attn.: Repairs
25A East Pearce Street, Unit 1
Richmond Hill, Ontario L4B 2M9
European Service Centre
Mathias-Bruggen-Str. 80
D-50827 Köln
GERMANY
©2010 Bushnell Outdoor Products
Bushnell
For further questions or additional information please contact:
Bushnell Outdoor Products
9200 Cody, Overland Park, Kansas 66214
(800) 423-3537 www.bushnell.com