
T-FLIGHT STICK X - Joystick THRUSTMASTER - Free user manual and instructions
Find the device manual for free T-FLIGHT STICK X THRUSTMASTER in PDF.
| Brand | THRUSTMASTER |
| Model | T-FLIGHT STICK X |
| Product type | Flight simulation joystick |
| Compatible platforms | PC (Windows XP/Vista) and PlayStation 3 |
| Connectivity | USB |
| Power supply | Via USB port (bus-powered) |
| Number of action buttons | 12 |
| Hat switch (Point of view) | Yes |
| Rudder | Handle rotation with locking screw |
| Throttle control | Wheel |
| Status LED | Yes (red for auto preset, green for manual) |
| PRESET button | Selection between automatic and manual programming |
| Adjustable handle resistance | Yes, via a wheel under the base |
| Internal memory (EEPROM) | Saves custom configurations |
| USB selector | PC / PS3 |
| Manual programming | Yes, via MAPPING button |
| Warranty | 2 years |
| Technical support | Website ts.thrustmaster.com, email, phone |
| Recycling | Do not dispose of with household waste, deposit at WEEE collection point |
Frequently Asked Questions - T-FLIGHT STICK X THRUSTMASTER
User questions about T-FLIGHT STICK X THRUSTMASTER
0 question about this device. Answer the ones you know or ask your own.
Ask a new question about this device
Download the instructions for your Joystick in PDF format for free! Find your manual T-FLIGHT STICK X - THRUSTMASTER and take your electronic device back in hand. On this page are published all the documents necessary for the use of your device. T-FLIGHT STICK X by THRUSTMASTER.
USER MANUAL T-FLIGHT STICK X THRUSTMASTER
USER MANUAL
MANUEL DE L'UTILISATEUR
BENUTZERHANDBUCH
HANDLEIDING
MANUALE D'USO
MANUAL DEL USUARIO
PykoBoJoCTBO IOJIb3ObaTeJI
THRUSTMASTER
T.Flight Stick X
Compatible / Kompatibel
PlayStation® 3* & PC
T.Flight StickX
User Manual
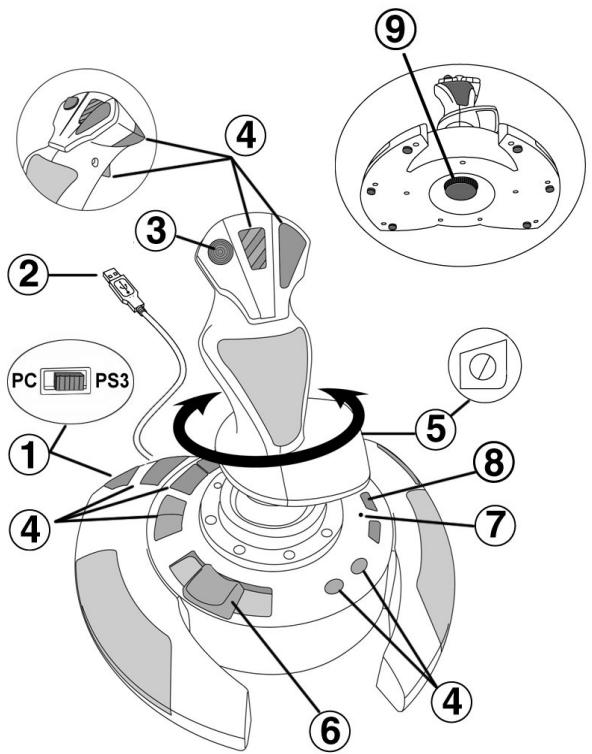
TECHNICAL FEATURES
- USB selector (PC / PS3)
- PC and PlayStation® 3 USB connector
- Multidirectional "Point Of View" hat-switch
- 12 action buttons
-
Rudder function via twisting handle with locking screw
-
Sliding thumb throttle
- LED
- PRESET button (to select programming)
- Handle resistance adjustment dial
PC
INSTALLATION ON PC
- Set your joystick's USB selector (1) to the "PC" position.
- Connect the USB connector (2) to one of your computer's USB ports. Windows XP or Vista will automatically detect the new device.
- The drivers are installed automatically. Follow the on-screen instructions to complete the installation.
- Click Start/Settings/Control Panel and then double-click Game Controllers. The Game Controllers dialog box displays the joystick's name with OK status.
- In the Control Panel, click Properties to configure your joystick. Test device: Lets you test and view all of your joystick's functions.
You are now ready to play!
IMPORTANT NOTES FOR PC
-
Your joystick's USB selector (1) must always be set to the "PC" position before connecting your joystick.
-
When connecting your joystick: Leave the handle and rudder centered and do not move them (to avoid any calibration problems).
"AUTOMATIC PRESET" CONFIGURATION - PC
"AUTOMATIC PRESET" diagram on PC
RED LED
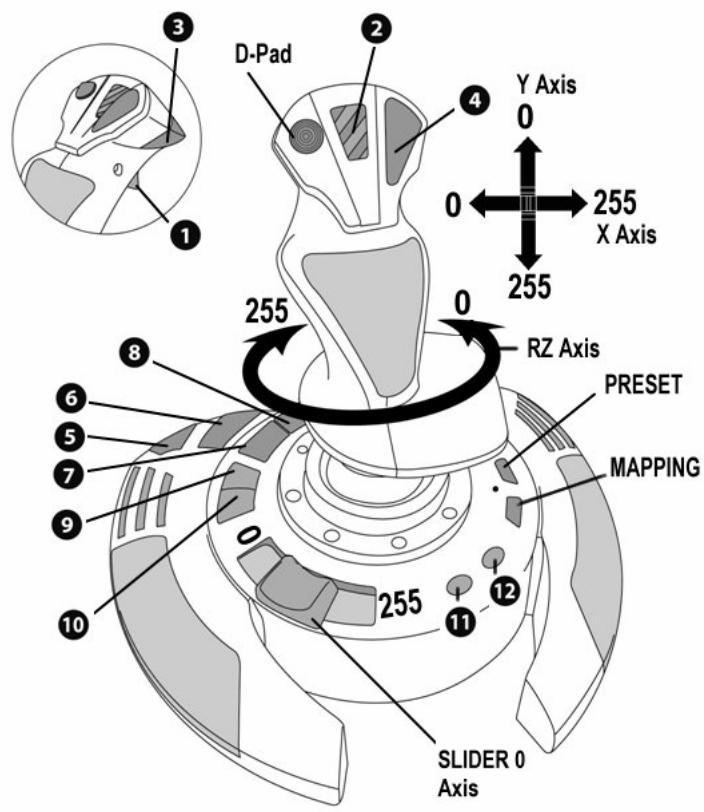
This preset corresponds to the default configurations for most aerial simulation games on PC.
It will therefore allow you to start playing your game right away, without having to reconfigure your joystick.
PLAYSTATION® 3
INSTALLATION ON PLAYSTATION® 3
- Set your joystick's USB selector (1) to the "PS3" position.
- Connect the USB connector (2) to one of your console's USB ports.
- Switch on your console.
- Launch your game.
You are now ready to play!
USING THE "HOME / PS" BUTTON
Your joystick's "Home / PS" button allows you to exit your games, access menus and directly switch off your PlayStation®3 system.
IMPORTANT NOTES FOR PLAYSTATION® 3
- Your joystick's USB selector (1) must always be set to the "PS3" position before connecting your joystick.
- In "1 Player" mode: If your official gamepad is on, you must switch it to "controller port 2" in order for your joystick to be functional.
- On PlayStation® 3, the joystick is only compatible with PlayStation® 3 games (and will not function with PlayStation® 2 games).
- When connecting your joystick: Leave the handle, rudder and throttle centered and do not move them (to avoid any calibration problems).
"AUTOMATIC PRESET" CONFIGURATION - PLAYSTATION® 3
"AUTOMATIC PRESET" diagram on PlayStation® 3
REDLED
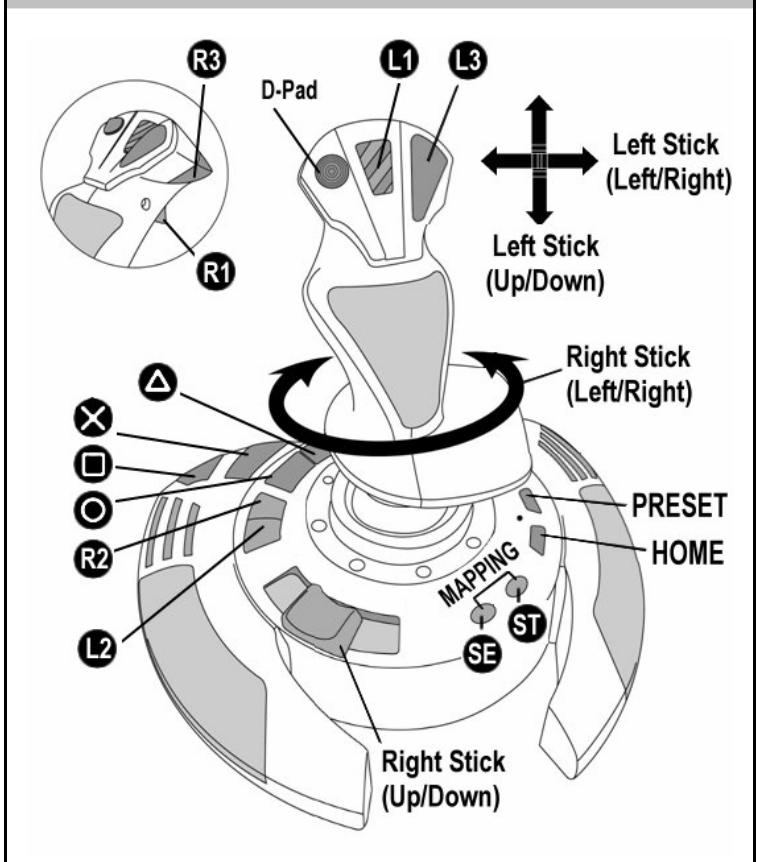
This preset corresponds to the default configurations for most aerial simulation games on PlayStation® 3. It will therefore allow you to start playing your game right away, without having to reconfigure your joystick.
The 4 handle directions: Correspond to the 4 directions on your gamepad's left mini-stick.
The throttle (6): Corresponds to the Up/Down directions on your gamepad's right mini-stick.
The rudder (5): Corresponds to the Left/Right directions on your gamepad's right mini-stick.
MAPPING button: Simultaneously press SELECT (SE) + START (ST).
HOME/PS button: Simply press the button.
GETTING TO KNOW YOUR JOYSTICK
Adjustable handle resistance
Depending on your gaming style, you may prefer to have an ultra-sensitive joystick, which responds to the slightest movement, or a firmer joystick, which offers a certain resistance when you use it.
Your joystick's handle resistance is adjustable, in order to adapt to all gamers. To adjust it, use the handle resistance adjustment dial (9) located under your joystick's base.
Throttle
The throttle is in the form of a thumb slider (6), easily accessible with your left hand resting on the base of your joystick.
Rudder function
Your joystick features a rudder function, which in a plane corresponds to the pedals used by the pilot to turn the steering, allowing the plane to pivot around its vertical axis (therefore making the plane turn left or right). This rudder function is accessible on your joystick by rotating the handle to the left or right.
If you are not using the rudder function in your games (or if you have programmed it onto action buttons), you can disable handle rotation thanks to the locking screw (5) located on the handle's base.
Use a flat head screwdriver to change the screw's position and thus lock/unlock the rudder function.
Multidirectional "Point Of View" hat-switch
Your joystick features a "Point Of View" hat-switch (3) which, as its name indicates, allows you (in games which permit) to instantly view everything that's going on around your plane. To do so, simply go to your game's configuration menu and program the different views (rear view, left view, right view, and also external views) onto the directions of the "Point Of View" hat-switch.
Of course, you can also use the "Point Of View" hat-switch for other functions instead (firing, etc.).
2 PROGRAMMING MODES
The PRESET button (8) and LED (7) allow you to view the type of programming selected: AUTOMATIC (preprogrammed) or MANUAL (programmed by yourself).
A single press of this button will allow you to switch from one programming mode to the other, even during the course of a game.
AUTOMATIC PRESET: RED LED
This represents the default programming: the axes, positions of the buttons and of the hat-switch are preprogrammed.
PLEASE REFER TO THE "AUTOMATIC PRESET" CONFIGURATION DIAGRAMS.
- MANUAL PRESET: GREEN LED
This represents your own person programming:
- The buttons, axes and the hat-switch can be switched between themselves.
- You can modify the programming to suit your taste and whenever you like.
- Programming is automatically saved in your joystick (even when it is disconnected).
- When your "MANUAL PRESET" is blank, it is identical to the "AUTOMATIC PRESET".
PROGRAMMING/MAPPING
You can program your joystick using the MAPPING button.
Attention: This button is not located in the same position on PC and PS3 (please refer to the diagrams):
- On PC: Directly press the button in question.
- On PS3: Simultaneously press START (ST) + SELECT (SE).
Examples of possible applications:
- Switching the positions of buttons.
- Switching axes between themselves = directions of the handle, of the throttle or of the rudder (In this case, you must map the 2 directions of the first axis to those of the second.)
- Switching the 2 directions of the same axis.
- Switching buttons with a direction of an axis or of the hat-switch.
- Exception:
On PlayStation® 3, the START (ST) and SELECT (SE) buttons also correspond to the MAPPING button (and therefore may not be reprogrammed).
PROGRAMMING PROCEDURE
| Steps | Action | LED |
| 1 | Enable MANUAL PRESET (8) by pressing the button. | GREEN |
| 2 | Press and release the MAPPING button. | OFF |
| 3 | Press and release the button or direction to program. | FLASHES GREEN |
| 4 | Press and release the button or direction onto which you wish to place your function. | GREEN |
Your "MANUAL PRESET" is now enabled and up to date (with your programming carried out).
EEPROM MEMORY
- Your joystick features an internal chip which saves all of your "MANUAL PRESET" programming in memory (even when the joystick is switched off or unplugged for a long period of time).
- You can save a different "MANUAL PRESET" for each platform used (one for PC and one for PlayStation® 3).
ERASING A "MANUAL PRESET"
| Steps | Action | LED |
| 1 | Enable your MANUAL PRESET (8). | GREEN |
| 2 | Press and hold the MAPPING button for 2 seconds. | FLASHES GREEN 2 SECONDS |
Your "MANUAL PRESET" is now blank (and once again identical to the "AUTOMATIC PRESET").
RETURNING TO "FACTORY SETTINGS"
You can erase all of your programming or settings carried out on both PC and PlayStation® 3 with a single step:
| Step | Action | LED |
| 1 | Simultaneously press the buttons MAPPING + 11 (SE) + 12 (ST) | FLASHES GREEN/RED 2 SECONDS |
All of your "MANUAL PRESETS" (PC + PS3) or settings are now blank.
Note: This operation will completely restart your joystick (on PC, we therefore recommend that you do this outside of games).
TROUBLESHOOTING AND WARNING
- My joystick doesn't function correctly or appears to be improperly calibrated:
- Switch off your computer or your console, disconnect your joystick, reconnect your joystick and then re-launch your game.
- When connecting your joystick: Leave the handle, rudder and throttle centered and do not move them (to avoid any calibration problems).
-
Exit your game, disconnect your joystick, verify that the USB selector (PC / PS3) (1) is set to the proper position, then reconnect your joystick.
-
I can't configure my joystick:
-
In your game's "Options / Controller / Gamepad or Joystick" menu: Select the most appropriate configuration or completely reconfigure the controller options.
- Please refer to your game's user manual or online help for more information.
-
You can also use your joystick's "MAPPING" function to resolve this type of problem.
-
My joystick is too sensitive or not sensitive enough:
-
Your joystick self-calibrates on its own after you have made a few movements on the different axes.
- In your game's "Options / Controller / Gamepad or Joystick" menu: Adjust the sensitivity or dead zones for your controller (if this option is available).
- Adjust the handle resistance using the dial (9) located under your joystick's base.
TECHNICAL SUPPORT
If you encounter a problem with your product, please go to http://ts.thrustmaster.com and click Technical Support. From there you will be able to access various utilities (Frequently Asked Questions (FAQ), the latest versions of drivers and software) that may help to resolve your problem. If the problem persists, you can contact the Thrustmaster products technical support service ("Technical Support"):
By email:
In order to take advantage of technical support by email, you must first register online. The information you provide will help the agents to resolve your problem more quickly. Click Registration on the left-hand side of the Technical Support page and follow the on-screen instructions. If you have already registered, fill in theUsername and Password fields and then click Login.
By telephone:
| United Kingdom | 08450800942Charges at local rate | Monday to Friday from Noon to 4pm and 5pm to 10pm Saturday from 9am to Noon and 1pm to 7pm Sunday from 9am to Noon and 1pm to 4pm |
| United States | 1-866-889-5036Free | Monday to Friday from 7am to 11am and from Noon to 5pm Saturday and Sunday from 7am to Noon (Eastern Standard Time) |
| Canada | 1-866-889-2181 Gratisuit / Free | Monday to Friday from 7am to 11am and from Noon to 5pm Saturday and Sunday from 7am to Noon (Eastern Standard Time) |
| Denmark | 80887690Free | Monday to Friday from 1pm to 5pm and 6pm to 11pm (English) Saturday from 9am to 1pm and 2pm to 8pm Sunday from 10am to 1pm and 2pm to 5pm |
| Sweden | 0200884567Free | Monday to Friday from 1pm to 5pm and 6pm to 11pm (English) Saturday from 9am to 1pm and 2pm to 8pm Sunday from 10am to 1pm and 2pm to 5pm |
| Finland | 0800 913060Free | Monday to Friday from 2pm to 6pm and 7pm to Midnight (English) Saturday from 10am to 2pm and 3pm to 9pm Sunday from 11am to 2pm and 3pm to 6pm |
WARRANTY INFORMATION
Worldwide, Guillemot Corporation S.A. ("Guillemot") warrants to the consumer that this Thrustmaster product will be free from material defects and manufacturing flaws for a period of two (2) years from the original date of purchase. Should the product appear to be defective during the warranty period, immediately contact Technical Support, who will indicate the procedure to follow. If the defect is confirmed, the product must be returned to its place of purchase (or any other location indicated by Technical Support).
Within the context of this warranty, the consumer's defective product will, at Technical Support's option, be either repaired or replaced. Where authorized by applicable law, the full liability of Guillemot and its subsidiaries (including for indirect damages) is limited to the repair or replacement of the Thrustmaster product. The consumer's legal rights with respect to legislation applicable to the sale of consumer goods are not affected by this warranty.
This warranty shall not apply: (1) if the product has been modified, opened, altered, or has suffered damage as a result of inappropriate or abusive use, negligence, an accident, normal wear, or any other cause not related to a material defect or manufacturing flaw; (2) in the event of failure to comply with the instructions provided by Technical Support; (3) to software not published by Guillemot, said software being subject to a specific warranty provided by its publisher.
Additional warranty provisions
In the United States of America and in Canada, this warranty is limited to the product's internal mechanism and external housing. Any applicable implied warranties, including warranties of merchantability and fitness for a particular purpose, are hereby limited to two (2) years from the date of purchase and are subject to the conditions set forth in this limited warranty. In no event shall Guillemot Corporation S.A. or its affiliates be liable for consequential or incidental damage resulting from the breach of any express or implied warranties. Some States/Provinces do not allow limitation on how long an implied warranty lasts or exclusion or limitation of incidental/consequential damages, so the above limitation may not apply to you. This warranty gives you specific legal rights, and you may also have other legal rights which vary from State to State or Province to Province.
COPYRIGHT
© 2007 Guillemot Corporation S.A. All rights reserved. Thrustmaster® is a registered trademark of Guillemot Corporation S.A. PlayStation® is a registered trademark of Sony Computer Entertainment, Inc. Windows®, XP and Vista are registered trademarks of Microsoft Corporation in the United States and/or other countries. All other trademarks and brand names are hereby acknowledged and are property of their respective owners. Illustrations not binding. Contents, designs and specifications are subject to change without notice and may vary from one country to another. Made in China.
ENVIRONMENTAL PROTECTION RECOMMENDATION


At the end of its working life, this product should not be disposed of with standard household waste, but rather dropped off at a collection point for the disposal of Waste Electrical and Electronic Equipment (WEEE) for recycling.
This is confirmed by the symbol found on the product, user manual or packaging.
Depending on their characteristics, the materials may be recycled. Through recycling and other forms of processing Waste Electrical and Electronic Equipment, you can make a significant contribution towards helping to protect the environment.
Please contact your local authorities for information on the collection point nearest you.
FAQs, tips and drivers available at www.thrustmaster.com
T.Flight StickX
INFORMATIONS RELATIVES À LA GARANTIE
TWEE PROGRAMMEERMODI
- MANUAL PRESET: GROENE LED
PROBLEM OPLOSSEN EN WAARSCHUWINGEN
INFORMATIE MET BETREKKING TOT DE GARANTIE
- MANUAL PRESET: LED VERDE
PykoBoOCTBO noJIb3OBaTeJIa
TEXHNUECKNEXAPAKTEPNCNTNKN
- celenktop USB (IK / PS3)
- USB-pa3bEmДЯп подкючени ПК nPlayStation® 3
- M HorOHa npaBneHHbI nepeKIOuHaeTbe BuaDa «hat-switch»
- 12 KOMaHdHbIX KHONOK
5.ФунклmaшTypbana c NOMOьH BpaaHoueMcyKoTKn
6.YnpabJIeHne cekTopom r3a 60JIbIIM nJIbUeM
7.ИнданаТор
8. KhoNka PRESET (PNEyCTAHOBKN) (OJIe 6bIbopa peXuma npoepaMMUPOEAHua)
9. PeryjTOp cOnpOTnBJIeHn pyKoTKn C BInTOBoI ΦnKCaUneI, KpyROBa I ShkaHaNCTPOIKN
#
YCTAHOBKA HA PIK
- Yctanobite celeKtop USBdkoIcTnka (1) B noJIOKeHne PIK.
- Пдклочite pa3bem USB (2) К odHomy n3 USB-NoptOB кOMMbtepe.Опационье cnCTembl Windows XP иn Vista abTomatuchekn obhapykaT hoBOE yctpoiCTBO.
3.Драиьеры установпав�юг са abTomat�есн.
BO3BPAT K 3ABOДСКИМ HACTPOИКAM
YdJIaIte BCE yCTaHOBJIeHHbIe I 3aDaHHbIe HAcTpoIK Ha PnATΦopMax PIK i PlayStation® 33a OdnH wa:
HeMoryHactpontbJXKoICTNK:
B MeHIO nIrpbl Options (Ipapametpb)/Controller (KoHTpoJIlep)/Gamepad (Vrroboi KOHTPOJIlep) mJIo Joystick (JxOoiCTNK): BbIbepnte 60nee noDxOJaUy KoHfMguraquio mIn oNHOCTbIO npEneHaCTpoTe cyHKmIo KOHTPOJIlep.
-Донолпельну Инфорmaцию CMOTPte B pykoBoJCTBe NOIb3ObaTeЯ IrgpbI NIN B INThepHete.
-Дя решени зтои поблемы takke мохно BOCNoJIb3ObaTbcЯ Функneи джоида «ПЕДУCTAHOBKA».
B 3aBcHmOCTn OT CBOIcTB, MaTePnaJIbI MOrTy nepeDaBaTbcra B nobToPhyIO nepepa60Ky.
NobTporahpepeBaT03XtOxD8n3EeKTHeCkoRIOeKToPONHOoB6OpOyOBaHmMOKET BHeCTn3AHTeHbN bKAdN BCOxAHPENHE OOKyAooIcpeDbI.
06ObatneTcB MeCThB opraHbI Bnactn 3a HnΦOpMaueH o 6bnHexaHem pyHKTe npMeA taks THXODB.