
OP650W - Hand blender GORENJE - Free user manual and instructions
Find the device manual for free OP650W GORENJE in PDF.


| Product Type | Hand Blender (Immersion Blender) |
| Brand | Gorenje |
| Model | OP650W |
| Power | 650 W |
| Speed Settings | 2 speeds + turbo |
| Blade Material | Stainless steel |
| Shaft Material | Stainless steel |
| Housing Material | Plastic |
| Dimensions (H x W x D) | 38 x 6 x 7 cm |
| Weight | 0.9 kg |
| Voltage | 220-240 V |
| Frequency | 50/60 Hz |
| Cord Length | 1.2 m |
| Accessories Included | Beaker (600 ml), whisk attachment |
| Detachable Shaft | Yes |
| Dishwasher Safe Parts | Shaft and beaker |
| Safety Features | Overheat protection, non-slip handle |
| Warranty | 2 years |
| Color | White |
Frequently Asked Questions - OP650W GORENJE
User questions about OP650W GORENJE
0 question about this device. Answer the ones you know or ask your own.
Ask a new question about this device
Download the instructions for your Hand blender in PDF format for free! Find your manual OP650W - GORENJE and take your electronic device back in hand. On this page are published all the documents necessary for the use of your device. OP650W by GORENJE.
USER MANUAL OP650W GORENJE

On/Off

Reverse

Start/Pause

Important:
Caution
Preparation for use
Add seeds or nuts to the hopper.
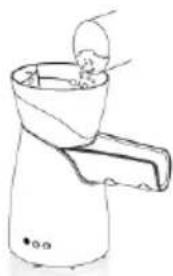
Close the hopper lid and place the containers for oil and pulp underneath.

Remove the hopper (2) and move the auger housing locking lever (10) to the unlocked position.

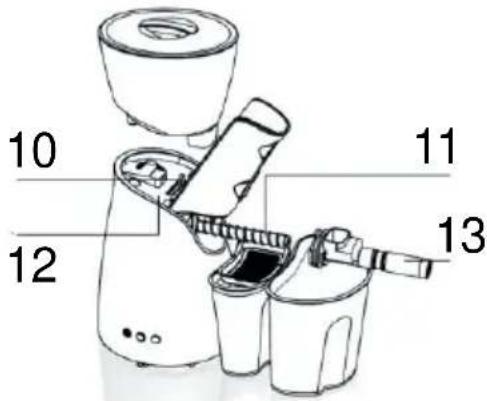
- Hopper lid
- Hopper
- Protective cover
- Housing
- Filter
- Power socket
- Control buttons
- Mixing bowl
- Oil container
- Worm housing locking lever
- Worm
- Motor drive cover
- Worm housing


Do not bring your eyes close to the filling opening, as an accident may occur. During operation, the worm and worm housing become hot, so do not touch these surfaces. Risk of burns!

Attention
Lift the protective cover (3).
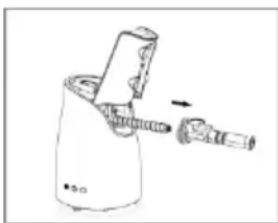
Pull out the worm housing (13) and the worm (11).
Clean the worm housing and worm with the supplied brush and a soft cloth. You can also use lukewarm water and a mild detergent for cleaning.

- Hopper lid
- Hopper
- Protective cover
- Housing
- Filter
- Power socket
- Control buttons
- Pulp container
- Oil container
- Auger housing lock lever
- Auger
- Motor drive cover
- Auger housing


Attention
Before plugging the appliance into the power supply and starting it, check that all parts of the appliance are properly assembled.
Use the appliance only if the cover is properly fitted.
Remove the hopper cover

Pour seeds or nuts into the hopper.
Note: use seeds or nuts that contain a high concentration of oil. Solid particles, such as stones, sand, metals, and similar, can damage the appliance. Seeds or nuts larger than a peanut must be crushed into smaller pieces!

Close the hopper lid and place containers for collecting oil and pulp under the appropriate openings.
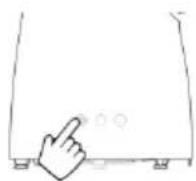
Plug the appliance into the electrical outlet. Press the "On/Off" button, then also press the "Start/Pause" button. The "On/Off" button starts blinking red.
After one minute, or when the appliance has heated to operating temperature, the button turns green and the appliance starts operating.
Remove the hopper (2) and move the locking lever of the auger housing (10) to the unlocked position.

Lift the protective cover (3).

Pull out the auger housing (13) and the auger (11).
Clean the auger housing and auger with the provided brush and a soft cloth. You can also use lukewarm water and mild detergent for cleaning.
Reassembling the appliance will be easier if you first insert only the auger, and only then the auger housing.
Troubleshooting/Error handling
 |
| zapušiti otvor u levku.4. Proverite da li je poklopac levka pravilno namešten. | |
| Levak ne može pravilno da nasedne na kućište. | 1. Proverite da li se poluga za blokadu kućišta puža (10) nalazi u položaju zaključano. |
| Polugu za blokadu (10) nije moguće prebaciti u položaj zaključano | 1. Prilikom sastavljanja aparata najpre umetnite puž, a tek zatim i kućište puža. |

On/Off

Repeat

Start/Pause

Important:
Warning

- Funnel lid
- Funnel
- Protective cover
- Housing
- Filter
- Power supply socket
- Control buttons
- Cake container
- Oil container
- Auger enclosure lock lever
- Auger
- Motor unit cover
- Auger enclosure

On/Off

Reverse
Start/pause

Important:
Before using the appliance for the first time, carefully read this instruction manual and save it for future reference. Also save the warranty sheet.
Warning
Before connecting the oil press to the power mains, make sure the voltage indicated on the appliance matches the power mains voltage in your home. To avoid hazard, do not connect the appliance to an external timer.
Only connect the appliance to a grounded power socket. Make sure the power plug is inserted correctly into the socket.
If the power cord is damaged, it may only be replaced by Gorenje,
Gorenje's authorized service and
repair centre, or an adequately trained professional.
If you notice any cracks or signs of damage on the appliance, discontinue its use and contact the nearest Gorenje authorized service and repair centre. Do not replace appliance parts yourself.
The appliance may not be used by children.
This appliance may be used by persons with reduced physical or mental abilities or lacking experience and knowledge if they have received instructions on safe use of the appliance or if they are supervised by a person responsible for their safety, who will warn them of any hazards.
For safety reasons, do not allow the children to play with the appliance.
Keep the appliance and the power cable out of reach of children.
Make sure the power cord does not hang over the edge of the table or worktop on which the appliance is placed.
To prevent short circuit or an electric shock, make sure your hands are dry when plugging the plug into the power socket and when switching on the appliance.
Do not leave the appliance to operate unattended.
During appliance operation, do not reach into the feed funnel and the main unit with your fingers or with any object.
Attention: When the funnel is in place, never pour liquid into it.

To avoid an accident, do not approach the feed opening with your eyes.
During operation, the auger and the auger enclosure will heat up. Do not touch these surfaces. Risk of burns!

Caution
The appliance is intended solely for household use.
Attention: The appliance is only intended for pressing the oil out of seeds and nuts.
Do not use attachments or spare parts by other manufacturers unless they are expressly recommended by Gorenje. Use of such attachments will void the warranty.
Only use the appliance on a stable and flat surface.
Before connecting the plug to the power socket, make sure the appliance is correctly assembled.
After use, immediately disconnect the appliance from the power mains.
After use, switch off the appliance and disconnect it from the power mains (remove the plug from the socket). Wait for the auger and the auger enclosure to stop and cool down before removing the attachments from the main unit.
Food colourants may cause discolouration of appliance parts. This is entirely normal and it does not affect the use of the appliance.
To prevent damage from heat deformation, do not clean any part with water at a temperature of over 60 °C or in a microwave oven.
Do not clean the appliance with scouring pads, caustic or corrosive cleaners, or aggressive liquids like gasoline, alcohol, or acetone.
Hazard: Do not immerse the main unit or appliance housing in water or any other liquid, and do not rinse it under running water. Only use a damp cloth to clean it.
Before switching on the appliance, make sure all components are correctly installed.
Only use the appliance if the lid is correctly in place.
Do not open the lid during appliance operation.
Make sure the motor unit is dry during appliance operation.
Maximum appliance use time is 30 minutes. When maximum time is reached, the appliance has to be left to cool down for at least 20 minutes before next use.
Always disconnect the appliance from the power mains after use.
The appliance features overheating protection. In case of overheating, the appliance will stop automatically. In such case, operation can only be resumed after 30 minutes.
This appliance is labelled in compliance with the European Directive 2012/19/EC on waste electric and electronic equipment – WEEE. The Directive specifies the requirements for collection and management of waste electric and electronic equipment effective in the entire European Union.
Preparation for use
- Remove the packaging.
- Clean the appliance as instructed in the section "Cleaning".

Use
Important: Store-bought nuts are usually not dry enough. We recommend drying such nuts before pressing for at least two or three hours in the sun or 30 minutes in an oven at a temperature of 80 °C. For best results, humidity in the nuts should not exceed 10%.
Remove the funnel cover.

Add seeds or nuts into the funnel.
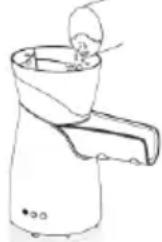
Note: Only use seeds or nuts with high oil content. Solid parts such as rocks, sand, and metal may damage the appliance. Seeds or nuts larger than peanuts should be chopped into smaller parts.

Close the funnel cover and put the oil and cake containers in place.

Connect the appliance to the power mains. Press the "on/off" button and then the "start/pause" button. The "on/off" button will start blinking in red. After one
minute or when the appliance heats up to operating temperature, the button will turn green and appliance operation will start.
If the on/off button is not pressed, the appliance will not operate.
The appliance has a built-in protection device. Thus, it stops automatically one minute after the funnel is emptied.
If the seeds are too large and the funnel is clogged, the appliance will stop automatically after one minute.
Seeds that are too moist or solid parts among the seeds may clog or block the auger. In such case, first press the "start/pause" button and then immediately press the "reverse" button and hold it for at least three seconds. The auger will start to rotate in the opposite direction in order to unclog.
Note: Using soy in this appliance is not recommended due to low oil content in soy beans.
Tips
Store-bought peanuts, walnuts, hazelnuts etc. are usually not dry enough. Pressing such nuts may block the auger and decrease the oil yield.
It is therefore recommended to toast the nuts or at least additionally dry them before using them in the appliance. If you decide to toast the nuts, make sure not the heat them to a temperature higher than 80 °C.
After pressing, we recommend letting the oil rest for at least 12 hours in a cool and dark place for the sediment to settle. Then, slowly decant the oil into tinted bottles. Do not discard the sediment as it is excellent for making sauces or dressings.
Cleaning
Before cleaning, unplug the appliance from the power mains and wait for the appliance to cool down.

Remove the funnel (2) and move the auger enclosure lock lever (10) to the "unlock" position.

Lift the protective cover (3).

Pull out the auger enclosure and the auger (11).
Clean the auger enclosure and the auger using the supplied brush and a soft cloth. You can also use lukewarm water and delicate detergent for cleaning.
After cleaning, thoroughly dry all parts.
Do not clean the appliance with scouring pads, caustic or corrosive cleaners or aggressive liquids like alcohol, gasoline, or acetone.
Appliance is easier to clean if it is cleaned immediately after use.
Do not use any metal accessories for cleaning as these may damage the appliance.
Do not immerse the motor unit in water and do not wash it under running water. Only use a damp cloth to clean it.
Do not wash the appliance or parts thereof in the dishwasher.

Reassembling the appliance is easier if you insert the auger first, and then the auger enclosure.
Troubleshooting
| Problem | Solution |
| Auger blocked | - Press the "reverse" button and hold it for 5–10 seconds. The auger will start to rotate in the opposite direction in order to unclog. Then, press the start/pause button to restart the appliance.- Disconnect the appliance from the power mains, disassemble it and clean it. |
| The | - It is normal. The appliance |
| appliance does not work; red signal light is flashing. | needs to preheat for 30 to 60 seconds. Flashing red light is a sign that the appliance is heating up.- Make sure the funnel cover is correctly in place. |
| The appliance will switch off automatically. | - Check if the funnel is empty. The appliance has a built-in protection device. Thus, it stops automatically one minute after the funnel is emptied.- If the appliance is operated for a long period of time, overheating protection may be activated. Wait for the appliance to cool down completely. If the appliance still does not function, disassemble it and clean it.- Check if the funnel is clogged. Large nuts may clog the opening in the funnel.- Make sure the funnel cover is correctly in place. |
| The funnel cannot be correctly attached to the housing/main unit. | - Make sure the auger enclosure lock lever (10) is in the lock position. |
| The lock lever (10) cannot be shifter to the "lock" position. | - When assembling the appliance, first insert the auger and then the auger enclosure. |
Control light messages
| Control light | Message |
| Rapid blinking in red | Preheating |
| Blinking in red | Appliance ready for operation. Press "start/pause". |
| Slowly blinking in red | Pause. Press "start/pause" to resume or restart operation. |
| Blinking in green | Operation |
| Rapid blinking in green | Auger rotating in reverse direction. |
| Red and green blinking alternately. Acoustic signal is emitted. | Error |
Environment
After the expiry of its useful life, do not discard the appliance with common household waste. Take it to an authorized recycling centre. This will help preserve the environment.
Warranty and repair
For more information or in case of problems, please visit the Gorenje website at
www.gorenje.com or contact Gorenje customer service in your country (phone numbers are listed in the International Warranty Sheet). If there is no such centre in your country, please contact the local Gorenje dealer or Gorenje's small domestic appliance department.
For personal use only!
GORENJE
WISHES YOU A LOT OF PLEASURE IN USING YOUR APPLIANCE.
We reserve the right to modifications.
General description

On/Off
Reverse
Start/pause
Important:
Attention

Caution

Hopper lid
On/Off button
Back
Start/pause
Important:
Warning
ON/OFF

Reverse

Start/pause

Important:
Do not bring your eyes close to the filling opening to avoid injury.
Caution
Close the hopper lid and insert the oil and cake tanks into place.

Pull out the funnel (2) and move the spiral housing adjustment lever (10) to the "unlocked" position.
Pull out the spiral housing and the spiral (11).

ON/OFF

Reverse
Start/Pause

Important:
Warning
Pull out the spiral housing and the spiral (11).

Warning!

ON/OFF

REVERSE

START/PAUSE

Important
Switch on/off

Reverse

Start/Pause

Important:
Caution


Brand : GORENJE
Model : OP650W
Category : Hand blender