
HNC 9.8 AB X/HA - Dishwasher HOTPOINT - Free user manual and instructions
Find the device manual for free HNC 9.8 AB X/HA HOTPOINT in PDF.

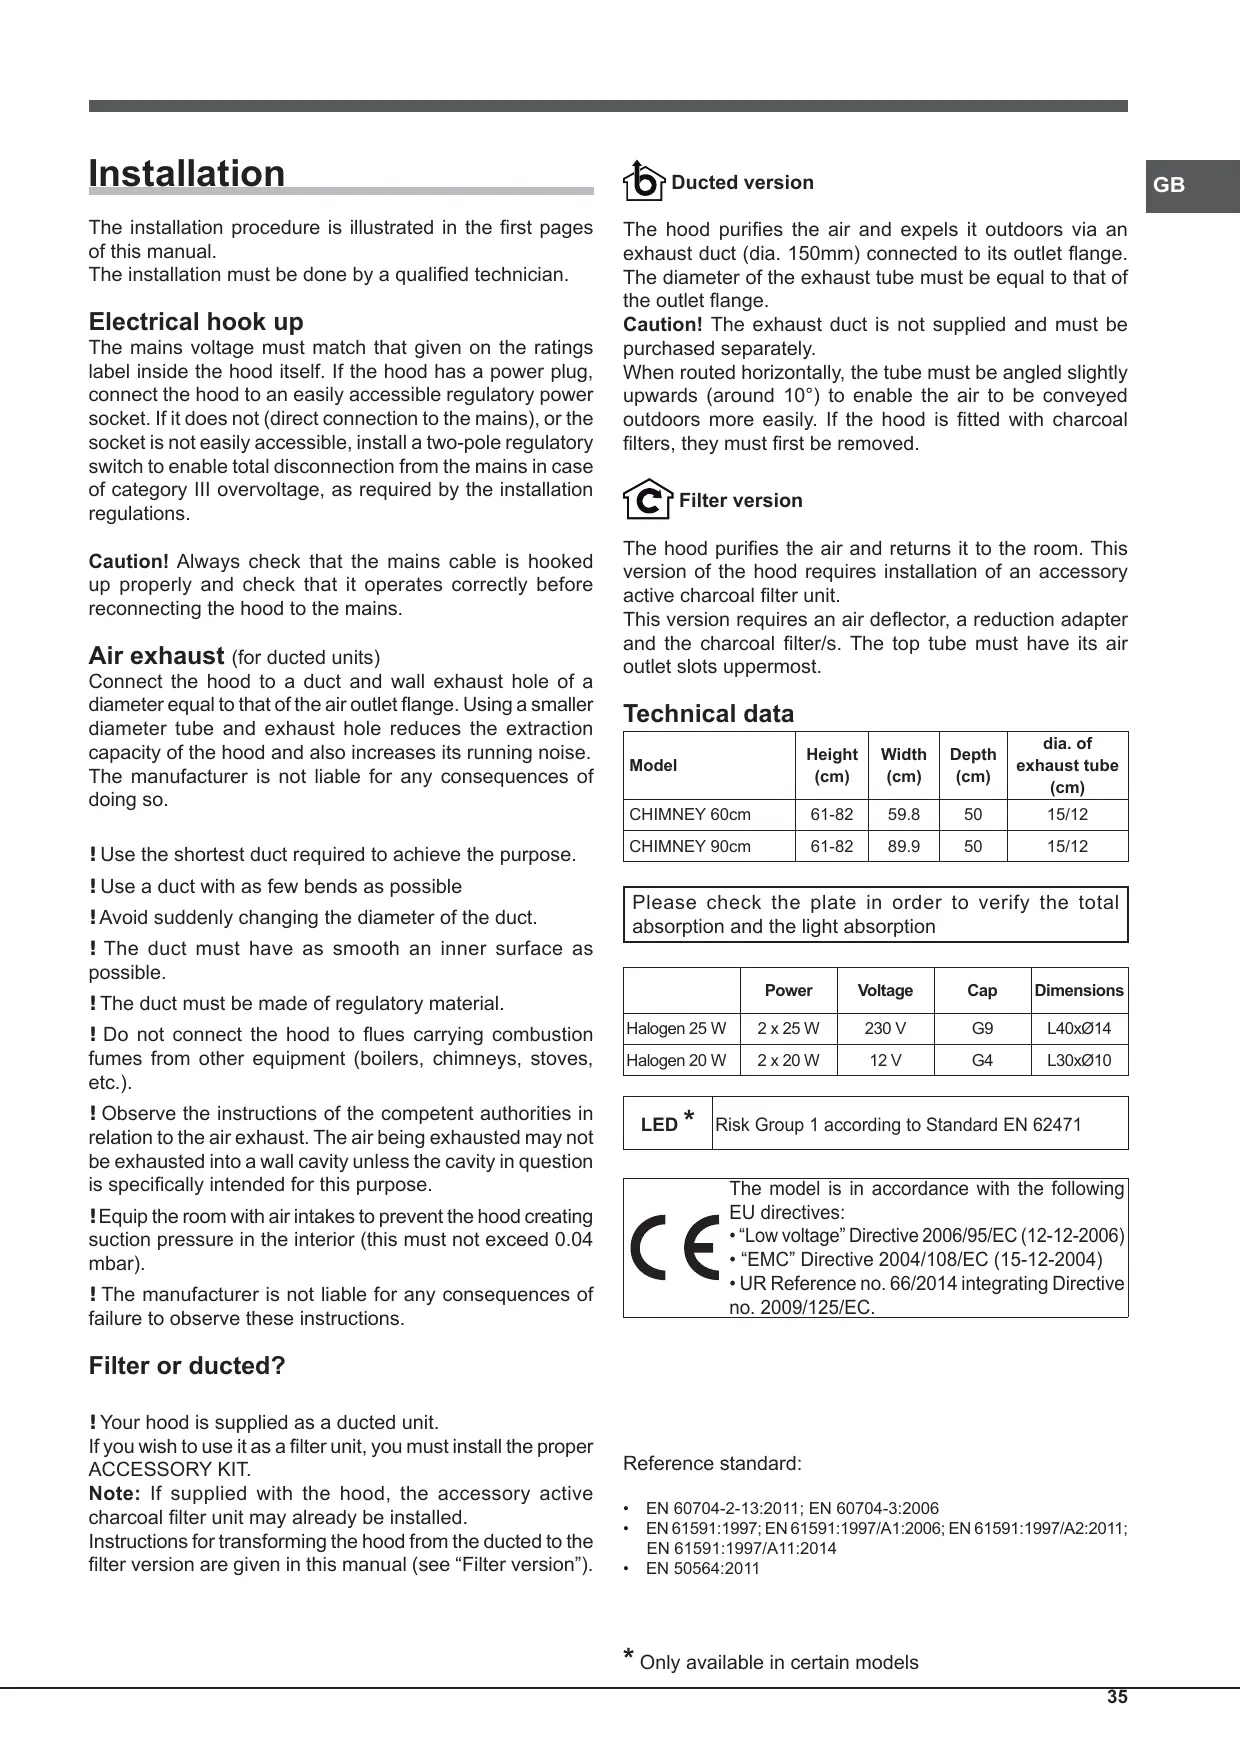


| Product Type | Cooker Hood |
| Brand | HOTPOINT |
| Model | HNC 9.8 AB X/HA |
| Dimensions (W x D x H) | 89.9 x 50 x 61-82 cm |
| Weight (approx.) | Approximately 15 kg |
| Supply voltage | 230 V |
| Maximum power | 240 W (motor + lighting) |
| Exhaust duct diameter | 150 mm (or 120 mm with reducer) |
| Installation type | External evacuation or recirculation (optional charcoal kit) |
| Available speeds | 3 speeds + intensive (booster) function |
| Grease filter | Metal, dishwasher safe (monthly) |
| Charcoal filter | Replacement every 20 months (not washable) |
| Lighting | 2 halogen G9 25 W bulbs or LED (depending on version) |
| Main material | Brushed stainless steel |
| Minimum distance above cooking surface | 65 cm (gas) / 55 cm (electric) |
| Filter saturation indicators | Yes (button blinking) |
| Noise level (approx.) | 50-65 dB(A) depending on speed |
Frequently Asked Questions - HNC 9.8 AB X/HA HOTPOINT
User questions about HNC 9.8 AB X/HA HOTPOINT
0 question about this device. Answer the ones you know or ask your own.
Ask a new question about this device
Download the instructions for your Dishwasher in PDF format for free! Find your manual HNC 9.8 AB X/HA - HOTPOINT and take your electronic device back in hand. On this page are published all the documents necessary for the use of your device. HNC 9.8 AB X/HA by HOTPOINT.
USER MANUAL HNC 9.8 AB X/HA HOTPOINT
Operating Instructions COOKER HOOD
Contents
Operating Instructions, 1
Assembly, 4
Warnings, 10
Assistance, 28
Installation, 35
Chimney controls, 36
Maintenance and care, 36
Troubleshooting, 38

Spanish
! Keep this manual for reference. If you sell, transfer or move the unit to another location, make sure to keep the manual with the product. ! Read the instructions carefully - they contain important installation, user and safety information. ! Do not tamper with the electrical or mechanical equipment of the product or
its exhaust ducts.
General safety information
- The distance between the cookware support surface on top of the cooking appliance and the lowest part of the cooker hood must be at least:
65 cm if the hood is installed over a gas cooktop, 55 cm if the hood is installed over an electric cooktop.
If the installation instruction manual for the gas cooking appliance specifies a greater distance, this measurement should be taken into account.
- The cooker hood comes with anchor plugs which are suitable for use with most walls/ceilings. However, you must contact a qualified technician to check the suitability of the materials in relation to the type of wall/ceiling, which must be strong enough to support the weight of the unit.
- Caution! Do not hook the unit up to its electrical power supply until the installation has been completed.
- Before cleaning or servicing the unit, disconnect it from the mains by pulling the power plug or disconnecting the main circuit breaker.
- Always wear work gloves when installing and servicing the unit.
- It is not intended for use by children or persons with sensory or mental disability and lack of experience or familiarity, except under the supervision or instruction of a person responsible for their safety.
- Make sure children do not play with the unit.
- Never operate the unit without its grease filter installed!
- NEVER use the hood as a support, unless expressly instructed to do so.
- The room must be adequately ventilated if the hood is used at the same time with other equipment burning gas or other fuels.
- Extracted air must not be conveyed into a duct used for exhausting combustion fumes from gas or other fuel-fired equipment.
- Observe all regulations in relation to air extraction.
- NEVER cook food with an open flame under the hood; open flames will damage the filters and may cause fires. Never do this.
- Always supervise frying to make sure the heated oil does not catch fire.
- Strictly observe all local regulations in relation to the technical and safety measures to be employed in fumes extraction.
- Clean the product frequently, inside and out (AT LEAST ONCE A MONTH, and in observance of the maintenance instruction given in this manual).
- Failure to observe the hood cleaning and filter cleaning/replacement instructions can result in fires.
- Never use the hood without its bulbs properly installed - electrocution hazard.
- The manufacturer is not liable for any inconvenience, damage or fire caused by the unit as a result of failure to observe the instructions given in this manual.
- Caution! The unit's accessible parts can get very hot when used with cooking equipment.
- This appliance can be used by children aged from 8 years and above and persons with reduced physical, sensory or mental capabilities or lack of experience and knowledge if they have been given supervision or instruction concerning use of the appliance in a safe way and understand the hazards involved. Children shall not play with the appliance. Cleaning and user maintenance shall not be made by children without supervision
The minimum distance between the supporting surfaces of the cooking hob and the lowest part of the extractor hood must be not less than:
65 cm, if the hood is installed above a gas hob with a 55 cm width, or if the hood is installed above an electric hob.
If the installation instructions for the gas hob specify a greater distance, this must be taken into account when installing the hood.
The hood is supplied with fixing screws designed for most types of walls and ceilings. However, it is necessary to consult a qualified technician for
PPOBepKn PnroDnOCTN MaTepeNaIOB B COOTBcTbN C TINOM CTeHbI/NOTOLKa, KOtOpbIe DoJXHbI 6bITb DOCTaTOUHO PPoUHbIMn DnA BECa KxOHNo BbITaJxKn.
- Bнимане! He подочауприборк Эльектосядо поного заBERшени мOLTажа.
- Перацалом кaknx-lno bo pabot no qucTke nIIN Tex. O6cnykBaHNO OTcoeHNHTe BbITJxKy OT 3JIeKTpocETN, BbIHyB 7TeNCeJbHyU BnIKy N3 cTeBOi P03eTKI IN BblKJIuOuH B oSni BblKJIuOHaTeJb BДOME. Дя Вынонец BCex pa6ot no MOHTaJy n Tex. 6cIyKuBaHnHO HaDeBaTb pa6OuHe nepuAtkN.
- I3dJIe He npEHa3HaueHo IJIa NcNoIb3OBaHnA DeTbMn IJIu JIuCaMn C OrpaHnUeHHbIMN 0n3nueCKmN, CeHCOPHbIMN IJIu yMCTBeHHbIMN cNoCObHOCTaMn, 6e3 OnbIta n 3HaHnA, 6e3 KOHTpOJa IJIu OByeHnja npaBnIaM NcNoIb3OBaHnA I3dJIy JIuCaMn, OTBeuaOuIIMN 3a INx 6e3OpaSchoCTb. Cneinte, TTo6bI Detn He nIrpaln C n3dennem.
- HNKoIda He nCNoJIb3yIte n3dJeIne 6e3 npaBnIbHO yCTaHOBJIeHHOrO JxIpOBOrO fIJIbTpa!
- HNKOДА He ИспόлььзуйTe Кухоннуов ВытяжКУВ КачесТBE onopнОиоверхноCTи, ecIn эTOЧETКО He pa3peшеHo.
- Помешене должнохоршо npobetpnbatbca, когда Кухонная Bытжka ИспOLTьетсяОДНовременс другимприборами на ra3у улінHom Горючem ТОПЛИBE.
- YdaJIaIeMbI B03dUx He DoJIXeH NOnaIaTb B DbIMoxoD, IcNoJIb3yEmbI JIaYdaJIeHnIy DbIMa OT N3deJIiN C Ra3OBbIM TOJIINBOM INI INHbIM TOpIOChM TOJIINBOM.
- Co6JIIOJaIte Bce HOpMaTINBbI NO DblMOydaJIeHnIO. Kateropnueckn 3anpeaetcra roTOBNTb Ha OTKpbITOM PJaMeHn
ПОД KУOHNo BbITJxKoI; OTKpbIToE Пламя можET NOBpeДNTь ФиЛБТры И пИВЕСТИ K BO3rOpaHnIO, ПОЗТому erо ИспОлььЗOBaHne KaTeROpNueeCKn 3aIpeшаETcЯ.
- PekomeHnyetc HnpepbBNO KOHTpOJInpOBaTb npIroTOBJeHne 6JIoD BO pIHToP BO n36eKaHne BO3rOpAHnI rOpAYeMaCna. -ПравILA.texнии бezоноасно, рименьемы К сntеме дыmoудаленяdoлжнbl CTporo COOTBETCTBOBaT HopmatuBam MecTHbIX KOMNETHTbIX OpraHOB.
- PekomeHdyetcpeyIapHo qnCTnTb n3dJIne KaK n3HyTpN, TaK n ChapJxN (HEPEXEOHOTOPA3ABMECAY, B IIO6OM clyuae co6JIoDaTb IHCTpyKcIIN NO Tex. OBCnyKbAHNo, pRnBeJeHHbIe B HactOaIeM Tex. pyKOBoDCTBe).
- HecobJIoJeHne npaBnI no yXoJy 3a KxOHHO BbITJKKOIN 3aMeHe N YnCTKe QnJIbTPOB nPnBOIDNT K BO3rOpAHIO. He nCnoJIb3yIte nIIn He octaBnIte BblTJkKy 6e3 npabNlboH O yCTaHOBJIeHHbIX JAmNoYeK, TaK KaK 3TO MOKeT npNBecTn K ydApY TOKOM.
- ПОНЗВОДИТЕЛСНИМаETССЕБАВСЯКУЮ OTВETCTBEHNOCTь 3aBO3MOЖнBLE NOВPEЖDEHNY,уцepбилпОжары,КOTOPБIЕ MOrYT CJIyUHTbCSaN3deJIINEM IOПрИЧИNE HeCoBЛЮDEHNYИHCTUPKЦИ,ПрИВeДeEHнblXВHACTOJU伸TEX.pyKOBODCTBE. BhImaHHe! OTkpbItbIe yactn MoryT cnIbHO HaPepTbcra OT BapOuHOI paHeJI. -Данhoeи3делme можетбыть NCПОЛБ3OBaHO DeTbMn CTapшe 8петилцamN C OгранчeHHbIMNФИЗЧECKIMN,CEHcOрНыIMNIIYMCTBHeHbIMN CNOco6HocTЯМNII6e3 OпытaN 3HaHЯ O npaВилax NCПОЛБ3OBaHЯ N3ДeJIЯПри YCПОВИнНаджашero KOHTPOMI INI OБчЕнЯ6e3ОпаСHOMY NCПОЛБ3OBaHInO N3ДeJIЯc UyeTOM COOTBeTCTByUOxN PNUCKOB.He pa3peшайTe DeTЯ M nIgpaTb C N3ДeJIem. He pa3peшaiTe DeTЯM
OCyUeCTBJIaTb YnCtKu I yXoI 3a n3dJIeNem 6e3 KOHTpOJa B3PocJIbIX.
UA
3açtepeşkhi 3ac06n
!Важлво 3берети се кервицтво,шоб matи harodу 3berpaTисяdo HbOTo y 6ydЯкni мочent.В pa3i npodaЖу,пepedaqui abo nepeizdy cnilд пepekonatИся,шо сe keribnucTBO cynpobODxye Bnpi6.
ASSISTANCE - SPARE PARTS, ACCESSORIES
199.199.199
NUMERO UNICO
! Never use the services of an unauthorised technician.
Please have the following information to hand:
The type of problem encountered. The appliance model (Mod.). The serial number (S/N).
The latter two pieces of information can be found on the data plate located on the appliance.
FR
Assistance
Do not contact unauthorized technicians.
When contacting the Technical Service Centre, please provide:
The type of fault;
Model (Mod.)
Serial number (S/N)
You will find these data on the rating plate located on the appliance.
UA
Road
Contact qualified professionals.
Help line:
Malfunctions; - Model (Mod.) Serial number (S/N)
"Low voltage" Directive 2006/95/EC (12-12-2006) EMC "Directive 2004/108/EC (15-12-2004)
The installation procedure is illustrated in the first pages of this manual.
The installation must be done by a qualified technician.
Electrical hook up
The mains voltage must match that given on the ratings label inside the hood itself. If the hood has a power plug, connect the hood to an easily accessible regulatory power socket. If it does not (direct connection to the mains), or the socket is not easily accessible, install a two-pole regulatory switch to enable total disconnection from the mains in case of category III overvoltage, as required by the installation regulations.
Caution! Always check that the mains cable is hooked up properly and check that it operates correctly before reconnecting the hood to the mains.
Air exhaust (for ducted units)
Connect the hood to a duct and wall exhaust hole of a diameter equal to that of the air outlet flange. Using a smaller diameter tube and exhaust hole reduces the extraction capacity of the hood and also increases its running noise. The manufacturer is not liable for any consequences of doing so.
! Use the shortest duct required to achieve the purpose.
! Use a duct with as few bends as possible
! Avoid suddenly changing the diameter of the duct.
! The duct must have as smooth an inner surface as possible.
! The duct must be made of regulatory material.
! Do not connect the hood to flues carrying combustion fumes from other equipment (boilers, chimneys, stoves, etc.).
! Observe the instructions of the competent authorities in relation to the air exhaust. The air being exhausted may not be exhausted into a wall cavity unless the cavity in question is specifically intended for this purpose.
! Equip the room with air intakes to prevent the hood creating suction pressure in the interior (this must not exceed 0.04 mbar).
! The manufacturer is not liable for any consequences of failure to observe these instructions.
Filter or ducted?
! Your hood is supplied as a ducted unit.
If you wish to use it as a filter unit, you must install the proper ACCESSORY KIT.
Note: If supplied with the hood, the accessory active charcoal filter unit may already be installed.
Instructions for transforming the hood from the ducted to the filter version are given in this manual (see "Filter version").

Ducted version
GB
The hood purifies the air and expels it outdoors via an exhaust duct (dia. 150 mm) connected to its outlet flange. The diameter of the exhaust tube must be equal to that of the outlet flange.
Caution! The exhaust duct is not supplied and must be purchased separately.
When routed horizontally, the tube must be angled slightly upwards (around 10°) to enable the air to be conveyed outdoors more easily. If the hood is fitted with charcoal filters, they must first be removed.

Filter version
The hood purifies the air and returns it to the room. This version of the hood requires installation of an accessory active charcoal filter unit.
This version requires an air deflector, a reduction adapter and the charcoal filter/s. The top tube must have its air outlet slots uppermost.
Technical data
| Model | Height (cm) | Width (cm) | Depth (cm) | dia. of exhaust tube (cm) |
| CHIMNEY 60cm | 61-82 | 59.8 | 50 | 15/12 |
| CHIMNEY 90cm | 61-82 | 89.9 | 50 | 15/12 |
| Please check the plate in order to verify the total absorption and the light absorption |
| Power | Voltage | Cap | Dimensions | |
| Halogen 25 W | 2 x 25 W | 230 V | G9 | L40xØ14 |
| Halogen 20 W | 2 x 20 W | 12 V | G4 | L30xØ10 |
| LED* | Risk Group 1 according to Standard EN 62471 |
The model is in accordance with the following EU directives:
Low voltage" Directive 2006/95/EC (12-12-2006) EMC" Directive 2004/108/EC (15-12-2004) - UR Reference no. 66/2014 integrating Directive no. 2009/125/EC.
Reference standard:
EN 60704-2-13:2011; EN 60704-3:2006 EN61591:1997;EN61591:1997/A1:2006;EN61591:1997/A2:2011 EN61591:1997/A11:2014 EN 50564:2011
- Only available in certain models
Models with soft button keypad
HNC9.8LBX/HA
HNC6.8ABX/HA
HNC9.8ABX/HA
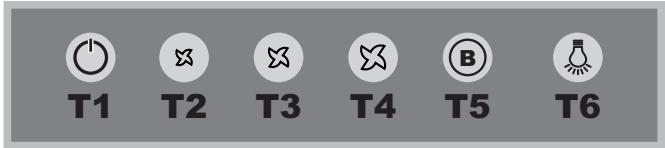
T1 Motor reset
Press the button with the hood off to set speed 1. Pressing the button while the hood is in operation turns it OFF.
T2 Speed 1
Pressing the button sets the hood to speed 1.
T3 Speed 2
Pressing the button sets the hood to speed 2.
T4 Speed 3
Pressing the button sets the hood to speed 3.
T5 Booster
Pressing the button sets the hood to high speed. After 5 minutes, the hood returns to the previous speed; pressing a speed button (T2, T3 or T4) quits booster mode and sets the selected speed.
T6 Lights ON/OFF
Grease/odour filter warnings
The T2 icon flashes to indicate that the grease filter is saturated, while T3 flashes to indicate that the odour filter is saturated, and if both are flashing then both filters are saturated. You must then clean/replace the grease filter (A) or odour filter (B) or both, accordingly (see “Maintenance and care”).
To reset the filter counter:
Hold down T5 for three seconds while the hood is on.
The warning led flashes three times, then returns to its normal mode. If both filter warnings are active at the same time, you must reset each separately.
The first sequence resets the grease filter, while the second sequence resets the odour filter.
Hood configuration:
To set the operating mode of the hood, hold down T5 for 6 seconds while the product is off. Icons T2 or T3 will light up to show the type of installation: T2 ventilation, T3 filtering. You can change the type of installation by pressing T4 cyclically.
To save the new configuration press T1 individually.
Maintenance and care
Caution! Before cleaning or servicing the unit, disconnect it from the mains by pulling the power plug or disconnecting the main circuit breaker.
First cleaning
- Remove the protective film
- Clean with a damp sponge and a little neutral soap
- Rinse off with a damp cloth
- Dry with a soft cloth; if the hood is stainless steel, dry along the metal's grain
Periodic cleaning
The hood must be cleaned frequently (at least as often as you service the grease filter), inside and out. Use a damp cloth and a neutral liquid detergent with lukewarm water. Do not use abrasive or corrosive products.
Warning: Failure to observe the hood cleaning and filter cleaning/replacement instructions can result in fires. Follow the instructions carefully. The manufacturer is not liable for any damage to the motor or fires caused by incorrect care or failure to follow the above instructions.
Servicing the grease filter (A)

The grease filter retains the particles of grease produced during cooking; it must be cleaned at least once a month with a non-aggressive detergent, either by hand or with a low temperature, short dishwasher cycle.
To extract the grease filter, pull the spring loaded handle.
If washed in a dishwasher, the metal filter may change colour, but this does not affect its performance.
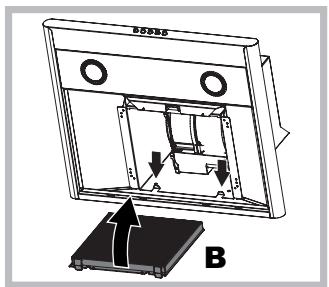
Servicing the charcoal filter (B)
The charcoal filter retains unpleasant cooking odours. The filter saturates after a variable time, depending on the type of cooking and how often the grease filter is cleaned. The cartridge must be replaced at least once every twenty months. This filter can NOT be washed or regenerated
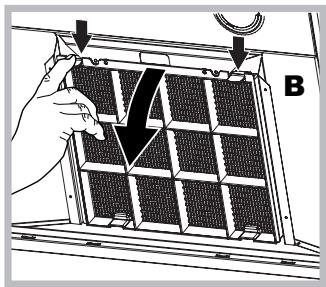
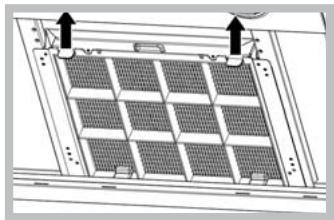
Disassembly: Remove the activated-carbon filter by pressing the two front levers which secure it to the hood.
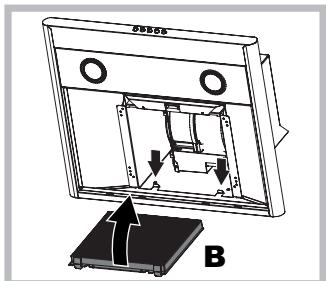
Assembly: Secure the activated-carbon filter first in the back using the hood's metal tabs and then in the front by pressing the two levers.
Replacing the bulbs
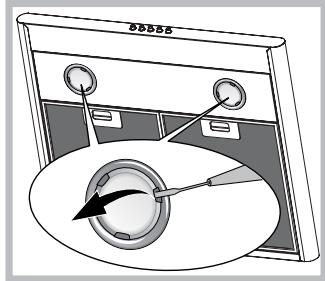
Disconnect the unit from the mains and remove the grease filter.
Caution! Make sure the bulbs are cool before touching them.
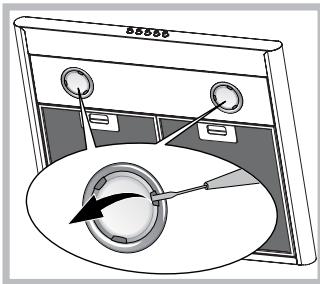
- Extract the guard by prising it out with a small flat head screwdriver or something similar.
- Replace the faulty bulb. Use only bulbs of the same type (for details, see the technical data in the following manual).
- Refit the guard (push it in).
Replacing the lights LED *
The hood is fitted with a lighting system based on LED technology. The LEDs ensure optimal lighting, longer life and lower consumption compared with traditional lights. To replace them please contact the assistance service.
Electrical cable
If the power cable is damaged, it can be replaced by the manufacturer or his technical service, to prevent any attendant risks.
SCRAPPING
The unit is marked for conformity with European Directive 2012/19/EC, Waste Electrical and Electronic Equipment (WEEE). By ensuring that the unit is scrapped properly, the user contributes to safeguarding the environment and public health.

The symbol on the product or on its accompanying documents indicates that the product may not be treated as domestic waste but must be handed over to a sorting centre for electrical and electronic waste. Dispose of it in accordance with local waste disposal regulations. For further information on the handling, recovery and recycling of this product, contact the local authority, domestic waste disposal service or the reseller from whom you purchased it
Troubleshooting
If something does not work, make the following simple checks before contacting Technical Service:
If the hood does not operate:
Check that:
the unit is powered up. - a speed has been set.
If the hood is not working effectively:
Check that:
- the selected motor speed is sufficient to handle the amount of smoke and steam being produced.
- the kitchen is adequately ventilated for the unit to take air in.
- the charcoal filter is not exhausted (filter version).
If the hood turns off during normal operation:
Check that:
the unit is powered up. - the circuit breaker has not tripped.
In case of faulty operation, before contacting Technical service, first disconnect the machine from the mains for at least 5 seconds by pulling its plug, then reconnect it. If the fault persists, contact Technical Service.
Save energy and respect the environment
- Please use the hood by setting the speed in line with the real extraction need; please limit the use of the "intensive speed" feature, if present. Using the hood in a rational way allows you to limit energy consumption and to avoid an useless waste of clean and air-conditioned air.
- Please don't turn on the hood light unless this is needed to light the cooking area.
Installation
Save energy and respect the environment
- Please use the hood by setting the speed in line with the real extraction need; please limit the use of the "intensive speed" feature, if present. Using the hood in a rational way allows you to limit energy consumption and to avoid an useless waste of clean and air-conditioned air.
- Please don't turn on the hood light unless this is needed to light the cooking area.
- Available only on certain models
Installation
"Low voltage" Directive 2006/95/EC (12-12-2006) EMC" Directive 2004/108/EC (15-12-2004)
If the hood does not work:
Check:
Presence of electrical power - whether the speed has been set.
Low suction efficiency:
Check:
- That the set speed of the motor is sufficient for the volume of steam and smoke. - That the duct is not blocked or too long. - That the charcoal filters are not saturated (filtering version).
If the hood switches off during operation:
Check:
Electrical connections did not work for multi-pole disconnectors.
In case of possible malfunctions, before contacting service, disconnect the exhaust approximately for 5 sec. from the mains supply, pull the plug out of the wall socket, then reconnect. If the malfunction is not eliminated, contact service.
Exhaust air modification
The exhaust air duct must be routed to the outside through appropriate pipes (diameter 150 mm), or connected to a flange with an equivalent diameter.
Warning! The pipe for exhaust air outlet is not included in the delivery set and must be purchased separately. On the horizontal section, the pipe must have a slight slope upwards (approximately 10°) to facilitate exhaust air outlet. If the hood is equipped with carbon filters, they must be removed.

Filter modification
The duct is used for air exhaust and supply to the room. To use the duct in recirculation mode, it is necessary to install an additional filtration system based on activated carbon. This modification requires an air deflector, a reducer, and a carbon filter. In the upper pipe there must be openings for air outlet, located in the upper part.
Technical data
Filter 1 for recirculation mode, carbon type. The filter is installed in the recirculation mode, it is replaceable.
T2 Carbon filter 1
In recirculation mode, filter 1 is installed.
T3 Carbon filter 2
In recirculation mode, filter 2 is installed.
T4 Carbon filter 3
In recirculation mode, filter 3 is installed.
T5 Kymei
When the button is pressed, the filter is quickly replaced. After 5 minutes, the filter is replaced with a new one; when the button is pressed (T2, T3 or T4), the filter is replaced in intensive mode and the new filter is installed.
T6 Adding/removing filters
Filter replacement specialists
If the T2 indicator is lit, it means the filter is clogged; if the T3 indicator is lit, it means the first filter is clogged; if both are lit, it means both filters are clogged. In that case, the filter (A) and the filter (B) or both need to be replaced (see the "Technical Service and Maintenance" section).
Replacing the filter:
When the filter is clogged, press the T5 button and hold it for 5 seconds.
The replacement indicator will light up, then return to normal mode.
If both filter replacement indicators are lit at the same time, they must be replaced one after the other.
First replace the filter, then the filter.
Filter replacement:
To replace the filter in intensive mode, press the T4 button and hold it for 6 seconds. To select the replacement type, use the T2 or T3 indicators: T2 - replace, T3 - filter.
Press the T4 button repeatedly to change the replacement type.
To replace the filter, press the T1 button twice.
Technical Service and Maintenance
Attention! Before starting work, it is necessary to disconnect the device from the power supply and wait until the rotating parts come to a complete stop.
Cleaning the device
Before cleaning, disconnect the device from the power supply and let it cool down. Wipe the device with a soft, dry cloth. If the dirt is difficult to remove, wipe with a slightly damp cloth.
Cleaning the filter
Clean the filter with a soft brush or rinse it under running water (if it is very dirty). Let it dry completely before putting it back.
Do not use abrasive or aggressive cleaning agents.
Note: If cleaning and filter cleaning/replacement instructions are not followed, proper operation is not possible. Do not operate the device without the filter. If the motor is damaged or the device malfunctions, contact the service center.
Device maintenance (A)
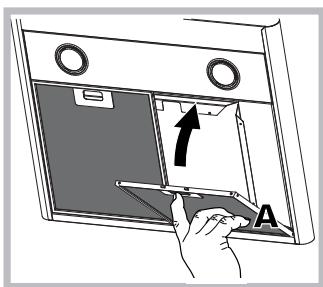
If the device is very dirty, clean it with a soft brush or cloth; if necessary, use a mild detergent and wipe with a damp cloth.
To remove the device cover, press the button
Carefully. If the cover is stuck, do not force it; instead, press the button again.
Filter maintenance (B)
The filter is installed in the filter slot. To clean the filter, remove it from the slot and clean it according to the cleaning instructions. Then reinsert it.
If necessary, replace the filter with a new one. Do not use the device without the filter.
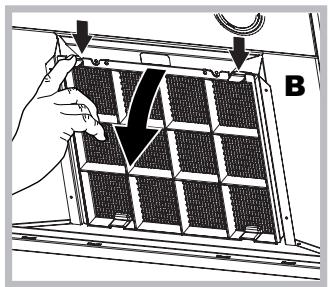
Storage: Store the device in a dry place, away from direct sunlight, and keep the filter clean.
Structure: The device is intended for cutting and welding of ferrous metals, as well as for cutting with two cutting edges and welding.
Operation
Turn off the device, disconnect the power supply. Attention! Before opening the housing, wait a while.
1. Remove the device from the housing: press the release button or use a screwdriver to pry it out. 2. Clean the device with a dry cloth. Do not use solvents (for cleaning, use the technical brush provided). 3. Replace the device in its original position (insert, replace).
LED indicator
The device has a protection system based on modern technology. It protects against overheating, overcurrent, and short circuits. If it activates, wait a few minutes before using it again.
Electrical connection
If the power cord is damaged, it must be replaced by the manufacturer or its technical service to avoid danger.
DISPOSAL
This device is marked with the symbol of a crossed-out wheeled bin in accordance with the European Directive 2012/19/EU on Waste Electrical and Electronic Equipment (WEEE).
The crossed-out wheeled bin symbol indicates that this product must not be disposed of with household waste. It must be taken to a collection point for recycling of electrical and electronic equipment.

The device and its accessories must be disposed of separately from household waste. Dispose of them at an appropriate collection point for electrical and electronic equipment. Follow local regulations for waste disposal. For more information on collection, reuse, and recycling programs, contact your local authorities, the waste disposal service, or the store where you purchased the device.
Accessories
If the device malfunctions, contact the technical service center and provide the following information:
If the device malfunctions:
KeNeci KaFdaIaIapDbI TeKcepH3:
Kypblfbl KocblbnTyp. - XbIJaMdBk OPhaTbINFaH.
Copfbiu TImdi kymbc ic iTeMece:
KeNeci KaFdaIaIapDbI TeKcepH3:
TaHdaJFaH MOTOp KbIJaMdbIbI IbIKKaH TyTih MeH 6y KeJIemH eHdeYre xeTKijIKTi. Kypblfbyayaanybi yuih ac yinde Tnicti BEHTnlaucna 6ap. Kemip cy3ri KaHBiKaFaHaC (Cy3y Hcckacbl).
Kymbc icten Typran Ke3ne, copbuiw ewin KaiaTbIH 6onca:
KeNeci KaFdaIaIapDbI TeKcepH3:
KypblfblKocblbnTyp. aBipbIKCKblIJKCobImaFaH.
AkaYbI JyMbIC icTeReH XaFdaaJa, TexHnKaIbIK KbI3MET KepcTeTy opTaIbIFbIHa xaabapnacnac 6ypbIH, aIbIPbIH aftTy apKblbl KpyblfbiTOKtaH KEM dereHde 5 ceKyHdka aftbIbIN, KaTaN KocbIHbI3. AkaybIK WseWJmMece, TexHnKaIbIK KbI3MET KepcTeTy opTaIbIFbIHa xaabapnacbIHbI3.
3KOHOMbTe 3HeprnIO n 6bepeRrTe okpykaIoUo cpeNy
- IcnojIb3yIte BbITJxKky, yCTaHaBnIBaR cKOpocTb B COOTBeTCTBUN C peaJIbHbIMN NOTpe6HOCTaM; ORpaHUnBaIte NCNoJIb3OBAHne OyHKUIN «NOBbIWeHHaR cKOpocTb》(“intensive speed”)prn HaIuHm TaKOBo. IcnoJIb3OBAHne BbITJxKKn paUHOHaJIbHbIM Cnocobom No3BOJIeT ORpaHUnBaTb NOTpe6JeHne 3Heprn N 136eRaTb BeCNoJe3HOJ TpaTbI YNCTOrO IN KOHNIOHINPOBaHHO BO3dyxa.
- He BkIIOuAte OcBeUeHne BbITaKn, KpOme ClyuaeB, KOrda 3To Heo6XoDnMo dJIa OCBeUeHnBaPouHoi NobepxHOCTn.
KZ
KZ
Indesit Company S.P.A.
Viale Aristide Merloni, 47
60044 Fabriano (AN)
www.hotpoint.eu
- OPERATING INSTRUCTIONS COOKER HOOD
- UA
- AÇTEPEŞKHI 3AC06N
- FR
- ASSISTANCE
- ROAD
- ELECTRICAL HOOK UP
- AIR EXHAUST (FOR DUCTED UNITS)
- FILTER OR DUCTED
- DUCTED VERSION
- FILTER VERSION
- REFERENCE STANDARD
- MODELS WITH SOFT BUTTON KEYPAD
- T1 MOTOR RESET
- T2 SPEED
- T3 SPEED
- T4 SPEED
- T5 BOOSTER
- T6 LIGHTS ON/OFF
- GREASE/ODOUR FILTER WARNINGS
- TO RESET THE FILTER COUNTER
- HOOD CONFIGURATION
- MAINTENANCE AND CARE
- FIRST CLEANING
- PERIODIC CLEANING
- SERVICING THE GREASE FILTER (A)
- SERVICING THE CHARCOAL FILTER (B)
- REPLACING THE BULBS
- REPLACING THE LIGHTS LED
- ELECTRICAL CABLE
- SCRAPPING
- TROUBLESHOOTING
- IF THE HOOD DOES NOT OPERATE
- IF THE HOOD IS NOT WORKING EFFECTIVELY
- IF THE HOOD TURNS OFF DURING NORMAL OPERATION
- SAVE ENERGY AND RESPECT THE ENVIRONMENT
- INSTALLATION
- IF THE HOOD DOES NOT WORK
- LOW SUCTION EFFICIENCY
- IF THE HOOD SWITCHES OFF DURING OPERATION
- EXHAUST AIR MODIFICATION
- FILTER MODIFICATION
- T2 CARBON FILTER
- T3 CARBON FILTER
- T4 CARBON FILTER
- T5 KYMEI
- T6 ADDING/REMOVING FILTERS
- FILTER REPLACEMENT SPECIALISTS
- REPLACING THE FILTER
- FILTER REPLACEMENT
- TECHNICAL SERVICE AND MAINTENANCE
- CLEANING THE DEVICE
- CLEANING THE FILTER
- DEVICE MAINTENANCE (A)
- FILTER MAINTENANCE (B)
- OPERATION
- LED INDICATOR
- ELECTRICAL CONNECTION
- DISPOSAL
- ACCESSORIES
- IF THE DEVICE MALFUNCTIONS
- COPFBIU TIMDI KYMBC IC ITEMECE
- KYMBC ICTEN TYPRAN KE3NE, COPBUIW EWIN KAIATBIH 6ONCA
- KOHOMBTE 3HEPRNIO N 6BEPERRTE OKPYKAIOUO CPENY
Brand : HOTPOINT
Model : HNC 9.8 AB X/HA
Category : Dishwasher