
MiniVac FC6093 - Vacuum Cleaner PHILIPS - Free user manual and instructions
Find the device manual for free MiniVac FC6093 PHILIPS in PDF.


| Product Type | Handheld Vacuum Cleaner |
| Model | MiniVac FC6093 |
| Brand | Philips |
| Dimensions (L x W x H) | Approx. 20 x 15 x 8 cm |
| Weight | Approx. 1.2 kg |
| Power Source | 200-240V AC, 50/60 Hz |
| Power Consumption | 600 W |
| Dust Capacity | 0.5 L |
| Filter Type | Washable reusable filter |
| Cord Length | 5 m |
| Suction Power | Adjustable with air vent |
| Included Attachments | Crevice tool, brush nozzle |
| Noise Level | Approx. 80 dB |
| Housing Material | ABS plastic |
| Color | White/Blue |
| Cleaning Maintenance | Empty dust container after use; wash filter every 3 months |
| Safety Features | Overheat protection, double insulation |
| Availability of Spare Parts | Filters, attachments, and dust bags available online |
| Warranty | 2 years |
| Certifications | CE, RoHS |
Frequently Asked Questions - MiniVac FC6093 PHILIPS
User questions about MiniVac FC6093 PHILIPS
0 question about this device. Answer the ones you know or ask your own.
Ask a new question about this device
Download the instructions for your Vacuum Cleaner in PDF format for free! Find your manual MiniVac FC6093 - PHILIPS and take your electronic device back in hand. On this page are published all the documents necessary for the use of your device. MiniVac FC6093 by PHILIPS.
USER MANUAL MiniVac FC6093 PHILIPS
Register your product and get support at
www.philips.com/welcome
FC6095, FC6093, FC6091

PHILIPS

ENGLISH 6
БЪЛГАРСКИ 15
ČEŠTINA 25
EESTI 34
HRVATSKI 43
MAGYAR 52
КАЗАКША 61
LIETUVIŠKAI 71
LATVIEŠU 80
POLSKI 89
ROMÂNĂ 98
РУССКИЙ 108
SLOVENSKY 118
SLOVENŠČINA 127
SRPSKI 135
УКРАЇНСЬКА 144
Introduction
Congratulations on your purchase and welcome to Philips! To fully benefit from the support that Philips offers, register your product at www.philips.com/welcome.
General description (Fig. 1)
1 Bendable crevice tool (FC6093/6091)
2 Floor nozzle (FC6095 only)
3 Cleaning brush
4 Crevice tool
5 Brush tool
6 Socket for car cord (FC6093 only)
7 Contact points
8 Connection for telescopic stick (FC6095 only)
9 Charging socket
10 Charging light
11 Exhaust air openings
12 On/off slide
13 Dust compartment release button
14 Motor inlet grille
15 Filter holder
16 Inner HEPA filter
17 Outer filter
18 Dust compartment
19 Nozzle release button
20 Nozzle insert
21 Detachable nozzle
22 Nozzle & stick holder (FC6095 only)
23 Wall mounting bracket
24 Charger
25 Adapter
26 Car cord with car plug (FC6093 only)
27 Telescopic stick (FC6095 only)
Important
Read this user manual carefully before you use the appliance and save it for future reference.
Danger
- Never suck up water or any other liquid. Never suck up flammable substances and do not suck up ashes until they are cold.
- Never immerse the vacuum cleaner, the charger or the adapter in water or any other liquid.
Warning
- Check if the voltage indicated on the appliance corresponds to the local mains voltage before you connect the appliance.
- Do not use the vacuum cleaner, the charger or the adapter if it is damaged.
- Do not use the appliance if it is damaged in any way. Take it to an authorised Philips service centre for repair.
- If the adapter or charger is damaged, always have it replaced with one of the original type in order to avoid a hazard.
- FC6093 only: if the car cord or car plug is damaged, stop using the car cord and have it replaced with one of the original type.
- This appliance is not intended for use by persons (including children) with reduced physical, sensory or mental capabilities, or lack of experience and knowledge, unless they have been given supervision or instruction concerning use of the appliance by a person responsible for their safety.
- Children should be supervised to ensure that they do not play with the appliance.
Caution
- Remove the adapter from the wall socket before you clean the charger.
- Only charge the vacuum cleaner with the adapter and charger supplied. During charging, the adapter feels warm to the touch. This is normal.
- Always switch off the vacuum cleaner after use.
ENGLISH8
- The voltage on the contact points in the charger is low (max. 30 volts) and therefore not dangerous.
- Never block the exhaust air openings during vacuuming.
- Make sure the appliance is switched off when you charge it.
- Always use the vacuum cleaner with the filter unit assembled.
- Always use the appliance with the nozzle insert in place.
- To avoid the risk of electric shock, be careful when you drill holes in the wall to attach the charger, especially close to a wall socket.
Noise levels
- FC6095: Lc = 80 dB(A)
- FC6093: Lc = 79 dB(A)
- FC6091: Lc = 78 dB(A)
Electromagnetic fields (EMF)
This Philips appliance complies with all standards regarding electromagnetic fields (EMF). If handled properly and according to the instructions in this user manual, the appliance is safe to use based on scientific evidence available today.
Preparing for use
Placing the charger
1 To attach the charger to the wall:
- Screw the wall mounting bracket to the wall with the screws supplied with the appliance (Fig. 2).
- Place the charger on the wall mounting bracket (1) and push the charger downwards to fix it (2) (Fig. 3).
- Attach the nozzle & stick holder to the wall mounting bracket (FC6095 only).
- Screw the nozzle & stick holder to the wall with the screws supplied with the appliance.
2 To use the charger without attaching it to the wall:
- Place the charger on a level and horizontal surface. (Fig. 4)
3 Slide the brush tool onto the crevice tool and place them in the charger (Fig. 5).
4 FC6095 only: insert the telescopic stick and the floor nozzle into the nozzle & stick holder ('click') (Fig. 6).
Charging the appliance
Caution: Make sure the appliance is switched off when you charge it.
Charge the appliance for at least 18 hours before you use it for the first time.
Tip: If you are not going to use the appliance for a longer period of time, remove the adapter from the wall socket to save energy.
1 Charge the appliance in one of the following two ways:
- Insert the small plug into the charger, insert the adapter into the wall socket, and place the appliance on the charger (Fig. 7).
- Insert the small plug into the charging socket of the appliance and insert the adapter into the wall socket (Fig. 8).
The charging light on the appliance goes on to indicate that the appliance is charging (Fig. 9).
Note: The charging light stays on as long as the appliance is placed on the charger and the adapter is in the wall socket.
Note: The charging light does not give any information about the charge level of the built-in battery pack.
Using the appliance
1 Push the on/off slide forwards to switch on the appliance (Fig. 10).
2 Push the on/off slide backwards to switch off the appliance. (Fig. 11)
3 Leave the adapter in the wall socket and always put the vacuum cleaner back onto the charger after use, even if the battery pack is still almost fully charged.
Accessories
Tools
This appliance comes with the following tools:
1 Brush tool for cleaning delicate surfaces
2 Crevice tool for cleaning hard-to-reach places
3 Bendable crevice tool for cleaning at an angle (FC6093/6091 only)
1 Take the tool you want to use.
2 Attach the tool to the detachable nozzle (Fig. 12).
Car cord (FC6093 only)
With the car cord, you can connect the vacuum cleaner to the cigarette lighter socket in your car. You can use it as long as necessary without having to recharge it.
1 Insert the small plug of the car cord into the car cord socket of the appliance. Then insert the car plug into the cigarette lighter socket of your car (Fig. 13).
Note: The car cord cannot be used to charge the appliance.
2 Press the button on the small plug to detach the car cord from the appliance.
Caution: To prevent damage, do not pull the small plug out of the appliance without pressing the button.
Telescopic stick (FC6095 only)
1 Push the telescopic stick firmly into the back of the appliance until it locks into position ('click') (Fig. 14).
The telescopic stick gives you extra reach when you clean hard floors, carpets and hard-to-reach areas.
2 Attach the floor nozzle to the detachable nozzle (Fig. 15).
The floor nozzle can be used to vacuum hard floors and carpets.
The floor nozzle is equipped with a fluff collector that removes hair and fluff.
Note: Pass the fluff collector gently over the hairs and/or fluff to be removed. The hairs and/or fluff are worked loose from the surface, collected and then sucked up.
Note: The floor nozzle allows you to stop the vacuuming for a short time (e.g. to answer the phone) without bending and putting the stick on the floor. Simply push the stick forwards until the rib and the ridge on the floor nozzle are aligned. This makes the vacuum cleaner stand upright independently (Fig. 16).
3 Adjust the stick to the length you find most comfortable during vacuum cleaning. Push the ring downwards and pull the upper part of the stick upwards or push it downwards (Fig. 17).
4 To detach the telescopic stick, press the release button on the back of the vacuum cleaner (1) and pull the stick out of the appliance (2) (Fig. 18).
Cleaning
Danger: Never immerse the vacuum cleaner, the charger or the adapter in water or any other liquid.
Always disconnect the charger and the appliance from the mains before you clean them.
1 Clean the charger and the appliance with a damp cloth.
Dust compartment and filters
Make sure you empty the dust compartment and clean the filters regularly.
We advise you to clean the filters every 2 to 4 weeks to maintain optimal suction performance.
Quick cleaning
To empty the dust compartment quickly:
1 Press the nozzle release button to remove the detachable nozzle (Fig. 19).
ENGLISH12
2 Shake the contents of the dust compartment out into a dustbin (Fig. 20).
Thorough cleaning
To clean the dust compartment and the filter unit thoroughly:
1 Hold the appliance over a dustbin, press the dust compartment release button (1) and remove the dust compartment (2). (Fig. 21)
2 Take the filter unit out of the dust compartment (Fig. 22).
3 Shake the dust compartment out with your free hand to empty it.
4 Turn the outer filter anticlockwise to remove it from the filter holder and clean the filter (Fig. 23).
5 Gently turn the inner HEPA filter anticlockwise to remove it from the filter holder (Fig. 24).
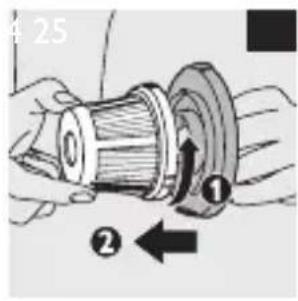
6 Clean the inner HEPA filter and the outer filter with the cleaning brush supplied. (Fig. 25)
Brush the inner HEPA filter from the top downwards along the ribs of the filter.
If necessary, you can clean the outer filter and the inner HEPA filter in cold or lukewarm water.
The inner HEPA filter and outer filter are not dishwasher-proof.
7 Turn the inner HEPA filter clockwise to attach it to the filter holder (Fig. 26).
8 Place the outer filter back onto the filter holder and turn it clockwise to fasten it (Fig. 27).
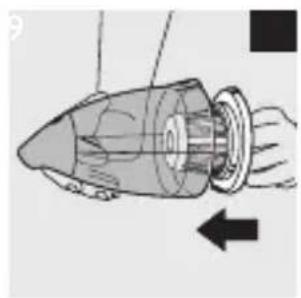
9 Place the filter unit back into the dust compartment (Fig. 28).
Never put the filter unit back into the dust compartment when the outer filter and inner filter are still wet.
10 To clean the detachable nozzle, press the nozzle release button to remove the detachable nozzle from the appliance (Fig. 19).
11 Pull the nozzle insert out of the detachable nozzle.
Both the nozzle insert and the detachable nozzle can be cleaned in warm water with some washing-up liquid or in the dishwasher.
Make sure the nozzle insert and the detachable nozzle are dry before you reattach them to the appliance.
12 Reattach the dust compartment to the body of the vacuum cleaner ('click').
Replacement
Replace the inner HEPA filter if it can no longer be cleaned properly (usually after it has been cleaned about 50 times).
You can buy new HEPA filters from authorised Philips service centres.
1 Take the filter unit out of the dust compartment (Fig. 22).
2 Turn the outer filter anticlockwise (1) and remove it from the filter holder (2) (Fig. 23).
3 Gently turn the inner HEPA filter anticlockwise (1) and remove it from the filter holder (2) (Fig. 24).
4 Place a new inner HEPA filter on the filter holder (1) and turn the HEPA filter clockwise to fix it. (Fig. 26).
5 Place the outer filter back onto the filter holder (1) and turn the outer filter clockwise to fix it (2) (Fig. 27).
Environment
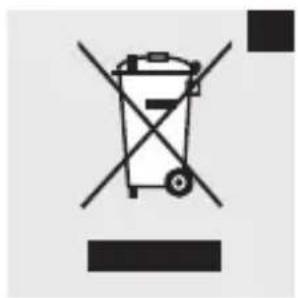
- Do not throw away the appliance with the normal household waste at the end of its life, but hand it in at an official collection point for recycling. By doing this, you help to preserve the environment (Fig. 29).
- The built-in rechargeable battery pack contains substances that may pollute the environment. Always remove the battery pack before you discard and hand in the appliance at an official collection point. Dispose of the battery pack at an official collection point for batteries. If you have trouble removing the battery pack, you can also take the appliance to a Philips service centre. The staff of this centre will
ENGLISH14
remove the battery pack for you and will dispose of it in an environmentally safe way.
Removing the battery pack
NiMH battery packs may explode if exposed to high temperatures or fire.
Only remove the battery pack if it is completely empty.
Remove the battery pack in the following way:
1 Let the appliance run until it stops.
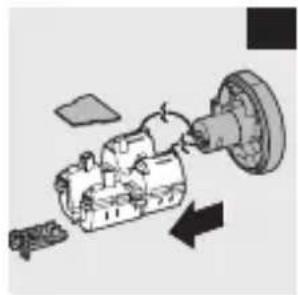
2 Loosen and remove the screws. Open the vacuum cleaner (Fig. 30).
3 Cut the connecting wires one by one and remove the battery pack (Fig. 31).
Saving energy
If you are not going to use the appliance for a longer period of time, we advise you to remove the adapter from the wall socket to save energy.
Guarantee & service
If you need information or if you have a problem, please visit the Philips website at www.philips.com or contact the Philips Customer Care Centre in your country (you find its phone number in the worldwide guarantee leaflet). If there is no Customer Care Centre in your country, go to your local Philips dealer or contact the Service Department of Philips Domestic Appliances and Personal Care BV.
YBOA



- INTRODUCTION
- GENERAL DESCRIPTION (FIG. 1)
- IMPORTANT
- DANGER
- WARNING
- CAUTION
- ENGLISH8
- NOISE LEVELS
- ELECTROMAGNETIC FIELDS (EMF)
- PREPARING FOR USE
- PLACING THE CHARGER
- 1 TO ATTACH THE CHARGER TO THE WALL
- 2 TO USE THE CHARGER WITHOUT ATTACHING IT TO THE WALL
- 3 SLIDE THE BRUSH TOOL ONTO THE CREVICE TOOL AND PLACE THEM IN THE CHARGER (FIG. 5)
- CHARGING THE APPLIANCE
- USING THE APPLIANCE
- ACCESSORIES
- TOOLS
- CAR CORD (FC6093 ONLY)
- TELESCOPIC STICK (FC6095 ONLY)
- CLEANING
- DUST COMPARTMENT AND FILTERS
- QUICK CLEANING
- ENGLISH12
- THOROUGH CLEANING
- REPLACEMENT
- ENVIRONMENT
- ENGLISH14
- REMOVING THE BATTERY PACK
- SAVING ENERGY
- GUARANTEE & SERVICE
- YBOA
Brand : PHILIPS
Model : MiniVac FC6093
Category : Vacuum Cleaner