Approx APPIP01WV4 - Surveillance Camera

APPIP01WV4 - Surveillance Camera Approx - Free user manual and instructions

Find the device manual for free APPIP01WV4 Approx in PDF.

📄 129 pages English EN Download 💬 AI Question 10 questions ⚙️ Specs
Notice Approx APPIP01WV4 - page 17
Pick your language and provide your email: we'll send you a specifically translated version.
Product Type Surveillance Camera
Brand Approx
Model APPIP01WV4
Dimensions (L x H x D) 10 x 6 x 5 cm
Weight 150 g
Power Supply 5V DC via USB adapter
Video Resolution Full HD 1080p
Night Vision Yes, range up to 10 meters
Viewing Angle 120 degrees
Connectivity Wi-Fi 2.4 GHz
Audio Function Built-in microphone
Motion Detection Yes, with push notifications
Storage microSD card (up to 128 GB) or cloud
Compatibility iOS and Android
Maintenance and Cleaning Clean with a soft, dry cloth
Security SSL/TLS encryption
Spare parts and repairability Non-disassemblable device, repair by professional
General Information Indoor use only

Frequently Asked Questions - APPIP01WV4 Approx

How to reset the camera to factory settings?
Press and hold the reset button on the back for about 10 seconds until the indicator flashes red.
Which app to use to set up the camera?
Download the Approx View app from the App Store or Google Play.
How to insert a microSD card?
Open the rubber cover at the bottom of the camera and insert the card with the contacts facing up until it clicks.
The camera does not connect to Wi-Fi, what should I do?
Make sure your network is 2.4 GHz, the password is correct, and the camera is within 5 meters of the router during setup.
Can I use the camera without an SD card?
Yes, you can use cloud storage via the app, but a subscription may be required.
How to view recordings?
Open the Approx View app, go to the 'History' tab, and select the desired date.
Night vision is not working, why?
Make sure the night vision option is enabled in the app settings and that the infrared sensors are not blocked.
How to share camera access with another user?
In the app, go to 'Settings' > 'Share' and enter the person's email address.
What is the range of the microphone?
The microphone picks up sounds within a range of about 5 meters.
How to update the camera firmware?
The app notifies you of updates. Follow the instructions to download and install it automatically.

User questions about APPIP01WV4 Approx

0 question about this device. Answer the ones you know or ask your own.

Ask a new question about this device

The email remains private: it is only used to notify you if someone responds to your question.

No questions yet. Be the first to ask one.

Download the instructions for your Surveillance Camera in PDF format for free! Find your manual APPIP01WV4 - Approx and take your electronic device back in hand. On this page are published all the documents necessary for the use of your device. APPIP01WV4 by Approx.

USER MANUAL APPIP01WV4 Approx

natural_image Two-panel image showing a device being connected to a server via an LED, with no visible text or symbols.

Approx APPIP01WV4 - 1

flowchart
graph LR
    A["Remote Port"] -->|Network cable| B["Router/Switch"]
    B -->|Network cable| C["Computer"]

Run History Run History on the website What is what? How much better Network Camera Run History Run History on the website What is what? How much better Network Camera

Wireless Lan Settings 123[002586745b2c] infra WEP ChinaNet-RCJZ[00255e1dc55a] infra WPA/WPA 1[00258637ee26] infra None hybf[001478661226] infra WEP Scan Using Wireless Lan SSID ChinaNet-RCJZ Network Type Infra Encryption WPA Personal (TKIP) Share Key Submit Refresh

6.3 Pregunta 3: Como utilizar DDNS

DONS Service Settings Manufacturer's DONS Manufacturer's Domain e254.aspx.com Third Party DONS DONS Service 3302 arg(dyndex) DDNS User specendema DDNS Password ********** DDNS Host specendema 3302.org Submit Refresh

1. PRODUCT INTRODUCTION

Thank you for choosing the APPIP01WV4 wireless IP Camera solution.

1.1 Product overview

This is an integrated wireless IP Camera solution. It combines a high quality digital Video Camera with network connectivity and a powerful web server to bring clear to your desktop from anywhere on your local network or over the Internet.

The basic function of it is transmitting remote video on IP network. The high quality video image can be transmitted with 30fps speed on the LAN/WAN by using MJPEG hardware compression technology.

It is based on TCP/IP standard, build-in WEB server which could support Internet Explore. Therefore the management and maintenance of your device become more simply by using network to achieve the remote configuration, start-up and upgrade firmware. You can use this IP Camera to monitor some special places such as your home and your office. Also controlling and managing images are simple by clicking the website through the network.

1.2 PRODUCT FEATURES

  • Powerful high-speed video protocol processor
    • High-sensitivity 1/4" CMOS sensor
    • Picture total 300k pixels
    • Support PT control, Pan 270, Tilt 120
  • Optimized MJPEG video compression for transmission
  • Multi-level users' management and passwords definition
  • Embedded Web Server for users to visit by IE

English

  • Support wireless network (WI-FI/802.11/b/g)
  • Supporting Dynamic IP (DDNS) and UPNP LAN and Internet (ADSL, Cable Modem)
    • Giving alarm in cause of motion detection
    • Supporting image snapshot
  • Support multiple protocols: HTTP/TCP/IP/UDP/SMTP/DDNS/SNTP/DHCP/FTP
  • Support WEP/WPA/WPA2 encryption
  • Support 3G phone, Smart phone control and surveillance
  • Support Firefox, Safari, Google chrome browser
  • Support Hotmail, Gmail, Yahoo accounts.

2. PRODUCT DESCRIPTION

2.1 Front View
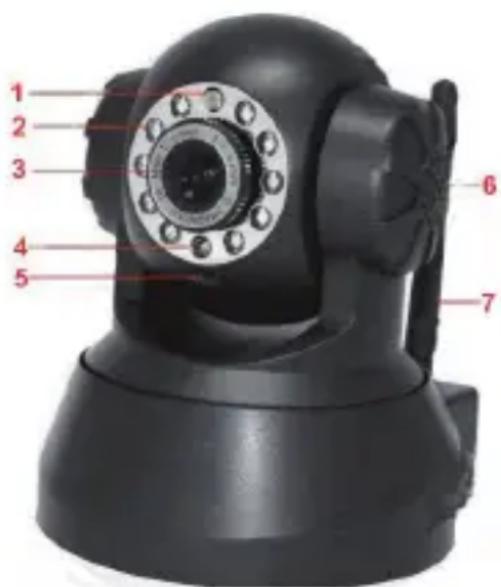
1 2 3 4 5 6 7

1 Sensitive Hole: For light sensitive
2 Infrared LED: For night vision
3 LENS: CMOS sensor with fixed focus lens. (Default is 6mm, 3.6mm optional)
4 Network Indicator LED: If there is network activity, the LED will blink
5 Microphone: Build-in microphone
6 Speaker: Build-in speaker
7 Wireless Antenna: WI-FI Antenna

2.2 Rear Panel

Network Indicator LED ANT I/O Alarm 1 2 3 4 DC 5V AUDIO Audio Output LAN Antenna I/O Alarm Pin Power

LAN: RJ-45/10-100 base T

Power: DC 5V/2A power supply

Network Light: The green LED will on when connect to the network, the yellow LED will blink when data transferred

Audio Output: The jack is used to plug external speaker

I/O PINS: 1 Output A 2 Output B 3 Alarm input 4 Input (GND)

2.3 Botton View

There are some stickers at the bottom of IPCAM, such as MAC address sticker, QC sticker etc.

If your camera does not have these stickers, it may be a fake one, fake IPCAM could not use the original firmware and obtain our good after sale service.

AutoCAD/DAAS 2018/Interw/MS/Agocam.com Open access Passwd/daise □ Wire □ Wireless CE FC RoHS Reset Button DC PANESO C D E F G H I J K L M N O P Q R S

RESET BUTTON: Press and hold the RESET BUTTON for 15 Seconds, then the IPCAM will be reset back to the factory default Parameter. (Please keep the power on when do RESET)

2.4 PC System Requirements

System configuration requirements: (Example for viewing four IPCAM)

CPU: 2.06GHz or above

Memory: 256M or above

Network Card: 10M or above

Display Card: 64M or above memory

Recommendable Operating system: Windows 2000/XP/Vista/7

3. PACKAGE CONTENTS

Open the package and check the items contained against the following list:

• 1 Wireless IP Camera
• 1 Wi-Fi Antenna
• 1 DC Power Supply
- 1 CD
- 1 Network Cable
• 1 Mounting bracket
• 1 Quick Guide

4. SPECIFICATIONS

Item Specifications
Video Compression MJPEG video compression
Video Resolution Adjustment 640 x 480 Pixels (300k Pixels)
Video Parameters Brightness, contrast
Video Frame 15fps(VGA), 30fps(QVGA)
Communication interface 10Base-T/100Base-TX Ethernet Port
Wi-Fi Module Supporting IEEE802.11b/g
Supported ProtocolTCP/IP, DHCP, SMTP, HTTP, DDNS, UPNP, PPPoE, FTP, DNS, UDP, GPRS
Power Supply 5VDC/2A External PowerAdapter
Maximum Power 5W (Max.)
Operating Temperature0°C ~ 55°C (14°F~131°F)
Storage Temperature-10°C ~ 60°C (14°F ~140°F)
Operating Humidity 20%-85% non-condensing
System RequirementsMicrosoft Windows 98/ME/2000/XP/Vista/7
BrowserIE6.0, IE7.0, IE8.0, Firefox, Safari, Google Chrome etc

5. INSTALLATION GUIDE

5.1 Hardware installation.

  1. Install the Wi-Fi antenna.
  2. Plug the power adaptor into camera.
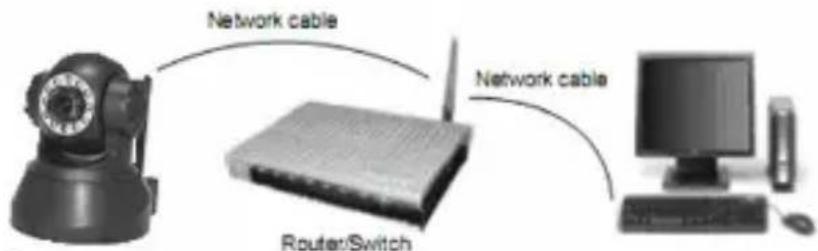
  3. Plug the network cable into camera, the other side to the router/switch.

Approx APPIP01WV4 - Hardware installation. - 1

natural_image Two-panel image showing a device being inserted into a rack and then processed into a server or printer (no visible text or symbols)

Network cable Router/Switch Network cable

5.2 Software installation

  1. IP Camera Tool: Open the CD, click "IPCamSetup.exe"—"Next"—"Next"—"Close".
  2. ActiveX: Click "Appinstall.exe"—"Next"—"Install"—"Finish".

Approx APPIP01WV4 - Software installation - 1

After this done, the icon "IP Camera Tool" will be displayed on desktop.

6. CONFIGURATION GUIDE

  1. Login: Double click "IP Camera Tool" icon on desktop, search the IP address, choose the one of your camera, double click to go to IE login interface.

Default username: admin

Password: no password

Windows Security The server 192.168.1.104 at ipcamera_000635489755 requires a username and password. Warning: This server is requesting that your username and password be sent in an insecure manner (basic authentication without a secure connection). User name Password Remember my credentials OK Cancel

  1. Choose the language: English, Chinese, Spanish, Korean, German, French, Italian, Portuguese optional.

Language: English Languages ActiveX Mode (For IE Browser) Sign in Click here, visit on IE browser Server Push Mode (For Safari, FireFox, Google Browser) Sign in Click here, visit on Safari, Firefox, Google chrome browser via server push mode VLC mode (for IE, Safari, FireFox, Google, Opera browser) Sign in Click here, visit on VLC mode Sign in mobile phone Click here, visit on mobile phone attention: case sensitive propose using 1024 * 769 screen resolution

  1. Choose the work mode.

IE browser: choose ActiveX mode.

Safari, Firefox, Google chrome browser: Server push mode/VLC mode.

Mobile phone: sign in mobile phone mode.

  1. Sign in. Click Sign In, then can get video on real-time.

6.1 Question 1: ActiveX Settings for IE Browser

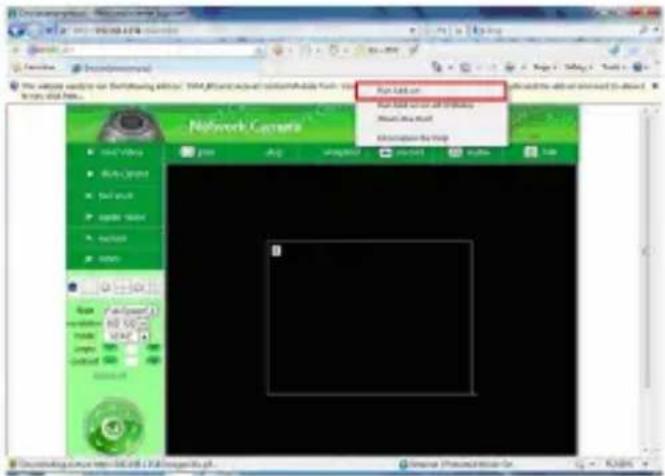
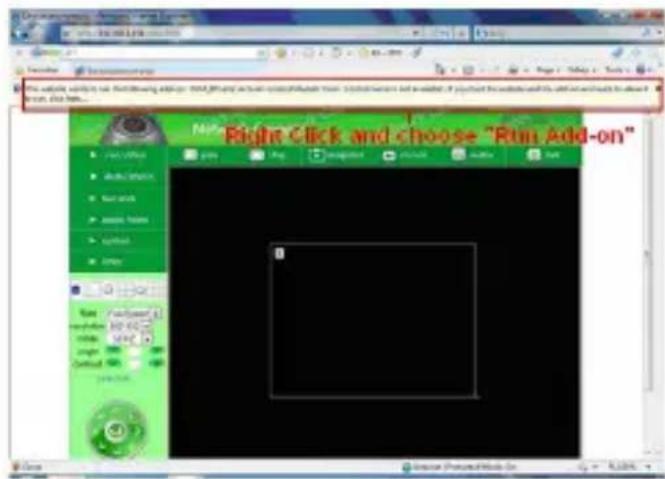
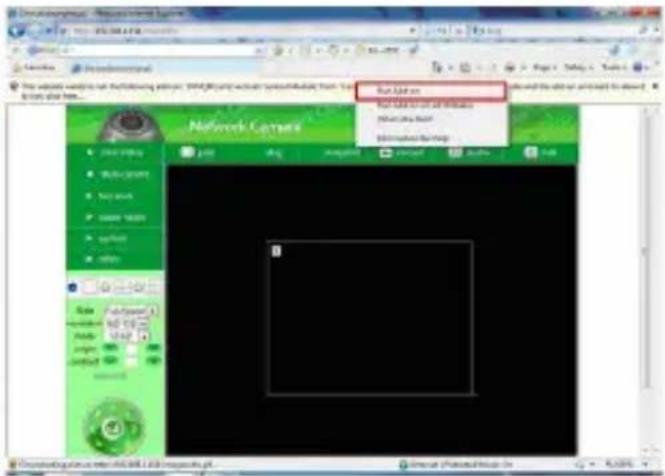
If use IE browser to connect the camera for the 1st time, maybe there is no image displayed, there will be an ActiveX prompt, please click the prompt and choose Run Add-on, refresh the IE interface, and login the camera again, then will see live video.
Play Click and choose "Run Add-on" File Edit View Help Tools Run Click and Action Click Button Tools Run Click and Action Click Button Tools Run Click and Action Click Button Tools Run Click and Action Click Button Tools Run Click and Action Click Button Tools Run Click and Action Click Button Tools Run Click and Action Click Button Tools Run Click and Action Click Button Tools Run Click and Action Click Button Tools Run Click and Action Click Button Tools Run Click and Action Click Button Tools Run Click and Action Click Button Tools Run Click and Action Click Button Tools Run Cncl Run Cncl Run Cncl Run Cncl Run Cncl Run Cncl Run Cncl Run Cncl Run Cncl Run Cncl Run Cncl Run Cncl Run Cncl Run Cncl Run Cncl Run Cncl Run Cncl Run Cncl Run Cncl Run Cncl Run Cn1 Run Cn2 Run Cn3 Run Cn4 Run Cn5 Run Cn6 Run Cn7 Run Cn8 Run Cn9 Run Cn10 Run Cn11 Run Cn12 Run Cn13 Run Cn14 Run Cn15 Run Cn16 Run Cn17 Run Cn18 Run Cn19 Run Cn20 Run Cn21 Run Cn22 Run Cn23 Run Cn24 Run Cn25 Run Cn26 Run Cn27 Run Cn28 Run Cn29 Run Cn30 Run Cn31 Run Cn32 Run Cn33 Run Cn34 Run Cn35 Run Cn36 Run Cn37 Run Cn38 Run Cn39 Run Cn40 Run Cn41 Run Cn42 Run Cn43 Run Cn44 Run Cn45 Run Cn46 Run Cn47 Run Cn48 Run Cn49 Run Cn50 Run Cn51 Run Cn52 Run Cn53 Run Cn54 Run Cn55 Run Cn56 Run Cn57 Run Cn58 Run Cn59 Run Cn60 Run Cn61 Run Cn62 Run Cn63 Run Cn64 Run Cn65 Run Cn66 Run Cn67 Run Cn68 Run Cn69 Run Cn70 Run Cn71 Run Cn72 Run Cn73 Run Cn74 Run Cn75 Run Cn76 Run Cn77 Run Cn78 Run Cn79 Run Cn80 Run Cn81 Run Cn82 Run Cn83 Run Cn84 Run Cn85 Run Cn86 Run Cn87 Run Cn88 Run Cn89 Run Cn90 Run Cn91 Run Cn92 Run Cn93 Run Cn94 Run Cn95 Run Cn96 Run Cn97 Run Cn98 Run Cn99 Run Cn100

Netbec Camera File Edit View Help View Tools Help View Tools Help Internet Explorer Help New Open Close Target Default Help Downloading software help: Netbec Camera Help...

If there is still no live video after run ActiveX, please try to enable the ActiveX options of IE security settings, please do the follow steps:

  1. Close the firewall of your computer.
  2. Change the ActiveX settings, "IE" browser > "Tool" > "Internet Options" > "Security" > "Custom Level" > "ActiveX control and Plug-ins", all the ActiveX options set to be "Enable": Especially:

Enable: Download unsigned ActiveX controls

Enable: Initialize and script ActiveX controls not marked as safe

Enable: Run ActiveX controls and plu-ins

Internet Options Customize Customize (Default) Connections Programs (Advanced) Select a user for more than 20% access to settings. Customize Customize Customize Customize Customize Customize Customize Customize Customize Customize Customize Customize Customize Customize Customize Customize Customize Customize Customize Customize Customize Customize Customize Customize Customize Customize Customize Customize Customize Customize Customize Customize Customize Customize Staticify... Customize... Customize... Customize... Customize... Customize... Customize... Customize... Customize... Customize... Customize... Customize... Customize... Customize... Customize... Customize... Customize... Customize... Customize... Customize... Customize... Customize... Customize... Customize... Customize... Customize... Customize... Customize... Customize... Customize... Customize... Customize... Customize... Customize... Customize... Customize... Customize... Customize... Customize... Customize... Customize... Customize... Customize... Customize... Customize... Customize... Customize... Customize... Customize... Customize... Customize... Customize... Customize... Customize... Customize... Customize... Customize... Customize... Customize... Customize... Customize... Customize... Customize... Customize... Customize... Customize... Customize... Customize... Customizc... Customizc... Customizc... Customizc... Customizc... Customizc... Customizc... Customizc... Customizc... Customizc... Customizc... Customizc... Customizc... Customizc... Customizc... Customizc... Customizc... Customizc... Customizc... Customizc... Customizc... Customizc... Customizc... Customizc... Customizc... Customizc... Modernization - Default Select customization options: Select customization options: Select customization options: Select customization options: Select customization options: Select customization options: Select customization options: Select customization options: Select customization options: Select customization options: Select customization options: Select customization options: Select customization options: Select customization options: Select customization options: Select customization options: Select customization options: Select customization options: Select customization options: Select customization options: Select customization options: Select customization options: Select customization options: Select customization options: Select customization options: Select customization options: Select customization options: Select customization options: Select customization options: Select customization options: Select customization options: Select customization options: Select customization options: Select customization options: Select customization options: Select customization options: Select customization options: Select customization option: Select customization option: Select customization option: Select customization option: Select customization option: Select customization option: Select customization option: Select customization option: Select customization option: Select customization option: Select customization option: Select customization option: Select customization option: Select customization option: Select customization option: Select customization option: Select customization option: Select default. Select default. Select default. Select default. Select default. Select default. Select default. Select default. Select default. Select default. Select default. Select default. Select default. Select default. Select default. Select default. Select default. Select default. Select default. Select default. Select default. Select default. Select default. Select default. Select default. Select default. Select default. Select default. Select default. Select default. Select default. Select default. Select default. Select default. Set customization options: Set customization options: Set customization options: Set customization options: Set customization options: Set customization options: Set customization options: Set customization options: Set customization options: Set customization options: Set customization options: Set customization options: Set customization options: Set customization options: Set customization options: Set customization options: Set customization options: Set customization options: Set customization options: Set customization options: Set customization options: Set customization options: Set customization options: Set customization options: Set customization options: Set customization options: Set customization options: Set customization options: Set customization options: Set customization options: Set customization options: Set customization options: Set customization options: Set customization options: Set customization options: Set customization options: Set customization options: Set customization options: Set customization options: Set customization options: Set customization options:

In Addition: you can also click “start” menu->“Internet Explorer”, choose “Internet attributes “ to enter, or via “Control Panel” ->“Internet Explorer”, enter to Security setting.

  1. If there is still no image, please close your anti-virus software, and then try step 1 & 2 again.

6.2 Question 2: How to do Wireless Settings

  1. Make sure the router is a wireless router.
  2. Make sure the Wi-Fi antenna installed.
  3. Make sure whether there is encryption of the WLAN of router, if there is encryption, keep the key.
  4. Login the camera, click "Network">"Wireless Lan Settings">"Scan", please scan 2 times, then you will find the WLAN from the list, choose the one you use.
  5. If there is no encryption, just click "Submit", if there is encryption, please input the key, then click "Submit".
  6. Wait about 30 seconds, the camera will reboot, then unplug the network cable.

Live Video Multi-Device Net work Audio video system other Wireless Lan Settings Basic Network Settings Wireless Lan Settings ADSL Settings UPnP Settings DDNS Service Settings List 4 123[002586745b2c] infra WEP ChinaNet-RCJZ[00255e1dc55a] infra WPA/WPA 1[00258637ee26] infra None zhonglian[0025862c0beo] infra WEP Scan SSID Network Type Encryption 5 1 Infra None 6 Submit Refresh Rate Full-Speed resolution 640*490 mode 50 HZ Wireless Lan Settings Wireless Network List 123[002586745b2c] infra WEP ChinaNet-RCJZ[00255e1dc55a] infra WPA/WPA 1[00258637ee26] infra None hybf[001478661226] infra WEP Scan Using Wireless Lan SSID ChinaNet-RCJZ Network Type Infra Encryption WPA Personal (TKIP) Share Key Submit Refresh

6.3 Question 3: How to use DDNS

  1. Login the camera: Click "Network">"DDNS Service Settings".

Live Video Multi-Device Net work Audio video system other DDNS Service Settings Basic Network Settings DNS Wireless Lan Settings domain e0254.aipcam.com ADSL Settings UPnP Settings None DDNS Service Settings Submit Refresh

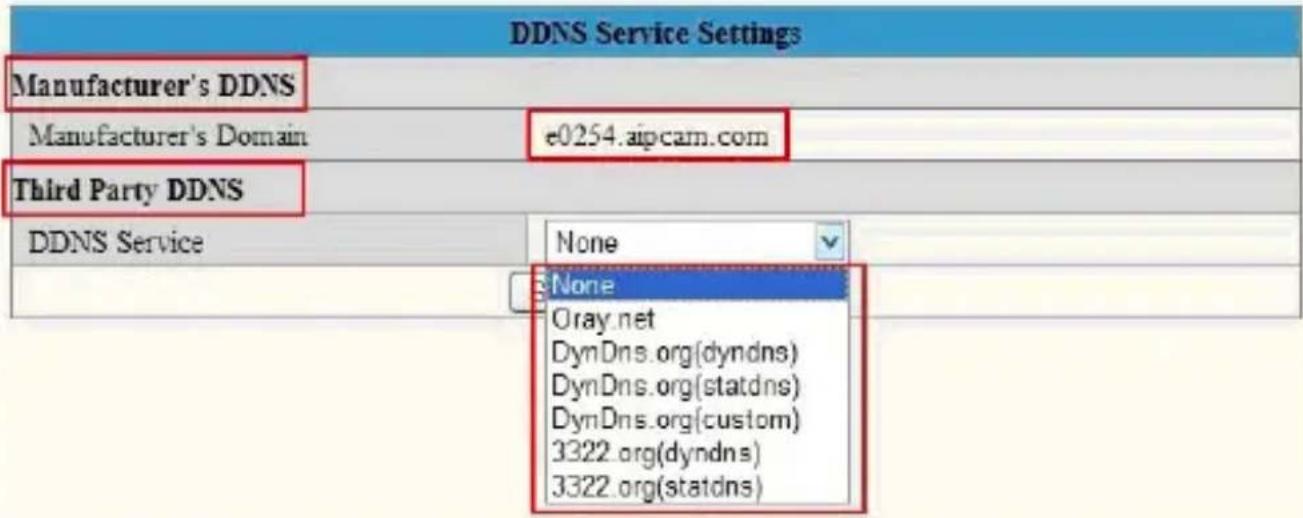
  1. Choose the DDNS, there are 2 options:

  2. Manufacturer's DDNS: This domain is provided by manufacturer.

  3. Third Party DDNS: This domain is provided by the 3rd party, such as Dyndns, Oray, 3322 etc.
DDNS Service Settings Manufacturer's DDNS Manufacturer's Domain e0254.aipcam.com Third Party DDNS DDNS Service None None Gray.net DynDns.org(dyndns) DynDns.org(statdns) DynDns.org(custom) 3322.org(dyndns) 3322.org(statdns)

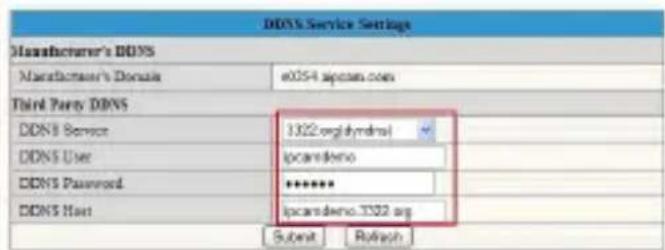
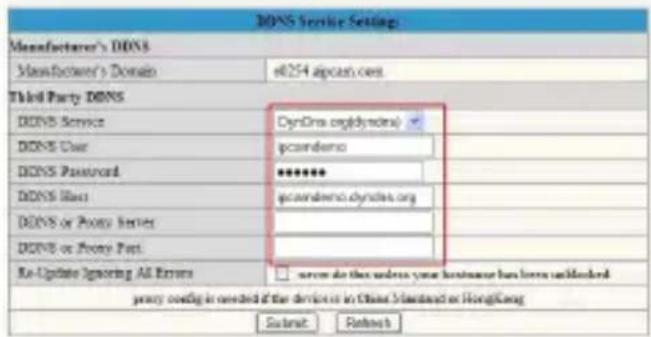
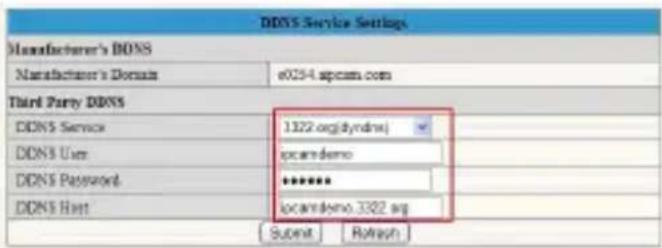
If you use third party DDNS, please choose the server you use, such as "3322.org" or "dyndns.org" as below:
DONS Service Settings Manufacturer's DONS Manufacturer's Domain e8254 apcsn.com Third Party DONS DONS Service DynDra.org(dyndera) DONS User pcamdemo DONS Password ******** DONS List pcamdemo.dyndera.org DONS or Proxy Series DONS or Proxy Part Re-Update Ignoring All Errors server do this unless your hostname has been unblocked proxy config is needed if the device is in China. Standard or HongKong Submit Refresh

DOS Service Settings Manufacturer's DOS Manufacturer's Domain e0354.spcam.com Third Party DOS DOS Service 1322.org( synds) DDNS User ipcamdemo DDNS Password ******** DDNS Host ipcamdemo.3322.org Submit Refresh

You have to register an account firstly, keep the user, password, host, then fill in it.

Note: Only one DDNS can be chosen, for example, if you use manufacturer's DDNS, the 3rd one won't work, if use the 3rd DDNS, the manufacturer's one won't work.

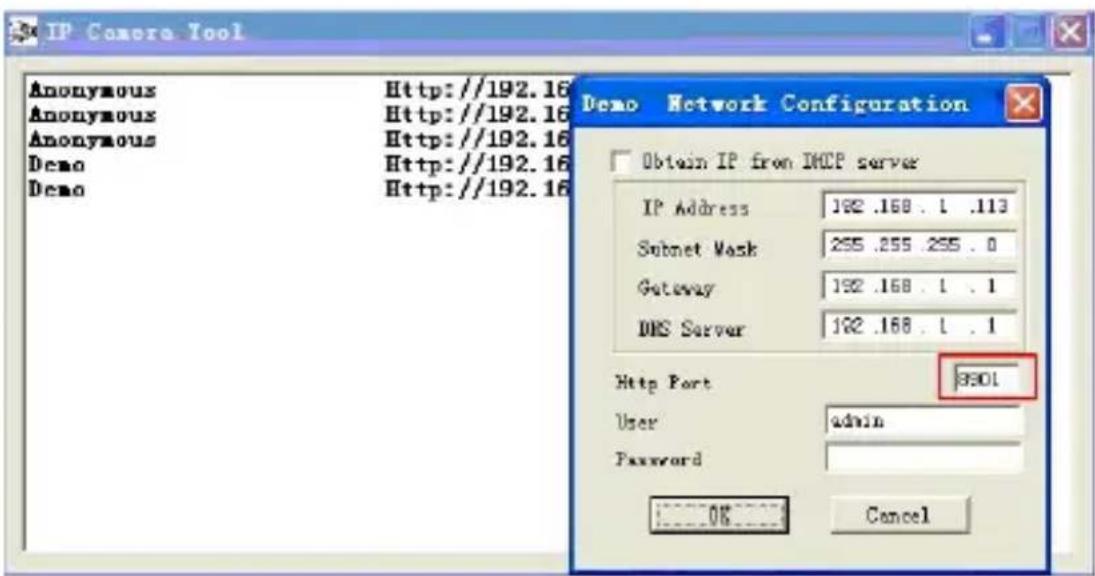
  1. Change the camera's port: The default port of camera is "80", please change "80" to any other one you like, such as "81", "100", "8091" etc. Click "OK", the camera will reboot, wait about 30 seconds.

IP Camera Tool Anonymous Http://192.16 Anonymous Http://192.16 Anonymous Http://192.16 Demo Http://192.16 Demo Http://192.16 Demo Network Configuration Obtain IP from DHCP server IP Address 192 .168 . 1 .113 Subnet Mask 255 .255 .255 . 0 Gateway 192 .168 . 1 . 1 DNS Server 192 .168 . 1 . 1 Http Port 8901 User admin Password OK Cancel

Make sure the “Subnet Mask”, “Gateway”, “DNS Server” is the same as your router.

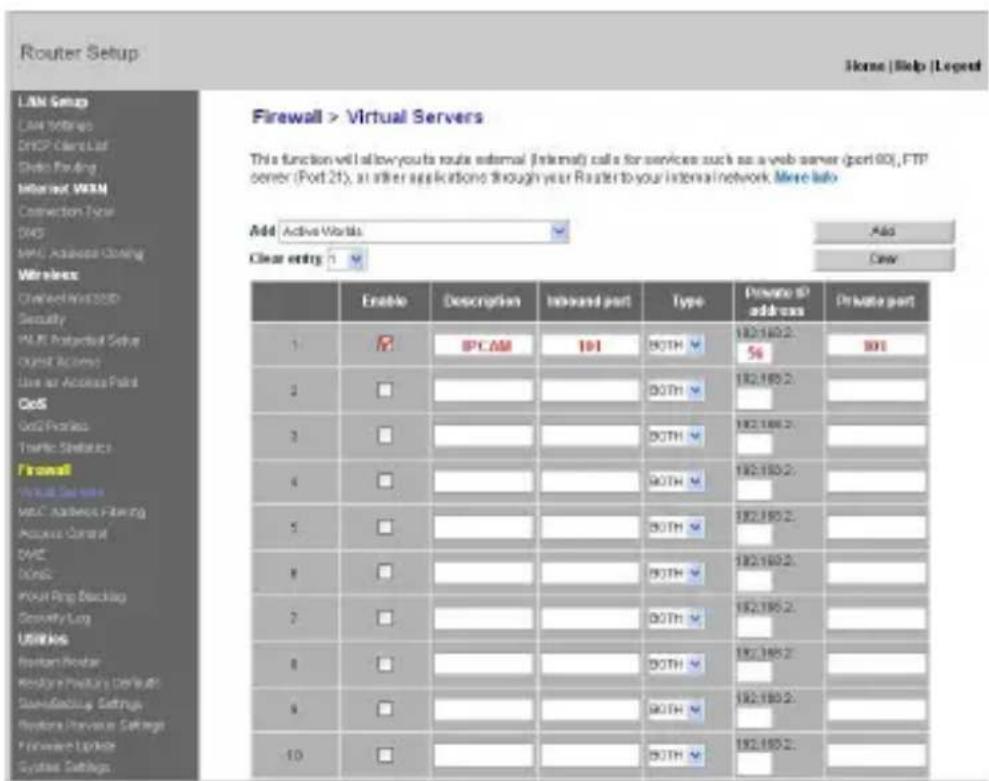
  1. Set Port Forwarding in the router: This is the most important step. Set port forwarding in router refer to the IP of your camera correctly, then the DDNS will work. Because there are so many kinds of routers from all over the world, so it's difficult to show a fix steps, but there are some samples of different routers' port forwarding settings as below, just for reference:

APPROX ROUTER:

  1. Login the router.
  2. Choose "Forwarding", select "Virtual Servers"
  3. Click the Add New button, pop-up below:

Add or Modify a Virtual Server Entry
Service Part: (0x36 or 30) IP Address: Protocol ALL Status: Enabled Common Service Part: -Select One- Save Return

Fill the service port (except 80), IP address of the camera, then click Save

The port and IP address should be the same as Camera.

GENERIC ROUTER:

  1. Login the router.
  2. Choose "Firewall", select "Virtual Servers"
  3. Input the port (except 80) and IP address, then click save.
Router Setup LAN Setup LAN Wires DHCP Client Studio Pacing Internet WAN Connection Type DNS MAIL Address Closing Wireless Connected Version Security MAC Protocol Set Digital Access Use as Access Point CDS Grid Process Traffic Statistics Firewall Virtual Server VOC Address Setting Access Control DVC DOSI Mount Ring Backlog Security Log Uniting Bottom Router Restore Privacy Default Manufacturing Settings Restore Private Settings Forward Update System Settings Firewall > Virtual Servers This function will allow your route external (Internal) calls for services such as a web server (Port 80), FTP center (Port 21), at other applications through year Router to your internal network. More info. Add Active Worlds Clear entry 1 Enable Description Inboard part Type Private IP address Private part 1 BPCAM 101 BOTH 56 301 2 3 4 5 6 7 8 9 10 Add Clear

Note: The port and IP address should be the same as Camera.

GENERIC ROUTER:

  1. Login the router.
  2. Choose "Advanced", select "Virtual Servers"
  3. Input the port, IP address, Protocol, then click save.

Note: The “public port” & “private port” should be the same as camera’s port, choose the protocol to be “both”.
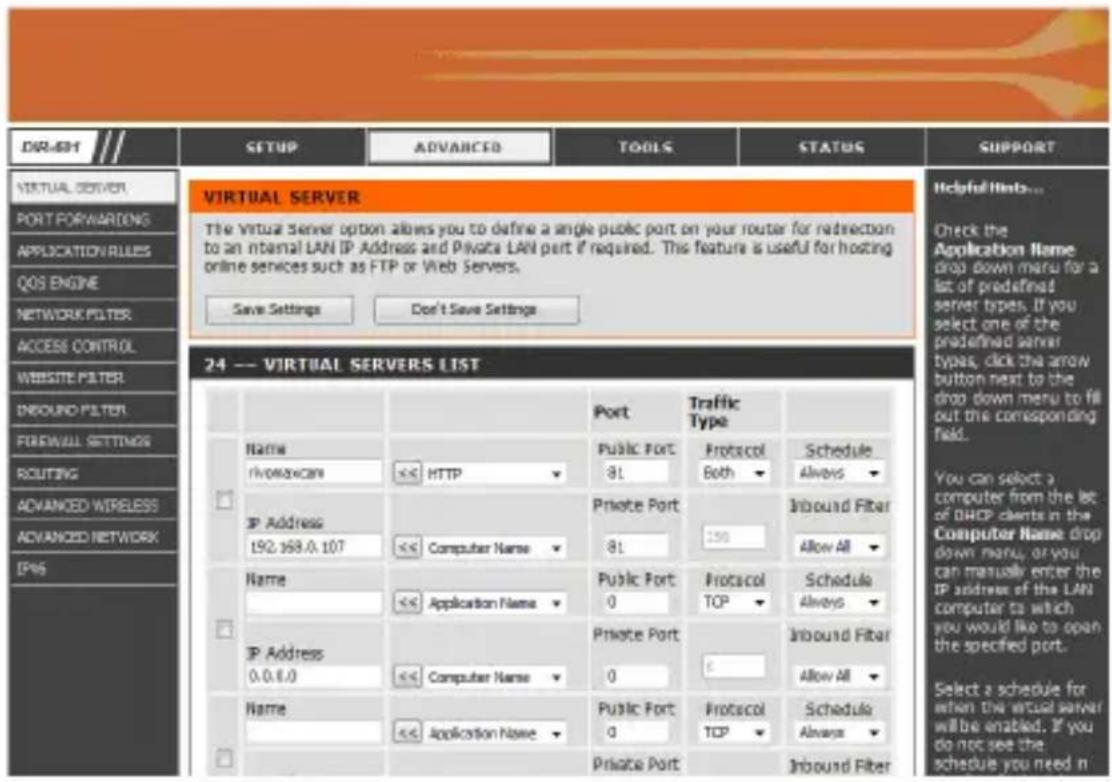
DIR-691 SETUP ADVANCED TOOLS STATUS SUPPORT VIRTUAL SERVER PORT FORWARDING APPLICATION RULES QOS ENGINE NETWORK FILTER ACCESS CONTROL WEBSITE FILTER INBOUND FILTER FOREWALL SETTINGS ROUTING ADVANCED WIRELESS ADVANCED NETWORK IP45 VIRTUAL SERVER The Virtual Server option allows you to define a single public port on your router for redirection to an internal LAN IP Address and Private LAN port if required. This feature is useful for hosting online services such as FTP or Web Servers. Save Settings Don't Save Settings 24 --- VIRTUAL SERVERS LIST Name rivomoxcan <<< HTTP Private Port 81 Inbound Fiber Allow All Name <<< Application Name Private Port 0 Protocol TCP Schedule Always Inbound Fiber Allow All IP Address 0.0.0.0 <<< Computer Name Private Port 0 Inbound Fiber Select a schedule for when the virtual server will be enabled. If you do not see the schedule you need n Private Port

After all these 4 steps done, then you can use the DDNS freely, check the DDNS status from the camera as below, and get the link of DDNS for internet view.

Step: "Login">System">Device Info":

Live Video Play Watch Tunesheet Microsoft audio talk Risikv Device Host work Audio video Systems Other Device Status Device ID 00450815479M Device Formatware Version 17.32.3.26 Device Embedded Web UI Version 20.4.3.37 KIAA Text Kines Status None DXN5 Status 19.22 Second http://www.2022.org/126 DGP Status UPGP Second Refresh Network Camera Live Video play step maps record run Multi Device Network Audio video system other Device Status Device ID 000DC EXOERA Device Formatware Version 17.32.3.26 Device Embedded Web UI Version 20.4.3.37 Altim Demo Maxo Status Xbox DXN5 Status upcam.com Second http://02/43.asp DGP Status UPGP Second Refresh

6.4 Question 4: How to know the WAN IP of the device.

  1. From internet: If you want to know the WAN IP of your device, please go to http://www.whatismyip.com. You will find the current WAN IP of your device.
  2. From router: You can also get the WAN IP address from your router.

7. OBTAINING TECHNICAL SUPPORT

While we hope your experience with the IP CAMERA network camera is enjoyable and easy to use, you may experience some difficulties or have some questions that this User Guide has not answered. Please contact your reseller and ask them for help first. If they are unable to resolve your issue, please contact our company.

This user manual is based on the latest version of our camera. System Firmware: 17.22.2.30 Web UI: 20.8.1.88

If your cameras does support some special functions showed in the manual, please contact our technical support team to obtain the latest Firmware and WEB UI file for doing upgrade.

NOTE: Some older versions cannot be upgraded to the latest version. It is not only due to the software difference, but also due to the hardware difference. If you cannot make sure of it, please contact our technical support team directly.

Thank you for your support and attention, for further operation details, please consult the full version of the user manual of our IP Cameras.

1. INTRODUCTION DU PRODUIT
Netrock Camera File Edit View Help New Add Remove Edit Delete Help Save Add Remove Edit Delete Help Add Remove Edit Delete Help Add Remove Edit Delete Help Add Remove Edit Delete Help Add Remove Edit Delete Help Add Remove Edit Delete Help Add Remove Edit Delete Help Add Remove Edit Delete Help Add Remove Edit Delete Help Add Remove Edit Delete Help Add Remove Edit Delete Help

DONS Service Settings Manufacturer's DONS Manufacturer's Domain e6254.aspx.com Third Party DOS DONS Service 3322 ang(cyindex) DDNS User epsandema DDNS Password ******** DDNS Host epandema 3322.0g Submit Refresh

REMARQUE:

Run List on Run List on the Web Run List on the Web Run List on the Web Run List on the Web Run List on the Web Run List on the Web Run List on the Web Run List on the Web Run List on the Web Run List on the Web Run List on the Web Run List on the Web Run List on the Web Run List on the Web Run List on the Web Run List on the Web Run List on the Web Run List On Run List On Run List On Run List On Run List On Run List On Run List On Run List On Run List On Run List On Run List On Run List On Run List On Run List On Run List On Run List On Run List On Run List On Run List On Run List On Run List On Run List On Run List On Run List On Run List On Run List Off Run List Off Run List Off Run List Off Run List Off Run List Off Run List Off Run List Off Run List Off Run List Off Run List Off Run List Off Run List Off Run List Off Run List Off Run List Off Run List Off Run List Off Run List Off Run List Off Run List Off Run List Off Run List Off Run List Off Run List Off Run List Out Run List Out Run List Out Run List Out Run List Out Run List Out Run List Out Run List Out Run List Out Run List Out Run List Out Run List Out Run List Out Run List Out Run List Out Run List Out Run List Out Run List Out Run List Out Run List Out Run List Out Run List Out Run List Out Run List Out Run List Out Run List In

Enable: Download unsigned ActiveX controls

Enable: Initialize and script ActiveX controls not marked as safe

Enable: Run ActiveX controls and plu-ins

Security Settings - Static Line Settings Software controls and subject ■ Enable ■ Download signed Active controls ■ Enable ■ Enable ■ Prompt ■ Download signed Active controls ■ Enable ■ Enable ■ Update and script Active controls ■ Enable ■ Enable □ Create link after model Internet Explorer Smart cache settings User to: requesting (default) Apply... Options (default) Cancel effects after user model Internet Explorer Reset click settings Request to: Medications (default)

DDNS Service Settings Manufacturer's DONS Manufacturer's Domain e0354.spcam.com Third Party DONS DDNS Service 1322.org/dynrrol DDNS User ipcamdemo DDNS Password ****** DDNS Host ipcamdemo.1322.org Submit Refresh

Run List on Run List on or add links Add link to Information for help Network Capture run Avg unipart control admin Lab New 100.00 WAG 100.00 Logy 100.00 CNC 100.00 Decubbing 2008-09-26 (A) 145899345.pk. Source: Promotion Data

Wireless Lan Settings 123[002586745b2c] infra WEP ChinaNet-RCJZ[00255e1dc55a] infra WPA/WPA 1[00258637ee26] infra None hybf[001478661226] infra WEP Scan Using Wireless Lan SSID ChinaNet-RCJZ Network Type Infra Encryption WPA Personal (TKIP) Share Key Submit Refresh

DDNS Service Settings Manufacturer's DONS Manufacturer's Domain: e024-aspcom.com Third Party DONS DDNS Service 1322.org/dyndraj DDNS User ipcamidemo DDNS Password ****** DDNS Host ipcamidemo.3322.ang Submit Refresh

File name File type: Web Files Microsoft Word 文档 Internet Explorer Web File Name File Type Microsoft Word 文档 Microsoft Word 文档 Internet Explorer Web File Name File Type Microsoft Word 文档 Microsoft Word 文档 Internet Explorer Web File Name File Type Microsoft Word 文档 Microsoft Word 文档 Internet Explorer Web File Name File Type Microsoft Word 文档 Microsoft Word 文档 Internet Explorer Web File Name File Type Microsoft Word 文档 Microsoft Word 文档 Internet Explorer Web File Name File Types Microsoft Word 文档 Microsoft Word 文档 Internet Explorer Web File Name File Type Microsoft Word 文档 Microsoft Word 文档 Internet Explorer Web File Name File Type Microsoft Word 文档 Microsoft Word 文档 Internet Explorer Web File Name File Type Microsoft Word 文档 Microsoft Word 文档 Internet Explorer Web File Name File Type Microsoft Word 文档 Microsoft Word 文档 Internet Explorer Web

Enable: Run ActiveX controls and plug-ins

Security Settings - Internet Zone Settings Custom Items and updates Create Create Create Create Create Create Create Create Create Create Create Create Create Create Create Create Create Create Create Create Create Create Create Create Create Create Create Create Create Create Create Create Create Create Create Create Create Create Create Create Create Create Create Create Create Create Create Create Create Create Custom Item... Custom Item... Custom Item... Custom Item... Custom Item... Custom Item... Custom Item... Custom Item... Custom Item... Custom Item... Custom Item... Custom Item... Custom Item... Custom Item... Custom Item... Custom Item... Custom Item... Custom Item... Custom Item... Custom Item... Custom Item... Custom Item... Custom Item... Custom Item... Custom Item... Custom Item... Custom Item... Custom Item... Custom Item... Custom Item... Custom Item... Custom Item... Custom Item... Custom Item... Static Effect after your mode Internet Explorer. Custom Item: Default (default) Assign...

DDNS Service Settings Manufacturer's DONS Manufacturer's Domain e0254.upcam.com Third Party DONS DDNS Service 1322.org/dyndm DDNS User locamdemo DDNS Password ****** DDNS Host locamdemo.3322.org Submit Refresh

  1. Odaberite jezik: engleski, kineski, španjolski, korejski, njema ki, francuski, talijanski, portugalski opcija.

Language: English Languages ActiveX Mode (For IE Browser) Sign in Click here, visit on IE browser Server Push Mode (For Safari, FireFox, Google Browser) Sign in Click here, visit on Safari, Firefox, Google chrome browser via server push mode VLC mode (for IE, Safari, FireFox, Google, Opera browser) Sign in Click here, visit on VLC mode Sign in mobile phone Click here, visit on mobile phone attention: case sensitive propose using 1024 * 769 screen resolution

  1. Odaberite na in rada.

IE: Odaberite ActiveX na in.

Safari, Firefox, Google Chrome preglednik: Server pritisnite Mode / VLC na in.

Mobitel: prijava mobitel na in.

  1. Prijava Kliknite prijavite, onda mogu dobiti video na stvarnom vremenu.

6.1 Pitanje 1: ActiveX postavke za IE preglednik

Nettoek Camera File Edit View Tools Help View the text file in the Web View the text file in the Web Internet Explorer Help New Text New Text to use all Web... About this Web Internet Explorer Help Base: 100% (1) Internet: 100% Internet: 100% (1) Internet: 100% (1) Internet: 100% (1) Internet: 100% (1) Internet: 100% (1) Internet: 100% (1) Internet: 100% (1) Internet: 100% (1) Internet: 100% (1) Internet: 100% (1) Internet: 100% (1)

Osim toga: mo ete kliknuti na “Start” izbornik-> “Internet Explorer”, odaberite “Internet atribute” za ulazak, ili putem “Control Panel” -> “Internet Explorer”, unesite sigurnosti postavljanje.

  1. Ako i dalje nema slike, molimo vas da zatvorite anti-virus softver, a zatim pokušajte korak 1 i 2 ponovno.

6.2 Pitanje 2: Kako to u initi Wireless postavke

6.3 Pitanje 3: Kako koristiti DDNS

  1. Prijava kamera: kliknite na "Network"> "DDNS postavke usluge".

Live Video Multi-Device Net work Audio video system other DDNS Service Settings Basic Network Settings Wireless Lan Settings ADSL Settings UPnP Settings DDNS Service Settings DNS domain e0254.azpcam.com None Submit Refresh

  1. Odaberite DDNS, postoje 2 opcije:

  2. Proizvo a je DDNS: Ova domena osigurava proizvo a .

  3. Tre e strane DDNS: Ovo podru je je koje je 3rd party, kao što su DynDNS, Oray, 3322 i sl.

DDNS Service Settings Manufacturer's DDNS Manufacturer's Domain e0254.aipcam.com Third Party DDNS DDNS Service None None Oray.net DynDns.org(dyndns) DynDns.org(statdns) DynDns.org(custom) 3322.org(dyndns) 3322.org(statdns)

Ako koristite tre e strane DDNS, odaberite poslu itelja koji koristite, kao što su “3322.org” ili “dyndns.org” kao ispod:

DONS Service Settings Manufacturer's DOSS Manufacturer's Domain e0254 apcam.com Third Party DOSS DONS Service DynOne.org(dynodora) DONS Clear pcamidemo DONS Password ******** DONS Rist pcamidemo.dynodora.org DONS or Proxy Series DONS or Proxy Part Re-Update Ignoring All Errors □ never do then unless your hostname has been unmarked proxy config is needed if the device is in China Standard or HongKang Submit Refresh

DDNS Service Settings Manufacturer's DDBS Manufacturer's Bonus e0254.spcam.com Third Party DBSS DDNS Service 1322.org/dmbrel DDNS User ipcamdemo DDNS Password ****** DDNS Host ipcamdemo.3322.org Submit Refresh

Morate se registrirati ra un Prvo, dr ati korisnika, lozinka, doma in, a zatim ispunite ga.

Napomena: Samo jedan DDNS mogu izabrati, na primjer, ako koristite proizvo a a DDNS, 3. jedan ne e raditi, ako koristite tre i DDNS, proizvo a je jedan ne e raditi.

  1. Promjena fotoaparata luke: zadani luka kamere je “80”, promijenite “80” na bilo koji drugi jednom vam se svi a, kao što su “81”, “100”, “8091”, itd. Kliknite na “OK”, fotoaparat e ponovno podizanje sustava, pri ekajte oko 30 sekundi.
IP Camera Tool Anonymous Http://192.16 Anonymous Http://192.16 Anonymous Http://192.16 Demo Http://192.16 Demo Http://192.16 Demo Network Configuration Obtain IP from DHCP server IP Address 192 .168 . 1 .113 Subnet Mask 255 .255 .255 . 0 Gateway 192 .168 . 1 . 1 DNS Server 192 .168 . 1 . 1 Http Port 8901 User admin Password OK Cancel

Ispunite su elje usluga (osim 80), IP adresu kamere, a zatim kliknite Spremi

Luka i IP adresa mora biti ista kao kamere.

GENERIC ROUTER:

  1. Prijavite se router.
  2. Odaberite "Firewall", odaberite "Virtualni poslu itelji"
  3. Ulaz u luku (osim 80) i IP adresu, a zatim kliknite Spremi.

Router Setup LAN Setup LAN Wires DHCP Client Studio Pacing Internet WAN Connection Type DNS MAIL Address Closing Wireless Connected Version Security MAC Protocol Set Digital Access Use as Access Point COS Data Portes Traffic Statistics Firewall Virtual Server VOC Address Setting Access Control DVC DOS Host Ping Backlog Security Log Usering Button Router Restore Privacy Default Manufacturing Settings Restore Private Settings Forward Linker System Settings Firewall > Virtual Servers This function will allow your route external (Internal) calls for services such as a web server (Port 80), FTP center (Port 21), at other applications through year Router to your internal network. More info Add Active Worlds Clear entry 1 Enable Description Inboard part Type Private IP address Private part 1 BPCAM 101 BOTH 56 301 2 3 4 5 6 7 8 9 10 Add Clear

Napomena: luka i IP adresa mora biti ista kao kamere.

GENERIC ROUTER:

  1. Prijavite se router.
  2. Odaberite "Advanced", odaberite "Virtualni poslu itelji"
  3. Ulaz u luku, IP adresu, Protokol, a zatim kliknite Spremi.

Napomena: “javne luke” i “privatne luke” bi trebao biti isti kao i kamere luka, odaberite protokol za “obje”.
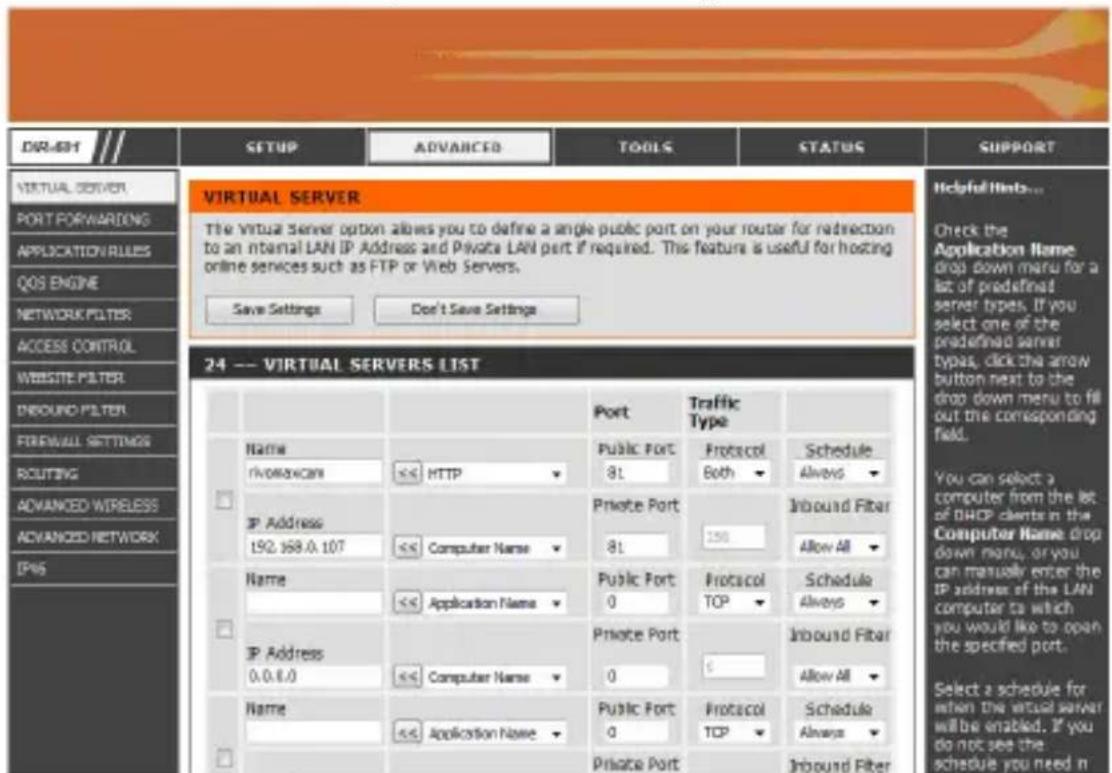
DIR-691 SETUP ADVANCED TOOLS STATUS SUPPORT VIRTUAL SERVER PORT FORWARDING APPLICATION VALUES QOS ENGINE NETWORK FILTER ACCESS CONTROL WEBSITE FILTER INBOUND FILTER FORWALL SETTINGS ROUTING ADVANCED WIRELESS ADVANCED NETWORK IP45 VIRTUAL SERVER The Virtual Server option allows you to define a single public port on your router for redirection to an internal LAN IP Address and Private LAN port if required. This feature is useful for hosting online services such as FTP or Web Servers. Save Settings Don't Save Settings 24 -- VIRTUAL SERVERS LIST Name rivowavcom HTTP Private Port 81 Protocol Both Schedule Always IP Address 192.168.0.107 Computer Name 81 Inbound Fiber Allow All Name << Application Name Public Port 0 Protocol TOP Schedule Always IP Address 0.0.0.0 Computer Name Private Port 0 Inbound Fiber Allow All Name << Application Name Public Port 0 Protocol TOP Schedule Always Private Port Inbound Fiber Helpful Hints... Check the Application Name drop down menu for a list of predefined server types. If you select one of the predefined server types, click the arrow button next to the drop down menu to fill out the corresponding field. You can select a computer from the list of DHCP clients in the Computer Name drop down menu, or you can manually enter the IP address of the LAN computer to which you would like to open the specified port. Select a schedule for when the virtual server will be enabled. If you do not see the schedule you need n

Nakon svih tih 4 koraka u injeno, tada mo ete koristiti DDNS slobodno, provjerite DDNS status kamere kao ispod, i dobiti vezu DDNS za internet prikaz.

Korak: "Login">"System">"Device Info":
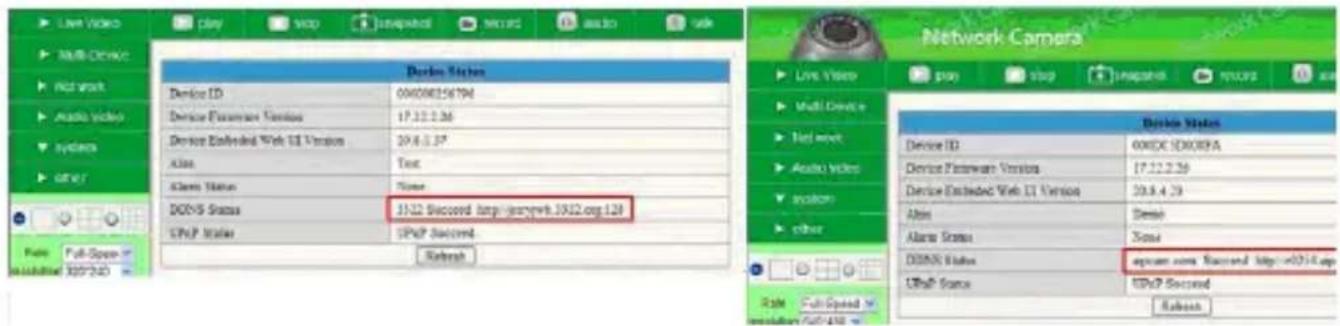
Live Video Multi Device Hot work Audio video Systems Other Full-Space 300*240 Device Status Device ID 00008156794 Device Features Version 17.12.1.36 Device Embedded Web UI Version 29.6.1.37 Alias Text Alias Status None DOYS Status 31.22 Second http://www.bcb.1912.org/128 SPCP Status SPCP Second Refresh Network Camera Live Video Multi Device Hot work Audio video Simulation other Device Status Device ID 0000E I/OOSFA Device Features Version 17.12.2.36 Device Embedded Web UI Version 29.8.4.29 Alias Dense Alias Status None DOYS Status app user now Second http://0144-up SPCP Source SPCP Second Refresh

6.4 Pitanje 4: Kako znati WAN IP ure aja.

  1. Od internetu: Ako elite znati WAN IP ure aja, molimo vas da http://www.whatismyip.com. Na i ete trenutnu WAN IP ure aja.
  2. Od router: Tako er mo ete dobiti WAN IP adresu iz svog routera.

7. STJECANJE Tehni ka podrška

Dok se nadamo da svoje iskustvo s IP kamera mre a kamera je ugodan i jednostavan za korištenje, vi svibanj iskustvo nekih poteško a ili su neka od pitanja koja ovaj Priru nik nije odgovorio. Molimo obratite se svom prodava u i pitati ih za pomo prvi. Ako oni nisu u stanju riješiti problem, obratite se našoj tvrtki.

Ovaj korisni ki priru nik temelji se na najnoviju ina icu našeg fotoaparata. Sustav Firmware: 17.22.2.30 Web UI: 20.8.1.88

Ako kamere ne podr ava neke posebne funkcije pokazao u priru niku, molimo kontaktirajte naš tim za tehni ku potporu za dobivanje najnoviji firmware i WEB UI datoteka za obavljanje nadogradnje.

NAPOMENA: Neke starije verzije ne mogu nadograditi na najnoviju verziju. To je ne samo zbog razlika softvera, ali i zbog hardverskih razlika. Ako ne mo ete napraviti sigurni u to, molimo kontaktirajte naš tim za tehni ku potporu izravno.

Hvala za vašu podršku i pa nju, za daljnje poslovanje detalje, obratite punu verziju korisni ki priru nik naših IP kamere.

1. WPROWADZANIE NOWYCH PRODUKTÓW

natural_image Two-panel image showing a device being inserted into a network interface, with no visible text or symbols.
Network cable Network cable Router/Switch

  1. Wybierz tryb pracy.

Wireless Lan Settings 123[002586745b2c] infra WEP ChinaNet-RCJZ[00255e1dc55a] infra WPA/WPA 1[00258637ee26] infra None hybf[001478661226] infra WEP Scan Using Wireless Lan SSID ChinaNet-RCJZ Network Type Infra Encryption WPA Personal (TKIP) Share Key Submit Refresh

DDNS Service Settings Manufacturer's DOS Manufacturer's Domain e034.sipcom.com Third Party DOS DDNS Service 1322.org/dynndm DDNS User ipcamdemo DDNS Password ******** DDNS Host ipcamdemo.3322.arg Submit Refresh

natural_image Two-panel image showing a mechanical component being processed and finally into a server rack (no visible text or symbols)

Network cable Network cable Router/Switch

Network Camera Run Files Run Files on Web Run Files on Web Run Files on Web Run Files on Web Run Files on Web Run Files on Web Run Files on Web Run Files on Web Run Files on Web Run Files on Web Run Files on Web Run Files on Web Run Files on Web Run Files on Web Run Files on Web Run Files on Web Run Files on Web Run Files on Web Run Files on Web Run Files on Web Run Files onWeb Run Files on Web Run Files on Web Run Files on Web Run Files on Web Run Files on Web Run Files on Web Run Files on Web Run Files on Web Run Files on Web Run Files on Web Run Files on Web Run Files on Web Run Files on Web Run Files on Web Run Files on Web Run Files on Web Run Files on Web Run Files on Web Run Files on Web Run Files on

DDNS Service Settings Manufacturer's DONS Manufacturer's Domain e0254.spcam.com Third Party DDNS DDNS Service 1322.org(dyndrs) DDNS User ipcardemo DDNS Password ****** DDNS Host ipcardemo.3322.aq Submit Refresh

Manual assistant
Powered by Anthropic
Waiting for your message
Product information

Brand : Approx

Model : APPIP01WV4

Category : Surveillance Camera