
KHA 18 LTX Set - Drill METABO - Free user manual and instructions
Find the device manual for free KHA 18 LTX Set METABO in PDF.


| Product Type | Cordless impact drill/driver |
| Brand | Metabo |
| Model | KHA 18 LTX Set |
| Nominal Voltage | 18 V |
| Battery Type | Lithium-Ion (Li-Ion) |
| Battery Capacity | 2.0 Ah / 4.0 Ah (depending on version) |
| No-load Speed (1st gear) | 0 - 550 rpm |
| No-load Speed (2nd gear) | 0 - 2000 rpm |
| Maximum Torque | 60 Nm |
| Chuck | Self-tightening, 1.5 - 13 mm |
| Impact Mode | Yes |
| Max. Drilling Diameter (wood) | 60 mm |
| Max. Drilling Diameter (steel) | 13 mm |
| Max. Drilling Diameter (concrete) | 16 mm |
| Weight (without battery) | 1.2 kg |
| Weight with battery (2.0 Ah) | 1.7 kg |
| Dimensions (L x W x H) | 215 x 80 x 240 mm |
| Sound Pressure Level (LpA) | 85 dB(A) |
| Vibration Level (metal drilling) | 2.5 m/s² |
| Charger included | Yes, fast charger ASC 55 |
| Main Functions | Drilling, screwdriving, impact, variable speed, spindle lock |
| Safety | Motor brake, overload protection, battery charge indicator |
| Maintenance and Cleaning | Clean with a dry cloth; lubricate the chuck periodically |
| Spare Parts and Repairability | Parts available through Metabo after-sales service; repairable by a professional |
Frequently Asked Questions - KHA 18 LTX Set METABO
User questions about KHA 18 LTX Set METABO
0 question about this device. Answer the ones you know or ask your own.
Ask a new question about this device
Download the instructions for your Drill in PDF format for free! Find your manual KHA 18 LTX Set - METABO and take your electronic device back in hand. On this page are published all the documents necessary for the use of your device. KHA 18 LTX Set by METABO.
USER MANUAL KHA 18 LTX Set METABO
natural_image
Exterior view of a metallo tool with visible branding and specifications (no text extraction needed)
natural_image
Silhouette of a human figure with bandages and a device, no text or symbols present | KHA 18 LTX*1) Serial Number: 00210.. | ||
| U V 18 | |||
 | n_0 | /minrpm | 0 - 1100 |
 | SDS-plus | √ | |
 | ø max. | mm( in) | 24 ( ^15/_16 ) |
| s max. | /minbpm | 4000 | |
| W(EPTA (05/2009) J | 2,2 | ||
| S J/s 164 | |||
 | ø max. | mm( in) | 25 (1) |
 | ø max. | mm( in) | 13 ( ^1/_2 ) |
 | m | kg(lbs) | 2,9 (6.4) |
 | D | mm( in) | 43 ( 1^11/_16 ) |
| a_h,HD/K_h,HD | m/s ^2 | 13,7 / 1,5 | |
| a_h,Cheq/K_h,Cheq | m/s ^2 | 15,0 / 1,5 | |
 | L_pA/K_pA | dB (A) | 87 / 3 |
| L_WA/K_WA | dB (A) | 98 / 3 | |
CE *2) 2004/108/EC (-> 19.04.2016) / 2014/30/EU (20.04.2016 ->), 2006/42/EC, 2011/65/EU *3) EN 60745-1:2009+A11:2010, EN 60745-2-6:2010
2015-09-24, Volker Siegle

natural_image
Exterior view of a portable electronic device (no visible text or symbols)ASC ultra, ASC 15, ASC 30, ASC 30-36, etc.
B

18 V 4,0 Ah 6.25591 18 V 5,2 Ah 6.25592
©

D

natural_image
Three different types of metal drill bit designs, shown from different angles (no text or symbols visible)E
flowchart
graph TD
    A["6.31285"] --> B["6.35035"]
    A --> C["6.31285"]
    B --> D["G"]
    C --> E["H"]
I
6.31800
J
natural_image
Close-up of a black mechanical component with threaded end and attached cable, labeled (a) 6.31829 (no other text or symbols visible)
natural_image
Product photo of a mechanical hose assembly with labeled parts (b and c), no visible text or symbols on the main components.Original instructions
1. Declaration of Conformity
We, being solely responsible: Hereby declare that these cordless hammers, identified by type and serial number *1), meet all relevant requirements of directives *2) and standards *3). Technical documents for *4) - see Page 3.
2. Specified Use
With the appropriate accessories, the machine is suitable for working with hammer drills and chiselling into concrete, stone and other such materials, as well as for non-impact drilling into metal, wood etc. and for driving screws.
The user bears sole responsibility for any damage caused by inappropriate use.
Generally accepted accident prevention regulations and the enclosed safety information must be observed.
3. General Safety Instructions

For your own protection and for the protection of your power tool, pay attention to all parts of the text that are marked with this symbol!

WARNING – Reading the operating instructions will reduce the risk of injury.

WARNING Read all safety warnings and instructions. Failure to follow all safety
warnings and instructions may result in electric shock, fire and/or serious injury.
Keep all safety instructions and information for future reference.
Pass on your power tool only together with these documents.
4. Special Safety Instructions
Wear ear protectors. Exposure to noise can cause hearing loss.
Use the auxiliary handle(s), supplied with the tool. Loss of control can cause personal injury.
Hold power tool by insulated gripping surfaces, when performing an operation where the cutting accessory may contact hidden wiring. Cutting accessory contacting a "live" wire may make exposed metal parts of the power tool "live" and could give the operator an electric shock.
Always hold the machine with both hands at the intended handles, take a secure stance and concentrate on the work.
Always wear protective goggles, gloves, and sturdy shoes when working with this tool.
Ensure that the spot where you wish to work is free of power cables, gas lines or water pipes (e.g. using a metal detector).
Secure the workpiece against slipping or turning, e.g. with the help of clamping devices.
Keep hands away from the rotating tool! Remove chips and similar material only with the machine at a standstill.
Caution must be exercised when driving screws into hard materials (driving screws with metric or imperial threads into steel)! The screw head may break or a high reverse torque may build up on the handle.
Metabo S-automatic safety clutch.
When the safety clutch responds, switch off the machine immediately! If the tool jams or catches, the power supply to the motor is restricted. Due to the strong force which can arise, always hold the machine with both hands using the handles provided, stand securely and concentrate.
A damaged or cracked additional handle must be replaced. Never operate a machine with a defective additional handle.
Before fitting the battery pack, make sure that the machine is switched off.
Remove the battery pack from the machine before making any adjustments, changing tools, maintaining or cleaning.

Protect battery packs from water and moisture!
Do not expose battery packs to fire!
Do not use faulty or deformed battery packs! Do not open battery packs!
Do not touch contacts or short-circuit battery packs!

A slightly acidic, flammable fluid may leak from defective Li-ion battery packs!

If battery fluid leaks out and comes into contact with your skin, rinse immediately with plenty of water. If battery fluid leaks out comes into contact with your eyes, wash them clean water and seek medical attention diately!
LED lights (15): Do not observe the LED radiation directly with optical instruments.
Reduce dust exposure:
Some dust created by using this power tool may contain chemicals known to cause cancer, allergic reaction, respiratory disease, birth defects or other reproductive harm. Some examples of these chemicals are: Lead from lead-based paints, crystalline silica from bricks and cement and other masonry products, arsenic and chromium from chemically-treated lumber, hard wood like oak or beech, metals, asbestos. The risk from these exposures depends on how long you or bystanders are being exposed. Do not let particles enter the body. To reduce your exposure to these chemicals: work in a well ventilated area, and work with approved safety equipment, such as dust masks that are
ENGLISHen
specially designed to filter out microscopic particles.
Observe the relevant guidelines for your material, staff, application and place of application (e.g. occupational health and safety regulations, disposal).
Collect the generated particles at the source, avoid deposits in the surrounding area.
Use suitable accessories for special work (see chapter 9.), thus less particles enter the environment in an uncontrolled manner.
Use a suitable extraction unit.
Reduce dust exposure with the following measures:
- Do not direct the escaping particles and the exhaust air stream at yourself or nearby persons or on dust deposits.
- Use an extraction unit and/or air purifiers
- Ensure good ventilation of the workplace and keep clean using a vacuum cleaner Sweeping or blowing stirs up dust
- Vacuum or wash the protective clothing Do not blow, beat or brush
5. Overview
See page 3.
1 Additional handle
2 Tool lock
3 SDS chuck
4 Depth stop
5 Switch button (for changing the operating mode)
6 L o c k
7 Carrying strap
8 Eyelet for securing the carrying strap
9 Rotation selector switch
10 Trigger
11 Handle
12 Capacity indicator button
13 Capacity and signal indicator
14 Battery pack
15 LED lights
16 Battery pack release button
*equipment-specific
6. Commissioning
6.1 Assembly of the additional handle

For safety reasons, always use the additional handle supplied.
Open the clamping ring by turning the additional handle (1) counter-clockwise. Push the additional handle onto the collar of the machine. Insert the depth stop (4). Securely tighten the additional handle at the angle required for the application.
6.2 Battery pack
Charge the battery pack (14) before use.
If performance diminishes, recharge the battery pack.
The ideal storage temperature is between 10^ C and 30^ C.
Li-Ion battery packs "Li-Power" have a capacity and signal indicator (13):
- Press the button (12), the LEDs indicate the charge level.
- If one LED is flashing, the battery pack is almost flat and must be recharged.
6.3 Removing and inserting the battery pack
Removal: Press the battery pack release button (16) and pull the battery pack (14) forwards.
To insert: Slide the battery pack (14) in until it engages.
6.4 Carrying strap
If necessary, hang the hook on the Metabo carrying strap (7) on the eyelet (8). Set the carrying strap (7) to the desired length.
Carrying:

To prevent unintentional start-up, move the rotation selector switch (9) to centre position (sporting safety device).

Never carry with a tool inserted.

The machine must only be carried with the Metabo carrying strap (7) across chest and (illustration a, page 2). Hold the machine ly.
The machine must NOT be carried with the carrying strap (7) around your neck (illustration b, page 2).
7. Use
7.1 The machine's multifunctional monitoring system

If the machine switches off automatically, the machine electronics have activated automatic action mode. A warning signal sounds inuous beeping). The beeping stops after a mum of 30 seconds or when the trigger (10) is sed.

In spite of this protective function, overloading is still possible with certain applications and result in damage to the machine.
Causes and remedies:
- Battery pack almost flat: (the electronics prevent the battery pack form discharging totally and avoid irreparable damage).
If one LED is flashing, the battery pack is almost flat. (15) If necessary, press the (12) button and check the LEDs (13) to see the charge level. If the battery pack is almost flat, it must be recharged.
- Long continuous overloading of the machine will activate the temperature cut-out.
Leave the machine or battery pack to cool.
Note: If the battery pack feels very warm, the pack will cool more quickly in an "AIR COOLED" charger.
Note: The machine will cool more quickly if you operate it at idling speed.
- Metabo safety shutdown: The machine was SWITCHED OFF automatically. If the slew rate of the current is too high (for example, if the machine suddenly seizes or kickback occurs), the machine switches off. Switch off the machine at the trigger switch (10). Switch it on again and continue to work as normal. Try to prevent the machine from seizing.
7.2 Depth Stop Setting
Loosen the additional handle (1). Set depth stop (4) to the desired drilling depth and retighten additional handle (1).
7.3 On/Off switch, setting the speed
Switching on, speed: press the trigger switch (10). Press in the trigger to increase the rotational speed.
Switching off: Release the trigger switch (10).
7.4 Operating mode selection
Press the lock (6) and turn the thumbwheel (5).
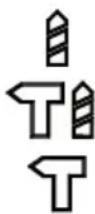
Drilling
Hammer drilling
Chiselling

When a chisel is fitted, only operate the machine in the chiselling operating mode

Avoid levering with the machine.
7.5 Setting chisel position
- Insert the chisel.
- Turn the switch button (5) to position 📤.
- Turn the chisel to the required position.
- Turn the switch button (5) to position

When a chisel is fitted, only operate the machine in the chiselling operating mode
7.6 Set direction of rotation, transportation safety device (switch-on lock)

Do not activate rotation selector switch (9) unless the motor has completely stopped!
Set the rotation selector switch (9).
See page 2:
R = clockwise rotation set (for drilling, hammer drilling, chiselling, inserting screws)
L = anti-clockwise rotation set (for the removal of screws)
0 = middle position: transportation safety device (Switch-on lock) set
7.7 Tool change with SDS chuck

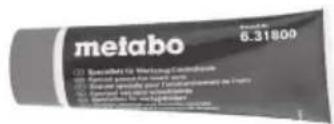
Before fitting, clean tool shank and apply special grease (accessories order no.
6.31800)! Use only SDS-Plus tools.
Inserting tools:
Turn tool and insert until it engages. The tool is automatically locked.
Remove the tool:
See page 2, fig. A.
Pull tool lock (2) backwards in direction indicated by arrow (a) and remove tool (b).
8. Maintenance, cleaning
The vent slots of the machine should be cleaned periodically.
9. Accessories
Use only genuine Metabo accessories.
Use only accessories which fulfil the requirements and specifications listed in these operating instructions.
Fit accessories securely. Secure the machine if it is operated in a bracket. Loss of control can cause personal injury.
See page 4.
A Chargers
B Battery packs with different capacities.
Use battery packs only with voltage suitable for your power tool.
C Metabocarrying strap
D Tools with SDS-Plus shank
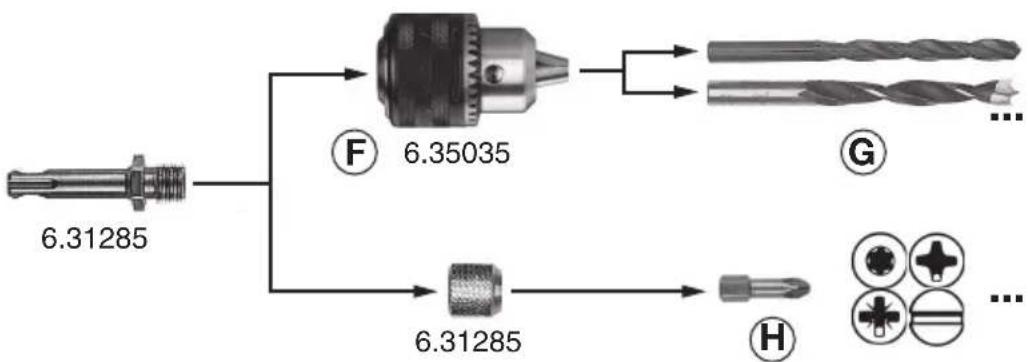
E Connecting piece
F Ge are d ch u c k
G Twist drills for metal and wood
H Screwdriver bit
I Special grease (for lubricating the tool shanks)
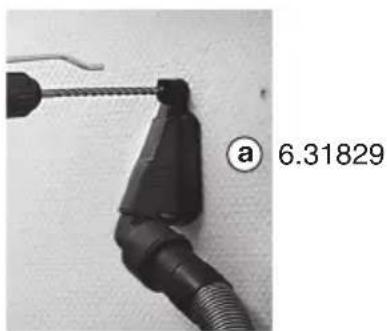
J Dust extraction systems:
a) Adapter for vacuum cleaner
b) Dust extraction set 43/50 mm
c) Chip and dust extraction unit
For a complete range of accessories, see www.metabo.com or the catalogue.
10. Repairs
Repairs to electrical tools must be carried out by qualified electricians ONLY!
Contact your local Metabo representative if you have Metabo power tools requiring repairs. For addresses see www.metabo.com.
You can download a list of spare parts from www.metabo.com.
11. Environmental Protection
Do not allow battery packs to come into contact with water!

Protect the environment, and do not dispose of power tools and battery packs with household waste. Observe national regulations on separated collection and recycling of disused machines, packaging and accessories.
ENGLISHen
Before disposal, discharge the battery pack in the power tool. Prevent the contacts from short-circuiting (e.g. by protecting them with adhesive tape).
12. Technical Specifications
Explanatory notes on the specifications on page 3. Changes due to technological progress reserved.
U = voltage of battery pack
n_0 = n o - l o a d s p e e d
_max = Maximum drill diameter
s_max = Maximum impact rate
W = S i n g l e i m p a c t f o
S = Single impact performance
m = Weight with smallest battery pack
D = Collar diameter
Measured values determined in conformity with EN 60745.
--- Direct current
The technical specifications quoted are subject to tolerances (in compliance with the relevant valid standards).
Emission values
These values make it possible to assess the emissions from the power tool and to compare different power tools. Depending on the operating conditions, the condition of the power tool or the accessories, the actual load may be higher or lower. For assessment purposes, please allow for breaks and periods when the load is lower. Based on the adjusted estimates, arrange protective measures for the user e.g. organisational measures.
Vibration total value (vector sum of three directions) determined in accordance with EN 60745:
a_h, HD = Vibration emission value (hammer drilling into concrete)
a_h, Cheq = Vibration emission value (chiselling)
K_h,HD/Cheq= Uncertainty (vibration)
Typical A-effective perceived sound levels:
L_pA = Sound-pressure level
L_WA = Acoustic power level
K_pA, K_WA= Uncertainty
During operation the noise level can exceed 80 dB(A).

Wear ear protectors!
Notice originale
--- Corriente continua
--- Corrente contínua
9 Rotationsomkopplare
10 Strömbrytare
11 Handtag
R = høyregang innstilt (til boring, hammerboring, meisling, skru inn skruer)
L = venstregang innstilt (skru ut skruer)
a_h, HD = vibrationsemission (hammerboring i beton)
a_h, Cheq = vibrationsemission (mejsling)
K_n,HD/Cheq=usikkerhed (vibration)
"Metabo Powertools (China) Co. Ltd."
Bldg. 7, 3585 San Lu Road,
Pujiang Industrial Park, Min Hang District, Китай
Импортер в России:
- Original instructions
- Declaration of Conformity
- Specified Use
- General Safety Instructions
- Special Safety Instructions
- Reduce dust exposure:
- ENGLISHen
- Overview
- Commissioning
- Assembly of the additional handle
- Battery pack
- Removing and inserting the battery pack
- Carrying strap
- Carrying:
- Use
- The machine's multifunctional monitoring system
- Causes and remedies:
- Depth Stop Setting
- On/Off switch, setting the speed
- Operating mode selection
- Setting chisel position
- Set direction of rotation, transportation safety device (switch-on lock)
- Tool change with SDS chuck
- Inserting tools:
- Remove the tool:
- Maintenance, cleaning
- Accessories
- Repairs
- Environmental Protection
- Technical Specifications
- Emission values
- Notice originale
Brand : METABO
Model : KHA 18 LTX Set
Category : Drill