RC-6406 - Talkie Walkie TRISTAR - Free user manual and instructions
Find the device manual for free RC-6406 TRISTAR in PDF.

User questions about RC-6406 TRISTAR
0 question about this device. Answer the ones you know or ask your own.
Ask a new question about this device
Download the instructions for your Talkie Walkie in PDF format for free! Find your manual RC-6406 - TRISTAR and take your electronic device back in hand. On this page are published all the documents necessary for the use of your device. RC-6406 by TRISTAR.
USER MANUAL RC-6406 TRISTAR
natural_image
Black walkie-talkie with digital display and antenna (no visible text or symbols)TOPCOM®
Twintalker 9500 Airsoft Edition
USER GUIDE
HANDLEIDING
MANUEL D'UTILISATEUR
BEDIENUNGSANLEITUNG
MANUAL DE USUARIO
BRUKSANVISNING
BRUGERVEJLEDNING
ANVÄNDARHANDBOK
KÄYTTÖOHJE
MANUALE D'USO
MANUAL DO UTILIZADOR
UŽIVATELSKÁ PŘÍRUČKA
Οδηγιεσ Χρησησ
INSTRUKCJA OBSŁUGI
UŽIVATEL'SKÝ MANUAL
V2.1-07/11

UK The DF symbol encodes that the red curve is in the several increments of the RDTF
ML. Het boote vansteel aan de hoo saloon van de RATTG-licht in. Str verelt bezweigd door de DE-
PR. La solantry del area of zavka ungrava kredanatika za kredicva van planerse 16
maha-seu levrau, sei-cerrée par belacel CE.
De l'asschluurant des Grilles et les ou laufender, anterhueraux au BATT-E directe
KUJIN (6) 上 KUJIN (1)
25 Clavilo CC con base la controllidad del era por los menores terros bilosales de la directiva
28. On the basis of the total number of variables (or n - 1 × 10^3 or 1 × 10^4 )
DK 25-raminger belwir, if possible in the environment is backward riders
40. Company the market of intercompany revenue and customer service provided by
The following table provides the information in English:
1. (2013) 1-8, 2013 (2014) A/659700 21/2014 B/659700 2013 (2014)
PT Quinnan DF Indica que se ester a pergr. ou ne modine www.na de dwafta Pa TF
CE Spred CE anemná za jednostu spl. 102-2014
OK Ta cipola 25- Bono in q paikha eppapiau μεβοτας επανληση σρούς
PL. 0740012-074001 2016dowy an the bodn natoe the wher PATT
SH SORRE OF CERM. D.S. as a result of the present health services
UK To know, described in the review of the following:
M. On a few hundred hundred thousand dollars, one point even at the level of
20. Low prices, high prices, low prices and public pay rates to modifications.
DE: Die r. deser Behringen zu, anschaff von Markel sieben, werden erichlich
Andesamt postel.
58 Cresema 2 in 19 Wefera
2.14.07.1985: 17:00:31:16:30
14. Bursat and Brancs is worth
15. Burba and Brancs is worth
H1 2020 年 10 月 20 日
IT La cooperazione della pavia riscata variesi pubblica con derivati modifica.
PT Para adem a liquido com o nce pública analógica.
CZ F
G. Pármu vú azvoklán kān 124000 amkogó mlequavač škina
M. Ihaša, iemná de ažlínna amkogáni něd ldeža oml
12. 2014. 12:30, 12:31, 12:32, 12:33, 12:34, 12:35, 12:36, 12:37, 12:38, 12:39, 12:40, 12:41, 12:42, 12:43, 12:44, 12:45, 12:46, 12:47, 12:48, 12:49, 12:50, 12:51, 12:52, 12:53, 12:54, 12:55, 12:56, 12:57, 12:58, 12:59, 12:60, 12:61, 12:62, 12:63, 12:64, 12:65, 12:66, 12:67, 12:68, 12:69, 12:70, 12:71, 12:72, 12:73, 12:74, 12:75, 12:76, 12:77, 12:78, 12:79, 12:80, 12:81, 12:82, 12:83, 12:84, 12:85, 12:86, 12:87, 12:88, 12:89, 12:90, 12:91, 12:92, 12:93, 12:94, 12:95, 12:96, 12:97, 12:98, 12:99, 13:00, 13:01, 13:02, 13:03, 13:04, 13:05, 13:06, 13:07, 13:08, 13:09, 13:10, 13:11, 13:12, 13:13, 13:14, 13:15, 13:16, 13:17, 13:18, 13:19, 13:20, 13:21, 13:22, 13:23, 13:24, 13:25, 13:26, 13:27, 13:28, 13:29, 13:30,
(四) 1.2.3.4.5.6.7.8.9.10.11.12.
In the case of a is a point to be the solution of the solution of 3-NCCTP, which is
The following table provides the information in a tab.
http://www.topcom.net/support/ocdeclarations.php
text_image
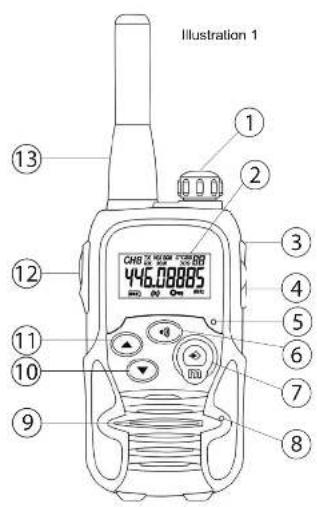
Illustration 1 ① ② ③ ④ ⑤ ⑥ ⑦ ⑧ ⑨ ⑩ ⑪ ⑫ ⑬ ⑭ 46.08885 CHD 20.0000 20.0000 44.08885 CHD 20.0000 20.0000
text_image
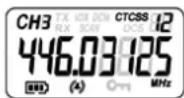
Illustration 2 2324 252627 1415 CH8 TX VOX DCM CTCSS 00 RX SCAN DCS 00 446.00005 MHz 181920211 l n t r o d u c t i o n
Thank you for purchasing the Twintalker 9500. It's a long range, low powered radio communication device with a range of maximum 10 Km. It has no running costs other than the minimal cost of re-charging the batteries. The Twintalker operates on 8 channels.
2 Intended purpose
It can be used for recreational purposes. For example: to keep in contact during travelling with 2 or more cars, biking, skiing. It can be used to keep in contact with your children when they are playing outside, etc...
3 C E M a r k
The CE symbol on the unit, user guide and giftbox indicates that the unit complies with the essential requirements of the R&TTE directive 1995/5/EC.
4 Safety instructions
4.1 General
Please read carefully through the following information concerning safety and proper use. Make yourself familiar with all functions of the device. Keep this manual in a safe place for future use.
4.2 Burning injuries
- If the cover of the antenna is damaged, do not touch because when an antenna comes in contact with the skin, a minor burn may result when transmitting.
- Batteries can cause property damage such as burns if conductive material such as jewellery, keys or beaded chains touches exposed terminals. The material may complete an electrical circuit (short circuit) and become quite hot. Exercise care in handling any charged battery, particularly when placing it inside a pocket, purse or other container with metal objects.
4.3 Injuries
- Do not place your device in the area over an air bag or in the air bag deployment area. Air bags inflate with great force. If a PMR is placed in the bag deployment area and the air bag inflates, the
communicator may be propelled with great force and cause serious injury to the occupants of the vehicle.
- Keep the PMR at least 15 centimetres away from a pacemaker.
- Turn your PMR OFF as soon as interference is taking place with medical equipment.
4.4 Danger of explosion
- Do not replace batteries in a potentially explosive atmosphere. Contact sparking may occur while installing or removing batteries and cause an explosion.
- Turn your PMR off when in any area with a potentially explosive atmosphere. Sparks in such areas could cause an explosion or fire resulting in bodily injury or even death.
- Never throw batteries in fire as they may explode.

Areas with potentially explosive atmospheres are often, but not always, clearly marked. They include fuelling areas such as below deck on boats, fuel or chemical transfer or storage facilities; areas where the air contains chemicals or particles, such as grain, dust or metal powders; and any other area where you would normally be advised to turn off your vehicle engine.
4.5 Poisoning danger
- Keep batteries away from small children.
4.6 Legal
- In some countries it is prohibited to use your PMR while driving a vehicle. In this case leave the road before using the device.
- Turn your PMR OFF when on board an aircraft when instructed to do so. Any use of the PMR must be in accordance with airline regulations or crew instructions.
- Turn your PMR OFF in any facilities where posted notices instruct you to do so. Hospitals or health care facilities may be using equipment that is sensitive to external RF energy.
- Replacing or modifying the antenna may affect the PMR radio specifications and violate the CE regulations. Unauthorised antennas could also damage the radio.
4 Twintalker 9500 Airsoft Edition
4.7 Notes
- Do not touch the antenna while transmitting, it could affect the range.
- Remove the batteries if the device is not going to be used for a long period.
5 Cleaning and maintenance
- To clean the unit, wipe with a soft cloth dampened with water. Don't use a cleaner or solvents on the unit; they can damage the case and leak inside, causing permanent damage.
- Battery contacts may be wiped with a dry lint-free cloth.
- If the unit gets wet, turn it off and remove the batteries immediately. Dry the battery compartment with a soft cloth to minimize potential water damage. Leave the cover off the battery compartment overnight or until completely dry. Do not use the unit until completely dry.
6 Disposal of the device (environment)

At the end of the product lifecycle, you should not throw this product into the normal household garbage but bring the product to a collection point for the recycling of electrical and electronic equipments. The symbol on the product, user guide and/or box indicate this.
Some of the product materials can be re-used if you bring
them to a recycling point. By re-using some parts or raw materials from used products you make an important contribution to the protection of the environment. Please contact your local authorities in case you need more information on the collection points in your area.
7 Using a PMR device
To communicate between PMR devices they need to be set all on the same channel and CTCSS/DCS code (see chapter "13.7 CTCSS (Continious Tone Coded Squelch System) / DCS (Digital Coded Squelch)" and within receiving range (up to max. 10 km in open field). Since these devices use free frequency bands (channels), all devices in operation share these channels(total 8 channels). Therefore, privacy is not guaranteed. Anybody with a PMR set to your channel can overhear the conversation. If you want to communicate (transmitting a voice signal) you need to press the Partition . ⑫
Once this button pressed, the device will go into transmit mode and you can speak into the microphone. All other PMR devices in range, on the same channel and in standby mode (not transmitting) will hear your message. You need to wait until the other party stops transmitting before you can reply to the message. At the end of each transmission the unit will send a beep if the Roger Beep is enable (see chapter "13.12 Roger Beep On/Off"). To reply, just press the Fluiton and speak into the microphone.

If 2 or more users press the Button at the same time the receiver will receive only the longest signal and the other signal(s) will be suppressed. Therefore you should only transmit a signal (press Button) ⑫ when the channel is free.

The range of radio waves is strongly affected by obstacles such as buildings, concrete/metal structures, the unevenness of the landscape, woodland, plants, ... This implies that the range between two or more PMR's may in some extreme cases be restricted to a maximum of a few tens of meters. You will soon notice that PMR works best when there is a minimum of obstacles between users.
8 Included in the package
• 1 x Twintalker 9500 Airsoft Edition
- 1 x Power adapter
• 4 x AAA NiMh batteries
- Headset
- User guide
9 Getting started
9.1 Installing/Removing the Belt Clip
-
To remove the belt clip from the unit, push the belt clip (B) towards the antenna, while pulling the clip tab (A).
-
When re-installing the belt clip, a click indicates the belt clip is locked into position
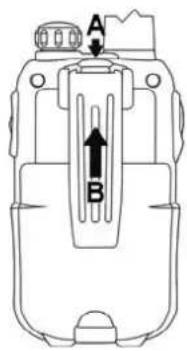
text_image
A B9.2 Battery Installation
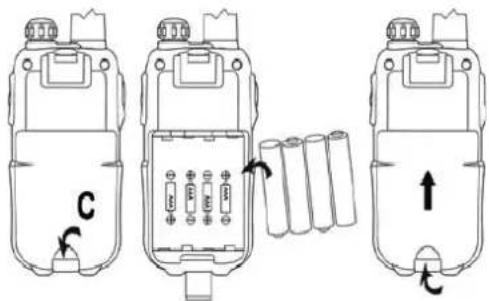
text_image
Diagram showing three stages of a battery pack with labeled components and directional arrows indicating movement.- Remove the belt clip (see chapter "9.1 Installing/Removing the Belt Clip")
- Lift the battery door by gently pushing the door clip (C) using your finger nail.
- Install the NiMh batteries. Make sure that the polarity of the NiMh batteries is correct.
- Close the battery door.
- Re-install the belt clip
10 Charging the batteries
- Connect the connector of the power adapter directly to the charger connection of the PMR.
It will take about 8 to 10 hours to fully charge the batteries

natural_image
Diagram of a medical or electrical device with a plug, cable, and connector (no text or symbols present)
Do not press the Button of the PMR's while they are charging!

Do not short-circuit the batteries or dispose in fire. Remove the batteries if this device is not going to be used for a long period.
Do not charge non rechargeable batteries like Alkaline batteries in the charger. This might damage the PMR's and charger unit.
11 Description
See folded cover page - illustration 1
- ON/OFF Volume knob
- LCD display
- Charger connection
- Headset connection
- TX LED (on when transmitting)
- Call button
- Menu button
- Enter the menu settings
- Microphone
5Twintalker
6 Twintalker 9500 Airsoft Edition
-
Speaker
-
Down button

– Select previous value in the menu
- Up button
- Select next value in the menu
-
PTT-button
-
Antenna
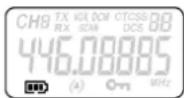
12 LCD display information
See folded cover page - illustration 2
-
CTCSS indication
-
DCS indication
-
CTCSS/DCS value
-
Frequency indication in MHz
-
MHz indication
-
Keypad lock icon
-
Call receive type indication
-
Battery level indication
-
Channel number
-
RX icon
– Displayed when receiving
- TX icon
– Displayed when transmitting
-
VOX indication
-
Scanning indication
-
Dual channel mode (DCM) indication
13 Using the Twintalker 9500

The display illustrations in next pages only show the icons or display informations of the functions that are explained in the text.
13.1 Switching On/Off the PMR radio
- Turn the "On-Off/Volume
Knob" clockwise. A clicking sound will indicate that the PMR radio is switched on.
- Turn the "On-Off/Volume Knob" fully
counter clockwise. The clicking sound will indicate that the PMR radio is switched off.
13.2 Battery Charge Level/Low Battery Indication
The battery charge level is indicated by the number of squares present inside the battery icon on the LCD Screen.
B
Battery Full
Battery 2/3 charged
Battery 1/3 charged
Battery empty
When the battery charge level is low, the battery icon will flash and a beep will be heard to indicate that the batteries need to be replaced or recharged.
13.3 Adjusting Speaker Volume
- Turn the "On-Off/Volume Knob" clockwise to increase the speaker volume.
- Turn counter-clockwise to lower the volume.
13.4 Receiving a Signal
The unit is continuously in the receive mode when the unit is switched ON and not transmitting.

In order for other people to receive your transmission, they must also be on the same channel and have set the same CTCSS code or DCS code. (See chapter "13.6 Changing Channels" and "13.7 CTCSS (Continious Tone Coded Squelch System) / DCS (Digital Coded Squelch)". Either CTCSS or DCS can be used but never both at the same time.
13.5 Transmitting a Signal

- Press and hold the -Btufton to 12 transmit. The TX symbol is displayed.
- Hold the unit in a vertical position with the microphone 10cm from the mouth and speak into the microphone.
- Release the -Button when you want to stop transmitting.

To check the channel activity use the monitor function (See chapter "13.8 Monitor").
13.6 Changing Channels

- Press the -button once, the current channel number flashes on the display.
- Press the -▲button or the1 button to change the channel.
- Press the -Button to confirm and return to stand-by mode.

If no button is pressed within 5 seconds during setting, the unit will return to standby.
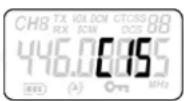
13.7 CTCSS (Continuous Tone Coded Squelch System) / DCS (Digital Coded Squelch)
License free PMR radio's operating on the 446 MHz frequency band, like the Twintalker 9500 PMR, have 8 available radio channels. If there are many PMR users in your neighborhood, there is a chance that some of these users are operating on the same radio channel.
To prevent that you receive signals from other users, sub-channels have been integrated.
Two PMR radio's will only be able to communicate with each other when they are operating on the same radio channel and when they have selected exactly the same sub-channel.
There are two kind of sub-channels :
• Continuous Tone Coded Squelch System (CTCSS)
• Digital Coded Squelch (DCS)
When using CTCSS, a low frequency tone (between 67 and 250 Hz) will be transmitted along with the voice signal. There are 38 available tones to choose from. You are free to choose one of these 38 available tones. Due to filtering, these tones will generally not be audible so they will not disturb the communication.
DCS is similar to CTCSS, but instead of sending a continuous tone of a selected frequency, a digital data transmission is added to the radio signal. This Digital Code is transmitted at a really low rate, around 134 bits per second (the code is 23 bits long). Only the PMR's of the latest generation will support DCS. There are 83 available DCS codes that can be used. Since earlier models will only support CTCSS it will be better to use DCS to prevent that other users will be audible during your PMR conversations.
13.7.1 CTCSS
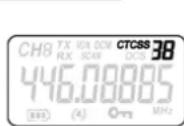
- Press the -button twice 7 "CTCSS" and the current CTCSS code flashes on the display.
- Press the -button or the1 button to change to another code.
- Press the -bfton to confn and return to stand-by mode.
13.7.2 DCS
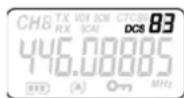
- Press the -button three times: "DCS" and the current DCS code flashes on the display.
- Press the -button or the11 button to change to another code.
- Press the -button to confirm and return to stand-by mode.

To disable CTCSS or DCS, select code "00" for CTCSS or for DCS in the menu. When the entry is confirmed, "OF" will be displayed.
8 Twintalker 9500 Airsoft Edition
13.8 Monitor
You can use the monitor feature to check for weaker signals in the current channel.
- Press the -button and -button simultaneously to activate channel monitoring.
- Press the -button to stop/channel monitoring.

During channel monitoring the receiver circuit in the PMR will not listen to CTCSS or DCS codes.
13.9 VOX Selection
The PMR is capable of voice activated (VOX) transmission. In VOX mode, the radio will transmit a signal when it is activated by your voice or other sound around you. VOX operation is not recommended if you plan to use your radio in a noisy or windy environment.

VOX mode will be overridden when you press the RTT button 12

- Press the - button ⑦ four times, the current VOX setting flashes on the display and the VOX icon is displayed.
- Press the -button to set the VOX sensitivity level between 1 and 3 (level 3 is the most sensitive level).
- Press the button until OFF' appears on the display, to turn VOX OFF.
- Press the -Button to confirm and return to stand-by mode.
13.10 Channel Scan
Channel scan performs searches for active signals in an endless loop from channel 1 to 8.
Once an active channel is found you have the option to search for the CTCSS code or the DCS code that is set by the user who is broadcasting on the channel.
13.10.1 Scanning for an active radio channel

- Press the -button five times: "SCAN" and the current channel flashes on the display. - Press the -button or the 1 button 10 start the channel scan.
Once an active channel is found, the scanning will stop and you can listen to the transmission.
When the transmission on the found channel stops, the scanning will resume automatically.

If you press the Button while listening to a found channel, the PMR will go back in stand-by mode on the found channel.
13.10.2 Scanning for a CTCSS code
When an active channel is found press the Button to select the found active channel. Now you have to option to search for the CTCSS/DCS code that is used by the found user.

- Press the -button six times: "SCAN" and "CTCSS 00" flashes on the display for the selected radio channel. - Press the -button or the 1 button to start the CTCSS scan.
Once there is a transmission on the channel, the CTCSS code (if used) will be detected and displayed.

- If you press the button while listening to a found CTCSS code, the PMR will go back in stand-by mode on the channel with the CTCSS code. - If no CTCSS code is detected there is a chance that DCS is selected by the user. In this case you can scan for the DCS code. (section 13.10.3)
13.10.3 Scanning for a DCS code
- Press the -button seven times: "SCAN" and "DCS 00" flashes on the display for the selected radio channel. - Press the ▲button 1 for the -▼ button to start the DCS scan.
Once there is a transmission on the channel, the DCS code (if used) will be detected and displayed.

If you press the PTT button WBile listening to a found DCS code, the PMR will go back in stand-by mode on the channel with the DCS code.
13.11 Call Tones
A call tone alerts others that you want to start talking.
13.11.1 Setting the Call Tone
The Twintalker 9500 has 15 call tones.
- Press the -button eight times, "C" is displayed and the current call tone is flashing. - Press the -button 11 or the ▼ button to change to another Call Tone. - Press the -button to confirm and return to stand-by mode.
13.11.2 Sending a call Tone
Press the • button briefly. The call tone will be transmitted on the set channel.
13.11.3 Call tone reception type
- Press the -button nine times. - Press the -button or -button to select the call tone reception type.
9Twintalker
- Tone only
- Tone + vibration
- Vibration only

Press the Partition to confirm and return to stand-by mode.
13.12 Roger Beep On/Off
After the Putton is released, the unit will send out a roger beep to confirm that you have stopped talking.
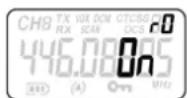
To set the Roger Beep. - Press the button ten times. 'rO' will be displayed. - Press ▲ button 11 to enable (ON) or ▼ button to disable the Roger-Beep (OFF). - Press the PButton to confirm your turn to the standby mode.
13.13 Key-Tone On/Off
When a button is pressed, the unit will beep briefly.

To set the key-tone. - Press button eleven times. 'tO' will be displayed. - Press ▲ button 11 to enable (ON) or ▼ button to disable the Key Tones (OFF). - Press the P-T button to confirm your selection and return to the standby mode.
13.14 Dual Channel Monitor function
In stand-by, the PMR is set on one channel with CTCSS/DCS code. The PMR will only receive signals transmitted on that channel with the CTCSS/DCS code.
10 Twintalker 9500 Airsoft Edition
Dual Channel Monitor (DCM) allows you to monitor a second channel with CTCSS/DCS code.

- Press the -button twelve times," DCM OFF" will flash on the display.
- Press the -button or the 1 button to change the channel.
- Press the -button to confirm the channel selection and go to CTCSS selection. (Press the -button again to go to DCS selection)
- Press the -button or the 1 button 10 change the CTCSS code or DCS code.
- Press the -button to confirm and return to stand-by mode
- To disable the function select "OFF" when selecting the DCM channel.
When the Dual Channel Monitor function is activated, the PMR will switch sequentially between the standby channel + CTCSS/DCS code and the Dual Channel + CTCSS/DCS code.
13.15 Button Lock

- Press and hold the -button for ⑦ three seconds to activate the Button lock mode. The button lock icon is displayed on the LCD Screen.
- Press and hold the -button again ⑦ for three seconds deactivate button lock

The Button, the ②-button and the ⑥ button ① will still be functional when the Button Lock is activated.
13.16 Display back light
To activate the backlight of the LCD display, press any button except the PTT - button of the button). ⑥ The LCD backlight will light up for 6 seconds.
14 Earpiece connection
The connector is located on the upper side of the unit ② Insert the earpiece plug into the connector (2,5mm jack). The small button on the earpiece has the same function as the PTT - button ①2 the unit When you use the P-T button from the Earpiece, you must also use the microphone from the earpiece to talk into.

Do not connect other earpieces. This may damage your device.
15 Troubleshooting
| No power | Clean the battery contacts with a soft cloth. Replace the batteries. |
| No transmission Make | sure the - button is pressed12 completely before you speak. Monitor the channel activity and switch to another channel if the current is used. |
| No reception | Check the speaker volume. Make sure that you are in the reception range of the sender and change if necessary your location. |
| Limited Range and noise during transmission | The talking range depends on the terrain. Steal constructions, concrete buildings or the use in vehicles have a bad influence on the range. Try to avoid as many obstacles as possible and communicate in a clear line of sight. Change your locations. |
| Interference The rece | ver and transmitter are too close. The minimum distance between 2 units is 1,5m. |
16 Technical specifications
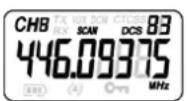
| Channels | 8 |
| Sub-code | CTCSS 38 / DCS 83 |
| Frequency | 446.00625MHz - 446.09375 MHz |
| Range | Up to 10 Km (Open field) |
| Battery | 4 x 1.2 V NiMH rechargeable |
| Transmission Power | =< 500mW ERP |
| Modulation Type | FM - F3E |
| Channel spacing | 12,5 kHz |
| Duo Charger adapter | Input : 230V AC / 50HzOutput : 9 V DC / 300mA |
| Channel Frequency Chart: CTCSS Code Chart | |||||||||
| Channel Frequency (MHz) | Code Frequency (Hz) Code Freq. (Hz) Code Freq. (Hz) Code Freq. (Hz) | ||||||||
| 1 446.00525.0 Disabled 10 | 94.8 | 20 131.8 | 30 188.2 | ||||||
| 2 | 446.01875 | 1 | 67.0 | 11 | 97.4 | 21 | 136.5 | 31 | 192.5 |
| 3 | 446.03125 | 2 | 71.9 | 12 | 100.0 | 22 | 141.3 | 32 | 203.5 |
| 4 | 446.04375 | 3 | 74.4 | 13 | 103.5 | 23 | 148.2 | 33 | 210.7 |
| 5 | 446.05625 | 4 | 77.0 | 14 | 107.2 | 24 | 151.4 | 34 | 218.1 |
| 6 | 446.06875 | 5 | 79.7 | 15 | 110.9 | 25 | 158.7 | 35 | 225.7 |
| 7 | 446.08125 | 6 | 82.5 | 16 | 114.8 | 26 | 162.2 | 36 | 233.6 |
| 8 | 446.09375 | 7 | 85.4 | 17 | 118.8 | 27 | 167.9 | 37 | 241.8 |
| 8 | 86.5 | 18 | 123.0 | 28 | 173.8 | 38 | 250.3 | ||
| 9 | 91.5 | 19 127.3 | 29 79.9 | ||||||
11Twintalker
| DCS Code Chart | |||||||
| No | DCS code | No | DCS code | No | DCS code | No | DCS code |
| 0 | Disabled | 21 | 134 | 42 | 311 | 63 | 516 |
| 1 | 23 | 22 | 143 | 43 | 315 | 64 | 532 |
| 2 | 25 | 23 | 152 | 44 | 331 | 65 | 546 |
| 3 | 26 | 24 | 155 | 45 | 343 | 66 | 565 |
| 4 | 31 | 25 | 156 | 46 | 348 | 67 | 606 |
| 5 | 32 | 26 | 162 | 47 | 351 | 68 | 612 |
| 6 | 43 | 27 | 165 | 48 | 364 | 69 | 624 |
| 7 | 47 | 28 | 172 | 49 | 365 | 70 | 627 |
| 8 | 51 | 29 | 174 | 50 | 371 | 71 | 631 |
| 9 | 54 | 30 | 205 | 51 | 411 | 72 | 632 |
| 10 | 65 | 31 | 223 | 52 | 412 | 73 | 654 |
| 11 | 71 | 32 | 226 | 53 | 413 | 74 | 662 |
| 12 | 72 | 33 | 243 | 54 | 423 | 75 | 664 |
| 13 | 73 | 34 | 244 | 55 | 431 | 76 | 703 |
| 14 | 74 | 35 | 245 | 56 | 432 | 77 | 712 |
| 15 | 114 | 36 | 251 | 57 | 445 | 78 | 723 |
| 16 | 115 | 37 | 261 | 58 | 464 | 79 | 731 |
| 17 | 116 | 38 | 263 | 59 | 465 | 80 | 732 |
| 18 | 125 | 39 | 265 | 60 | 468 | 81 | 734 |
| 19 | 131 | 40 | 271 | 61 | 503 | 82 | 743 |
| 20 | 132 | 41 | 306 | 62 | 506 | 83 | 754 |
17 Warranty
17.1 Warranty period
The devices have a 24-month warranty period. The warranty period starts on the day the new unit is purchased. There is no warranty on standard or rechargeable batteries (AA/AAA type).
Consumables or defects causing a negligible effect on operation or value of the equipment are not covered. The warranty has to be proven by presentation of the original or copy of the purchase receipt, on which the date of purchase and the unit-model are indicated.
17.2 Warranty exclusions
Damage or defects caused by incorrect treatment or operation and damage resulting from use of non-original parts or accessories are not covered by the warranty.
The warranty does not cover damage caused by outside factors, such as lightning, water and fire, nor any damage caused during transportation. No warranty can be claimed if the serial number on the units has been changed, removed or rendered illegible. Any warranty claims will be invalid if the unit has been repaired, altered or modified by the buyer
12 Twintalker 9500 Airsoft Edition
1 Inleiding
text_image
Diagram showing three stages of battery charging device with labeled components and directional arrows indicating charging direction.natural_image
Diagram of a walkie-talkie with attached plug and cable, showing wiring connections (no text or labels)
13.7 CTCSS (Continuous Tone Coded Squelch System) / DCS (Digital Coded Squelch)
• Continuous Tone Coded Squelch System (CTCSS)
• Digital Coded Squelch (DCS)
text_image
Diagram showing three views of a battery pack with labeled components and directional arrows indicating movement or change.natural_image
Diagram of a hand holding a device with a plug, showing wiring and a close-up inset (no text or symbols)
text_image
Diagram showing three views of a battery pack with labeled components and directional arrows indicating movement or change.natural_image
Technical line drawing of a handheld device with cable and plug, showing internal components (no text or symbols)
13.7 CTCSS (Continuous Tone Coded Squelch System) / DCS (Digital Coded Squelch)
• CTCSS (Continuous Tone Coded Squelch System)
• DCS (Digital Coded Squelch)
text_image
Diagram showing three types of battery pack components with labeled parts and directional arrows indicating movement or change.natural_image
Diagram of a handheld device connected to a cable, with an inset showing internal components (no text or symbols)
text_image
Diagram showing three stages of a battery pack with labeled components and directional arrows indicating movement or change.natural_image
Diagram of a walkie-talkie with attached plug and socket, showing wiring and socket (no text or labels)
13.7 CTCSS (Continuous Tone Coded Squelch System) / DCS (Digital Coded Squelch)
• CTCSS (Continuous Tone Coded Squelch System)
• DCS (Digital Coded Squelch)
text_image
Diagram showing three views of a battery pack with labeled components and directional arrows indicating movement or change.natural_image
Diagram of a hand holding a cable connected to a walkie-talkie, with an inset showing internal components (no text or symbols present)
13.7 CTCSS (Continuous Tone Coded Squelch System)/DCS (Digital Coded Squelch)
• Continuous Tone Coded Squelch System (CTCSS)
• Digital Coded Squelch (DCS)
text_image
Diagram showing three types of battery pack components with labeled parts and directional arrows indicating movement or change.natural_image
Line drawing of a walkie-talkie with attached plug and socket, shown with inset detail (no text or symbols)
- Vises under mottak
- TX-ikon
– Vises under sending
13.7 CTCSS (Continuous Tone Coded Squelch System) / DCS (Digital Coded Squelch)
• Continuous Tone Coded Squelch System (CTCSS)
• Digital Coded Squelch (DCS)
75Twintalker
text_image
Diagram showing three views of a battery pack with labeled components and directional arrows indicating movement or change.natural_image
Technical line drawing of a handheld device with cable and plug, showing internal components (no text or symbols)
13.7 CTCSS (Continuous Tone Coded Squelch System) / DCS (Digital Coded Squelch)
• CTCSS (Continuous Tone Coded Squelch System)
• DCS (Digital Coded Squelch)
text_image
Diagram showing three stages of battery charging with labeled components and directional arrows indicating charging direction.natural_image
Diagram of a handheld device connected to a plug, showing wiring and a close-up inset (no text or symbols)92 Twintalker 9500 Airsoft Edition

text_image
Diagram showing three views of a battery pack with labeled components and directional arrows indicating movement or change.10 Carregar as pilhas
- Ligue o conector do transformador de corrente directamente à entrada de carregamento do PMR.
natural_image
Diagram of a hand holding a plug connected to a walkie-talkie device, with an inset showing internal components (no text or symbols present)102 Twintalker 9500 Airsoft Edition

text_image
Diagram showing three views of a battery pack with labeled components and directional arrows indicating movement or change.natural_image
Line drawing of a walkie-talkie with attached plug and cable, shown in two views (no text or symbols)
• Continuous Tone Coded Squelch System (CTCSS)
• Digital Coded Squelch (DCS)
text_image
Diagram showing three views of a battery pack with labeled components and directional arrows indicating movement or change.natural_image
Diagram of a hand holding a cable connected to a walkie-talkie device, with an inset showing two socket connectors (no text or symbols present)
• Continuous Tone Coded Squelch System (CTCSS)
• Digital Coded Squelch (DCS)
text_image
Diagram showing three views of a battery pack with labeled components and directional arrows indicating movement or change.natural_image
Diagram of a hand holding a walkie-talkie connected to a device, with an inset showing a close-up of its electrical socket (no text or symbols present)
text_image
Diagram showing three stages of battery charging device with labeled components and directional arrows indicating charging direction.natural_image
Diagram of a hand holding a cable connected to a walkie-talkie, with an inset showing a close-up of a socket (no text or symbols present)
13.7 CTCSS (Continuous Tone Coded Squelch System) / DCS (Digital Coded Squelch)
• CTCSS (Continuous Tone Coded Squelch System)
• DCS (Digital Coded Squelch)