
RC-6401 - Walkie-talkie TRISTAR - Free user manual and instructions
Find the device manual for free RC-6401 TRISTAR in PDF.


| Product type | Walkie-talkie |
| Brand | TriStar |
| Model | RC-6401 |
| Dimensions (L x W x H) | 160 x 60 x 35 mm |
| Weight | 140 g |
| Power supply | 3 AAA batteries (not included) or rechargeable Li-ion battery (optional) |
| Battery life | up to 12 h (standby), 8 h (use) |
| Channels | 8 |
| Maximum range | up to 5 km |
| Functions | VOX, squelch, channel scan, power saving |
| Display | LCD with backlight |
| Volume control | rotary knob |
| Connectivity | fixed antenna |
| Maintenance | Clean with a soft, dry cloth |
| Safety | Avoid moisture, do not open the device |
| Spare parts | Batteries, battery, antenna (not included by default) |
| General information | Outdoor use, ideal for hiking, construction sites |
Frequently Asked Questions - RC-6401 TRISTAR
User questions about RC-6401 TRISTAR
0 question about this device. Answer the ones you know or ask your own.
Ask a new question about this device
Download the instructions for your Walkie-talkie in PDF format for free! Find your manual RC-6401 - TRISTAR and take your electronic device back in hand. On this page are published all the documents necessary for the use of your device. RC-6401 by TRISTAR.
USER MANUAL RC-6401 TRISTAR
natural_image
Black and silver Topcom radio device with digital display and control buttons (no visible text or symbols on device body)USER GUIDE / GEBRUIKSHANDLEIDING MANUEL D'UTILISATEUR / BEDIENUNGSANLEITUNG MANUAL DE USUARIO / BRUKSANVISNING BRUGERVEJLEDNING / ANVÄNDARHANDBOK KÄYTTÖOHJE / MANUALE D'USO MANUAL DO UTILIZADOR / UŽIVATELŠKÁ PŘÍRUČKA Однүгієσ Хрнσησ / HASZNÁLATI ÚTMUTATÓ INSTRUKCJA OBSŁUGI / РУКОВОДСТВО ПОЛЬЗОВАТЕЛЯ UŽÍVATEL'SKÝ MANUÁL
V1.0 - 06/11
CE

UK The features described in this manual are published with reservation to modifications.
Thank you for purchasing the TOPCOM Twintalker 1302. It's a short range, low powered radio communication device that has no running costs other than the minimal cost of re-charging the batteries.
The TwinTalker 1302 operates on Private Mobile Radio frequencies and can be used in any country where the service is authorised as indicated on the packing box and in this manual.
2 INTENDED PURPOSE:
It can be used for different professional as well as for recreational purposes. For example: to keep in contact during travelling with 2 or more cars, biking, skiing. It can be used to keep in contact with your children when they are playing outside, etc...

Restriction:
Check the local regulations before using it outside the country where it was purchased. The standard may be prohibited in this country.
3 CE MARK
This product is in compliance with the essential requirements and other relevant provisions of the R&TTE directive 1999/5/EC. This is confirmed by the CE-mark.
The Declaration of conformity can be found on: http://www.topcom.net/cedeclarations.php
4 SAFETY INSTRUCTIONS
4.1 GENERAL
Please read carefully through the following information concerning safety and proper use. Make yourself familiar with all functions of the device. Keep this manual on a safe place for future use.
4.2 BURNING INJURIES
- If the cover of the antenna is damaged, do not touch because when an antenna comes in contact with the skin, a minor burn may result when transmitting.
- Batteries can cause property damage such as burns if conductive material such as jewellery, keys or beaded chains touches exposed terminals. The material may complete an electrical circuit (short circuit) and become quite hot. Exercise care in handling any charged battery, particularly when placing it inside a pocket, purse or other container with metal objects.
4.3 PERSONAL SAFETY
- Do not place your device in the area over an air bag or in the air bag deployment area. Air bags inflate with great force. If a communicator is placed in the bag deployment area and the air bag inflates, the communicator may be propelled with great force and cause serious injury to the occupants of the vehicle.
- Keep the radio at least 15 centimetres away from a pacemaker.
- Turn your radio OFF as soon as interference is taking place with medical equipment.
- Do not replace batteries in a potentially explosive atmosphere. Contact sparking may occur while installing or removing batteries and cause an explosion.
- Turn your communicator off when in any area with a potentially explosive atmosphere. Sparks in such areas could cause an explosion or fire resulting in bodily injury or even death.
- Never throw batteries in fire as they may explode.

Areas with potentially explosive atmospheres are often, but not always, clearly marked. They include fuelling areas such as below deck on boats, fuel or chemical transfer or storage facilities; areas where the air contains chemicals or particles, such as grain, dust or metal powders; and any other area where you would normally be advised to turn off your vehicle engine.
- Keep batteries away from small children
4.5 LEGAL
- In some countries it is prohibited to use your PMR while driving a vehicle. In this case leave the road before using the device.
- Turn your unit OFF when on board an aircraft when instructed to do so. Any use of the unit must be in accordance with airline regulations or crew instructions.
- Turn your unit OFF in any facilities where posted notices instruct you to do so. Hospitals or health care facilities may be using equipment that is sensitive to external RF energy.
- Replacing or modifying the antenna may affect the PMR radio specifications and violate the CE regulations. Unauthorised antennas could also damage the radio.
4.6 NOTES
- Do not touch the antenna while transmitting, it could affect the range.
- Remove the battery if the device is not going to be used for a long period.
5 CLEANING AND MAINTENANCE
- To clean the unit, wipe with a soft cloth dampened with water. Don't use a cleaner or solvents on the unit; they can damage the case and leak inside, causing permanent damage.
- Battery contacts may be wiped with a dry lint-free cloth.
- If the unit gets wet, turn it off and remove the batteries immediately. Dry the battery compartment with a soft cloth to minimize potential water damage. Leave the cover off the battery compartment overnight or until completely dry. Do not use the unit until completely dry.
6 DISPOSAL OF THE DEVICE (ENVIRONMENT)
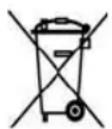
At the end of the product lifecycle, you should not throw this product into the normal household garbage but bring the product to a collection point for the recycling of electrical and electronic equipments. The symbol on the product, user guide and/or box indicate this.
Some of the product materials can be re-used if you bring them to a recycling point. By re-using some parts or raw materials from used products you make an important contribution to the protection of the environment. Please contact your local authorities in case you need more information on the collection points in your area.
7 USING A PMR DEVICE
To communicate between PMR devices they need to be set all on the same channel and within receiving range (up to max. 5 km in open field). Since these devices use free frequency bands (channels), all devices in operation share these channels(total 8 channels). Therefore, privacy is not guaranteed. Anybody with a PMR set to your channel can overhear the conversation.
If you want to communicate (transmitting a voice signal) you need to press the PButton (Push to talk). Once this button pressed, the device will go into transmit mode and you can speak into the microphone. All other PMR devices in range, on the same channel and in standby mode (not transmitting) will hear your message. You need to wait until the other party stops transmitting before you can reply to the message. At the end of each transmission the unit will send a beep. To reply, just press the PButton and speak into the microphone.

If 2 or more users press the PTT - button at the same time the receiver will receive only the stongest signal and the other signal (s) will be suppressed. Therefore you should only transmit a signal (press PTT - button) when the channel is free.
8 GETTING STARTED

8.1 REMOVING/INSTALLING THE BELT CLIP
- To remove the clip from the unit, push the belt clip (2) towards the antenna, while pulling the clip tab (1).
- When re-installing the belt clip, a click indicates the BeltClip is locked into position.
8.2 BATTERY INSTALLATION
-
Remove the belt clip (§ 8.1).
-
Pull the battery door tab down (3) and slide the battery cover away from the antenna. (4)
- Install 3'AAA' alkaline or rechargeable batteries following the polarity as shown.
- Re-install the Battery Cover and Belt Clip (§ 8.1).
9 B U T T O N S
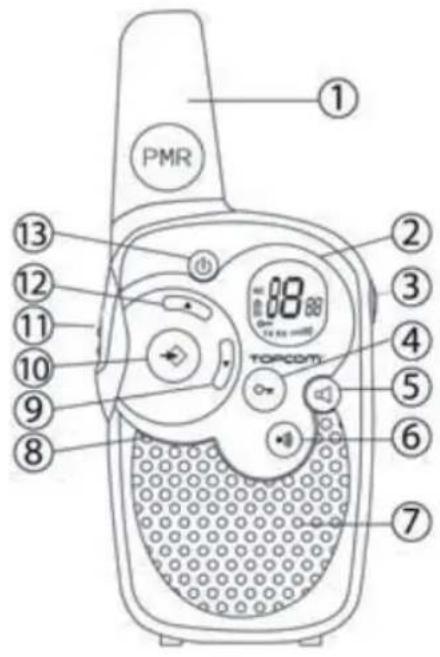
-
ANTENNA
-
LCD Display
-
SPEAKER/MIC/CHARGER Connector
-
LOCK button

- MONITOR button

- CALL button

- Transmit a call tone
- Decrease the speaker volume
- Select the previous item in the menu.
- MENU button

- Enter menu.
- PUSH TO TALK button PTT
- Press To Talk or release to listen
- Confirm a setting in the menu
- UP button
- Increase the speaker volume
- Select the next item in the menu.
- ON/OFF button ⏻
10 LCD DISPLAY INFORMATION

a. Channel number
b. Speaker Volume
c. RX icon - Displayed when receiving a signal
d. TX icon - Displayed when transmitting a signal
e. Lock icon - Displayed when the keypad is locked.
f. Battery charge level indicator
g. Scan icon - Displayed when scan mode is active
11 BATTERY CHARGE LEVEL/LOW BATTERY INDICATION
The BATTERY CHARGE LEVEL is indicated by the number of squares present inside the BATTERY icon on the LCD Screen.
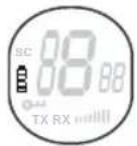
Battery Full
Battery 2/3 charged
Battery 1/3 charged
Battery empty
When the BATTERY CHARGE LEVEL is low, the BATTERY icon will flash to indicate that the batteries need to be replaced or recharged.

Dispose of batteries at a designated battery disposal unit and not in the household waste. Do not short-circuit & dispose of in fire. Remove the batteries if this device is not going to be used for a long period.
12 CHARGING RECHARGEABLE BATTERIES
The PMR can be used with 3 alcaline or rechargeable NiMh AAA batteries.

Only use the AC/DC ADAPTER with "AAA" rechargeable batteries. Do not try to charge this unit when regular "AAA" alkaline batteries are installed.
When using rechargeable batteries you can use the optional adapter to charge.

natural_image
Diagram of a mechanical component with an arrow indicating direction, no text or symbols present- Insert 3 "AAA" rechargeable batteries.
- Plug the small plug of the 7,5 V DC / 200 mA adapter into the SPK/MIC/CHG jack and the other end in the electrical socket.
- Make sure that the unit is switched off in order to charge the batteries properly. There is no charge indicator during charging at OFF mode.
NOTE: It takes approximately 7 to 10 hours to fully charge the batteries.
13 USING THE TWINTALKER 1302
13.1 TURNING THE UNIT ON/OFF
- To activate; press and hold. The unit will "beep" and the LCD Screen will display the current channel.
- To switch off; press and hold again. The unit will "beep" and the LCD Screen will turn blank.
13.2 ADJUSTING SPEAKER VOLUME

The Speaker Volume can be adjusted using 📁. The Speaker Volume level is displayed on the LCD.
13.3 RECEIVING A SIGNAL

The unit is continuously in the RECEIVE mode when the unit is ON and not transmitting. When you receive a signal on the current channel, the RX icon is displayed.

In order for other people to receive your transmission, they must be set on the same channel.
13.4 TRANSMITTING A SIGNAL

- Press and hold PotTRANSMIT.
- Hold the unit in a vertical position with the MICROPHONE 10 cm from the mouth and speak into the microphone.
- Release When you have finished transmitting.
13.5 CHANGING CHANNELS
The PMR has 8 available channels.
To change channels:

- Press once, the current channel number flashes on the LCD Screen.
- Press or to change the channel.
- Press To confirm the channel selection and return to NORMAL mode.
NOTE: Any PMR set on the same channel can receive and listen to the conversation.
13.6 MONITOR
You can use the MONITOR feature to check for weaker signals in the current channel.
- Press button for normal monitoring
- Press and hold. After 5 seconds you can release the button. You are now continuous monitoring the channel until you press again.
13.7 CHANNEL SCAN
CHANNEL SCAN performs searches for active signals in an endless loop from channel 1 to 8.

- Press and hold and for 2 seconds.
- Release the buttons. The channel on the display changes as it scans through the channels.
- When an active signal (one of 8 channels) is detected, CHANNEL SCAN pauses and you will hear the active signal.
- When an active signal (one of 8 channels) is detected, press 📄 or 🍸 to bypass the current channel and continue to search for another active channel
- Press R0 communicate through the active signal channel or press to deactivate channel scan.
13.8 BUTTON LOCK

- Press and hold for 2 seconds to activate or deactivate the BUTTON LOCK mode. The BUTTON LOCK icon is displayed on the LCD Screen.
- Press and hold again to deactivate BUTTON LOCK
13.9 CALL TONES
A call tone alerts others that you want to talk.
a. Setting the Call Tone

5 different Call Tones can be selected.
- Press 2 times. CA will be displayed.
- Press or to select another call tone or select OF to enable call tones.
- Press R0To confirm your selection and return to the standby mode.
b. Sending a call Tone
Press briefly. The call tone will be transmitted for 3 seconds on the set channel.
13.10 KEY-TONE ON/OFF
When a button is pressed, the unit will beep briefly.

To set the key-tone.
- Press 8 times. 'to' will be displayed.
- Press to enable (ON) or disable the key-tone (OF).
- Press ☑ To confirm your selection and return to the standby mode.
13.11 ROGER BEEP ON/OFF
After the button is released, the unit will send out a roger beep to confirm that you have stopped talking.

To set the Roger Beep.
- Press 4 times. 'ro' will be displayed.
- Press to enable (ON) or disable the Roger-Beep (OF).
- Press RTO confirm your selection and return to the standby mode.
13.12 HEADSET CONNECTION

natural_image
Diagram of a mechanical component with an arrow pointing to a circular feature (no text or symbols)The Twintalker 1302 can be used with an external microphone and speaker.
The connector is located under the protective rubber cover on the top of the unit. To attach the external speaker/microphone headsets or earpiece, lift the rubber flap on the top of the unit to expose the connector.
Insert the appropriate plug into the connector.
14 TECHNICAL SPECIFICATIONS
| ChannelsFrequencyRangeBatteries PMRTransmission PowerModulation TypeChannel spacing | 8446.00625MHz - 446.09375 MHzUp to 5 km (Open field)3 x AAA Alkaline or NiMh rechargeable=< 500mW ERPFM - F3E12,5 Khz |
| Channel Frequency Chart: | |
| Channel | Frequency (MHz) |
| 1 | 446,00625 |
| 2 | 446,01875 |
| 3 | 446,03125 |
| 4 | 446,04375 |
| 5 | 446,05625 |
| 6 | 446,06875 |
| 7 | 446,08125 |
| 8 | 446,09375 |
15 WARRANTY
15.1 WARRANTY PERIOD
Topcom units have a 24-month warranty period. The warranty period starts on the day the new unit is purchased. Consumables or defects causing a negligible effect on operation or value of the equipment are not covered. The warranty has to be proven by presentation of a copy of the original purchase receipt, on which the date of purchase and the unit-model are indicated.
15.2 WARRANTY EXCLUSIONS
Damage or defects caused by incorrect treatment or operation and damage resulting from use of non-original parts or accessories are not covered by the warranty. The warranty does not cover damage caused by outside factors, such as lightning, water and fire, nor any damage caused during transportation. No warranty can be claimed if the serial number on the unit has been changed, removed or rendered illegal.
1 INLEIDING
8.1 DE RIEMCLIP VERWIJDEREN/INSTALLEREN
natural_image
Pure mechanical diagram showing a gear or cam mechanism with no text, numbers, or symbolsnatural_image
Diagram of a mechanical component with an arrow pointing to a circular feature (no text or symbols)8.1 MANIPULATION DU CLIP DE CEINTURE
natural_image
Simple line drawing of a mechanical component with an arrow pointing to a circular feature (no text or symbols)natural_image
Pure mechanical diagram showing a gear or cam mechanism with an arrow pointing to a circular component (no text or symbols)8.1 GÜRTELCLIP ENTFERNEN / BEFESTIGEN
natural_image
Pure mechanical diagram showing a gear or cam mechanism with an arrow pointing to a circular component (no text or symbols)natural_image
Pure mechanical diagram showing a gear or cam mechanism without any text, numbers, or symbolsnatural_image
Diagram of a mechanical component with an arrow pointing to a circular feature (no text or symbols)natural_image
Pure mechanical diagram showing a gear or cam mechanism with an arrow indicating direction (no text or symbols)8.1 TA BORT/SÄTT PÅ BÄLTESKLÄMMAN
- TRYCK FÖR ATT TALA-knapp PTT
natural_image
Pure mechanical diagram showing a gear or cam mechanism with an arrow indicating direction (no text or symbols)natural_image
Diagram of a mechanical component with an arrow indicating direction (no text or symbols)8.1 AFMONTERING/MONTERING AF BÆLTECLIPS
natural_image
Pure mechanical diagram showing a gear or cam mechanism without any text, numbers, or symbolsnatural_image
Diagram of a mechanical component with a circular feature and an arrow pointing to it (no text or symbols)8.1 FJERNE/MONTERE BELTEKLIPSEN
natural_image
Diagram of a mechanical component with an arrow indicating direction (no text or symbols)natural_image
Diagram of a mechanical component with an arrow pointing to a circular feature (no text or symbols)8.1 VYÖKIINNIKKEEN IRROTTAMINEN/ASENTAMINEN
natural_image
Pure mechanical diagram showing a gear or cam mechanism with an arrow indicating direction (no text or symbols)natural_image
Pure mechanical diagram showing a gear or cam mechanism without any text, numbers, or symbolsnatural_image
Pure mechanical diagram showing a gear or cam mechanism with no text, numbers, or symbolsnatural_image
Pure mechanical diagram showing a gear or cam mechanism with an arrow indicating direction (no text or symbols)8.1 REMOVER/INSTALAR O GANCHO DE TRANSPORTE
12 CARREGAR PILHAS RECARREGÁVEIS
natural_image
Diagram of a mechanical component with an arrow pointing to a circular feature (no text or symbols)natural_image
Pure mechanical diagram showing a gear or cam mechanism with an arrow pointing to a circular component (no text or symbols)8.1 DEMONTÁŽ/INSTALACE SPONY PÁSU
natural_image
Pure mechanical diagram showing a gear or cam mechanism with no text, numbers, or symbolsnatural_image
Pure mechanical diagram showing a gear or cam mechanism without any text, numbers, or symbolsnatural_image
Diagram of a mechanical component with an arrow indicating direction, no text or symbols presentnatural_image
Simple line drawing of a mechanical component with an arrow pointing to a circular feature (no text or symbols)8.1 AZ ÖVTARTÓ FELHELYEZÉSE ÉS LEVÉTELE
natural_image
Diagram of a mechanical component with an arrow pointing to a circular feature (no text or symbols)natural_image
Pure mechanical diagram showing a gear or cam mechanism with an arrow pointing to a circular component (no text or symbols)natural_image
Pure mechanical diagram showing a gear or cam mechanism with an arrow indicating direction (no text or symbols)natural_image
Diagram of a mechanical component with a circular feature and an arrow indicating direction (no text or symbols)natural_image
Pure mechanical diagram showing a gear or cam mechanism with an arrow indicating direction (no text or symbols)natural_image
Pure mechanical diagram showing a gear or cam mechanism with an arrow indicating direction (no text or symbols)natural_image
Pure mechanical component diagram without any text, numbers, or symbolsnatural_image
Diagram of a mechanical component with an arrow pointing to a circular feature (no text or symbols)- INTENDED PURPOSE:
- CE MARK
- SAFETY INSTRUCTIONS
- GENERAL
- BURNING INJURIES
- PERSONAL SAFETY
- LEGAL
- NOTES
- CLEANING AND MAINTENANCE
- DISPOSAL OF THE DEVICE (ENVIRONMENT)
- USING A PMR DEVICE
- GETTING STARTED
- REMOVING/INSTALLING THE BELT CLIP
- BATTERY INSTALLATION
- B U T T O N S
- LCD DISPLAY INFORMATION
- BATTERY CHARGE LEVEL/LOW BATTERY INDICATION
- CHARGING RECHARGEABLE BATTERIES
- USING THE TWINTALKER 1302
- TURNING THE UNIT ON/OFF
- ADJUSTING SPEAKER VOLUME
- RECEIVING A SIGNAL
- TRANSMITTING A SIGNAL
- CHANGING CHANNELS
- MONITOR
- CHANNEL SCAN
- BUTTON LOCK
- CALL TONES
- KEY-TONE ON/OFF
- ROGER BEEP ON/OFF
- HEADSET CONNECTION
- WARRANTY
- WARRANTY PERIOD
- WARRANTY EXCLUSIONS
- INLEIDING
- DE RIEMCLIP VERWIJDEREN/INSTALLEREN
- MANIPULATION DU CLIP DE CEINTURE
- GÜRTELCLIP ENTFERNEN / BEFESTIGEN
- TA BORT/SÄTT PÅ BÄLTESKLÄMMAN
- AFMONTERING/MONTERING AF BÆLTECLIPS
- FJERNE/MONTERE BELTEKLIPSEN
- VYÖKIINNIKKEEN IRROTTAMINEN/ASENTAMINEN
- REMOVER/INSTALAR O GANCHO DE TRANSPORTE
- CARREGAR PILHAS RECARREGÁVEIS
- DEMONTÁŽ/INSTALACE SPONY PÁSU
- AZ ÖVTARTÓ FELHELYEZÉSE ÉS LEVÉTELE
Brand : TRISTAR
Model : RC-6401
Category : Walkie-talkie