Radiant - Barbecue BARBECOOK - Free user manual and instructions
Find the device manual for free Radiant BARBECOOK in PDF.

User questions about Radiant BARBECOOK
0 question about this device. Answer the ones you know or ask your own.
Ask a new question about this device
Download the instructions for your Barbecue in PDF format for free! Find your manual Radiant - BARBECOOK and take your electronic device back in hand. On this page are published all the documents necessary for the use of your device. Radiant by BARBECOOK.
USER MANUAL Radiant BARBECOOK
natural_image
Line drawing of a portable air conditioner unit with airflow arrows indicating movement (no text or symbols)IT ISTRUZIONI DI USO E MONTAGGIO
FR MODE D'EMPLOI ET INSTRUCTIONS
DE GEBRAUCHSANLEITUNG UND DIE AUFBAUANLEITUNG
NL HANDLEIDING EN GEBRUIKSAANWIJZING
ES MODO DE EMPLEO E INSTRUCCIONES
UK USER MANUAL AND ASSEMBLY INSTRUCTIONS
PT AS INTROÇÕES DE MONTAGEM E FONCIONAMENTO
NO BRUKS-OG MONTERINGSANVISNING
SE MONTERINGS- OCH BRUKSANVISNING
FI PAKKAUKSESSA ON GRILLIN
indice/index
UK USER MANUAL AND ASSEMBLY INSTRUCTIONS pag. 47
text_image
Fig. 1 F R_WN = I_m 1Fig. 1 Fig. 2
text_image
g. 2 712 562 1033 A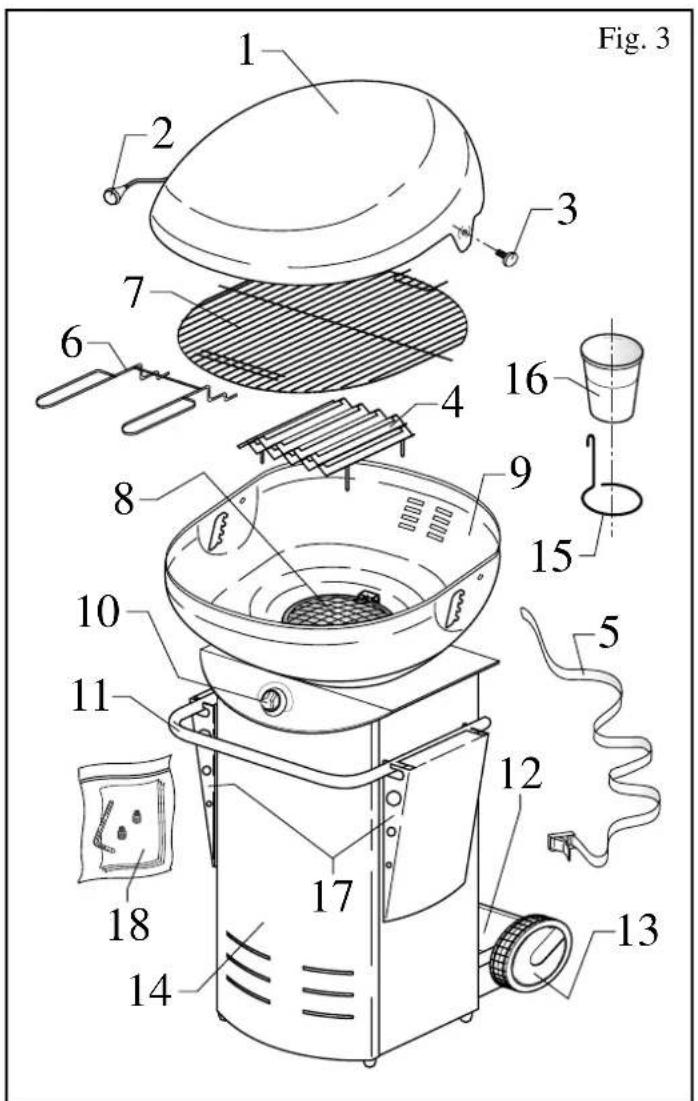
text_image
Fig. 3 1 2 3 4 5 6 7 8 9 10 11 12 13 14 15 16 17 18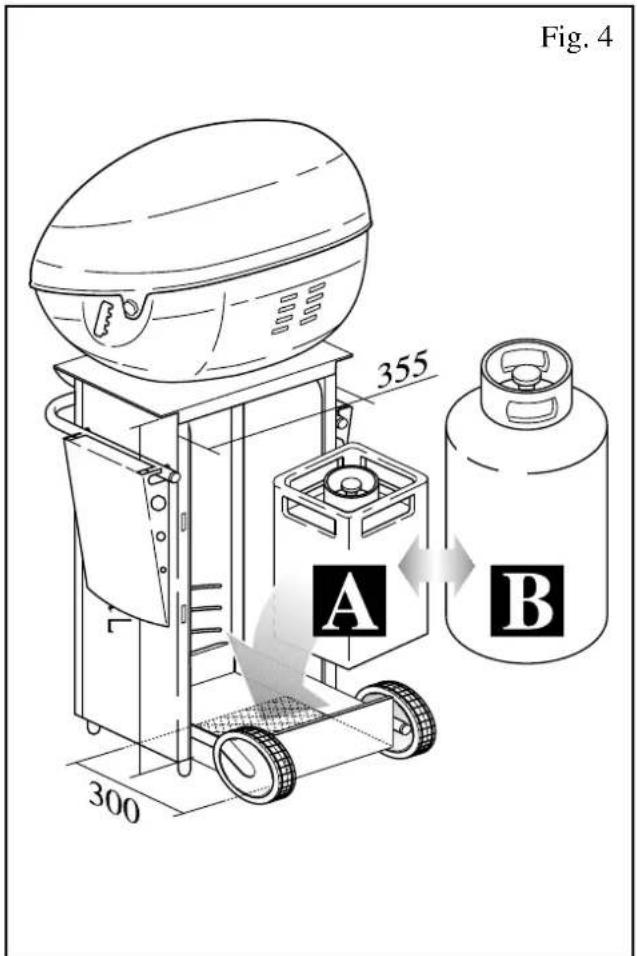
text_image
Fig. 4 355 A B 300
text_image
Fig. 5 1 2 3 A
text_image
Fig. 6 1 2 3 B
text_image
A GPL LPG B B1 B2 B1 B2 Fig. 7 1 2 3 4 5 6 7 8 9 10 11 12 13 13 6
text_image
Fig. 8 1 2 3
flowchart
graph TD
    A["MIN"] -->|OFF| B["MAX"]
    B --> C["PUSH"]
    C --> D["MAX"]
    D --> E["OFF"]
    E --> F["MAX"]
    F --> G["PUSH"]
    G --> H["MIN"]
    style A fill:#f9f,stroke:#333
    style B fill:#ccf,stroke:#333
    style C fill:#cfc,stroke:#333
    style D fill:#fcc,stroke:#333
    style E fill:#cff,stroke:#333
    style F fill:#ffc,stroke:#333
    style G fill:#cfc,stroke:#333
    style H fill:#fcc,stroke:#333
text_image
Fig. 10 B1 B2 15 16 18 19
text_image
Fig. A a| SAEY N.V. INDUSTRIELAAN 4 B-8 501 KORTRIJK-HEULE BELGIUM - MADE IN ITALY - | |||||||||||||||
| A B | C D E F | G H | kW | I kW | L g/ h | M ∅ mm | N ∅ mm | O G30 mbar | P G31 mbar | Q | |||||
| ○ AT | - | - | ■3B/ P | - | - | - | - | - | ○ | ||||||
| ● BE | - | - | ■3+ | - | 26 | 30 37 BE | ● | ||||||||
| ○ CH | - | - | - | - | - | - | - | - | ○ | ||||||
| ○ CZ | - | - | - | - | - | - | - | - | ○ | ||||||
| ○ DE | - | - | ■3B/ P | - | - | - | - | - | ○ | ||||||
| ● DK | ■3B/ P | 30 | 30 | ● DK | |||||||||||
| ● ES | ■3+ | - | 28-30 | 37 | ● ES | ||||||||||
| ● FI | ■3B/ P | - | 30 | 30 | ● FI | ||||||||||
| ● FR | ■3+ | - | 28 30 | 37 | ● FR | ||||||||||
| ● GB | ■3+ | - | 28-30 | 37 | ● GB | ||||||||||
| ● GR | ■3+ | - | 28-30 | 37 | ● GR | ||||||||||
| ○ HU | - | - | - | - | ○ HU | ||||||||||
| ● IE | ■3+ | - | 28 30 | 37 | ● IE | ||||||||||
| ● IS | ■3B/ P | - | 30 | 30 | ● IS | ||||||||||
| ● IT | ■3+ | - | 28-30 | 37 | ● IT | ||||||||||
| ○ LU | - | - | - | - | - | - | - | - | ○ | ||||||
| ● NL | - | - | ■3B/ P | - | 30 | 30 | NL | ● | |||||||
| ● NO | - | - | ■3B/ P | - | 30 | 30 NO | ● | ||||||||
| ● PT | - | - | ■3+ | - | 28 | 30 37 PT | ● | ||||||||
| ● SE | - | - | ■3B/ P | - | 30 | 30 SE | ● | ||||||||
| LEGENDA colonne: - Columnes esplication | |||||||||||||||
| A....Q: Sigla Paese - Land identification - désignation du pays - Landesbezeichnung - Indicacao do pais - Land van bestemming ● SI, YES, JA, OUI ○ NO, NEEN, NEIN, NON | |||||||||||||||
| B: series apparecchio - appliance serial- serie de l'appareil- Serie des Geräts - série aparelho - serie aparato - Merk | |||||||||||||||
| C: modello apparecchio - appliance model - serie aparato - Modell des Geräts -modelo aparelho - modelo aparato - Model | |||||||||||||||
| D: categoria gas - gas categories - type de gaz - Gaskategorie - categoria de gas - categoria de gas - Gascategorie | |||||||||||||||
| E: tipo apparecchio - appliance type - type d'appareil - Typ des Geräts - tipo do aparelho - version aparato - Toesteltype | |||||||||||||||
| F: codice apparecchio - appliance code - code appareil - Kode Geräts - código aparelho - aparato código - Serienummer | |||||||||||||||
| G: numero codice PIN - NIP number - numero de code PIN - PIN-Kodenummer - numero de código PIN - numero de codificacion PIN - PIN code | |||||||||||||||
| H: portata termica nominale - nominal heat input - débit calorifique nominal - Nennbelastung - carga nominal - carga nomina - Nominale belasting | |||||||||||||||
| I: portata termica ridotta - reduced heat input - débit calorifique minimal - Mindestbelastung - carga minima - carga minima - Minimum belasting | |||||||||||||||
| L: consumo orario gas - gas consonction - consommation de gaz - Gasverbrauch - consumo de gas - consumo de gas - Consumptie | |||||||||||||||
| M: diametro ugello - injector diameter - diamètre du gicleur - Durchmesser Einspritzdüse - diametro do injector - diametro inyector - Diameter inspuiter | |||||||||||||||
| N: diametro diaframma - diafragme diameter - diamètre du diaphragme - é Durchmesser Blende - Diâmetro do diafragma - diâmetro diafragma - Diameter diafragma |  | ||||||||||||||
| O: press. alim. BUTANO G30 - inlet gas pressure BUTANE G30 - pression de gaz entrante BUTANE G30 - Eintrittsgasdruck Butan G30 - pressão do gas de entrada BUTANO G30 - presion gas entrante BUTANO G30 - Gasdruk inlaat Butaan G30 | |||||||||||||||
| P: press. alim. PROPANO G31 - inlet gas pressure PROPANE G31 - pression de gaz entrante PROPANE G31 - Eintrittsgasdruck Propan G31 - pressão do gas de entrada PROPANO G31 - presión gas entrante PROPANO G31 - Gasdruk inlaat Propaan G31 | |||||||||||||||
Tab.1
| SAEY N.V. INDUSTRIELAAN 4 B-8501 KORTRIJK-HEULE BELGIUM - MADE IN ITALY - | ||||||||||||||
| A B | C D E F | G H | kW | I kW | L g/h | M ∅ mm | N ∅ mm | O G30 mbar | P G31 mbar | Q | ||||
| ● AT | ■3B/P | - | - | - | - | - | - | 1,40 | 50 | 50 | ● AT | |||
| ○ BE | - | - | - | - | - | - | - | ○ | ||||||
| ○ CH | - | - | - | - | - | - | - | ○ | ||||||
| ○ CZ | - | - | - | - | - | - | - | ○ | ||||||
| ● DE | - | - | ■3B/P | - | - | - | - | - | - | 1,40 | 50 | 50 | ● DE | |
| ○ DK | - | - | - | - | ○ DK | |||||||||
| ○ ES | - | - | - | - | ○ ES | |||||||||
| ○ FI | - | - | - | - | ○ FI | |||||||||
| ○ FR | - | - | - | - | ○ FR | |||||||||
| ○ GB | - | A | 0694BL2879 | ( Hs) | ( Hs) | G30: 545G31: 536 | 1,30 | - | - | ○ GB | ||||
| ○ GR | - | - | - | ○ GR | ||||||||||
| ○ HU | - | - | - | ○ HU | ||||||||||
| ○ IE | - | 7,5 | 4,0 | - | - | ○ IE | ||||||||
| ○ IS | - | - | - | - | ○ IS | |||||||||
| ○ IT | - | - | - | - | ○ IT | |||||||||
| ● LU | - | - | ■3P | - | 1,40 | 50 LU | ● | |||||||
| ○ NL | - | - | - | - | - | - | - | - | ○ | |||||
| ○ NO | - | - | - | - | - | - | - | - | ○ | |||||
| ○ PT | - | - | - | - | - | - | - | - | ○ | |||||
| ○ SE | - | - | - | - | - | - | - | - | ○ | |||||
| LEGENDA colonne: - Columnes esplication | ||||||||||||||
| A....Q: Sigla Paese - Land identification - désignation du pays - Landesbezeichnung - Indicação do país - Land van bestemming ● SI, YES, JA, OUI ○ NO, NEEN, NEIN, NON | ||||||||||||||
| B: serie apparecchio - appliance serial- série de l'appareil- Serie des Geräts - série aparelho - serie aparato - MerkAT= Osterraich, BE= Belgique, DE= Deutschland, ES= Espana, IT= Italia, DK= Denmark, FI= Finland, GR= Greece, IS= Iceland, LU= Luxembourg, NL= Holland, NO= Norway, PT= Portugal, SE= Sweden. | ||||||||||||||
| C: modello apparecchio - appliance model - serie aparato - Modell des Geräts - modelo aparelho - modelo aparato - ModelD: categoria gas - gas categories - type de gaz - Gaskategorie - categoria de gás - categoria de gas - GascategorieE: tipo apparecchio - appliance type - type d'appareil - Typ des Geräts - tipo do aparelho - versión aparato - ToesteltypeF: codice apparecchio - appliance code - code appareil - Kode Geräts - código aparelho - aparato código - SerienummerG: numero codice PIN - NIP number - numero de code PIN - PIN-Kodenummer - número de código PIN - número de codificación PIN - PIN codeH: portata termica nominale - nominal heat input - débit calorifique nominal - Nennbelastung - carga nominal - carga nomina - Nominale belastingI: portata termica ridotta - reduced heat input - débit calorifique minimal - Mindestbelastung - carga mínima - carga mínima - Minimum belastingL: consumo orario gas - gas consonction - consommation de gaz - Gasverbrauch - consumo de gás - consumo de gas - Consumptie | ||||||||||||||
| M: diametro ugello - injector diameter - diamètre du gicleur - Durchmesser Einspritzdüse - diametro do injector - diametro inyector - Diameter inspuiter | ||||||||||||||
| N: diametro diaframma - diafragme diameter - diamètre du diaphragme - é Durchmesser Blende - Diâmetro do diafragma - Diâmetro diafragma |  | |||||||||||||
| O: press. alim. BUTANO G30 - inlet gas pressure BUTANE G30 - pression de gaz entrante BUTANE G30 - Eintrittsgasdruck Butan G30 - pressão do gás de entrada BUTANO G30 - presión gas entrante BUTANO G30 - Gasdruk inlaat Butaan G30 | ||||||||||||||
| P: press. alim. PROPANO G31 - inlet gas pressure PROPANE G31 - pression de gaz entrante PROPANE G31 - Eintrittsgasdruck Propan G31 - pressão do gás de entrada PROPANO G31 - presión gas entrante PROPANO G31 - Gasdruk inlaat Propaan G31 | ||||||||||||||
Tab.1b
- Barbecook RADIANT - - I -
indice
- Barbecook RADIANT - - FR -
index
- Barbecook RADIANT - - DE -
Inhaltsverzeichnis
- ALLGEMEINE BESCHREIBUNG pag. 23
- MONTAGE pag. 24
- INBETRIEBNAHME pag. 25
- VERLÖSCHEN pag. 27
- REINIGUNG pag. 27
- WARTUNG pag. 28
- ERSETZEN DER EINSPRITZDÜSE pag. 28
- PROBLEME pag. 29
- LAGERUNG pag. 29
- GARANTIE pag. 29
BEWAHREN SIE DIESES BUCH WÄHREND DER GESAMTEN LEBENSDAUER DES GERÄTES SORGFÄLTIG AUF.
- Barbecook RADIANT - - NL -
index
- Barbecook RADIANT - - ES -
index
- DESCRIPCIÓN GENERAL pag. 40
- MONTAJE pag. 41
- PUESTA EN MARCHA pag. 42
- APAGADO pag. 44
- LIMPIEZA pag. 44
- MANTENIMIENTO pag. 45
- SUSTITUCIÓN DEL INYECTOR pag. 45
- PROBLEMAS pag. 46
42 - ALMACENAMIENTO pag. 46
- GARANTÍA pag. 46
- Barbecook RADIANT - - UK -
index
- GENERAL DESCRIPTION pag. 48
- ASSEMBLY pag. 49
- TURNING THE BARBECUE ON pag. 50
- TURNING THE BARBECUE OFF pag. 52
- CLEANING pag. 52
- MAINTENANCE pag. 52
- REMPLACING THE GAS JET pag. 53
- TROUBLESHOOTING pag. 53
- STORAGE pag. 54
- GUARANTEE pag. 54
CAREFULLY KEEP THIS MANUAL DURING THE ENTIRE SERVICE LIFE OF THE APPLIANCE! ASK FOR A COPY IF THE ORIGINAL MANUAL IS DAMAGED OR LOST!
1 - GENERAL DESCRIPTION
Thanks to its direct and reflected irradiation, the Barbecook RADIANT offers you a large and uniform grilling surface (1: Fig.1).
As it is conceived for outdoor use, it may only be used in open air (gardens, pavements etc.) or in sufficiently ventilated rooms such as covered terraces, pergolas etc. The barbecue is very easy to use, was built in conformity with the European safety standards and has been tested and approved and is checked by the Notified Body that is entrusted with most of the manufacturer's certifications for products on gas.
IMPORTANT ! Carefully follow all instructions and warnings of this manual. Non-observance may result in failures and/ or danger.
The RADIANT can be used in the following way:
- MOBILE: completely freestanding. This type runs on LPG (incorporated gas cylinder recess).
IMPORTANT! CERTAINS PARTS OF THIS GAS RUN BARBECUE BECOME VERY HOT WHEN IN USE. KEEP IT OUT OF REACH OF CHILDREN.
IMPORTANT! Read the warnings in this booklet very carefully. They contain important indications regarding your safety while assembling, using and maintaining the barbecue.
IMPORTANT! This gas run barbecue is intended for the use it was conceived for, i.e. to prepare food in open air.
Every other use must be considered improper and even dangerous. The manufacturer cannot be held responsible for any injury to people or animals or for any damage to goods in case of improper use.
IMPORTANT! When in use, keep the gridiron out of reach of children and/or animals!
IMPORTANT! Keep your face away from the gridiron when starting and/or restarting the barbecue.
IMPORTANT! DO NOT move the barbecue while the burner is working.
IMPORTANT! ALWAYS switch off the barbecue and turn off the gas tap before you unscrew or remove any part of the barbecue.
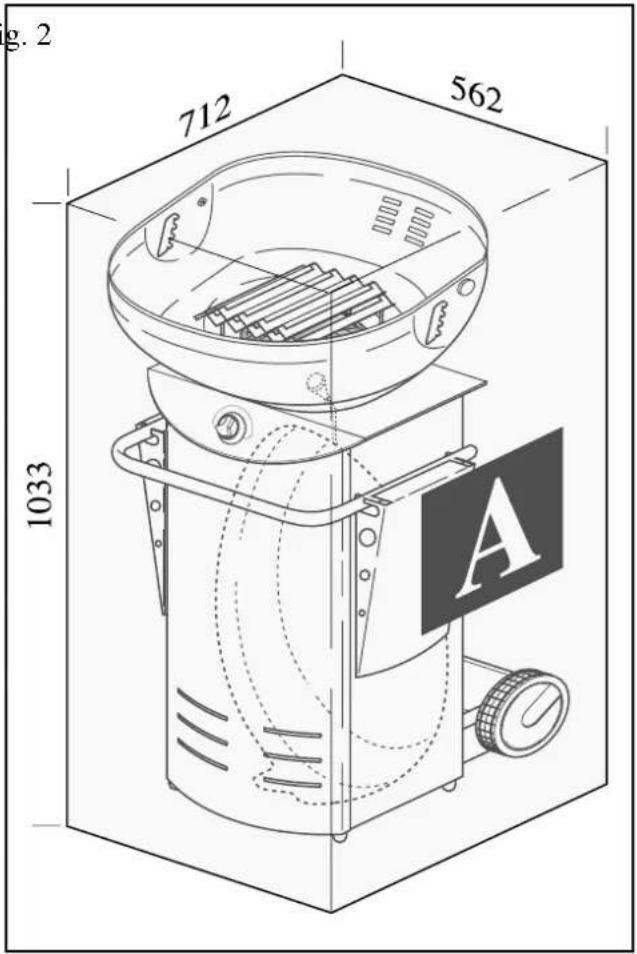
IMPORTANT! ALWAYS RESPECT THE SAFETY DISTANCES (FIG. 1) TO INFLAMMABLE OBJECTS OR SUBSTANCES.
IT IS STRICTLY FORBIDDEN TO USE THE BARBECUE IN CLOSED ROOMS: OFFICES, IN HOUSES, STABLES, FARMS, PLACES SITUATED CLOSE TO GAS DAMPS OR INFLAMMABLE AND/ OR EXPLOSIVE DUST ETC
IMPORTANT! DURING THE ASSEMBLY, COMPLY WITH THE FIRE AND ACCIDENT PREVENTION REGULATIONS OF THE COUNTRY IN WHICH THE BARBECUE IS USED.
IMPORTANT! DO NOT use the barbecue in basements if it is pre-set to run on LPG.
IMPORTANT! ALWAYS TURN OFF THE GAS TAP ON THE GAS CYLINDER WHEN THE GRIDIRON IS NOT IN USE.
IMPORTANT! DO NOT STORE GAS CYLINDERS IN PLACES THAT ARE NOT SUITED FOR STORING GAS CYLINDERS. CHECK THE SAFETY REGULATIONS OF THE COUNTRY IN WHICH THE BARBECUE IS USED.
2 - ASSEMBLY
Take all the parts out of their package (A: Fig.2). Be especially careful with the burner (8: Fig.3). Check whether the contents of the packages is complete and in compliance with the list below. Follow the regulations in force when throwing away the packages.
Inspection of the contents:
Fig.3 = lid (1) with handle (2) and hinges (3), burner protection tray (4), belt to fasten the gas cylinder (5), handles (6) and gridiron (7), burner (8), bowl (9), ignition knob (10), handle (11), gas cylinder recess (12), set of wheels (13) on the base (14), supporting bracket (15) for the collecting cup (16) and lateral tables (17) and the set of 2 LPG diaphragms with pin spanner + instruction notice (18).
IMPORTANT! DO NOT PROCEED WITH THE ASSEMBLY IF ONE OF THE PARTS IS DAMAGED!
IMPORTANT! Before making the connection, check whether the supplied hose connection meets the regulations in force in the country where it will be used.
2.1 STEP-BY-STEP ASSEMBLY (MOBILE type with gas cylinder, LPG):
IMPORTANT! Before assembling the appliance, check whether its parts are appropriate for use in combination with the gas type and gas pressure foreseen and whether they meet the regulations in force.
1) Put the barbecue on the ground. Make sure the surface is quite flat and does not slope too much.
2) Fix the lid (inside the structure) to the pre-fitted bowl. Use the two bolts + nuts (3: Fig.3).
3) Put the gas cylinder on the rear base plate (12: Fig.3) ("low gas cylinder", A: Fig.4 or "high gas cylinder", B: Fig.4) and fasten it by inserting the belt (supplied) in the openings ("low gas cylinder",
1: Fig.5 or "high gas cylinder", 2: Fig.6) and by winding it around the handles of the gas cylinder (3: Fig.5 and 6).
4) Fit the pressure regulator (NOT supplied, 2: Fig.7) to the gas cylinder. Also fit the diaphragm (6: Fig.7) when this is necessary for the gas type and gas pressure used in the country in which the barbecue is used, as indicated in Tab.1.
5) Buy a connection and a rubber connecting hose. Make sure their type and material are in conformity with the regulations of the country in which the barbecue is installed.
To the threaded final part of the connection (1/4 gas, 13: Fig.7) you can:
IN CASE A (B1: Fig.7): (1/4" gas turning to the left) fit the rubber hose (8) equipped with the
appropriate threaded hose connection (12) (NOT SUPPLIED) (this solution is valid in the following countries: GERMANY, AUSTRIA and LUXEMBURG).
Before connecting, check whether the use of a diaphragm on the supply opening is necessary (6: Fig. 7) (only in AUSTRIA GERMANY and LUXEMBURG).
IN CASE B (B2: Fig.7): (1/4" gas turning to the right) fit the hose-end fitting (12) you have bought (in case the supplied part should not fit) directly to the threaded connection (1/4" gas) of the gas tap (13). Then fix the rubber hose (8) using the appropriate clip (11).
IMPORTANT: Always make sure that the rubber hose and the connection you have bought are in conformity with the regulations that are in force in the country in which the barbecue is installed.
6) Fix the bottom part of the connecting hose (1: Fig.7) to the pressure regulator on the gas cylinder (3: Fig.7) and the other end (8: Fig.7) to the threaded connection on the right hand side of the gas tap (5: Fig.7).
IMPORTANT! The area in which the RADIANT will be used, must have a volume of at least 20m^3 per kW nominal power and must be well ventilated. If you want to use the RADIANT at its maximum power, you must consequently have a volume of approximately 150m^3 .
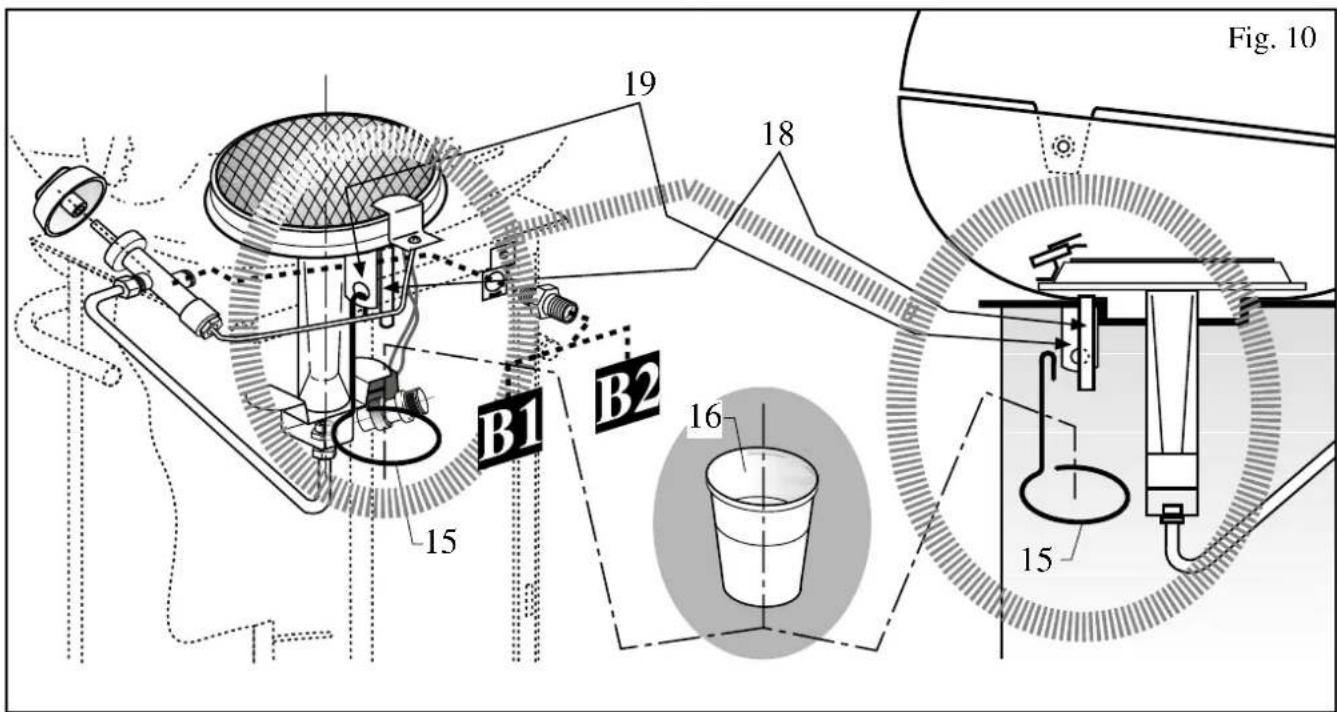
IMPORTANT! TO AVOID GREASE FROM PENETRATING IN THE APPLIANCE, INSTALL THE CUP BRACKET (15: Fig.3 and Fig.10) AND THE EMPTY CUP (16: Fig.3 and Fig.10) IN THE SPACE PROVIDED (19: Fig.10) UNDER THE SMALL DRAIN PIPE (19: Fig.10).
IMPORTANT! It is strictly forbidden to MAKE ALTERATIONS to the barbecue, except in the cases provided for by the manufacturer.
IMPORTANT! INSTALL THE LATERAL SUPPORTS ACCORDING TO THE DRAWINGS IN FIG. A BEFORE PUTTING THE APPLIANCE INTO OPERATION.
IMPORTANT! Check with soapy water or equivalent means whether the tubings and the connections of the appliance are LEAKPROOF. Also check the connections to the gas cylinder for leaks.
IMPORTANT: Before putting the appliance into operation, check whether the pressure regulator, the supply pressure and the type of gas used correspond to the data in tables 1a and 1b of this booklet and to the technical data on the identification plate and so comply with the regulations that are in force in the country in which the appliance is used.
IMPORTANT! When using LPG cylinders, take into account the dimension of the gas cylinder recess (Fig.4). DO NOT USE the barbecue in areas with combustible and/or explosive dust, gas damps, liquid fuels and inflammable material.
IMPORTANT! Repeated restarting: to avoid bursts of flame caused by gas accumulation, always wait 1 minute before turning the barbecue on again.
IMPORTANT! DO NOT use the barbecue in basements if it is pre-set to run on LPG.
IMPORTANT! Opening the lid: always use the handle (2: Fig.3) with the insulated grip to avoid burns and/or accidents.
IMPORTANT! Protecting the burner: to protect the burner when preparing food that produces a lot of juice or fat or food that has the tendency to fall apart, you must use the special tray (4: Fig. 3) supplied together with your Barbecook Radiant. Put it (4: Fig.3) above the burner. After having pre-
pared and removed the food, leave the burner turned on for approximately two minutes to allow the burner to clean itself by burning all small bits of food accidentally fallen on the burner.
IMPORTANT! Food preparation: It is strictly FORBIDDEN to close the lid when the burner is being used at its maximum power. If necessary, close the lid only when the burner is being used at its minimum power or has been turned off completely.
IMPORTANT! ALWAYS
- fit the lid.
- put the gas cylinder in the appropriate recess.
- correctly fix the gas tube before turning on the barbecue.
DO NOT cover the parts of the burner that emit heat completely or partially. DO NOT cover the barbecue shortly after turning it off. Wait until it has cooled down. We advise you to protect the barbecue from bruises, dampness or rain. Always put the barbecue on a flat surface (slope < 10%) to prevent it from turning over. The surface must also be non-inflammable (wooden floors, linoleum, synthetic floors etc.).
WHEN YOU TURN THE BARBECUE ON FOR THE FIRST TIME, AN OPERATION YOU SHOULD CARRY OUT OUTDOORS OR IN A WELL-VENTILATED ROOM, THE BARBECUE WILL EMIT FUMES FOR A SHORT PERIOD OF TIME.
IMPORTANT! Check, especially when changing the gas cylinder, whether the connections between the barbecue and the gas cylinder or the gas installation connections are LEAKPROOF. Use soapy water or equivalent means. DO NOT use lighters, matches etc.
......, ......, ......
Fit the battery for the electronic ignition of the burner if the battery is missing or empty:
- Locate the battery holder (10: Fig.7 and 1: Fig.8).
- Unscrew the lid of the battery holder (2: Fig.8) situated on the inside of the gas cylinder recess and insert the 1.5V battery in the holder. Pay attention to the poles (3: Fig.8).
- Refit the lid.
3.1 Ignition
1 - Make sure the adjustment knob is on "off" (0: full point, Fig.9) and turn on the gas tap.
2 - Press the ignition knob and turn it anticlockwise (Fig.9). This way sparks are automatically discharged and gas is supplied for the ignition. Once the flame burns, you must continue to press the button for approximately 1 minute (Fig.9) to allow the thermocouple to heat and to keep the valve open. Now you only have to adjust the burner's power (from MAX to MIN, Fig.9) according to your needs.
NOTE: When you turn on the barbecue for the first time, the flame has the tendency to go out because of the air in the tubes. You must wait a bit longer for the flame to stabilise!
- If the flame should go out accidentally, the incorporated safety device will automatically interrupt the gas supply.
- If the flame goes out for want of gas, the gas flow is interrupted (for example when the gas cylinder is empty). Always turn off the gas tap before removing an empty gas cylinder.
- In both cases you must wait a few minutes before turning the barbecue on again. Then repeat the operations mentioned in point 1 and 2.
- Do not try to restart the barbecue time and again; if the barbecue does not work immediately,
you should check whether ALL operations have been carried out correctly.
IMPORTANT! ALWAYS WAIT A FEW MINUTES BETWEEN EACH RESTART TO AVOID THE ACCUMULATION OF GAS AROUND THE BURNER AS THIS MAY CAUSE SUDDEN BURSTS OF FLAME!
IMPORTANT! DO NOT TOUCH the burner while the burner is working or has only just been turned off as this may cause burns. The barbecue can also be adjusted (MIN AND MAX) when it is turned on. If the LPG run barbecue is used outdoors and the temperature is below 2°C, we recommend the use of propane.
IMPORTANT! When all food has been removed, do not turn off the barbecue immediately. Leave it on for a few minutes to allow the burner to clean itself.
1) Turn the knob clockwise until it is on "0".
2) Turn off the gas tap.
IMPORTANT! IF YOU WIL NOT USE THE APPLIANCE FOR SOME TIME, REMOVE THE IGNITION BATTERY FROM ITS HOLDER TO AVOID CAUSTIC SUBSTANCES FROM LEAKING OUT OF THE BATTERY THUS DAMAGING THE APPLIANCE.
5 - CLEANING
IMPORTANT! Never put detergents straight onto the burner. This may damage the burner and the entire gas group.
IMPORTANT! Do not try to clean the burner with mechanical appliances as this may damage the upper fibre structure. Remove food scraps by hand or with compressed air. Only use a moderate air jet.
IMPORTANT! Clean the surface with mild detergents. Put them onto a soft cloth. Do not put them straight onto the surfaces.
IMPORTANT! Regularly check the appliance on gas leaks with a soap solution or a silimar product.
6 - MAINTENANCE
IMPORTANT! Regularly check with soapy water or equivalent means whether the tubings and the connections of the appliance are LEAKPROOF. Also check the connections to the gas cylinder for leaks.
Before carrying out maintenance operations, make sure the gas tap is turned off.
Maintenance includes:
- Cleaning the outside of the barbecue (use a soft cloth and mild detergents. Do not put any detergent straight onto the parts that need cleaning).
- Inspecting and replacing the rubber hose (Lmax=1,5m), when damaged and at the intervals and according to the methods provided for in the laws and regulations that are in force in the country in which the barbecue is installed.
Replacing the battery for the electronic ignition.
- Elimination of piled-up grease and other muck from the small drain pipe (18: Fig.10). Use the appropriate tools (a screwdriver, a cotton bud or alike, 20: Fig. 10)
- Cleansing of the gas jet and/or diaphragm (if they are obstructed by piled-up grease or other muck). Immerse them in a mild degreasing bath and blow them through with compressed air.
NEVER USE metal tools that might damage or enlarge the calibrated holes.
ALL other maintenance operations must be carried out by qualified fitters.
7 - REMPLACING THE GAS JET (must be carried out by qualified fitters)
Note: This operation is only necessary when the gas jet is damaged as this appliance is not equipped to be adapted to other gas families.
1 - Turn off the gas tap and remove the gas cylinder from its recess (12: Fig.3).
2 – Locate the gas jet (7: Fig.7), unscrew it from its housing under the Venturi (bottom part of the burner, 9: Fig.7).
3 – Replace and/or clean the gas jet. Refit it. MAKE SURE YOU DO NOT DAMAGE THE THREADED PARTS when fastening it.
4 – Turn on the gas tap and try to turn the barbecue on.
8 - TROUBLESHOOTING
IMPORTANT! Before carrying out repairs, always TURN OFF the gas tap.
If there is no flame when the barbecue is turned on, this can be caused by:
- an insufficient gas flow (bad LPG gasification), a blocked or faulty pressure regulator.
- a sudden gust of wind (more than 3 m/ sec.).
- a lack of gas (empty gas cylinder or faulty pressure regulator).
- an interrupted thermocouple.
- a faulty magnet.
- filth in the gas circuit.
- gas leaks.
- an empty battery
- insulation electrodes and/ or faulty cables.
9 - STORAGE
If you foresee that you will not use the barbecue for a while (change of season or another reason), store it in a dry place where it cannot get damaged.
Close the lid and ALWAYS cover the burner to avoid obstructions (cobwebs, dust) or damages (brui-ses etc.).
IMPORTANT! Do not store one or more gas cylinders together with the barbecue. Gas cylinders should be stored outdoors, in conformity with the rules and regulations of the country in which the barbecue is used.
10 - GUARANTEE
The Barbecook® comes with a two year guarantee on production flaws, from the date of purchase and to the extent the use corresponds with the present instructions for use. The receipt mentioning the date of purchase counts as guarantee card.
This Barbecook® is not suited for professional use.
Wear, corrosion, deformation and discoloration (especially on stainless steel models) of the parts that are directly exposed to the fire is quite normal and will therefore in no event ever be considered as a production flaw: it is the logical result of their use.
- Barbecook RADIANT - - PT -
index
RA INFLAMÁVEIS E/ OU EXPLOSIVAS, ETC.
IMPORTANTE! DURANTE A MONTAGEM OBSERVE AS NORMAS DA PREVENÇÃO DE INCÊNDIO E DE ACIDENTES EM VIGOR NO PAÍS ONDE FOR UTILIZADO O APARELHO.
- Barbecook RADIANT - - NO -
index
- Barbecook RADIANT - - SE -
index
- Barbecook RADIANT - - FI -
index
- YLEISKUVAUS pag. 80
- KOKOAMINEN pag. 81
- KÄYTTÖÖNOTTAMINEN pag. 82
- SAMMUTTAMINEN pag. 84
- PUHDISTUS pag. 84
- HUOLTO pag. 84
- SUUTTIMEN VAIHTO pag. 85
- ONGELMAT pag. 85
- SÄILYTYS pag. 86
- TAKUU pag. 86