
DK-E7P - CD Player SHARP - Free user manual and instructions
Find the device manual for free DK-E7P SHARP in PDF.
| Product Type | CD Player / Music System for iPhone/iPod |
| Brand | SHARP |
| Model | DK-E7P |
| Dimensions (W × H × D) | 198 × 69.8 × 77 mm |
| Weight | 0.62 kg |
| AC Power Supply | AC/DC Adapter 6 V 2 A (100-240 V ~, 50/60 Hz) |
| Battery Power | 4 AA batteries (UM/SUM-3, R6, HP-7) |
| Power Consumption (Operating) | 7 W |
| Power Consumption (Standby) | 0.6 W |
| Output Power (front speakers) | RMS 2.4 W (1.2 W + 1.2 W) at 10% THD |
| Output Power (subwoofer) | RMS 2 W at 10% THD |
| Speakers | 2.1-channel system: front 3.0 cm, subwoofer 4.6 cm |
| Auxiliary Input (AUX IN) | 250 mV/47 kΩ (3.5 mm jack) |
| Video Output | 1 Vp-p (RCA jack) |
| iPod/iPhone Compatibility | iPod nano, mini, classic, touch (multiple generations), iPhone, iPhone 3G |
| Esound Function | Automatic bass and treble adjustment |
| Auto Power Off | After 5 minutes of inactivity (if no iPod/iPhone and no AUX cable) |
| TV Output | Display iPod/iPhone videos on TV |
| Included Accessories | AC/DC adapter, case (2), iPhone adapters (2), iPod adapters (4) |
| Maintenance | Clean with a soft, dry cloth. Do not use chemical products. |
| Safety | Do not expose to moisture, temperatures >60°C. Unplug before cleaning. Use only the supplied adapter. |
| Operating Temperature | 5°C to 35°C |
| Country of Manufacture | Malaysia |
Frequently Asked Questions - DK-E7P SHARP
User questions about DK-E7P SHARP
0 question about this device. Answer the ones you know or ask your own.
Ask a new question about this device
Download the instructions for your CD Player in PDF format for free! Find your manual DK-E7P - SHARP and take your electronic device back in hand. On this page are published all the documents necessary for the use of your device. DK-E7P by SHARP.
USER MANUAL DK-E7P SHARP
natural_image
3D rendering of a rectangular electronic device with a flat top and rounded side (no visible text or symbols)
Made for
iPod
iPod is a trademark of Apple Inc.,
registered in the U.S. and other countries.

Works with
iPhone
iPhone is a trademark
of Apple Inc.
POLSKI
.. Please refer to pages i to xiv and E-1 to E-12.
DK-E7P
Wprowadzenie
Thank you for purchasing this SHARP product.
To obtain the best performance from this product, please read this manual carefully. It will guide you in operating your SHARP product.
PL - WAŻNE INFORMACJE
OSTRZEŻENIA:
SK - DÔLEŽITÉ INFORMÁCIE
UPOZORNENIE:
- When the ON/STAND-BY button is set at STAND-BY position, mains voltage is still present inside the unit.
- This unit contains no user serviceable parts. Never remove covers unless qualified to do so. This unit contains dangerous voltages, always remove mains plug from the socket before any service operation and when not in use for a long period.
- Audio-visual material may consist of copyrighted works which must not be recorded without the authority of the owner of the copyright. Please refer to relevant law in your country.
- To prevent fire or shock hazard, do not expose this appliance to dripping or splashing. No objects filled with liquids, such as vases, shall be placed on the apparatus.
- The supplied AC/DC adaptor contains no user serviceable parts. Never remove covers unless qualified to do so. It contains dangerous voltages, always remove mains plug from the main outlet socket before any service operation or when not in use for a long period.
- The AC/DC adaptor supplied with the DK-E7P must not be used with other equipment.
- Never use an AC/DC adaptor other than the one specified. Otherwise, problems or serious hazards may be created.
- “Made for iPod” means that an electronic accessory has been designed to connect specifically to iPod and has been certified by the developer to meet Apple performance standards.
- “Works with iPhone” means that an electronic accessory has been designed to connect specifically to iPhone and has been certified by the developer to meet Apple performance standards.
- Apple is not responsible for the operation of this device or its compliance with safety and regulatory standards.
DK-E7P
vi
DK-E7P
PL - INFORMACJE DOTYCZĄCE USUWANIA ZUŻYTEGO URZĄDZENIA


Attention: Your product is marked with this symbol. It means that used electrical and electronic products should not be mixed with general household waste. There is a separate collection system for these products.
A. Information on Disposal for Users private households)
- In the European Union
Attention: If you want to dispose of this equipment, please do not use the ordinary dustbin!
Used electrical and electronic equipment must be treated separately and in accordance with legislation that requires proper treatment, recovery and recycling of used electrical and electronic equipment.
Following the implementation by member states, private households within the EU states may return their used electrical and electronic equipment to designated collection facilities free of charge*. In some countries* your local retailer may also take back your old product free of charge if you purchase a similar new one.
*) Please contact your local authority for further details.
If your used electrical or electronic equipment has batteries or accumulators, please dispose of these separately beforehand according to local requirements.
By disposing of this product correctly you will help ensure that the waste undergoes the necessary treatment, recovery and recycling and thus prevent potential negative effects on the environment and human health which could otherwise arise due to inappropriate waste handling.
- In other Countries outside the EU
If you wish to discard this product, please contact your local authorities and ask for the correct method of disposal.
B. Information on Disposal for Business Users
- In the European Union
If the product is used for business purposes and you want to discard it:
Please contact your SHARP dealer who will inform you about the take-back of the product. You might be charged for the costs arising from take-back and recycling. Small products (and small amounts) might be taken back by your local collection facilities.
- In other Countries outside the EU
If you wish to discard of this product, please contact your local authorities and ask for the correct method of disposal.
INFORMATION ON BATTERY DISPOSAL

For EU: The crossed-out wheeled bin implies that used batteries should not be put to the general household waste! There is a separate collection system for used batteries, to allow proper treatment and recycling in accordance with legislation. Please contact your local authority for details on the collection and recycling schemes.
For Switzerland: The used battery is to be returned to the selling point.
For other non-EU countries: Please contact your local authority for correct method of disposal of the used battery.
xiv
DK-E7P
POLSKI
Informacle ogolne
Akcesoria

natural_image
Diagram of a device rear panel with mounting holes and a labeled component (no text or symbols present)■ Widok z przodu
natural_image
Diagram of a portable electronic device with two speakers and control knobs, no text or symbols presentnatural_image
Diagram of a device rear panel with mounting holes and a small component labeled '1' (no text or symbols beyond label)■ Pohled zpředu
natural_image
Diagram showing a device interior with labeled components before and after assembly (no text or symbols present)natural_image
Diagram of a device rear panel with mounting holes and a small component labeled '1' (no text or symbols beyond label)Előnézet
Megjegyzés:
natural_image
Diagram of a portable electronic device with front speakers and control knobs (no text or symbols)natural_image
Diagram of a device rear panel with mounting holes and a small component labeled '1' (no text or symbols beyond label)■ Pohl'ad spredu
- Konektor na pripojenie zariadení iPod a iPhone .....8
- Tlačidlo výstupu ESOUND/TV OUT .....6
- Tlačidlo zníženia hlasitosti .....6
- Konektor subwoofera 6
- Tlačidlo ON/STAND-BY (ZAP./POHOTOVOSTNÝ REŽIM) .6
- Tlačidlo zvýšenia hlasitosti .....6
■ Pohl'ad zozadu
Poznámka:
natural_image
Diagram of a device rear panel with mounting holes and a small component, labeled with number 1 (no text or symbols on the diagram itself)■ Вигляд спереду
Увага:
natural_image
Diagram of a device rear panel with mounting holes and a highlighted internal component (no text or symbols)■ Vedere frontală
- Doc iPod și iPhone 8
- Buton ESOUND/TV Out.... 6
- Buton Volume Down 6
- Port Subwoofer 6
- Buton ON/STAND-BY 6
- Buton Volume Up 6
■ Vedere dorsală
Remarcă:
natural_image
Diagram of a device rear panel with labeled component (no text or symbols present)DK-E7P_A6_LT.mif
2009 September 25
Sistemos jungtys
natural_image
Diagram of a portable electronic device with two speakers and control knobs (no text or symbols)■ Prietaiso ijungimas
natural_image
Diagram of a device rear panel with mounting holes and a small component labeled '1' (no text or symbols beyond label)■ Μπροστινή πλευρά
Σημείωση:
natural_image
Diagram of a portable electronic device with front speakers and control knobs (no text or symbols)Please confirm that only the following accessories are included.
 AC/DC adaptor x 1RADPAA068AWZZ AC/DC adaptor x 1RADPAA068AWZZ | |
 Carry case x 1 (unit) Carry case x 1 (unit) |  Carry case x 1(AC/DC adaptor) Carry case x 1(AC/DC adaptor) |
 iPhone adaptor x 2 iPhone adaptor x 2 | 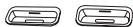 (TK46)iPod adaptor x 4 (TK46)iPod adaptor x 4 |
ENGLISH
Contents
Page
■ General Information
Precautions 2
Controls and indicators ....3
■ Preparation for Use System connections ..... 4 - 5
■ Basic Operation General control ....6
■ iPod and iPhone Listening to the iPod or iPhone .....7 - 8
■ Advanced Feature Enhancing your system ....9
■ References Troubleshooting chart .....10 Maintenance .....11 Specifications .....12
Precautions
General
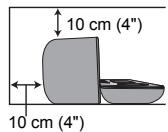
- Please ensure that the equipment is positioned in a well-ventilated area and ensure that there is at least 10 cm (4") of free space along the sides, top and back of the equipment
- Use the unit on a firm, level surface free from vibration.
- Keep the unit away from direct sunlight, strong magnetic fields, excessive dust, humidity and electronic/electrical equipment (home computers, facsimiles, etc.) which generate electrical noise.
- Do not place anything on top of the unit.
- Do not expose the unit to moisture, to temperatures higher than 60°C (140°F) or to extremely low temperatures.
- If your system does not work properly, disconnect the AC/DC adaptor from the wall socket. Plug the AC/DC adaptor back in, and then turn on your system.
- In case of an electrical storm, unplug the unit for safety.
- Do not use an external power supply other than the 6V DC supplied with this unit as it may be damaged.
- SHARP is not responsible for damage due to improper use. Refer all servicing to a SHARP authorised service centre.
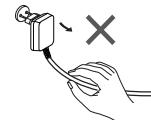
- Hold the AC/DC adaptor by the head when removing it from the wall socket, as pulling the lead can damage internal wires.
- The AC/DC adaptor is used as a disconnect device and shall always remain readily operable.
- Do not remove the outer cover, as this may result in electric shock. Refer internal service to your local SHARP service facility.
- The ventilation should not be impeded by covering the ventilation openings with items, such as newspapers, tablecloths, curtains, etc.
- No naked flame sources, such as lighted candles, should be placed on the apparatus.
- Attention should be drawn to the environmental aspects of battery disposal.
● The apparatus is designed for use in moderate climates.
- This unit should only be used within the range of 5°C - 35°C (41°F - 95°F).
Warning:
The voltage used must be the same as that specified on this unit. Using this product with a higher voltage other than that which is specified is dangerous and may result in a fire or other type of accident causing damage. SHARP will not be held responsible for any damage resulting from use of this unit with a voltage other than that which is specified.
Volume control
The sound level at a given volume setting depends on speaker efficiency, location and various other factors. It is advisable to avoid exposure to high volume levels. Do not turn the volume on to full at switch on. Listen to music at moderate levels.
DK-E7P
ENGLISH
DK-E7P
ENGLISH
General Information
E-3
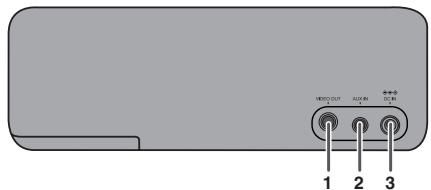
Controls and indicators

natural_image
Diagram of a device rear panel with mounting holes and a small component labeled '1' (no text or symbols beyond label)■ Front View
- iPod and iPhone Dock 8
- ESOUND/TV Out Button 6
- Volume Down Button 6
- Subwoofer Port 6
- ON/STAND-BY Button 6
- Volume Up Button 6
■ Back View
- Video Out Socket .... 4
- Auxiliary Input Socket 9
- DC Input Socket 4
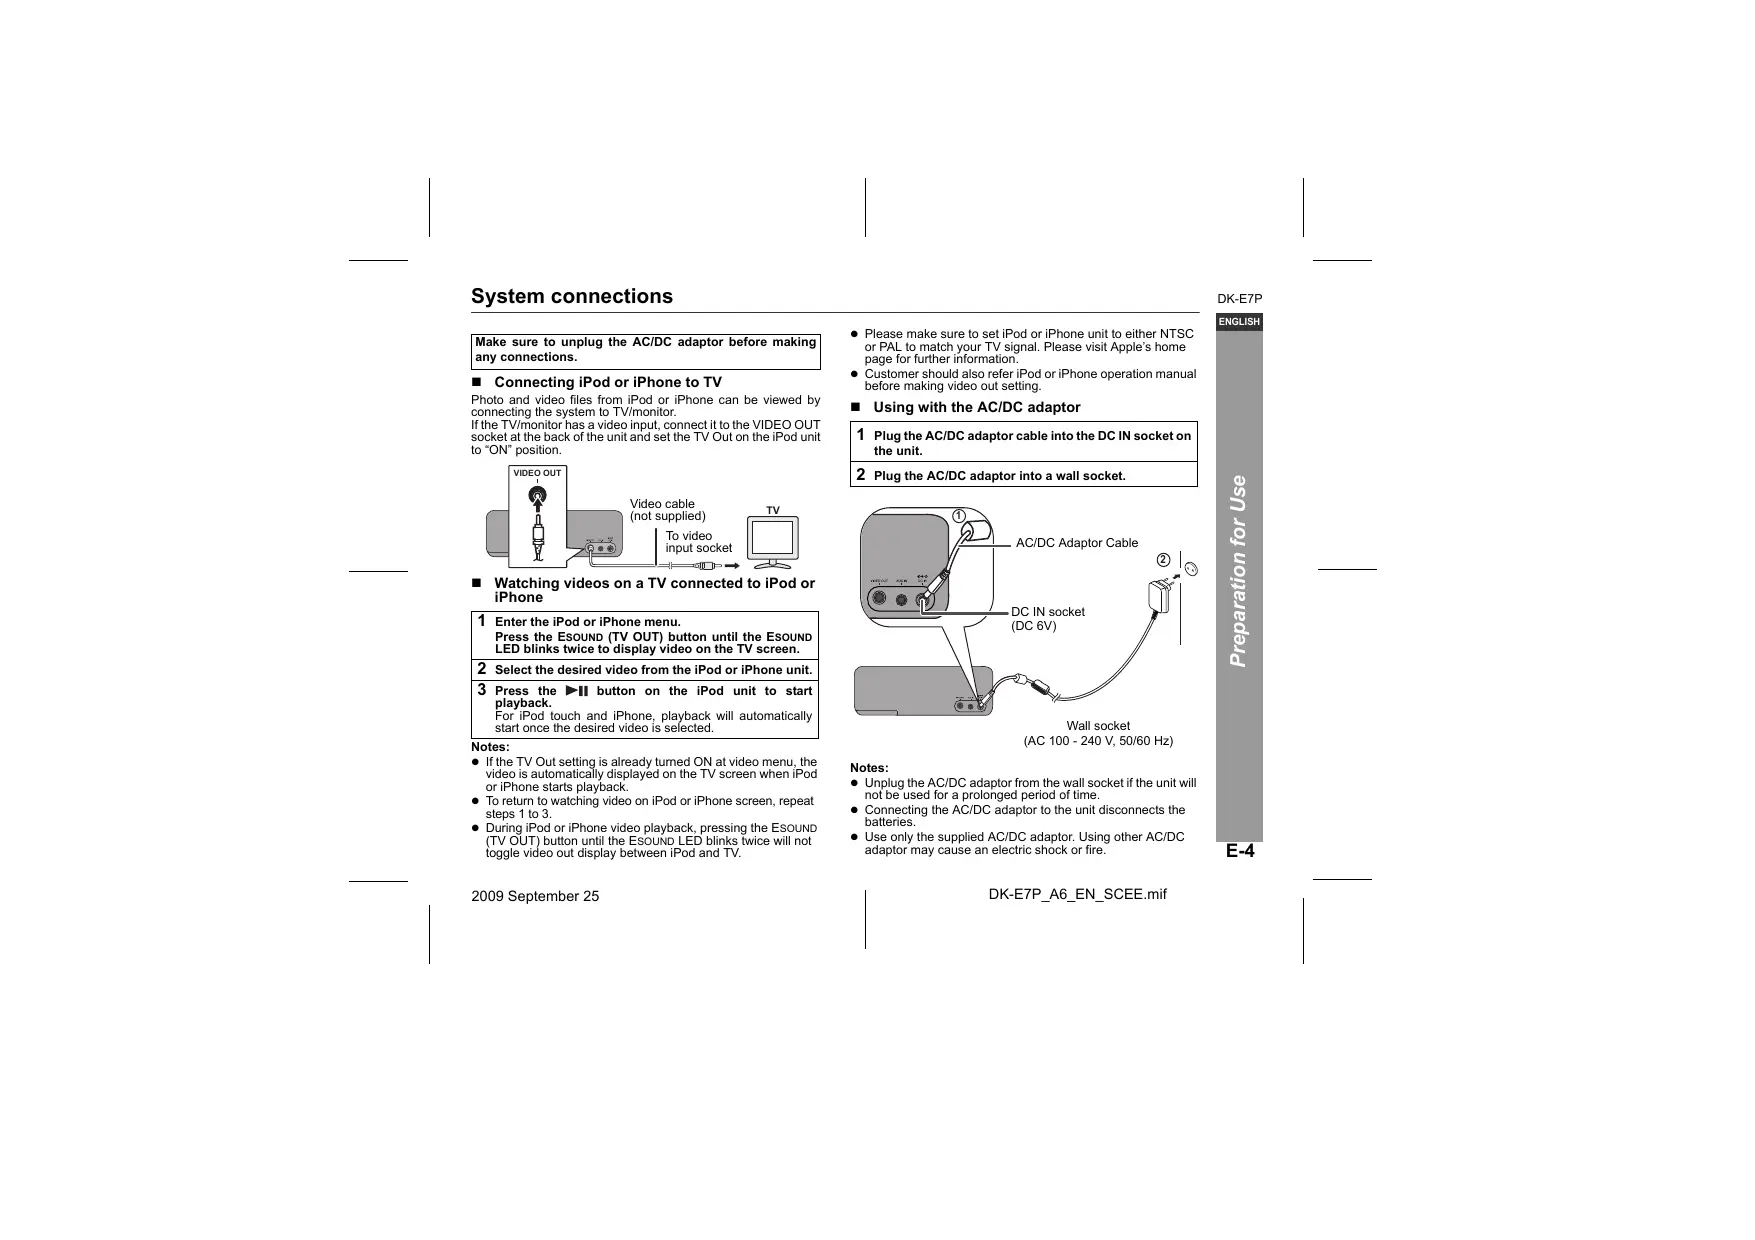
■ Bottom View
- Battery Compartment 5
Reference page
Reference page
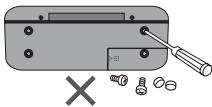
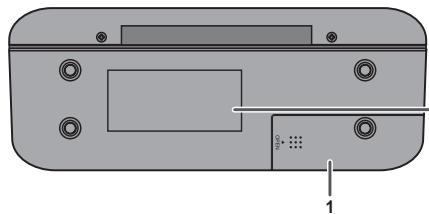
The spec label (*)
![SHARP MUSIC SYSTEM / SISTEMA SOCIAL DC IN 6V 25 EN 6V = (UM+3/SUM-3, R6/AA) x4 [DO NOT USE UNSPECIFIED AC ADAPTOR +..] SERIAL NO. NO. DE SERIE SHARP CORPORATION MADE IN MALAYSIA FABRIQUE EN MALASIE / FABRIQUE EN MALASIA UWAGA ! PRZED ZDJEÇIEM POKRYWY WYJÄC WYTZCKE Z GNIAZDA SECIOWEGO A készülük hältapjänak dátvollítása ELETVESZÉLYES!](/content/2025/01/122173/images/bdb289e325f9d2b1a04876ab2460bcb4ccd31561afa48470cc83fd898fa26f13.jpg)
The spec label illustration may be different from the actual label used.
(*) Label is located at the bottom of the unit.
System connections
Make sure to unplug the AC/DC adaptor before making any connections.
■ Connecting iPod or iPhone to TV
Photo and video files from iPod or iPhone can be viewed by connecting the system to TV/monitor. If the TV/monitor has a video input, connect it to the VIDEO OUT socket at the back of the unit and set the TV Out on the iPod unit to "ON" position.

■ Watching videos on a TV connected to iPod or iPhone
1 Enter the iPod or iPhone menu.
Press the ESOUND (TV OUT) button until the ESOUND LED blinks twice to display video on the TV screen.
2 Select the desired video from the iPod or iPhone unit.
3 Press the ▶II button on the iPod unit to start playback.
For iPod touch and iPhone, playback will automatically start once the desired video is selected.
Notes:
- If the TV Out setting is already turned ON at video menu, the video is automatically displayed on the TV screen when iPod or iPhone starts playback.
- To return to watching video on iPod or iPhone screen, repeat steps 1 to 3.
-
During iPod or iPhone video playback, pressing the ESOUND (TV OUT) button until the ESOUND LED blinks twice will not toggle video out display between iPod and TV.
-
Please make sure to set iPod or iPhone unit to either NTSC or PAL to match your TV signal. Please visit Apple's home page for further information.
- Customer should also refer iPod or iPhone operation manual before making video out setting.
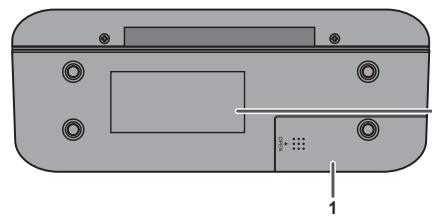
■ Using with the AC/DC adaptor
1 Plug the AC/DC adaptor cable into the DC IN socket on the unit.
2 Plug the AC/DC adaptor into a wall socket.
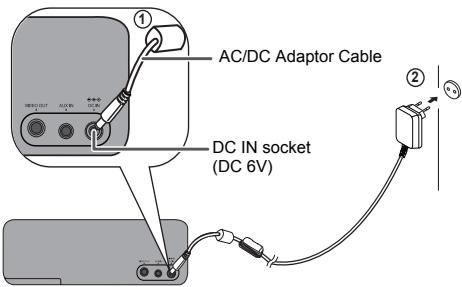
Wall socket (AC 100 - 240 V, 50/60 Hz)
Notes:
- Unplug the AC/DC adaptor from the wall socket if the unit will not be used for a prolonged period of time.
- Connecting the AC/DC adaptor to the unit disconnects the batteries.
- Use only the supplied AC/DC adaptor. Using other AC/DC adaptor may cause an electric shock or fire.
DK-E7P
ENGLISH
System connections (continued)
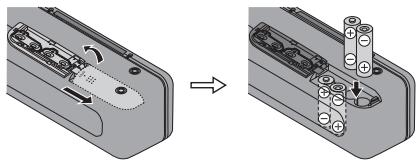
■ Using with the batteries
Use 4 "AA" size batteries (UM/SUM-3, R6, HP-7 or similar). Batteries are not included.
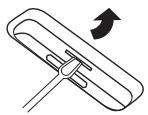
1 Open the battery cover.
Slide the cover in the direction of the arrow.
2 Insert the batteries according to the direction indicated in the battery compartment.
3 Close the cover.
natural_image
Diagram showing a device's internal structure before and after assembly, with no visible text or symbols.Precautions for battery use:
- Installing the batteries incorrectly may cause the unit to malfunction.
- Insert the batteries according to the direction indicated in the battery compartment.
- Remove the batteries if the unit will not be used for a long period of time. This will prevent potential damage due to battery leakage.
- When using batteries, the brightness of all illumination light (indicators) is reduced compared to using AC/DC adaptor.
- Replace all old batteries with new ones at the same time.
- Do not mix old and new batteries.
- Batteries (battery pack or batteries installed) shall not be exposed to excessive heat such as sunshine, fire or the like.
Changing power source:
Turn off the unit before changing the power source. If the 6V DC power supply is directly plugged in during power on, the unit may automatically enter to stand-by mode. Press the ON/STAND-BY button again to turn on the unit.
Note:
Battery life may vary depending on the temperature, battery types and usage conditions.
Battery replacement:
When batteries are low, sound may become distorted and unit may automatically turn off or mute during high volume level. Reduce the volume level or replace the batteries.
Caution:
Do not use rechargeable batteries (nickel-cadmium battery, etc.).
General control

■ To turn the power on
Press the ON/STAND-BY button to turn the power on. The POWER and ESOUND indicator will turn on.
After use:
Press the ON/STAND-BY button to enter the power stand-by mode. The POWER indicator will turn off.
Note:
This unit consumes low current during stand-by mode. However, please remove the batteries if the unit will not be used for a long period of time.
Volume control
Press the VOL (+ or -) button to increase or decrease the volume.
POWER indicator will be blinking when the volume reaches maximum or minimum level.
■ Esound control
When ON/STAND-BY button is pressed, the ESOUND indicator turns yellowish orange. You are now in the ESOUND mode, where low bass and high frequency are automatically adjusted according to the volume input.
To turn off ESOUND, press the ESOUND (TV OUT) button. The ESOUND indicator will go off.
■ Auto Power off function
If no iPod or iPhone is docked and there is no audio cable connected to AUX IN terminal, the unit will enter the power stand-by mode after 5 minutes of inactivity.
DK-E7P
ENGLISH
Listening to the iPod or iPhone
Supported iPod and iPhone models:
- iPod nano (software 1.2 above)
- iPod mini (software 1.2 above)
- iPod (5 ^th generation) (software 1.3 above) (Dock connector equipped Click Wheel model)
- iPod (4 ^th generation) (software 3.0.2 above) (Dock connector equipped Click Wheel model)
- iPod nano ( 2^nd generation) (software 1.0.0 above)
- iPod nano (3 ^rd generation) (software 1.0.3 above)
- iPod nano (4 ^th generation) (software 1.0.3 above)
- iPod ` (software 1.0.3 above)
- iPod touch (software 1.1 above)
- iPod touch (2 ^nd generation) (software 2.1 above)
- iPhone (software 2.2.1 above)
- iPhone 3G (software 2.2.1 above)
Caution:
- Please update your iPod or iPhone unit to the latest software version before using it. Please visit Apple's homepage to download the latest version for your iPod and iPhone.
Notes:
- Once the iPod or iPhone is connected to the unit it will begin charging when AC/DC adapter is used. There is a possibility that the sound output may delay.
- Error message "This accessory is not made to work with iPhone" may appear on the iPhone screen when iPhone battery is low.
- The iPod or iPhone will not be charged while the main unit uses batteries as power supply.
■ iPod or iPhone adaptor connection
Choose the adaptor that fits your iPod or iPhone. Your iPod or iPhone will fit snuggly into the correct adaptor. If your iPod is not mentioned below, an iPod adaptor may have been included with your iPod unit.
The marking shows which iPod or iPhone fits
| Adaptor No. | iPod or iPhone Description | Capacity |
| 9 | 5G iPod (with video) | 30GB |
| 9 | U2 iPod with video | 30GB |
| 9 | iPod classic | 80GB, 120GB |
| 10 | 5G iPod with video | 60GB & 80GB |
| 10 | iPod classic | 160GB |
| 12 | iPhone | 4GB & 8GB & 16GB |
| 15 | iPhone 3G | 8GB & 16GB |
| A | iPod mini | 4GB & 6GB |
| A | 4G iPod & U2 iPod | 20GB |
| A | iPod photo & Color U2 iPod | 20GB & 30GB |
| A | iPod with color display | 20GB |
| B | 4G iPod | 40GB |
| B | iPod photo | 40GB & 60GB |
| B | iPod with color display | 60GB |
Notes:
- iPod nano (2 ^nd generation), iPod nano (3 ^rd generation), iPod nano (4 ^th generation), iPod touch and iPod touch (2 ^nd generation) are not compatible with the iPod adaptors listed above. Please use the adaptor supplied with your iPod unit.
- If you have an iPod that does not have an iPod 30 Pin connector, you can use an audio cable to connect it to the AUX IN socket.
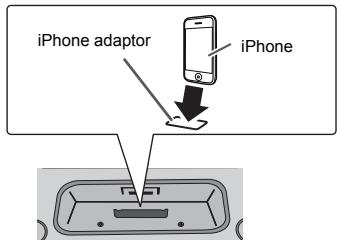
■ To insert iPod or iPhone adaptor
- Insert the iPod or iPhone adaptor into unit and connect your iPod or iPhone.

Caution:
Unplug all accessories for the iPod or iPhone before inserting it into the dock.
■ To remove iPod or iPhone adaptor
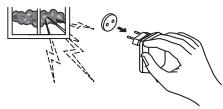
Insert the tip of a screwdriver (“-” type, small) into the adaptor hole as shown and lift upward to remove.
■ iPod or iPhone playback
1 Press the ON/STAND-BY button to turn the power on.
2 Insert iPod or iPhone unit in the dock of main unit.
3 Press the ▶II button on the iPod unit to start playback.
For iPod touch and iPhone, playback will automatically start once the desired file is selected.
■ iPhone playback
- Sound will only switch from iPhone to the main unit after authentication process is completed in approximately 10 seconds.
- Incoming calls will pause the playback and iPhone ringtones will be heard from the main unit speaker only.
- Once the calls are answered, the conversation can only be heard through the built-in speaker. Turn on the iPhone speaker or undock the iPhone to start the conversation.
■ To disconnect iPod or iPhone
Simply remove the iPod or iPhone from the dock. It is safe to do so even during playback.
DK-E7P
ENGLISH
DK-E7P
ENGLISH
Advanced Feature
Enhancing your system
The audio cable is not included. Purchase a separate audio cable as shown below.
Portable audio player
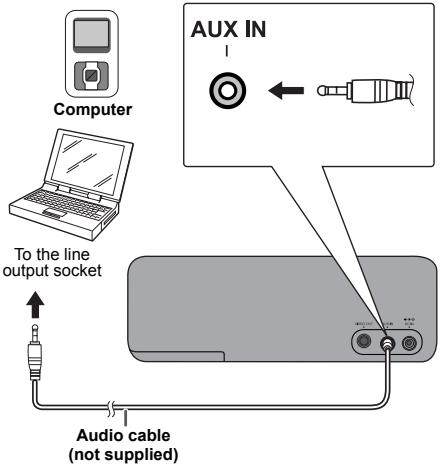
■ Listening to the audio/video sounds from portable audio player, computer/notebook, etc.
1 Use Audio cable to connect the portable audio player, computer/notebook etc. to the AUX IN socket.
When using video equipment, connect the audio output to this unit and the video output to a television.
2 Press the ON/STAND-BY button to turn the power on.
3 Play the connected equipment.
If volume level of the connected device is too high, sound distortion may occur. Should this happen, lower the volume of the connected device.
Notes:
- To prevent noise interference, place the unit away from the television.
- Make sure to undock the iPod or iPhone before making any connections to AUX IN. Otherwise, sound from AUX IN will not be heard.
E-9
Troubleshooting chart
Many potential problems can be resolved by the owner without calling a service technician.
If something is wrong with this product, check the following before calling your authorized SHARP dealer or service center.
General
| Symptom | Possible cause |
| When a button is pressed, the unit does not respond. | Set the unit to the power stand-by mode and then turn it back on. |
| No sound is heard. | Is the volume level set to minimum? |
■ iPod and iPhone
| Symptom | Possible cause |
| No sound is produced.No image appears on the TV/monitor. | The iPod or iPhone is not playing.The iPod or iPhone is not properly connected to the unit.Is the AC/DC adaptor of the unit plugged in?The video cable is not properly connected.The TV/monitor's input selection is not properly set.The iPod TV out feature has been not set to output video. |
| iPod or iPhone will not charge. | The iPod or iPhone is not making full contact with the connector.The main unit is using batteries as power supply.Using iPod ( 3^rd generation).The iPod or iPhone is not supported. Refer to page 7 for compatible models. |
| "This accessory is not made to work with iPhone" appears on iPhone screen. | The iPhone battery is low.Please charge the iPhone.iPhone not properly docked. |
DK-E7P
ENGLISH
References
E-10
DK-E7P
ENGLISH
References
Troubleshooting chart (continued)
■ Condensation
Sudden temperature changes, storage or operation in an extremely humid environment may cause condensation inside the cabinet.
Condensation can cause the unit to malfunction. If this happens, leave the power on until normal playback is possible (about 1 hour) before operating the unit.
■ If problem occurs
When this product is subjected to strong external interference (mechanical shock, excessive static electricity, abnormal supply voltage due to lightning, etc.) or if it is operated incorrectly, it may malfunction.
If such a problem occurs, do the following:
1 Set the unit to the stand-by mode and turn the power on again.
2 If the unit is not restored in the previous operation, unplug and plug in the unit, and then turn the power on.
■ Before transporting the unit
Undock the iPod or iPhone and close the unit. The unit will automatically enter stand-by mode.
CAUTION: Carrying the unit with iPod or iPhone docked might damage both systems.
E-11
Maintenance
■ Cleaning the unit
Periodically wipe the unit with a clean soft cloth.
Caution:
- Do not use chemicals for cleaning (gasoline, paint thinner, alcohol, etc.). It may damage the unit finishing.
- Do not apply oil to the inside of the unit. It may cause malfunctions.
Specifications
As part of our policy of continuous improvement, SHARP reserves the right to make design and specification changes for product improvement without prior notice. The performance specification figures indicated are nominal values of production units. There may be some deviations from these values in individual units.
■ General
| Power source | DC IN 6V === 2A: AC/DC adaptor (AC 100 - 240 V ~ 50/60 Hz)DC IN 6V === [ “AA” size (UM/SUM-3, R6 or HP-7) battery x 4] |
| Power consumption | Power on: 7 WPower stand-by: 0.6 W(*) |
| Output power | Front speakers:RMS: 2.4 W (1.2 W + 1.2 W) (10% T.H.D.)RMS: 0.72 W (0.36 W + 0.36 W) (1% T.H.D.)Subwoofer:RMS: 2 W (10% T.H.D.)RMS: 0.81 W (1% T.H.D.) |
| Speaker | 2.1-way type speaker systemFront speaker: 3.0 cm (1-1/8")Subwoofer: 4.6 cm (1-3/4") |
| Speaker maximum input power | Front speaker: 2.0 W / channelSubwoofer: 4 W |
| Speaker rated input power | Front speaker: 1.2 W / channelSubwoofer: 2 W |
| Output terminals | Video output: 1Vp-p |
| Input terminals | Auxiliary (audio signal): 250 mV/47 k ohms |
| Dimensions | Width: 198 mm (7-4/5") Height: 69.8 mm (2-7/10") Depth: 77 mm (3") |
| Weight | 0.62 kg (1.4 lbs.) |
(*) This power consumption value is obtained when in the power stand-by mode.
DK-E7P
ENGLISH
SHARP®
SHARP ELECTRONICS (Europe) GmbH

- Wprowadzenie
- PL - WAŻNE INFORMACJE
- OSTRZEŻENIA:
- SK - DÔLEŽITÉ INFORMÁCIE
- UPOZORNENIE:
- PL - INFORMACJE DOTYCZĄCE USUWANIA ZUŻYTEGO URZĄDZENIA
- INFORMATION ON BATTERY DISPOSAL
- Informacle ogolne
- Akcesoria
- ■ Widok z przodu
- ■ Pohled zpředu
- Előnézet
- Megjegyzés:
- ■ Pohl'ad spredu
- ■ Pohl'ad zozadu
- Poznámka:
- ■ Вигляд спереду
- Увага:
- ■ Vedere frontală
- ■ Vedere dorsală
- Remarcă:
- Sistemos jungtys
- ■ Prietaiso ijungimas
- ■ Μπροστινή πλευρά
- Σημείωση:
- ENGLISH
- Contents
- Precautions
- General
- Warning:
- Volume control
- Controls and indicators
- ■ Front View
- ■ Back View
- ■ Bottom View
- System connections
- ■ Connecting iPod or iPhone to TV
- Notes:
- System connections (continued)
- ■ Using with the batteries
- Precautions for battery use:
- Changing power source:
- Note:
- Battery replacement:
- Caution:
- General control
- ■ To turn the power on
- After use:
- ■ Esound control
- ■ Auto Power off function
- Listening to the iPod or iPhone
- Supported iPod and iPhone models:
- ■ iPod or iPhone adaptor connection
- ■ To insert iPod or iPhone adaptor
- ■ To remove iPod or iPhone adaptor
- ■ iPod or iPhone playback
- ■ iPhone playback
- ■ To disconnect iPod or iPhone
- Enhancing your system
- Troubleshooting chart
- References
- Troubleshooting chart (continued)
- ■ Condensation
- ■ If problem occurs
- If such a problem occurs, do the following:
- ■ Before transporting the unit
- Maintenance
- ■ Cleaning the unit
- Specifications
- SHARP®
Brand : SHARP
Model : DK-E7P
Category : CD Player