
XLE80 - CD Player SHARP - Free user manual and instructions
Find the device manual for free XLE80 SHARP in PDF.


| Product Type | CD Player |
| Brand | Sharp |
| Model | XLE80 |
| Dimensions (W x H x D) | 430 x 100 x 280 mm |
| Weight | 3.5 kg |
| Power Consumption | 15 W |
| Power Supply | AC 230V, 50 Hz |
| Playback Formats | CD, CD-R, CD-RW, MP3 |
| Audio Outputs | Stereo RCA, Headphone Jack |
| Main Functions | Play, Pause, Stop, Skip, Repeat, Shuffle, Program |
| Display | LCD with track, time, and function indicators |
| Remote Control | Included |
| Cleaning | Use a soft, dry cloth. Avoid liquids. |
| Safety Features | Auto power off after 30 minutes of inactivity |
| Spare Parts Availability | Laser pickup, belts, and power supply available from Sharp service |
| Repairability Index | 7/10 (user-replaceable fuse, professional repair for laser) |
| Manual Language | English (PDF available for download) |
Frequently Asked Questions - XLE80 SHARP
User questions about XLE80 SHARP
0 question about this device. Answer the ones you know or ask your own.
Ask a new question about this device
Download the instructions for your CD Player in PDF format for free! Find your manual XLE80 - SHARP and take your electronic device back in hand. On this page are published all the documents necessary for the use of your device. XLE80 by SHARP.
USER MANUAL XLE80 SHARP
Thank you for purchasing this SHARP product.
To obtain the best performance from this product, please read this manual carefully. It will guide you in operating your SHARP product.
XL-E80 Micro Component System consisting of XL-E80 (main unit) and CP-E80 (speaker system).

natural_image
Illustration of four different audio equipment units: a remote control, two speakers with sound wave controllers, and a CD-R/RW portable speaker (no text or symbols on devices)SPECIAL NOTES

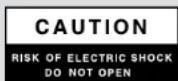

CAUTION: TO REDUCE THE RISK OF ELECTRIC SHOCK, DO NOT REMOVE COVER (OR BACK). NO USER-SERVICEABLE PARTS INSIDE. REFER SERVICING TO QUALIFIED SERVICE PERSONNEL.
Explanation of Graphical Symbols:

The lightning flash with arrowhead symbol, within an equilateral triangle, is intended to alert the user to the presence of uninsulated "dangerous voltage" within the product's enclosure that may be of sufficient magnitude to constitute a risk of electric shock to persons.

The exclamation point within an equilateral triangle is intended to alert the user to the presence of important operating and maintenance (servicing) instructions in the literature accompanying the appliance.
0012
WARNING: TO REDUCE THE RISK OF FIRE OR ELECTRIC SHOCK, DO NOT EXPOSE THIS APPLIANCE TO RAIN OR MOISTURE.
0012
Caution - use of controls or adjustments or performance of procedures other than those specified herein may result in hazardous radiation exposure.
0012
NOTE
This equipment has been tested and found to comply with the limits for a Class B digital device, pursuant to Part 15 of the FCC Rules. These limits are designed to provide reasonable protection against harmful interference in a residential installation. This equipment generates, uses, and can radiate radio frequency energy and, if not installed and used in accordance with the instructions, may cause harmful interference to radio communications. However, there is no guarantee that interference will not occur in a particular installation. If this equipment does cause harmful interference to radio or television reception, which can be determined by turning the equipment off and on, the user is encouraged to try to correct the interference by one or more of the following measures:
● Reorient or relocate the receiving antenna.
- Increase the separation between the equipment and receiver.
- Connect the equipment into an outlet on a circuit different from that to which the receiver is connected.
- Consult the dealer or an experienced radio/TV technician for help.
WARNING
FCC Regulations state that any unauthorized changes or modifications to this equipment not expressly approved by the manufacturer could void the user's authority to operate this equipment.
NOTES
- It is the intent of Sharp that this product be used in full compliance with the copyright laws of the United States and that prior permission be obtained from copyright owners whenever necessary.
- Licensed under one or more of U.S. Pat. 4,972,484, 5,214,678, 5,323,396, 5,530,655, 5,539,829, 5,544,247, 5,606,618, 5,610,985, 5,740,317, 5,777,992, 5,878,080 or 5,960,037. 0403 A5
FOR YOUR RECORDS
For your assistance in reporting this unit in case of loss or theft, please record below the model number and serial number which are located on the rear of the unit.
Please retain this information.
Model number ....
Serial number
Date of purchase ....
Place of purchase ....
0202
IMPORTANT SAFETY INSTRUCTIONS
1 Read Instructions - All the safety and operating instructions should be read before the product is operated.
2 Retain Instructions - The safety and operating instructions should be retained for future reference.
3 Heed Warnings - All warnings on the product and in the operating instructions should be adhered to.
4 Follow Instructions - All operating and use instructions should be followed.
5 Cleaning - Unplug this product from the wall outlet before cleaning. Do not use liquid cleaners or aerosol cleaners. Use a damp cloth for cleaning.
6 Attachments - Do not use attachments not recommended by the product manufacturer as they may cause hazards.
7 Water and Moisture - Do not use this product near water - for example, near a bath tub, wash bowl, kitchen sink, or laundry tub; in a wet basement; or near a swimming pool; and the like.
8 Accessories - Do not place this product on an unstable cart, stand, tripod, bracket, or table. The product may fall, causing serious injury to a child or adult, and serious damage to the product. Use only with a cart, stand, tripod, bracket, or table recommended by the manufacturer, or sold with the product. Any mounting of the product should follow the manufacturer's instructions, and should use a mounting accessory recommended by the manufacturer.
9 A product and cart combination should be moved with care. Quick stops, excessive force, and uneven surfaces may cause the product and cart combination to overturn.

10 Ventilation - Slots and openings in the cabinet are provided for ventilation and to ensure reliable operation of the product and to protect it from overheating, and these openings must not be blocked or covered. The openings should never be blocked by placing the product on a bed, sofa, rug, or other similar surface. This product should not be placed in a built-in installation such as a bookcase or rack unless proper ventilation is provided or the manufacturer's instructions have been adhered to.
11 Power Sources - This product should be operated only from the type of power source indicated on the marking label. If you are not sure of the type of power supply to your home, consult your product dealer or local power company. For products intended to operate from battery power, or other sources, refer to the operating instructions.
12 Grounding or Polarization - This product may be equipped with a polarized alternating-current line plug (a plug having one blade wider than the other). This plug will fit into the power outlet only one way. This is a safety feature. If you are unable to insert the plug fully into the outlet, try reversing the plug. If the plug should still fail to fit, contact your electrician to replace your obsolete outlet. Do not defeat the safety purpose of the polarized plug.
Alternate Warnings - This product is equipped with a three-wire grounding-type plug, a plug having a third (grounding) pin. This plug will only fit into a grounding-type power outlet. This is a safety feature. If you are unable to insert the plug into the outlet, contact your electrician to replace your obsolete outlet. Do not defeat the safety purpose of the grounding-type plug.
13 Power-Cord Protection - Power-supply cords should be routed so that they are not likely to be walked on or pinched by items placed upon or against them, paying particular attention to cords at plugs, convenience receptacles, and the point where they exit from the product.
14 Protective Attachment Plug - The product is equipped with an attachment plug having overload protection. This is a safety feature. See Instruction Manual for replacement or resetting of protective device. If replacement of the plug is required, be sure the service technician has used a replacement plug specified by the manufacturer that has the same overload protection as the original plug.
IMPORTANT SAFETY INSTRUCTIONS (continued)
15 Outdoor Antenna Grounding - If an outside antenna or cable system is connected to the product, be sure the antenna or cable system is grounded so as to provide some protection against voltage surges and built-up static charges. Article 810 of the National Electrical Code, ANSI/NFPA 70, provides information with regard to proper grounding of the mast and supporting structure, grounding of the lead-in wire to an antenna discharge unit, size of grounding conductors, location of antenna discharge unit, connection to grounding electrodes, and requirements for the grounding electrode.
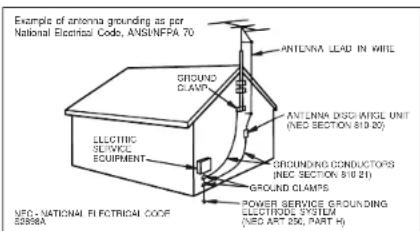
16 Lightning - For added protection for this product during a lightning storm, or when it is left unattended and unused for long periods of time, unplug it from the wall outlet and disconnect the antenna or cable system. This will prevent damage to the product due to lightning and power-line surges.
17 Power Lines • An outside antenna system should not be located in the vicinity of overhead power lines or other electric light or power circuits, or where it can fall into such power lines or circuits. When installing an outside antenna system, extreme care should be taken to keep from touching such power lines or circuits as contact with them might be fatal.
18 Overloading - Do not overload wall outlets, extension cords, or integral convenience receptacles as this can result in a risk of fire or electric shock.
19 Object and Liquid Entry - Never push objects of any kind into this product through openings as they may touch dangerous voltage points or short-out parts that could result in a fire or electric shock. Never spill liquid of any kind on the product.
20 Servicing - Do not attempt to service this product yourself as opening or removing covers may expose you to dangerous voltage or other hazards. Refer all servicing to qualified service personnel.
21 Damage Requiring Service - Unplug this product from the wall outlet and refer servicing to qualified service personnel under the following conditions:
a) When the power-supply cord or plug is damaged,
b) If liquid has been spilled, or objects have fallen into the product,
c) If the product has been exposed to rain or water,
d) If the product does not operate normally by following the operating instructions. Adjust only those controls that are covered by the operating instructions as an improper adjustment of other controls may result in damage and will often require extensive work by a qualified technician to restore the product to its normal operation,
e) If the product has been dropped or damaged in any way, and
f) When the product exhibits a distinct change in performance - this indicates a need for service.
22 Replacement Parts - When replacement parts are required, be sure the service technician has used replacement parts specified by the manufacturer or have the same characteristics as the original part. Unauthorized substitutions may result in fire, electric shock, or other hazards.
23 Safety Check - Upon completion of any service or repairs to this product, ask the service technician to perform safety checks to determine that the product is in proper operating condition.
24 Wall or Ceiling Mounting - The product should be mounted to a wall or ceiling only as recommended by the manufacturer.
25 Heat - The product should be situated away from heat sources such as radiators, heat registers, stoves, or other products (including amplifiers) that produce heat.
0304
Accessories
Please confirm that the following accessories are included.


Remote control ×1 AC power cord 1 (RRMCGA010SJSA) (QACCU0003SJ0

FM/AM loop antenna × 1 (QANTL0009SJZZ)
Note:
Only the above accessories are included.
Contents
Page
■General Information
Precautions 6
Controls and indicators 7, 8
■Preparation for Use
Remote control 9 System connections 10, 11
■Basic Operation
Sound control 12 Setting the clock 13
■CD or MP3 disc Playback
Listening to a CD or MP3 disc ..... 14, 15 Advanced CD or MP3 disc playback ..... 16 - 18
■Radio
Listening to the radio 19 Listening to the memorized station 20
■Tape Playback
Listening to a cassette tape 21
■Tape Recording
Recording on a cassette tape 22, 23
■Advanced Features
Timer and sleep operation ....24 - 26 Enhancing your system ....26, 27
■References
Troubleshooting chart....28, 29 Maintenance....30 Specifications....31
CONSUMER LIMITED WARRANTY ....Back cover
XL-E80
Precautions
■General
- Please ensure that the equipment is positioned in a well-ventilated area and ensure that there is at least 4" (10 cm) of free space along the sides, top and back of the equipment.
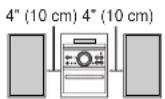
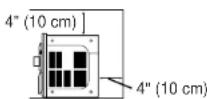
- Use the unit on a firm, level surface free from vibration.

- Keep the unit away from direct sunlight, strong magnetic fields, excessive dust, humidity and electronic/electrical equipment (home computers, facsimiles, etc.) which generate electrical noise.
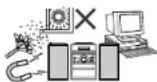
- Do not place anything on top of the unit. - Do not expose the unit to moisture, to temperatures higher than 140^ (60°C) or to extremely low temperatures.
- If your system does not work properly, disconnect the AC power cord from the AC outlet. Plug the AC power cord back in, and then turn on your system.
- In case of an electrical storm, unplug the unit for safety.
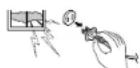
- Hold the AC power plug by the head when removing it from the AC outlet, as pulling the cord can damage internal wires.

- Do not remove the outer cover, as this may result in electric shock. Refer internal service to your local SHARP service facility.

- This unit should only be used within the range of 41°F - 95°F (5°C - 35°C).
Warning:
The voltage used must be the same as that specified on this unit. Using this product with a higher voltage other than that which is specified is dangerous and may result in a fire or other type of accident causing damage. SHARP will not be held responsible for any damage resulting from use of this unit with a voltage other than that which is specified.
■Volume control
The sound level at a given volume setting depends on speaker efficiency, location and various other factors. It is advisable to avoid exposure to high volume levels, which occurs while turning the unit on with the volume control setting up high, or while continually listening at high volumes.
Controls and indicators
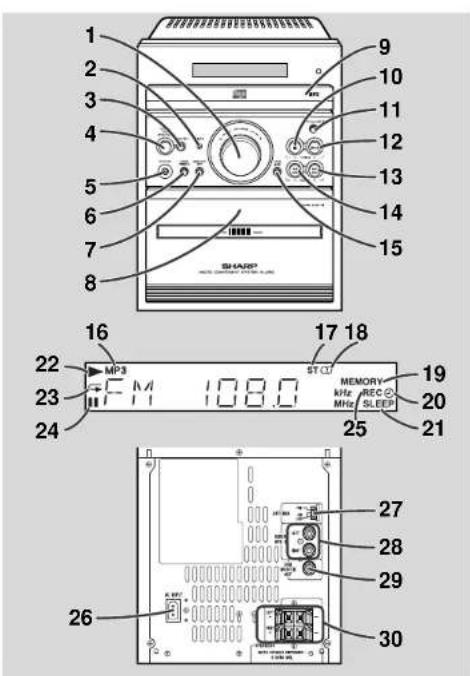
Reference page
-
Volume Control .... 12
-
Timer Set Indicator 25
-
Function Selector Button....14, 19, 21, 27
-
Power On/Stand-by Button 11
5.Headphone Jack 26
- Bass/Treble Selector Button 12
7.Memory/Set Button 18,20
8.Cassette Compartment 21
9.Disc Tray 14
- Disc or Tape Stop, Tuning Down Button ..... 15, 19, 21
11.Disc Tray Open/Close Button 14
12.Disc Play or Pause, Tape Play, Tuning Up Button.14.15,19.
21
- Disc Track Up or Fast Forward. Tape Fast Forward. Tuner
Preset Up Button 16.20.21
14.Disc Track Down or Fast Reverse. Tape Rewind. Tuner Pre-
set Down Button 16.20.21
-
Tape Record Pause Button 22
-
Rape Record Palace Button: 1777777777777777772
-
MP3 Disc Indicator 14
-
FM Stereo Mode Indicator 19
-
FM Stereo Receiving Indicator 19
-
Memory Indicator 18.20
20 Timer Play Indicator 24
21 Sleep Indicator 25
- Sleep Indicator 25
-
Disc Play Indicator 14
-
Disc Play Indicator 14
-
Disc Repeat Indicator 17
-
Disc Repeat Indicator 17
-
Disc Repeat Indicator 15
-
Disc Pause Indicator .... 15
25.Tape Record Indicator 2
26.AC Power Input Jack 11
- FM/AM Loop Antenna Jack 10
28.Video/Auxiliary (Audio Signal) Input Jacks 27
29 Subwoofer Output Jack 26
30.Speaker Terminals 10.11
XL-E80
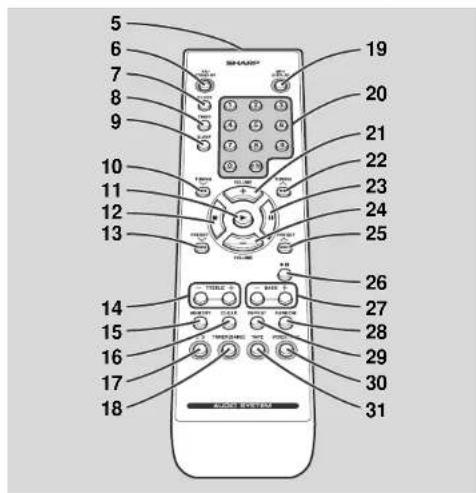
Controls and indicators (continued)

- Tweeter
2.Woofer - Bass Reflex Duct
- Speaker Wire
Reference page
- Remote Control Transmitter 9
- Power On/Stand-by Button 9
- Clock Button 13
8.Timer Button 24
9.Sleep Button 25
10.Disc Fast Reverse. Tuning Down. Tape Rewind Button ..16.
19.21 - Disc or Tape Play Button 14, 21
- Disc or Tape Stop Button 15, 21
13.Disc Track Down. Tuner Preset Down. Time Down Button . . -
- 20
14.Treble Up and Down Buttons 12
15.Memory Button 13, 18, 20
16.Disc Program Clear Button 18
- 20
- CD/MP3 Disc Button 14
18.Tuner and Band Selector Button 19 - MP3 Disc Display Button 15
- Direct Search Buttons 17
- Volume Up Button 12
22.Disc Fast Forward. Tuning Up, Tape Fast Forward Button . . -
- 21
- Disc Pause Button 15
24.Volume Down Button 12 - Disc Track Up, Tuner Preset Up, Time Up Button . 13, 16, 20
- Tane Record Pause Button 22
- Bass Up and Down Buttons 12
28.Disc Random Play Button 17 - Disc Repeat Button 17
- Video/Auxiliary Button 27
- Tape Button 21
Remote control
■Battery installation
Use 2 "AA" size batteries (UM/SUM-3, R6, HP-7 or similar). Batteries are not included.
1 Remove the battery cover.
2 Insert the batteries according to the direction indicated in the battery compartment.
When inserting or removing the batteries, push them toward the battery terminals.
3 Replace the cover.

Precautions for battery use:
- Replace all old batteries with new ones at the same time.
- Do not mix old and new batteries.
- Remove the batteries if the unit will not be used for long periods of time. This will prevent potential damage due to battery leakage.
Caution:
- Do not use rechargeable batteries (nickel-cadmium battery, etc.).
- Installing the batteries incorrectly may cause the unit to malfunction.
Notes concerning use:
- Replace the batteries if the operating distance is reduced or if the operation becomes erratic.
- Periodically clean the transmitter on the remote control and the sensor on the unit with a soft cloth.
- Exposing the sensor on the unit to strong light may interfere with operation. Change the lighting or the direction of the unit.
- Keep the remote control away from moisture, heat, shock, and vibrations.
■Test of the remote control
Check the remote control after checking all the connections (see pages 10 - 11).
Point the remote control directly at the remote sensor on the unit.
The remote control can be used within the range shown below:
Press the ON/STAND-BY button. Does the power turn on? Now, you can enjoy music.

System connections
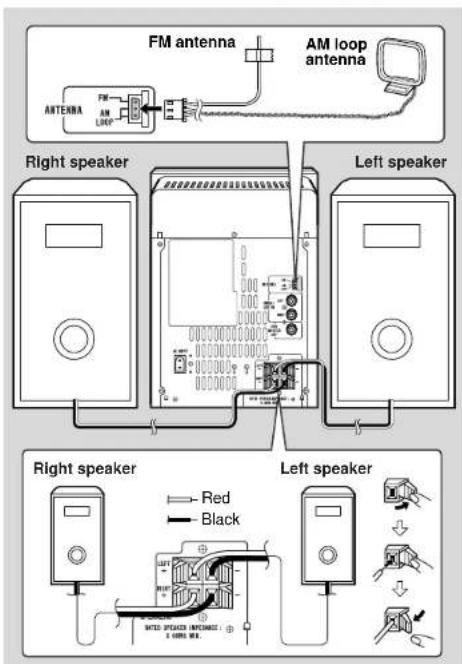
Make sure to unplug the AC power cord before any connections.
■FM/AM loop antenna connection
Connect the FM/AM loop antenna to the ANTENNA jack.
Position the FM antenna wire and rotate the AM loop antenna for optimum reception. Place the AM loop antenna on a shelf, or attach it to a stand or a wall.
Notes:
- Placing the antenna on the stereo system or near the AC power cord may cause noise pickup. Place the antenna away from the stereo system for better reception.
- Do not connect the attached FM antenna to an external antenna as this may cause trouble.
Installing the AM loop antenna:

■Speaker connection
Connect the black wire to the minus (-) terminal, and the red wire to the plus (+) terminal.
Caution:
- Use speakers with an impedance of 6 ohms or more, as lower impedance speakers can damage the unit.
- Do not mistake the right and the left channels. The right speaker is the one on the right side when you face the unit.
- Do not stand or sit on the speakers. You may be injured.
- Do not allow any objects to fall into or to be placed in the bass reflex ducts.
- Do not let the bare speaker wires touch each other.
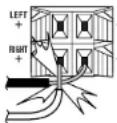
Incorrect
Placing the speaker system:
There is no distinction between the right and the left speakers.
Speaker grilles are removable:
Make sure nothing comes into contact with the speaker diaphragm when you remove the speaker grilles.

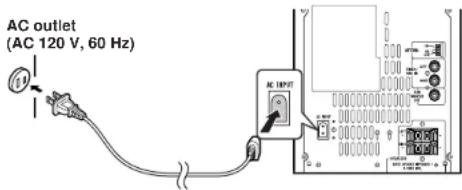
■Connecting the AC power cord
After checking all the connections have been made correctly, connect the AC power cord to the AC power input jack, then plug the AC power cord of this unit into the AC outlet.
Notes:
●Unplug the AC power cord from the AC outlet if the unit will not be in use for a prolonged period of time.
●Never use a power cord other than the one supplied. Otherwise, a malfunction or an accident may occur.
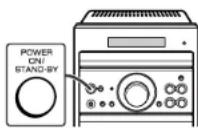
■To turn the power on
Press the ON/STAND-BY button to turn the power on.
After use:
Press the ON/STAND-BY button to enter the power stand-by mode.
Sound control

■Adjusting the volume
Main unit operation:
When the VOLUME control is turned clockwise, the volume will increase. When it is turned counterclockwise, the volume will decrease.
Remote control operation:
Press the VOLUME (+ or -) button to increase or decrease the volume.

■Adjusting the bass
Main unit operation:
1 Press the BASS/TREBLE button to select "BASS".
2 Within 5 seconds, turn the VOLUME control to adjust the bass.
Remote control operation:
Press the BASS (+ or -) button to adjust the bass.

4 3
■Adjusting the treble
Main unit operation:
1 Press the BASS/TREBLE button to select "TREB".
2 Within 5 seconds, turn the VOLUME control to adjust the treble.
Remote control operation:
Press the TREBLE (+ or -) button to adjust the treble.

4 3
Setting the clock

This may be operated only with the remote control. In this example, the clock is set for the 12-hour (AM 12:00) display.
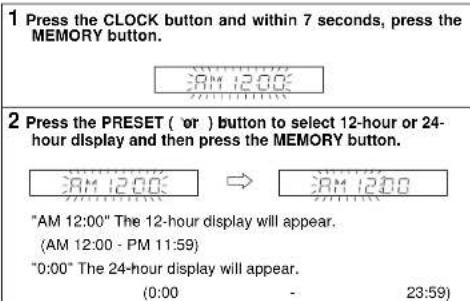
3 Press the PRESET (or) button to adjust the hour and then press the MEMORY button.

- Press the PRESET (or) button once to advance the time by 1 hour. Hold it down to advance continuously.
- When the 12-hour display is selected, "AM" will change automatically to "PM".
4 Press the PRESET (or) button to adjust the minutes and then press the MEMORY button.

- Press the PRESET (or) button once to advance the time by 1 minute. Hold it down to advance continuously.
●The hour will not advance even if minutes advance from "59" to "00".
To confirm the time display:
Press the CLOCK button. The time display will appear for about 7 seconds.
Note:
The time will flash at the push of the CLOCK button when the AC power supply is restored after a power failure or unplugging the unit. Readjust the clock as follows.
To readjust the clock:
Perform "Setting the clock" from the beginning. If the "AM 12:00" is not flashing in step 1, step 2 (for selecting the 12-hour or 24-hour display) will be skipped.
To change the 12-hour or 24-hour display:
1 Clear all the programmed contents. [Refer to "Clearing all the memory (reset)" on page 29 for details.]
2 Perform "Setting the clock" from the beginning.
Listening to a CD or MP3 disc
This system can play audio CD, CD-R and CD-RW discs, but cannot record. Some audio CD-R and CD-RW discs may not be playable due to the state of the disc or the equipment used for recording.
MP3 is a form of compression. It is an acronym which stands for MPEG Audio Layer 3.
MP3 is a type of audio code which is processed by significant compression from the original audio source with very little loss in sound quality.
Notes:
- Due to the structure of its disc information, it takes longer to read an MP3 disc than a normal CD.
●"MP3" indicator will light up if an MP3 disc is initialized. - This system supports MPEG 1 Layer 3, MPEG 2 Layer 3, and VBR files.
●During VBR file playback, time counter in the display may differ from its actual playback time.

1 Press the ON/STAND-BY button to turn the power on.
2 Press the FUNCTION button until "CD" appears on the display.
When operating with the remote control, press the CD button.
3 Press the OPEN/CLOSE button to open the disc tray.
4 Place the disc on the disc tray, label side up.

Be sure to place 3" (8 cm) discs in the middle of the disc positions.
5 Press the OPEN/CLOSE button to close the disc tray.


6 Press the button to start playback from track 1.
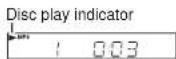
When the last track on the disc has finished playing, the unit will stop automatically.
To Interrupt playback:
Main unit operation:
Press the ▶button.
To resume playback from the same
point, press the ▶button again.

Remote control operation:
Press the IButton.
To resume playback from the same point, press the button.
To stop playback:
Press the ■button.
To remove the disc:
While In the stop mode, press the OPEN/CLOSE ▲button.
Caution:
- Do not place two CDs in one disc tray.
- Do not play discs with special shapes (heart- or octagon-shaped) as it may cause malfunctions.
- Do not push the disc tray while it is moving.
- If the power falls while the tray is open, wait until the power is restored.
- If a disc is damaged, dirty, or loaded upside down, the disc will skip or not play.
- Subjecting the unit to shock or vibration may cause mistracking.
- If TV or radio interference occurs during CD operation, move the unit away from the TV or radio.
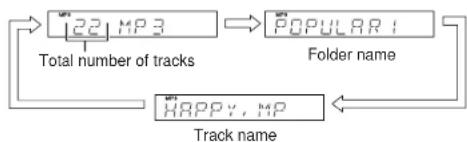
■To change the display (MP3 discs only)
While in the stop mode or playback mode, press the MP3 DISPLAY
button.
Each time the button is pressed, the display will change as follows.
[When in the stop mode]
flowchart
graph TD
    A["122 MP3"] --> B["POPULAR 1"]
    B --> C["Total number of tracks"]
    C --> D["HAPPY, MP"]
    D --> E["Track name"]
    E --> F["Folder name"]
[When in the playback mode]

flowchart
graph TD
    A["Track number"] --> B["Elapsed playback time"]
    B --> C["Folder name"]
    C --> D["Popular folder"]
    D --> E["Track name"]
    E --> F["PREAM.MP"]
Advanced CD or MP3 disc playback
■To select the desired folder or track by name (MP3 discs only)
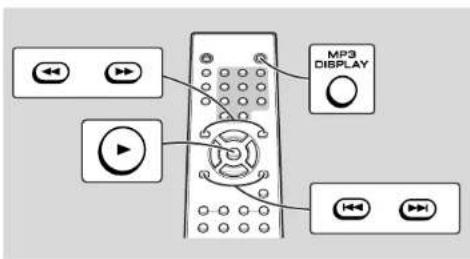
| 1 While in the stop mode, press the MP3 DISPLAY button onthe remote control to display the folder name. | |
| POPULAR! | |
| 2 Select the desired folder by pressing the door button. | |
| 3 Press the MP3 DISPLAY buttonto display the track name. | HAPPY, MP |
| 4 Select the desired track by pressing the door button. | |
| 5 Press the (*) button to begin playback. | S 001 |
■To locate the beginning of a track
| To move to the beginning of the next track:Press the ▶ button for less than 0.5 seconds during playback. |
| To restart the track being played:Press the ▶ button for less than 0.5 seconds during playback. |
Note:
You can skip to any track by pressing the◀ or button repeatedly until the desired track number appears.
■To locate the desired portion
| For fast forward:Press and hold down the ▶button during playback. |
| For fast reverse:Press and hold down the ◀button during playback. |
Notes:
- Normal playback will resume when the ◀or ▶button is released.
- When the end of the last track is reached during fast forward, CD operation will be paused. When the beginning of the first track is reached during fast reverse, playback will start when you release the ◀ button.

■Direct search of the track
By using the direct search buttons, the desired tracks can be played
Use the direct search buttons on the remote control to select the desired track.

Selected track number
- The direct search buttons allow you to select up to number 9.
- When selecting number 10 or higher, use the "+10" button.
A. For example, to choose 13
1 Press the "+10" button once
2 Press the "3" button.
B. For example, to choose 30
1 Press the "+10" button three times.
2 Press the "0" button.
Playback of the selected track is started. When the last track on the disc has finished playing, the unit will stop automatically.
Notes:
- A track number higher than the number of tracks on the disc cannot be selected.
●During random play, direct search is not possible. - When playing MP3 discs, you can display the track number but cannot select the folder by pressing the direct search button(s).
■Repeat play
All tracks or a programmed sequence can be continuously repeated.
To repeat all tracks:
1 Press the REPEAT button on the remote control.
2 Press the ▶) button
To repeat a desired track:
1 Perform steps 1 - 3 in the "Programmed play" section on page 18 and then press the REPEAT button.
2 Press the ▶) button.
To repeat random play:
Press the REPEAT button during random play.
To cancel repeat play:
Press the REPEAT button again. "will go out."
Caution:
After performing repeat play, be sure to press the ■button. Otherwise, the disc will play continuously.
■Random play
The tracks can be played in random order automatically.
While in the stop mode, press the
RANDOM button on the remote con-
trol and the ▶(▶button sequen-
tially to begin random play.

To cancel random play:
While in the stop mode, press the RANDOM button again.
Notes:
●Random play will stop automatically when all tracks are played once. (The same track will not be played back twice.)
- In random play, the unit will select and play tracks automatically. (You cannot select the order of the tracks.)
- If you press the button during random play, you can move to the next track by the random operation. On the other hand, the button does not allow you to move to the previous track. The beginning of the track being played will be located.
Advanced CD or MP3 disc playback (continued)

■Programmed play
You can choose up to 20 selections for playback In the order you like.
1 While in the stop mode, press the MEMORY (MEMORY/SET) button to enter the programming save mode.
2 Press the direct search buttons on the remote control to select the desired track.
Selected track number
You can also select a track by pressing the button.
3 Press the MEMORY (MEMORY/SET) button to save the track number.
Playback order
4 Repeat steps 2 - 3 for other tracks. Up to 20 tracks can be programmed.
If you make a mistake, the programmed tracks can be cleared by pressing the CLEAR button.
5 Press the ↕) button to start playback.


To clear the programmed selections:
While the "MEMORY" indicator is lit, set the CD to the stop mode and then press the CLEAR button.
Each time the button is pressed, one track will be cleared, beginning with the last track programmed. When all the tracks are cleared, "MEMORY" will disappear.
Adding tracks to the program:
If a program has been previously stored, the "MEMORY" indicator will be displayed. Then follow steps 2 - 3 to add tracks. The new tracks will be stored after the last track of the original program.
Notes:
- If you open the disc tray or enter the stand by mode, the programmed sequence is automatically canceled.
●Even if you changed the function from CD to some other function, the programmed selections will not be cleared.
●During the program operation, random play is not possible. - When playing MP3 discs, you can display the track number but cannot select the folder by pressing the direct search button(s).
Listening to the radio

1 Press the ON/STAND-BY button to turn the power on.
2 Press the FUNCTION button until "FM" or "AM" appears on the display.
When operating with the remote control, press the TUNER (BAND) button to select "FM" or "AM".
3 Press the TUNING ( or ) button to tune in to the desired station.
Manual tuning:
Press the TUNING button as many times as required to tune in to the desired station.
Auto tuning:
When the TUNING button is pressed for more than 0.5 seconds, scanning will start automatically and the tuner will stop at the first receivable broadcast station.
Notes:
- When radio interference occurs, auto scan tuning may stop automatically at that point.
●Auto scan tuning will skip weak signal stations.
● To stop the auto tuning, press the TUNING button again.
To receive an FM stereo transmission:
Press the FUNCTION [TUNER (BAND)] button to display the "ST" indicator.
● "will appear when an FM broadcast is in stereo.
- If the FM reception is weak, press the FUNCTION [TUNER (BAND)] button to extinguish the "ST" indicator. The reception changes to monaural, and the sound becomes clearer.
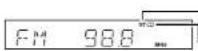
FM stereo mode indicator
FM stereo receiving indicator
Listening to the memorized station
■Memorizing a station
You can store up to 45 stations (30 FM stations and 15 AM stations) and recall them at the push of a button (preset tuning).
1 Perform steps 1 - 3 in "Listening to the radio" on page 19.
2 Press the MEMORY/SET (MEMORY) button to enter the preset tuning saving mode.
3 Within 5 seconds, press the PRESET (vor) button to select the preset channel number.
Store the stations in memory, in order, starting with preset channel 1.
4 Within 5 seconds, press the MEMORY/SET (MEMORY) button to store that station in memory.
●30 FM stations can be preset (preset channels 1 through 30).
- 15 AM stations can be preset (preset channels 1 through 15).
- If the "MEMORY" and preset number indicators go out before the station is memorized, repeat the operation from step 2.
5 Repeat steps 1 - 4 to set other stations, or to change a pre-set station.
When a new station is stored in memory, the station previously memorized will be erased.

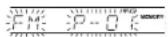

Note:
The backup function protects the memorized stations for a few hours should there be a power failure or the AC power cord disconnection.
■To recall a memorized station
Press the PRESET (or) button for less than 0.5 seconds to select the desired station.

Preset channel Frequency and frequency band
■To erase entire preset memory
1 Press the ON/STAND-BY button to
enter the power stand-by mode.
2 While pressing down the MEMORY/SET button and the PRESET button, press the ON/STAND-BY button until "TUNER CL" appears.

Listening to a cassette tape
Before playback:
- For playback, use normal or low-noise tapes for the best sound. (Metal or CrO _2 tapes are not recommended.)
- Do not use C-120 tapes or poor-quality tapes, as they may cause malfunctions.
- Before loading a tape into the cassette compartment, tighten the slack with a pen or a pencil.

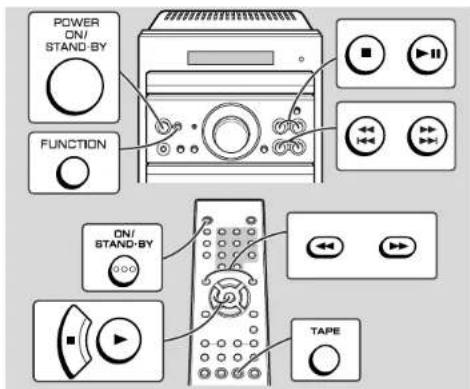
1 Press the ON/STAND-BY button to turn the power on.
2 Press the FUNCTION button until "TAPE" appears on the display.
When operating with the remote control, press the TAPE button.

To stop playback:
Press the button
Fast forward/rewind:
To advance the tape, press the button. To rewind it, press the button.
Caution:
- To remove the cassette, press the button, and then open the compartment.
●Before changing from one tape operation to another, press the button. - If a power failure occurs during tape operation, the tape head will remain engaged with the tape and the cassette compartment will not open. In this case, wait until the power is restored.
- Even if the ▶(1) Button is pressed during tape playback, the unit will not enter the pause mode.
Recording on a cassette tape
Before recording:
- When recording important selections, make a preliminary test to ensure that the desired material is properly recorded.
- SHARP is not liable for damage or loss of your recording arising from malfunction of this unit.
- The volume and sound controls can be adjusted with no effect on the recorded signal (Variable Sound Monitor).
- For recording, use only normal tapes. Do not use metal or CrO_2 tapes.
- Do not use C-120 tapes or poor-quality tapes, as they may cause malfunctions.

Erase-prevention tab of cassette tapes:
- When recording on a cassette tape, make sure that the erase-prevention tabs are not removed. Cassettes have removable tabs that prevent accidental recording or erasing.
● To protect the recorded sound, remove the tab after recording. Cover the tab hole with adhesive tape to record on the tape without the tab.

■Recording from a CD or MP3 disc
1 Press the ON/STAND-BY button to turn the power on.
2 Press the FUNCTION button until "CD" appears on the display.
When operating with the remote control, press the CD button.
3 Load the desired disc.
4 Load a cassette into the cassette compartment with the side to be recorded on facing you. Wind past the leader of the tape, on which recording cannot be performed.
5 Press the TAPE 📄 button.
Recording will be paused.
6 Press the 📋 button to start recording.
●Playback of the disc will start in a few seconds after the tape starts.
- When the playback is finished, the disc and the cassette will stop automatically.


To stop recording:
Press the ■button.
The tape will stop. When the ■ button is pressed again, the disc will stop.
To interrupt recording:
Press the TAPE 📄 button.
To resume recording, press the ▶(1) ▶button.
To perform programmed recording:
1 Program tracks (see page 18).
2 Press the TAPE libbon.
3 Press the ▶ button.
■Recording from the radio
| 1 Tune in to the desired station (see page 19). |
| 2 Load a cassette into the cassette compartment with the side to be recorded on facing you.Wind past the leader of the tape, on which recording cannot be performed. |
| 3 Press the TAPE ☐ button.Recording will be paused. |
| 4 Press the ▶(II) button to start recording. |
To stop recording:
Press the ■button.
To interrupt recording:
Press the TAPE 📄 button.
To resume recording, press the ▶(1) button.
Note:
If you hear a whistling noise while recording an AM station, move the AM loop antenna.
■Erasing recorded tapes
1 Load the tape to be erased into the cassette compartment with the side to be erased facing toward you.
2 Press the FUNCTION button until "TAPE" appears on the display.
When operating with the remote control, press the TAPE button.
3 Press the TAPE 🐎ibunin.
4 Press the ▶ button to start erasing.
Timer and sleep operation
This may be operated only with the remote control.
Timer playback:
The unit turns on and plays the desired source (CD, MP3 disc, tuner, tape) at a preset time.
Sleep operation:
The radio, CD, MP3 disc and cassette tape can all be turned off automatically.

■Timer playback
Before setting timer:
1 Press the CLOCK button to check that the clock is set to the correct time. (Refer to page 13.)
2 Load a cassette or disc to be played.


1 Press the ON/STAND-BY button to turn the power on.
2 Press the CD, TUNER (BAND) or TAPE button to select the desired function. When you selected the TUNER (BAND), tune in to the desired station.
3 Adjust the volume using the VOLUME buttons. Do not turn the volume up too high.
4 Press the TIMER button and within 7 seconds, press the MEMORY button.

5 Press the PRESET (or) button to specify the hour to start, then press the MEMORY button.


To reset or change the timer setting:
Perform "Timer playback" from the beginning.
Notes:
- Once the time is set, the setting will be retained until a new time is entered.
- When performing timer playback using another unit connected to the VIDEO/AUX IN jacks, select "VIDEO/AUX" in step 2. At this time, only this unit will be turned on or enter the power stand-by mode automatically. It will enter the power stand-by mode 1 hour after the timer playback starts. However, the other unit will not be turned on or off.
■Sleep operation

Timer and sleep operation (continued)
To cancel the sleep operation:
Press the ON/STAND-BY button while "SLEEP" is indicated.
To cancel the sleep operation without setting the system to the stand-by mode, press the SLEEP button until "OFF" appears on the display.
To confirm the remaining sleep time:
Press the SLEEP button once while the sleep timer is set.
The remaining sleep time is displayed for about 3 seconds.
■To use timer and sleep operation together
Example: To fall asleep and wake up to the same radio station
You can play back the same source only (the function cannot be switched).
1 Set the sleep time (steps 1 - 2, page 25).
2 While the sleep timer is set, set the desired playback time (steps 4 - 6, pages 24 - 25).
Sleep timer setting Timer playback setting

flowchart
graph LR
    A["5 minutes - 3 hours"] --> B["Sleep operation will automatically stop."]
    B --> C["Timer playback start time"]
Caution:
When using the cassette deck, be sure the tape length is long enough to perform both functions. If you want to sleep and wake up listening to a tape, and the length of the tape is shorter than the sleep timer setting, timer playback will not be possible.
Enhancing your system
■Headphones
- Before plugging in or unplugging the headphones, reduce the volume
- Be sure your headphones have a 1/8" (3.5 mm) diameter plug and are between 16 ohms and 50 ohms impedance. The recommended impedance is 32 ohms.
- Plugging in the headphones disconnects the speakers automatically. Adjust the volume using the VOLUME control.
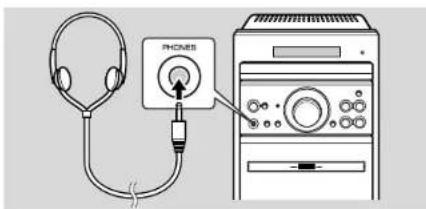
■Subwoofer connection
When a commercially available speaker with a built-in amplifier is connected to this unit, you can enjoy sound with emphasized bass. Connect an RCA cord from a commercially available speaker with a built-in amplifier to the SUBWOOFER OUT jack.

The connection cord is not included. Purchase a commercially available cord as shown below.

■Listening to the playback sounds from VCR, DVD, etc.
1 Use a connection cord to connect the VCR, DVD, etc. to the VID-EO/AUX IN jacks.
When using video equipment, connect the audio output to this unit and the video output to a television.
2 Press the ON/STAND-BY button to turn the power on.
3 Press the FUNCTION button until "AUX" appears on the display. When operating with the remote control, press the VIDEO/AUX button.
4 Play the connected equipment.
Note:
To prevent noise interference, place the unit away from the television.
■To record on a tape
1 Load a cassette into the cassette compartment with the side to be recorded on facing you.
2 Press the VIDEO/AUX button.
3 Press the TAPE
4 Press the 📋Button
5 Play the VCR, DVD, etc.
Troubleshooting chart
Many potential problems can be resolved by the owner without calling a service technician. If something is wrong with this product, check the following before calling your authorized SHARP dealer or service center.
■General
| Symptom Possible cause | |
| ● The clock is not set to the correct time. | ● Did a power failure occur? Reset the clock. (Refer to page 13.) |
| ● When a button is pressed, the unit does not respond. | ● Set the unit to the power stand-by mode and then turn it back on. ● If the unit still malfunctions, reset it. (Refer to page 29.) |
| ● No sound is heard. | ● Is the volume level set to "0"? ● Are the headphones connected? ● Are the speaker wires disconnected? |
■CD player
| Symptom Possible cause | |
| ●Playback does not start.● Playback stops in the middle or is not performed properly. | ● Is the disc loaded upside down?● Does the disc satisfy the standards?● Is the disc distorted or scratched? |
| ●Playback sounds are skipped, or stopped in the middle of a track. | ● Is the unit located near excessive vibrations?● Is the disc very dirty?● Has condensation formed inside the unit? |
Tuner
| Symptom Possible | cause |
| ● The radio makes unusual noises continuously. | ● Is the unit placed near the TV or computer?● Is the FM antenna or AM loop antenna placed properly? Move the antenna away from the AC power cord if it's located nearby. |
■Cassette deck
| Symptom Possible cause | |
| Cannot record. | Is the erase-prevention tab removed? |
| Cannot record tracks with proper sound quality.Cannot erase completely. | Is it a normal tape? (You cannot record on a metal or CrO_2 tape.) |
| Sound skipping.Cannot hear treble.Sound fluctuation. | Is there slack in the tape?Is the tape stretched?Are the capstans, pinch rollers, or heads dirty? |
| Cannot remove the tape. | If a power failure occurs during playback, the heads remain engaged with the tape. Do not open the compartment with great force. |
■Remote control
| Symptom Possible | cause |
| ● The remote control does not operate. | ● Is the AC power cord of the unit plugged in? ●Is the battery polarity correct? ●Are the batteries dead? ●Is the distance or angle incorrect? ●Does the remote control sensor receive strong light? |
■If trouble occurs
When this product is subjected to strong external interference (mechanical shock, excessive static electricity, abnormal supply voltage due to lightning, etc.) or if it is operated incorrectly, it may malfunction.
If such a problem occurs, do the following:
1 Set the unit to the stand-by mode and turn the power on again.
2 If the unit is not restored in the previous operation, unplug and plug in the unit, and then turn the power on.
Note:
If neither operation above restores the unit, clear all the memory by resetting it.
■Clearing all the memory (reset)
1 Press the ON/STAND-BY button to enter the power stand-by mode.
2 While pressing down the MEMORY/SET button and the TAPE button, press the ON/STAND-BY button until "CLEAR" appears.

Caution:
This operation will erase all data stored in memory including clock, timer settings, tuner preset, and CD program.
■Condensation
Sudden temperature changes, storage or operation in an extremely humid environment may cause condensation inside the cabinet (CD pickup, tape heads, etc.) or on the transmitter on the remote control. Condensation can cause the unit to malfunction. If this happens, leave the power on with no disc (or cassette) in the unit until normal playback is possible (about 1 hour). Wipe off any condensation on the transmitter with a soft cloth before operating the unit.
■Care of compact discs
Compact discs are fairly resistant to damage, however mistracking can occur due to an accumulation of dirt on the disc surface. Follow the guidelines below for maximum enjoyment from your CD collection and player.
- Do not write on either side of the disc, particularly the non-label side from which signals are read. Do not mark this surface.
- Keep your discs away from direct sunlight, heat, and excessive moisture.
- Always hold the CDs by the edges. Fingerprints, dirt, or water on the CDs can cause noise or mistracking. If a CD is dirty or does not play properly, clean it with a soft, dry cloth, wiping straight out from the center, along the radius.

Maintenance
■Cleaning the cabinet
Periodically wipe the cabinet with a soft cloth and a diluted soap solution, then with a dry cloth.
Caution:
- Do not use chemicals for cleaning (gasoline, paint thinner, etc.). It may damage the cabinet finish.
- Do not apply oil to the inside of the unit. It may cause malfunctions.
■Cleaning the CD pickup lens
In order to ensure proper operation of the CD player, preventative maintenance (cleaning of the laser pickup lens) should be performed periodically. Lens cleaners are commercially available. Contact your local CD software dealer for options.
■Cleaning the tape-handling parts
- Dirty heads, capstans or pinch rollers can cause poor sound and tape jams. Clean these parts with a cotton swab moistened with commercial head/pinch roller cleaner or isopropyl alcohol.
- When cleaning the heads, pinch rollers, etc., unplug the unit which contains high voltages.

A Erase
head
Capstan
B Recording/Playback head Pinch roller
●After long use, the deck's heads and capstans may become magnetized, causing poor sound. Demagnetize these parts once every 30 hours of playing/recording time by using a commercial tape head demagnetizer. Read the demagnetizer's instructions carefully before use.
Specifications
As part of our policy of continuous improvement, SHARP reserves the right to make design and specification changes for product improvement without prior notice. The performance specification figures indicated are nominal values of production units. There may be some deviations from these values in individual units.
■General
| Power source AC 120 V, 60 Hz | |
| Power consumption | 83 W |
| Dimensions Width: 6-5/16" (160 mm)Height: 9" (228 mm)Depth: 9-13/16" (248 mm) | |
| Weight 8.4 lbs. (3.8 kg) | |
■Amplifier
| Output power 20 watts minimum RMS per channel into 6 ohms from 100 Hz to 20 kHz, 10% total harmonic distortion |
| Output terminals Speakers: 6 ohmsHeadphones: 16 - 50 ohms (recommended; 32 ohms)Subwoofer pre-output: 500 mV/47 kohms |
| Input terminals Videb/Auxiliary (audio signal): 500 mV/47 k ohms |
Tuner
| Frequency range FM: 87.5 - 108 MHzAM: 530 - 1,720 kHz |
■CD player
| Type Compact disc p | ayer |
| Signal readout Non- | contact, 3-beam semiconductor laser pickup |
| D/A converter 1-bit D/A converter | |
| Frequency re-sponse | 20 - 20,000 Hz |
| Dynamic range 90 dB (1 kHz) | |
■Cassette deck
| Frequency response | 50 - 14,000 Hz (normal tape) |
| Signal/noise ratio 50 | dB (recording/playback) |
| Wow and flutter 0.25 | % (WRMS) |
■Speaker
| Type 2-way type speaker system | |
| Super tweeter3-9/16" (9 cm) woofer | |
| Maximum input power | 40 W |
| Rated input power | 20 W |
| Impedance | 6 ohms |
| Dimensions | Width: 5-3/16" (132 mm)Height: 9" (228 mm)Depth: 7" (177 mm) |
| Weight 4.0 lbs. (1.8 kg)/each | |
XL-E8D
CONSUMER LIMITED WARRANTY
SHARP ELECTRONICS CORPORATION warrants to the first consumer purchaser that this Sharp brand product (the "Product"), when shipped in its original container, will be free from defective workmanship and materials, and agrees that it will, at its option, either repair the defect or replace the defective Product or part thereof with a new or remanufactured equivalent at no charge to the purchaser for parts or labor for the period(s) set forth below.
This warranty does not apply to any appearance items of the Product nor to the additional excluded item(s) set forth below nor to any Product the exterior of which has been damaged or defaced, which has been subjected to improper voltage or other misuse, abnormal service or handling, or which has been altered or modified in design or construction.
In order to enforce the rights under this limited warranty, the purchaser should follow the steps set forth below and provide proof of purchase to the servicer.
The limited warranty described herein is in addition to whatever implied warranties may be granted to purchasers by law. ALL IMPLIED WARRANTIES INCLUDING THE WARRANTIES OF MERCHANTABILITY AND FITNESS FOR USE ARE LIMITED TO THE PERIOD(S) FROM THE DATE OF PURCHASE SET FORTH BELOW. Some states do not allow limitations on how long an implied warranty lasts, so the above limitation may not apply to you.
Neither the sales personnel of the seller nor any other person is authorized to make any warranties other than those described herein, or to extend the duration of any warranties beyond the time period described herein on behalf of Sharp.
The warranties described herein shall be the sole and exclusive warranties granted by Sharp and shall be the sole and exclusive remedy available to the purchaser. Correction of defects, in the manner and for the period of time described herein, shall constitute complete fulfillment of all liabilities and responsibilities of Sharp to the purchaser with respect to the Product, and shall constitute full satisfaction of all claims, whether based on contract, negligence, strict liability or otherwise. In no event shall Sharp be liable, or in any way responsible, for any damages or defects in the Product which were caused by repairs or attempted repairs performed by anyone other than an authorized servicer. Nor shall Sharp be liable or in any way responsible for any incidental or consequential economic or property damage. Some states do not allow the exclusion of incidental or consequential damages, so the above exclusion may not apply to you.
THIS WARRANTY GIVES YOU SPECIFIC LEGAL RIGHTS. YOU MAY ALSO HAVE OTHER RIGHTS WHICH VARY FROM STATE TO STATE.
Model Specific Section
Your Product Model Number & Description:
XL-E80 Micro Component System
(Be sure to have this information available when you need service for your Product.)
Warranty Period for this Product: One (1) year parts and labor from the date of purchase.
Additional Item(s) Excluded from Warranty Coverage (If any): Non-functional accessories, supplies, and consumable items.
Where to Obtain Service: At a Sharp Authorized Servicer located in the United States.
What to do to Obtain Service:
To find a location of the nearest Sharp Authorized Servicer, call Sharp toll free at 1-800-BE-SHARP.
Ship prepaid or carry in your Product to a Sharp Authorized Servicer.
Be sure to have Proof of Purchase available. If you ship the Product, be sure it is insured and
packaged securely
TO OBTAIN SUPPLY, ACCESSORY OR PRODUCT INFORMATION, CALL 1-800-BE-SHARP.
COUS
SHARP
SHARP ELECTRONICS CORPORATION
Sharp Plaza, Mahwah, New Jersey 07430-2135
Printed in China
TINSEA013SJZZ
04C N HK①
SHARP CORPORATION
56106

- SPECIAL NOTES
- NOTE
- WARNING
- NOTES
- FOR YOUR RECORDS
- IMPORTANT SAFETY INSTRUCTIONS
- IMPORTANT SAFETY INSTRUCTIONS (continued)
- Accessories
- Contents
- Precautions
- ■General
- Warning:
- ■Volume control
- Controls and indicators
- Reference page
- Controls and indicators (continued)
- Remote control
- ■Battery installation
- Remove the battery cover.
- Precautions for battery use:
- Caution:
- Notes concerning use:
- ■Test of the remote control
- The remote control can be used within the range shown below:
- System connections
- ■FM/AM loop antenna connection
- Notes:
- Installing the AM loop antenna:
- ■Speaker connection
- Placing the speaker system:
- Speaker grilles are removable:
- ■Connecting the AC power cord
- ■To turn the power on
- After use:
- Sound control
- ■Adjusting the volume
- ■Adjusting the bass
- ■Adjusting the treble
- Setting the clock
- Listening to a CD or MP3 disc
- To Interrupt playback:
- Main unit operation:
- Remote control operation:
- To stop playback:
- To remove the disc:
- ■To change the display (MP3 discs only)
- Advanced CD or MP3 disc playback
- ■Direct search of the track
- Use the direct search buttons on the remote control to select the desired track.
- ■Repeat play
- To repeat all tracks:
- ■Random play
- While in the stop mode, press the
- To cancel random play:
- Advanced CD or MP3 disc playback (continued)
- ■Programmed play
- To clear the programmed selections:
- Adding tracks to the program:
- Listening to the radio
- Listening to the memorized station
- ■Memorizing a station
- Note:
- ■To recall a memorized station
- ■To erase entire preset memory
- Listening to a cassette tape
- Before playback:
- Recording on a cassette tape
- Before recording:
- Erase-prevention tab of cassette tapes:
- ■Recording from a CD or MP3 disc
- To stop recording:
- To interrupt recording:
- To perform programmed recording:
- ■Erasing recorded tapes
- Timer and sleep operation
- Timer playback:
- Sleep operation:
- ■Timer playback
- Before setting timer:
- ■Sleep operation
- Timer and sleep operation (continued)
- To cancel the sleep operation:
- To confirm the remaining sleep time:
- ■To use timer and sleep operation together
- Enhancing your system
- ■Headphones
- ■Subwoofer connection
- ■Listening to the playback sounds from VCR, DVD, etc.
- ■To record on a tape
- Troubleshooting chart
- ■If trouble occurs
- If such a problem occurs, do the following:
- ■Clearing all the memory (reset)
- ■Condensation
- ■Care of compact discs
- Maintenance
- ■Cleaning the cabinet
- ■Cleaning the CD pickup lens
- ■Cleaning the tape-handling parts
- Specifications
- CONSUMER LIMITED WARRANTY
- Model Specific Section
- XL-E80 Micro Component System
- SHARP
- SHARP ELECTRONICS CORPORATION
Brand : SHARP
Model : XLE80
Category : CD Player