
OT-200ID - Alarm clock radio JBL - Free user manual and instructions
Find the device manual for free OT-200ID JBL in PDF.
| Product Type | Clock radio with iPod docking station |
| Brand | JBL |
| Model | OT-200ID |
| Dimensions (W × D × H) | 284 × 146 × 70 mm |
| Weight | 0.8 kg |
| Mains power | 220-230 V, 50/60 Hz (European version) |
| Backup batteries | 3 × AAA batteries (non-rechargeable, alkaline) |
| Power consumption | 30 W max |
| Frequency response | 70 Hz - 20 kHz |
| Output power | 2 x 6 W |
| Signal-to-noise ratio | > 80 dB |
| Input sensitivity | 350 mV RMS |
| Remote control battery | CR2025 |
| Display | Backlit LCD display with adjustable brightness |
| Main functions | Wake-up with multiple alarms, AM/FM radio, iPod docking station, Sleep timer, Snooze function, Infrared remote control, iPod charging, iPod synchronization via USB |
| Maintenance and cleaning | Dry cloth only. Do not use liquid products. |
| Safety | Do not expose to water or moisture. Do not open the device. Use in moderate climates. |
| Spare parts and repairability | No user-replaceable parts. Contact a qualified technician. |
| General information | UL/CUL/CE approved. Recycling via collection points. |
Frequently Asked Questions - OT-200ID JBL
User questions about OT-200ID JBL
0 question about this device. Answer the ones you know or ask your own.
Ask a new question about this device
Download the instructions for your Alarm clock radio in PDF format for free! Find your manual OT-200ID - JBL and take your electronic device back in hand. On this page are published all the documents necessary for the use of your device. OT-200ID by JBL.
USER MANUAL OT-200ID JBL
IMPORTANT SAFETY INSTRUCTIONS
PLEASE READ THE FOLLOWING PRECAUTIONS BEFORE USE:
- Read these instructions, heed all warnings and keep for future reference.
- Do not use this apparatus near water.
Clean only with a dry cloth. - Do not block any ventilation openings; a minimum distance of 10mm around the entire apparatus is required for sufficient ventilation.
- No naked flame sources, such as lighted candles, should be placed on or near the apparatus.
- Attention should be drawn to the environmental aspects of battery disposal.
The apparatus is to be used in moderate climates only. - Do not install near any heat sources such as radiators, heat registers, stoves or other apparatuses (including amplifiers) that produce heat.
- Protect the power cord from being walked on or pinched, particularly at the plugs and convenience receptacles, and at the point where they exit from the apparatus.
- Only use attachments/accessories specified by the manufacturer.
- Unplug this apparatus during lightning storms or when unused for long periods of time.
Refer all servicing to qualified service personnel. Servicing is required when the apparatus has been damaged in any way, such as the power supply cord or plug is damaged, liquid has been spilled or objects have fallen into the apparatus, or the apparatus has been exposed to rain or moisture, does not operate normally, or has been dropped. - To be completely disconnected from the power input, the main plug of the AC/DC adapter shall be disconnected from the main.
- The main plug of the AC/DC adapter should not be obstructed OR should be easily accessed during intended use.
- The marking information is located at the bottom of the apparatus.
- The battery shall not be exposed to excessive heat such as sunshine, fire or the like.
- The apparatus and AC/DC adapter shall not be exposed to dripping or splashing, and no objects filled with liquids, such as vases, shall be placed on the apparatus and AC/DC adapter.
TO PREVENT THE RISK OF ELECTRIC SHOCK, DO NOT REMOVE THE COVER (OR BACK). THERE ARE NO USER-SERVICEABLE PARTS INSIDE THIS UNIT. PLEASE REFER SERVICING TO QUALIFIED HARMAN CONSUMER GROUP, INC., SERVICE PERSONNEL. - Never remove grille covers in order to service the speaker system. The speaker system does not contain any user-serviceable parts.
IMPORTANT NOTE FOR ALL ELECTRONIC PRODUCTS:
Before inserting or unplugging audio cables from the source device's headphones or line-level output jacks, it is good practice to turn off the device first. This will prolong the life of your unit, help protect your device from static electricity and prevent potential damage.
2 JBL ON TIME 200iD USER GUIDE
FCC STATEMENT AND WARNING
This device complies with Part 15 of the FCC Rules. Operation is subject to the following two conditions: 1) this device may not cause harmful interference, and 2) this device must accept any interference received, including interference that may cause undesired operation.
This equipment has been tested and found to comply with the limits for a Class B digital device, pursuant to Part 15 of the FCC Rules. These limits are designed to provide reasonable protection against harmful interference in a residential installation. This equipment generates, uses and can radiate radio frequency energy and, if not installed and used in accordance with the instructions, may cause harmful interference to radio communications. However, there is no guarantee that interference will not occur in a particular installation. If this equipment does cause harmful interference to radio or television reception, which can be determined by turning the equipment off and on, the user is encouraged to try to correct the interference by one or more of the following measures:
Reorient the receiving antenna.
- Increase the separation between the equipment and receiver.
- Connect the equipment into an outlet on a circuit different from that to which the receiver is connected.
- Consult the dealer or an experienced radio/TV technician for help.
Any special accessories needed for compliance must be specified in the instruction manual.
MODIFICATIONS NOT EXPRESSLY APPROVED BY THE MANUFACTURER COULD Void THE USER'S AUTHORITY TO OPERATE THE EQUIPMENT UNDER FCC RULES.
The normal function of the product may be disturbed by strong electromagnetic interference. If so, simply reset the product to resume normal operation by following the instruction manual. In case the function could not resume, please use the product in another location.

THE LIGHTNING FLASH AND ELECTRIC ADJACATE WITHIN THE TRIANGLE IS A WARNING SIGN ALERTING YOU ABOUT THE VOLTAGE INSIDE OF THE PRODUCT.
CAUTION
RISK OF ELECTRIC SHOCK -DO NOT OPEN

THE EXCLAMATION POINT WITHIN THE TRIANGLE IS A WARNING SIGN ALERTING YOU TO IMPORTANT INFORMATION ACCOMPANYING THE PRODUCT.
WARNING: TO PREVENT FIRE OR ELECTRICAL SHOCK HAZARD,DO NOT EXPOSE THIS PRODUCT TO RAIN OR MOISTURE.
WARNING: THE APPARATUS SHOULD NOT BE EXPOSED TO DRIpping OR SPLASHING AND NO OBJECTS FILLED WITH LIQUID, SUCH AS VASES, SHOULD BE PLACED ON THE APPARATUS.
IMPORTANT:
THE APPROPRIATE ADAPTER MUST BE INSTALLED BEFORE INSERTING YOUR iPod INTO THE JBL® PRODUCT. MAKE SURE THAT THE CONNECTOR FOR THE iPod IS PROPERLY ALIGNED WITH THE JBL PRODUCT'S CONNECTOR WHEN INSTALLING YOUR iPod. FAILURE TO DO SO MAY CAUSE PERMANENT DAMAGE TO THE CONNECTOR FOR THE iPod, RENDERING THE iPod INOPERABLE.
JBL ON TIME™ 2001D
The JBL On Time™ 200ID high-performance loudspeaker dock and clock radio for iPod will revolutionize the way you listen to your radio, use your iPod, and wake from a good night's sleep.
The JBL On Time 200ID system is a revolution in time travel. Imagine waking up to music on your favorite station or your iPod, with no more buzzer or bad radio reception. The compact time machine and sound center, when connected to your iPod, MP3 player or other music source, produces clean, powerful sound while providing time-keeping, alarm and radio features. The system is the world's first time machine with an intuitive user interface that is easier than ever to navigate.
The JBL On Time 2001D loudspeaker dock has full ability to navigate your iPod via IR remote. Also, not only can you wake up to your favorite radio station or song on your iPod, but with the multiple alarm setting option, you can set up to seven different alarms for "His" and "Hers," at whatever day or frequency needed.
ONEPOINT DESIGN
The OnePoint connectors provide the connection to your computer. Connect the standard cable for iPod to the rear of the JBL On Time 200ID unit, and every time you dock your iPod, you'll have a connection for synchronizing.
EVERCHARGE TOPOLOGY
The JBL On Time 200ID speaker dock charges your iPod, even when it's not connected to the computer or the system is off. The system's memory is maintained by a backup battery. Even with the power out, it will provide the alarm function.
COE (COMPUTER-OPTIMIZED EQUALIZATION)
The JBL On Time 200ID system equalization is computer-optimized to provide a rich, complete soundstage.
OCT (OPTIMIZED COMPRESSION TOPOLOGY)
The JBL On Time 200ID radio and loudspeaker dock utilizes a proprietary compression technology to ensure clean, accurate sound at high output levels.
DISPLAY
The large, backlit LCD enables easy viewing and menu navigation. Automatic dimming sets the correct brightness level in any room environment.
4 JBL ON TIME 200iD USER GUIDE
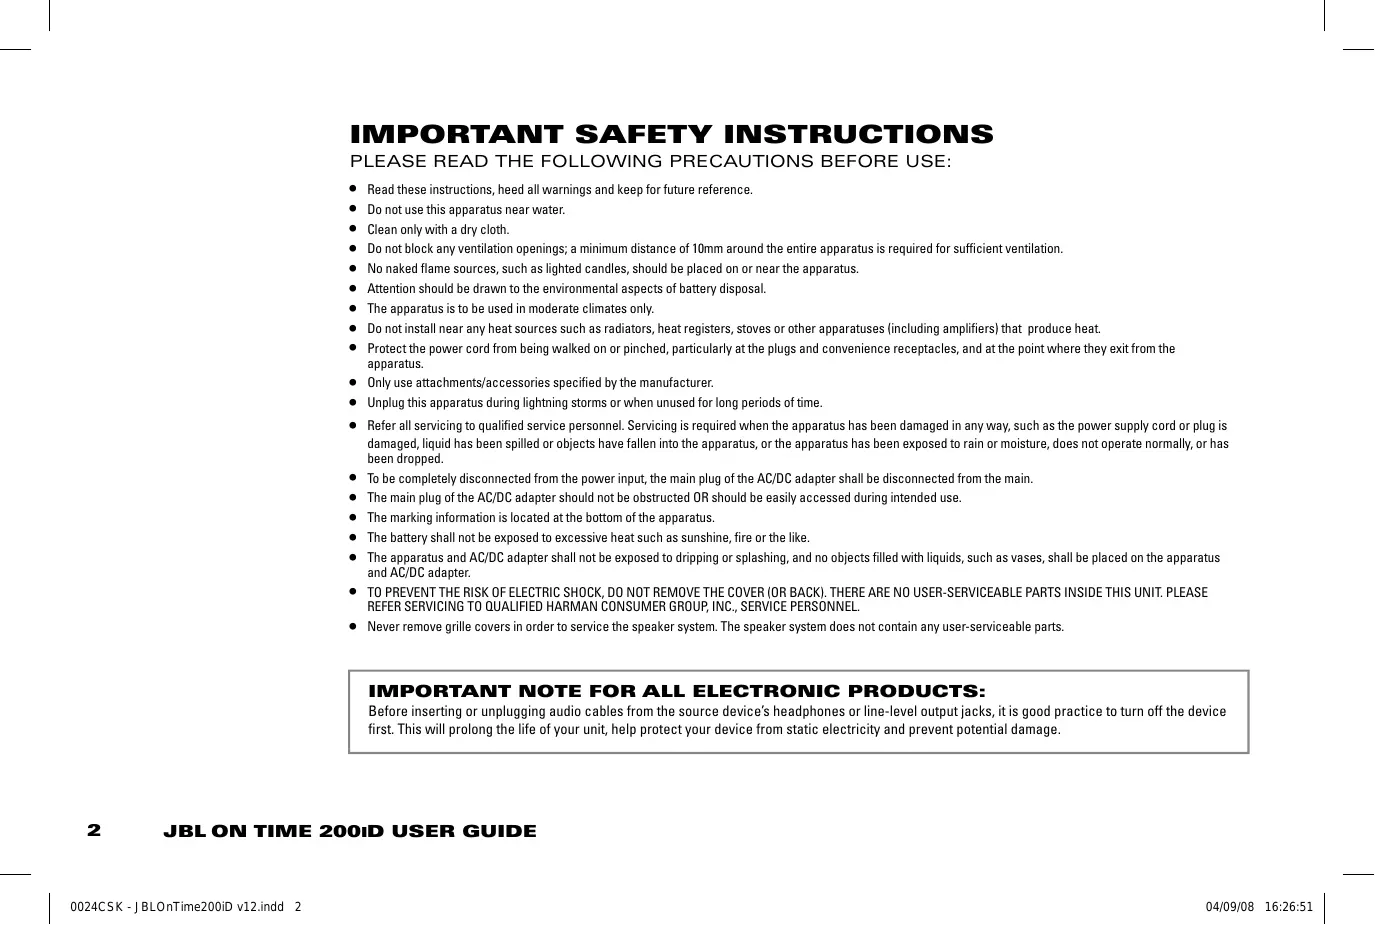
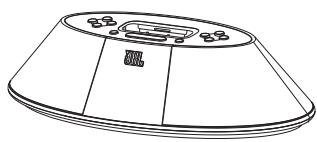
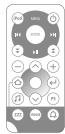
Carefully unpack your speaker system and identify all its components:
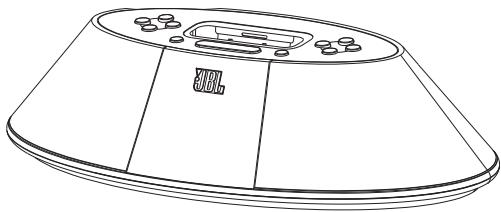
JBL On Time™ 200ID

Adapters for iPod
IR remote

Power supply

FM antenna

Audio cable
AM antenna
QUICK SETUP INSTRUCTIONS
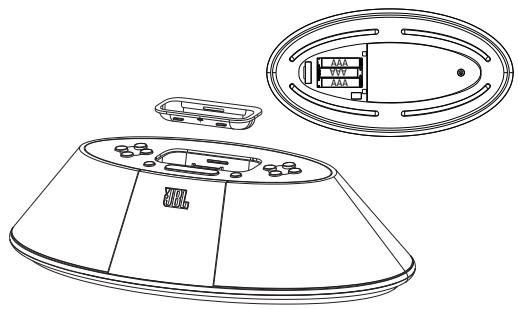
- Choose the appropriate adapter for iPod and place it into the docking station. Then place your iPod into the adapter.
- For backup memory, install three AAA batteries in the battery compartment underneath the unit.
- Connect the external AM antenna for better reception.
- Unwind the FM antenna and straighten the wire for the best reception.
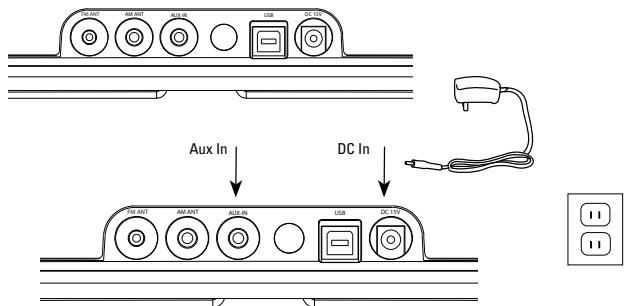
- Plug the power adapter into the "DC In" jack and then plug the adapter into a wall outlet.
- If an additional audio source is used, connect the source to the "Aux In" jack.
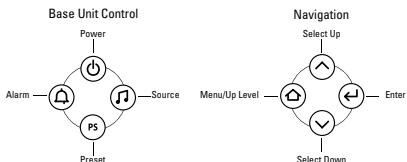
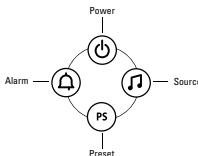
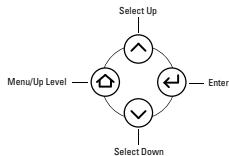
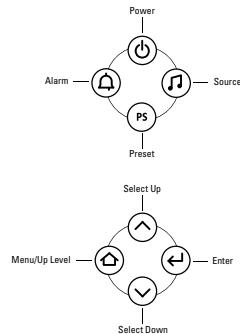
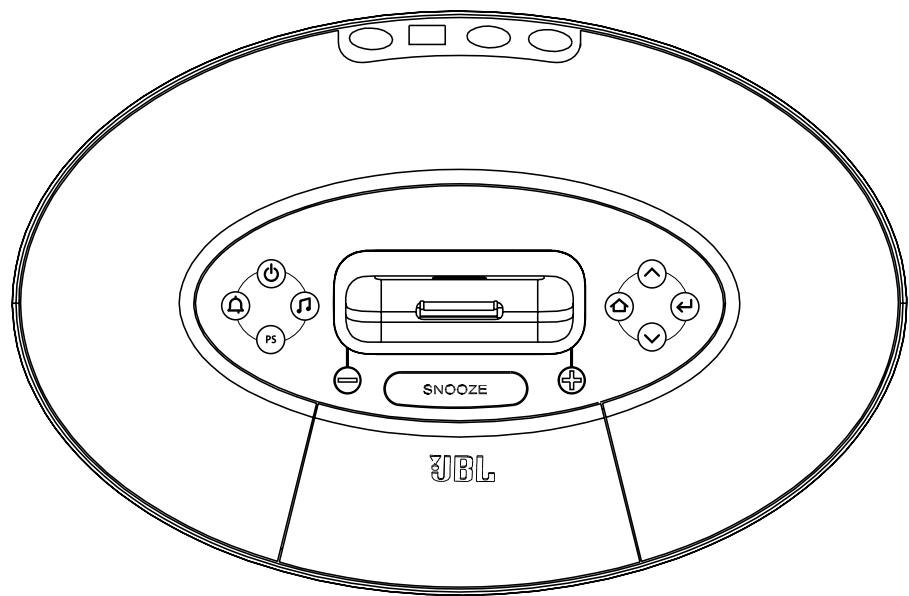
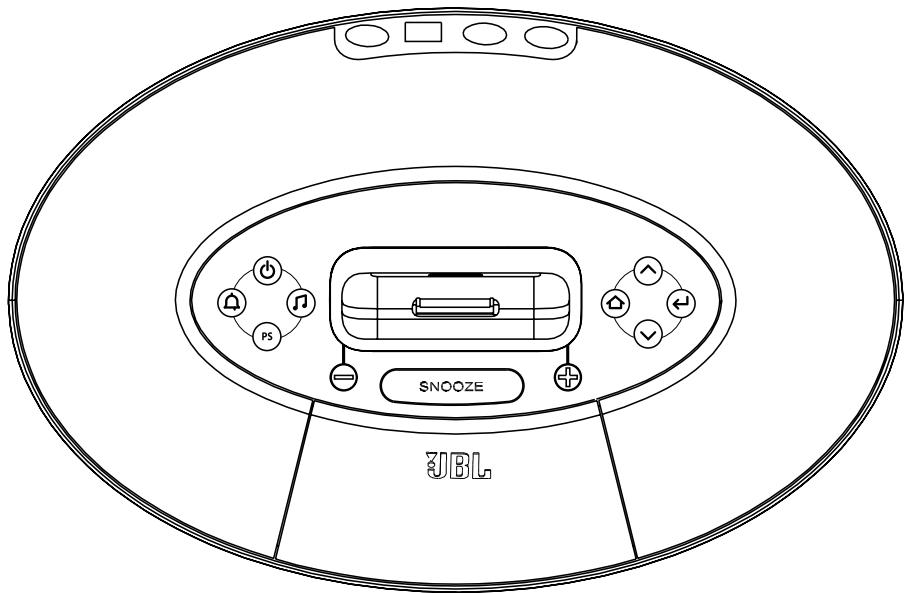
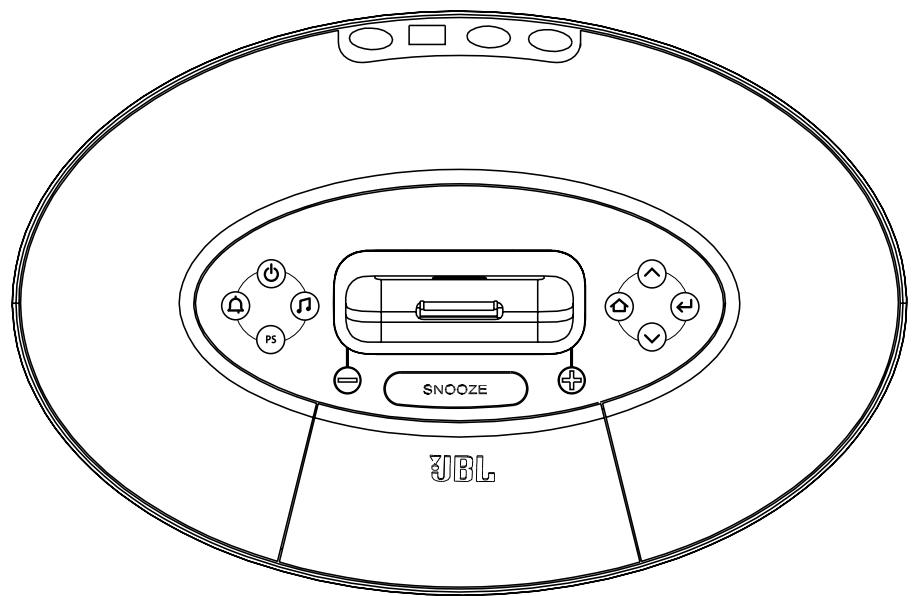
CONTROLS
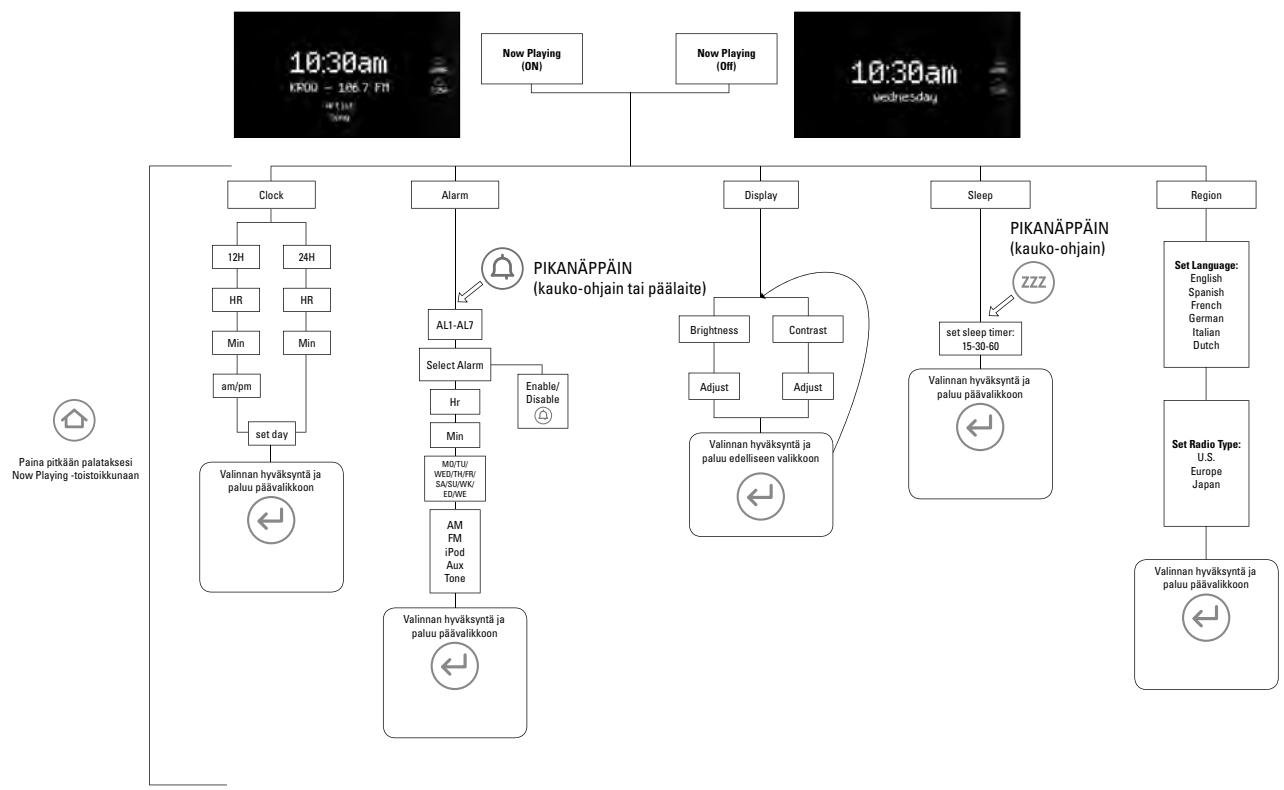
Setting the Clock
- Press Menu/Up Level at any screen to display Top Menu (may require repeated presses, depending on which menu state the unit was previously in).
- Use Up/Down arrows to highlight Clock. Press Enter to confirm.
- Use Up/Down arrows to highlight 12-hour or 24-hour format. Press Enter to confirm.
- Use Up/Down arrows to set Hour. Press Enter to confirm. Minute field becomes highlighted.
- Use Up/Down arrows to set Minutes. Press Enter to confirm. AM/PM field becomes highlighted.
- Use Up/Down arrows to set Day of Week. Press Enter to confirm. The clock is set!
Note: During clock-setting, if there is no user input for 2 seconds, display will return to the Now Playing screen. Press any one of the Enter, Up/Down arrows, or Menu/Up Level to return to setting selection.

6 JBLONTIME200IDUSERGUIDE
Playing Music
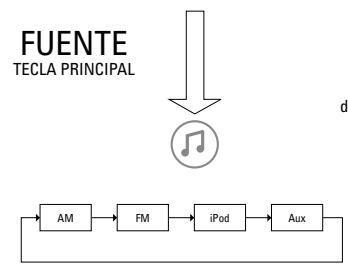
- Press Source button to select the source (iPod, AM, FM, Aux).
- Press "+" button to increase volume.
- Press " - " button to decrease volume.
Languages/Region
- Press the Menu/Up Level button until you reach the Top Menu screen.
- Use Up/Down arrows to select Region and press Enter.
- Use Up/Down arrows to select language. Press Enter.
- Use Up/Down arrows to select radio band region type. Press Enter.
Radio Tuning
- If AM or FM radio is already selected and playing, use Up/Down arrows to tune frequency; hold either button and release to scan for the next station.
- Otherwise, press Source until FM or AM is selected.
- Tune to the desired frequency using Up/Down arrows; hold either button and release to scan for the next station.
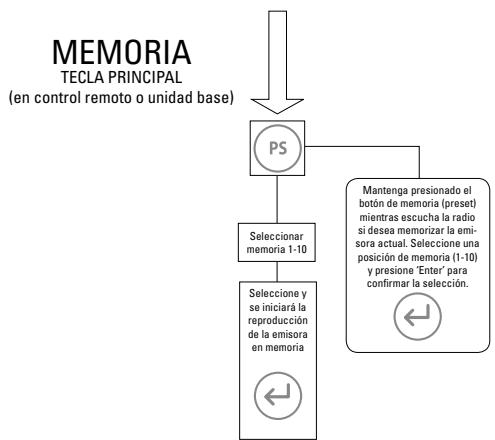
Setting Presets
- While listening to AM/FM radio, press and hold Preset for 2 seconds. The Radio Preset screen will be displayed.
- Use Up/Down arrows to select slot to store preset. Press Enter to confirm. Preset is stored!
To Select a Preset for Listening
- Press Preset once at any screen to display the Preset list.
- Use Up/Down arrows to highlight Preset. Press Enter to confirm. Preset station will begin playing!
CONTROLS (CONT.)
Alarm Setting†
- Press Menu/Up Level at any screen to display Top Menu (may require repeated presses, depending on which menu state the unit was previously in).
- Use Up/Down arrows to highlight Alarm. Press Enter to confirm; or press Alarm to go directly to the Alarm menu.
- Use Up/Down arrows to select an Alarm slot to edit. Press Enter to confirm. Hour field becomes highlighted.
- Use Up/Down arrows to set Hour. Press Enter to confirm. Minute field becomes highlighted.
- Use Up/Down arrows to set Minutes. Press Enter to confirm. AM/PM field becomes highlighted.
- Use Up/Down arrows to set AM/PM. Press Enter to confirm.
- Use Up/Down arrows to set Day of Week, Weekdays, Weekends, Everyday or One-Time. Press Enter to confirm.
- Use Up/Down arrows to set Alarm source. Press Enter to confirm. Alarm is set!
Note: During alarm-setting, if there is no user input for 2 seconds, display will return to the Now Playing screen. Press any one of the Enter, Up/Down arrows, or Menu/Up Level to return to setting selection.
† Use this same procedure to modify a previously set Alarm.
To Enable/Disable a Set Alarm
- Press Menu/Up Level at any screen to display the Top Menu (may require repeated presses, depending on which menu state the unit was previously in).
- Use Up/Down arrows to highlight Alarm. Press Enter to confirm; or press Alarm to go directly to the Alarm menu.
- Use Up/Down arrows to highlight Alarm. Press Alarm to enable/disable the alarm. An icon will be displayed on the left when the alarm is enabled, and the alarm will sound at the set time.
Waking to the iPod
- Use the steps under Alarm Setting and choose "iPod" as the source.
- On your iPod, choose the song you would like to awaken to and press Play.
- Set the volume level on the JBL On Time™ 200ID unit.
- Put your iPod to sleep by holding down the Play/Pause button (older iPod models may vary).
- The JBL On Time 200ID system can be put to sleep by pressing the Power button.
Note: If you choose the last song on your iPod, please place the iPod in repeat mode, which will ensure that the iPod will continue playing past the last song.
8 JBLONTIME200IDUSERGUIDE
Screen Contrast/Brightness
- Press the Menu/Up Level button until you reach the Top Menu screen.
- Use Up/Down arrows to select Display and press Enter.
- Use Up/Down arrows to select Brightness or Contrast. Press Enter.
- Adjust settings using Up/Down arrows.
Note: To set brightness to Auto, press the Down arrow until Auto is highlighted.
Sleep Timer
- Press the Menu/Up Level button until you reach the Top Menu screen.
- Use Up/Down arrows to select Sleep and press Enter.
- Use Up/Down arrows to select minutes and press Enter.
- The sleep timer is started and the unit will power off when the timer reaches zero.
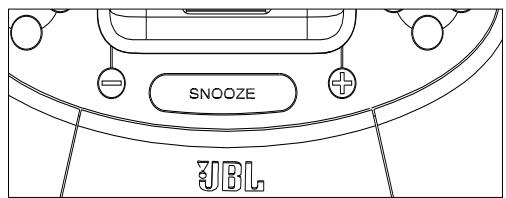
Snoopze Timer Set
- Press and hold the Snooze button for 3 seconds until you reach the Set Snooze Timer screen.
- Use Up/Down arrows to select minutes and press Enter.
- Snooze feature will use this value the next time it is activated.

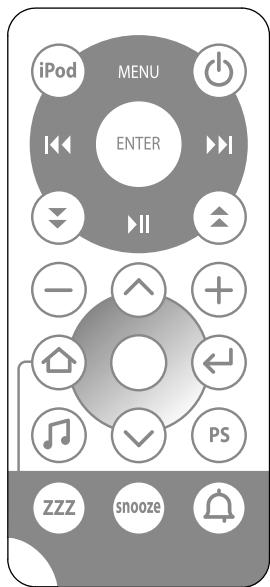
REMOTE NAVIGATION
Button Function
| Turns main unit power on and off. Button is active in any menu state. | |
| PS | Preset the hot key. A single press brings up the preset screen from any menu. Repeated presses cycle through the preset list to the next preset slot. Press and hold for 2 seconds when listening to the radio and the Now Playing screen is displayed, to store current radio station. |
| + | Volume Increase. Display changes to Volume screen. Increases volume level, turns Amps on if off, then increases volume. If in snooze mode, cancels snooze mode and turns Amps on. Times out back to current menu. |
| - | Volume Decrease. If in snooze mode, no action. If not in snooze mode and Amps are on, displays changes to Volume screen and decreases volume level. Times out back to current menu. Does not turn Amps on if off. |
| ← | Enter or Selection Confirmation button. Confirms selection on any JBL On Time~200ID settings screen. If Now Playing screen is displayed, returns to last-used menu screen. |
| Scroll Up/Tune Up. Moves highlighted box up on any JBL On Time 200ID menu setting screen. Increases digit value when setting Time (hours and minutes) and Snooze Timer. In radio mode, manually increases tuning frequency; hold for Seek. | |
| Scroll Down/Tune Down. Moves highlighted box down on any menu setting screen. Decreases digit value when setting Time (hours and minutes) and Snooze Timer. In radio mode, manually decreases tuning frequency; hold for Seek. | |
| Menu or Up Level button. If Now Playing screen is displayed, takes user to top-level menu screen. If in menu settings, steps up one level to previous field or menu screen. Hold for 2 seconds to return to Now Playing screen. | |
| Alarm hot key. Takes user to Alarms settings of menu tree. Button is active in any menu state. If alarm is sounding, turns alarm off. When viewing alarms list, enables or disables selected alarm. | |
| SNOOZ | Snooze button and Snooze Timer setting hot key. If alarm is sounding, enables snooze mode. Press and hold for 2 seconds to enter Snooze Timer setting screen. |
| iPod | Directly switches the JBL On Time 200ID source to iPod. |
| Sends Scroll Down command to iPod navigation. Works in iPod navigation only. | |
| Sends Scroll Up command to iPod navigation. Works in iPod navigation only. | |
| Cycles to next source. AM → FM → iPod → AUX. | |
| ZZZ | A single press starts sleep time countdown, using currently set timer. Press and hold for 2 seconds to enter Sleep Timer setting screen (similar to base unit). |
| Next Track in iPod navigation only. Does not affect JBL On Time 200ID menu navigation or function. | |
| 144 | Previous Track in iPod navigation only. Does not affect JBL On Time 200ID menu navigation or function. |
| ENTER | Enter/Select in iPod navigation only. Does not affect JBL On Time 200ID menu navigation or function. Similar function to the center button of the iPod. |
| MENU | Menu/Up Level in iPod navigation only. Does not affect JBL On Time 200ID menu navigation or function. Similar function to the Menu button of the iPod. |
| II | Play/Pause/Mute button. When iPod is the active source, a single press sends the Play/Pause command to the iPod. When AM, FM or AUX is the active source, a single press mutes audio/ampl on the JBL On Time 200ID system. |
10 JBL ON TIME 200iD USER GUIDE
Power Consumption: 30 Watts maximum
JBL On Time™ 200ID Transducer: Phoenix SE
1-3/4" (45mm) x 2 (full range per channel)
Power: 2 × 6 Watts
Input Impedance: >5k Ohms
Signal-to-Noise Ratio: >80dB
Input Sensitivity: 350mV RMS for rated power output
Power (USA/Canada): 120 Volts, 60Hz AC
Power (Europe/UK): 220 - 230 Volts, 50Hz or 60Hz AC
Power (Japan): 100 Volts, 50Hz or 60Hz AC
Power (Australia): 240 Volts, 50Hz or 60Hz AC
UL/CUL/CE-Approved
Dimensions: 11 - 3 / 16^n× 5 - 3 / 4^n× 2 - 3 / 4^n
(W × D × H) (284mm × 146mm × 70mm)
Weight: 1.8 lb (0.8kg)
Remote Battery: CR2025

DISPOSAL: Do not dispose of this product as unsorted municipal waste. Collection of such waste separately for special treatment is necessary.
IMPORTANT: Use UM4/AAA/LR03 alkaline-type nonrechargeable batteries only.
TROUBLESHOOTING
SOUND QUALITY
| Symptom | Possible Problem | Solution | Note |
| No sound from the JBL On Time® 200ID unit | No power to the unit | Make sure the wall power outlet or power strip has power. Make sure all switches for outlet/ power strip are on and that all switches for speaker system are on. | Is the display on? If not, power is not getting to your JBL On Time 200ID; try the solutions shown. |
| Incorrect source selection | Make sure the correct source is selected; choose FM radio as a source. Turn up the volume. Check the system with a known good source, such as your iPod. Connect the Aux In cable to the headphone jack on your iPod. | ||
| No sound or weak signal from the AM/FM radio | Bad reception from current location | Reposition your JBL On Time 200ID unit until you find better reception. | If you are still getting a weak signal from AM broadcasts, connect the external AM antenna to the AM antenna jack. |
| Interference | Check surrounding area for any possible interference; wrap up any excess cables. | ||
| Sound comes from one side/channel only | iPod or audio cable is not seated properly | Make sure the iPod or Aux In cable is seated all the way into the JBL On Time 200ID unit. | If you want to use a longer cable, make sure it's a 3.5mm mini-jack stereo male-to-male cable. |
| Distortion (static, cracking or hissing sounds) | Noise may be caused by interference from a monitor, cell phone or other transmitting device | Turn monitor off to see whether noise is eliminated. Move JBL On Time 200ID unit's cables farther away from monitor. | |
| JBL On Time 200ID unit is being over-driven by an amplified audio source | Make sure the unit is connected to an appropriate source device. Make sure all signal cables are inserted snugly into receptacles. | ||
| Volume level may be too high | Check volume of source device; some devices will distort the output signal if the volume is set to maximum. | ||
| Too much bass or treble | Check the EQ setting on your iPod or source device | We recommend that the source device EQ be set to Flat or Off. | |
| JBL On Time 200ID unit emits a loud hum or buzzing noise | Input cables are not plugged in properly | Check input cable connection. | |
| Speaker system experiences radio frequency interference or picks up a radio station | Input cable may be picking up interference | Wrap up excess input cable to make it as short as possible. Purchase a ferrite clamp and attach it over the input cable; a clamp can be purchased at your local electronics store. |
TROUBLESHOOTING
CHARGING AND SYNCING
| Symptom | Possible Problem | Solution | Note |
| iPod will not charge | Wrong adapter is used | Make sure correct adapter is used for your specific iPod model. | |
| The iPod is not making full contact with the docking station | Make sure the iPod is seated securely into the docking station. | ||
| iPod is not recognized by the computer when docked into the JBL On TimeTM 200ID unit, or there is an error in data transfer | Third-party accessories may be conflicting with the USB signal | Make sure you do not have the JBL On Time 200ID unit connected to a USB hub; connect the unit directly into the computer's USB port. | |
| USB port is not supplying enough power | Try connecting the USB cable to another port on the back of the computer. |
CLOCK SET AND CLOCK MEMORY
| Symptom | Possible Problem | Solution | Note |
| Clock is not set to correct time | Incomplete setup | Be sure to follow the clock setting procedure through, to the end. A confirmation screen will be displayed when set completely. | |
| JBL On Time 200ID unit does not retain memory settings when there is a power outage, or if the unit is unplugged | There are no batteries installed in the unit | Make sure you install three AAA batteries in the base of the JBL On Time 200ID unit. | |
| Batteries may be low | If you have installed three AAA batteries, replace them, as they may be defective. |
14 JBLONTIME200IDUSERGUIDE
INFORMATIONS IMPORTANTES CONCERNANT LA SÉCURITÉ
VEUILLEZ LIRE LES PRECAUTIONS NOTÉES CI-DESSOUS AVANT UTILISATION
Alimentation (USA/Canada): 120 volts, 60 Hz CA
JBL ON TIME™ 2001D:N VALIKOT (JATKOA)

ESPECIFICACIONES
JBL ON TIME™ 200ID
COE (COMPUTER GEOPTIMALISEERDE EQUALIZATION)
(B x D x H): (11-3/16" x 5-3/4" x 2-3/4")
- Stunst Taier Mefi Chon Hnai Bnai 3o Tn An Snoozr Toe n Rn
- 戎/əra/ro 3. 哈塞尔图 to 4. 求 5. 费
- SsneJGgIeRnD aDmBnBnBnBnBnBnBnBnBnBnBnBnBnBnBnBnBnBnBnBnBnBnBnBnBnBnBnBnBnBnBnBnBnBnBnBnBnBnBnBnBnBnBnBnBnBnBnBnBnBnB
京
専述
(284mm x 146mm x 70mm)
乌盖:1.8和二元(0.8kg)
员猿匝越:CR2025

用:i:1J
i.
本题解法
上
LYNSYMBOLI
TREKANT ADVANT MOD FARLING
AFTER THE FATE
APPEARATE!
ADVARSEL
RISIKO FOR ELEKTRISK STOD - MA IKAKE ABNSES
ADVARSEL FOR AT REDUCERE RISIKO FOR ELEKTRISKSTODMA SVOBET ALDRIGFJERNDES.INDE APPARATAFTINDEESIT INTEL SOMAKVICERES OF BRUGEREN.ALSERVICE HENVISES TILAUTURISERET VARKSTED.

UDRASTEGN I
TREKGN BORG
DEP. 10005
OPMAKRKSOM PAI
AT DER FIGLSE
VOTIGLE INSTRUKTIONAL
PRODUKTET
ADVARSEL: FOR AT FOREBODYGELEKTRISK STOED ELLER BRAND, MA APPARATETIKKE UDSAETTES FOR VASKER ELLER FUGT.
ADVARSEL: APPARATET M Å IKKE UDSÄTTES FOR DRYP ELLER STÄNK OG GEN-STANDE SOM INDEHOLDER VÅSEK M Å IKKE STILLES P A APPARATET.
VIGTIG:
EN KORREKT ADAPTOR SKAL VAERE INSTALLERET INDEN EN iPod TILSLUTTRES JBL PRODUKTET.iPod KONNEKTOREN SKAL VAERE KORREKT PLACERET VED JBL PRODUKTETS KONNEKTOR VED TILSLUTNING AF iPod. OVERHOLDES DETTE IKKE, KAN DER SKE PERMANENT SKADE PÀ iPod KONNEKTOREN SOM GOR iPod UBRUGELIG.
JBL ON TIME™ 2001D
OCT (OCTCONPLESHON回路)
(W × D × H) (284mm × 146mm × 70mm)
重量:1.8 lb (0.8kg)
LMO-1BbTJER:CR2025

3NEKTPVHECKM TOKOM HE
CHIMANTE Kpbllky. BHYTPN
10CYCTB9Y3JINVACIM
KOTOPETIUBSSOBATEB
CAMOCTOTETLHIO
05COTYOKBAHME CDEJIMAIHNO
NODOTOBIEHHOMY
TEXHMNECKOMY TIEPCOHAM

BCKNMLJATEJIbHbM
SHAK B
TPEYIOIBHMK
TIPEYIPEXIAE
PAHOMYM235FPMG
DPADAMOTCS
BAXHNE
INHCTPYKLM
OCTOPOXHO:BOV36EXAHME
BOCIPLAMEHEHINIINIPOXAHEHIN
3JEKTPNUECKM TOKOM N3BETAHTE PONADAHIN
HAH3DEJINEIOXIDNINBIAI.
OCTOPOXHO: I36E7AITEI0NAHINHA
APAPATPYBpI3NKAPEJIb.3APPEJEAETCR
CTABNTb HA ANIAPATPY NPEDMETbl.
HANOJIHEHHbIe XNIDKOCTbIO, HANIPIMEP, BA3bl
BAXKHO:HEO6XIDIMO YCTAHOBITb COOTBETCTBYIOUIM AADANTEP
NEPED BKJIOUHHEM BAWETO NOPTATUBHO TO MDAI PONIPBIBATEJI
I Pod B IN3DEJINE IPON3BODCTBA KOMPAHNI JBL. YBEINTECB, YTO
KOHHEKTOPIQPATAHBHOTo MEDNA IPOONTPBIBATEJIPoD PABINbHO
OTUHTPPOBAH C KOHHEKTOPOM I3DEJIMI PPOUM3BOIDCTBA
KOMNAHIN JBL IPEDET, KAK YCTAHABJIMBATb BAI iPod.
HECOBJIODEHNE BbIeIPINBEDEHHbIX TPEBOAHM MOXET PNBECTN
K IIOJOMKE KOHHEKTOPA IOPTATUBHOTO MEDINA IPOINIPBATEJIy iPod.
YTO CIDEAET HEBO3MOXHBIM EFO DAJIbHEIUYIO 3KCIJIYATALINI.
JBL ON TIME™ 2001D
Akyctuuecka CnCTema JBL On Time™ 200ID npedna3aHcHe dIra pa6oTbI c npotaBbIM Meia npoiRpbIbATElem iPod, ochaene BaICOKokaeeCTBeHHbIMM DInHAMKAMM, YacamN paIIO. CnCTema JBL On Time 200ID BHOIT nepeBOPOT B TO, KaK Bbl CNyuaete padio, noIb3yeTeCb CBOIM iPod nI npocbinaeTecb Pocne xOPOwero HOnHoro CHa.
Cnctema JBL On Time 2001D - 3TO peboIouaB nyeTeWeCTbMn BO BpeMeHn. PpeCTabTBe Ce6e, YTO Bbl npocbIaeTecb NO My3bky CBOE IIObIMo PAIOCTAHcNm NIN CBOero IPoA, a He noPn HADOBeWbI 3yMMep NIN TpeCK PAIOIPOMEK. KOMNAkTHAR MaIIHn BpeMeHn CO BCTPOEHbIM 3BYKObIM CEHTPOM CoeIHENHaC BAWMi IPo, MP-3 NpEEPOM INn DpyTm NCTOHNcM OMy3bIKu, CO3DaET NtCBY, MOUHb3 3ByK, COxPAHr PN3OTM Bo3MOXHOCTN XPOHOMETpaX, bdyINbHNa I n pAOIOPIeMHNka. CnCTema PpeCTABTAE TOCBIpeBvO B MPeMaUNHy BpeMeHn C INHTYNBHO-NOHRTHBM NIObBOATEBckm INTEPpehcom, nepeMeaTa5cNo KO TOTOPOM NeJeCe OBkHOBEHNGo.
B akyctuiecko ciTeMe JBL On Time 2001D peaIIm3yetcB O3MOKHOCTb IONHOrO ynpabLeHn oNpTaTHBbIM MeMaI npOnrPbIbATEeM iPod c nomouhOpnyIbTa dIcTahUIOHnHO IK-ynpaBHeHn. KpOme TOrO,OTbIHe Bbl MoKTe He ToIbKO pOcsbIaTcB NOD My3bIK CBoEJIIObMoI paINoCTAHm INI neChnHa npotATNBOM MediAnpOirPbIbATEe iPod, Hn 3aDaTb CeMb pa3bIX CInHANOB 6dyINbHnKa DnA "Hero" N"HeE", B IIOBOe BpeM dHn Ha IIOboJ YactOTE.
ODHOTOUEHbI IN3AHN
OndnochneKnHKeTOpbl iPod oecneuBaOT coeHNHeHc n BaWIM KOMbIOTepm. PincoeHNITE cTaHdpThn Ka6eB Apple iPod K pa3bemy Ha 3aDne yactn ycToBBA JBL On Time 200ID, nKaXdb pa3, noKIOyCBoN npTaMbHm Medna npOnrpbIbTeIb iPod, bI npLyyeTe CnHXpOHoe coeHNHeHne.
TONOJORMA NOCTOHHOH NO3APRANK
Modylb JBL On Time 2001D npoH3BODHT no3ap4ky Bawaero npotatmbHO ro Medna npoiRpbBaTeJy iPod, daXe ecnTo TOT He npinoCoeINHe K KOMTbOtepy, nIe cnc SiCTema BbKJIUcHema. PamrB CNTembl no3depXnBAeTcpe3epBHO 6aTaee abTOHOMH IO3ap4Kn. DaXe npi BbIKIOueHHOM pntAHm OHa oBeocneuBaet pa6Ory 6dynlhNka.
OK3 (ONTMN3NPYEMbI KOMNbIOTEPOM 3KBAJIAM3EP)
B akyctueckon cncteme JBL On Time 2001D kBaJau3ep onTNm3npyeTc KOMbIOpom, BbIaBaI coHbI, 6oraTb 3ByK.
OTC (ONTUMN3NPOBAHHA TONOJIOJNA CXKATNA)
B akyctuueckoi cncTeMe JBL On Time 200ID nCnoIb3oBaHa yHnKaIbHa TExHoIgTu CxAty, oBeCneUHaOuaa 3ByK BbICOKoi YcCTObl Ha 6OJIbIoI rPOMKOCTN.
ДИСПЛЕМ
BoIbIooJ, xNIOKOKPcTaNIIuYeckn IINcIeI c NODCBETKO ObecNeuBaET IeKNI PPOCMOTp INpeMeueHne NO MeHIO. ABTOMATNUeCKOE IN3MeHHe RPKOCTV DInCITPE peaMpyet Ha IIObO yPoBeHb OCBSeHHOCTN NOMeUHIN.
144 JBL ON TIME 200iD USER GUIDE
IPEBAPITEJIbHO3ADAHHAR
TOUKA “TOPRAYEN” KJABINSHI
TEXHNUECKHEXAPAKTEPNCTNKN
JBL ON TIME™ 200ID
YactoTHbIe xapaKTePcHmKn:70Tg-20KtG
Iotppe6nemma Moohoctb: 30 Bt MaKcMymM
BbXIDHnA HcyBCTBHTeNbHOCTb:350MBCK3dHOMHaJIbHO BbIXOHDMOUHOCTN
Pa3Mepbl: 11-3/16" x 5-3/4" x 2-3/4"
CtpaHa n3rOToBnEHH Ktai
SÄKERHETSFÖRESKRIFTER
LÄS FÖRST FÖLJANDE SÄKERHETSFÖRESKRIFTER:
Ström (Australian): 240 V, 50 Hz erler 60 Hz AC
UL-/CUL-/CE-märkt
Matt: 11-3/16" x 5-3/4" x 2-3/4"
(B × D × H) (284 mm × 146 mm × 70 mm)
Vikt:0,80 kilo
Batteri f järkrkontrollen: CR2025

AVFALLSHANTERING: Slang
CLOCK SET AND CLOCK MEMORY
JBL ON TIME™ 200iD:N VALIKOT
JBL ON TIME™ 200iD:N VALIKOT (JATKOA)
PIKAVALINTA
ADVARSEL: APPARATET BØR IKKE UT-SETTIES FOR DRYPPING ELLER PLASK, OG INGEN OBJEKTER FYLTD VAESKE, SOM VASER, BØR PALLSERES PÅ APPARATET.
VIKTIG: RIKTIG ADAPTER MÅ INSTALLERES FØR DU
PLASSERER DIN iPod I JBL®-PRODUKTET. FORSIKRE DEG OM AT iPod KOPLING ER RIKTIG RETTET INN I FORHOLD TIL JBL-PRODUKTETS KOPLING FDR INSTALLASJON AV iPod. HVIS IKKE SIRIKERER MAN PERMANENT SKADE P iOS iPod KOPLING SOM VIL GJORE DEN UBRUKELIG.
JBL ON TIME™ 2001D
Still inn snooze-timer
(W × D × H) (284mm × 146mm × 70mm)
Vekt: 1.8 lb (0.8kg)
Batteri til fjernkontrollen: CR2025

AVHENDING: Dette Produktet må
KLOKKEINNSTILLING OG KLOKKEMINNE
| symptom | mulig problem | løsning | merk |
| Klokken er ikke stilt til riktig tid. | Ufullstendig opsett. | Forsikre deg om at du fullfærer prosedyren for still-ing av klokken. En bekreftelse vil bli gitt på displayet nár opsettet er komplet. | |
| JBL On Time 2001D-enheten beholder ikke minnet ved strømbrudd eller frakobling. | Batterier er ikke installer i enheten. | Forsikre deg om at du installerer tre AAA-batteri i JBL On Time" 2001D-enheten. | |
| Svake batterier. | Hvis du har installer tre AAA-batteri, bytt dem ut da de kan varne defekte. |
JBL
JBL is a trademark of Harman International Industries, Incorporated, registered in the United States and/or other countries.
JBL On Time is a trademark of Harman International Industries, Incorporated.
iPod, Apple and iTunes are trademarks of Apple Inc., registered in the U.S. and other countries. "Made for iPod" means that an electronic accessory has been designed to connect specifically to iPod and has been certified by the developer to meet Apple performance standards. Apple is not responsible for the operation of this device or its compliance with safety and regulatory standards.
Harman Consumer Group, Inc.
8500 Balboa Boulevard, Northridge, CA 91329 USA
516.255.4525 (USA only)
www.jbl.com
© 2008 Harman International Industries, Incorporated. All rights reserved. Tous droits réservés.
Document Number: 950-0232-001 REV.B
H A Harman International Company
R
- IMPORTANT SAFETY INSTRUCTIONS
- IMPORTANT NOTE FOR ALL ELECTRONIC PRODUCTS:
- JBL ON TIME 200iD USER GUIDE
- FCC STATEMENT AND WARNING
- CAUTION
- IMPORTANT:
- JBL ON TIME™ 2001D
- ONEPOINT DESIGN
- EVERCHARGE TOPOLOGY
- COE (COMPUTER-OPTIMIZED EQUALIZATION)
- OCT (OPTIMIZED COMPRESSION TOPOLOGY)
- DISPLAY
- JBL ON TIME 200iD USER GUIDE
- QUICK SETUP INSTRUCTIONS
- CONTROLS
- Setting the Clock
- JBLONTIME200IDUSERGUIDE
- Playing Music
- Languages/Region
- Radio Tuning
- Setting Presets
- To Select a Preset for Listening
- CONTROLS (CONT.)
- Alarm Setting†
- To Enable/Disable a Set Alarm
- Waking to the iPod
- JBLONTIME200IDUSERGUIDE
- Screen Contrast/Brightness
- Sleep Timer
- Snoopze Timer Set
- REMOTE NAVIGATION
- JBL ON TIME 200iD USER GUIDE
- TROUBLESHOOTING
- CLOCK SET AND CLOCK MEMORY
- JBLONTIME200IDUSERGUIDE
- INFORMATIONS IMPORTANTES CONCERNANT LA SÉCURITÉ
- JBL ON TIME™ 2001D:N VALIKOT (JATKOA)
- ESPECIFICACIONES
- COE (COMPUTER GEOPTIMALISEERDE EQUALIZATION)
- 京
- 本题解法
- ADVARSEL
- VIGTIG:
- OCTOPOXHO:BOV36EXAHME
- OCTOPOXHO: I36E7AITEI0NAHINHA
- BAXKHO:HEO6XIDIMO YCTAHOBITb COOTBETCTBYIOUIM AADANTEP
- ODHOTOUEHbI IN3AHN
- TONOJORMA NOCTOHHOH NO3APRANK
- OK3 (ONTMN3NPYEMbI KOMNbIOTEPOM 3KBAJIAM3EP)
- OTC (ONTUMN3NPOBAHHA TONOJIOJNA CXKATNA)
- ДИСПЛЕМ
- JBL ON TIME 200iD USER GUIDE
- TEXHNUECKHEXAPAKTEPNCTNKN
- SÄKERHETSFÖRESKRIFTER
- AVFALLSHANTERING: Slang
- JBL ON TIME™ 200iD:N VALIKOT (JATKOA)
- PIKAVALINTA
- JBL
- Harman Consumer Group, Inc.
- www.jbl.com
Brand : JBL
Model : OT-200ID
Category : Alarm clock radio