
CP-2EX - Speaker Stand PIONEER - Free user manual and instructions
Find the device manual for free CP-2EX PIONEER in PDF.
| Product Type | Speaker Stand |
| Brand | Pioneer |
| Model | CP-2EX |
| Dimensions (W × H × D) | 400 × 604 × 513 mm |
| Weight | 17.8 kg |
| Material | Steel with black finish |
| Maximum Recommended Load | 29 kg |
| Speaker Compatibility | S-2EX and other speakers up to 29 kg |
| Speaker Mounting | Screws supplied for direct mounting or with decoupling spikes |
| Decoupling Spikes | 8 spikes with nuts and 8 bases included |
| Number of Screws Supplied | 24 M6×L40 screws, 4 M5×L62 screws, 4 M5×L36 screws |
| Other Accessories | 4 washers, 4 spring washers, instruction manual |
| Maintenance | Dry cloth or diluted neutral detergent |
| Safety Precautions | Use only the supplied screws; assemble on a flat and stable surface; do not exceed 29 kg |
| Recycling | Do not dispose of with household waste; follow local regulations |
Frequently Asked Questions - CP-2EX PIONEER
User questions about CP-2EX PIONEER
0 question about this device. Answer the ones you know or ask your own.
Ask a new question about this device
Download the instructions for your Speaker Stand in PDF format for free! Find your manual CP-2EX - PIONEER and take your electronic device back in hand. On this page are published all the documents necessary for the use of your device. CP-2EX by PIONEER.
USER MANUAL CP-2EX PIONEER
Pioneer sound.vision.soul
CP-2EX
Speaker Stand / Socle d'enceinte / Lautsprecherständer / Base per diffusori / Luidsprekerstandaard / Soportes de altavoz / Suporte para colunas / Högtalarstativ / Højttalerstativ / Høyttalerstativ / Kaiutinjalusta / Стойка под динамик
Discover the benefits of registering your product online at www.pioneer.co.uk (www.pioneer-eur.com). Découvrez les nombreux-avantages offerts en enregistrant votre produit en ligne maintenant sur www.pioneer.fr (ou www.pioneer-eur.com). Bitte nutzen Sie die Möglichkeit zur Registrierung Ihres Produktes unter www.pioneer.de (oder www.pioneer-eur.com) Registra il tuo prodotto su www.pioneer.it (o www.pioneer-eur.com) e scopri subito quali vantaggi puoi ottenere! Ontdek nu de voordelen van online registratie! Registreer uw Pioneer product via www.pioneer.nl - www.pioneer.be (of www.pioneer-eur.com) Registre su producto en www.pioneer.es (o en www.pioneer.eur-com) Descubra los beneficios de registrarse on-line: Registe o seu produto em www.pioneer.pt (ou em www.pioneer-eur.com). Descubra as vantagens de o fazer agora on-line. Registrera din produkt på www.pioneer.se (eller på www.pioneer-eur.com). Upptäck fördelarna med att göra det on-line nu. Registrer dit produkt på www.pioneer.dk (eller www.pioneer-eur.com). Oplev fordelene ved at gå online nu. Registrer produktet ditt på www.pioneer.no (www.pioneer-eur.com). Oppdag fordelene med dette på nettet i dag. Rekisteröi tuote sivustossa www.pioneer-eur.com. Tutustu nyt online-rekisteröi tymisen etuihin. Зарегистрируйте Ваше изделие на www.pioneer-rus.ru (или www.pioneer-eur.com). Ознакомьтесь с преимуществами регистрации в Интернет
Operating Instructions / Mode d'emploi / Bedienungsanleitung / Istruzioni per l'uso / Gebruiksaanwijzing / Manual de instrucciones / Manual de instruções / Bruksanvisning / Brugsanvisning / Bruksanvisning / Käyttöohjeet / Инструкции по эксплуатации
Thank you for buying this Pioneer product. Please read through these operating instructions for proper assembly and use. After you have finished reading the instructions, put them away in a safe place for future reference.
Before you start
Before setting up your speaker system, we recommend reading the operating instructions for your system thoroughly.

Caution
- Only use the screws supplied when fixing the speaker to the speaker stand.
- Do not place the stand on an unstable and/or sloping surface. The stand and speaker may fall and cause injury.
- Do not use with any speaker system other than the one for which the unit was designed. The stand may collapse and be damaged and/or the speaker may fall and cause injury.
- When moving the speaker and stand, first remove the speaker from the stand, and then move the stand, holding it by the two stems.
Installing the speaker stands
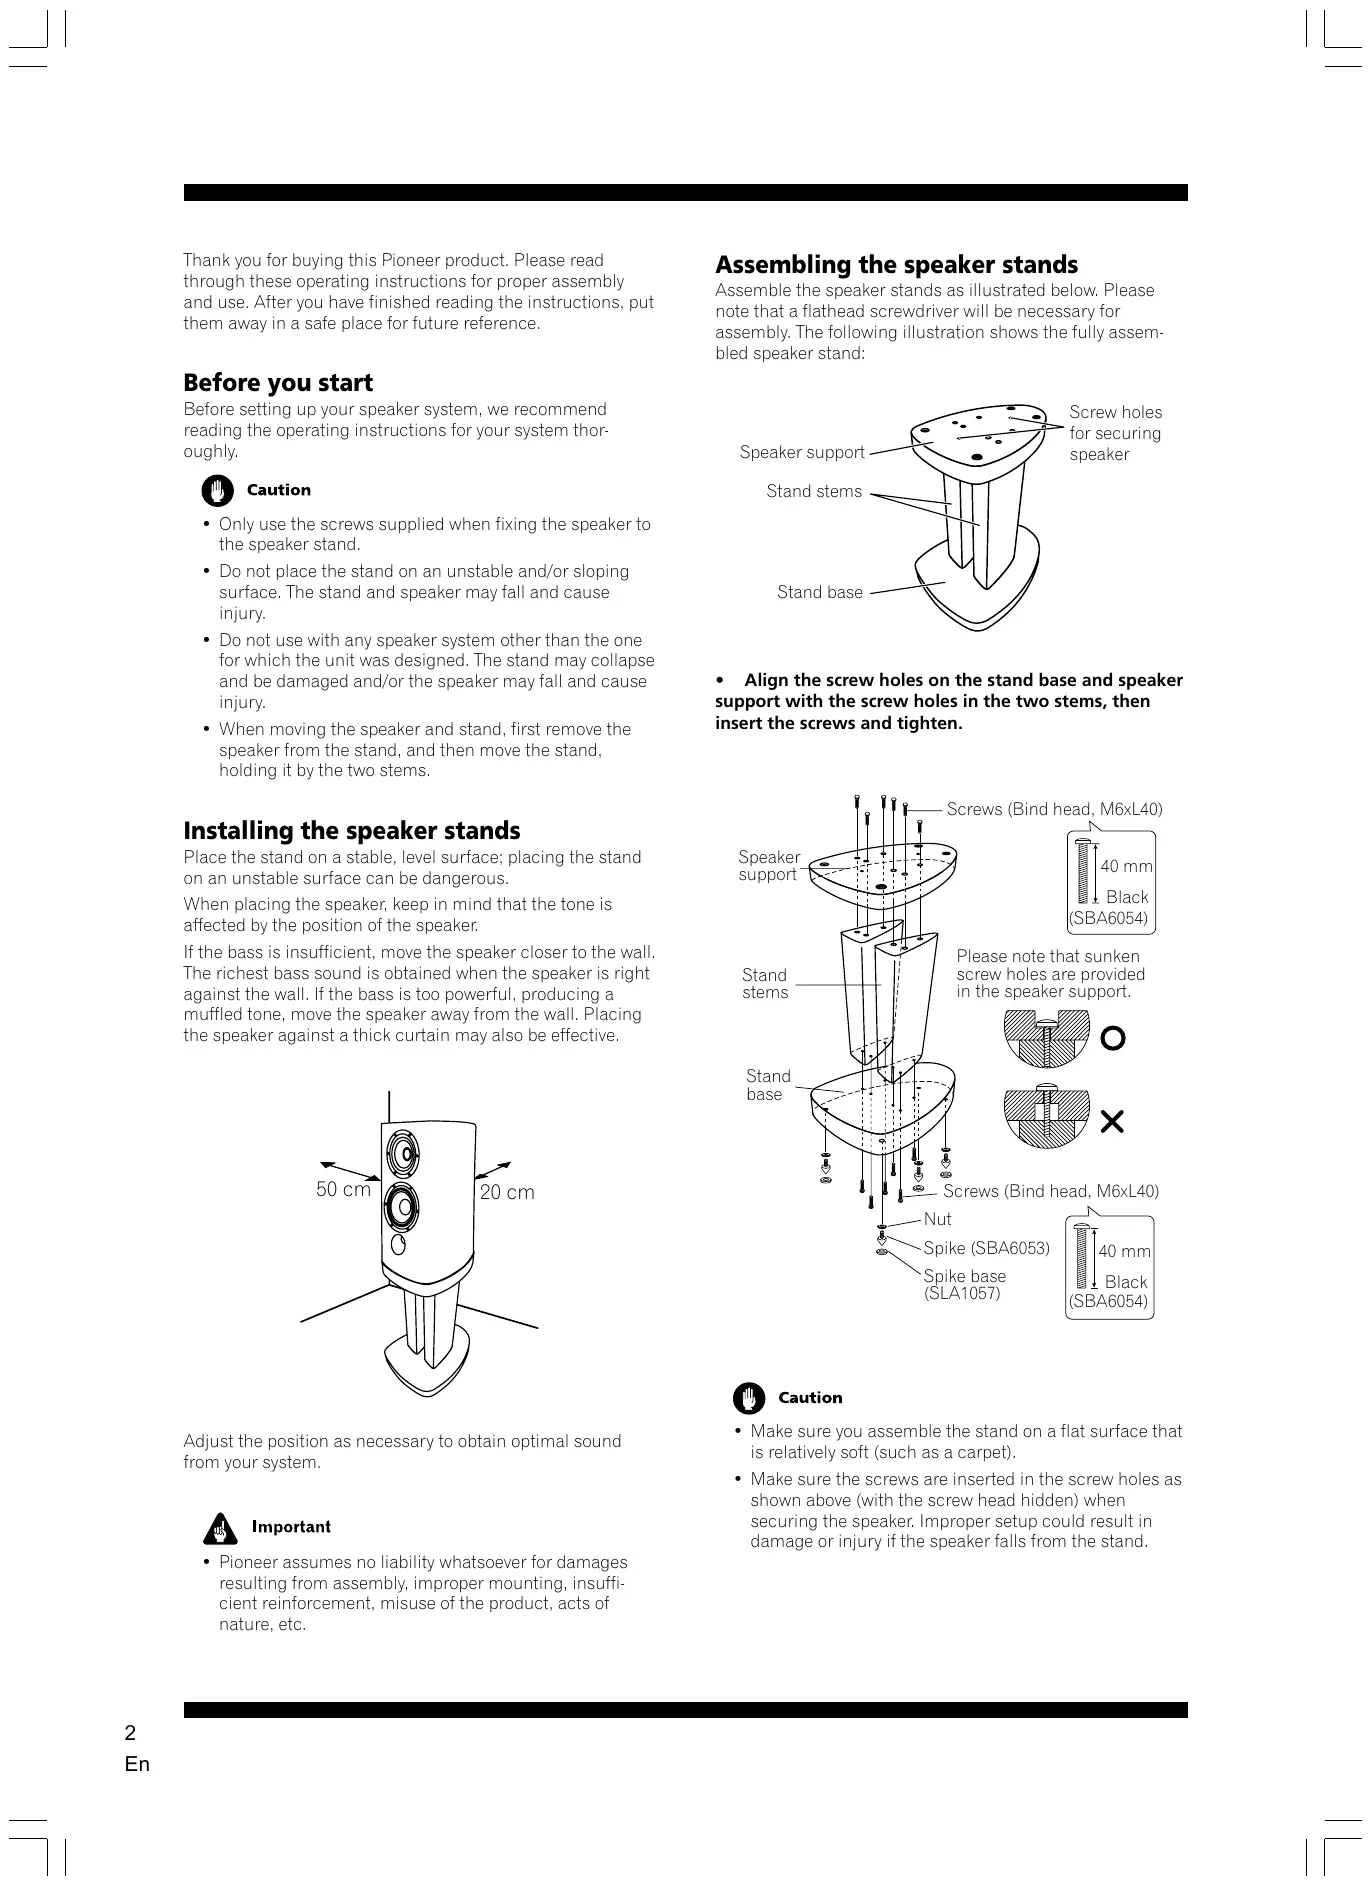
Place the stand on a stable, level surface; placing the stand on an unstable surface can be dangerous.
When placing the speaker, keep in mind that the tone is affected by the position of the speaker.
If the bass is insufficient, move the speaker closer to the wall. The richest bass sound is obtained when the speaker is right against the wall. If the bass is too powerful, producing a muffled tone, move the speaker away from the wall. Placing the speaker against a thick curtain may also be effective.
text_image
50 cm 20 cmAdjust the position as necessary to obtain optimal sound from your system.

Important
- Pioneer assumes no liability whatsoever for damages resulting from assembly, improper mounting, insufficient reinforcement, misuse of the product, acts of nature, etc.
Assembling the speaker stands
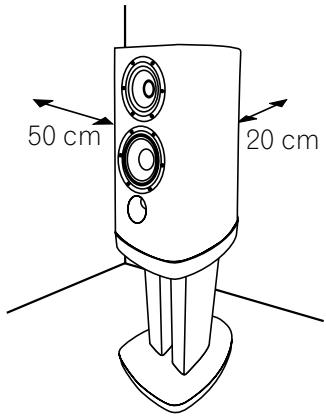
Assemble the speaker stands as illustrated below. Please note that a flathead screwdriver will be necessary for assembly. The following illustration shows the fully assembled speaker stand:
text_image
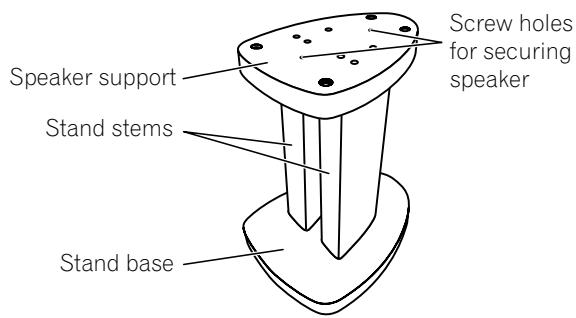
Screw holes for securing speaker Speaker support Stand stems Stand base- Align the screw holes on the stand base and speaker support with the screw holes in the two stems, then insert the screws and tighten.
text_image
Screws (Bind head, M6xL40) Speaker support Stand stems Stand base Please note that sunken screw holes are provided in the speaker support. Screws (Bind head, M6xL40) Nut Spike (SBA6053) Spike base (SLA1057) 40 mm Black (SBA6054) 40 mm Black (SBA6054)
Caution
- Make sure you assemble the stand on a flat surface that is relatively soft (such as a carpet).
- Make sure the screws are inserted in the screw holes as shown above (with the screw head hidden) when securing the speaker. Improper setup could result in damage or injury if the speaker falls from the stand.
Using the spikes
The speaker stands include spikes that you can use to isolate the speaker from the floor. Spikes are recommended when placing the stand on a thick carpet (for added stability), or for better sound when placing the stand on a hard reverberant surface (such as a concrete or wood floor). Use the supplied spike bases to avoid scratching the floor or other surface where the stand is placed.

text_image
Stand base plate 1 Spike ↑ Nut1 Attach the spikes to the nuts provided.
2 Attach all four spikes to the threaded metal inserts at the base of the speaker stand.
3 Choose the location for speaker placement then put the spike bases on the floor.
4 Place the stand so that the spikes are resting on the spike bases on the floor.
Before placing the speaker on the speaker stand, make sure the stand is stable and resting squarely on all four spikes.

Caution
- Note that these spikes are sharp metal and can cause damage to flooring. Make sure to lay down a cloth or suitable base before setting up.
- The spike bases should be placed as shown below (with the depression on the top side).
- Make sure to use the spike bases provided to avoid damaging the surface where you place the stand.
Attaching speakers to the stands
To avoid accident or injury, please use screws to secure the speakers to the speaker stands.
Assembly with the S-2EX speaker system
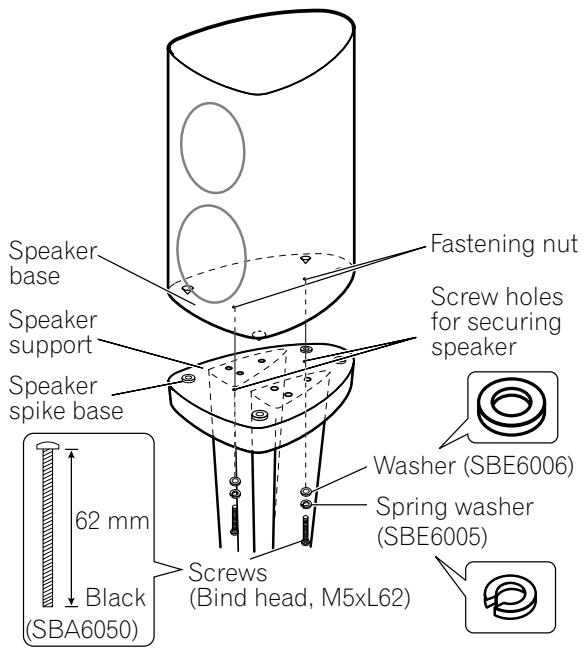
If you are using the S-2EX speaker system, note that there is a fastening nut provided on the speaker base (see below).
When using speaker spikes:
Place the speaker spike bases in the four holes provided on the speaker support, then secure the speaker to the speaker support using the washer, spring washer and the 62 mm screws as shown below.
text_image
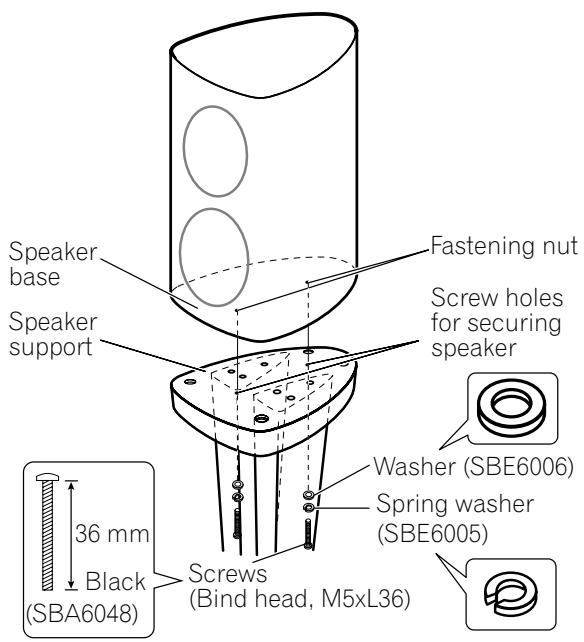
Speaker base Speaker support Speaker spike base 62 mm Black (SBA6050) Screws (Bind head, M5xL62) Fastening nut Screw holes for securing speaker Washer (SBE6006) Spring washer (SBE6005)When not using speaker spikes:
Secure the speaker to the speaker support using the washer, spring washer and the 36 mm screws as shown below.
text_image
Speaker base Speaker support Fastening nut Screw holes for securing speaker Washer (SBE6006) Spring washer (SBE6005) 36 mm Black (SBA6048) Screws (Bind head, M5xL36)Assembly with a separate speaker system
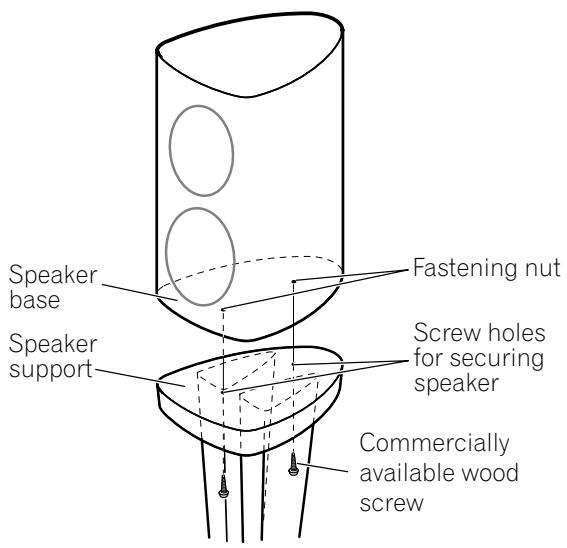
If you are using a speaker system other than the S-2EX, note that you will have to use a hand drill (or the like) to make holes on the speaker base to secure it to the stand. Make sure the speaker weight does not exceed 29 kg.
After making holes on the speaker base where indicated (make sure they line up with the screw holes on the speaker support), secure the speaker to the speaker support using commercially available wood screws as shown below.
text_image
Speaker base Speaker support Fastening nut Screw holes for securing speaker Commercially available wood screwCabinet and stand maintenance
- Use a polishing cloth or dry cloth to wipe off dust and dirt.
- If the cabinet or stand is very dirty, use a soft cloth dipped in some neutral cleanser diluted 5 or 6 times with water. Finally, wipe again using a dry cloth. Do not use furniture wax or cleaners.
- Never use thinners, benzine, insecticide sprays and other chemicals on or near the cabinet or stand, since these will corrode the surfaces.
Specifications
External dimensions ..... 400 (W) x 604 (H) x 513 (D) mm Weight ..... 17.8 kg
Supplied accessories
Stand base plates 2
Speaker supports 2
Stems 4
Spikes (with attached nuts) [SBA6053] 8
Spike bases [SLA1057] 8
Screws (Bind head, M5xL62) [SBA6050] 4
Screws (Bind head, M5xL36) [SBA6048] 4
Screws (Bind head, M6xL40) [SBA6054] 24
Spring washers [SBE6005] 4
Washers [SBE6006] 4
These operating instructions [SRD6045] 1

Note
- Specifications and design subject to possible modification without notice, due to improvements.
- The product number are listed above in square brackets.
Replacement part numbers
| Part name | Part no. |
| • Protector (Bottom) | SHA6095 |
| • Protector (Middle) | SHA6096 |
| • Protector (Top) | SHA6097 |
| • Protector | SHA6098 |
| • Packing case | SHG6150 |
| • Protection sheet | SHC6044 |
| • Protection sheet | SHC6045 |
| • Protection sheet | SHC6046 |

If you want to dispose this product, do not mix it with general household waste. There is a separate collection system for used electronic products in accordance with legislation that requires proper treatment, recovery and recycling.
Private households in the 25 member states of the EU, in Switzerland and Norway may return their used electronic products free of charge to designated collection facilities or to a retailer (if you purchase a similar new one).
For countries not mentioned above, please contact your local authorities for the correct method of disposal.
By doing so you will ensure that your disposed product undergoes the necessary treatment, recovery and recycling and thus prevent potential negative effects on the environment and human health.
Published by Pioneer Corporation.
Copyright © 2005 Pioneer Corporation.
All rights reserved.
Publication de Pioneer Corporation.
© 2005 Pioneer Corporation.
natural_image
Four technical diagrams showing bolt and nut arrangements, one with a circle and cross symbol (no text or labels)Copyright © 2005 Pioneer Corporation.
natural_image
Pure technical diagram showing bolt and nut assembly symbols without any text or labelsVeerringen [SBE6005] 4
Vulringen [SBE6006] 4
Copyright © 2005 Pioneer Corporation.
natural_image
Pure electrical circuit symbols without any text or labelsCopyright © 2005 Pioneer Corporation.
"Copyright" © 2005 Pioneer Corporation.
Published by Pioneer Corporation.
Copyright © 2005 Pioneer Corporation.
All rights reserved.
natural_image
Pure electrical circuit symbols without any text or labelsPublished by Pioneer Corporation.
Copyright © 2005 Pioneer Corporation.
All rights reserved.
text_image
Stativets bunnplate 1 Spike Mutternatural_image
Pure technical diagram showing bolt and nut assembly symbols without any text or labelsSpike tabletter [SLA1057] 8
Skruer (krysshode, M5xL62) [SBA6050] 4
Skruer (krysshode, M5xL36) [SBA6048] 4
Skruer (krysshode, M6xL40) [SBA6054] 24
Fjærskiver [SBE6005] 4
Pakninger [SBE6006] 4
Denne bruksveiledningen [SRD6045] 1

Merk
Published by Pioneer Corporation.
Copyright © 2005 Pioneer Corporation.
All rights reserved.
Copyright-oikeudet © 2005 : Pioneer Corporation.
natural_image
Pure technical drawings of screw and nut components with symbols (circle, cross) without any text or labelsИздано Pioneer Corporation.
text_image
www.pioneer.co.uk


text_image
www.pioneer-rus.ru
text_image
www.pioneer-eur.comPIONEER CORPORATION
4-1, Meguro 1-Chome, Meguro-ku, Tokyo 153-8654, Japan
PIONEER ELECTRONICS (USA) INC.
P.O. BOX 1540, Long Beach, California 90810-1540, U.S.A. TEL: (800) 421-1404
PIONEER ELECTRONICS OF CANADA, INC.
300 Allstate Parkway, Markham, Ontario L3R OP2, Canada TEL: 1-877-283-5901
PIONEER EUROPE NV
Haven 1087, Keetberglaan 1, B-9120 Melsele, Belgium TEL: 03/570.05.11
PIONEER ELECTRONICS ASIACENTRE PTE. LTD.
253 Alexandra Road, #04-01, Singapore 159936 TEL: 65-6472-7555
PIONEER ELECTRONICS AUSTRALIA PTY. LTD.
178-184 Boundary Road, Braeside, Victoria 3195, Australia, TEL: (03) 9586-6300
PIONEER ELECTRONICS DE MEXICO S.A. DE C.V.
Blvd.Manuel Avila Camacho 138 10 piso Col.Lomas de Chapultepec, Mexico,D.F. 11000 TEL: 55-9178-4270
K002_A_En