
PDK-TS33A - Electronic device stand PIONEER - Free user manual and instructions
Find the device manual for free PDK-TS33A PIONEER in PDF.
| Product type | Table stand for monitor/TV |
| Brand | PIONEER |
| Model | PDK-TS33A |
| Compatibility | Pioneer 50-inch monitors and TVs (PDP-LX5090, PDP-LX5090H, PDP-LX509A, PDP-C509A, KRP-500P, KRP-500M) |
| Dimensions (W × H × D) | 552 mm × 402 mm × 350 mm |
| Weight | 2.7 kg |
| Maximum supported weight | Approximately 30 kg |
| Materials | Steel, plastic |
| Color | Black |
| Box contents | Table cover, anti-glare strip, support column (L) and (R), installation screws (5 types), anti-fall metal parts (×2), cover pad, instruction manual |
| Main functions | Stable TV fixation, anti-glare strip to prevent reflections, integrated anti-fall system |
| Installation | Simple screw mounting, requires 2 people for TV installation |
| Safety | Anti-fall metal parts, additional wall mounting recommendation |
| Maintenance | Clean with a soft dry cloth, avoid solvents |
| Intended use | Indoors only, on a flat and stable surface |
| Operating temperature | Standard indoor use (not specified) |
| Accessories included | Yes |
| Repairability | Spare parts not provided by the manufacturer, contact the dealer |
| Warranty | Not specified |
Frequently Asked Questions - PDK-TS33A PIONEER
User questions about PDK-TS33A PIONEER
0 question about this device. Answer the ones you know or ask your own.
Ask a new question about this device
Download the instructions for your Electronic device stand in PDF format for free! Find your manual PDK-TS33A - PIONEER and take your electronic device back in hand. On this page are published all the documents necessary for the use of your device. PDK-TS33A by PIONEER.
USER MANUAL PDK-TS33A PIONEER
Thank you for buying Pioneer's product.
Please read through the Operating Instructions to learn how to operate your model safely and properly.
Please be advised to keep the Operating Instructions in your place for future reference.
Installation
- Consult your dealer if you encounter any difficulties with this installation.
- Pioneer is not liable for any damage resulting from improper installation, improper use, modification, or natural disasters.
IMPORTANT NOTICE
Record the model number and serial number of this equipment below.
Model No.
Serial No.
Keep these numbers for future use.
Contents
Cautions. 9
Checking the Standard Accessories. 10
Assembling the Stand 11
Attaching the Cushion 12
Attaching the Pioneer Display and Television .... 13
Installing the Product on a Rack etc. 14
Preventing Equipment from Falling Over 15
Specifications 15
Dimensions Diagram 16

CAUTION
This symbol refers to a hazard or unsafe practice which can result in personal injury or property damage.
Cautions

This product is a table top stand exclusively designed for Pioneer displays and televisions (PDP-LX5090 / PDP-LX5090H / PDP-LX509A / PDP-C509A / KRP-500P / KRP-500M).
Use with other model is capable of resulting in instability causing possible injury. For further information, please contact the store where you purchased your display.
Do not install or modify the product other than specified.
Do not use this stand for a Pioneer display and television other than those designated and do not modify it or use it for other purposes.
Installation Location
- Select a location that is strong enough to support the weight of the stand and the displays.
- Make sure to place it in a level and stable location.
- Do not install it outdoors or in a wet place such as at a hot spring or near a beach.
- Do not install the stand where it may be subjected to vibration or shock.
Assembling and Installation
- Assemble the stand in accordance with the assembly instructions and securely attach all screws at the designated locations.
There have been cases where unforeseen accidents such as the equipment breaking or falling over occurred after the installation of the display because the stand was not installed as instructed. - The display must always be installed by two or more people to assure it is installed safely.
- Before installation, turn off the power for the display and peripheral devices then remove the power cord plug from the power outlet.
Prevent accidents caused by the product falling over, by taking reliable measures to prevent it from falling over (see page 15).
Pioneer display, television and stand compatibility table
| Pioneer display and television | Table top stand |
| 50 inch under speaker model | PDK-TS33A/PDK-TS33 |
| 50 inch side speaker model | KRP-TS02 |
Checking the Standard Accessories
Check to make sure that you have all the standard accessories before assembly and installation.
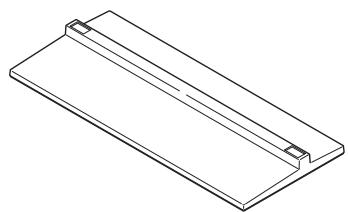
- Base cover × 1
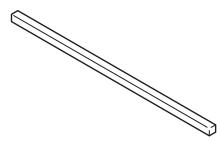
Cushion × 1
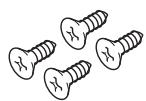
- Screws ① (4 mm × 10 mm: silver) × 4
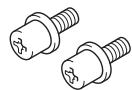
- Installation screws ④ (M8 × 15 mm: black) ×2
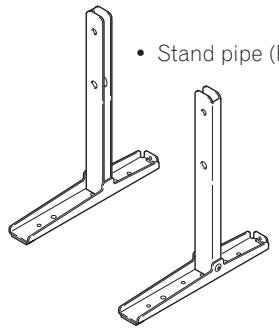
- Stand pipe (L) × 1
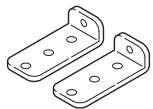
- Falling prevention metal fittings × 2
- Installation screws ② ^ 串 (M8 × 40 mm: black) ×2
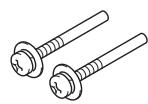
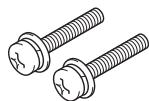
- Installation screws (5) (M4× 35mm : black) × 2 [for falling prevention metal fitting]

Light-blocking pad* × 1

- Installation screws ③ (M8 × 23 mm: black) ×2
- Operating instructions (this document) × 1
*: Use with PDP-LX5090 / PDP-LX5090H / PDP-C509A (with under speaker installed).
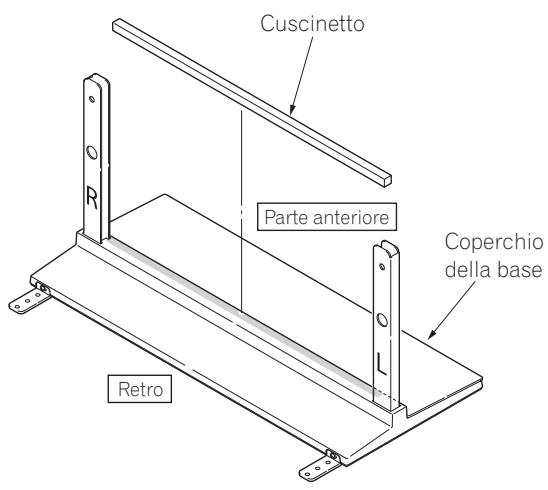
Assembling the Stand
Assembly Procedure
1 Turn the base cover over so the underside is facing up.
2 Insert the stand pipes into the base cover.
- Insert stand pipe (R) into the side marked "R" and stand pipe (L) into the side marked "L".
- Ensure that the open sides of the stand pipes face inward. Insert the stand pipes, making sure to match them to the raised portion of the base cover.
3 Tighten the screws ① (4 mm × 10 mm: silver) to stabilize the stand pipes.

Note
- Assemble the stand with a soft sheet placed under the base cover. If a sheet is not laid before assembly, the front surface of the base cover may be scratched.
- Please take care when installing stand pipes (L) and (R) to ensure that they are in the correct positions. Mistakenly installing the stand pipes may damage the stand.
4 After assembling the stand, attach the falling prevention metal fittings with the installation screws ⑤ (M4 × 35 mm: black).
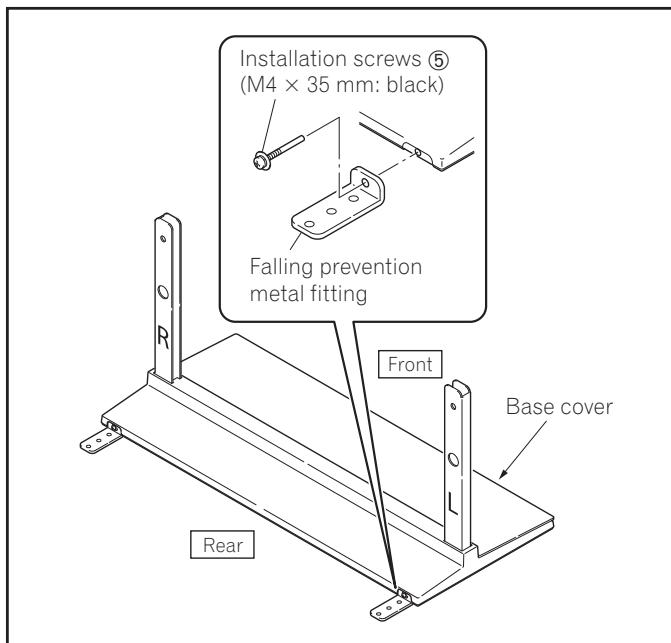
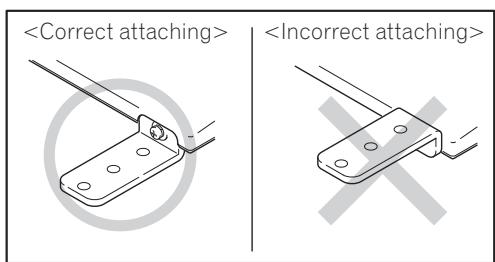
Note
Be sure not to attach the falling prevention metal fittings in the reverse position.
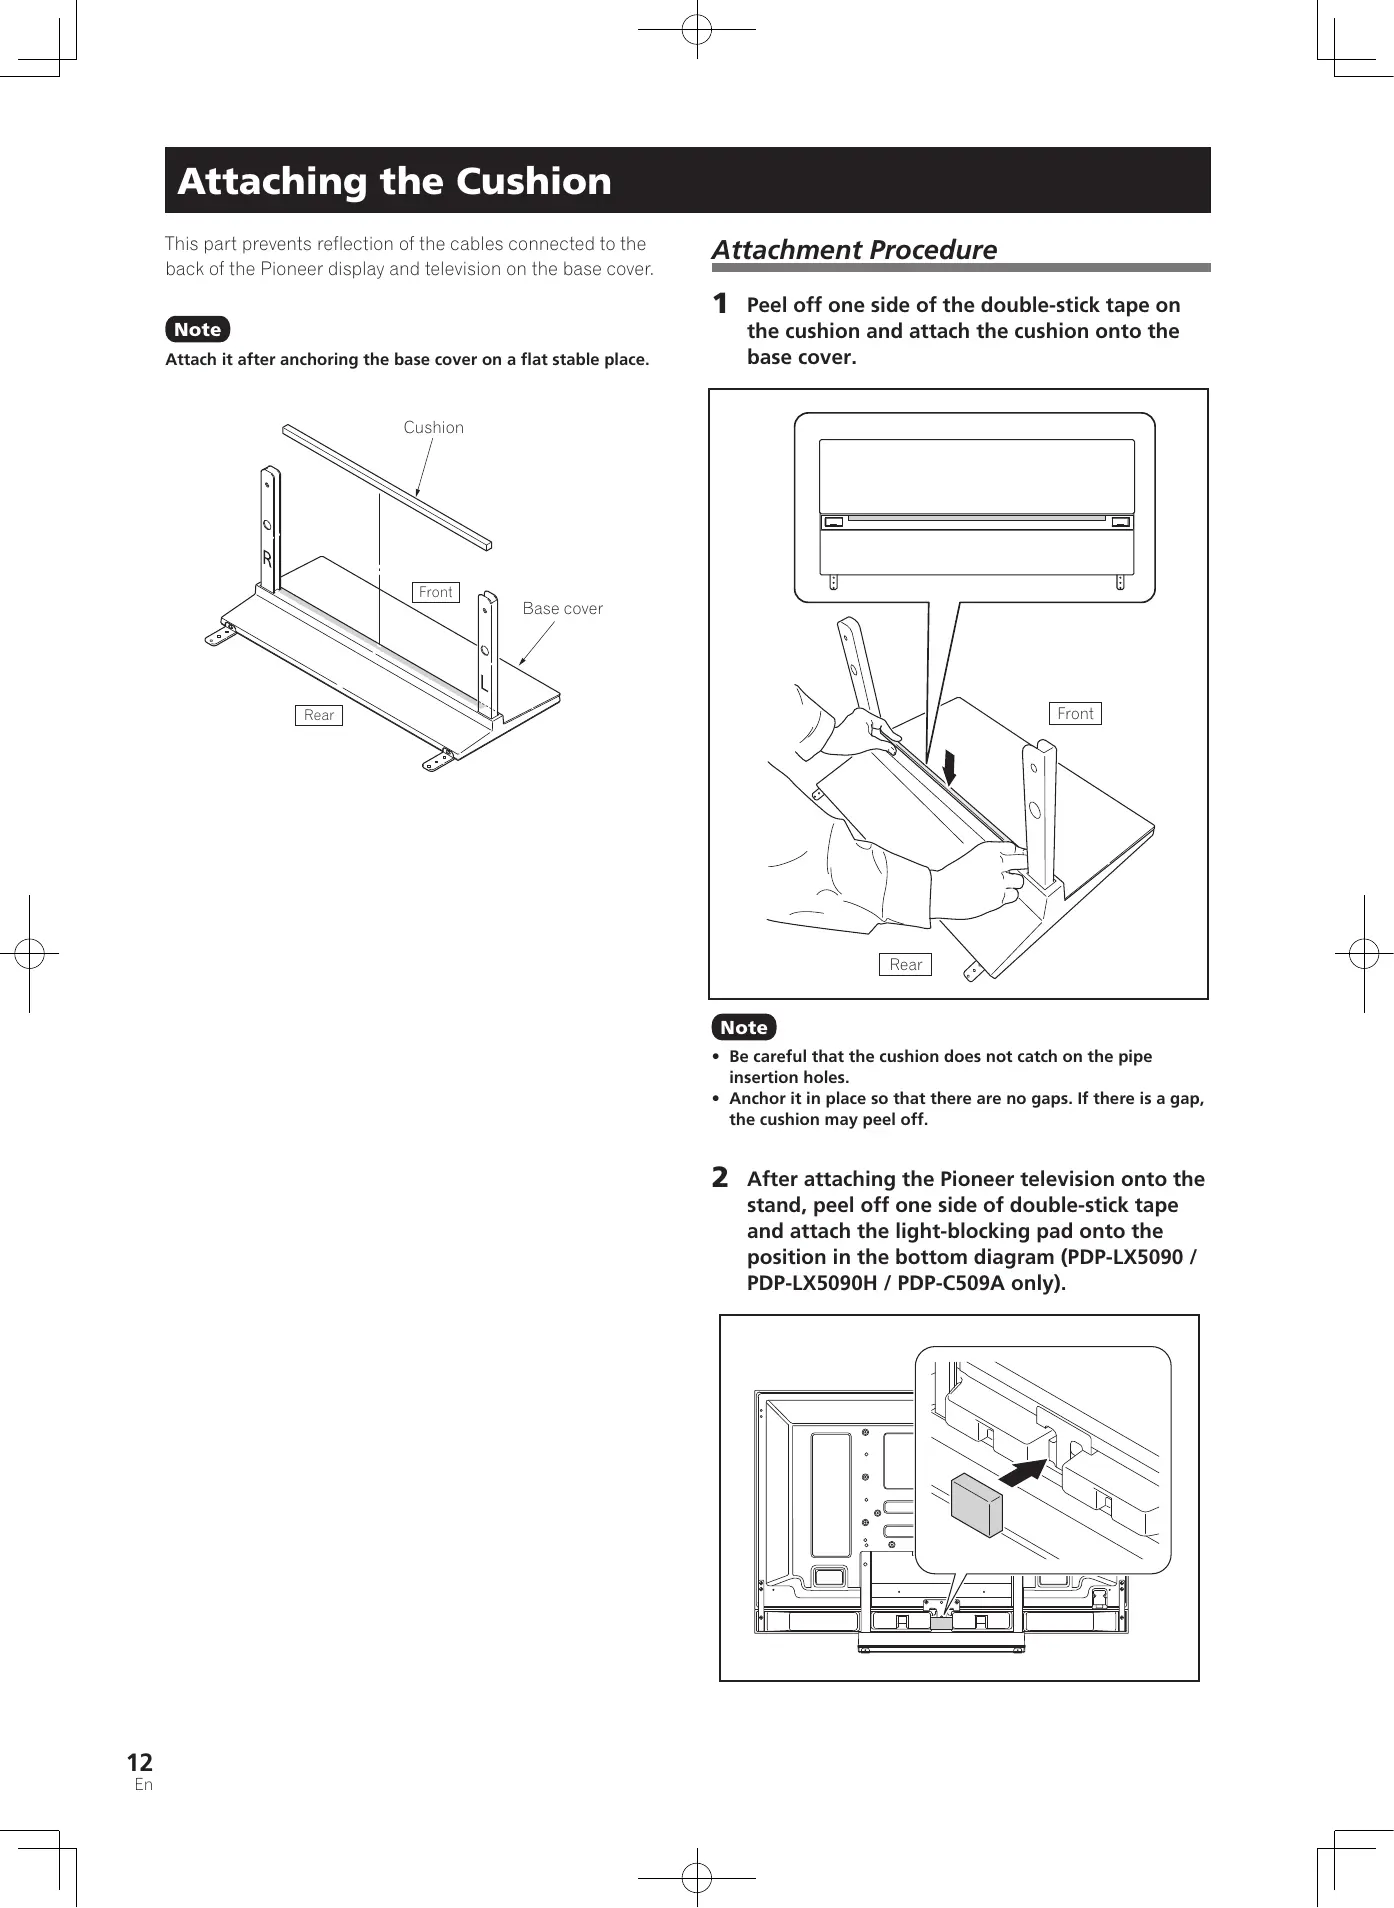
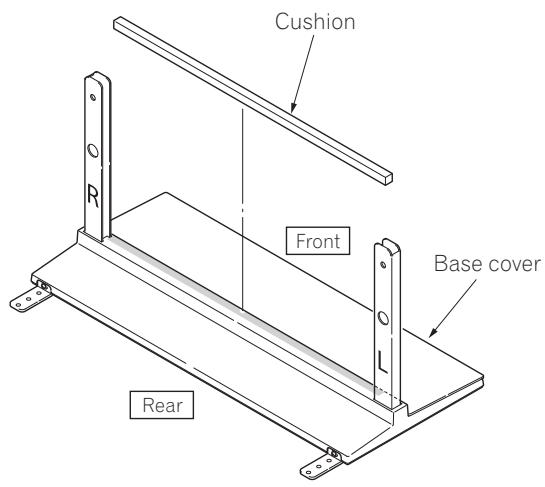
Attaching the Cushion
This part prevents reflection of the cables connected to the back of the Pioneer display and television on the base cover.
Note
Attach it after anchoring the base cover on a flat stable place.
Attachment Procedure
1 Peel off one side of the double-stick tape on the cushion and attach the cushion onto the base cover.

Note
- Be careful that the cushion does not catch on the pipe insertion holes.
- Anchor it in place so that there are no gaps. If there is a gap, the cushion may peel off.
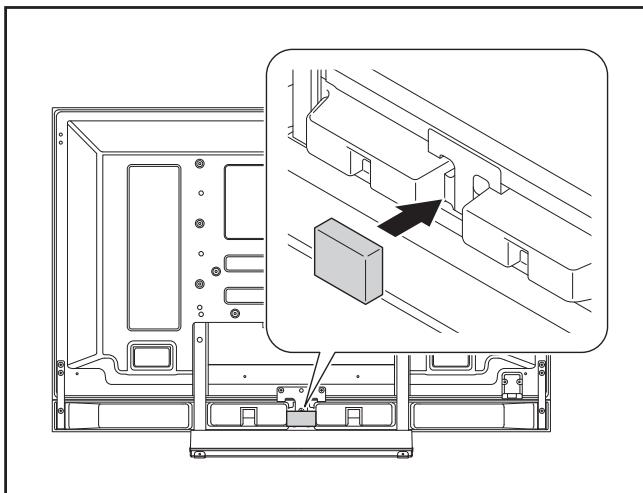
2 After attaching the Pioneer television onto the stand, peel off one side of double-stick tape and attach the light-blocking pad onto the position in the bottom diagram (PDP-LX5090 / PDP-LX5090H / PDP-C509A only).
Attaching the Pioneer Display and Television

Caution
The weight of a Pioneer display and television is about 30kg (66 lbs), they have no depth, and are unstable. Therefore, at least two people must assemble and install them.
Note
- Be sure to install it on a flat stable location.
- Insert the screws in the holes vertically and securely tighten.
- Place a sheet or other material under the display to prevent scratches or damage to it.
- After manually turning the screw lightly two or three times, tighten it with a screw-driver.
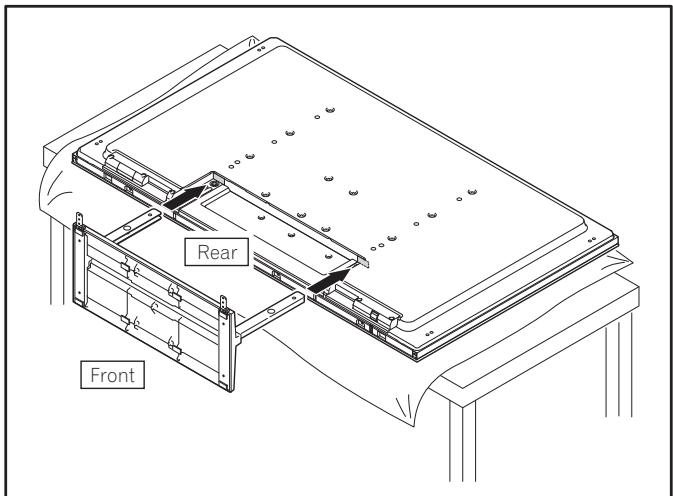
1 Attaching the Pioneer display and television to the stand.
Lay the Pioneer display and television down flat. Align the stand supports with the Pioneer display and television stand slots, and slowly insert the supports horizontally. Please ensure that the stand supports do not come into contact with anything other than the Pioneer display and television stand slots. Contact with any other area may result in scratching or deformation of the display's rear side or terminals.
Note
When laying down the Pioneer display and television, be careful so as to not scratch or damage it.
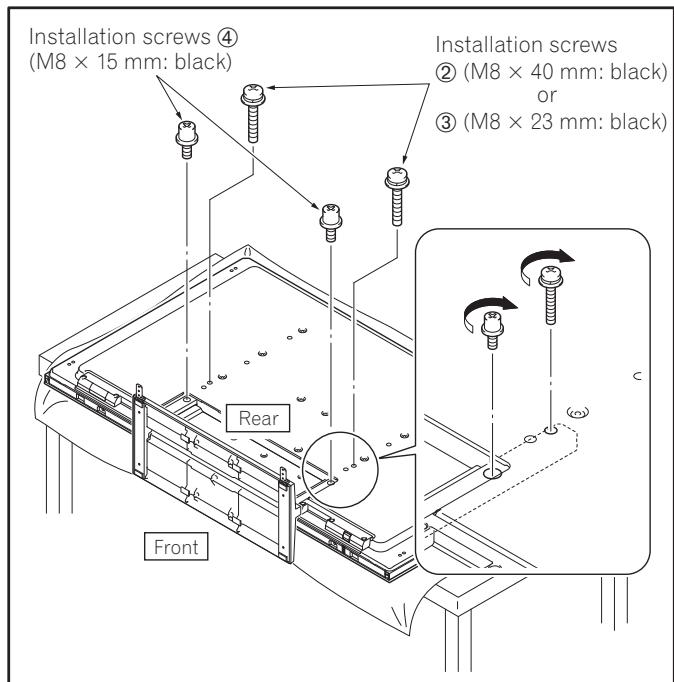
2 Securing the Pioneer display and television with Installation screws.
Secure the parts marked with the arrows (holes marked "T") using a Phillips screwdriver.
[PDP-LX5090/PDP-LX5090H/PDP-LX509A/PDP-C509A] KRP-TS02 / PDK-TS33A / PDK-TS33
Upper............ Installation screw ② (M8 × 40 mm: black) Bottom............ Installation screw ④ (M8 × 15 mm: black)
[KRP-500P/KRP-500M]
KRP-TS02
Upper............................ Installation screw ③ (M8 × 23 mm: black)
Bottom............Installation screw ④ (M8 × 15 mm: black)
Installing the Product on a Rack etc.

Caution
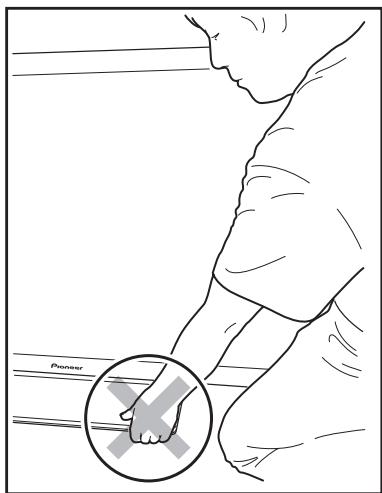
- When installing on a rack etc., please be sure that the Pioneer display and television is held by two or more people.
- Please do not hold the Pioneer display and television by the speakers or stand. Doing so may damage the product.
Hold the Pioneer display and television by its handles and from the top.
Hold the Pioneer display and television by its handles and from the sides.

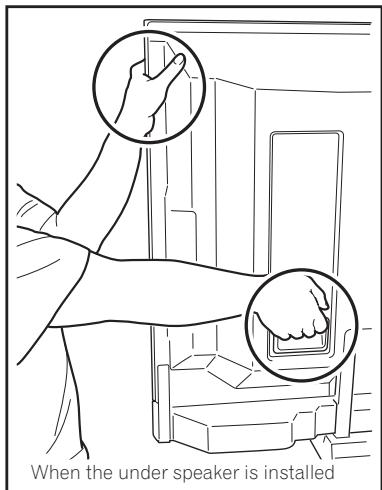
Do not hold the Pioneer display and television by the speakers.
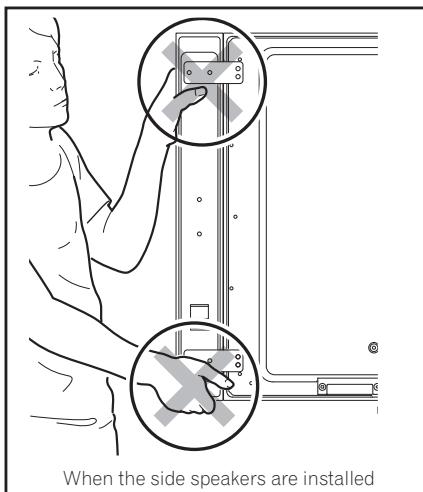
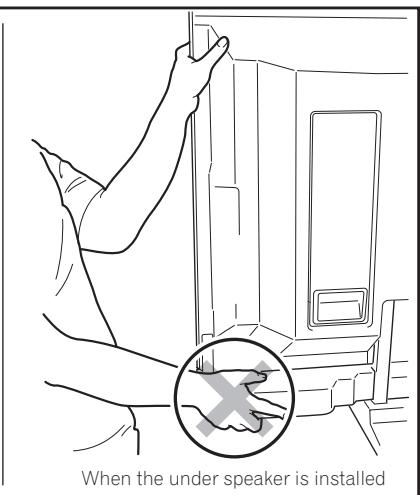
Do not hold the Pioneer display and television by the stand.
Preventing Equipment from Falling Over
- After installing the stand, be sure to take special care to ensure that the equipment will not fall over.
- Secure the plasma television to both the rack and the wall surface.
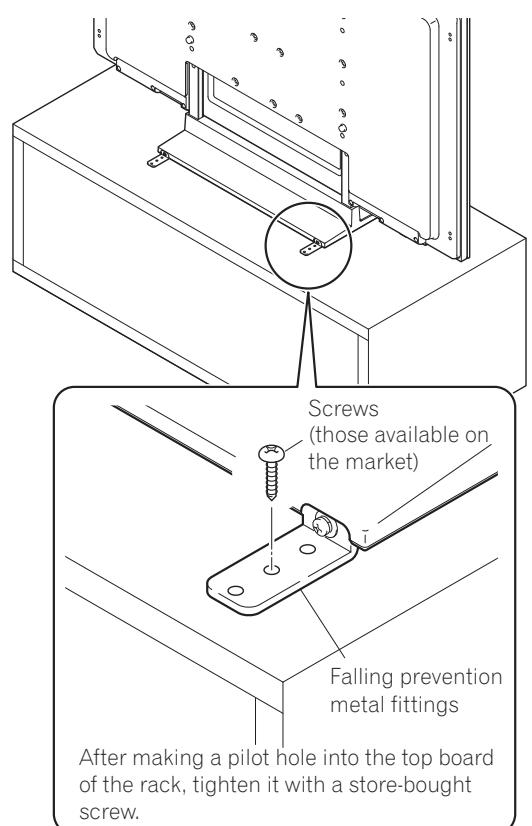
Stabilizing on a rack etc.
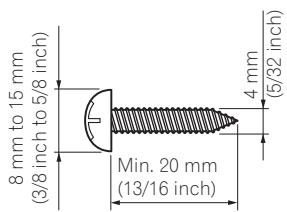
Use screws (those available on the market) to fix the Pioneer display and television like shown in the diagram.
Note
To stabilize the equipment on a table, use screws that have a nominal diameter of 4mm (5/32 inch) and that are at least 20mm (13/16 inch) long.
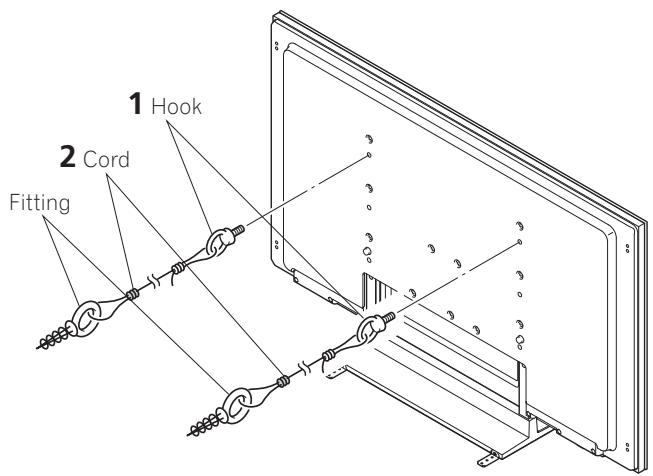
Using a wall for stabilization
1 Attaching falling prevention bolts (hooks) to the Pioneer display and television.
2 Using strong cords to firmly stabilize it appropriately and firmly to a wall, pillar, or other sturdy element.
Perform this work in the same way on the left and right sides.
Note
Use hooks, cords, and fittings that are available on the market.
Recommended hook:
Nominal diameter M8
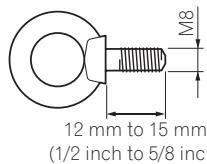
Length 12 mm to 15 mm (1/2 inch to 5/8 inch)
Specifications
External dimensions:
KRP-TS02......... 552 mm (W) × 323 mm (H) × 350 mm (D) (21-23/32 in. (W) × 12-23/32 in. (H) × 13-25/32 in. (D))
PDK-TS33 550 mm (W) × 402 mm (H) × 349 mm (D) (21-21/32 in. (W) × 15-13/16 in. (H) × 13-3/4 in. (D))
PDK-TS33A...... 552 mm (W) × 402 mm (H) × 350 mm (D) (21-23/32 in. (W) × 15-13/16 in. (H) × 13-25/32 in. (D))
Weight:
KRP-TS02. 2.5 kg (5.6 lbs)
PDK-TS33 2.2 kg (4.9 lbs)
PDK-TS33A. 2.7 kg (6.0 lbs)
- The above specifications and exterior may be modified without prior notice to improve the product.
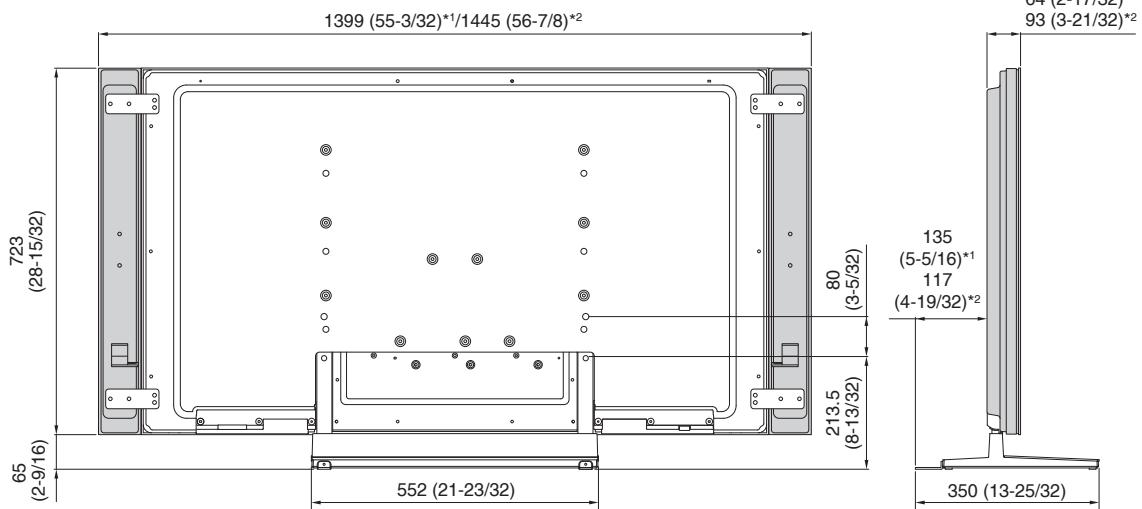
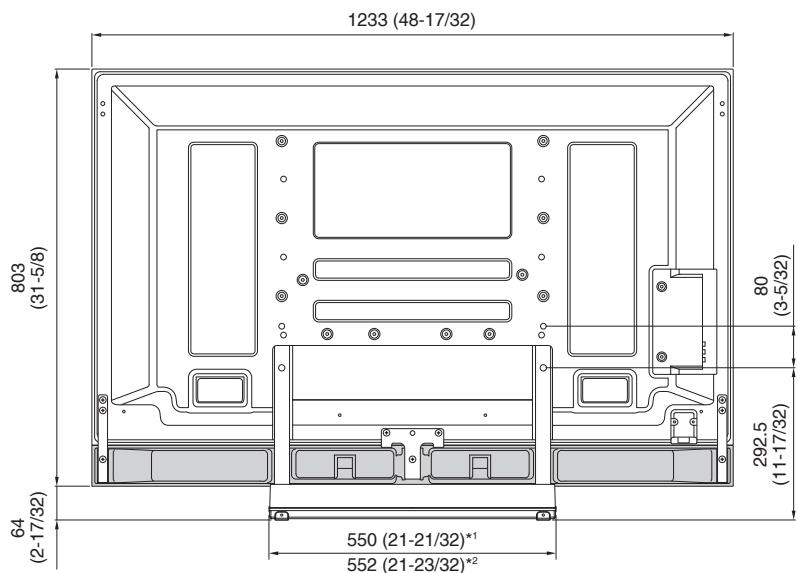
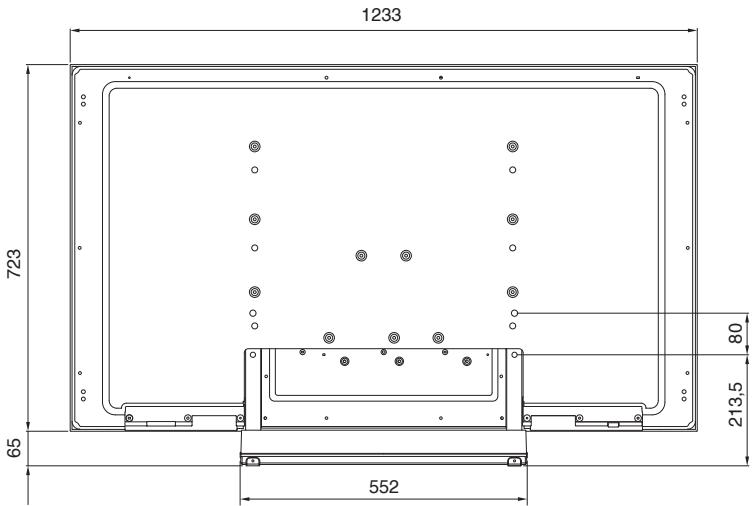
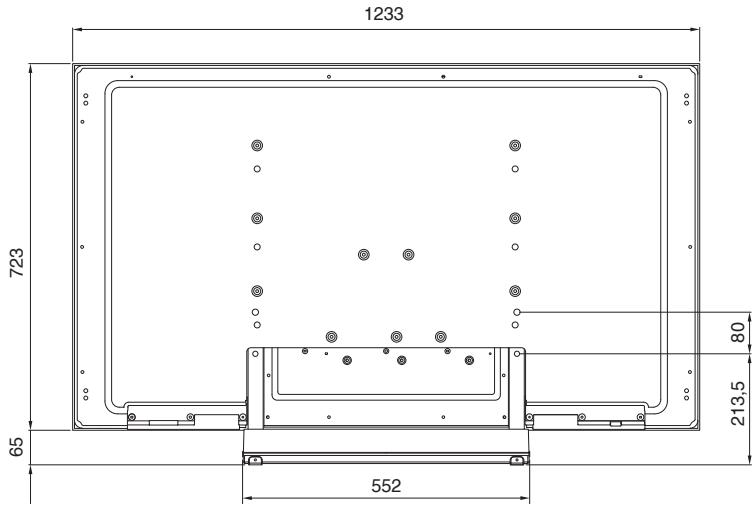
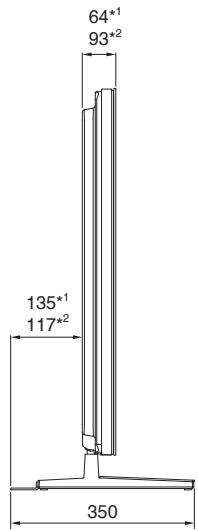
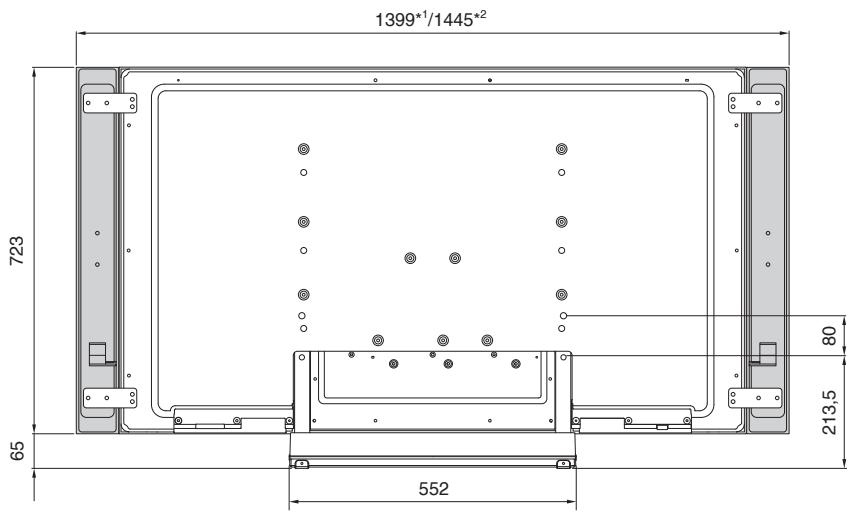
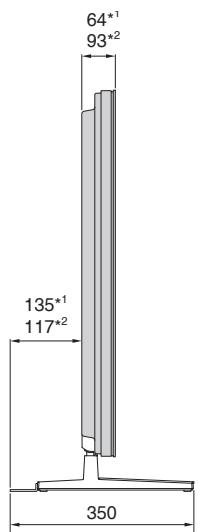
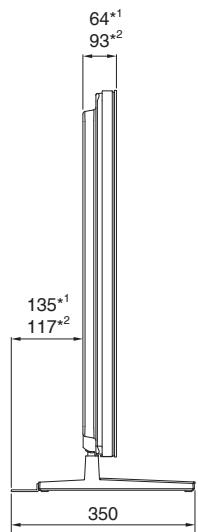
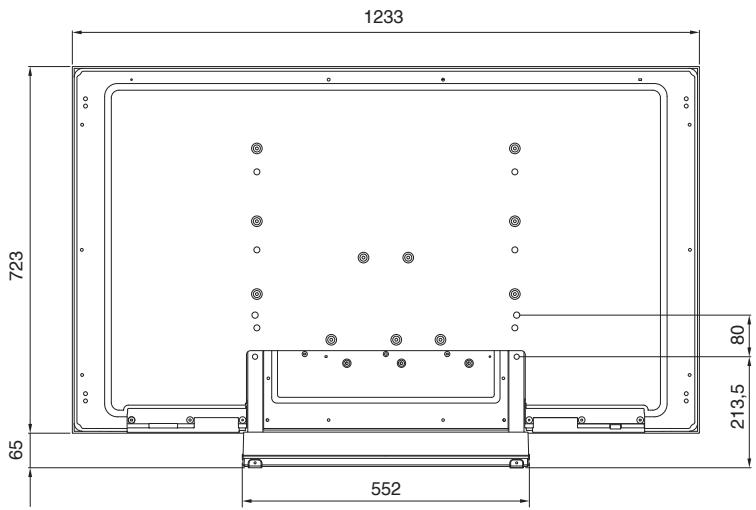
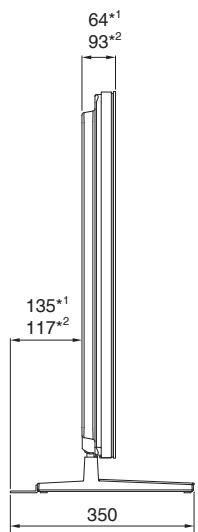
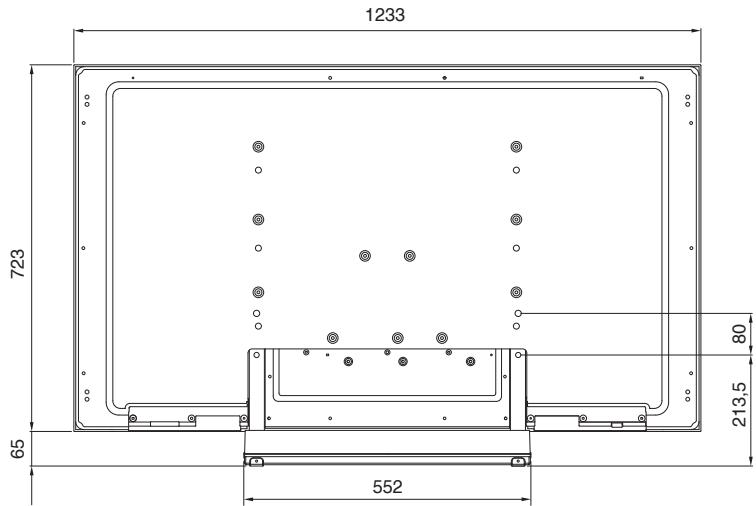
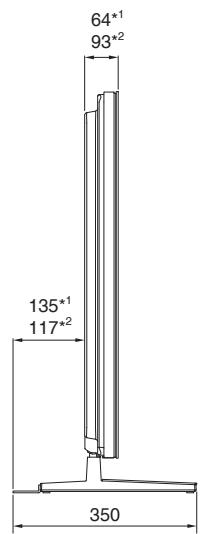
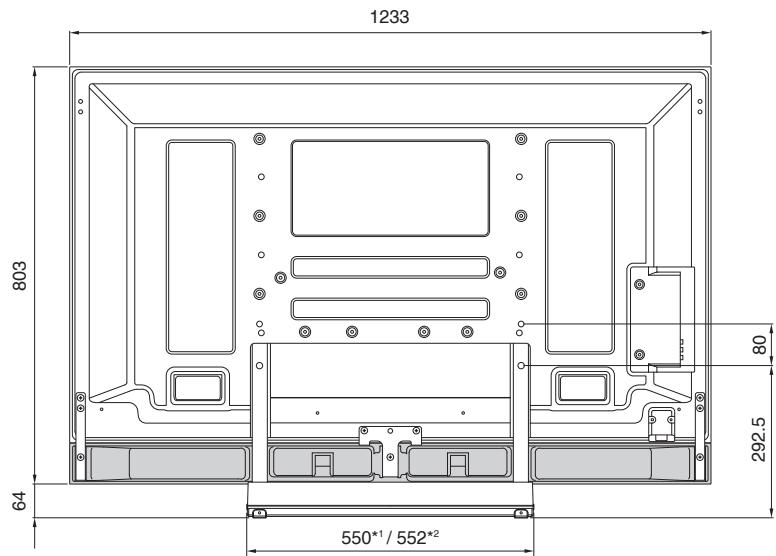
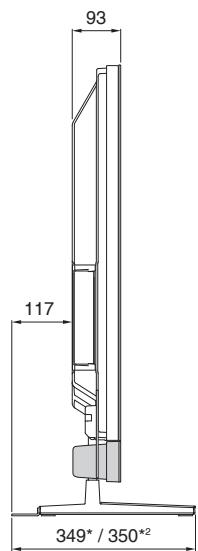
Dimensions Diagram
When the side speakers are installed
KRP-TS02
Unit: mm (inch)
1 KRP-500P / KRP-500M
2 PDP-LX5090 / PDP-LX5090H / PDP-LX509A
Without speakers
KRP-TS02
Unit: mm (inch)
^1 KRP-500P / KRP-500M
2 PDP-LX5090 / PDP-LX5090H / PDP-LX509A
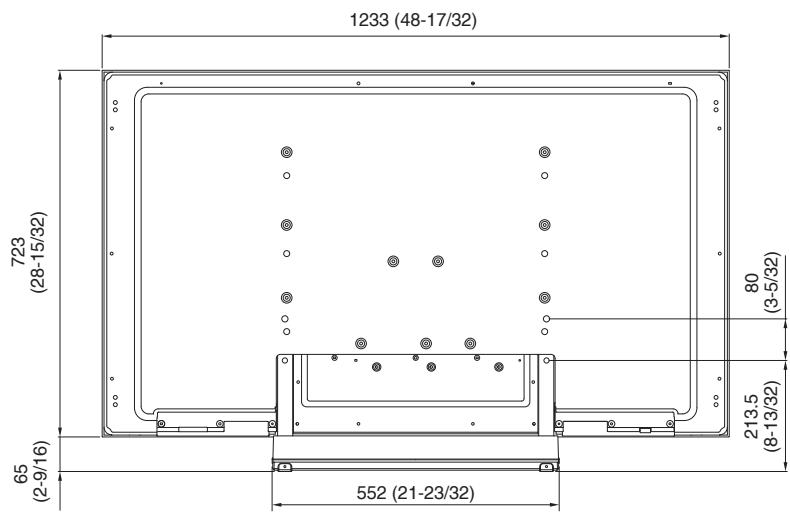
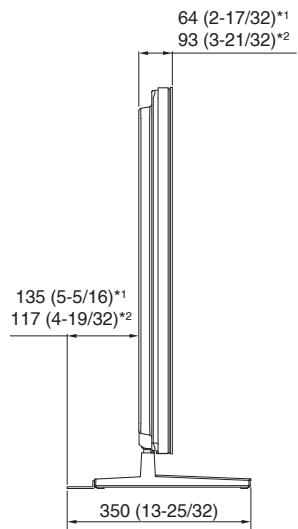
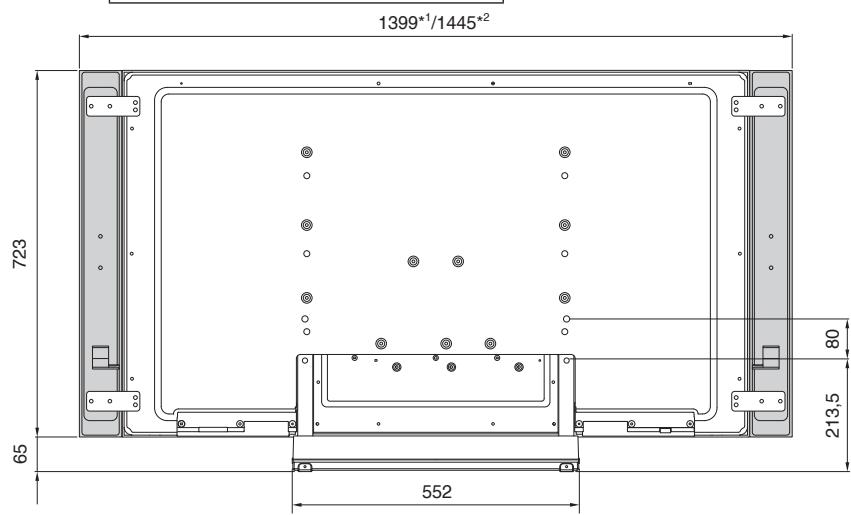
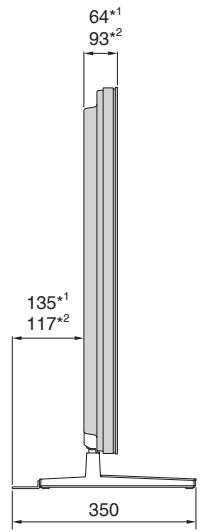
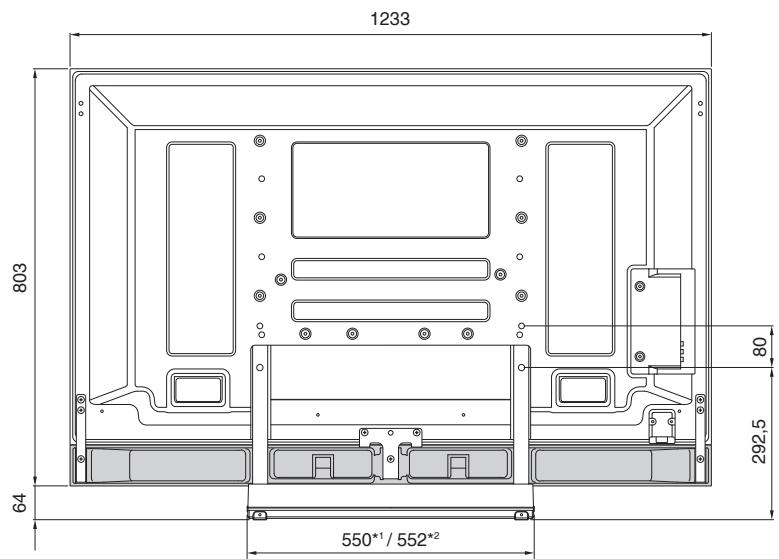
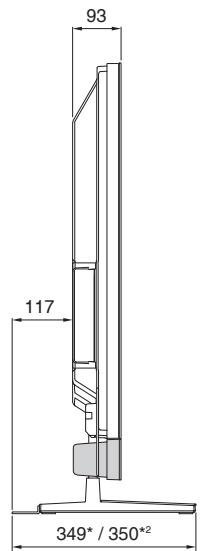
When the under speaker is installed
PDK-TS33\*1
PDK-TS33A\*2
Unit: mm (inch)

[PDP-LX5090/PDP-LX5090H/PDP-LX509A/PDP-C509A]
KRP-TS02/PDK-TS33A/PDK-TS33
*2 PDP-LX5090 / PDP-LX5090H / PDP-LX509A
![PIONEER PDK-TS33A - [PDP-LX5090/PDP-LX5090H/PDP-LX509A/PDP-C509A] - 1](/content/2024/12/118668/images/e804df004798085d0a925fea3f52b367d3bc5bafd1c380e67c1d209ec6e4be42.jpg)
KRP-TS02
KRP-TS02
![PIONEER PDK-TS33A - [PDP-LX5090/PDP-LX5090H/PDP-LX509A/PDP-C509A] - 2](/content/2024/12/118668/images/31ba44709e23990f018c18d3ab8e91fc1a93b4017025931bc5979d8f1bde310f.jpg)
Unité : mm
1 KRP-500P / KRP-500M
2 PDP-LX5090 / PDP-LX5090H / PDP-LX509A
Sans enceintes

Unité : mm
[PDP-LX5090/PDP-LX5090H/PDP-LX509A/PDP-C509A]
KRP-TS02/PDK-TS33A/PDK-TS33
1 KRP-500P / KRP-500M
2 PDP-LX5090 / PDP-LX5090H / PDP-LX509A
![PIONEER PDK-TS33A - [PDP-LX5090/PDP-LX5090H/PDP-LX509A/PDP-C509A] - 1](/content/2024/12/118668/images/31a71cb251cc299dc230d94c00eca7f35c219e75d9e451252afdb4c4dd251ddd.jpg)
![PIONEER PDK-TS33A - [PDP-LX5090/PDP-LX5090H/PDP-LX509A/PDP-C509A] - 2](/content/2024/12/118668/images/8ce50c3ad1e47dad2f404052eba425f6c284979c38f5414dc90a98cc9d0275b5.jpg)
Ohne Laufsprecher
KRP-TS02
Einheit: mm
1 KRP-500P / KRP-500M
2 PDP-LX5090 / PDP-LX5090H / PDP-LX509A
Fissatela工程技术 is a very good choice for the construction of a superficie.
[PDP-LX5090/PDP-LX5090H/PDP-LX509A/PDP-C509A]
KRP-TS02/PDK-TS33A/PDK-TS33
Superiore............Viti di montaggio ② (M8× 40~mm : nero) Inferiore............Viti di montaggio ④ (M8× 15mm : nero)
[KRP-500P/KRP-500M]
KRP-TS02
KRP-TS02. 552 mm (L) × 323 mm (A) × 350 mm (P)
PDK-TS33 550 mm (L) × 402 mm (A) × 349 mm (P)
PDK-TS33A. 552 mm (L) × 402 mm (A) × 350 mm (P)
Peso:
KRP-TS02. 2,5 kg
PDK-TS33 2,2 kg
PDK-TS33A......2,7 kg
*2 PDP-LX5090 / PDP-LX5090H / PDP-LX509A
KRP-TS02
KRP-TS02
Unità: mm
1 KRP-500P / KRP-500M
2 PDP-LX5090 / PDP-LX5090H / PDP-LX509A
Senza altoparlanti

Unità: mm
[PDP-LX5090/PDP-LX5090H/PDP-LX509A/PDP-C509A]
KRP-TS02/PDK-TS33A/PDK-TS33
Bovenste.......Montageschroeven ② (M8×40 mm: zwart)
Onderste...... Montageschroeven ④ (M8x15 mm: zwart)
[KRP-500P/KRP-500M]
KRP-TS02
Bovenste............ Montageschroeven ③ (M8×23 mm: zwart)
Onderste...... Montageschroeven ④ (M8×15 mm: zwart)
![PIONEER PDK-TS33A - [KRP-500P/KRP-500M] - 1](/content/2024/12/118668/images/f7644e8b63bc9fb7c122a0b57388de8cf63cd5a31f2652aed07036df888dfee1.jpg)
1 KRP-500P / KRP-500M
2 PDP-LX5090 / PDP-LX5090H / PDP-LX509A
![PIONEER PDK-TS33A - [KRP-500P/KRP-500M] - 2](/content/2024/12/118668/images/0ef1d3851d985008d4d03ebfbea61bd725889e8e1751be505bdf3710a0d11b2c.jpg)
![PIONEER PDK-TS33A - [KRP-500P/KRP-500M] - 3](/content/2024/12/118668/images/2a3f8dc598f2b314dce9316ac5ea79ace943197b0974b8de4cc55aa13b56dace.jpg)
Zonder luidsprekers
KRP-TS02
Eenheid: mm
1 KRP-500P / KRP-500M
2 PDP-LX5090 / PDP-LX5090H / PDP-LX509A
[PDP-LX5090/PDP-LX5090H/PDP-LX509A/PDP-C509A]
KRP-TS02/PDK-TS33A/PDK-TS33
1 KRP-500P / KRP-500M
2 PDP-LX5090 / PDP-LX5090H / PDP-LX509A
![PIONEER PDK-TS33A - [PDP-LX5090/PDP-LX5090H/PDP-LX509A/PDP-C509A] - 1](/content/2024/12/118668/images/05f649b75e33e8d44de0abb638c12b97852921488c24db6835ad772cbde5f389.jpg)
![PIONEER PDK-TS33A - [PDP-LX5090/PDP-LX5090H/PDP-LX509A/PDP-C509A] - 2](/content/2024/12/118668/images/1530be5de395cdea31be8dd3ed36a35ef24fba2de88a91e7a3ce669d749510be.jpg)
Sin altavoces
KRP-TS02
Unidad: mm
1 KRP-500P / KRP-500M
2 PDP-LX5090 / PDP-LX5090H / PDP-LX509A

[PDP-LX5090/PDP-LX5090H/PDP-LX509A/PDP-C509A]
KRP-TS02 / PDK-TS33A / PDK-TS33
1 KRP-500P / KRP-500M
2 PDP-LX5090 / PDP-LX5090H / PDP-LX509A
![PIONEER PDK-TS33A - [PDP-LX5090/PDP-LX5090H/PDP-LX509A/PDP-C509A] - 1](/content/2024/12/118668/images/771e164099fb5ae8b1c4494ba4a64927560ab892272db7b01cd88f3e4386de9d.jpg)
![PIONEER PDK-TS33A - [PDP-LX5090/PDP-LX5090H/PDP-LX509A/PDP-C509A] - 2](/content/2024/12/118668/images/8164147ea744e2240cd1c424a785cd01e78873164fdeed35e4d2662dd7096a25.jpg)
未配備揚聲器
KRP-TS02
單位:mm
1 KRP-500P / KRP-500M
2 PDP-LX5090 / PDP-LX5090H / PDP-LX509A

安装底部揚聲器時
PDK-TS33\*1
PDK - TS33A^*2
單位:mm
Cnacn6o 3a IokyIky IpoIyKta Pioneer.
IIOkaJIyIcTa, IPOoTHTE DaHHbIe HNCTpyKcIIIN IO 3KcIIyataaIIH, YTO6bl 3HaTb, KaK 6e3OJaIacHO IN IpaBnJIbHO O6paIaTbcS c 3ToI MoJeJIbIO. CoXpAHte DaHHbIe HNCTpyKcIIIN IO 3KcIIyataaIIH B NaJdeJxHOM MeTe JIIRA HcIIIOJIb3OBaHnR B 6yUiem.
YctaHOBka
- PpokOHcyIbIbTHpyIteScb C BaIIHm IINIEpOM,ecJIN BbI cTOJIKKHeTeScb C TpyIHNOCTaMn IIph 3ToIyycTaHOBKe.
Pioneer He Hecet OTBETCTBEHHOCTH 3aJIIO6bIe IOBpeKJHeHn, BO3HNKIIHe IIO IIpHUnHe HeHaJIeKaIeYcTaHOBKn, HeHaJIeKaIeTeO HcIOJIb3OBaHHn, MOINΦHKaIIHH nJIn cTHXnHbIX 6eIDCTBn.
OUEHbBAxHO
3aIIHHTe IIpHBeIeHHbIe HnJke HOMep MoJeIH n cepHnHbI HOMep IaHHoro OobopyoBaHHa.
Homep moJeJIIN
CepiHbI HOMep
CoxpaHnTe 3TN HOMepa IJIa NocJIeIyIoUeRo HcIIIOJIb3OBAHHa.
CopepxaHne
BHHMaHne 65
*2 PDP-LX5090 / PDP-LX5090H / PDP-LX509A
KRP-TS02
KRP-TS02
EHHHb:MM
^1 KRP-500P / KRP-500M
2 PDP-LX5090 / PDP-LX5090H / PDP-LX509A
Бe3 Гомковорптуй


EHHHcI:MM
Pnp yctaHOBKe HxKHXrPoMkoROBOpHTeJe
PDK-TS33
PDK-TS33A*2
Приимechани:
B cooTBeTCTBm co cTaBey 5 3aKoHa Pocsnckofoepaun "O 3aunTe npab notpebnte" u Yka3aHnem PpaBnteBCTBa Pocsnckofoepaun Nc 720 ot 16 nHOra 1997 rda, koprnapuaPioneer Europe NV yctanabnBaet ycnohe Ha cneDyUOyU npdoJNKeTbHoctb cpoKa cnjkblo fniuaNbHO nocTabnEmbix Ha Pocsnckn pbHOK TObapOB.
Aydnoи видаооборудане:7пет
Ipehenochoe ayduoobopydobaHne:6 let
PIONEER ELECTRONICS (USA) INC.
P.O. BOX 1540, Long Beach, California 90801-1540, U.S.A. TEL: (800) 421-1404
PIONEER ELECTRONICS OF CANADA, INC.
300 Allstate Parkway, Markham, Ontario L3R 0P2, Canada TEL: 1-877-283-5901, 905-479-4411
PIONEER EUROPE NV
Haven 1087, Keetberglaan 1, B-9120 Melsele, Belgium TEL: 03/570.05.11
PIONEER ELECTRONICS ASIACENTRE PTE. LTD.
253 Alexandra Road, #04-01, Singapore 159936 TEL: 65-6472-7555
PIONEER ELECTRONICS AUSTRALIA PTY. LTD.
178-184 Boundary Road, Braeside, Victoria 3195, Australia, TEL: (03) 9586-6300
PIONEER ELECTRONICS DE MEXICO S.A. DE C.V.
Blvd. Manuel Avila Camacho 138 10 piso Col.Lomas de Chapultepec, Mexico, D.F. 11000 TEL: 55-9178-4270 K002_WL
©2008八才二株式会社 禁無断軀載
Published by Pioneer Corporation.
Copyright © 2008 Pioneer Corporation.
All rights reserved.
Publication de Pioneer Corporation.
© 2008 Pioneer Corporation.
PRINTED WITH SOY INK
- Installation
- IMPORTANT NOTICE
- Contents
- CAUTION
- Cautions
- Installation Location
- Assembling and Installation
- Checking the Standard Accessories
- Assembling the Stand
- Assembly Procedure
- Note
- Attaching the Cushion
- Attachment Procedure
- Attaching the Pioneer Display and Television
- Attaching the Pioneer display and television to the stand.
- Securing the Pioneer display and television with Installation screws.
- Installing the Product on a Rack etc.
- Preventing Equipment from Falling Over
- Stabilizing on a rack etc.
- Using a wall for stabilization
- Specifications
- External dimensions:
- Weight:
- Dimensions Diagram
- When the side speakers are installed
- KRP-TS02
- Without speakers
- When the under speaker is installed
- PDK-TS33\*1
- PDK-TS33A\*2
- [PDP-LX5090/PDP-LX5090H/PDP-LX509A/PDP-C509A]
- Sans enceintes
- Ohne Laufsprecher
- [KRP-500P/KRP-500M]
- Peso:
- Senza altoparlanti
- Zonder luidsprekers
- Sin altavoces
- 未配備揚聲器
- 安装底部揚聲器時
- PDK - TS33A*2
- YctaHOBka
- OUEHbBAxHO
- CopepxaHne
- Бe3 Гомковорптуй
- Pnp yctaHOBKe HxKHXrPoMkoROBOpHTeJe
- Приимechани:
- PIONEER ELECTRONICS (USA) INC.
- PIONEER ELECTRONICS OF CANADA, INC.
- PIONEER EUROPE NV
- PIONEER ELECTRONICS ASIACENTRE PTE. LTD.
- PIONEER ELECTRONICS AUSTRALIA PTY. LTD.
- PIONEER ELECTRONICS DE MEXICO S.A. DE C.V.
Brand : PIONEER
Model : PDK-TS33A
Category : Electronic device stand