
PDK-FS01E - Electronic device stand PIONEER - Free user manual and instructions
Find the device manual for free PDK-FS01E PIONEER in PDF.
| Product type | Plasma TV stand |
| Brand | PIONEER |
| Model | PDK-FS01E |
| Screen compatibility | 43 and 50 inches |
| Horizontal rotation | 30° left and right |
| Height adjustment | 3 levels (high, medium, low) |
| Maximum shelf load | 20 kg |
| Supported weight (total) | Up to 73.5 kg |
| Shelf plate material | Glass |
| Cable management | Magnetic covers and cable ties |
| Casters | Yes, for easy movement |
| Screen attachment | Mounting bracket with M8 bolts |
| Installation | Requires at least two people |
| Included accessories | Screws, bolts, Allen key, cable ties, covers |
| Approximate dimensions (W x D x H) | 850 x 505 x 1779 mm |
| Weight of stand alone | Not specified |
Frequently Asked Questions - PDK-FS01E PIONEER
User questions about PDK-FS01E PIONEER
0 question about this device. Answer the ones you know or ask your own.
Ask a new question about this device
Download the instructions for your Electronic device stand in PDF format for free! Find your manual PDK-FS01E - PIONEER and take your electronic device back in hand. On this page are published all the documents necessary for the use of your device. PDK-FS01E by PIONEER.
USER MANUAL PDK-FS01E PIONEER
Operating instructions
Mode d'emploi
Bedienungsanleitung
Thank you for buying this Pioneer product.
Please read through these operating instructions so you will know how to operate your model properly. After you have finished reading the instructions, put them away in a safe place for future reference.
In some countries or regions, the shape of the power plug and power outlet may sometimes differ from that shown in the explanatory drawings. However the method of connecting and operating the unit is the same.
WARNING: THE APPARATUS IS NOT WATERPROOFS, TO PREVENT FIRE OR SHOCK HAZARD, DO NOT EXPOSE THIS APPLIANCE TO RAIN OR MOISTURE AND DO NOT PUT ANY WATER SOURCE NEAR THIS APPARATUS, SUCH AS VASE, FLOWERPOT, COSMETICSC CONTAINERAND MEDICINE BOTTLE ETC. H001AEn
CAUTION
This symbol refers to a hazard or unsafe practice which can result in personal injury or property damage.
Special Features
- A design that creates an atmosphere in which the display seems to float in space
- Easy to move thanks to the attached casters
- Its gooseneck lets you easily rotate the direction of the screen (left or right 30^ )
Cautions
- Do not lean on the plasma display and do not get on the shelf.
- It is extremely dangerous to fail to install it properly, because it might fall over or another accident might occur. Always attach the brackets to the plasma display after laying down the plasma display.
- Always choose an installation location that is strong enough to bear the combined weight of the stand and the display. The product weights are listed on Page 8.
- Always be extremely careful to install it at a location that is level, flat, stable, and can bear the load uniformly.
- Do not install it outdoors or near a hot spring bath on the seashore.
- Do not install it where it is exposed to vibration or impact.
-
Do not install it on any plasma display other than the designated plasma display, do not modify it, and do not use it for any other purpose.
-
Obey the installation instructions and firmly insert the screws at all stipulated locations. If you do not, the display may be damaged or fall over after it has been installed.
- Always have at least two people install it on the display so that the work is done safely.
- Do not begin the installation work until after you have disconnected the power to the display and to the peripheral equipment, and have removed the power plugs from the wall sockets.
- Because of the characteristics of the glass, it breaks easily if anything strikes its edge.
Do not let anything strike the edge of the glass.
And be extremely careful to prevent any small children from striking the edge of the glass to protect them from injury.
- Be extremely careful to keep your hands out of the oscillating part. If you do place your hand in this part, you will injure it.
IMPORTANT

The lightning flash with arrowhead symbol, within an equilateral triangle, is intended to alert the user to the presence of uninsulated "dangerous voltage" within the product's enclosure that may be of sufficient magnitude to constitute a risk of electric shock to persons.
CAUTION
RISK OF ELECTRIC SHOCK DO NOT OPEN
CAUTION:
TO PREVENT THE RISK OF ELECTRIC SHOCK,DO NOT REMOVE COVER (OR BACK).NO USER-SERVICEABLE PARTS INSIDE.REFER SERVICING TO QUALIFIED SERVICE PERSONNEL.

The exclamation point within an equilateral triangle is intended to alert the user to the presence of important operating and maintenance (servicing) instructions in the literature accompanying the appliance.
H002 En
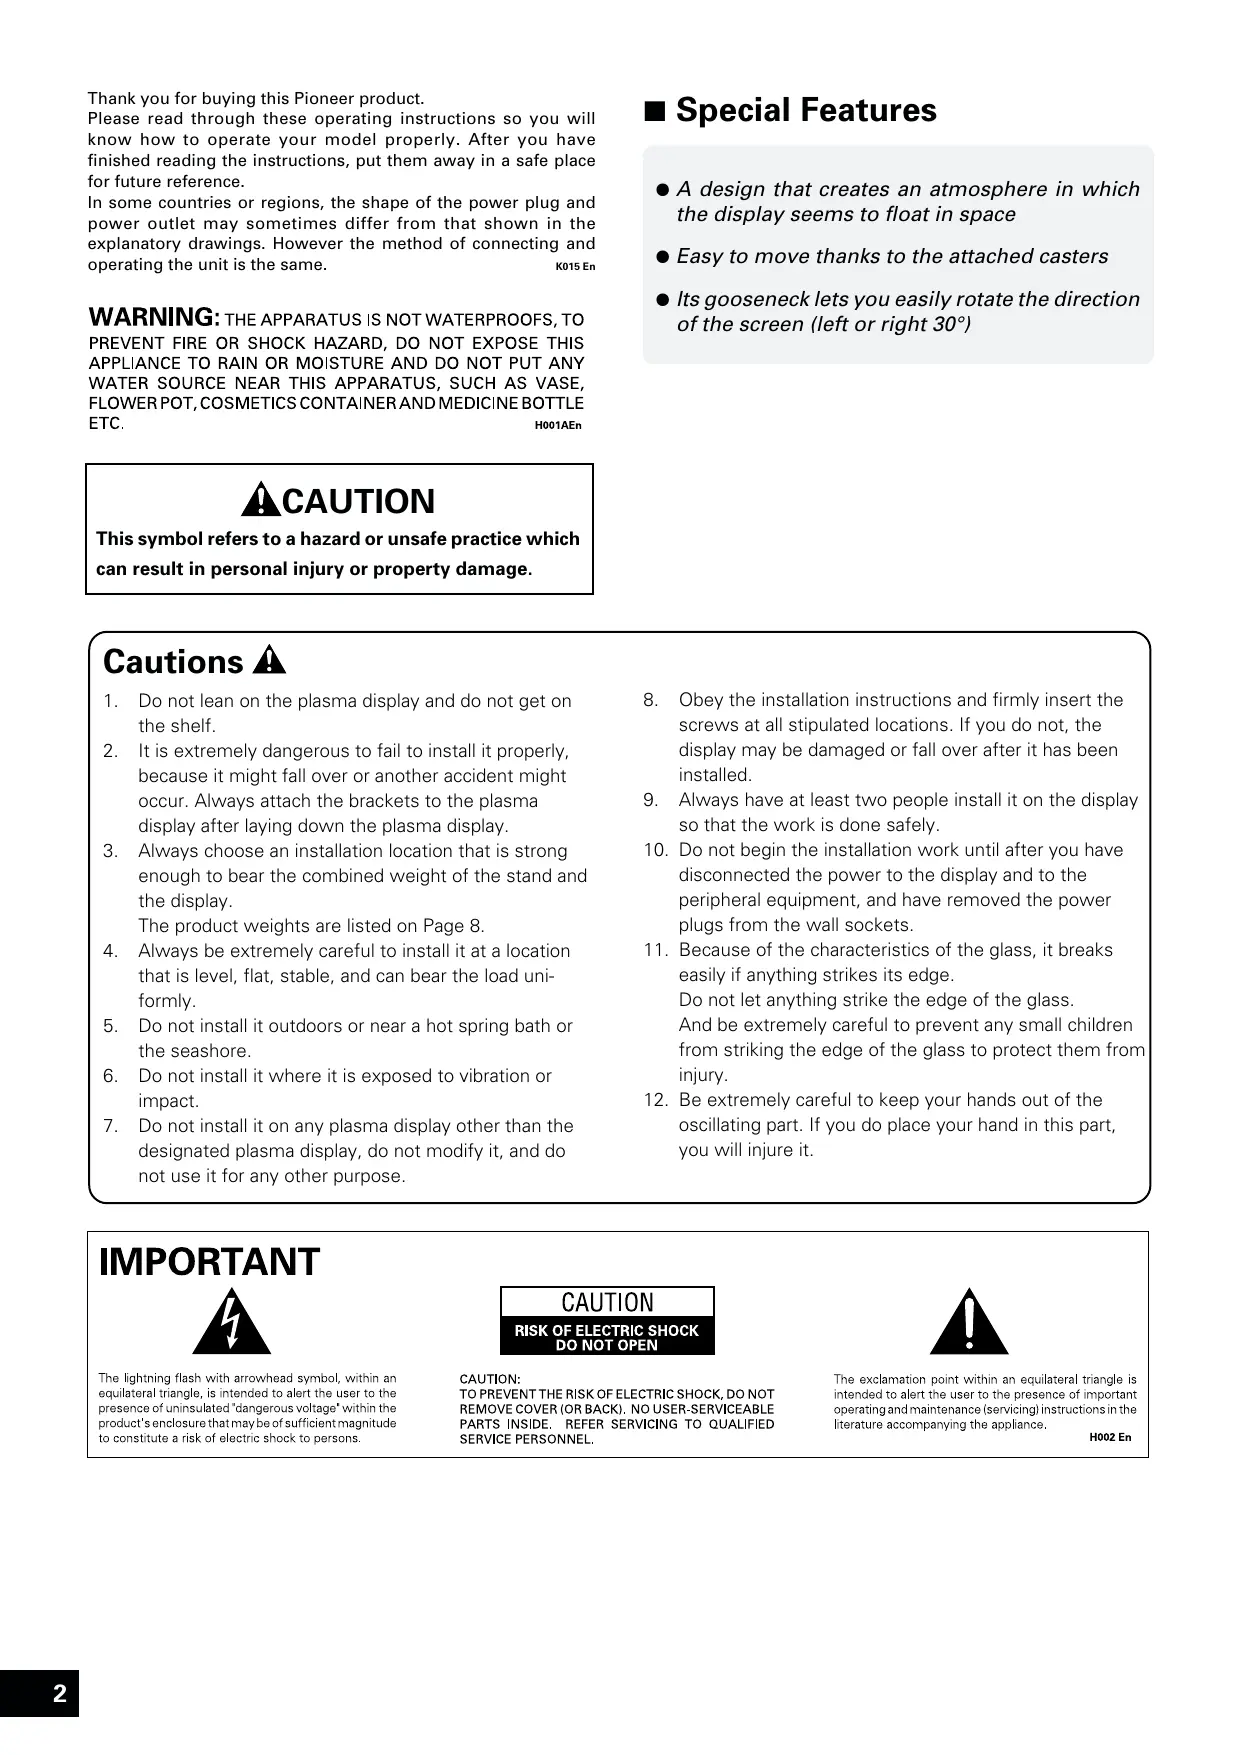
Confirmation of constituent parts
Please check to make sure you have all the parts before beginning the installation.
- You will need a Philips (+) screwdriver.
Please obtain one.
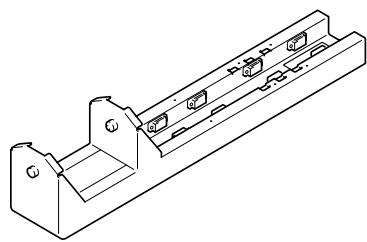
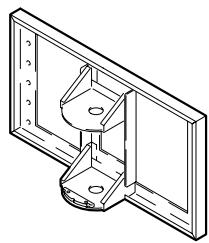
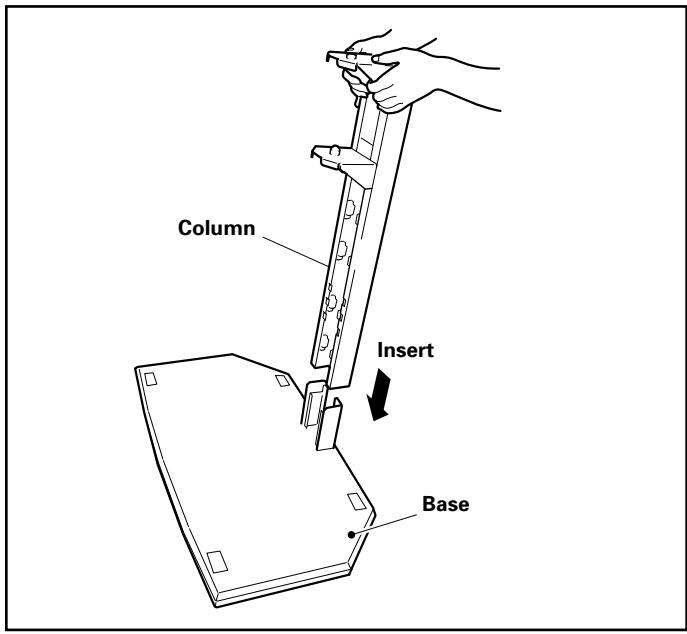
- Column 1
- Base 1
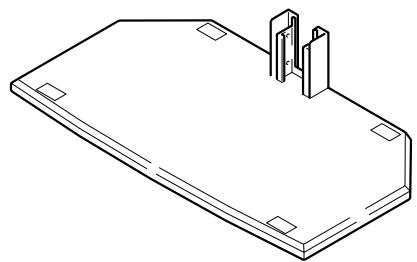
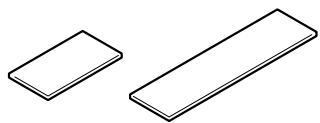
- Ornamental base 1
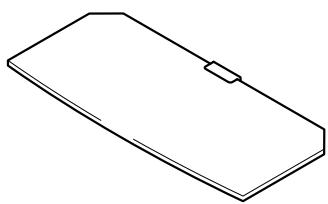
- Shelf glass 1

Glass stays (left and right) 1 each
- PDP attachment bracket ... 1
Precaution
Because there is a danger of the glass breaking accidentally, we recommend that it be left in its case until it is time to install it.

- Screws (M4 x 8) 2
- Cable covers (Attached to the column by a magnet.) (large, small) 1each
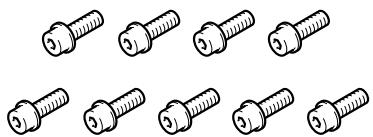
- Bolts M8. 9
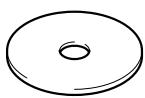
- Washer 1
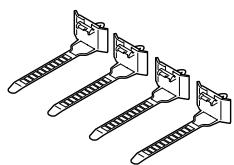
- Cable clamps 4
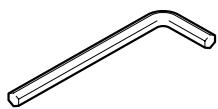
- Hexagonal wrench 1
- Operating instructions ..... 1
■ Installation method
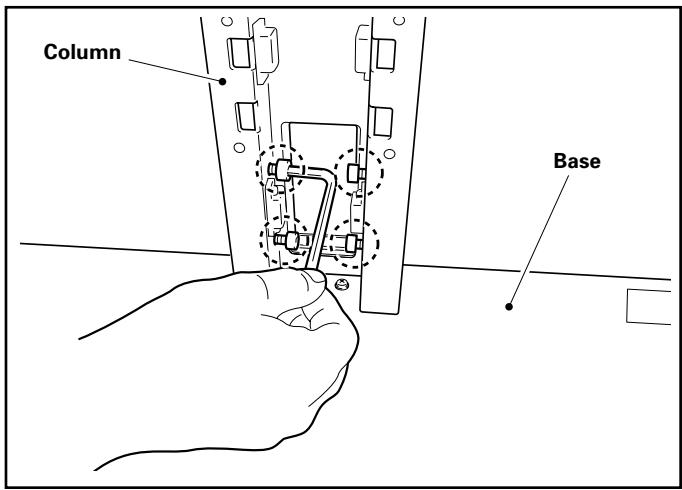
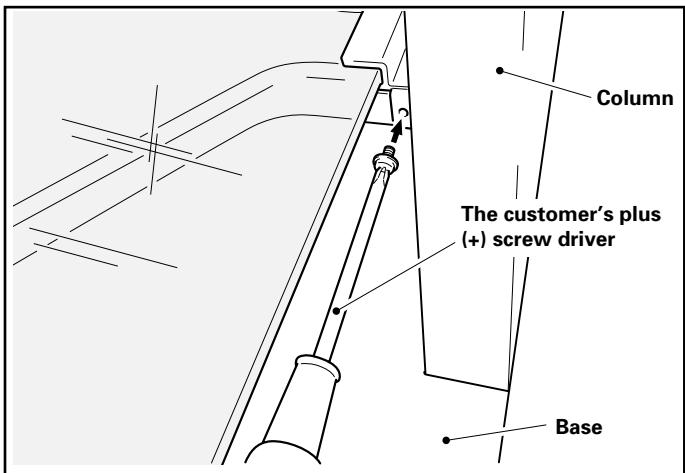
1 Remove the cable covers and insert the column into the base.
2 Anchor the column with the bolt M8 (4 locations).
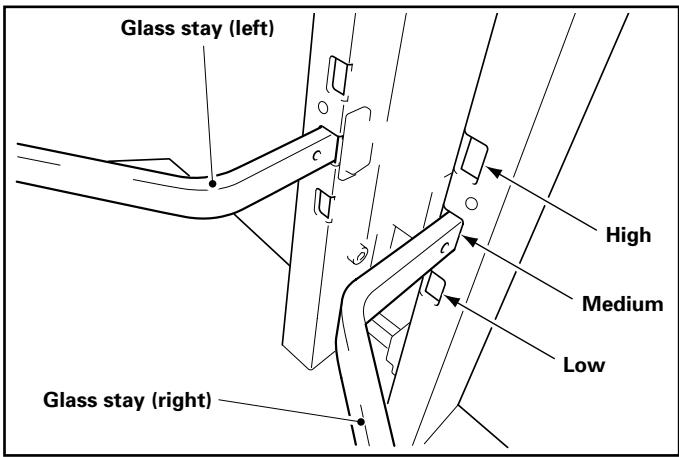
3 Attach the glass stays (left, right) to the column.
① Hold the glass stays slightly downward as you insert them into the holes.
② Push the end of each glass stay downwards and fix it in place by inserting the pin in the notch.
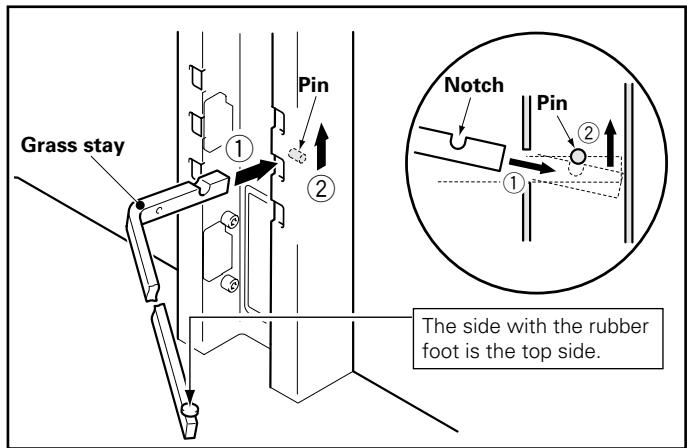
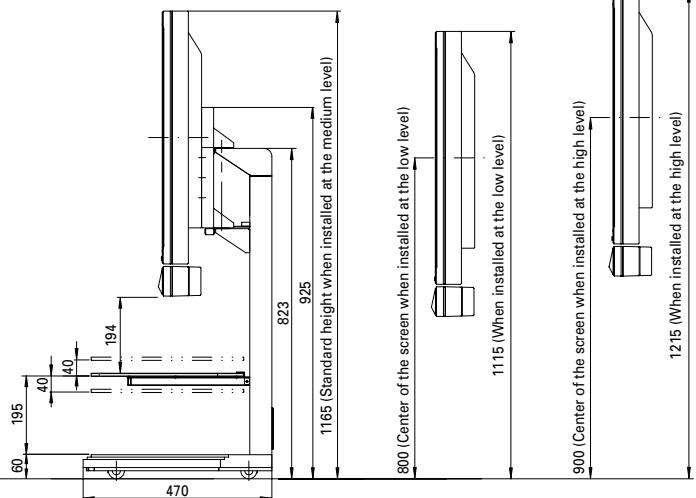
- The height can be adjusted in three stages: high, medium, and low.
The standard installation location is the medium position hole.
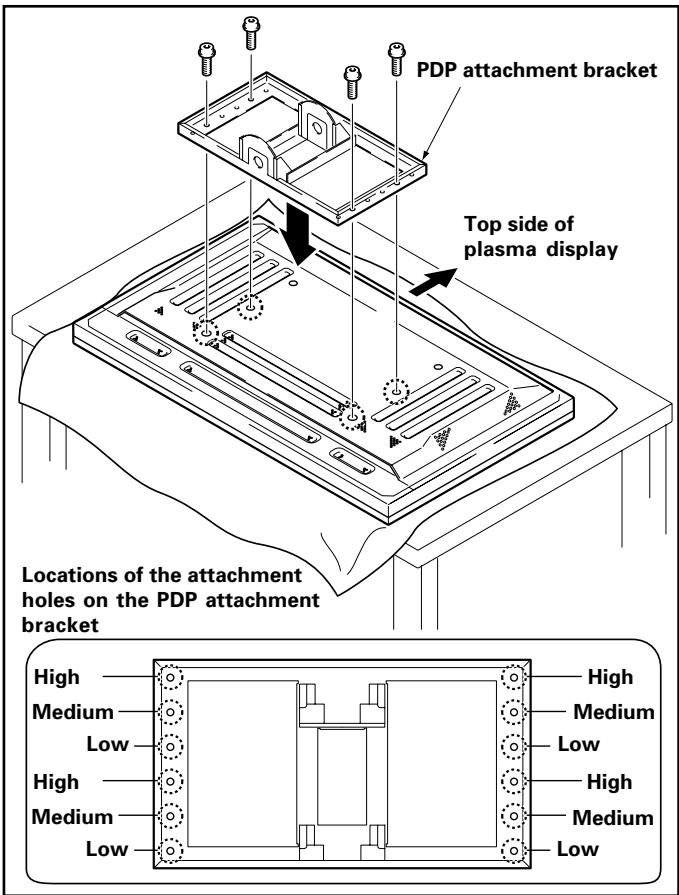
4 Attach the PDP attachment bracket to the plasma display with the bolt M8. (4 locations)
The height can be adjusted in three stages: high, medium, and low.
The standard installation location is the medium position hole.
!Precaution
- Be sure to spread a sheet or similar protective material to prevent scratches or damage to the display.
- Be sure to do this attachment with the plasma display on a table or other flat surface.
- Be sure to use the middle and lower level screw attachment positions on the plasma display. Do not perform the attachment by combining the upper and middle levels.
5 Attach the plasma display to the column.
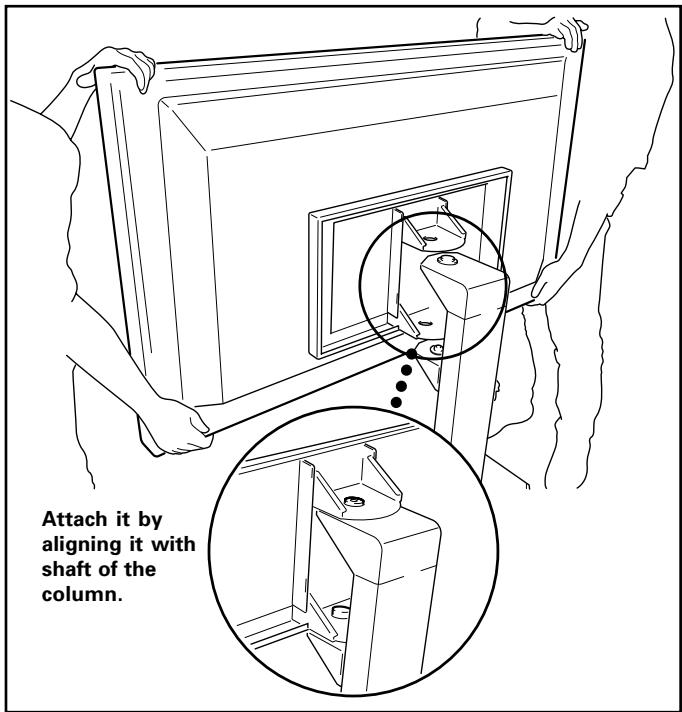

Precaution
- Be sure to have two or more people perform the attachment.
- Be extremely careful not to jam your figures while doing this task.
6 Attach the washer and bolt M8 to the shaft of the column.
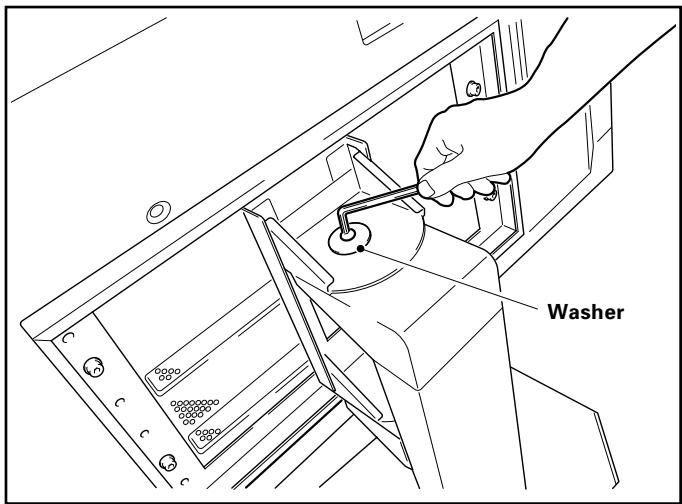

Precaution
- Be sure to attach the washer and bolt M8 to do this step for safety.
7 Pass the cable through the columns.
[Anchoring the system cables]
House the cables inside the column as shown below.
![PIONEER PDK-FS01E - [Anchoring the system cables] - 1](/content/2024/12/118637/images/bb36a863a8116ed432774c43aa59775ad6a65dce5e1a99609755d6befcac477b.jpg)
![PIONEER PDK-FS01E - [Anchoring the system cables] - 2](/content/2024/12/118637/images/92f77afc317cecd666ad8ca951afe0bf3b79f4dc7e640f6a4218b1cad390eb56.jpg)
Precaution
- Be extremely careful that the cable is not stretched and that it is not partly jammed in the floor stand when the plasma display is moved to the left or right (max. 30^ ).
[Passing the power cord (plasma display, media receiver) through the hole]
Pass the cables through the hole in the column as shown below.
![PIONEER PDK-FS01E - [Passing the power cord (plasma display, media receiver) through the hole] - 1](/content/2024/12/118637/images/ead57688bc0f6a328c0d654c14691445552a1210b5f4c5ea834f715b238b6894.jpg)
[Attaching the cable clamp]
The extra cables can be bundled and anchored with the cable clamp as shown below.
![PIONEER PDK-FS01E - [Attaching the cable clamp] - 1](/content/2024/12/118637/images/469b9a06d018e169c9c65c255d179eaed18d9717cbbf0a417d123157cfc013f1.jpg)
[Attaching the cable covers]
- Attach the cable covers to the column (2 locations).
- The cable cover is magnetically attached so that its position can be changed according to the way the cables come out.
![PIONEER PDK-FS01E - [Attaching the cable covers] - 1](/content/2024/12/118637/images/67ce853fa354535f969eee66085793f654cb2441dc19ae457010f9e85cee0259.jpg)
![PIONEER PDK-FS01E - [Attaching the cable covers] - 2](/content/2024/12/118637/images/d4334028460ff8a0824b29445a6dfda61b04e87a147fa466db6edd17e0b4780d.jpg)
Precaution
- Use the large cable cover above the shelf glass and the small cable cover under the shelf glass.
- The storage space cannot be completely covered, because the cable cover is set so that the cables pass through when it is installed.
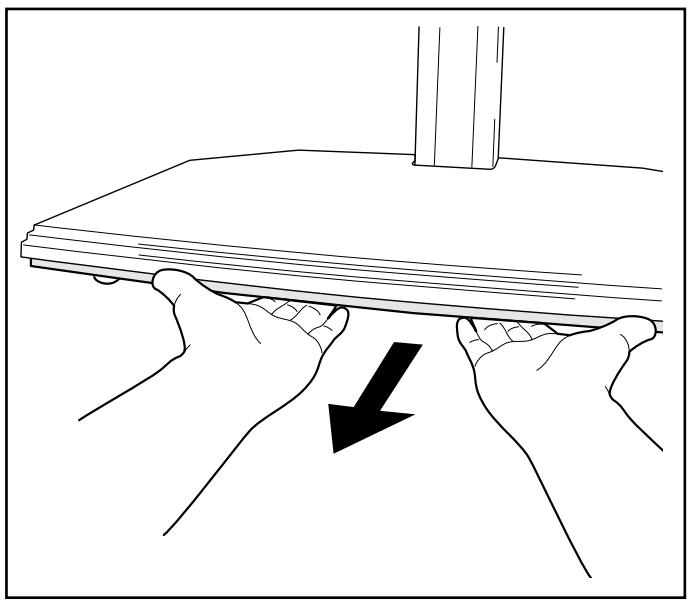
8 Insert the shelf glass into the glass stays.
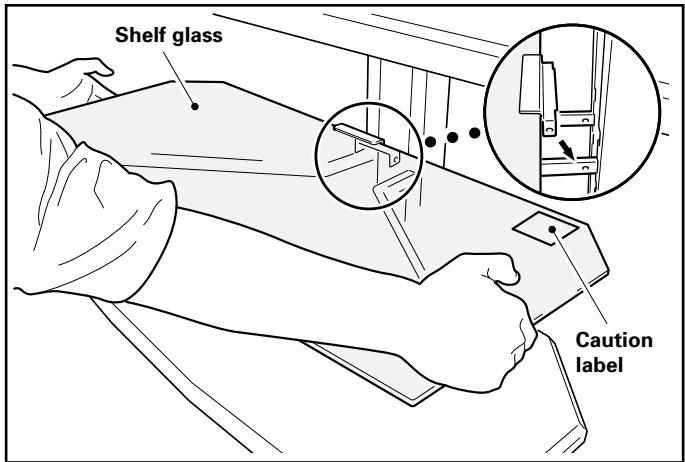

Precaution
Install it with the caution label facing upwards.
9 Fix it with the screws (M4). (2 locations: left and right)

Precaution
- Be sure to fix it with screws. If the shelf glass is not fixed, it might overturn if someone accidentally touches it.
10 Place the ornamental base on the base.
11Installing and wiring the equipment.
- Install the equipment on the shelf glass and ornamental base and wire it.
- Maximum load of the shelf grass and ornamental base is 20kg . Be sure to install equipment so that the load does not exceed 20kg .

Precaution
- If a video deck is installed on top of the shelf glass, on rare occasions, picture noise will be generated under specified conditions such as the angle of the plasma display. If this happens, install the video deck on top of the ornamental base.
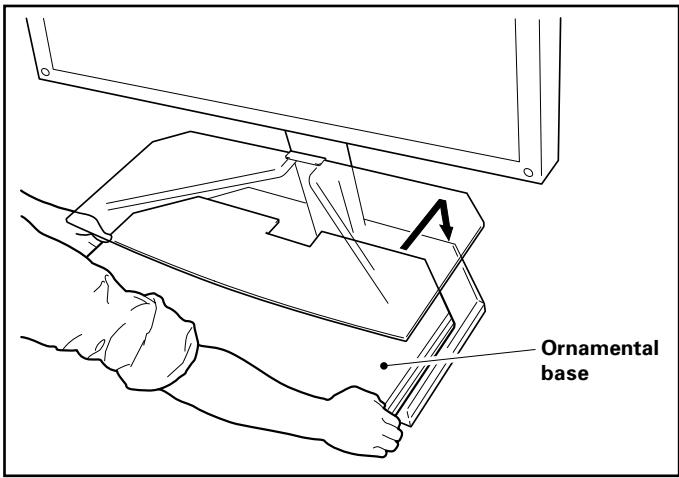
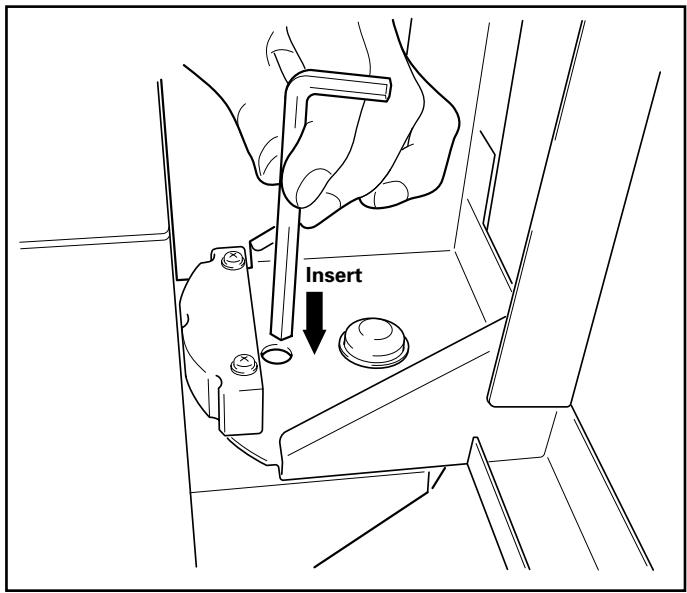
■ Moving the stand
Before moving the stand, insert the attached hexagonal wrench into the attachment hardware under the PDP attachment bracket and the column to fix the plasma display so that it will not rotate, then hold the column to move the floor stand.
If you cannot hold the column, pull it holding the base under the ornamental base.

Precaution
- Do not move the floor stand by holding the plasma display, speakers, shelf glass, or ornamental base. If you do, you will damage these components.
- To move the floor stand over a level difference on the floor, detach the ornamental base and lift the stand by holding the base.
- Do not lift up the ornamental base. It is dangerous to do this because the ornamental base may be displaced or damaged. Always lift it by holding the base.
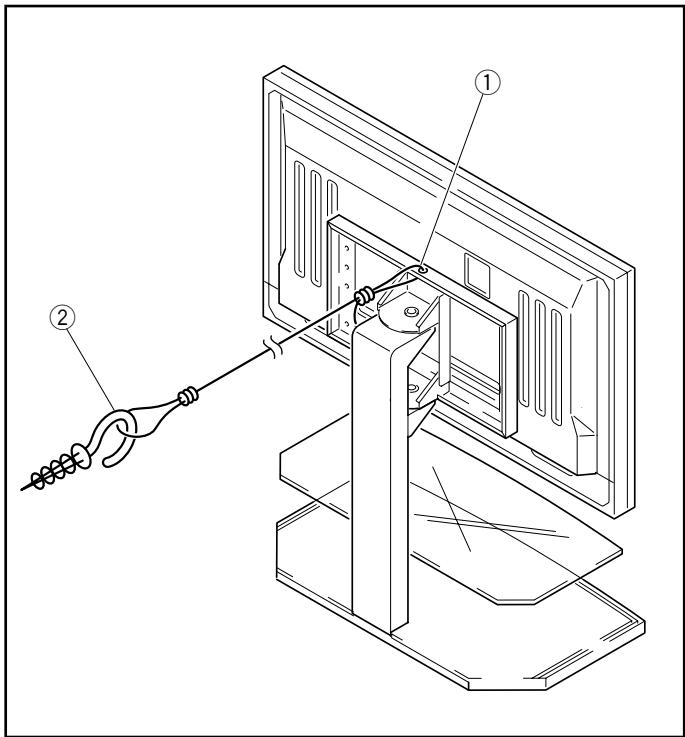
Preventing Overturning
(1) Attach a strong cord to the hole on the top of the PDP attachment bracket.
Fix the cord to the wall or a column.
- Use cord and hooks sold on the market.
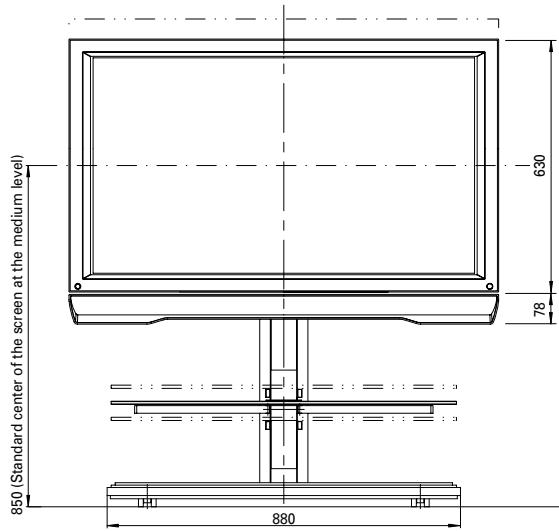
External appearance and dimensions
Weight 31.3 kg (stand only)
66.0 kg (stand + plasma display
65.5 kg (stand + plasma display
73.5 kg (stand + plasma display
43" and 50" display with optional speakers attached to the sides of display
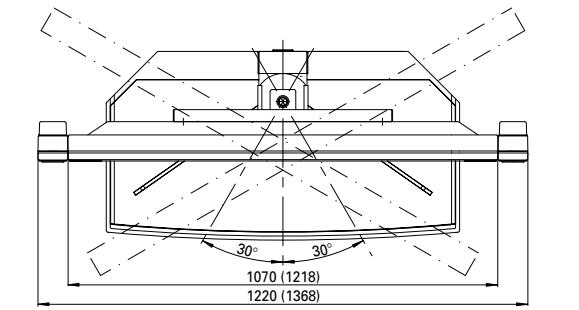
Unit: mm
Dimensions in ( ) are the dimensions for the 50" display
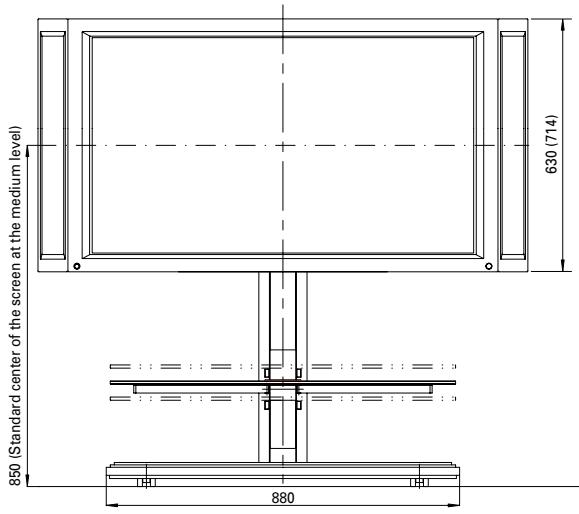
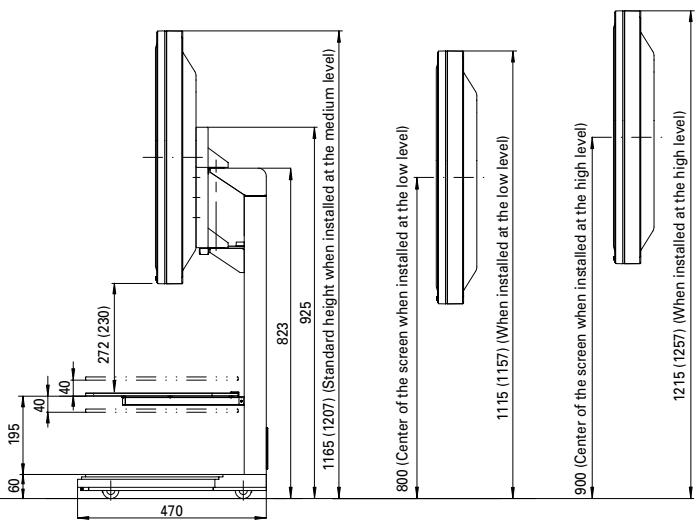

Attached to the 43" display (under speaker type)
Poids 31.3 kg (Support uniquement)
PIONEER ELECTRONICS (USA) INC. P.O. BOX 1540, Long Beach, California 90801-1540, U.S.A.
PIONEER ELECTRONICS OF CANADA, INC. 300 Allstate Parkway, Markham, Ontario L3R OP2, Canada
PIONEER EUROPE NV Haven 1087, Keetberglaan 1, B-9120 Melsele, Belgium TEL: 03/570.05.11
PIONEER ELECTRONICS AUSTRALIA PTY. LTD. 178-184 Boundary Road, Braeside, Victoria 3195, Australia, TEL: [03] 9586-6300
PIONEER ELECTRONICS DE MEXICO S.A. DE C.V. San Lorenzo 1009 3er Piso Desp. 302 Col. Del Valle Mexico D.F. C.P. 03100 TEL: 55-5688-5290
- CAUTION
- Special Features
- Cautions
- IMPORTANT
- RISK OF ELECTRIC SHOCK DO NOT OPEN
- Confirmation of constituent parts
- Precaution
- ■ Installation method
- !Precaution
- Attach the plasma display to the column.
- Attach the washer and bolt M8 to the shaft of the column.
- Pass the cable through the columns.
- [Anchoring the system cables]
- [Passing the power cord (plasma display, media receiver) through the hole]
- [Attaching the cable clamp]
- [Attaching the cable covers]
- Insert the shelf glass into the glass stays.
- Fix it with the screws (M4). (2 locations: left and right)
- Place the ornamental base on the base.
- 11Installing and wiring the equipment.
- ■ Moving the stand
- Preventing Overturning
- External appearance and dimensions
Brand : PIONEER
Model : PDK-FS01E
Category : Electronic device stand